


Introduction to Business Process Automation with Zapier
Before you start building your first automated workflow, you should understand what business process automation (BPA) is and how it can make light work of manual and repetitive processes. We’ll cover how applications connect with others to transfer data and how Zapier has impacted the no-code revolution to automate tasks without the need for developers. This background information will put you in a better position to grasp the terms and concepts used by Zapier and will help you understand the features and functionality of Zapier, as well as how the platform works.
If you have only just started using Zapier, you may not know which pricing plan is most suitable for your business and when the right time to upgrade is. We will cover the features available for each pricing plan in this chapter and explain the pros and cons of choosing one over another. Then, we will describe how to set up a Zapier account, and we will provide an overview of how the platform is structured to enable you to find your way around effectively. We will conclude this chapter by working through how to customize your settings and preferences.
We will cover the following key topics in this chapter:
- How process automation helps businesses increase productivity
- The “no-code revolution” and workflow automation with Zapier
- Understanding the key terms used by Zapier
- Choosing the right Zapier plan
- Creating a Zapier account
- Familiarizing yourself with navigation on the Zapier platform
- Changing your settings and preferences
Once you have worked through each of these topics, you will be ready to start building your first workflow automation.
Technical requirements
How process automation helps businesses increase productivity
Whether you are a solopreneur or your business has a team, every successful business strives to make the most of its resources and improve productivity so that there is more time to increase revenue. Many companies have systems that may not communicate with each other, and as a result will have processes that are manual, time-consuming, and error-prone.
We live in a time where technology is continually evolving to help us make our work easier, and it is now more straightforward and cost-effective than ever to implement and run this technology ourselves. By introducing appropriate business technology tools, connecting those tools, and automating manual and repetitive tasks, businesses can significantly increase productivity. We’ll explore this next.
Introducing BPA
According to Zapier, “Business process automation (BPA) is the practice of using software to automatically execute repetitive tasks related to a company’s essential procedures. You can use BPA to streamline and optimize processes for everything from sales and marketing to HR, compliance, training, and beyond.” BPA is all about using technology to improve the way we work by automatically performing repetitive tasks that would typically require human intervention. It ultimately focuses on the human element in the process rather than the actual applications that are in use. Of course, the tools you use are fundamental and need to be the right ones for their jobs; however, the real goal is to help the people using those systems to be more productive and focus on the tasks that truly matter for the success and growth of an organization.
BPA principles focus on process simplification, optimization and digitization, system integration, and the automation of cloud technologies (or cloud-based applications).
Here are a few examples of when BPA can help you get rid of manual tasks and increase productivity:
- Posting the same information on multiple social media channels
- Inputting new web form leads into your customer database
- Importing sales invoices and payment information from your e-commerce store into your accounting software
- Collating reporting information from numerous sources
- Processing feedback and testimonials from customers
- Adding meeting events to your calendar
- Sending documents for signing
- Following up with leads
It does take time to learn and successfully implement BPA; however, the resulting value far outweighs the time investment. These are just some of the benefits of using BPA:
- Reduced manual data entry and errors
- Reduced operational costs
- More time for growing sales
- Better customer service
- Increased employee engagement and job satisfaction
The most significant benefit of using BPA is the overall time savings. Automation platform users report time savings of a few hours a week by automating certain tasks such as social media posting, to more than 160 hours a month being saved by automating entire sales cycles or operation functions. The value of time savings is relative to the individual case. For example, a time saving of 2 or 3 hours a week may be of significant value to a solopreneur, whereas a 160-hours-per-month saving equates to having a full-time employee working for free. These savings in hours would translate to savings of thousands of dollars in resource time.
Zapier has several case studies and customer success stories on its website: https://zapier.com/customers. Here are a few examples of successful use cases of automation that help businesses become more efficient and grow:
- A real estate agent reduces lead management by 40%
- A digital agency saves 30 hours a week with messenger funnel automation
- A coffee shop powers online ordering with automation
- A home entertainment company automates its entire sales cycle
- A freelancer automates client onboarding and grows their business
BPA essentially allows companies of all sizes and in any industry to innovate by using cloud-based technology to work better and more efficiently and stay ahead of the competition. The possible improvements you can make to your business with BPA are endless.
Although automation functions to make processes work better, it is essential to bear in mind that applying automation to an already inefficient operation will increase its inefficiency. As a whole, BPA requires you to take specific steps to look at your processes holistically, understand and simplify them, identify what systems can be connected, and only then decide on which tasks can benefit from automation. In Chapter 2, Preparing to Automate Your Processes, we will work through the steps required to map out our business processes and streamline them by identifying what can be simplified, digitized, and automated.
Important note
In this book, we will use the term workflow automation interchangeably with BPA.
Before we can focus on the practical aspects of improving and automating our operations, we need to understand how web applications communicate with each other and what options are available for businesses to connect their tools.
How your business applications communicate with each other
Allowing your business applications to communicate with one another and then automating tasks where possible is key to increasing productivity. Before we can explore how automation with Zapier comes into this picture, we need to understand how business applications can be connected using API integrations.
An application programming interface (API) is a means by which a software program can communicate with another software program. It essentially allows data from different systems to pass between them when they are connected by some form of middleware. If you imagine two software programs having their own language in their API – for example, one French and one Spanish – the middleware acts as the translator between the two.
When two software programs are connected in this way through their APIs and middleware, they are said to be “integrated.” When an integration exists, this allows specific requests to be sent by one application, producing a response by another. The information requests are usually in the form of creating new (create), retrieving existing (read), editing/updating existing (update), or deleting existing (delete) resources. This is also referred to as CRUD. Upon receipt of a request, the application will try to fulfill the request and send back a response in the form of a three-digit status code, which signifies a possible success or possible issues. If, for example, you type a website URL into your browser and the page is displayed, this would be a success response. If the page does not exist, an error message will be displayed stating The requested URL was not found on this server, depicting a 404 error response. How API integration is created and customized defines what range of information can be requested.
As the goal of API integration is to share data efficiently between two connected apps, there must be a way to identify changes in these resources. For example, if you want a new row to be created in your spreadsheet app when a new subscriber is added to your email marketing app, you need to know that the new contact has been created in the first place. At the time of writing, the two most popular methods for identifying changes are polling endpoints and webhooks.
With the polling method, requests for new events (for example, creating, retrieving, and deleting resources) are repeatedly sent at predefined intervals, waiting for a response. If there is no response, this signifies that there are no new events. So, in the preceding example, the polling method would periodically search for new occurrences of contact records being created, say every 15 minutes.
With webhooks, however, instead of sending requests, you provide a URL that your originating app monitors for new events, thus receiving information in real time. So, in the preceding example, when a new contact record is created, the information would be provided instantly. Webhooks are an instant and much more efficient way of communicating event information. We will discuss webhooks in more detail in Chapter 11, Advanced Built-In Apps by Zapier.
The options available for businesses to connect their tools
Building API integrations requires software programming and development skills and can be a lengthy and costly process. Most applications that you are currently using for your business processes are likely to have a section on their website containing a list of the other applications with which they integrate natively. The applications listed in these app marketplaces, or app ecosystems, have integrations created using APIs to enable the two apps to communicate with each other. Software providers invest time, money, and technical skills into building and maintaining these native integrations. Generally, these providers will create an integration that satisfies the highest priority needs of most users to automate the most frequently used types of activities. They may also prioritize integration development resources on other more commonly used applications rather than smaller, less popular apps.
In some cases, a user of certain software might need to connect another tool that is not listed in the app ecosystem or may need to accomplish a specific task that is not available with the existing native integration. Under these circumstances, a business could employ a programmer to write code to create a custom integration with the API provided by the software provider. For most companies, the process of developing a custom integration is not a financially viable option. Therefore, there is often a reliance on what integrations are available in these app ecosystems and how flexible they are.
By now, you should have a better understanding of what BPA is and how process automation helps increase productivity. Next, we’ll explore how this relates to Zapier.
The “no-code revolution” and workflow automation with Zapier
Thankfully, as technology has developed, it is now possible to create digital processes without the need to write any code. Therefore, anyone can learn how to build a website, create email templates, and connect their systems using, in many cases, visual drag-and-drop editors. These editors give you the ability to add and remove visual blocks in templates rather than writing code in a computer programming language. Instead of needing to use a developer to write this code, the average person with basic IT skills can create these processes themselves. These advances are described as a no-code revolution, as software providers have pushed forward to develop solutions that will help the non-IT workforce to execute tasks that could previously only be done by software engineers.
Zapier is one of these technology solutions that allows you to automate and manage your business processes without writing code. Zapier essentially acts as a connector or translator between thousands of cloud-based applications that may not have native integrations with each other or for which the event requests are more limited, allowing them to communicate with each other. The platform enables users to build business-specific workflow automation with a visual editor using pre-built integrations to seamlessly perform manual and repetitive tasks without human intervention.
Zapier is the brainchild of forward-thinking founders Wade Foster, Bryan Helmig, and Mike Knoop. They recognized the productivity struggles that plague small- and medium-sized businesses, where many repetitive tasks are handled manually and with an ever-increasing chance of errors occurring. They developed a powerful solution to help businesses with their efficiency struggles, allowing them to connect their web applications and automate their mundane and repetitive tasks using custom-built workflows. Most importantly, the solution allows the average business owner and their team to use the software without the need for writing code. The first release of the Zapier platform was in 2012, and since then, they have grown their integration marketplace to over 5,000 app connections. Zapier is based in California, USA, and as a company that actively supports an ethos of remote working, they have grown their global team to over 600 people located in the US and over 20 other countries around the world.
As well as allowing the less technical user to build custom workflows, the Zapier platform allows app developers to build integrations with Zapier to connect their apps to the platform. This, in turn, allows their customers to create custom integrations with thousands of other apps, using Zapier as the connector or middleware between thousands of different apps In essence, the Zapier user then becomes the developer without needing to use code. Using no-code technology, we no longer need advanced technical skills to harness the power of integration automation.
To help you understand a bit more about BPA and the no-code revolution, you can get access to a free masterclass here: https://bit.ly/zapier-book.
You now have a better understanding of how Zapier and BPA work hand in hand to help businesses increase productivity. In the next section, we’ll cover the key terms that are used by Zapier, as well as throughout this book.
Understanding the key terms used by Zapier
Zapier uses specific terminology throughout the platform. We will use these terms frequently throughout this book. It is useful to know and understand the most commonly used terms before we discuss the features available in each Zapier pricing plan.
What is an app?
An application (app) is a technology tool or cloud-based web service. Zapier integrates with thousands of apps to allow you to transfer data between them and automate your manual and repetitive tasks. Most apps are available for use regardless of which Zapier pricing plan you use, except for premium apps, such as Salesforce, Facebook lead ads, and Xero, which are only available on paid plans. Zapier has an app ecosystem of over 6,000 app integrations listed in a directory. We will cover Zapier’s app ecosystem directory in more detail in Chapter 2, Preparing to Automate Your Processes.
What is a Zap?
A Zap is a step-by-step automated workflow that allows a user to create a flow of data between two or more apps. When an event occurs in one app, this produces an activity such as an action or event in another app. Zaps allow you to connect your different apps and automate repetitive tasks between them. We will cover how to create a Zap in Chapter 3, Building Your First Automated Workflow (Zap).
What is a trigger?
A trigger is an originating event that starts an automated workflow. The trigger is always the first step in the workflow, and only one trigger step will ever exist in a Zap.
What is an action?
An action is a resulting activity that happens once a trigger starts an automated workflow. Zaps can have one or multiple actions. Actions can also include searches.
What is a task?
Once a Zap has been built, tested, and turned on, a trigger in one app will cause an action to happen in another app. A task is an activity that the Zap completes. Your Zapier pricing plan defines your monthly task limit. Completed actions, searches, and passed filters all count as a task, which, in turn, count toward your monthly task limit. For example, if you have a single-step Zap with one action and the Zap triggers five times in one day, your task count would be five. If, however, you have a multi-step Zap that has three actions and it triggers five times in one day, your task count would be 15.
Tip
Use BPA principles to strategize your workflows in advance of actually building your Zaps. Doing this will allow you to reduce the number of steps in your workflows and minimize task usage. Every task counts toward how much you spend on your Zapier pricing plan. Having simple processes from the start will enable you to use Zapier cost-effectively. You can set up a Zap to alert you on task usage related to your monthly allowance. We will discuss this in more detail in Chapter 12, Managing Your Zapier Account with Built-In Apps.
What is the Zap editor?
The Zap editor is a visual editor that allows you to create and alter your Zaps using simple drop-down lists and a systematic process. The Zap editor enables you to add your trigger app and action app(s) and run conditions in your workflows. We will discuss the Zap editor in more detail in Chapter 3, Building Your First Automated Workflow (Zap).
What is the update time/syncing interval?
The majority of app triggers use the polling method to retrieve new data on events. The update time (or syncing interval) refers to how quickly your automated workflow triggers and depends on how often the polling runs to check the triggering app for new information. Zapier checks for new activities to trigger an automated workflow every 1 to 15 minutes, and your Zapier pricing plan defines this time interval. Triggers that use the polling method are denoted by the word scheduled.
Important note
Some app triggers use the webhooks (instant) method and allow an automated workflow to run as soon as new event information is available. These triggers are denoted by the word instant.
What is a filter?
A filter is a condition that you can add to a Zap to prevent the workflow from moving on to the next action step. Filters are only available on paid Zapier pricing plans. We will cover using filters in detail in Chapter 7, Getting Started with Built-In Apps.
What is a formatter?
A formatter is a function that allows you to alter numbers, text, dates, and times, as well as perform tasks such as looking up data from a list. Formatters are only available on paid Zapier pricing plans. We will comprehensively cover the various formatter apps built by Zapier in Chapter 14, Formatting Date and Time, Chapter 15, Formatting Numbers, Chapter 16, Text Formatting Functions in Zapier – Part 1, Chapter 17, Text Formatting Functions in Zapier – Part 2, and Chapter 18, Zapier’s Utilities Functions.
What are paths?
Paths allow you to create complex Zaps that use “if this, then that” conditional logic to perform different actions based on multiple conditions. For instance, if X happens in the trigger app, then do Y in one or more action steps. Paths are only available with the Professional, Team, and Company plans. We will cover paths comprehensively in Chapter 7, Getting Started with Built-In Apps.
What is a multi-step Zap?
A multi-step Zap is a workflow that involves one trigger and multiple actions, as opposed to a single-step Zap, which contains one trigger and only one action. With multi-step Zaps, you can also add filters, formatter steps, searches, and complex paths to your workflows, which allow you to create flexible automated workflows. Multi-step Zaps are only available on paid Zapier pricing plans. We will cover how to build multi-step Zaps in detail in Chapter 6, Creating Multi-Step Zaps and Using Built-In Apps.
What is Zap history?
Zap history shows a detailed log of activity for each of your Zaps. You can view data that has passed through each step of your workflow and use this to troubleshoot errors. We’ll cover Zap history in more detail in Chapter 5, Troubleshooting and Handling Zap Errors.
What is Autoreplay?
Sometimes, tasks will fail due to app downtime or temporary errors. If this happens, you can enable the Autoreplay feature, which allows Zapier to retry running these tasks immediately, and repeat this a few times if the error still exists. The Autoreplay feature is available with Professional, Team, and Company plans, and it can be found in Task History. This feature is handy if you use a large number of tasks. We will cover the Autoreplay functionality in more detail in Chapter 5, Troubleshooting and Handling Zap Errors.
An example demonstrating the use of these terms
To help you to understand some of these terms, let’s look at an example. You can use the Zap editor to build a Zap that involves Google Forms and Google Sheets apps, as follows:
- Trigger: Google Form New Submission
- Search Action (Find): Google Sheet Find Row (search by Email Address)
- Filter: Continue only if… Row Found
- Action (Create or Update): Google Sheet Update Row (using the Row ID from Step 2)
You now have a better understanding of the key terminology that’s used on the Zapier platform. Next, we’ll discuss the different Zapier pricing plans, what is included in each, and how to choose the right plan for your needs.
Choosing the right Zapier plan
Zapier offers five pricing options to suit your business requirements, as follows:
The following figure summarizes the features available for each Zapier pricing plan:

Figure 1.1 – Summary of features available for each Zapier pricing plan
Important note
All prices and plan structures are correct at the time of publishing this book. You may also find that, depending on your region, the pricing and plan structure vary slightly.
Each pricing plan varies in features; however, primarily, the plans are categorized according to the number of tasks you have available monthly, the number of Zaps you can set up, and how short the syncing interval is. On most plans (except for the Free plan), you can retain features and add additional tasks for an extra fee. The availability of Zap history data and access to online customer service and technical support is included in all plans.
The Free plan is free forever, and all paid Zapier plans are available to be paid monthly or annually.
Zapier offers a 14-day trial plan, which gives you access to the majority of features on the Professional plan with 1,000 tasks, except for Autoreplay.
Once you’ve logged in to your Zapier account, you can view a detailed list of the features and pricing for each plan and change your plan as needed by clicking on the links in the following navigation options:
- Billing and Usage (Settings)
- Wallet (expandable left sidebar)
- Pricing (top menu on information pages)
- Pricing (footer menu)
Important note
Your monthly task allocation does not carry over to the next month. Toward the end of each billing period, if you have unused tasks left over and you are using fewer tasks than you need to, you may be able to downgrade to a lower subscription and still retain your pricing plan features.
Next, let’s take a look at different Zapier plans that will be suitable for your business.
Which is the right Zapier plan to use for your business?
Zapier is ideal for any size business that wants to automate its processes. It can be used by solopreneurs or companies with small or large teams. It can also be used by freelancers and consultants to manage their clients’ processes.
The needs of your business will determine which price plan is best to use. How many processes you would like to automate and how complex these processes are will impact your decision.
Free plan
For businesses with one user that only have a few simple tasks to automate, this plan is the most appropriate. You will be able to build up to five single-step workflows using the majority of the apps that Zapier integrates with (excluding premium apps). Zapier will search for new data in your trigger apps every 15 minutes and run your Zaps, allowing up to 100 tasks per month to be processed. The Free plan is the best plan to get started with while you get to grips with how Zapier works at a basic level. You will also get access to standard features, such as creating your Zaps in draft, copying and pasting steps, and duplicating and reordering steps. You will also be able to organize your Zaps into folders and subfolders.
Starter plan
If you still only have one user and a relatively small number of processes to automate, but you need to automate multiple activities in one or more apps (including up to three premium apps), try the Starter plan. You can take advantage of additional features, such as using conditions in filters, formatting text, numbers, and dates, accessing version history, as well as creating custom integrations with webhooks. You can build up to 20 Zaps and will have access to 750 tasks per month (1,500 for a higher subscription payment). The update time remains at 15 minutes.
Professional plan
The Professional plan is for single users that want to level up and use Zapier optimally. This plan is best for you if you have a large number of complex, multi-step processes that require conditional logic and you use more than three premium apps in your business. All Starter plan features are included, as well as the ability to create, duplicate, and reorder paths, use Autoreplay, create custom error notifications, and roll back to previous versions of your Zaps. You can take advantage of unlimited premium apps, unlimited Zaps, a quicker update time of two minutes, and access to between 2,000 and 2,000,000 tasks per month (depending on your subscription payment).
Team plan
Businesses with two or more team members that are responsible for automating and managing processes should take advantage of the features available with the Team plan. All the elements of the Professional plan are included, with the added benefits of a faster update time of one minute, and you will be able to export Zaps and access audit logs. The Team plan allows teams to collaborate and automate their processes securely and in an organized way. Team members can securely access multiple apps without the need to share passwords and API keys between them, share workspaces, and select who has access to specific folders and apps. An additional bonus of this plan is access to a premier support team with faster, prioritized responses.
Company plan
The Company plan is for organizations that require enterprise-grade security considerations and want to separate their users into teams. You still have access to all the features of the Team plan, plus access to multiple workspaces, per-Zap Autoreplay, and the ability to adjust error ratio settings. Security features include user management, app access control, secure single sign-on (SSO), and top-level account management.
An additional bonus of this plan is the ability to customize Zap history data retention for shorter periods than the standard 30 days available on other plans to fit with your company’s regulatory requirements, as well as real-time support via live chat.
You now have a better understanding of what features and functionality are included in each Zapier plan and which plan would suit your business most. Next, we’ll cover how to set up a Zapier account.
Creating a Zapier account
For you to get started with Zapier, the first thing you will need to do is create a Zapier account.
Important note
The Zapier team is very proactive in trying to create the best experience for the user and often tests different user interface (UI) changes on user groups. UI updates, new features, and changes to navigation are released regularly, so don’t be surprised if, as you work through this book, the screenshots we have used differ slightly from the current, live state.
Work through the following steps to create your new Zapier account:
- Open your web browser, navigate to the Zapier website home page (https://zapier.com/), and click on the Sign up button.
- Create a Zapier account by entering your business email address and your first and last name. Then, click Get Started Free, as shown in the following screenshot. Alternatively, you can sign up using your Google, Facebook, or Microsoft credentials:

Figure 1.2 – The sign-up area on the Zapier home page

Figure 1.3 – Filling in details on Zapier’s home page sign-up area
- Complete the first step in the onboarding process by identifying your role, adding how many employees your company has, and clicking Continue, as shown in the following screenshot:
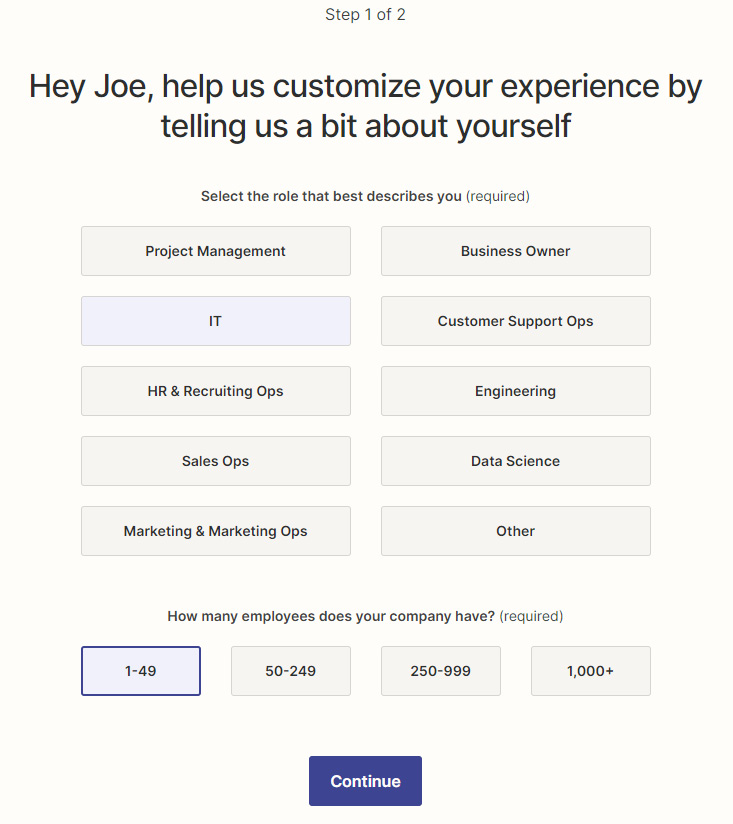
Figure 1.4 – The first step of the Zapier sign-up onboarding process
- Complete the second step in the onboarding process by selecting five or more apps that you use in your business so that Zapier can provide you with tailored recommendations. Then, click Finish setup, as shown in the following screenshot:
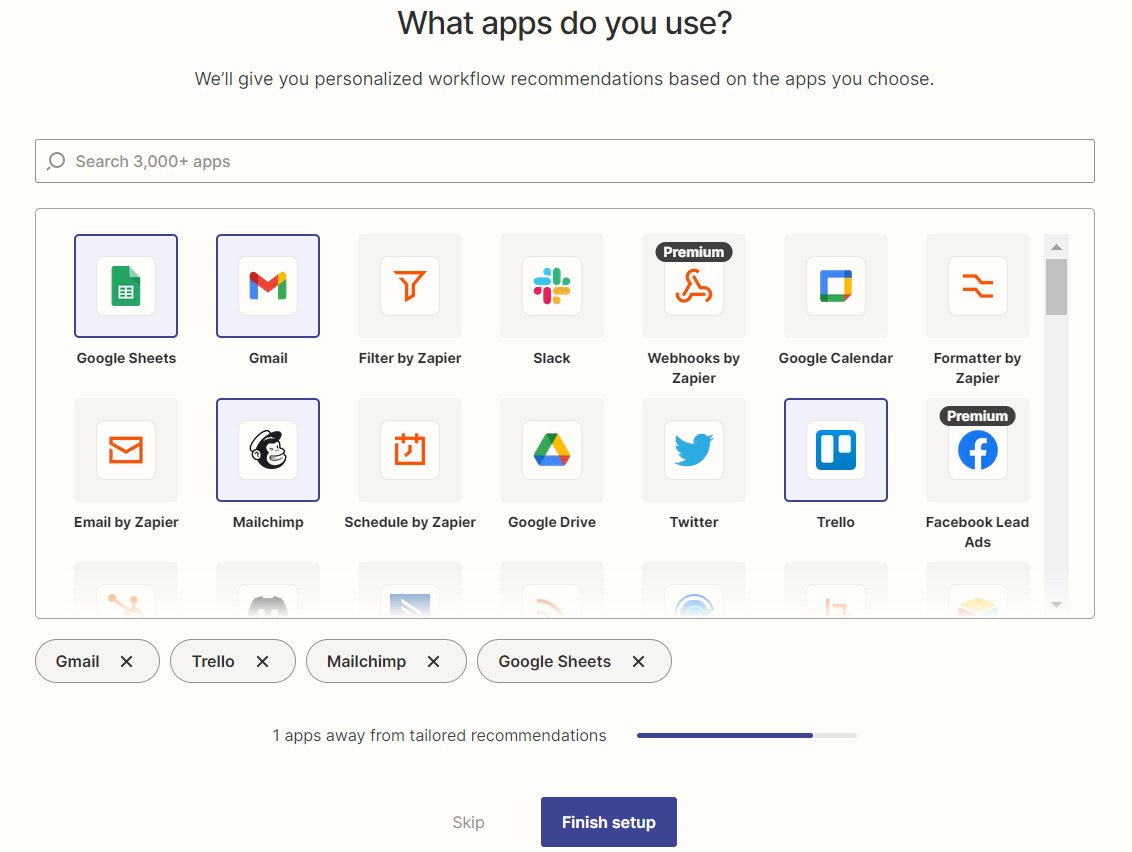
Figure 1.5 – The second step of the Zapier sign-up onboarding process
Important note
By completing this two-step onboarding process accurately, Zapier will be able to customize your user experience and provide you with tailored workflow suggestions. These recommendations will give you ideas of what types of tasks you can automate using your business apps as examples. You can choose to fill this information in as appropriate or skip these steps.
Now that you have set up your Zapier account, you’re one step closer to building your first workflow automation. In the next section, we’ll cover navigation on the Zapier platform.
Familiarizing yourself with navigation on the Zapier platform
Zapier has made its UI helpful for navigating easily around the platform. When you sign in to Zapier, the first thing you will see is the main dashboard. The central dashboard area provides you with useful information to help you get started with tutorials, creating workflows, and using some pre-built workflow examples.
The dashboard’s layout is shown in the following screenshot:
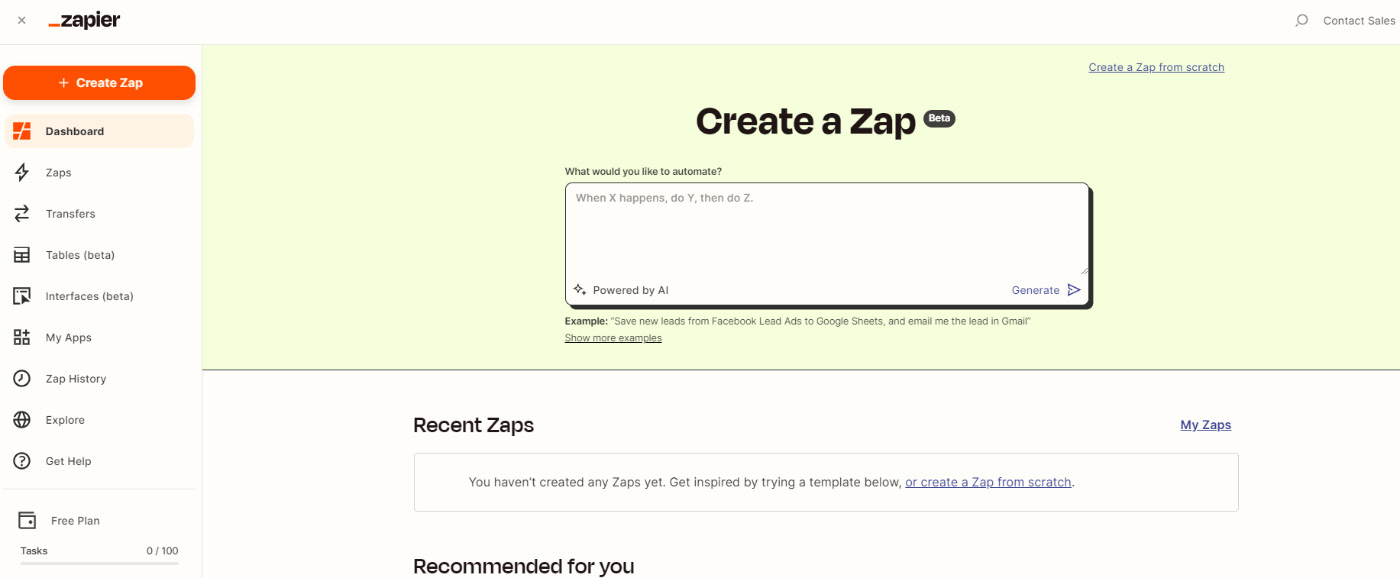
Figure 1.6 – Overview of the Zapier main dashboard layout
On the majority of the pages within the platform, you have multiple navigation options:
- Icons in the left sidebar
- Icons on the top right
- Footer menu
Important note
These navigation options are available on most Zapier pages except information pages and within the Settings area and Zap editor modules.
Icons in the left sidebar
The left sidebar is the most commonly used navigational bar in Zapier. It can be found on every page within the platform (except on information pages and within the Settings area and Zap editor modules). The sidebar can be expanded and reduced using the hamburger menu next to the Zapier logo. The following screenshot shows the navigation options in this bar:
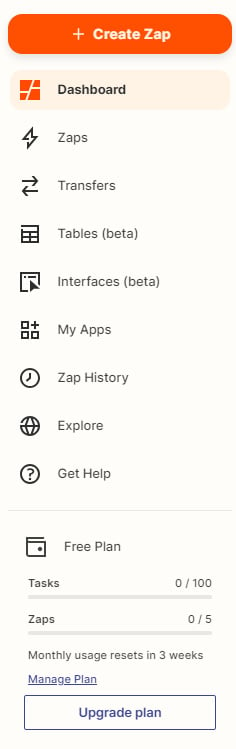
Figure 1.7 – Navigation options in the left sidebar
These navigation options are as follows:
- + Create Zap: This button takes you straight into the Zap editor, where you can start building a Zap. We will cover the Zap editor in more detail in Chapter 3, Building Your First Automated Workflow (Zap).
- Dashboard: This icon link will take you back to the main dashboard at any time.
- Zaps: This icon link will take you into your Zap management area. This area gives you a list of all of your Zaps, where you can organize them into different folders, change team sharing preferences, and enable or disable specific Zaps. We will cover the Zap management area in more detail in Chapter 4, Managing Your Zaps.
- Transfers: This icon link will take you to the Transfers area, where you can send data in bulk from one app to another. We will cover the Transfer feature in more detail in Chapter 13, Newly Released Apps and Features.
- Tables (beta): This icon link will take you to the Tables creator. This menu option may not be visible in all accounts while in the Beta phase. We will cover the Tables feature in more detail in Chapter 13, Newly Released Apps and Features.
- Interfaces (beta): This icon link will take you to the Interfaces creator. This menu option may not be visible in all accounts while in the alpha phase. We will cover the Interfaces feature in more detail in Chapter 13, Newly Released Apps and Features.
- My Apps: The My Apps icon link will take you to your list of connected apps. From there, you can connect and authenticate all your relevant business apps. We will cover the My Apps module and how to connect your apps in more detail in Chapter 3, Building Your First Automated Workflow (Zap), and Chapter 4, Managing Your Zaps.
- Zap History: This icon link will take you into your Zap history, where you can review data that has run in your triggered Zaps. We will cover Zap History in more detail in Chapter 5, Troubleshooting and Handling Zap Errors.
- Explore: This icon link will take you into the Explore area, where you will find a wide range of information on different ways to use Zapier to automate your business processes.
- Get Help: The Get Help icon link will take you to the help center, which contains comprehensive how-to articles, FAQs, and support options. We will cover this in more detail in Chapter 5, Troubleshooting and Handling Zap Errors.
- Wallet: This gives you a handy snapshot view of your current plan, task usage relative to your monthly limit, and the number of Zaps relative to your plan limit. From here, you can also manage or upgrade your plan using the links provided.
Icons on the top right
In the top-right corner, you can find the following icons:
- Magnifying glass: This icon allows you to search for apps to find out whether Zapier integrates with them. The app ecosystem directory contains a comprehensive list of app integrations and details about them.
- People icon: This icon displays a drop-down menu with your account settings and an option to log out of Zapier. This icon might also be displayed as your initials.
Footer menu
In the footer menu, you will find additional navigation options that are available on all pages. The two most useful ones are as follows:
- Pricing: This link will take you to the Plans page, which will show you the different Zapier plans, features, and associated prices. You can choose to trial, upgrade, or downgrade your plan while reviewing the features and pricing of different plans.
- Help: This link will take you to the Help area, which we described earlier.
You now have a better understanding of and have become familiarized with navigation in the Zapier platform. Next, we will discuss how to change our settings and preferences.
Changing your settings and preferences
Ensuring that your settings are correct and understanding how specific settings impact other areas of your account is essential for successful account management.
You can access your settings by clicking on the circle icon that contains your initials in the top right of your dashboard and selecting the cogwheel icon/settings option. The settings menu will be shown in the left sidebar, as shown in the following screenshot:
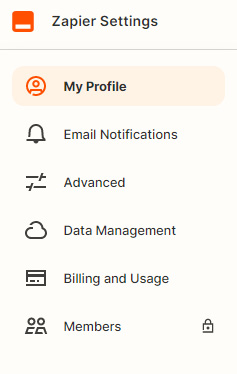
Figure 1.8 – The left sidebar menu in the settings area
Team and Company plans have an extra Organization menu item, and the Company plan has an Advanced Security option. We will cover these settings in Chapter 5, Troubleshooting and Handling Zap Errors.
My Profile
This area contains basic data about you and allows you to do the following:
- Authenticate your email address
- Add/change a profile image using Gravatar (an online service that links a picture of you with your email address)
- Change your email address, first and last name, password, and company
- Change your role
- Adjust your time zone
The following screenshot shows the layout of the My Profile area:
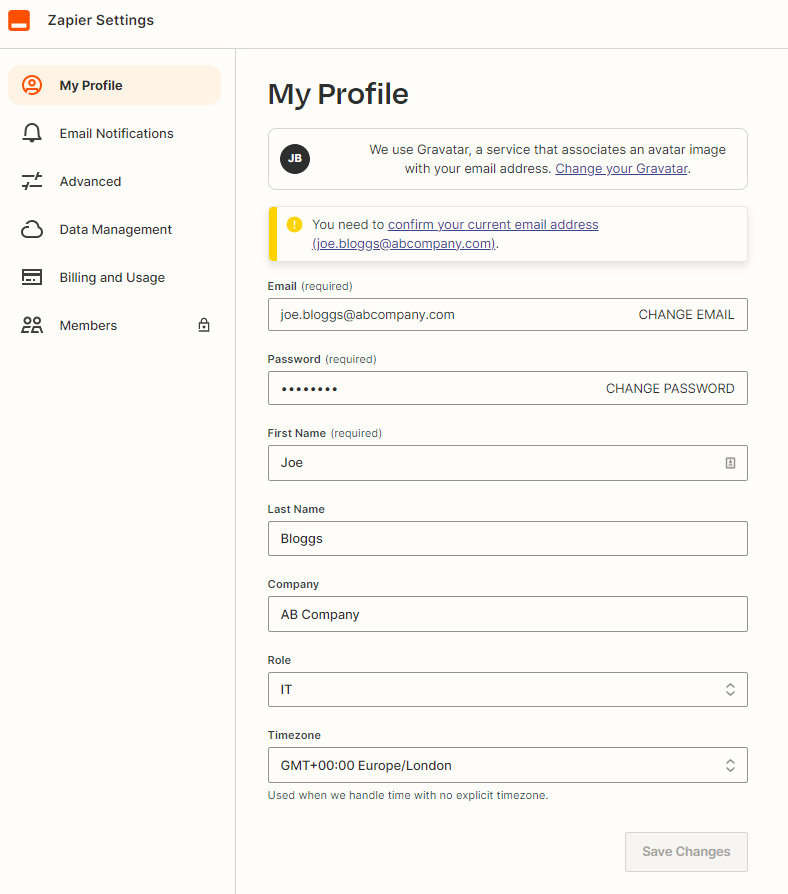
Figure 1.9 – Layout of the My Profile area
Important settings to customize in My Profile
There are a few things that you should do once you have set up your Zapier account:
Let’s go through how to do each of these in Zapier.
Validating your email address
Work through the following steps to adjust these settings:
- Click on the highlighted text (marked as important) to confirm your email address.
- Follow the instructions in the email you are sent from Zapier.
This is the first step to protecting your account and allowing Zapier to ensure that it has the right email address to send notifications.
Adding your role
If you did not add your role in the two-step onboarding process when you set up your Zapier account, you can do so here. To do this, scroll to Role and choose the closest match to your role from the drop-down list. Completing this step will enable Zapier to make workflow suggestions based on what other users with the same role might be using.
Adding your time zone
To adjust these settings, scroll to Timezone and choose your time zone from the drop-down list.
Completing this step will enable Zapier to use your time zone when displaying and handling time in your account. The default is Coordinated Universal Time (UTC).
An example of this would be in your Zap history. Times will be displayed in your time zone rather than in UTC. It is much easier to keep track of times when investigating errors if they are in your time zone.
Important note
Specifying your time zone is crucial for how Zapier defines and uses dates in your Zaps. The importance of adding the time zone to your account should not be overlooked.
Email Notifications
This area will enable you to alter your preferences for how and when you want to receive email communications. The following screenshot shows the layout of the Email Notifications area:
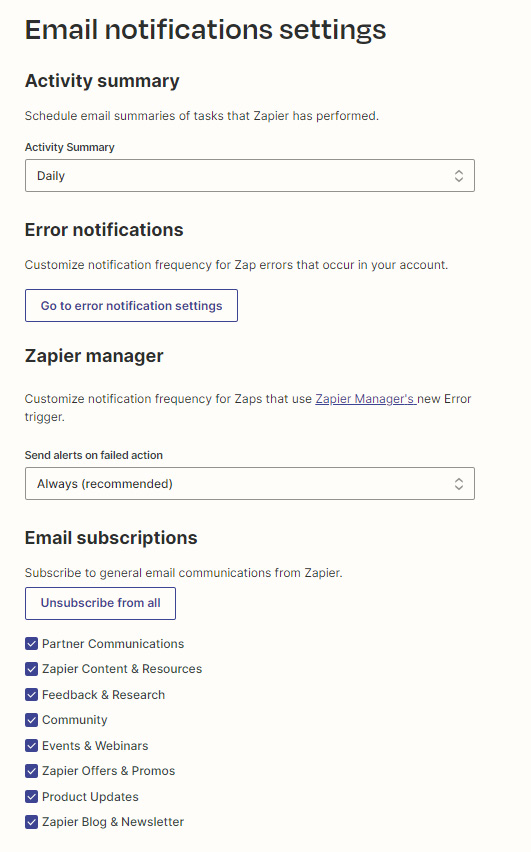
Figure 1.10 – Layout of the Email Notifications area
You can change your preferences for the following:
- Activity Summary: Zapier regularly sends you summaries of all the tasks that have been performed over a certain period (within the set frequency). You can choose to receive activity summaries daily or weekly, or if you prefer, never.
- Error notifications: In Professional, Team, and Company accounts, you can customize the frequency of Zap error notifications by adjusting your custom error notification. Click the Go to error notification settings button. In the Default Notification Rule section, choose the frequency of notifications to be applied to all Zaps from Immediately, Hourly Summary, and Never. In the Custom Notification Rules section, you can create a customized notification rule for specific Zaps you select. Use the Select a Zap drop-down list to choose the Zap and then use the Select a frequency drop-down list to choose Immediately, Hourly Summary, or Never. This is shown in the following screenshot:
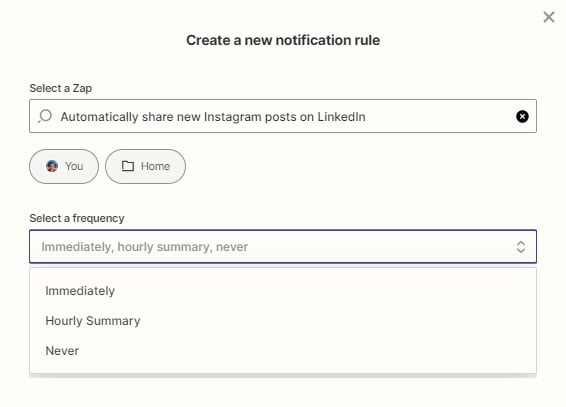
Figure 1.11 – Overview of the custom error notifications
Then, click the Save Notification Rule button to save the rule. From the dashboard, you can view the Zap’s name, change its frequency using the dropdown, or delete the Zap from the three-dots icon menu. Error notification settings can also be accessed from the Zap history area, which we will discuss in more detail in Chapter 5, Troubleshooting and Handling Zap Errors.
- Zapier Manager: In the Send Alerts on Failed Action section, you can choose to receive alerts if any of your actions have issues. It is useful to have this information so that you can sort out a problem soon after it happens. You can choose to receive failed action alerts repeatedly, always (this is the recommended setting), or if you prefer, never. You can also pair this notification setting with the Zapier Manager built-in app triggers, which we will discuss in more detail in Chapter 5, Troubleshooting and Handling Zap Errors.
- Email subscriptions: You can choose what kind of content you want Zapier to send you. You can also unsubscribe from receiving any newsletter content.
Advanced
In the Advanced area, you can change your preferences for the following:
- Two-Factor Authentication: Two-factor authentication (2FA) gives you more security by requiring you to enter your standard login details (email address and password), as well as an authentication code that’s been generated and sent to a nominated email address or mobile phone number. It is recommended that you set up 2FA on your account.
- Authorized Applications: This shows a list of apps that you have granted access to your Zapier account. You can remove apps from this area as needed. This area differs from your connected apps in My Apps.
- SSL Checks: SSL certificates allow scrambled information to be sent between Zapier and its partners. These settings are turned “on” by default and should only be altered if you have experience with changing them and know the consequences or if you have been advised to do so by the Zapier support team.
- Sign-in With: This allows you to change your sign-in settings so that you can use your Google account instead of the standard email and password.
- Delete My Account: If you want to close your Zapier account and delete all your account data, you can use this area to proceed. If you wish to delete some data periodically, you can do so through the Data Management area.
Data Management
Zapier gives account owners the ability to control their data. In this area, you can export and delete your data periodically and read more about data regulation and GDPR compliance.
Team and Company plans have additional Data Management settings that allow you to import and export Zaps in bulk (in a JSON file) so that you can make backups or share them with others.
Account
If you have access to your account as well as one or more Team or Company accounts, a drop-down option will be displayed, allowing you to navigate between your different accounts to view the settings for each account.
Billing and Usage
This area is essential for anything related to billing, task, and Zap usage. You will have access to more detailed information about your usage than in the snapshot wallet in the expandable left navigation bar. Here, you can see how many tasks have been used and how many Zaps have been built concerning your limit, as well as what date your usage resets. You will also be able to adjust your price plan, payment method, and billing information and view your invoices.
Members
Unless you are on a Team or Company plan, this area will be locked, denoted with a padlock icon.
The Members area gives you an overview of tasks related to Zaps built and owned by this member. You can adjust team member settings as follows:
You now have a better understanding of how to change your settings and preferences.
Summary
In this chapter, we started with an overview of the principles of BPA and how we can use it to increase productivity. We discussed how applications integrate using APIs and transfer data between them. We then introduced Zapier, a no-code tool that integrates with thousands of business apps to help you automate tasks without the need for developers. We presented the key terms used on the Zapier platform and covered how to choose the right pricing plan for your business needs. Then, we discussed how to set up a Zapier account and familiarize yourself with navigating the platform. Lastly, we covered how to customize the various available settings.
You now know how to choose the right Zapier pricing plan for your business, set up your Zapier account, navigate the Zapier platform with ease, and customize your settings.
In the next chapter, we will cover how to use the principles of BPA to improve our processes before we jump into automating them. We’ll then discuss how to strategize and plan a workflow in preparation for building a Zap and how to explore Zapier’s ecosystem of app integrations and use its features.
Questions
- What are two benefits of BPA?
- How do two or more apps have the ability to communicate with each other?
- How many premium apps can you connect to Zapier on the Free plan?
- Why is it important to add five or more apps that you use during the onboarding process?
