


 Download code from GitHub
Can you image a life without the Internet? For almost everything, right from exchanging information to ordering food, we rely heavily on the Internet today. Let's go through the interesting world of the World Wide Web and cover numerous ways with which we can interact with it using Python modules.
In this chapter, we will cover the following recipes:
Making HTTP requests
A brief look at web scraping
Parsing and extracting web content
Downloading content from the Web
Working with third-party REST APIs
Asynchronous HTTP server in Python
Web automation with selenium bindings
Automating lead generation with web scraping
Internet has made life so easy that sometimes you just don't realize the power of it. Checking out your friend's status, calling your parents, responding to an important business e-mail, or playing a game--we rely on the World Wide Web (WWW) today for almost everything.
Thankfully, Python has a rich set of modules that help us perform various tasks on the Web. Phew! Not only could you make simple HTTP requests retrieve data from websites or download pages and images, you could also parse the page content to gather information and analyze it to generate meaningful insights with Python. And wait; did I mention that you could spawn a browser in an automated fashion to perform a daily mundane task?
The recipes in this chapter will primarily focus on the Python modules that can be treated as the tool of choice while performing the preceding operations on the Web. Specifically, we will focus on the following Python modules in this chapter:
requests(http://docs.python-requests.org/en/master/)BeautifulSoup4(https://pypi.python.org/pypi/beautifulsoup4)selenium(http://selenium-python.readthedocs.org/)
Throughout the following recipes in this chapter, we will use Python v2.7 and the requests (v2.9.1) module of Python. This recipe will show you how to make HTTP requests to web pages on the Internet.
But before going there, let's understand the Hypertext Transfer Protocol (HTTP) in brief. HTTP is a stateless application protocol for data communication on the WWW. A typical HTTP Session involves a sequence of request or response transactions. The client initiates a TCP connection to the Server on a dedicated IP and Port; when the Server receives the request, it responds with the response code and text. HTTP defines request methods (HTTP verbs like GET, POST), which indicate the desired action to be taken on the given Web URL.
In this recipe, we'll learn how to make HTTP GET/POST requests using Python's requests module. We'll also learn how to POST json data and handle HTTP exceptions. Cool, let's jump in.
To step through this recipe, you will need to install Python v2.7. Once installed, you will need to install Python pip. PIP stands for Pip Installs Packages and is a program that can be used to download and install the required Python packages on your computer. Lastly, we'll need the requests module to make HTTP requests.
We will start by installing the requests module (I'll leave the Python and pip installation for you to perform on your machine, based on your operating system). No other prerequisites are required. So, hurry up and let's get going!
On your Linux/Mac computer, go to Terminal and run the following command:
pip install -U requestsYou only need to use
sudoif you don't have permissions to Python site packages, elsesudois not required.The following code helps you make a HTTP
GETrequest with Python'srequestsmodule:import requests r = requests.get('http://ip.jsontest.com/') print("Response object:", r) print("Response Text:", r.text)You will observe the following output:

Creating a HTTP
GETrequest with data payload is also trivial with requests. The following code helps you in achieving this. This is how you can also check the URL request that will be sent:payload = {'q': 'chetan'} r = requests.get('https://github.com/search', params=payload) print("Request URL:", r.url)
Let's now make a HTTP
POSTcall using therequestsmodule. This is similar to filling up and posting a login or signup form on a website:payload = {'key1': 'value1'} r = requests.post("http://httpbin.org/post", data=payload) print("Response text:", r.json())
Handling errors and exceptions is also very convenient with requests. The following code snippet shows an example of error handling. If you run this code without an Internet connection on your machine, it will result in an exception. The exception handler catches the exception and states that it failed to establish a new connection, as expected:
        try:
            r = requests.get("http://www.google.com/")
        except requests.exceptions.RequestException as e:
            print("Error Response:", e.message)
In the this recipe, we looked at how to make different types of HTTP requests with Python's requests module. Let's look at how this code works:
In the first example, we made a
GETrequest to http://ip.jsontest.com and got the response code and response text. It returns the current IP address of our computer on the Internet.In the second example, we made a HTTP
GETrequest with the payload data. Look how the request URL contains?q=chetan, and it searches all the repositories by the name, Chetan, on GitHub.Next, we made a
POSTrequest with the payload data being{'key1', 'value1'}. This is like submitting an online form, as we observed in the How to do it section.The
requestsmodule has aResponseobject,r, which includes various methods. These methods help in extracting response, status code and other information required while working with the Web:r.status_code- Returns the response coder.json()- Converts the response to.jsonformatr.text- Returns the response data for the queryr.content- Includes the HTML and XML tags in the response contentr.url- Defines the Web URL of the request made
We also looked at the exception handling with the
requestsmodule, wherein, if there was no Internet, an exception occurred and therequestsmodule could easily catch this exception. This was achieved with therequests.exceptionsclass of therequestsmodule.
Before we learn how to perform web scraping, let's understand what scraping means. In the Web world, scraping is a way to sift through the pages of a website with the intention of extracting the required information in the said format with the help of a computer program. For example, if I want to get the title and date of all the articles published on a blog, I could write a program to scrape through the blog, get the required data, and store it in a database or a flat file, based on the requirement.
Web scraping is often confused with web crawling. The web crawler is a bot that systematically browses the Web with the purpose of web indexing and is used by search engines to index web pages so that users can search the Web more effectively.
But scraping is not easy. The data, which is interesting to us, is available on a blog or website in a particular format, say XML tags or embedded in HTML tags. So, it is important for us to know the format before we begin extracting the data we need. Also, the web scraper should know the format in which the extracted data needs to be stored in order to act on it later. It is also important to understand that the scraping code will fail should the HTML or XML format change, even though the browser display may be the same.
Web scraping has always been under the scanner in legal terms. Can you do web scraping? How legal or ethical is it? Can we use the data obtained from scraping for profit?
This subject has been under a lot of discussion, but at a high level, you may get into issues with web scraping if you scrape the Web for copyright information, violate the Computer Fraud and Abuse Act, or violate a website's terms of service. For instance, if you're scraping the Web to get public data, you should still be fine. However, it is very contextual and you need to be careful about what you're scraping and how you are using the data.
Here are a few pointers on the Web on data scraping:
We take an example of pricing data from the https://github.com/ website to demonstrate web scraping with Python. This is a really trivial example but gets us up to speed with scraping. Let's get started and scrape some interesting data with this Python recipe.
Open the Google Chrome browser on your computer and open the https://github.com/pricing/ web page. On this page, you will notice multiple pricing plans namely, Personal, Organization, and Enterprise.
Now, on your browser, right-click on the pricing of the Personal plan and click on the Inspect element, as shown in the following screenshot:

Once you click on Inspect, the Chrome browser's console log opens up, which will help you understand the HTML structure of GitHub's pricing page, as follows:

If you look at the highlighted HTML
span-<span class="default-currency">$7</span>, you'll know that this web page uses thedefault-currencyclass to list down the pricing of plans. We'll now use this property to extract the prices of multiple GitHub plans.But before doing that, let's install the Python module,
lxml, which will be needed to extract content from the preceding HTML document. Install thelxmlandrequestsmodules:pip install lxml pip install requests
Now, open your favorite editor and type this code snippet:
        from lxml import html
        import requests

        page = requests.get('https://github.com/pricing/')
        tree = html.fromstring(page.content)
        print("Page Object:", tree)
        plans = tree.xpath('//h2[@class="pricing-card-name
        alt-h3"]/text()')
        pricing = tree.xpath('//span[@class="default-
        currency"]/text()')
        print("Plans:", plans, "\nPricing:", pricing)
If you look at the preceding code, we used the
default-currencyclass andpricing-card-name display-heading-3to get the pricing and pricing plan. If you run the code snippet, the output of the program will be as follows:
As we discussed earlier, we need to find out an appropriate way of extracting information. So, in this example, we first got the HTML tree for the https://github.com/pricing/ page. We got the tree with the help of the fromstring() method that converts the contents of the page (string format) to the HTML format.
Then, using the lxml module and the tree_xpath() method, we looked for the default-currency class and pricing-card-name display-heading-3 to get the pricing and pricing plans.
See how we used the complete XPath, h3[@class='class-name'], to locate the pricing plans and the //span[@class="default-currency"] XPath to select the actual pricing data. Once the elements were selected, we printed the text data that was returned to us as a Python list.
That's it; we scraped the GitHub page for the required data. Nice and simple.
You learnt what web scrapers are, and how they go ahead and extract interesting information from the Web. You also understood how they are different from web crawlers. But then, there's always something more!
Web scraping involves extraction, which cannot happen until we parse the HTML content from the web page to get the data interesting to us. In the next recipe, we'll learn about parsing HTML and XML content in detail.
Well, now we're confident about making HTTP requests to multiple URLs. We also looked at a simple example of web scraping.
But WWW is made up of pages with multiple data formats. If we want to scrape the Web and make sense of the data, we should also know how to parse different formats in which data is available on the Web.
In this recipe, we'll discuss how to s.
Data on the Web is mostly in the HTML or XML format. To understand how to parse web content, we'll take an example of an HTML file. We'll learn how to select certain HTML elements and extract the desired data. For this recipe, you need to install the BeautifulSoup module of Python. The BeautifulSoup module is one of the most comprehensive Python modules that will do a good job of parsing HTML content. So, let's get started.
We start by installing
BeautifulSoupon our Python instance. The following command will help us install the module. We install the latest version, which isbeautifulsoup4:pip install beautifulsoup4Now, let's take a look at the following HTML file, which will help us learn how to parse the HTML content:
        <html xmlns="http://www.w3.org/1999/html">
        <head>
            <title>Enjoy Facebook!</title>
        </head>
        <body>
            <p>
              <span>You know it's easy to get intouch with
              your <strong>Friends</strong> on web!<br></span>
              Click here <a href="https://facebook.com">here</a>
              to sign up and enjoy<br>
            </p>
            <p class="wow"> Your gateway to social web! </p>
            <div id="inventor">Mark Zuckerberg</div>
            Facebook, a webapp used by millions
        </body>
        </html>
Let's name this file as
python.html. Our HTML file is hand-crafted so that we can learn the multiple ways of parsing it to get the required data from it.Python.htmlhas typical HTML tags given as follows:<head>- It is the container of all head elements like<title>.<body>- It defines the body of the HTML document.<p>- This element defines a paragraph in HTML.<span>- It is used to group inline elements in a document.<strong>- It is used to apply a bold style to the text present under this tag.<a>- It represents a hyperlink or anchor and contains<href>that points to the hyperlink.<class>- It is an attribute that points to a class in a style sheet.<div id>- It is a container that encapsulates other page elements and divides the content into sections. Every section can be identified by attributeid.
If we open this HTML in a browser, this is how it'll look:

Let's now write some Python code to parse this HTML file. We start by creating a
BeautifulSoupobject.Tip
We always need to define the parser. In this case we used
lxmlas the parser. The parser helps us read files in a designated format so that querying data becomes easy.import bs4 myfile = open('python.html') soup = bs4.BeautifulSoup(myfile, "lxml") #Making the soup print "BeautifulSoup Object:", type(soup)The output of the preceding code is seen in the following screenshot:

OK, that's neat, but how do we retrieve data? Before we try to retrieve data, we need to select the HTML elements that contain the data we need.
We can select or find HTML elements in different ways. We could select elements with ID, CSS, or tags. The following code uses
python.htmlto demonstrate this concept:#Find Elements By tags print soup.find_all('a') print soup.find_all('strong') #Find Elements By id print soup.find('div', {"id":"inventor"}) print soup.select('#inventor') #Find Elements by css print soup.select('.wow')The output of the preceding code can be viewed in the following screenshot:

Now let's move on and get the actual content from the HTML file. The following are a few ways in which we can extract the data of interest:
        print "Facebook URL:", soup.find_all('a')[0]['href']
        print "Inventor:", soup.find('div', {"id":"inventor"}).text
        print "Span content:", soup.select('span')[0].getText()
The output of the preceding code snippet is as follows:

Whoopie! See how we got all the text we wanted from the HTML elements.
In this recipe, you learnt the skill of finding or selecting different HTML elements based on ID, CSS, or tags.
In the second code example of this recipe, we used find_all('a') to get all the anchor elements from the HTML file. When we used the find_all() method, we got multiple instances of the match as an array. The select() method helps you reach the element directly.
We also used find('div', <divId>) or select(<divId>) to select HTML elements by div Id. Note how we selected the inventor element with div ID #inventor in two ways using the find() and select() methods. Actually, the select method can also be used as select(<class-name>) to select HTML elements with a CSS class name. We used this method to select element wow in our example.
In the third code example, we searched for all the anchor elements in the HTML page and looked at the first index with soup.find_all('a')[0]. Note that since we have only one anchor tag, we used the index 0 to select that element, but if we had multiple anchor tags, it could be accessed with index 1. Methods like getText() and attributes like text (as seen in the preceding examples) help in extracting the actual content from the elements.
Cool, so we understood how to parse a web page (or an HTML page) with Python. You also learnt how to select or find HTML elements by ID, CSS, or tags. We also looked at examples of how to extract the required content from HTML. What if we want to download the contents of a page or file from the Web? Let's see if we can achieve that in our next recipe.
So, in the earlier recipe, we saw how to make HTTP requests, and you also learnt how to parse a web response. It's time to move ahead and download content from the Web. You know that the WWW is not just about HTML pages. It contains other resources, such as text files, documents, and images, among many other formats. Here, in this recipe, you'll learn ways to download images in Python with an example.
To download images, we will need two Python modules, namely BeautifulSoup and urllib2. We could use the requests module instead of urrlib2, but this will help you learn about urllib2 as an alternative that can be used for HTTP requests, so you can boast about it.
Before starting this recipe, we need to answer two questions. What kind of images would we like to download? From which location on the Web do I download the images? In this recipe, we download Avatar movie images from Google (https://google.com) images search. We download the top five images that match the search criteria. For doing this, let's import the Python modules and define the variables we'll need:
        from bs4 import BeautifulSoup
        import re
        import urllib2
        import os
        ## Download paramters
        image_type = "Project"
        movie = "Avatar"
        url = "https://www.google.com/search?q="+movie+"&source=lnms&tbm=isch"
OK then, let's now create a
BeautifulSoupobject with URL parameters and appropriate headers. See the use ofUser-Agentwhile making HTTP calls with Python'surllibmodule. Therequestsmodule uses its ownUser-Agentwhile makingHTTPcalls:header = {'User-Agent': 'Mozilla/5.0'} soup = BeautifulSoup(urllib2.urlopen (urllib2.Request(url,headers=header)))Google images are hosted as static content under the domain name
http://www.gstatic.com/. So, using theBeautifulSoupobject, we now try to find all the images whose source URL containshttp://www.gstatic.com/. The following code does exactly the same thing:images = [a['src'] for a in soup.find_all("img", {"src": re.compile("gstatic.com")})][:5] for img in images: print "Image Source:", imgThe output of the preceding code snippet can be seen in the following screenshot. Note how we get the image source URL on the Web for the top five images:

Now that we have the source URL of all the images, let's download them. The following Python code uses the
urlopen()method toread()the image and downloads it onto the local file system:for img in images: raw_img = urllib2.urlopen(img).read() cntr = len([i for i in os.listdir(".") if image_type in i]) + 1 f = open(image_type + "_"+ str(cntr)+".jpg", 'wb') f.write(raw_img) f.close()When the images get downloaded, we can see them on our editor. The following snapshot shows the top five images we downloaded and
Project_3.jpglooks as follows:
So, in this recipe, we looked at downloading content from the Web. First, we defined the parameters for download. Parameters are like configurations that define the location where the downloadable resource is available and what kind of content is to be downloaded. In our example, we defined that we have to download Avatar movie images and, that too, from Google.
Then we created the BeautifulSoup object, which will make the URL request using the urllib2 module. Actually, urllib2.Request() prepares the request with the configuration, such as headers and the URL itself, and urllib2.urlopen() actually makes the request. We wrapped the HTML response of the urlopen() method and created a BeautifulSoup object so that we could parse the HTML response.
Next, we used the soup object to search for the top five images present in the HTML response. We searched for images based on the img tag with the find_all() method. As we know, find_all() returns a list of image URLs where the picture is available on Google.
Finally, we iterated through all the URLs and again used the urlopen() method on URLs to read() the images. Read() returns the image in a raw format as binary data. We then used this raw image to write to a file on our local file system. We also added a logic to name the image (they actually auto-increment) so that they're uniquely identified in the local file system.
That's nice! Exactly what we wanted to achieve! Now let's up the ante a bit and see what else we can explore in the next recipe.
Now that we've covered ground on scraping, crawling, and parsing, it's time for another interesting work that we can do with Python, which is working with third-party APIs. I'd assume many of us are aware and might have a basic understanding of REST API. So, let's get started!
To demonstrate the understanding, we take the case of GitHub gists. Gists in GitHub are the best way to share your work, a small code snippet that helps your colleague or a small app with multiple files that gives an understanding of a concept. GitHub allows the creation, listing, deleting, and updating of gists, and it presents a classical case of working with GitHub REST APIs.
So, in this section, we use our very own requests module to make HTTP requests to GitHub REST API to create, update, list, or delete gists.
The following steps will show you how to work with GitHub REST APIs using Python.
To work with GitHub REST APIs, we need to create a Personal access token. For doing that, log in to https://github.com/ and browse to https://github.com/settings/tokens and click on Generate new token:

You'll now be taken to the New personal access token page. Enter a description at the top of the page and check the gists option among the scopes given out. Note that scope represents the access for your token. For instance, if you just select gists, you can use GitHub APIs to work on the gists resource but not on other resources such as repo or users. For this recipe, the gists scope is just what we need:

Once you click on Generate token, you'd be presented with a screen containing your personal access token. Keep this token confidential with you.
With the access token available, let's start working with APIs and create a new gist. With create, we add a new resource, and for doing this, we make an HTTP
POSTrequest on GitHub APIs, such as in the following code:import requests import json BASE_URL = 'https://api.github.com' Link_URL = 'https://gist.github.com' username = '<username>' ## Fill in your github username api_token = '<api_token>' ## Fill in your token header = { 'X-Github-Username': '%s' % username, 'Content-Type': 'application/json', 'Authorization': 'token %s' % api_token, } url = "/gists" data ={ "description": "the description for this gist", "public": True, "files": { "file1.txt": { "content": "String file contents" } } } r = requests.post('%s%s' % (BASE_URL, url), headers=header, data=json.dumps(data)) print r.json()['url']If I now go to my
gistspage on GitHub, I should see the newly created gist. And voila, it's available!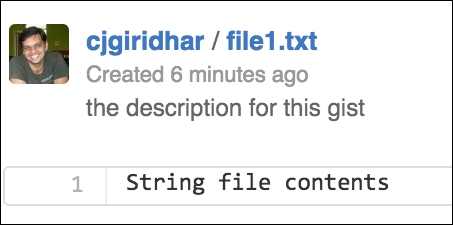
Hey, we were successful in creating the gist with the GitHub APIs. That's cool, but can we now view this
gist? In the preceding example, we also printed the URL of the newly created gist. It will be in the format,https://gist.github.com/<username>/<gist_id>. We now use this gist_id to get the details of the gist, which means we make a HTTPGETrequest on the gist_id:import requests import json BASE_URL = 'https://api.github.com' Link_URL = 'https://gist.github.com' username = '<username>' api_token = '<api_token>' gist_id = '<gist id>' header = { 'X-Github-Username': '%s' % username, 'Content-Type': 'application/json', 'Authorization': 'token %s' % api_token, } url = "/gists/%s" % gist_id r = requests.get('%s%s' % (BASE_URL, url), headers=header) print r.json()We created a new gist with the HTTP
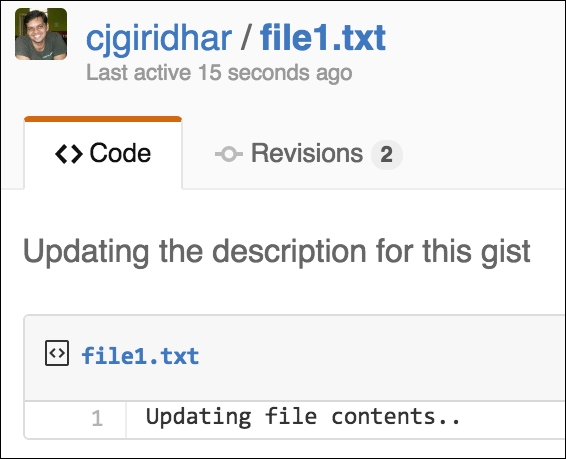
POSTrequest and got the details of the gist with the HTTPGETrequest in the previous steps. Now, let's update this gist with the HTTPPATCHrequest.Note
Many third-party libraries choose to use the
PUTrequest to update a resource, but HTTPPATCHcan also be used for this operation, as chosen by GitHub.The following code demonstrates updating the gist:
        import requests
        import json

        BASE_URL = 'https://api.github.com'
        Link_URL = 'https://gist.github.com'

        username = '<username>'
        api_token = '<api_token>'
        gist_id = '<gist_id>'

        header = { 'X-Github-Username': '%s' % username,
                   'Content-Type': 'application/json',
                   'Authorization': 'token %s' % api_token,
        }
        data = {   "description": "Updating the description
                   for this gist",
                   "files": {
                     "file1.txt": {
                       "content": "Updating file contents.."
                     }
                   }
        }
        url = "/gists/%s" % gist_id
        r = requests.patch('%s%s' %(BASE_URL, url),
                           headers=header,
                           data=json.dumps(data))
        print r.json()
Now, if I look at my GitHub login and browse to this gist, the contents of the gist have been updated. Awesome! Don't forget to see the Revisions in the screenshot--see it got updated to revision 2:
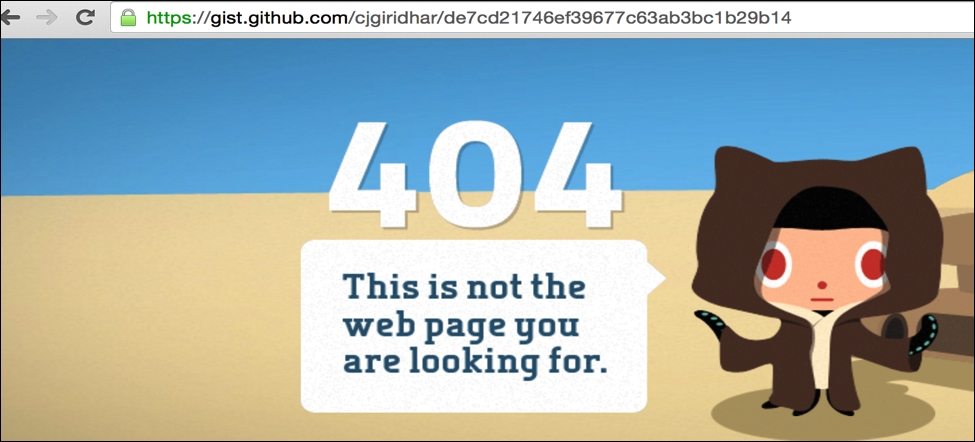
Now comes the most destructive API operation--yes deleting the gist. GitHub provides an API for removing the gist by making use of the HTTP
DELETE/gists/<gist_id>resource. The following code helps us delete thegist:import requests import json BASE_URL = 'https://api.github.com' Link_URL = 'https://gist.github.com' username = '<username>' api_token = '<api_token>' gist_id = '<gist_id>' header = { 'X-Github-Username': '%s' % username, 'Content-Type': 'application/json', 'Authorization': 'token %s' % api_token, } url = "/gists/%s" % gist_id r = requests.delete('%s%s' %(BASE_URL, url), headers=header, )Let's quickly find out if the gist is now available on the GitHub website? We can do that by browsing the gist URL on any web browser. And what does the browser say? It says 404 resource not found, so we have successfully deleted the gist! Refer to the following screenshot:
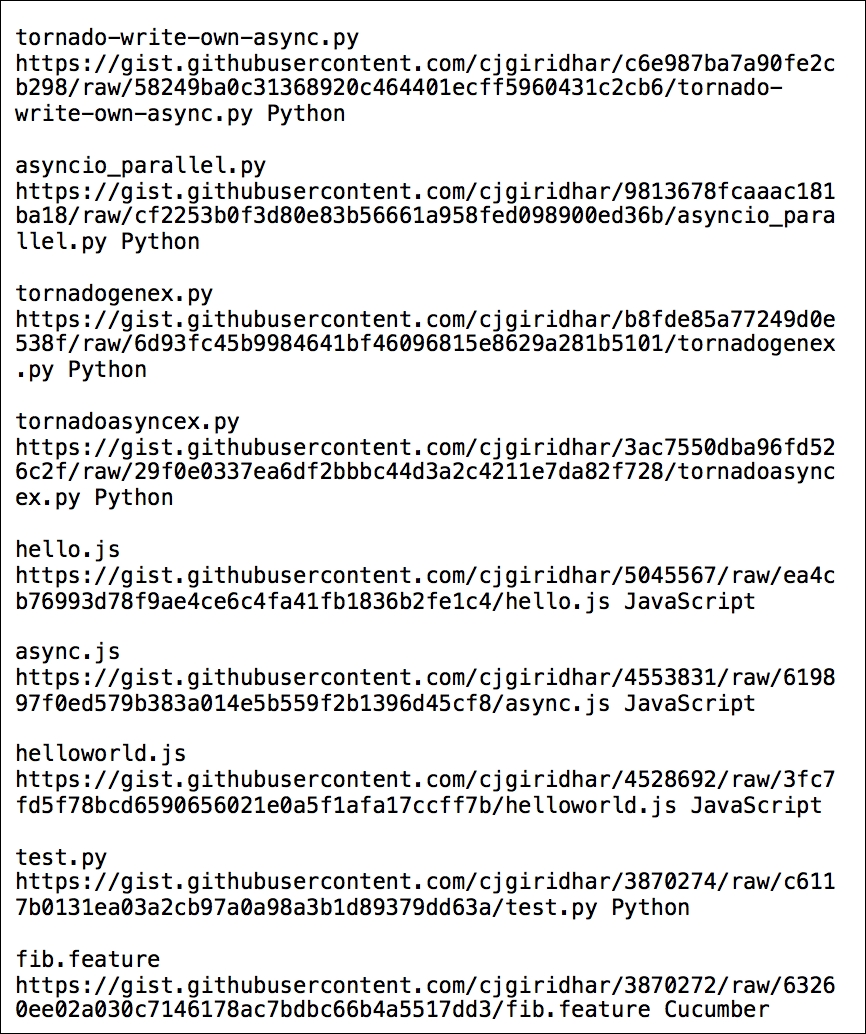
Finally, let's list all the gists in your account. For this we make an HTTP
GETAPI call on the/users/<username>/gistsresource:
        import requests

        BASE_URL = 'https://api.github.com'
        Link_URL = 'https://gist.github.com'

        username = '<username>'      ## Fill in your github username
        api_token = '<api_token>'  ## Fill in your token

        header = {  'X-Github-Username': '%s' % username,
                    'Content-Type': 'application/json',
                    'Authorization': 'token %s' % api_token,
        }
        url = "/users/%s/gists" % username
        r = requests.get('%s%s' % (BASE_URL, url),
                          headers=header)
        gists = r.json()
        for gist in gists:
            data = gist['files'].values()[0]
            print data['filename'],
            data['raw_url'], data['language']
The output of the preceding code for my account is as follows:
Python's requests module helps in making HTTP GET/POST/PUT/PATCH and DELETE API calls on GitHub's resources. These operations, also known as HTTP verbs in the REST terminology, are responsible for taking certain actions on the URL resources.
As we saw in the examples, the HTTP GET request helps in listing the gists, POST creates a new gist, PATCH updates a gist, and DELETE completely removes the gist. Thus, in this recipe, you learnt how to work with third-party REST APIs--an essential part of WWW today--using Python.
If you realize, many web applications that we interact with, are by default synchronous. A client connection gets established for every request made by the client and a callable method gets invoked on the server side. The server performs the business operation and writes the response body to the client socket. Once the response is exhausted, the client connection gets closed. All these operations happen in sequence one after the other--hence, synchronous.
But the Web today, as we see it, cannot rely on synchronous modes of operations only. Consider the case of a website that queries data from the Web and retrieves the information for you. (For instance, your website allows for integration with Facebook and every time a user visits a certain page of your website, you pull data from his Facebook account.) Now, if we develop this web application in a synchronous manner, for every request made by the client, the server would make an I/O call to either the database or over the network to retrieve information and then present it back to the client. If these I/O requests take a longer time to respond, the server gets blocked waiting for the response. Typically web servers maintain a thread pool that handles multiple requests from the client. If a server waits long enough to serve requests, the thread pool may get exhausted soon and the server will get stalled.
Solution? In comes the asynchronous ways of doing things!
For this recipe, we will use Tornado, an asynchronous framework developed in Python. It has support for both Python 2 and Python 3 and was originally developed at FriendFeed (http://blog.friendfeed.com/). Tornado uses a non-blocking network I/O and solves the problem of scaling to tens of thousands of live connections (C10K problem). I like this framework and enjoy developing code with it. I hope you'd too! Before we get into the How to do it section, let's first install tornado by executing the following command:
pip install -U tornado
We're now ready to develop our own HTTP server that works on an asynchronous philosophy. The following code represents an asynchronous server developed in the
tornadoweb framework:import tornado.ioloop import tornado.web import httplib2 class AsyncHandler(tornado.web.RequestHandler): @tornado.web.asynchronous def get(self): http = httplib2.Http() self.response, self.content = http.request("http://ip.jsontest.com/", "GET") self._async_callback(self.response, self.content) def _async_callback(self, response, content): print "Content:", content print "Response:\nStatusCode: %s Location: %s" %(response['status'], response['content-location']) self.finish() tornado.ioloop.IOLoop.instance().stop() application = tornado.web.Application([ (r"/", AsyncHandler)], debug=True) if __name__ == "__main__": application.listen(8888) tornado.ioloop.IOLoop.instance().start()Run the server as:
python tornado_async.pyThe server is now running on port 8888 and ready to receive requests.
Now, launch any browser of your choice and browse to
http://localhost:8888/. On the server, you'll see the following output:
Our asynchronous web server is now up and running and accepting requests on port 8888. But what is asynchronous about this? In fact, tornado works on the philosophy of a single-threaded event loop. This event loop keeps polling for events and passes it on to the corresponding event handlers.
In the preceding example, when the app is run, it starts by running the ioloop. The ioloop is a single-threaded event loop and is responsible for receiving requests from the clients. We have defined the get() method, which is decorated with @tornado.web.asynchronous, which makes it asynchronous. When a user makes a HTTP GET request on http://localhost:8888/, the get() method is triggered that internally makes an I/O call to http://ip.jsontest.com.
Now, a typical synchronous web server would wait for the response of this I/O call and block the request thread. But tornado being an asynchronous framework, it triggers a task, adds it to a queue, makes the I/O call, and returns the thread of execution back to the event loop.
The event loop now keeps monitoring the task queue and polls for a response from the I/O call. When the event is available, it executes the event handler, async_callback(), to print the content and its response and then stops the event loop.
Event-driven web servers such as tornado make use of kernel-level libraries to monitor for events. These libraries are kqueue, epoll, and so on. If you're really interested, you should do more reading on this. Here are a few resources:
In all the recipes so far, we had a dedicated URL to make HTTP requests, be it calling a REST API or downloading content from the Web. But then, there are services that don't have a defined API resource or need to log in to the Web to perform operations. In such cases, you don't have much control over the requests, as it is the same URL that serves multiple different content, based on the user session or cookie. Then what do we do?
Well, how about controlling the browser itself to achieve tasks in such scenarios? Controlling the browser itself? Interesting, isn't it?
For this recipe, we'll use Python's selenium module. Selenium (http://www.seleniumhq.org/) is a portable software framework for web applications and automates browser actions. You could automate mundane tasks with selenium. Selenium spawns a browser and helps you perform tasks as though a human is doing them. Selenium supports some of the most popularly used browsers like Firefox, Chrome, Safari, and Internet Explorer, among others. Let's take an example of logging in to Facebook with Python's selenium in this recipe.
We start by installing selenium bindings for Python. Installing selenium can be done with the following command:
pip install seleniumLet's start by first creating a browser object. We use the Firefox browser for spawning the browser instance:
        from selenium import webdriver browser =
        webdriver.Firefox()
        print "WebDriver Object", browser
The following screenshot shows how a selenium web driver object got created. It also has a unique session ID:

Next, we ask the browser to browse to the Facebook home page. The following code helps us achieve this:
        browser.maximize_window()
        browser.get('https://facebook.com')
Once you run the preceding code, you will see a Firefox browser opened, and it connects to the Facebook login page, as in the following screenshot:

For the next step, we locate the e-mail and password elements and enter the appropriate data:
        email = browser.find_element_by_name('email')
        password = browser.find_element_by_name('pass')
        print "Html elements:"
        print "Email:", email, "\nPassword:", password
The output of the preceding code is as follows:

Once we have selected the Email and Password text inputs, we now fill them with the correct Email and Password. The following code will enable entering Email and Password:
        email.send_keys('abc@gmail.com') #Enter correct email
        addresspassword.send_keys('pass123') #Enter correct password
Now that we have entered Email and Password, the last thing to do is submit the form and click on the Log In button. We do this by finding the element by ID and clicking on the element:
browser.find_element_by_id('loginbutton').click()If you have entered the correct e-mail ID and password, you'd have logged in to Facebook!
For this recipe, we used the selenium WebDriver Python APIs. WebDriver is the latest inclusion in selenium APIs and drives browsers natively like a user. It can drive locally or on a remote machine using the selenium server. In this example, we ran it on the local machine. Basically, the selenium server runs on a local machine on a default port 4444 and selenium WebDriver APIs interact with the selenium server to take actions on the browser.
In this recipe, we first created a WebDriver instance using the Firefox browser. We then used the WebDriver API to browse to the Facebook homepage. We then parsed the HTML page and located the Email and Password input elements. How did we find the elements? Yes, similar to what we did in the web scraping example. As we have the developer console in Chrome, we can install the firebug plugin in Firefox. Using this plugin, we can get the HTML elements for Email and Password. See the following screenshot:

Once we figured the HTML element names, we programmatically created an HTML element object using WebDriver's find_element_by_name() method. WebDriver API has a method send_keys() that can work on element objects and enter the required text (in this case email and password). The last operation is to submit the form, and we performed it by finding the Log In object and clicking on it.
Ryan is a marketing manager at Dely Inc. Dely is a food delivery start-up and is trying to establish itself in the city of London. Dely is good at logistics and wants to aggregate restaurants on their platform, so when consumers order food from these restaurants, Dely will be responsible for the actual delivery. Dely is hoping that with every delivery they do, they will get a percentage cut from the restaurants. In return, restaurants have to think about their kitchen and not the logistical aspects. If you carefully think, virtually, every restaurant, big or small, is their probable lead. Dely wants to reach out to these restaurants and hopes to add them to their platform and fulfill their delivery needs.
Ryan is responsible for getting in touch with restaurants and wants to run a marketing campaign on all the target restaurants. But before he can do this, he needs to create a database of all the restaurants in London. He needs details, such as the name of the restaurant, the street address, and the contact number so that he can reach these restaurants. Ryan knows all his leads are listed on Yelp, but doesn't know where to start. Also, if he starts looking at all restaurants manually, it will take him a huge amount of time. With the knowledge you gained in this chapter, can you help Ryan with lead generation?
We covered the legal aspects of web scraping in the initial parts of the chapter. I would like to warn you again on this. The example covered in this chapter, again, is for you to understand how to perform web scraping. Also, here we're scraping Yelp for public data, which is commonly available, as in this case, it is available on the restaurant's website itself.
Now, if you look at Ryan's problem, he needs an automated way of collecting the database of all the restaurants listed in London. Yes, you got it right. Web scraping can help Ryan build this database. Can it be that easy? Let's see in this recipe.
For this recipe, we don't need any extra modules. We'll use the BeautifulSoup and urllib Python modules that we used in the previous recipes of this chapter.
We start by going to the Yelp website (https://yelp.com/) and searching for all the restaurants in the city of London. When you do that, you'll get a list of all the restaurants in London. Observe the URL that displays the search criteria. It is https://www.yelp.com/search?find_desc=Restaurants&find_loc=London. See the following screenshot for reference:

Now, if you click on any of the restaurants' link that shows up in the search results, we should get the details that Ryan needs. See the following screenshot, where we get the details of Ffiona's Restaurant. Note how every restaurant has a dedicated URL; in this case, it is https://www.yelp.com/biz/ffionas-restaurant-london?osq=Restaurants. Also note that on this page, we have the name of the restaurant, the street address, and even the contact number. All the details that Ryan needs for his campaign; that's cool!

OK nice, so we now know how to get the list of restaurants and also fetch the relevant details for a restaurant. But how do we achieve this in an automated way? As we saw in the web scraping example, we need to look for the HTML elements on the web pages from where we can collect this data.
Let's start with the search page. Open the search page (https://www.yelp.com/search?find_desc=Restaurants&find_loc=London) on your Chrome browser. Now, right-click on the first restaurant's URL and click on Inspect to get the HTML elements. If you notice, in the following screenshot, all the restaurants that are listed on the search page have a common CSS class name,
biz-name, which indicates the name of the restaurant. It also contains thehreftag, which points to the dedicated URL of the restaurant. In our screenshot, we get the name, Ffiona's Restaurant, and thehrefpoints to the restaurant's URL, https://yelp.com/biz/ffionas-restaurant-london?osq=Resturants.
Now, let's look at the dedicated page of the restaurant to see how we collect the street address and the contact number of the restaurant with the HTML elements. We perform the same operation, right-click, and Inspect to get the HTML elements of street address and contact number. See the following screenshot for reference. Note that for the street address, we have a separate CSS class,
street-address, and the contact number is available under a span with the class name, biz-phone.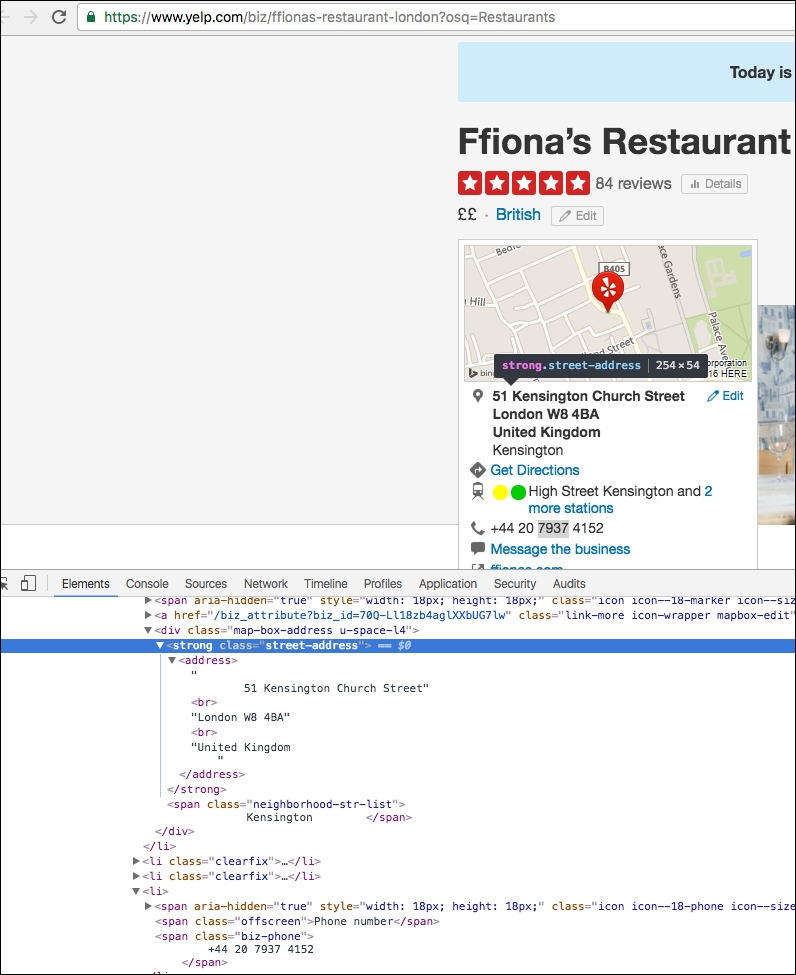
Awesome! So, we now have all the HTML elements that can be used to scrape the data in an automated way. Let's now look at the implementation. The following Python code performs these operations in an automated way:
        from bs4 import BeautifulSoup
        from threading import Thread
        import urllib

        #Location of restaurants
        home_url = "https://www.yelp.com"
        find_what = "Restaurants"
        location = "London"

        #Get all restaurants that match the search criteria
        search_url = "https://www.yelp.com/search?find_desc=" +
        find_what + "&find_loc=" + location
        s_html = urllib.urlopen(search_url).read()
        soup_s = BeautifulSoup(s_html, "lxml")

        #Get URLs of top 10 Restaurants in London
        s_urls = soup_s.select('.biz-name')[:10]
        url = []
        for u in range(len(s_urls)):
        url.append(home_url + s_urls[u]['href'])


        #Function that will do actual scraping job
        def scrape(ur):
                html = urllib.urlopen(ur).read()
                soup = BeautifulSoup(html, "lxml")

                title = soup.select('.biz-page-title')
                saddress = soup.select('.street-address')
                phone = soup.select('.biz-phone')

                if title:
                     print "Title: ", title[0].getText().strip()
                if saddress:
                     print "Street Address: ",
        saddress[0].getText().strip()
                if phone:
                     print "Phone Number: ", phone[0].getText().strip()
                print "-------------------"

        threadlist = []
        i=0
        #Making threads to perform scraping
        while i<len(url):
                  t = Thread(target=scrape,args=(url[i],))
                  t.start()
                  threadlist.append(t)
                  i=i+1

        for t in threadlist:
                  t.join()
OK, great! Now, if we run the preceding Python code, we get the details of the top 10 restaurants in London, along with their names, street addresses and contact numbers. Refer to the following screenshot:
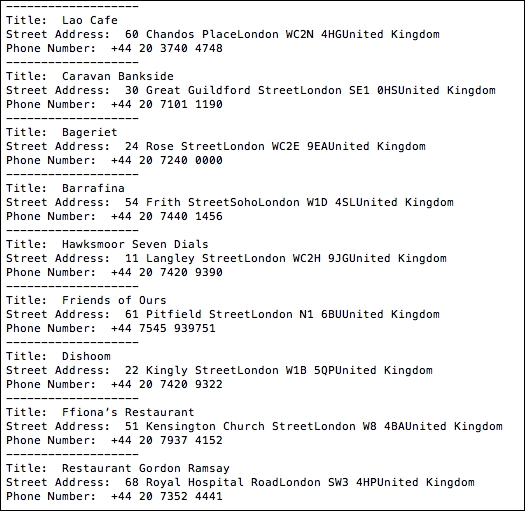
In the preceding screenshot, we get the records of 10 restaurants in London provided by Yelp. Title is the name of the restaurant and Street Address and Phone Number are self-explanatory. Awesome! We did it for Ryan.
In the preceding code snippet, we built the search criteria. We searched on https://yelp.com and looked for restaurants in London. With these details, we got the search URL on Yelp.
We then created a urllib object and used the urlopen() method on this search URL to read() the list of all the restaurants provided by Yelp matching the search criteria. The list of all the restaurants is stored as an HTML page, which is stored in the variable, s_html.
Using the BeautifulSoup module, we created a soup instance on the HTML content so that we could start extracting the required data using the CSS elements.
Initially, we browsed the top 10 results of the search on Yelp and got the URLs of the restaurants. We stored these URLs in the URL Python list. To get the URL, we selected the CSS class name biz-name using the code soup_s.select(.biz-name)[:10].
We also defined a method, scrape(), which takes the restaurant URL as a parameter. In this method, we read the details of the restaurant, such as name, street address, and contact number, using the CSS class names biz-page-title, street-address, and biz-phone, respectively. To get the exact data, we selected the HTML elements using title=soup.select(.biz-page-title) and got the data with title[0].getText().strip(). Note that the select() method returns the found element as an array, so we need to look for index 0 to get the actual text.
We iterated through all the restaurant URLs in a while loop and scraped the URL using the scrape() method to get the details for each restaurant. It prints the name, street address, and contact number for each restaurant on your console, as we saw in the preceding screenshot.
To improve on the performance of our screaping program, we performed data extraction for every restaurant in an independent thread. We created a new thread with t = Thread(target=scrape,args=(url[i],)) and got the results from each of them with the t.join() call.
That’s it, folks! Ryan is extremely happy with this effort. In this example, we helped Ryan and automated a critical business task for him. Throughout this book we'll look at various use cases where Python can be leveraged to automate business processes and make them efficient. Interested in more? Well, see you in the next chapter.

