


Atlassian started back in 2002 and they set out to create software that would be inexpensive, easy to use, and would take little effort to install and maintain. Thanks to these principles, the installation process of Confluence is relatively easy and straightforward; there is even a one-click installation wizard available. In this chapter, we will start with a high-level overview of Confluence, looking at the different components that make the application. We'll take a look at the different deployment options available, including distribution choices, application servers, and databases. Finally, we will install our own Confluence application from scratch.
By the end of the chapter, you will have learned about:
The overall architecture of Confluence
Platforms and applications supported by Confluence
Installing Confluence and all of the required software
Configuring database connections
Running Confluence, safely
Installing Confluence is simple and straightforward. However, it is important for us to understand the components involved in the installation process and the options that are available to us. This understanding will help you to make informed decisions and be better prepared for troubleshooting and future updates.
Atlassian has a comprehensive overview of the technical components of Confluence, available at https://developer.atlassian.com/display/CONFDEV/Confluence+Architecture. However, this overview is mainly interesting for those who are developing some custom add-ons and not so much for day-to-day administration and usage of Confluence. For this reason, we have created a high-level overview that highlights the most important components in the architecture, and how our users will connect to Confluence:

Confluence is a web application, so the only thing our users need for accessing it is a compatible web browser. This can be on a desktop system, laptop, or even a mobile device such as a smartphone or tablet. The more recent versions of Confluence depend heavily on some new web technologies and standards. For this reason, older versions of Internet Explorer and Firefox are no longer fully compatible.
The following table summarizes the browser requirements for Confluence 5.1:
|
Browsers |
Compatibility |
|---|---|
|
8, 9 (drag-and-drop not completely supported because Internet Explorer doesn't fully support the related HTML5 feature) | |
|
10+ | |
|
5, 6 | |
|
17+ | |
|
iOS 5.1, 6.0 (editing is not supported on mobile devices) |
The configuration files, attachments, indexes, and add-ons are stored, by default, in the Confluence Home directory that is configured when Confluence is first installed. All other data resides in the configured database. Optionally, attachments can be configured to be stored in the database instead of the Confluence Home directory.
You can choose to store the attachments in the database for ease of backup (all data in one single location) or to cope with characters that are invalid on your file system. Be aware: storing your attachments in the database increases the size of your database drastically. In a clustered environment where data is shared between several Confluence installations, you need to store the attachments in the database.
The directory where you install Confluence is called the Installation directory. It contains all the executable and configuration files of the application server. Confluence does not modify or store any data in this directory. This directory is primarily used for execution. For the remainder of the book we will be referring to this directory as CONF_INSTALL.
The Confluence Home directory is the folder where Confluence stores its configuration, search indexes, attachments, and add-ons, specific to one Confluence installation. This means that every Confluence installation must, and can, have only one Confluence Home directory, and each Confluence Home directory can serve only one Confluence installation. If you're evaluating Confluence and using the embedded HSQLDB database, the database files are also stored in this directory. For the remainder of this book we will refer to this directory as CONF_HOME.
It's recommended that CONF_HOME is created separately from the Confluence installation. This separation of data and application makes tasks such as maintenance, back ups, and future upgrades easier. Keep in mind that the Confluence Home directory can grow quite large on an intensively used site.
Within CONF_HOME there are several important files and subdirectories:
Confluence is a Java-based web application, developed using many open standards and libraries. For this reason, it is able to run on many different operating systems, databases, and application servers. We will take a closer look at the options we have, and make an informed decision on what would work best in our situation.
First, we need to decide on the distribution. Confluence comes in three distributions:
One-click installer
Standalone bundled with Apache Tomcat
WAR/EAR distribution
With regard to the application, there is no difference between the three distributions. The installer and standalone distributions are bundled with Apache Tomcat, which means we don't have to install and configure an application server ourselves. These distributions also come with an embedded in-memory database that can be used for evaluation purposes.
The installer is a very handy wrapper around the standalone bundle, automating all the steps we normally would have to perform manually. This is great when evaluating Confluence, but it doesn't give us much insight into the steps involved in maintaining our installation. For this reason, we will use the standalone distribution later, when we're going to install Confluence ourselves.
If you already have a running J2EE application server, or are experienced in installing and tuning one, the WAR distribution could be something for you. Due to differences between application servers, you are required to build the final deployment artifact with the provided build scripts. Once the artifact is built, you can deploy Confluence just like any other Java web application.
Confluence officially supports Microsoft Windows and Linux (all the distributions). Mac OS is supported only as a client platform. The choice of which operating system to run Confluence on is mostly a matter of preference based on expertise, and in most cases, there is an existing IT infrastructure with specific requirements.
If you do not have any preferences and would like to keep the initial costs down, Linux would be a good choice as there are no license fees involved. If you have more then 4 GB of memory on your server, make sure to pick a 64-bit version.
Confluence stores all its data in a relational database. The embedded in-memory HSQLDB database is only available for evaluation purposes, and should never be used in production environments. To limit the risk of data corruption, it's important that we use an enterprise database for production systems.
Confluence supports most relational databases available today. There will be no noticeable differences during the installation and configuration of Confluence. Just like the operating systems, your choice of database will come down to personal preference or IT standards within your organization. If you are using Windows as your operating system, the most likely choice would be Microsoft SQL Server. If you are using Linux, then you should consider PostgreSQL, MySQL, or Oracle.
The following table summarizes the list of databases currently supported by Confluence 5.1. It's worth mentioning that both PostgreSQL and MySQL are available as open source (free) products, making them excellent options if you are looking to minimize your initial investments.
|
Database |
Supported version |
|---|---|
|
PostgreSQL |
8.4, 9.0 |
|
MySQL |
5.1, 5.5 |
|
Microsoft SQL Server |
2005, 2008, 2008 R2 |
|
Oracle |
11.1, 11.2 |
|
HSQLDB |
(for evaluation purposes only) |
Now that we have a good understanding of the overall architecture of Confluence and the various installation options, we are ready to install our own Confluence instance.
In the following exercise, we will be installing and configuring a fresh Confluence instance that will be ready for production. We will be using the standalone bundle, and the installation will be based upon the Windows platform. If you are planning on using a different operating system, please refer to https://confluence.atlassian.com/display/DOC/Installing+Confluence for details on installing Confluence on that specific platform.
In this exercise we will:
We will continue to use this Confluence instance in other chapters and exercises as we prepare Confluence for usage within your own organization.
For our implementation, we will be using:
Confluence standalone distribution 5.1.0
PostgreSQL 9.0
Java Development Kit 7 update 9
Microsoft Windows Server 2008 R2
Confluence requires Java to be installed on the system, so this is our first step. Confluence 5.1 requires the latest update of JDK 7. If you are installing a different version of Confluence, make sure if JDK 7 is supported. Your choice between a 32-bit or 64-bit version depends on the amount of memory you want to allocate to Confluence; if it's more then 4 GB, pick the 64-bit version as 4 GB is the upper limit for the 32-bit version.
Currently, it is only possible to install Confluence as a Windows service if it is running on a 32-bit Java version.
Perform the following steps to install Java on your system:
Download the latest version of 32-bit JDK 7 from http://www.oracle.com/technetwork/java/javase/downloads/index.html.
Double-click on the downloaded installation file to start the installation wizard.
Select where you would like to install Java; or you can simply accept the default values. The location where you install the JDK will be referred to as
JAVA_HOMEfor the rest of the book.Create a new environmental variable named
JAVA_HOMEwith the path where you just installed Java, as shown in the following screenshot:
Test if installation was successful by typing the following command in the command prompt:
java –versionThis should display the version of Java installed:
C:\>java –version
java version "1.7.0_17"
Java(TM) SE Runtime Environment (build 1.7.0_17-b02)
Java HotSpot(TM) Client VM (build 23.7-b01, mixed mode, sharing)
The next step is to prepare a database for our Confluence installation.
To install PostgreSQL, simply perform the following steps:
Download PostgreSQL from http://www.postgresql.org/download/windows/.
Double-click on the downloaded installation file to start the installation wizard.
Select where you would like to install PostgreSQL and want to store the data. We'll be using the default settings during this exercise.
Choose a password for the root user; keep in mind that this is not the password for our Confluence database. I used
p0stgre$, to keep it simple and easy to remember during this exercise and confirm to the Windows 2008 password security rules.If you choose a different port number, please make sure it doesn't conflict with any other services running on your machine. Also remember the port number, as we'll need it later.
Uncheck the checkbox to make sure Stack Builder isn't launched at the completion of the installation process. We don't need it.

Now that PostgreSQL is installed on our machine, we need to create a dedicated user and database for Confluence to use. This will prevent other users of the application from accessing Confluence data.
Perform the following steps to create a new user and a database:
Start the pgAdmin III administration tool, which has just been installed by the installer. We will be using this administration tool to create the Confluence user and database.
Connect to the PostgreSQL server running at localhost, by double-clicking on the server name. Enter the root password you just picked, when prompted:

Create a new user, or "login role," as PostgreSQL calls it. Right-click on Login Roles in the object browser (on the left) and select New Login Role...:

Create a new database; right-click on Databases and select New Database.
Enter the database name: confuencedb.
Set the owner of the database to the user we just created.
Select UTF-8 for encoding.
Confirm the creation of the database.
That is it. We have installed PostgreSQL and created a user and database for our Confluence installation to use.
Now that we have the JDK and database prepared, we have met all the conditions required to install Confluence on our machine. In order to get Confluence installed we have to:
Unpack Confluence
Configure the Confluence Home directory
Check the ports Confluence uses
Configure e-mail
Optionally, we can configure Confluence to use HTTPS and run as a Windows service.
Perform the following steps to unpack Confluence:
Download the latest version of Atlassian Confluence from www.atlassian.com/software/confluence/download.
The Atlassian website will detect the operating system you are using and will suggest a distribution accordingly. If you intend to install Confluence on a different system than the one you are currently on, make sure you select the correct distribution.
As mentioned before, there are one-click installers available for both Windows and Linux. For the purpose of this exercise we will be using the ZIP archive, as it will provide us with an insight of the steps that are normally hidden by the installation process.
Extract the downloaded ZIP file to
c:/confluence/. It is recommended to use a third-party unzip software, such as 7-Zip or WinZip, as there are known issues with the unzip application provided with Windows. You can choose a different installation path; just make sure that you don't use spaces in your directory path.C:\confluence\atlassian-confluence-5.1will now be known asCONF_INSTALL. Next, we will define the Confluence Home directory.
Next we have to define and configure CONF_HOME. Remember that we want to keep our data separated from our installation data.
Create
c:\confluence\data; this directory will now be known asCONF_HOME.Open
CONF_INSTALLand open the fileconfluence\WEB-INF\classes\confluence-init.propertiesin your favorite text editor.Locate the following line; it's usually at the end of the file.
# confluence.home=c:/confluence/dataRemove the
#and the space at the beginning of this line, so that Confluence no longer regards it as a comment.If you have selected a different directory for
CONF_HOME, then change the path accordingly. Please note the following:Avoid spaces in the directory path.
Use forward slashes
/to define the path.
By default, Confluence runs on port 8090 with no context path. This means that after starting Confluence it will be available at http://localhost:8090/. If you have another application running on your machine that is using the same ports, you may need to change the port Confluence will use. Changing the context path is useful when you are running your applications behind a proxy and want to access them with the same domain, for example, http://example.com/jira and http://example.com/confluence. For this exercise we will be changing the context Confluence is running on to /confluence.
To change the ports for Confluence, open the file conf/server.xml under your CONF_INSTALL directory. An extract from that file is shown here:
<Server port="8000" shutdown="SHUTDOWN" debug="0">
<Connector className="org.apache.coyote.tomcat4.CoyoteConnector" port="8090"…. />
<Context path="/confluence" docBase="../confluence" debug="0" reloadable="false" useHttpOnly="true">
Tip
Downloading the example code
You can download the example code files for all Packt books you have purchased from your account at http://www.packtpub.com. If you purchased this book elsewhere, you can visit http://www.packtpub.com/support and register to have the files e-mailed directly to you.
Line 1: This line specifies the port for the command to shut down Tomcat. By default this port is 8000. If you already have an application running on that port, you can change this to another port.
Line 2: This line specifies on which port Confluence/Tomcat will be running. By default this is port 8090. If that port is unavailable for some reason, you can change it to another available port.
Line 3: This line allows you to change the context path on which Confluence will be available. By default the path is empty, meaning Confluence will be available on http://hostname:portnumber/.
For this exercise we will change the context path to /confluence, as shown in the previous file.
In order to use the share and notification features from Confluence an e-mail account has to be set up. Normally, we could do this using the Confluence interface, but there is an exception if you want to use SMTPS, with your Gmail account for example. So for this exercise we will be configuring Confluence to use your Gmail account for sending e-mail notifications to the users.
Move (don't copy)
activation-1.0.2.jarandmail-1.4.1.jarfromCONF_INSTALL/confluence/WEB-INF/libtoCONF_INSTALL/lib.Add the following resource to your
CONF_INSTALL/conf/server.xml; make sure to add it just before the</Context>tag.<Resource name="mail/GmailSMTPServer" auth="Container" type="javax.mail.Session" mail.smtp.host="smtp.gmail.com" mail.smtp.port="465" mail.smtp.auth="true" mail.smtp.user="yourEmailAddress@gmail.com" password="yourPassword" mail.smtp.starttls.enable="true" mail.transport.protocol="smtps" mail.smtp.socketFactory.class="javax.net.ssl.SSLSocketFactory" />
Replace
yourEmailAddress@gmail.comandyourPasswordwith the proper values for your account.Remember or write down the resource name. When we are configuring Confluence and asked for an e-mail server the JNDI location will be:
java:comp/env/mail/GmailSMTPServerNote that the name is case-sensitive.
By default, Confluence runs with a standard, non-encrypted HTTP protocol. This is acceptable if you are running Confluence in a secured environment, such as an internal network. However, if you are planning to open up access to Confluence via the Internet, you need to tighten the security. We will be doing this by configuring Confluence to run over HTTPS (HTTP over SSL), so that login information and data are encrypted during transport over the Internet.
For a standalone installation, we need to perform the following tasks:
Create or request a new SSL Certificate
Enable HTTPS on our application server
Redirect traffic to HTTPS
First, we need to get a digital certificate. This can be one from a Certification Authority such as VeriSign or StartSSL (CA certificate), or a self-signed certificate generated by you. A CA certificate will not only encrypt your data, but also identify your copy of Confluence to users. A self-signed certificate is useful when you do not have a valid CA certificate and you are only interested in setting up HTTPS for encryption.
Because a self-signed certificate is not signed by a Certificate Authority, users may receive a message that the site is not to be trusted and may have to perform several steps to accept the certificate before they can access the site. This usually will only occur the first time they access the site. A self-signed certificate is great for evaluation purposes, but I would recommend a CA certificate for your production environment.
For the purpose of this exercise we will create a self-signed certificate. If you already have a CA certificate you can, of course, use that certificate.
Follow these steps to generate a certificate using Java's keytool utility. This tool is included in the JDK and can be found in JAVA_HOME/bin.
Run the following command in the command prompt:
"%JAVA_HOME%/bin/keytool.exe" -genkeypair -alias tomcat -keyalg RSAWhen asked for a password:
Specify the password you want to use for the certificate. Note that the password text will not appear as you type.
Make a note of the password you choose; we will need it in the next step when editing the Tomcat configuration.
In this exercise we will be using the default password
changeit.
Follow the prompts to specify your domain name, organization, and location. This information is used to construct the X.500 Distinguished Name (DN) of the entity. To the question What is your first and last name? (CN), don't give your actual name. The CN must match the fully-qualified hostname of the server running Confluence. Tomcat will not be able to use the certificate for SSL otherwise.
For example, for our Confluence, running on localhost:
CN =
localhost, OU =Confluence Essentials, O =Packt, C =UKWhen asked for the password for
tomcat(the alias you entered in the keytool command), press the Enter key. You must use the same password here as the one that was used for the keystore password. This is a restriction of the Tomcat implementation.Your certificate is now ready.
Our self-signed certificate is now available in Java's keystore. If you are using a previously generated certificate or a CA certificate, you will need to import that certificate into Java's keystore. This can be done with the following command:
keytool -importcert -alias tomcat -file <MY_CERTIFICATE_FILENAME>
To enable HTTPS, open the CONF_INSTALL/conf/server.xml file in a text editor. Locate and uncomment the following lines:
<Connector port="8443" maxHttpHeaderSize="8192"
    maxThreads="150" minSpareThreads="25" maxSpareThreads="75"
    enableLookups="false" disableUploadTimeout="true"
    acceptCount="100" scheme="https" secure="true"
    clientAuth="false" sslProtocol="TLS" SSLEnabled="true"
    URIEncoding="UTF-8" keystorePass="<MY_CERTIFICATE_PASSWORD>"/>
This connector will enable HTTPS for Confluence on port 8443. We will have to replace <MY_CERTIFICATE_PASSWORD> with the password we specified when creating our certificate. In our case this would be changeit.
By default, Tomcat expects the keystore file to be named .keystore and be located in the user home directory under which Tomcat is running. This could be a different account than your own, and therefore, can be another directory. If your certificate is not in the default location, you will have to update the server configuration to include keystoreFile="<MY_CERTIFICATE_LOCATION>" in the connector element.
Although HTTPS is now active and available, the old HTTP URLs are still available. We will have to set up Confluence so that it will redirect automatically from an HTTP to an HTTPS request. We will need to do this by adding a security constraint in web.xml.
Open CONF_INSTALL/confluence/WEB-INF/web.xml and add the following snippet to the end of the file, before the </web-app> tag:
<security-constraint>
  <web-resource-collection>
    <web-resource-name>Restricted URLs</web-resource-name>
    <url-pattern>/</url-pattern>
  </web-resource-collection>
  <user-data-constraint>
    <transport-guarantee>CONFIDENTIAL</transport-guarantee>
  </user-data-constraint>
</security-constraint>
This will cause Tomcat to redirect all requests that come in on a non-SSL port. The first part will make sure all URLs are checked by this security constraint. The second part will guarantee that HTTPS is used for transportation.
Under Windows, Confluence can be configured to run as a Windows service, thus starting up automatically when the operating system reboots. This is recommended, as the alternative is having a console window open on the machine, which could be accidentally closed, thus shutting down Confluence.
To configure Confluence as a Windows service, simply perform the following steps:
Start a new command prompt as administrator, and browse to the
CONF_INSTALL/bindirectory.Run the following command:
service.bat install ConfluenceThis will install Confluence as a Windows service. The service will be called Apache Tomcat Confluence.
Verify the configuration by going to the Services console by going to Start | Administrative Tools | Services.

You can now start, stop, and restart Confluence from the Windows service panel.
Everything is in place to start our installation of Confluence. So let us start Confluence using the Services console in Windows. Once the server is running, you can access Confluence using your Internet browser. The URL to your Confluence is https://localhost:8443/confluence. If you didn't add the HTTPS or context path to your installation, you can find Confluence at http://localhost:8090/.
If you used a self-signed certificate, you will get a prompt that there is a certificate error, similar to the one shown in the following screenshot:

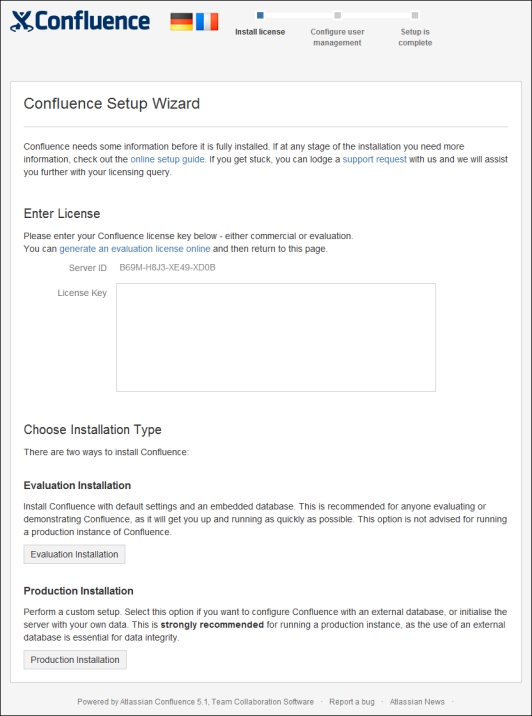
The first page you will see is the first step in the configuration wizard, which will finalize your Confluence installation.
The first step in the wizard is providing a valid license. This can be either a full license or an evaluation license. If you have already obtained a license from Atlassian, you can cut and paste it into the License Key textbox. If you don't have a license, you can generate an evaluation license by clicking on the generate an evaluation license online link. Once you have filled in the license key, you have to choose your installation type. We are going to install a Production Installation, so choose that option.
Step 2 is to configure our database connection. Select PostgreSQL from the drop-down list at the bottom and click on External Database. You will get the choice on how to connect to the database. This is either through JDNI or Direct JDBC. The difference is that JNDI is configured and managed on the application server, just like the SMTPS e-mail server. Direct JDBC is configured within the application.
For this exercise, we'll be using the Direct JDBC option.
On this screen we have to fill out our database configuration:
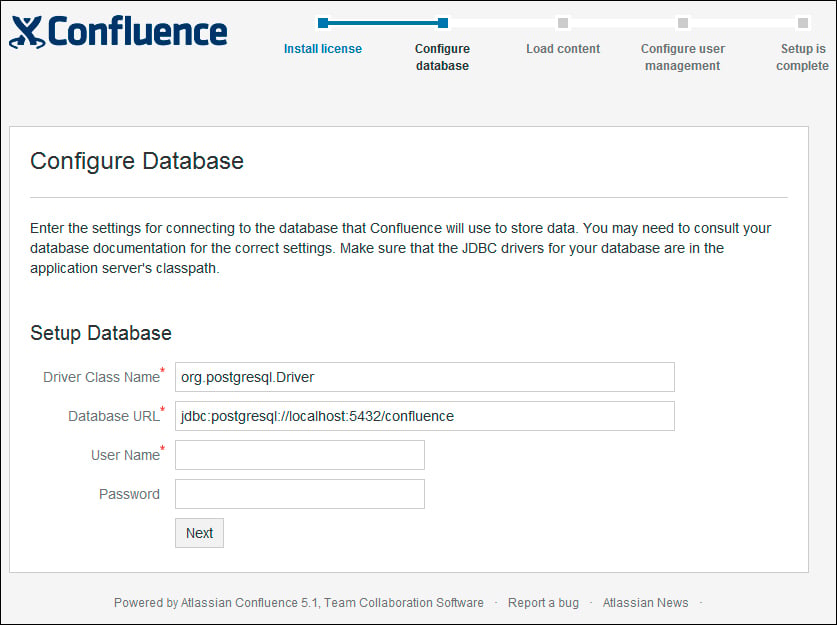
Enter the details for your database configuration according to the fields explained here:
|
Property |
Value |
|---|---|
|
Driver Class Name |
|
|
Database URL |
If you configured a different port number for PostgreSQL, be sure to also change it in this URL. |
|
User Name |
|
|
Password |
|
Click on Next to start the initialization of the database. This could take a while, so hold on.
After the database is initialized, you will get to the next screen (shown in the next screenshot), where you can choose how you would like to load content:
Example Site: This will load a demonstration space into Confluence, showing some of the features Confluence has to offer. Great if you want to evaluate Confluence.
Empty Site: A clean Confluence installation, without any space or content. Perfect if you are already familiar with Confluence and want to get started quickly.
Restore From Backup: If you already have a Confluence installation and a backup from that installation, you can import it using this option. Make sure that the backup data is from the same major version as the target Confluence.

For our installation we will pick Example Site, as this gives us some exposure on how we could use Confluence.
Once Example Site is loaded, it is time to set up user management. Choose to set up user management within Confluence. Connecting user management to an external source is discussed in Chapter 2, User Management.
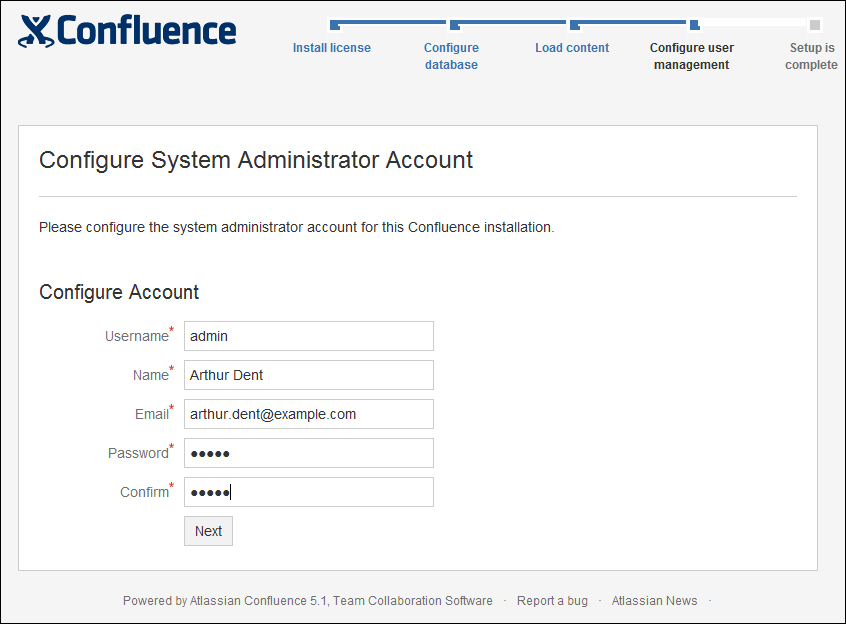
Set up the System Administrator account and make sure you remember the username/password, because Confluence only stores the hashed value of your password. You will not be able to retrieve it.
Confluence is now ready for use; you can either start using it or continue configuring. As for this exercise, we want to continue and set up the e-mail server, so choose Continue configuration. After logging in with your system administrator account, you will see the Confluence Administrator console.
Log in to Confluence and go to the Administration Console by going to Administration | Confluence Admin. You might have to log in another time due to Confluence's WebSudo. WebSudo prevents other people from accessing the administrator console, if you left your machine unattended, for example.
In Administration Console, select Mail Servers in the left menu. Select Add a new SMTP mail server to add a new SMTP mail server that Confluence will use to send notifications and password resets.
|
Property |
Description |
|---|---|
|
Name |
The name of the SMTP server used for reference within Confluence. |
|
From address |
Enter the e-mail address the e-mail is sent from. In most cases this must be the same address as the e-mail account you're using. |
|
From Name |
Enter the name that will be displayed in the
The default is |
|
Subject Prefix |
Enter some text to appear at the beginning of the subject line. |
Enter either the hostname and credentials of your mail server, or the JDNI resource. As we set up a Gmail account earlier, we will be using that one:
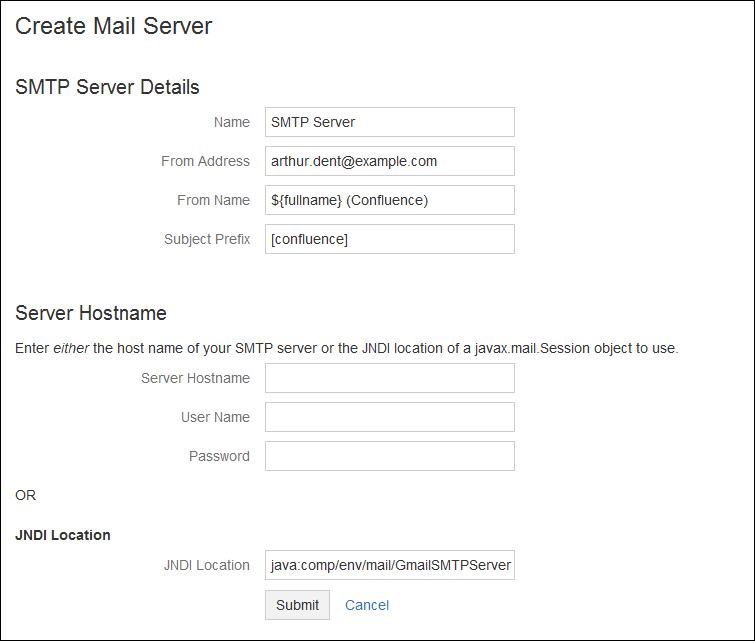
The JNDI location will be java:comp/env/mail/GmailSMTPServer.
Submit the configuration, and try to send a test e-mail to yourself to verify the settings.
We have seen that getting started with Confluence is fairly straightforward; it is also very flexible with regard to options you can choose from, when installing your copy of Confluence. You can mix these options to suit your situation best, or to comply with your IT department's requirements. If you wish to keep initial costs as low as possible, you can install Confluence completely with open source software, such as Linux and Postgresql, which are available for free.
Now that we have installed Confluence and gone through the set up wizard, we will start to dive deeper into the various aspects of Confluence. In the next chapter, we will go into how to manage your users and groups, as Confluence is not intended to be used alone.