


In order to change the world, you have to get your head together first. | ||
| --—Jimi Hendrix | ||
When Mark Spencer initially created Asterisk, he didn't realize the disruptive nature of his code. Just as Jimi Hendrix had a good idea of how he wanted to change the world, so does Mark on where Asterisk is destined to go. Getting our heads together with Asterisk may seem simple, but is more complex than you would imagine. You are probably saying to yourself right now: "Hey I'm a developer with years of experience; I have my head straight and on the money! Let's get coding!" Well, I have some news for you—NO YOU CAN'T!
Over the past five years, as the popularity of Asterisk grew and its install base multiplied at a geometric rate, it suffered an almost identical fate to that of PHP and other open source projects. Asterisk granted the integrators and developers the ability to shape and mould it to suit their needs. However, as Asterisk is an open source project, there was no clear methodology to do so. Thus many people developed a multitude of applications for Asterisk—some turned into huge projects (FreePBX, A2Billing, TrixBox) while others faded away. What made a good project unique? Was it its feature set? Was it a special function that everyone needed? If we examine the early stages of FreePBX (the early versions of FreePBX were called AMP (Asterisk Management Portal) and its current version, you wouldn't believe that they were programmed by the same people. This is because the people who invested their time into the project learned from their mistakes and created better applications. Developers and integrators dealing with Asterisk for the first time are usually fully capable of developing applications that work—at least to some extent. By superimposing their traditional development techniques to the Asterisk world, they usually end up developing an application that would work to an extent, but would fail miserably when dealing with the rapidly expanding IVR (Interactive Voice Response) services.
So how do we get our heads together? Simple! Start from the most basic thing, that is, installing Asterisk from its source code.
Note
At this point, we would assume that you already have a Linux-based desktop or server for you to use during this book. You can also use a virtual machine for this book. All of the examples and screenshots in this book are taken from a server running on a virtual machine, using VMWare.
The best place to obtain the Asterisk source code would be from the Asterisk community website. Point your browser to http://www.asterisk.org, and you should see the screen shown in the following screenshot, from which you can download the code.
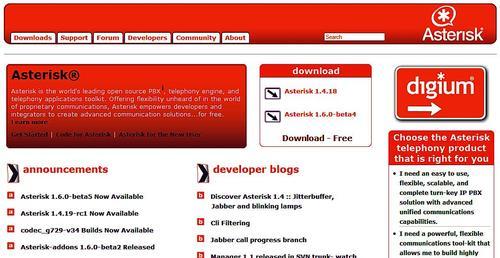
Asterisk is available for download in two distinct versions—a stable release and an SVN release. Apart from Asterisk, there are three additional software packages that you may require for your application to work completely. We shall now explain the usage of the stable software packages, and how to download and compile them. Later on, we shall learn how to download the latest SVN package.
The best place to obtain the Asterisk source code would be from the Asterisk community website. Point your browser to http://www.asterisk.org, and you should see the screen shown in the following screenshot, from which you can download the code.
Asterisk is available for download in two distinct versions—a stable release and an SVN release. Apart from Asterisk, there are three additional software packages that you may require for your application to work completely. We shall now explain the usage of the stable software packages, and how to download and compile them. Later on, we shall learn how to download the latest SVN package.
Let's turn our attention to Zaptel.
The Asterisk website describes Zaptel as:
Kernel interface device drivers for Analog and Digital interface cards. Digium hardware requires Zaptel drivers.
In general, Zaptel provides all of the drivers and kernel modules, required to use Asterisk with a TDM connection. The stock kernel drivers available in the Asterisk distribution are compatible with all Digium hardware and Astribank hardware available from Xorcom. In addition to the kernel support for Digium hardware, the Zaptel module also provides a virtual timer kernel module, which is used by Asterisk for allowing conference calls to be made without the physical timer that is provided by Digium hardware.
Note
Currently, there are various companies manufacturing Zaptel-compatible hardware. However, these hardware devices usually require a patch to the code, or they use an additional software package. Our book will not deal with these.
In general, it is my personal belief that when using an open source product, it is imperative to support the company funding the development—Digium in this case.
The stable Zaptel source code is available as a tar.gz file, from the Digium download site. Zaptel stable source code can be downloaded from http://downloads.digium.com/pub/zaptel/. The current stable release would usually be available with the keyword "current", indicating that this is the current stable release.
Note
At the time of writing this book, the current Zaptel stable release was 1.4.9.2. It is quite likely that by the time this book is published, the Zaptel stable release will be different.
Download the Zaptel source package to your designated Asterisk server, and continue to the next section.
In version 1.6 of Asterisk, Zaptel has been replaced by the DAHDI framework. Unlike Zaptel, which was both a self-enclosed kernel module and a set of tools, the DAHDI framework has separated these into two distinct packages—dahdi-linux and dahdi-tools.
Note
You are probably wondering: "What was wrong with the name Zaptel? Couldn't they just create zaptel-linux and zaptel-tools packages?" Well, the reason for the name change was due to a copyright infringement issue where a calling card company called Zaptel had indicated that the name Zaptel was their trademark, long before Asterisk used it—hence the name change.
The stable DAHDI source code is available as a tar.gz file, from the Digium download site. The dahdi-linux package can be downloaded from http://downloads.digium.com/pub/telephony/dahdi-linux/ and while dahdi-tools package can be downloaded from http://downloads.digium.com/pub/telephony/dahdi-tools/.
If you are using Asterisk 1.6 as the base of your installation, download the dahdi-linux and dahdi-tools packages, and continue to the next section.
The Asterisk website describes Libpri as:
Primary Rate ISDN (PRI) library for T1/E1/J1 interfaces.
In general, libpri provides Asterisk a programmatic API, allowing it to interface with ISDN-type interfaces. If you are not using hardware interfaces with your Asterisk installation, or you are not using an ISDN PRI interface, you don't have to install this library.
The stable libpri source code is available as a tar.gz file, from the Digium download site. Libpri stable source code can be downloaded from http://downloads.digium.com/pub/libpri/. The current stable release would usually be available with the keyword "current", indicating that this is the current stable release.
Note
At the time of writing this book, the current libpri stable release is 1.4.3. It is quite likely that by the time this book is published, the libpri stable release will be different, or may come in a completely new major version (1.6.X).
Download the libpri source package to your designated Asterisk server, and continue to the next section.
Asterisk doesn't require any introduction. Its source-stable source code is available for download from the Digium website. The source code can be downloaded from http://downloads.digium.com/pub/asterisk/. The current stable release would usually be available with the keyword "current", indicating that this is the current stable release.
Note
At the time of writing, the current Asterisk stable release was 1.4.22. It is quite likely that by the time this book is published, the Asterisk stable release will be different, or may come in a completely new major version (1.6.X).
Download the Asterisk source package to your designated Asterisk server, and continue to the next section.
While Asterisk provides a complete PBX system, some of the modules that people have become used to working with are required to be distributed using an external source package. These usually include packages that require a different licensing scheme, or packages that use other packages for which the licensing scheme doesn't comply with Asterisk's dual licensing scheme.
The Asterisk-addons stable source code is available for download from the Digium website. The source code can be downloaded from http://downloads.digium.com/pub/asterisk/. The current stable release would usually be available with the keyword "current", indicating that this is the current stable release.
Note
At the time of writing, the current Asterisk-addons stable release was 1.4.6. It is quite likely that by the time this book is published, a different stable release version or a completely new major version (1.6.X) may be released.
Download the Asterisk-addons source package to your designated Asterisk server. At this point, you may read the next section dealing with the aspects of using Asterisk SVN version, or continue to the following section dealing with code compilation.
Like most software products, Asterisk has had a multitude of versions since its early days. When a group of people are required to work together on the same code base, it is very common to use a code-versioning system that makes sure that while one person works on a certain piece of code, he/she does not overwrite another person's work. In the open source world, there are two main variants to code-versioning systems—CVS and SVN. CVS stands for Concurrent Versions System, which does exactly what it says. In the early days of the Asterisk project, CVS was used as the code-versioning system. During the course of 2005, Digium shifted from using CVS to using SVN. SVN stands for Subversion, which is a different method of managing multiple versions of the same source code.
Note
Code versioning systems are not covered by this book. However, we suggest that if you deal with multiple programmers working on the same source code, do look into using one of these.
Obtaining the source code packages via SVN is performed by using the SVN utility directly from your Linux command line. In order to do so, first log in to your Linux server as root, and create a directory that would hold your source code packages.
In order to get the source code packages, you are required to use the following commands:
# mkdir asterisk-sources
# cd asterisk-sources
# svn checkout http://svn.digium.com/svn/asterisk/trunk asterisk
# svn checkout http://svn.digium.com/svn/dahdi/linux/trunk dahdi-linux
# svn checkout http://svn.digium.com/svn/dahdi/tools/trunk dahdi-tools
# svn checkout http://svn.digium.com/svn/libpri/trunk libpri
In order to compile the various source code packages, some dependencies must be met. In accordance to your Linux distribution, you must install the following packages:
gccnewt-devellibusb-develkernel-devel (or kernel-smp-devel depending on your kernel)glibc-develncurses-developenssl-develzlib-devel
These package names are based upon the RedHat/Fedora distribution, so the names on your particular distribution may vary. Using your distribution package manager, install these packages prior to beginning any compilation.
The compilation of the Asterisk project source code is performed in a certain order. The following compilation order must be met, in order for your compiled code to run for the first time.
1. Compile and install the Zaptel kernel module (or the dahdi kernel module).
2. Compile and install the libpri library (applies only if you use ISDN PRI interface cards).
3. Compile and install the Asterisk software.
4. Compile and install the Asterisk-addons module.
Let's turn our attention to compiling and installing Zaptel.
Note
If you intend to use Asterisk version 1.6.X or SVN trunk (as we've mentioned before), please skip this section and go to the next one.
Follow the steps mentioned here to compile and install the Zaptel kernel module:
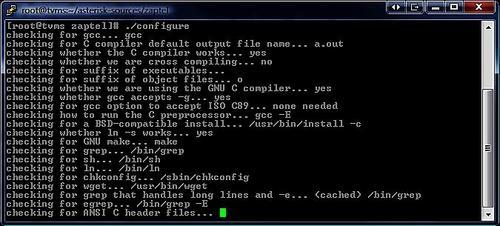
From within the Zaptel kernel module directory, issue the ./configure command, to have the compilation script scan your system and configure the proper compilation order.
Zaptel enables the installer to choose which Zaptel modules to include in the compilation order. The selection of modules is performed by issuing the command make menuconfig from the command line, and then using the available GUI.

From this menu, you will be able to select which of the kernel modules to compile, and which Zaptel utilities you would like to install. If you are unsure about the modules that you would like to enable or disable, simply press the q key to quit and leave the default settings.
Note
Zaptel provides a total of eighteen different kernel modules—each one for different hardware. It is possible that by the time you read this book, additional modules will be available, so listing each one of them at this point will be redundant. Consult the Zaptel documentation and the Digium forums for information about each of the kernel modules. Another good source of configuration examples for Zaptel would be the voip-info.org website, at: http://www.voip-info.org/wiki/view/Asterisk+Data+Configuration.
Once you have selected your desired zaptel kernel module configuration, proceed to the actual compilation. The compilation is performed by issuing the command make all from the command line, followed by make install in order to install the kernel modules, which is then followed by make config to install a set of preliminary configuration files.

The preceding image shows the actual compilation of the Zaptel kernel module. Once the compilation is completed without errors, issue the make install command to install your kernel modules.

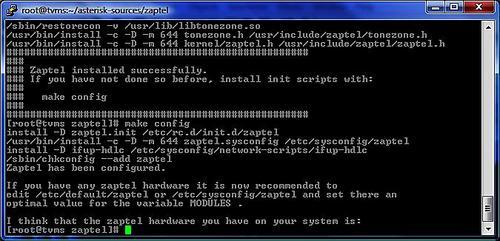
As the immediately preceding screenshot illustrates, issue the make config command in order to install the initial configuration files and system init scripts.
In order to verify your installation, you may use the modinfo zaptel command, which will report information back on your installed kernel module. If the module information is reported back correctly, issue the service zaptel start command in order to start the kernel modules.

Follow the steps mentioned here to compile and install the DAHDI kernel module and DAHDI tools.

Once your compilation is completed, issue the make install to install your newly-created kernel module.

Once your compilation is completed and the kernel module installed, you will be prompted with the following message:

We shall continue with compiling the dahdi-tools package which will allow us to configure and use the dahdi kernel module.
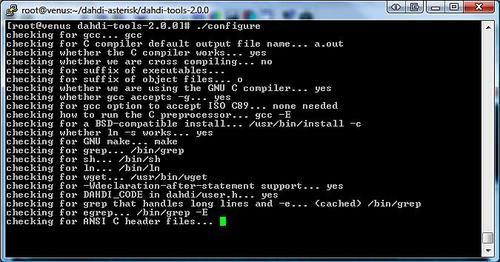
From within the dahdi-tools module directory, issue the ./configure command to analyze your server and have the compilation script correctly configure your compilation sequence.
Once the configuration script is completed, issue the make menuconfig command to initiate the dahdi-tools configuration menu. The configuration menu will allow you to optimize your dahdi-tools options and compiled utilities.
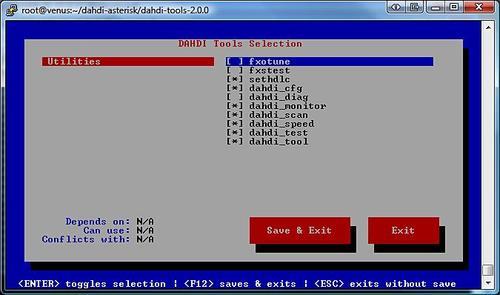
Once you have completed setting your dahdi-tools compilation options, click Save & Exit on the configuration menu.

While both DAHDI and Zaptel appear to handle the same functionality, their general configuration structure varies slightly—although when examined, it would appear that there are some similarities. The following is a small translation table to assist you in translating the Zaptel and DAHDI file naming conventions and configuration options:
|
Zaptel filename |
DAHDI filename |
Description |
|---|---|---|
|
|
|
The actual configuration file that controls the various aspects of your installed hardware |
|
|
|
Shell settings for the runlevel init scripts |
|
|
|
The kernel module init and configuration init script |
Unlike Zaptel and Asterisk, which require a ./configure script, the libpri compilation is a straightforward procedure. Compilation is performed using the make all command, and installation is performed using the make install command.

Very much like the Zaptel kernel module, the Asterisk compilation is a four-step operation. While the options available to compile Asterisk from source code are enormous, it is important that you understand the basic idea of fine-tuning your Asterisk installation.
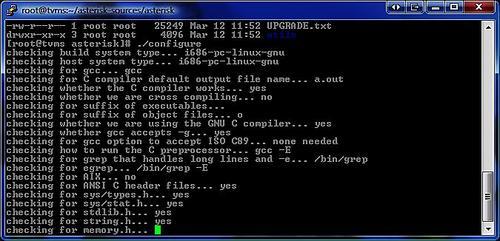
From within the Asterisk source directory, issue the ./configure command to have the compilation script scan your system and configure the proper compilation order.
Just as with Zaptel, Asterisk (versions 1.4 and onwards) includes a compilation setup and configuration GUI. The GUI enables us to select the Asterisk modules that we would like to compile and install. While it may seem fairly weird to have such a tool, the reason is fairly simple. Asterisk, being primarily a PBX system, includes a multitude of applications and drivers that are usually not required for targeted applications. For example, let's imagine that I build a TDM-to-SIP gateway using Asterisk. There isn't much use for a multi-party conferencing application in such a gateway, now is there?
Each application or driver that is included during the compilation and activation of Asterisk imposes a certain toll on the server running our Asterisk installation. Thus, if we remove modules that are not required, our produced Asterisk toll will be lower than that of a "stock vanilla" Asterisk compilation.
Note
One could argue that it is possible to disable Asterisk modules that are not required at load time, which would also be true. However, when building a high-performance system, it is always nice to know that you have limited the toll at compile time.
Starting the configuration GUI is performed by issuing the make menuconfig, command, to be greeted by the following text based GUI:

As indicated before, there are multitudes of applications and modules that can be included with your Asterisk server. Choosing which ones you require is something that you need to find out on your own. However, we shall take the opportunity to review several sections of this configuration GUI to help you get started.
As you browse the applications section of the GUI, a description of each application is given at the bottom of the screen. Each application description also includes the dependency (if it exists) of that application. Deciding on your set of applications is crucial, not only from the performance standpoint but also from a security standpoint. For example, imagine that you are now creating an IVR system for dating services. Like any other dating service, the usage of the system in mainly internal, so we don't want to compile a "dial" application that enables our users to dial out of the system (if we had made a mistake in our dialplan or programming). Another good example is the ADSI Programming application, which is used with ADSI-capable phones. If we don't have ADSI-capable phones, there is surely no reason to compile and install this application.
The following image shows the application selection GUI:

The channel drivers provide Asterisk's connections to the world, or in layman's terms, the way the calls are passed into and out of Asterisk. When dealing with a development platform, we would usually want to compile all possible channel drivers. However, when dealing with a production environment, this is not always required.
Some people may argue that disabling some channel drivers at compile time in a production environment is a good security practice. This is because Asterisk will not open an unrequired VoIP connection port, and thus, preventing people from either DoS (Denial of Service) attacking your Asterisk system or simply exploiting the exposed channel.
On most systems, you would want to make sure that the following minimal channel driver set is compiled:
|
Channel Driver |
Description |
|---|---|
|
chan_iax2 |
The Inter Asterisk eXchange protocol used to connect two or more Asterisk servers to one another and provide connectivity to IAX2 capable phones |
|
chan_local |
A local proxy channel, used in many parts of Asterisk |
|
chan_sip |
The Session Initiation Protocol channel driver, SIP is a de-facto industry standard for interconnecting with VoIP providers and various IP phones |
|
chan_zap |
The Zapata Telephony (Zaptel) channel driver; the Zaptel channel is used with traditional telephony interface, available from Digium, Sangoma and other respective vendors |
|
chan_dahdi |
The DAHDI channel drivers; this channel driver is identical to chan_zap in terms of its functionality |
At this point, we shall let you explore the compilation GUI yourself and make your own observations. In various sections of this book, we shall do our best to let you explore and find out various things for yourself. Our aim is not only to teach you, but also to expose you to the Asterisk way of thinking, which will help you develop better systems.
Once you have selected your desired Asterisk module configuration, proceed to the actual compilation. The compilation is performed by issuing the command make all from the command line, followed by make install in order to install the Asterisk binary executables and shared modules, which is finally followed by make samples to install a set of preliminary configuration files.
The following screenshot shows the various completed stages:

The preceding screenshot illustrates the completed compilation of the Asterisk source code.
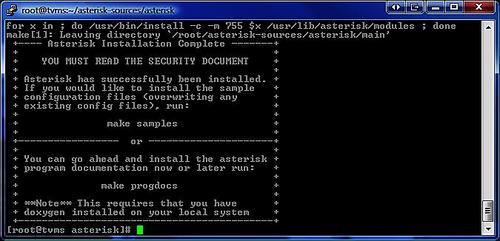
This screenshot illustrates the completed installation of the Asterisk binary executables and shared modules. Please note that, at this point your installation lacks sample configuration files and init scripts; so trying to run Asterisk at this point will fail. Issue the make samples command in order to create sample configuration files.
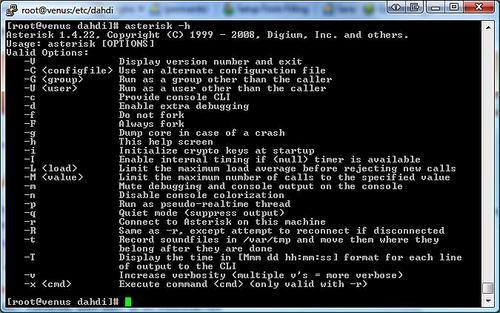
Once you have completed the sample configuration phase, issue the following command: asterisk - vvvvcgp. If a screen similar to the one shown next appears on your console at this point, you have a running Asterisk installation.
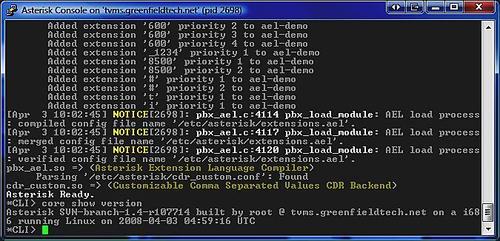
Issue the core show version command at your Asterisk Command Line interface to show your installed Asterisk version. Please note that your version may vary from the one appearing in the screenshot just shown.
You are probably wondering what the parameters vvvvcgp mean. Well, following is the list of the various parameters that the Asterisk binary program (asterisk) will accept as viable parameters for execution:
If you are new to compiling open source software, the actions you have just performed may seem fairly alien to you. Compiling the Asterisk source package is a task most Asterisk developers perform more than once, especially when upgrading Asterisk, or when migrating from one server to another. While some Linux distributions offer pre-compiled versions of Asterisk, it is always a good practice to compile Asterisk from source and get to know how to do this.