


In ASP.NET, the term Data Binding implies binding the controls to data that is retrieved from the data source and hence providing a read or write connectivity between these controls and the data, that they are bound to. These data sources can be one of databases, xml files or even, flat files. We would use the word data controls often in this book to imply controls that can be bound to data from external data sources. In ASP.NET 1.x, you were introduced to a powerful data binding technique where you could eliminate the need of writing lengthy code that was used in earlier for binding data to data controls. With ASP.NET 2.0, you have a lot of new controls and features added in this context. You now have simplified paging, filtering, sorting, automatic updates, data source controls, and a host of other powerful features.
In this chapter, we will cover the following points:
The ASP.NET Data Binding Model
Data Binding Expressions
The ASP.NET Data Source Controls
Object Data Source Control
SQL Data Source Control
Access Data Source Control
XML Data Source Control
In data binding, as we have discussed in the beginning, the controls are bound to data from the data source resulting in read or write connectivity between the controls and the data they are bound to. The controls are actually bound to the columns of the result set that contains the data. This result set can be a data set, a data table, a data reader, or any other instance of a collection type.
Note
We need not write any code to display the control values after they are bound to these data sources. This kind of data binding allows you to bind data to the user interface controls without the need to write code.
In its simplest form, the syntax for using data binding in your ASPX pages is as follows:
<%# Data Source Name %>
Depending on whether you require binding single value data or a multiple or repeated value data to a control, you can have the following types of binding mechanisms in ASP.NET data controls:
Single Value Data Binding
Repeated Value Data Binding
Single value data binding, as the name suggests implies, binding of a single value or a single record, say, an employee's record. In contrast, repeated value data binding implies binding a set or a table of employee records.
You can use any of the following for single value data binding:
<%# Name of the Property %>
<%# Expression %>
<%# Method Name, Parameter List %>
For repeated value data binding, you can use the following syntax:
<%# Name of the Data Source %>
The following sections presents a discussion on how you can use the data binding expressions in ASP.NET to bind data to the controls and a discussion on the newly added data source controls in ASP.NET 2.0 and their usage.
What are data binding expressions? Well, they are the code snippets that you use between the <%# and %> blocks in your ASP.NET web page. According to MSDN, "Data-binding expressions create bindings between any property on an ASP.NET page, including a server control property, and a data source when the DataBind() method is called on the page. You can include data-binding expressions on the value side of an attribute or value pair in the opening tag of a server control or anywhere in the page".
The following are the advantages of using Data Binding expressions in ASP.NET controls in the presentation layer:
Flexibility to use any data binding expressions provided that the value it resolves to is one that the data control can use.
You can use these expressions to bind any property to its corresponding data.
Flexibility to bind one property to one data source and another property to another data source.
You should use data binding in the ASP.NET web pages in the presentation layer of your application. The syntax used for data binding in ASP.NET 1.x is as follows:
<%# Container.DataItem("expression") %>
The following code snippet illustrates how you can bind data to a label control using the syntax shown above:
<asp:Label id="lblUserName" runat="server"
Text='<%# Container.DataItem("UserName") %>'>
</asp:Label>
You can also use the static method Eval() of the DataBinder class for binding data to your controls. This method has an overloaded version that accepts the format expression as an additional parameter that relates to the type of formatting that you would require on the data to be displayed. The syntax for using the Eval() method is shown as follows:
<%# DataBinder.Eval(Container.DataItem, "expression"[, "format"]) %>
As shown in the code snippet the Eval() method accepts two parameters:
The first of these parameters is the data container, that is, a data table, a data set or a data view.
The second parameter is a reference to the value that needs to be assigned to the control.
Refer to the following code snippet that illustrates, how you can use the DataBinder.Eval() method to bind data:
<asp:Label id="lblUserName" runat="server"
Text='<%# DataBinder.Eval(Container.DataItem, "UserName") %>'>
</asp:Label>
You can use the overloaded version of the Eval() method to specify the format expression (as an additional optional parameter) to display the data in your required format. Refer to the following code snippet:
<asp:Label id="lblLoginDate" runat="server"
Text='<%# DataBinder.Eval(Container.DataItem, "LoginDate", "{0:dddd
d MMMM"]) %>'>
</asp:Label>
This code would display the LoginDate in the label control named lblLoginDate as Sunday 15, April.
With ASP.NET 2.0, you have a much simpler syntax as the DataBinder instance is now the default context for all data binding expressions that are used for displaying non-hierarchical data in your presentation layer. You can now use any of the following overloaded versions of the Eval() method for binding data.
<%# Eval("expression") %>
<%# Eval("expression"[, "format"]) %>
Before we dig into a discussion on the data source controls in ASP.NET that follows this section, I would present here two classes that we would frequently be using here and after in the book; I would use these classes throughout this book. In order to reduce code duplication or redundancy, I am providing here the source code for both these classes; we would refer them elsewhere.
The Employee class in this example is the Business Entity class. It contains a set of public properties that expose the data members of the class. The source code for this class is as follows:
public class Employee
{
private string empCode = String.Empty;
private string empName = String.Empty;
private double basic = 0.0;
private string deptCode = String.Empty;
private DateTime joiningDate;
public string EmpCode
{
get
{
return empCode;
}
set
{
empCode = value;
}
}
public string EmpName
{
get
{
return empName;
}
set
{
empName = value;
}
}
public double Basic
{
get
{
return basic;
}
set
{
basic = value;
}
}
public string DeptCode
{
get
{
return deptCode;
}
set
{
deptCode = value;
}
}
public DateTime JoiningDate
{
get
{
return joiningDate;
}
set
{
joiningDate = value;
}
}
}
Note
We will use the fields basic and Salary interchangeably throughout this book. You will find some code examples that refer to the former and some that refer to the later. In either case, you can use the same Employee class as the BusinessEntity with a minor change, that is, replace the name of the public property called basic with Salary depending on whether you need to use basic or Salary as the column for displaying data. So, if you would like to use Salary as the name of the column data bound to a data control, just change the public property called basic shown as follows:
public double Salary
{
get
{
return basic;
}
set
{
basic = value;
}
}
To execute the programs listed in this book, ensure that the field names used in the DataManager is the same as the field names that you have used in the database table. We will revisit the Employee class in Chapter 5 of this book to incorporate some more variable and properties.
The DataManager class contains a set of methods that return data that would be used in the presentation layer of the application. The source code for the DataManager class is as follows:
public class DataManager
{
ArrayList data = new ArrayList();
String connectionString = String.Empty;
public DataManager()
{
connectionString = ConfigurationManager.ConnectionStrings
["joydipConnectionString"].
ConnectionString.Trim();
}
public ArrayList GetAllEmployees()
{
SqlConnection conn = null;
ArrayList employeeList = null;
try
{
conn = new SqlConnection(connectionString);
conn.Open();
string sql = "select EmpCode, EmpName, Basic,
JoiningDate, DeptCode from employee e, Department
d where e.DeptID = d.DeptID";
SqlCommand cmd = new SqlCommand(sql, conn);
SqlDataReader dr = cmd.ExecuteReader();
employeeList = new ArrayList();
while (dr.Read())
{
Employee emp = new Employee();
if (dr["EmpCode"] != DBNull.Value)
emp.EmpCode = dr["EmpCode"].ToString();
if (dr["EmpName"] != DBNull.Value)
emp.EmpName = dr["EmpName"].ToString();
if (dr["Basic"] != DBNull.Value)
emp.Basic = Convert.ToDouble(dr["Basic"].
ToString());
if (dr["JoiningDate"] != DBNull.Value)
emp.JoiningDate =
Convert.ToDateTime(dr["JoiningDate"].
ToString());
if (dr["DeptCode"] != DBNull.Value)
emp.DeptCode = dr["DeptCode"].ToString();
employeeList.Add(emp);
emp = null;
}
}
catch
{
throw;
}
finally
{
conn.Close();
}
return employeeList;
}
public ArrayList GetEmployeeByDept(string deptCode)
{
SqlConnection conn = null;
ArrayList employeeList = null;
try
{
conn = new SqlConnection(connectionString); conn.Open();
string sql = "select EmpCode, EmpName, Basic,
JoiningDate, DeptCode from employee e, Department
d where e.DeptID = d.DeptID and
d.DeptCode = ‘" + deptCode + "'";
SqlCommand cmd = new SqlCommand(sql, conn);
SqlDataReader dr = cmd.ExecuteReader();
employeeList = new ArrayList();
while (dr.Read())
{
Employee emp = new Employee();
if (dr["EmpCode"] != DBNull.Value)
emp.EmpCode = dr["EmpCode"].ToString();
if (dr["EmpName"] != DBNull.Value)
emp.EmpName = dr["EmpName"].ToString();
if (dr["Basic"] != DBNull.Value)
emp.Basic = Convert.ToDouble(dr["Basic"].
ToString());
if (dr["JoiningDate"] != DBNull.Value)
emp.JoiningDate =
Convert.ToDateTime(dr["JoiningDate"].
ToString());
if (dr["DeptCode"] != DBNull.Value)
emp.DeptCode = dr["DeptCode"].ToString();
employeeList.Add(emp);
emp = null;
}
}
catch
{
throw;
}
finally
{
conn.Close();
}
return employeeList;
}
}
In this code, the GetAllEmployees() method returns all records from the Employee table, whereas, the GetEmployeeByDept() method returns the records of all employees of a specific department.
With ASP.NET 2.0, data binding has been simplified a lot with the introduction of a number of data source controls. These data source controls are server controls that can be used to bind data to a number of data sources. You now have a more simplified, powerful, consistent, and extensible approach towards binding data between your presentation layer controls and a number of data source controls. You can use these controls to bind data between the data bound controls in your presentation layer to a variety of data sources seamlessly. You only need to choose the appropriate data source control that fits your requirement.
These data source controls facilitate a "Declarative programming model and an automatic data binding behavior". You can use them declaratively in your presentation layer or programmatically in your source code. The data store that contains the data and the operations that are performed on this data are abstracted, and you need not worry about how the data access and data binding logic works underneath. In essence, the entire ADO.NET Object Model is abstracted using these data source controls. Further, you can use these data source controls to display both tabular data as well as hierarchical data in your presentation layer.
In ASP.NET 2.0, you have the following data source controls that are of utmost importance; these would be discussed in detail later in this chapter:
Object data source control: This control can be used to bind data to middle-tier objects to the presentation layer components in an N-tier design.
SQL data source control: This control enables you to connect to and bind data to a number of underlying data sources, that is, Microsoft SQL Server, OLEDB, ODBC or Oracle databases.
Access data source control: This control can be used to bind data to Microsoft Access databases.
Xml data source control: This control can be used to bind data to XML data sources, that is, external XML data files, dataset instances, etc.
With these data source controls, you can easily implement data driven ASP.NET applications without the need to write the data access code. The only thing you have to do is, add and configure a data source control in your web page and then associate the DataSourceID property of any web control in your web page to the ID property of the data source control in use. The web control would now display the data using the data source control that you have used in your web page. You are done!
In the sections that follow, we would explore how you can use each of these controls to bind data to your controls seamlessly.
The Object data source control, one of the new data source controls added in ASP.NET 2.0, can be used to de-couple the User Interface or the Presentation Layer of the application from the Business Logic and the Data Access Layers. It is a non-visual control and is typically used to bind data to the data-bound controls in a consistent way and can be used for seamless CRUD (Create, Update, Read and Delete) operations in your applications.
The following are the four main methods of the Object data source control aligned to the CRUD operations that you need in your applications:
Update Method: This method is used for updating data using the Object data source control.
Insert Method: This method is used for inserting data using the Object data source control.
Select Method: This method is used for reading data using the Object data source control.
Delete Method: This method is used for deleting data using the Object data source control.
We would use the Object data source control to bind data to data bound controls with components that represent data collections, that is, those which return a set of data. We would use the Object data source control to bind data to a data bound component with a DataSet instance, a DataReader instance, a WebService instance that returns Data and a Collection instance. Hence, we would create a polymorphic method called GetData() that would accept a parameter that would indicate the source of the data that we need to retrieve the data from. The term polymorphic used here implies that we can have multiple methods of name GetData(), differing in their signatures. Hence, we may also say that the GetData() method is overloaded. We would use these methods throughout this book for all the subsequent chapters that would require data retrieval.
To use the Object data source control:
1. Create a new web application in Visual Studio, open the
default.aspxfile and then switch to design view mode.2. Now, add the ObjectDataSource control by dragging it from the toolbox. An ObjectDataSource control with the default name of ObjectDataSource1 is added to the web page.
3. We now require a data bound control to which we would bind the data using this control. We will choose the GridView control for this and drag one from the toolbox onto the web page. The default name of the control is GridView1.
4. The next step is to configure the ObjectDataSource control.
5. We associate the Object data source control to the GridView Control and set its DataSource property to the ObjectDataSource Control that we have added in our web page. The following screenshot illustrates how we associate the data source for the GridView control to our ObjectDataSource control.
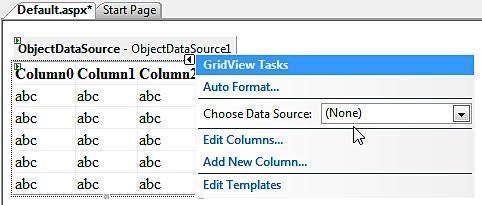
Note how the data source for the GridView Control is associated with the ObjectDataSource control using the Choose Data Source option.
To configure, click on the Configure Data Source option and then select the business object that would be used for the CRUD operations. Then click on Next. The Configure Data Source window pops up. Refer to the following screenshot:
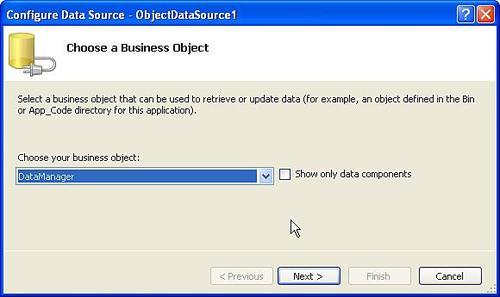
In our example, the business object class is DataManager and the business entity class is Employee. Hence, we would now select DataManager as the business object from the Choose your business object option of the Configure Data Source window.
Then, click Next and select the GetAllEmployees(), returns ArrayList as our business method (that would be used to retrieve data) from the Choose a method option. Refer to the following screenshot:
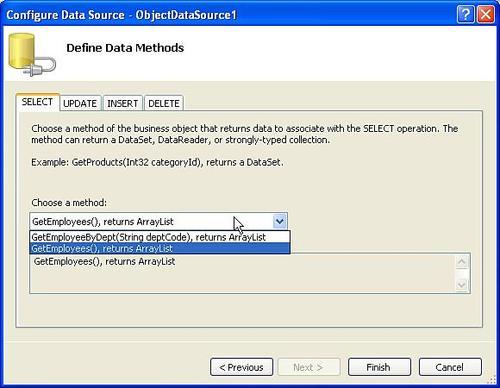
Then click on Finish. You are done!
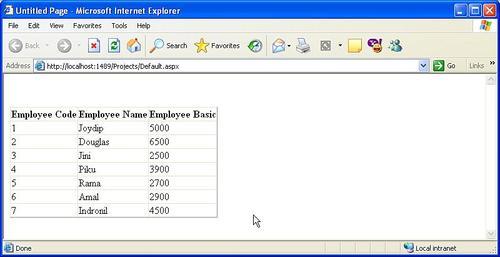
When you execute the application, the output will be something like the following screenshot:
Built on top of ADO.NET, the SQL data source control is a non-visual control and uses the built in ADO.NET objects for its operation. The SQL data source control is used to access data from any relational database, SQL Server database in particular. You can follow some simple steps described below that can be used to connect to your database and perform your CRUD operations in your applications with minimal or no coding at all!
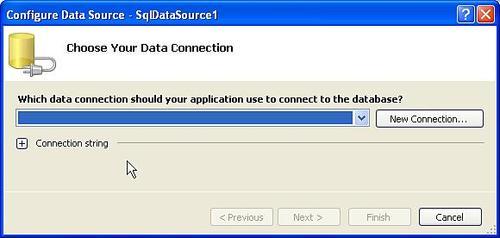
To use the SQL data source control, drag-and-drop it from the toolbox into your web page. The default name of the control would be SqlDataSource1. Next, you need to configure the data source as shown in the following screenshot:
Click on the New Connection button to create a new connection with the database. A window as shown in the following screenshot pops up.
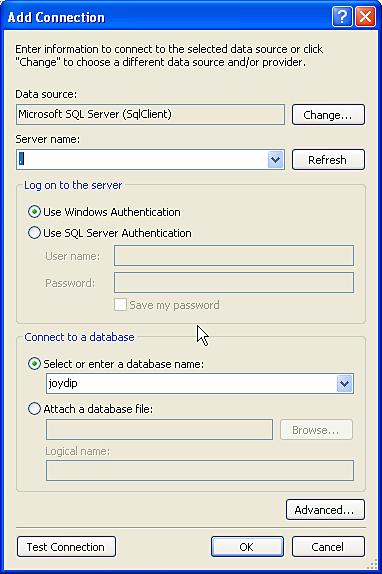
We would select the data source as Microsoft SQL Server and we would specify the Server Name as. (a dot) to indicate that the database to be connected to, is a local database. Select SQL Server Authentication mode and the database as shown in the screenshot above. Test your connection to check whether the connection was successful by clicking on the Test Connection button.
Once you click on OK, the next window that is displayed is as shown in the following screenshot:

You now need to configure the data source. Check to see whether the connection string is as desired and then click on the Next button. The next window that is displayed is as shown in the following screenshot:
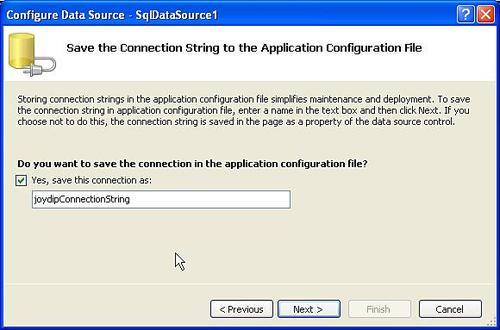
You can save the connection string generated earlier in the configuration file of your application by selecting the check box as shown in this screenshot. The saved connection string in the application's configuration file would resemble the following:
<connectionStrings>
<add name="joydipConnectionString" connectionString="Data
Source=.;Initial Catalog=joydip;User ID=sa;Password=sa"
providerName="System.Data.SqlClient" />
</connectionStrings>
Click on the Next button to proceed further. The next window that gets displayed allows you to configure your Select statement. You can specify the fields, the conditions, etc, that you require in the output. Once you are done, click on the Next button.
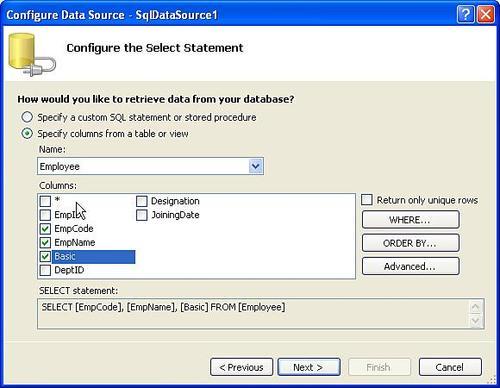
The final window that gets displayed would allow you to test the query prior to using it in the presentation layer of your application. Note that we have used the Employee table in our example and it contains the same set of data as we used when working with the Object data source control earlier in this chapter. Refer to the following screenshot:
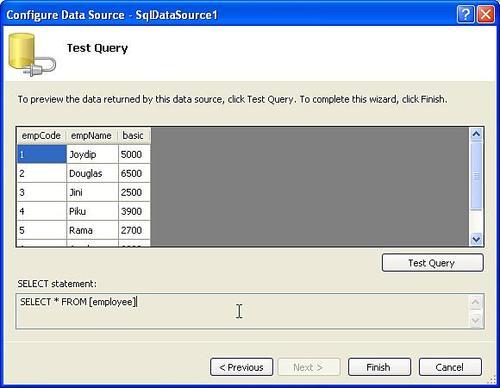
Notice the output of the query once the Test Query button is clicked. This is the final step in this process of configuring the SQL data source control. Click on Finish button to complete the process. The code that is generated for the SQL data source control in the .aspx file is as follows:
<asp:SqlDataSource ID="SqlDataSource1" runat="server"
ConnectionString="<%$ ConnectionStrings:joydipConnectionString %>"
SelectCommand="SELECT * FROM [employee]"></asp:SqlDataSource>
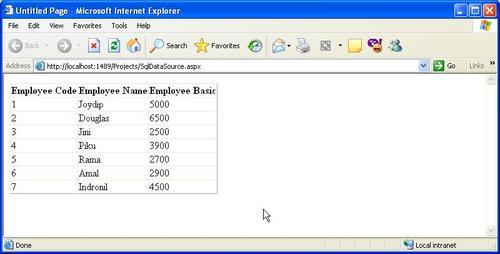
Now we need to drag and drop a GridView control from the toolbox and configure it with the SQL data source control, using the same process that we followed earlier, for configuring it with the Object data source Control. Once we are done, we can execute the web page; the output on execution of the web page is shown as follows:
The Access data source control can be used to connect to Microsoft Access databases and perform CRUD operations in your applications. The following section discusses how we can use this control in our applications.
To start with, drag and drop the Access Data Source Control from the toolbox onto your web page. Then configure the control by selecting the Configure Data Source option. Refer to the following screenshot:

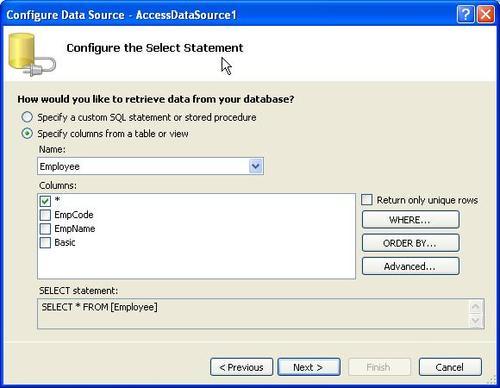
Specify the name and the path to the MS Access database as shown in the screenshot above and click on the Next button. Now, configure the select statement as you did earlier when working with SQL data source control. Refer to the following screenshot:
Click on the Next button to invoke a window where you can test your query. Refer to the following screenshot:

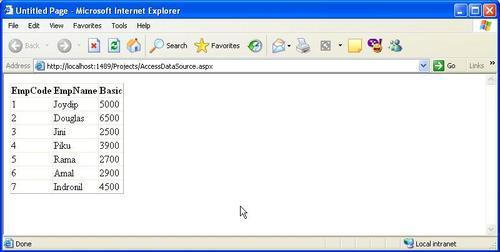
Note the output of the query once you click on the Test Query button as shown in the screenshot above. Click on the Finish button when done.
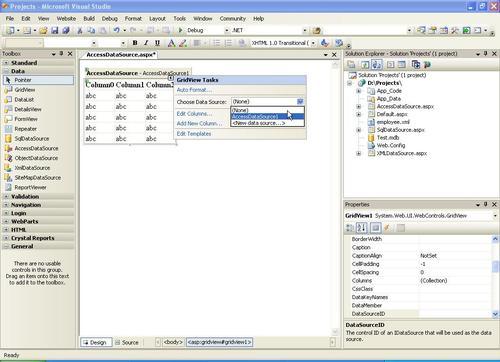
Next, drag-and-drop a GridView Control to display the data retrieved from the Access Data Source Control. Now, bind the GridView control to the Access Data Source control created earlier using the Choose Data Source option, as shown in the following screenshot.
You are done! Execute the web page as the last step; the output on execution is shown in the following screenshot:
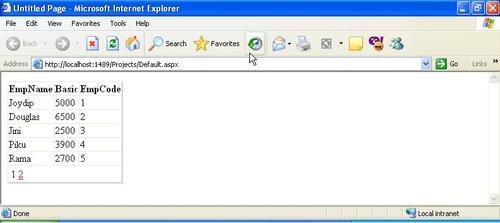
The XML data source control introduced in ASP.NET 2.0 can be used to bind to an XML Document seamlessly. It can also be used to bind hierarchical data with data controls that supports it.
To use this control, drag-and-drop the control from the toolbox onto your web form. The default name of this control would be XmlDataSource1. Now, configure the control by clicking on the Configure Data Source option as shown in the following screenshot:
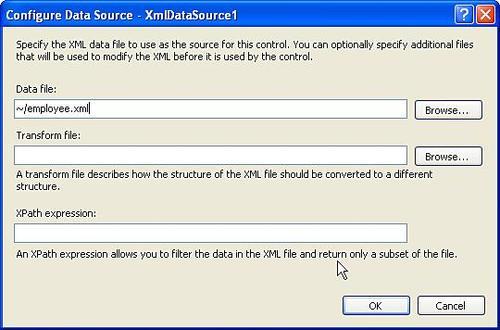
Specify the name and the path to the XML Data file as shown above. Then click on the OK button. In our example, the XML data file is employee.xml, present in the application's root directory. The following is the schema for the employee.xml file:
<?xml version="1.0" encoding="utf-8" ?>
<Employees>
<Employee Code ="1" Name = "Joydip" Basic ="5000"/>
<Employee Code ="2" Name = "Douglas" Basic ="6500"/>
<Employee Code ="2" Name = "Jini" Basic ="2500"/>
<Employee Code ="2" Name = "Piku" Basic ="3900"/>
<Employee Code ="2" Name = "Rama" Basic ="2700"/>
<Employee Code ="2" Name = "Amal" Basic="2900"/>
<Employee Code ="2" Name = "Indronil" Basic="4500"/>
</Employees>
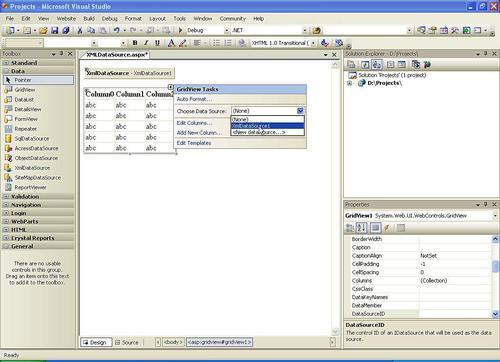
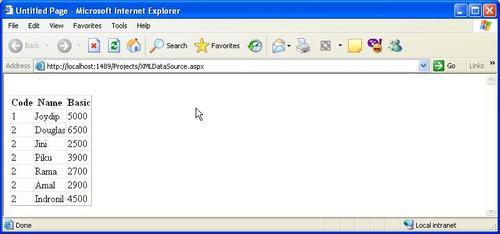
We now need a data control for displaying the data that would be retrieved by the XML data source control. For this, drag and drop a GridView control from the toolbox and associate the data source of this control with the XMLDataSource control created and configured earlier. Refer to the following screenshot:
You are done! On execution of the web page, the output is as follows:
Paging, Sorting, and Filtering of data is much more simplified using these Data Source Controls. You have two options for data paging and data sorting when using Object data source control. These are:
User Interface Paging or Sorting
Server Side Paging or Sorting
While the former is much simpler to use, the later can offer you much improved performance. Let us now see how we can implement User Interface Paging using Object data source control.
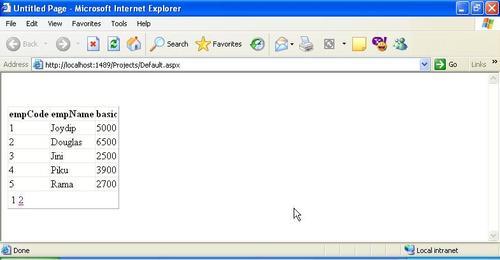
Refer to our discussion on Object data source control earlier. For the sake of simplicity, we would consider the same Object data source control data binding and the GridView control to present data to the User Interface. For working with User Interface Paging, simply set the Allow Paging property of the GridView to true. Further, set the Page Size property to the number of records that you would like to be displayed for each page. We would set the page size to a value of 5 for this example. On execution of the web page, the output is as follows:
Though User Interface Paging is very easy to use, the major drawback of using this approach is that it would load all the records in the server's memory even though only a specified number of records would actually be displayed. These drawbacks can be overcome using the other option of paging, that is, Data Source Paging.
For implementing Data Source Paging, you would require a method that returns paged data and one that returns the count of the data from the database table. The following two methods return a page of Employee records and the count of the Employee records respectively, from the database table Employee.
public SqlDataReader GetDataFromDataReader(int StartRowIndex,int MaximumRows)
{
String connectionString = "Data Source=.;Initial
Catalog=joydip;User ID=sa;Password=sa";
String procedureName = "GetPagedEmployeeRecords";
SqlConnection sqlConnection = new
SqlConnection(connectionString);
SqlCommand sqlCommand = new SqlCommand(procedureName,
sqlConnection);
sqlCommand.CommandType = CommandType.StoredProcedure;
sqlCommand.Parameters.AddWithValue("@StartRowIndex",
StartRowIndex);
sqlCommand.Parameters.AddWithValue("@MaximumRows",
MaximumRows);
sqlConnection.Open();
return sqlCommand.ExecuteReader
(CommandBehavior.CloseConnection);
}
public int GetDataCountFromDataReader()
{
String connectionString = "Data Source=.;Initial
Catalog=joydip;User ID=sa;Password=sa";
String sqlString = "Select count(*) from employee";
SqlConnection sqlConnection = new
SqlConnection(connectionString);
SqlCommand sqlCommand = new SqlCommand(sqlString,
sqlConnection);
sqlCommand.CommandType = CommandType.Text;
sqlConnection.Open();
return int.Parse(sqlCommand.ExecuteScalar().ToString());
}
The following is the stored procedure called GetPagedEmployeeRecords that returns a page of Employee records from the Employee table:
Create Procedure GetPagedEmployeeRecords
(
@StartRowIndex int, @MaximumRows int
)
as
select a.empCode,a.empName,a.basic from employee a inner join employee b on a.empcode = b.empCode where b.empCode >=@StartRowIndex and b.empCode <( @StartRowIndex + @MaximumRows)
Set the SelectMethod property of the Object data source control to the GetDataFromDataReader() method and the SelectCountMethod property to the GetDataCountFromDataReader() method. Ensure that the AllowPaging property for the GridView Control is set to true. Next, you need to set the EnablePaging property of the Object data source control to true. On doing so, this control would pass the parameters StartRowIndex and MaximumRows when calling the method represented by the SelectMethod property. Refer to the following source code snippet that gets generated for the .aspx file:
<asp:ObjectDataSource ID="ObjectDataSource1" runat="server"
Data Source Pagingimplementing, Object data source control usedEnablePaging="True"
SelectCountMethod="GetDataCountFromDataReader"
SelectMethod="GetDataFromDataReader" TypeName="DataManager">
</asp:ObjectDataSource>
<asp:GridView ID="GridView1" runat="server" AllowPaging="True"
DataSourceID="ObjectDataSource1" PageSize="5">
</asp:GridView>
The following is the output on execution:
The previous section discussed how we can implement paging seamlessly using the Object data source Control. This section will discuss how we can implement User Interface and Data Source sorting of data.
For User Interface Sorting, set the AllowSorting property of the GridView Control to true. Note that automatic data sorting with Object data source Control is supported with DataView, DataTable or a DataSet only. The following method illustrates how we can retrieve data from the Employee table, populate a DataSet with it and then return it.
public DataSet GetDataFromDataSet()
{
String connectionString = "Data Source=.;Initial
Catalog=joydip;User ID=sa;Password=sa";
String procedureName = "GetEmployeeRecords";
SqlConnection sqlConnection = new
SqlConnection(connectionString);
sqlConnection.Open();
SqlDataAdapter sqlDataAdapter = new
SqlDataAdapter(procedureName, sqlConnection);
DataSet dataSet = new DataSet();
sqlDataAdapter.Fill(dataSet);
return dataSet;
}
Now, set the Object data source Control's SelectMethod property to refer to the GetDataFromDataSet() method shown above. The code generated in the .aspx file is as follows.
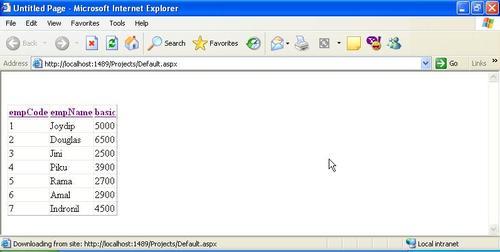
<asp:ObjectDataSource ID="ObjectDataSource1" runat="server"
SelectMethod="GetDataFromDataSet"
TypeName="DataManager">
</asp:ObjectDataSource>
<asp:GridView ID="GridView1" runat="server" AllowSorting="True"
DataSourceID="ObjectDataSource1">
</asp:GridView>
On execution, the following is the output:
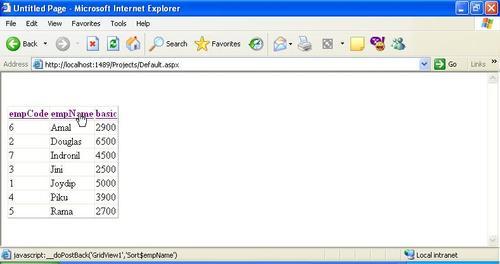
On clicking in the empName column, the output is sorted by employee name and the resultant output is as shown in the following screenshot:
For data source sorting, you have to set the SortParameterName property of the Object data source Control to the desired sort expression. If this property is set, Data Source Sorting would be used in place of User Interface Sorting. Note that the default sorting mode for this control, that is, if this property is not specified, is User Interface Sorting.
The following is the stored procedure that fetches sorted Employee Records from the Employee table:
create procedure GetSortedEmployeeRecords
(
@sortColumn int
)
as
select empCode,empName,basic from employee
order by
case when @sortColumn = 1 then empCode end asc,
case when @sortColumn = 2 then empName end asc,
case when @sortColumn = 3 then basic end
The following is the GetSortedEmployeeData() method that returns a list of sorted Employee records using the GetSortedEmployeeRecords() stored procedure.
public SqlDataReader GetSortedEmployeeData(int sortColumn)
{
String connectionString = "Data Source=.;Initial
Catalog=joydip;User ID=sa;Password=sa";
String procedureName = "GetSortedEmployeeRecords";
SqlConnection sqlConnection = new
SqlConnection(connectionString);
SqlCommand sqlCommand = new SqlCommand(procedureName,
sqlConnection);
sqlCommand.Parameters.AddWithValue("@sortColumn",
sortColumn);
sqlConnection.Open();
return sqlCommand.ExecuteReader
(CommandBehavior.CloseConnection);
}
The Object data source control supports filtering data provided the Select method property returns a DataSet, DataTable or a DataView instance. The FilterExpression property of the Object data source control can be used to specify the expression that should be used to filter the data. Note that you can retrieve data using the method that is specified by the SelectMethod property of the Object data source control.
To apply a filter on the data, specify basic > 3500 in the FilterExpression property of the Object data source control. Refer to the following screenshot:
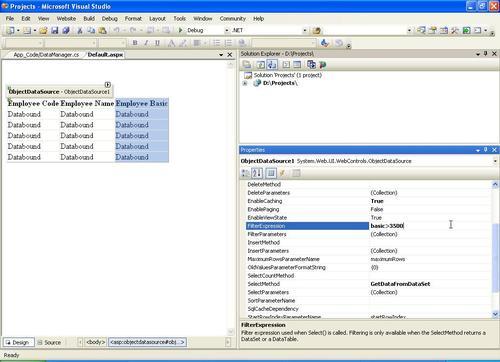
Note the resultant code that gets generated in the .aspx file as a result of the above screenshot:
<asp:ObjectDataSource ID="ObjectDataSource1" runat="server" SelectMethod="GetDataFromDataSet" TypeName="DataManager" EnableCaching="True"
FilterExpression=" basic>3500"></asp:ObjectDataSource>
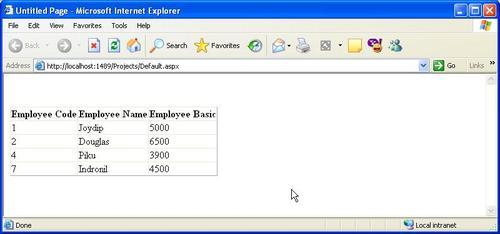
The output on execution is shown in the following screenshot:
This chapter gave a bird's eye view at ASP.NET's Data Binding Model and the Data Source Controls. We have discussed how we can work with the Data Source Controls like, Object data source, SQL data source, Xml data source and the Access data source control. We also had a look at how we can implement Paging, Sorting, and Filtering data using these controls. The next chapter, will discuss how we can bind data to the List Controls in ASP.NET and use them in our ASP.NET applications.