


 Download code from GitHub
Understanding the Fundamentals
Many modern web applications are now built as client-rendered Single-Page Applications (SPAs) rather than traditional server-rendered multipage applications. An SPA is a web application that only contains a single physical HTML page. This single page then uses JavaScript within a web browser to dynamically rewrite parts of the HTML, usually based on JSON data that's retrieved from API calls to the server. By doing so, after the initial page load, the application has no need to request full HTML pages from the server, which helps make it as fast and responsive as a native desktop application.
When it comes to building SPAs in 2018, we are absolutely spoiled for choice in frameworks and technologies that we could potentially use to help us build our apps. Regardless of their chosen technology stack, most web developers will probably have extensively used jQuery for their client-side JavaScript needs, and there is no reason why it couldn't be used to build SPAs as well. However, there are far better frameworks that are specifically designed to help us build modern SPAs.
Vue.js is a JavaScript framework for building the view layer of your applications. However, it differs from other large frameworks because it's designed to be incrementally adoptable. That is, with a single CDN script reference, you can plug Vue into a small portion of an existing application in much the same way as you would with jQuery. On the other hand, you could opt to use the modern tooling and supporting libraries in Vue's ecosystem to build a fully-fledged SPA from scratch. Vue really is one of the most simple yet powerful frameworks, with very little compromise in return.
ASP.NET Core is the latest version of Microsoft's ASP.NET web development framework. It has been completely rewritten to be more lightweight and modular, as well as to offer official cross-platform support for the first time. If you are reading this book, it is reasonably safe to assume that you are most likely already an experienced ASP.NET developer, with minimal experience of frontend frameworks and technologies. However, if you already have a basic understanding of Vue.js, then you may be able to skip this chapter, as it will be aimed primarily at those with no experience at all. Regardless of your level of experience with Vue, if you are already familiar with ASP.NET Core, then at the very least you can skip the ASP.NET Core sections near the end of this chapter. That being said, I'll only be focusing on areas where ASP.NET Core differs from previous versions of ASP.NET.
In summary, we'll cover the following topics:
- What are components?
- How do we compose a UI using components?
- Client-side application state
- Fundamental Vue concepts such as props, methods, computed properties, and directives
- What's new in ASP.NET Core?
- What's new in EF Core?
Thinking in components
Building web applications using Vue or any other JavaScript SPA framework revolves around the concept of breaking the UI down into the smallest possible chunks of functionality. These chunks are referred to as components, and can be likened to Razor view components, tag helpers, and partial views in ASP.NET Core MVC. However, in most SPAs, you'll end up breaking the UI down into far more pieces than you would in a traditional MVC application.
What is a component?
We can think of components as the building blocks of a UI. Each one is a self-contained piece of functionality, usually combined with a host of other components in a tree-like structure to form the UI of the entire web application. These components are also often reusable, and can be simply dropped into any part of the application where required.
A component in Vue is made up of two fundamental parts: presentation and behavior. The presentation part is simply the HTML template that is used to represent the data we are trying to display in the UI. The behavior part is a JavaScript object containing only the data relevant to that specific component, and any JavaScript functions necessary to manipulate that data and interact with the browser. This interaction includes handling the events raised by the browser, as well as refreshing certain portions of the UI depending on how the data has actually changed. Vue is smart enough to only refresh the parts of the UI that need to be, and doesn't bother refreshing the parts where the data hasn't changed.
In many SPA frameworks, this results in a single component being split into at least two, potentially three, separate physical files; a HTML file for the template; a JavaScript file for the data and behavioral functions; and an optional CSS file for styling the presentation of the component. In Vue, we have the concept of a single file component. We can use a custom file extension that allows us to combine these three aspects into a single file that contains three root elements: template, script, and style. In the following code snippet, we can see an example of a single file component:
<template>
  <div class="product">
    {{ name }}
  </div>
</template>


<script>
export default {
  name: 'product',
  data () {
    return {
      name: 'Hands on ASP.NET Core and Vue.js'
    }
  }
}
</script>

<style>
.product {
  font-size: 12px;
  font-weight: bold;
  color: teal;
}
</style>
The presentation part of this component, that is, the template and style sections, are incredibly simple. All we do is render a standard div element with a product class, and set the font size, weight, and color of that specific class using CSS. Inside the div element, we're using Vue's standard handlebar syntax to dynamically render a name variable. This variable is declared within the behavior part of the component, which again means the script section. Standard component data properties are declared inside a plain JavaScript object, which must be returned from a function named data. In this case, we return a simple object with a single name property, initialized with the Hands on ASP.NET Core and Vue.js value. This will subsequently be the text rendered inside the div element of template.
Each component should adhere to the SOLID principles of software design, and as such should only have a single responsibility. As soon as any single component starts to become overly complicated and difficult to see at a glance what its purpose is, it's probably time to refactor and extract a new component. Components are more often than not used in parent-child relationships, and Vue provides mechanisms for allowing related components to communicate with one another. Parents can pass data down into their children, and children can notify their parents of changes to their data. These parent-child relationships are the branches of our component tree, and there are many different ways that we could choose to break a UI down into this structure.
UI composition
Let's look at an example that most web developers will be familiar with. Imagine a web page with the Holy Grail layout—that is Header, Footer, left and right sidebars, and Main Content in the middle. When architecting this layout with components, the obvious composition is to start by creating a component for each major section of this layout:
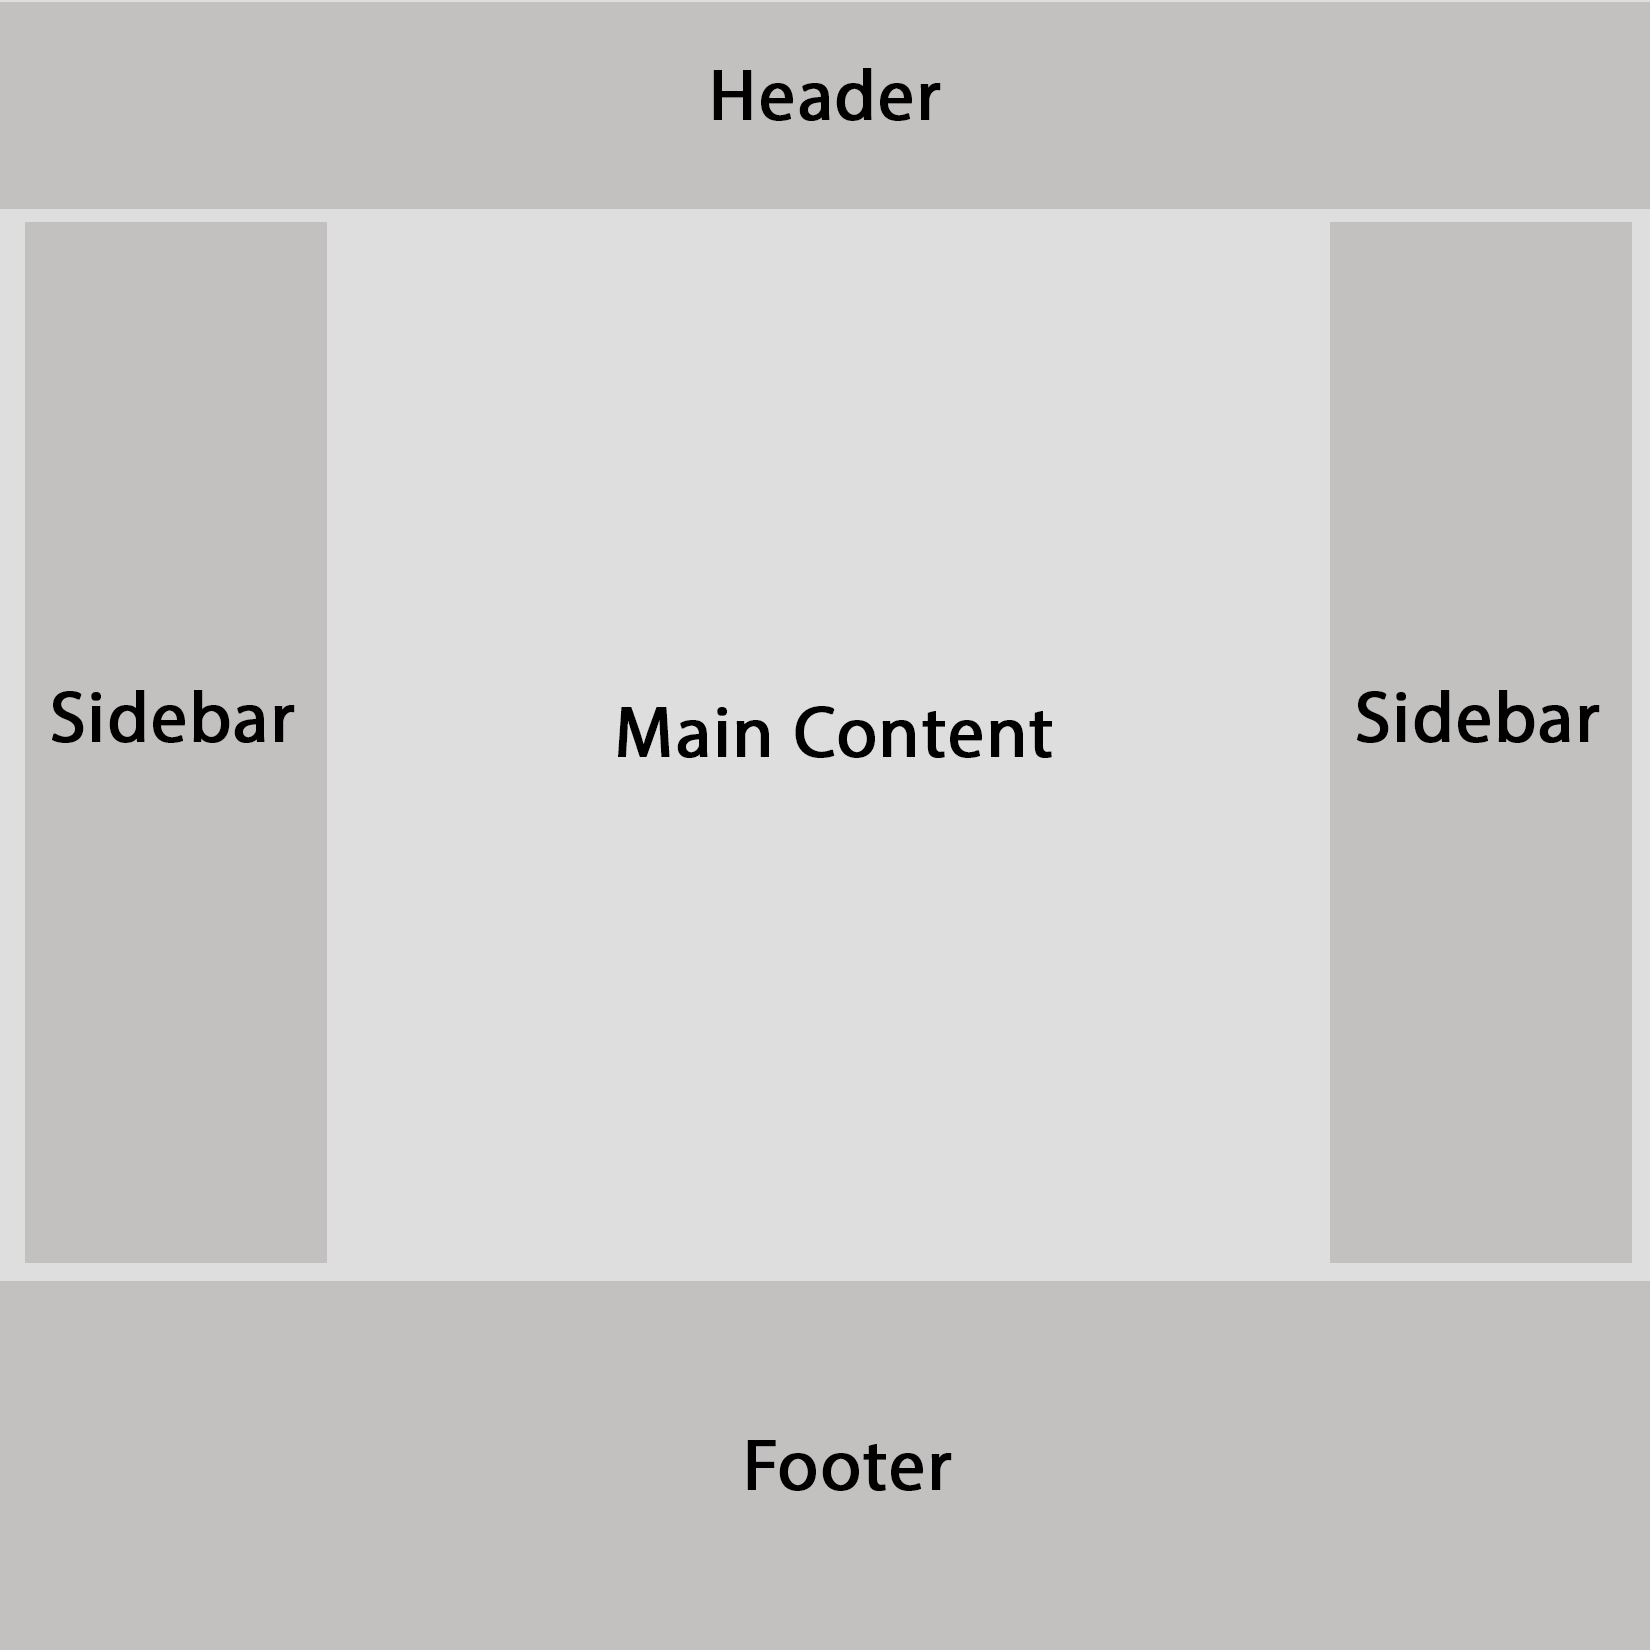
This is a good start, and in a typical MVC application, we might have done something similar using layout and partial views. However, we already know that a component is the smallest possible chunk of functionality that forms part of the UI. We need to break things down further, and be far more granular with our component boundaries. How we do this will obviously be highly dependent on the type of content we actually have contained within these major page sections. Let's expand on the previous layout with some standard UI features we'd expect in a typical e-commerce product listing page.
The header section would likely contain some kind of branding or Logo, along with a Navigation menu of some sorts and potentially a Search bar. The left sidebar is a common place to find any secondary navigation menus and some Filters to control which products are visible. The main content section will contain our Product List, along with some UI elements above to control the display order and maybe even switch between a grid and list view; there would also usually be a standard Pagination control at the bottom of the page. Finally, the right sidebar can hold a widget that displays a summary of the user's shopping cart contents, a widget to display a set of featured or most popular products, and a newsletter signup form. The following diagram shows how we could start composing this UI into a component tree:
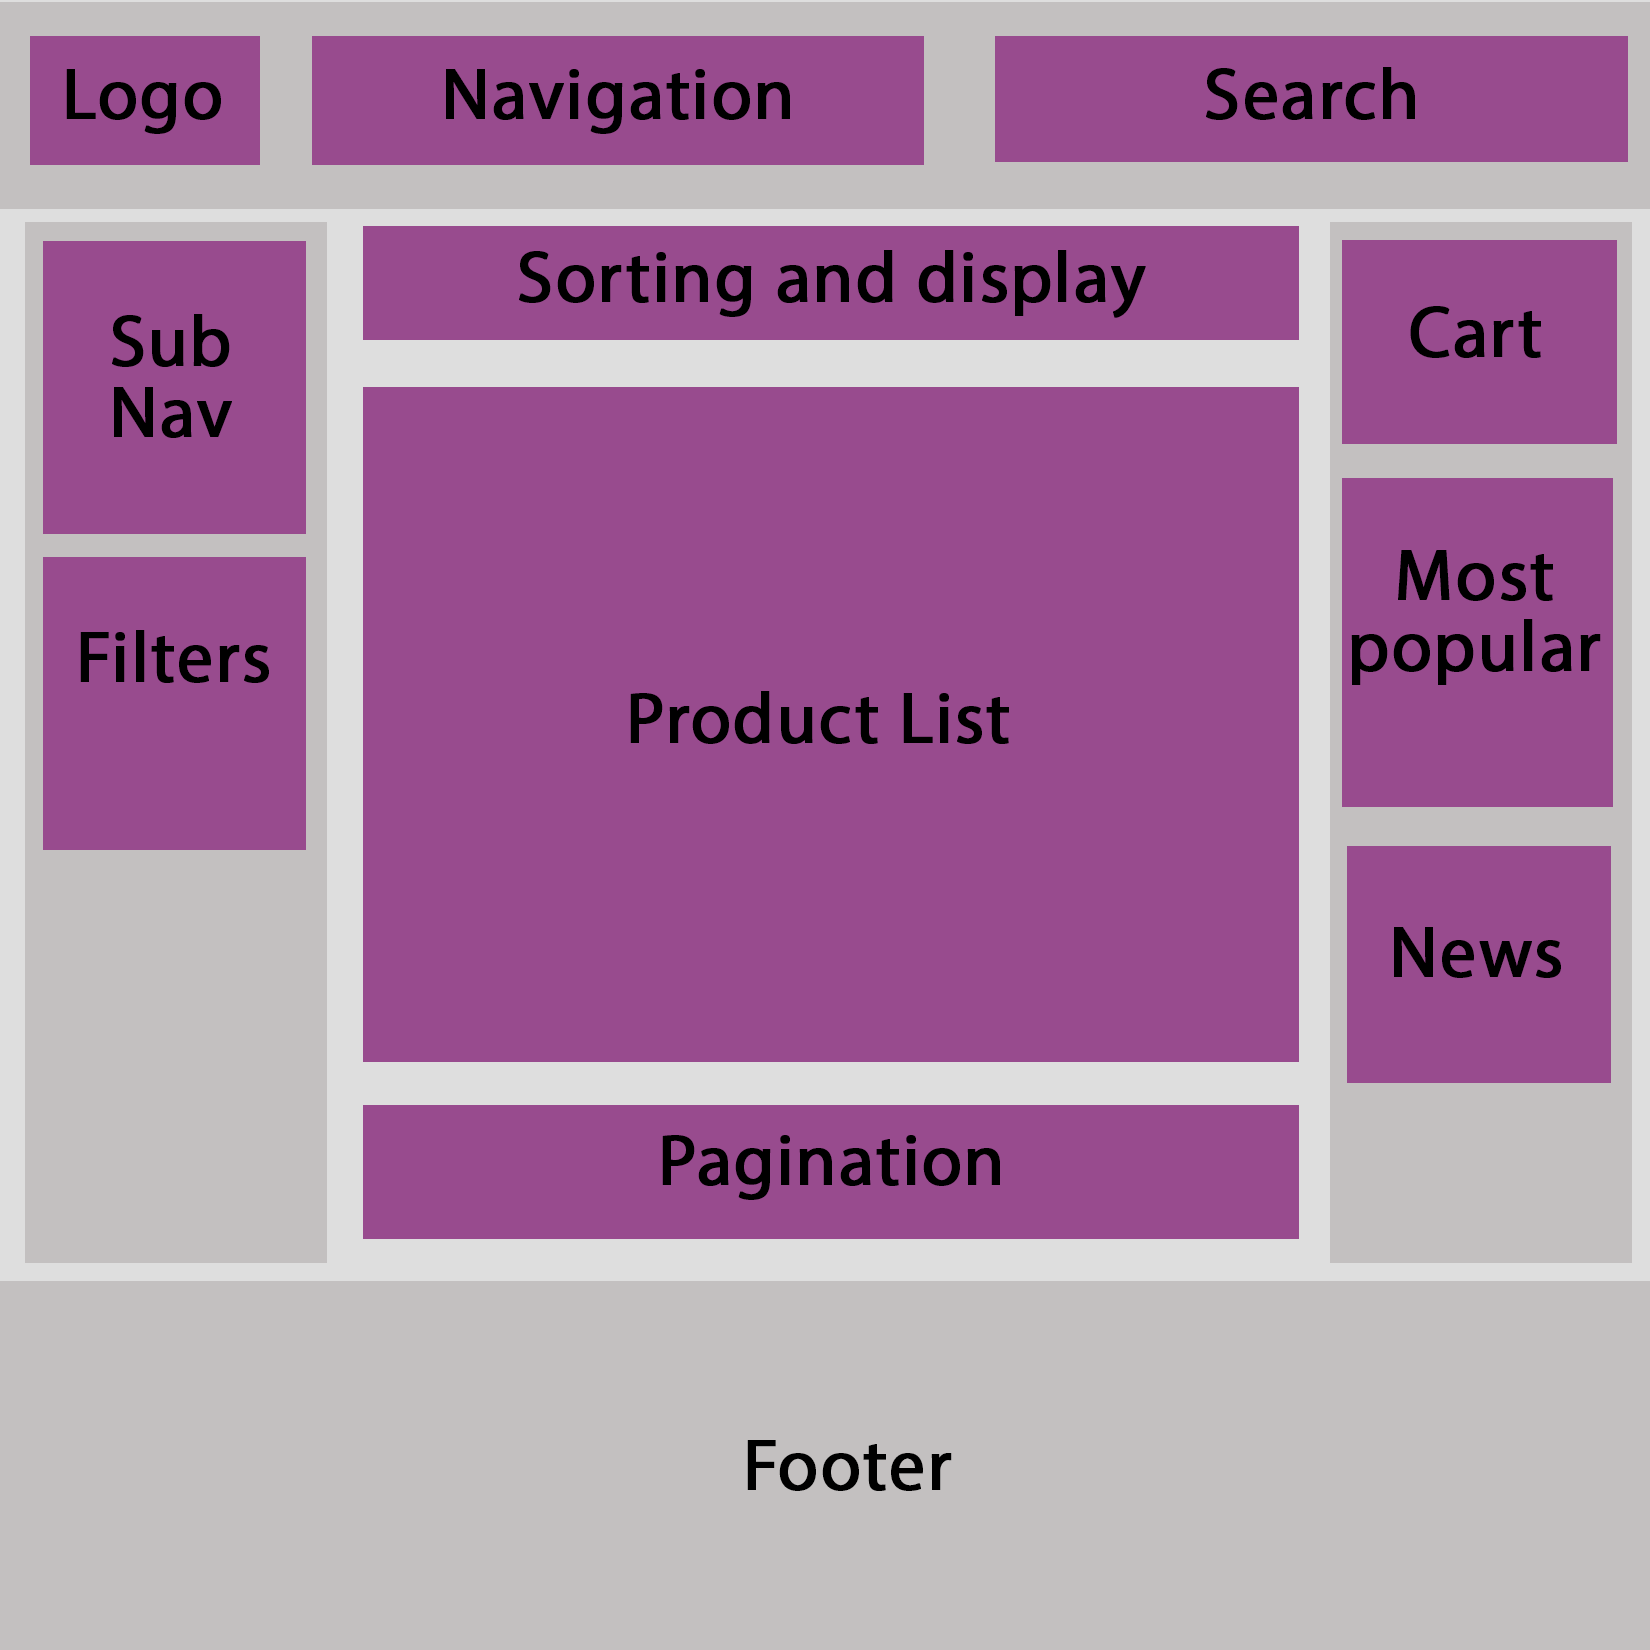
We could—and probably would—still break this down further as we were actually building these components; it's almost impossible to get things right the first time round. However, this is the beauty of component-based architectures. There is no right or wrong way of composing a UI; we simply try it one way, and if it doesn't work, we refactor our component tree until we find a way that does work!
Introduction to Vue
Before we go much further, we really need to understand the basics of Vue, and how we go about using it to define and display our application's data on a web page.
The Vue instance
Every Vue application must have at least one root Vue instance, which is created when we pass an options object into the new Vue() constructor. There are a number of properties that we can define on this object, many of which are optional. These properties describe what data the instance has access to, and what kind of actions and manipulations it can do with that data.
Attaching to the DOM
Root Vue instances are attached directly to the DOM using the standard CSS selector syntax. In the following example, we specify an el property of #app on the options object, which instructs the instance to look for an element with an ID of app and attach to it:
var app = new Vue({
  el: '#app'
})
This forms a relationship between the Vue instance and a specific portion of the DOM, meaning we can start to display our dynamic data anywhere inside the specified element. However, if we tried to display our data outside of it, it wouldn't work as Vue is not managing the DOM at that level.
Defining data properties
In order to render data into the DOM, we first need to define the data we want to display. Every Vue instance can define a data object to hold as many data properties as we wish:
var app = new Vue({
  el: '#app',
  data: {
    message: 'Hello World'
  }
})
Rendering data into the DOM using expressions
To render our dynamic data properties into the DOM, Vue uses a very simple HTML template syntax which is inspired by the very popular handlebars templating library. This is why we refer to it as the handlebar syntax, which uses double curly braces, or mustaches, to render data within HTML elements:
<div id="app">
  {{ message }}
</div>
var app = new Vue({
  el: '#app',
  data: {
    message: 'Hello World'
  }
})
Anything placed within a pair of double curly braces is treated as an expression, which means it will be interpreted using JavaScript. As such, we can reference the properties we define in the data object as we've done earlier, but can also make use of any standard JavaScript concept. As an example, we could easily make use of the Date object for rendering the current timestamp:
<div id="app">
  {{ message }}
  <p>
    The current date is: {{ new Date() }}
  </p>
</div>
We can even use logical operators to perform math-based operations or concatenate strings:
<div id="app">
  {{ message }}
  <p>
    {{ currentDate + ': ' + new Date() }}
  </p>
</div>
var app = new Vue({
  el: '#app',
  data: {
    message: 'Hello World',
    currentDate: 'The current date is'
  }
})
Expressions allow us to perform any kind of operation on the data properties defined on the Vue instance, as well as built-in JavaScript objects and functions.
Building component trees
If you are only interested in plugging Vue into a handful of pages in a traditional MVC web application, you would define as many root Vue instances as required, attaching each one to a different DOM element. However, when building a full SPA with Vue, you would instead define a single root Vue instance with a nested tree of components underneath it. This single root Vue instance would then be responsible for attaching the entire application to a single DOM element.
We've already discussed what components are at a very high level, but what exactly is a component within the context of a Vue SPA? The answer is simply another Vue instance, albeit this time not a root Vue instance. There are a few subtle differences between a root Vue instance and a non-root Vue instance—most notably that only the root Vue instances define el attributes. This is because nested Vue instances, or components in a component tree, are simply rendered within their parent root Vue instances template. They do not need to be told where to attach themselves.
The other main difference between a root Vue instance and a component Vue instance is that the latter must define their data property as a function rather than an object. We've already seen an example of this when we first looked at the basic structure of a Vue component, but to reiterate, it looked as follows:
<template>
  <div class="product">
    {{ name }}
  </div>
</template>


<script>
export default {
  name: 'product',
  data () {
    return {
      name: 'Hands on ASP.NET Core and Vue.js'
    }
  }
}
</script>

<style>
.product {
  font-size: 12px;
  font-weight: bold;
  color: teal;
}
</style>
Notice that the data property is a function that returns an object this time. This is because of the fact that every Vue component is a Vue instance. If we use a plain data object rather than a function returning an object, Vue cannot determine which component templates need to be refreshed when that property changes. This is a big issue when we render the same component multiple times when looping over lists of data, and then try and update a single list item's data property.
Reactivity
Now that we've talked about the Vue instance, it's worth talking about reactivity. One of Vue's core concepts is its reactivity system, which is also one of the main differences between building applications with Vue and sticking with jQuery or even plain old JavaScript. With jQuery or plain JavaScript, when a piece of data needs to change, we have to manually ensure that any DOM element which references that data is updated to display its new value. How big a job this is depends entirely on how big the application is, and how well-written it is. However, it's an exceptionally error-prone way of working, regardless of those factors.
In Vue, we bind the DOM to data properties defined in JavaScript, and then when those data properties change, the DOM is automatically updated for us by the reactivity system. The application quite literally becomes reactive to data changes, so it really doesn't matter how big the application is since every DOM element that displays a specific piece of data will automatically refresh when that value changes—no more manual DOM updates!
Component behavior
We've now seen how to define a Vue component, as well as how to declare data properties and render them into the DOM using component templates. However, this is just scratching the surface of what we can do with Vue components. We've already discussed how Vue components have two main aspects to them: presentation and behavior. Let's start to look at what else we can do with the behavior side of a component, starting by expanding on the data function and talking about state.
State
When talking about the state of an application, what do we actually mean? As soon as we introduce complex client-side logic to a web application, we also introduce multiple meanings of the word state, or rather, we introduce an additional type of state to our application. State can mean different things depending on the type of state we are interested in.
Most backend .NET developers will probably understand state to be based on a snapshot of the applications database at any point in time. In terms of our e-commerce example from earlier, this would include the current list of products and categories that make up our catalog; a list of users or customers who have registered for an account; and a list of orders and associated order items. This form of state is based on the domain of the application, and can be extended to include things that don't necessarily persist into the database, such as authentication, validation, and business rules that control how the application behaves.
The type of state that we care about at the component level is known as UI state. Generally speaking, UI state and domain state are separate things, but it isn't impossible for the two to cross over. For example, keeping track of the current user isn't necessarily a UI concern, but most SPAs will use some form of JWT authentication where the user's tokens, and as such their authentication state, will be tracked by the SPA. Another example is where we display paginated lists of data in an SPA—keeping track of the currently displayed list items is a UI concern, but we are still displaying a subset of the database-persisted items that belong to the domain of the application.
Other examples of UI state include keeping track of the active menu item in a navigation component; controlling the visibility of a modal window or custom drop-down menu; keeping track of which panels are open/closed in an accordion; and showing and hiding loading spinners during AJAX operations. These are fairly simple examples, and there are a lot more complex things that we can do with client-side state such as transitions and animations, but it's enough to demonstrate what we are talking about for now.
Each of our components are only responsible for their own subset of the application UI state. For example, a component that contains the filters that we've applied to a product list is only concerned with the selected values of those filter controls. It isn't—and shouldn't be—concerned with which user is currently logged in, or how many items the user has added to their shopping cart. This is all part of adhering to the single responsibility principle, which makes our components much easier to debug and maintain.
Sooner or later, we're going to come across a situation where a single component is in violation of the SRP, and we want to break that component down into a parent-child relationship instead. A common pattern is where we have a list component as a parent that contains a collection of list-item components as its children. The original component was probably already fetching the data it displays, and it makes sense to leave that responsibility up to the new parent list component; after all, the only alternative is to have each list-item component fetch its own data, which would result in multiple trips to the server instead of just one.
Props
We already know that components are self-contained, so how do the children get access to the data they need to display if the parent owns and controls it? The simple answer to that question is props. Props are a means of parent components passing data down into their children. The child component must explicitly declare the names of the props it expects to receive, and then these props can be referenced in much the same way that we do for any other piece of data that the component owns.
The following code demonstrates how we declare and reference a prop within a child component:
<template>
  <div class="product">
    {{ name }}
  </div>
</template>

<script>
export default {
  name: 'product',
  props: ['name']
}
</script>
We can render this child component from within its parent component template as follows:
<template>
  <div class="product">
    <child-component name="Hands on Vue.js and ASP.NET Core" />
  </div>
</template>

<script>
import ChildComponent from './ChildComponent.vue'
export default {
  name: 'parent',
  components: {
    ChildComponent
  }
}
</script>
At this stage, it is important to understand that this method of sharing data between components is strictly limited to one-way. It is impossible to send data back up the chain from a child to a parent using props. We'll look at how to communicate in the opposite direction later in this chapter.
The final point to mention about props is that Vue provides a means of validating the props being passed to a component. We can perform basic type checking; control whether props are required or optional; configure default values in the event that a prop is not provided; and even write custom validator functions in much the same way as we would with client-side validation libraries. The following code snippet shows an example of some of these validation rules and how we describe them in the component definition:
<script>
export default {
  name: 'validation',
  props: {
    name: {
      type: String,
      required: true
    },
    description: {
      type: String,
      required: true
    },
    price: {
      type: Number,
      required: true
    }
  }
}
</script>
Methods
If the data we are displaying within our components never changes, it's probably a sign that we really don't need to be using an SPA framework such as Vue. We know that the data in a component is used for things such as showing and hiding modal windows, so how do we actually change the data so that the UI can become reactive? Vue components can declare methods in order to manipulate their data. These methods are standard JavaScript functions, and automatically have their function context (that is, the value of this) bound to the component instance so that they can access its data, props, and computed properties. The following code shows how we can increment a simple counter using a method on a Vue component. We can trigger this method by calling it from a UI element event handler, which we'll look at later in this chapter:
<script>
export default {
  name: 'methods',
  data () {
    return {
      counter: 1
    }
  },
  methods: {
    increment () {
      this.counter++
    }
  }
}
</script>
Computed properties
As our applications grow in complexity, the chances are that sooner or later we'll need to perform some logic on one or more of our component data items and display it in a template. As a simple example, we may have data properties for a person's first and last name, but we are regularly required to concatenate them and display their full name. We could just use expressions inside the template as follows:
<template>
  <div>
    {{ firstName + ' ' + lastName }}
  </div>
</template>

<script>
export default {
  name: 'expressions',
  data () {
    return {
      firstName: 'Stu',
      lastName: 'Ratcliffe'
    }
  }
}
</script>
However, if we've duplicated this expression in multiple places throughout the template, and we then decide to change the way we display the person's full name, we have multiple places to find and update it. Even in a fairly small and simple example such as this one, this doesn't sound like much fun, and certainly isn't very maintainable.
Alternatively; we could use a computed property to achieve the same result. If you've ever used a computed column in SQL Server, then the concept will be familiar to you, and computed properties in Vue components behave in much the same way. In the following code snippet, we can see how we would declare a fullName computed property in our component declaration, and how we then render the value of that property into a template:
<template>
  <div>
    {{ fullName }}
  </div>
</template>

<script>
export default {
  name: 'computed-properties',
  data () {
    return {
      firstName: 'Stu',
      lastName: 'Ratcliffe'
    }
  },
  computed: {
    fullName () {
      return `${this.firstName} ${this.lastName}`
    }
  }
}
</script>
Although they are referred to and referenced in the same way as standard data properties, they are actually functions. As with the component data object and methods, if Vue detects that the returned value of a computed property has changed, it will automatically refresh the UI to reflect those changes.
Watchers
Watch properties are similar in functionality to computed properties, and in most cases it is actually unnecessary to use one. However, there is a limitation in that computed properties are synchronous functions and always return a value that we can bind to. This makes them impossible to use alongside asynchronous operations such as AJAX calls. So, what should we do if we want to trigger an AJAX call to our API server and react to the data that is returned?
Say we wanted to automatically display search results as a user enters their search term into a text input. We could implement a simple event listener on the input and create a method that is triggered on the keyup event, which performs an AJAX request with its current value. This would work absolutely fine, and you may never need any more control than this. However, this piece of functionality is completely coupled with the text input, and as such our component will not react and refresh the UI if we change the data value of the input directly.
Watch properties are a solution to this problem, as they provide a far more generic way of reacting to data changes. In the following example, we are performing an AJAX request that queries an API to perform some sort of search. We'll discuss what v-model, v-show, and v-for mean shortly, but for now, just know that the text input has its value bound to the searchValue property, and we display each search result in the array as a list item element:
<template>
  <div>
    <h1>Watchers Example</h1>
    <input v-model="searchValue" />
    <span v-show="loading">Loading...</span>
    <ul>
      <li v-for="result in searchResults">{{ result }}</li>
    </ul>
  </div>
</template>

<script>
export default {
  name: 'watchers',
  data () {
    return {
      searchValue: '',
      searchResults: [],
      loading: false
    }
  },
  watch: {
    searchValue (newValue) {
      let vm = this
      this.loading = true

      setTimeout(function () {
        vm.searchResults.push('some', 'search', 'results')
        vm.loading = false
      }, 500)
    }
  }
}
</script>
Note how we also have to declare a data property of the same name. The watch declaration instructs the component to quite literally watch the data property, and run the associated function each time it changes. The current value of the data property is passed to the function so that we can use it in any way that we please.
We also made use of this function to update a loading property to instruct the component that the AJAX call is in progress; this property can now be used to show a loading spinner in the UI each time the AJAX call is triggered. We could even extend this function to limit how often the AJAX call can take place by using a debounce or throttle function. None of this is possible with a computed property, and by using a watch property, it doesn't matter whether we update the data through a UI control or manually in another component method!
Lifecycle hooks
Every Vue component goes through a number of steps to initialize it when it's created. Among other things, these steps are responsible for compiling and rendering the HTML template, setting up the component's data so it becomes reactive, and mounting the component into the DOM. In order to hook into this process, we're given a number of lifecycle hooks that we can use to run our own application-specific initialization code at each stage.
These lifecycle hooks are as follows, and named appropriately enough to make themselves fairly self-explanatory:
- beforeCreate
- created
- beforeMount
- mounted
- beforeUpdate
- updated
- beforeDestroy
- destroyed
beforeUpdate and updated run in a continuous loop for the duration of the component's lifetime. Every time Vue detects a data change within the component, these steps are run before and after the virtual DOM is re-rendered.
So, how do we actually make use of these function hooks? The following code shows an example of how we declare the hooks we wish to use within a component definition:
<script>
export default {
  name: 'lifecycle-hooks',
  beforeCreate () {
    console.log('before create')
  },
  created () {
    console.log('created')
  },
  beforeMount () {
    console.log('before mount')
  },
  mounted () {
    console.log('mounted')
  },
  beforeUpdate () {
    console.log('before update')
  },
  updated () {
    console.log('updated')
  },
  beforeDestroy () {
    console.log('before destroy')
  },
  destroyed () {
    console.log('destroyed')
  }
}
</script>
We simply add a root-level function with its key matching the name of the lifecycle hook we want to use. This is all very well and good, but if you've never used an SPA framework such as Vue before, you're probably wondering why we'd ever want to bother doing this. There are many reasons to use lifecycle hooks, the most common of which is probably to fetch the data the component needs from an API somewhere. A good place to do this is in the created hook because we don't need access to the DOM, so there is no need to wait until the mounted hook is run later. The other reason to use created instead of mounted is because created is the only hook that is run on both client- and server-rendered versions of the component. We'll look at server-side rendering in one of the final chapters in this book!
A few other examples include triggering animations as soon as the page is displayed, and dirty checking a form to give the user a chance to complete it before navigating away. We would need to use the mounted and beforeDestroy hooks for these actions, respectively.
So far, we've been focusing on the Vue instances and the different ways they help us manage the data that our components are responsible for, but this is only half of the story. We're yet to see how Vue can help us actually display that data. Let's start focusing on the template section of our components!
Component presentation
We've now seen how a component can work with and manipulate the data of an application, so let's move on to look at how to actually display that data in the template section of our components.
Directives
Out of the box, Vue provides a number of directives that help us display our data. A directive is a special token that we attach to the HTML element markup in order to instruct Vue to do something special with the DOM element that it renders. Let's look at a simple example to make this a little easier to understand:
<template>
  <input v-bind:value="message" />
</template>

<script>
export default {
  name: 'data-binding',
  data () {
    return {
      message: 'Hands on Vue.js and ASP.NET Core'
    }
  }
}
</script>
Here, we use the v-bind directive to bind the value of a standard HTML input element to the message property of the component's data object. In an MVC application, we can do something similar with Razor syntax to bind DOM elements to properties on a view model. We can also use Razor to do things like loop over a list and render the same output for each item, and use conditional rendering and control flow to render different groups of elements depending on runtime model conditions.
The default directives that Vue provides can do all if these things and more, all while using a much cleaner and easier to read syntax!
Attribute binding with v-bind
We've already seen a simple example of v-bind, but there are many other uses for it. We can use v-bind to turn any standard HTML attribute into a reactive version that we can change the underlying data value of to cause the UI to refresh. For example, we can create a very basic image carousel by using v-bind on the src attribute of an HTML image tag, and then rotate through an array of data values to cause the image to refresh:
<template>
  <img v-bind:src="imageSrc" alt="image" />
</template>

<script>
export default {
  name: 'v-bind',
  data () {
    return {
      imageSrc: '',
      images: [
        'path/to/image/1.jpg',
        'path/to/image/2.jpg',
        'path/to/image/3.jpg'
      ]
    }
  },
  mounted () {
    let vm = this
    let count = 0

    setInterval(function() {
      vm.imageSrc = vm.images[count++]
      if (count == vm.images.length)
        count = 0
    }, 1500)
  }
}
</script>
Notice how we're using the mounted lifecycle hook that we talked about earlier, which is a perfect example of triggering a UI transition/animation as the component is rendered and displayed in the DOM.
One of the most common usages that we'll see throughout the rest of this book is class bindings to change how an element is styled reactively. We can conditionally add or remove classes based on the component's state, and change that state in response to user interactions such as button clicks. Until now, we've been using the full v-bind:attr syntax, where the section after the : is the specific HTML attribute you wish to data bind. However, Vue also provides a shorthand syntax for a number of its directives. In the case of v-bind, we can simply omit the v-bind part and use :attr instead:
<template>
  <div :class="{ 'blue': isBlue }"></div>
</template>

<script>
export default {
  name: 'v-bind',
  computed: {
    isBlue () {
      return Math.random(0, 1) > 0.5
    }
  }
}
</script>

<style>
div {
  background: red;
}

div.blue {
  background: blue;
}
</style>
Notice how we shortened the directives syntax to :class rather than v-bind:class. This is a very simple example that changes the color of a div element. However, we could use the same techniques to add colored borders and other indicators to show that a piece of the UI has been selected by the user, or that a form input element contains an error after validation.
Conditional display with v-show
Rich UIs usually require us to conditionally show and hide elements based on variables and user interactions. Vue gives us a couple of ways of achieving this with the v-show and v-if directives. We'll talk more about v-if in the next section, but ultimately, both options can be used for controlling the visibility of an element based on the component's state:
<template>
  <div v-show="show">
    v-show example
  </div>
</template>
In the preceding example, we're using v-show to control the visibility of a div element based on a simple Boolean property. This property is toggled by a simple method which is invoked by a button click.
Control flow with v-if and v-else
If...else statements will need no introduction, as we often use them in both our backend C# code and our frontend Razor views. Usage in Vue is no different; we just use v-if and v-else in place of the Razor syntax:
<template>
  <div v-if="show">
    v-if example
  </div>
  <div v-else>
    v-else example
  </div>
</template>
It is also possible to control multiple elements at once with a single v-if statement to prevent duplication. Once rendered, the following template tag will not be included, as it acts as an invisible wrapper:
<template>
  <div>
    <template v-if="show">
      <div class="first"></div>
      <div class="second"></div>
      <div class="third"></div>
    </template>
  </div>
</template>
As of version 2.1.0 of Vue, a v-else-if directive has also been added, and it behaves exactly as you'd expect:
<template>
  <div>
    <div v-if="show">
      v-if example
    </div>
    <div v-else-if="show2">
      v-else-if example
    </div>
    <div v-else>
      v-else example
    </div>
  </div>
</template>
As with a normal if...else statement, it must follow a v-if directive, and similarly the v-else statement must follow either a v-if or v-else-if statement.
There's nothing stopping us from using a v-if directive by itself, without any associated v-else or v-else-if directives, in which case it has a very similar behavior to v-show. At this point, you're probably wondering why we need both if they do the same thing. There is one very big difference between v-if and v-show, and it's important to understand how that difference should influence the decision on which to use in a given scenario.
An element with a v-show directive attached is always rendered into the DOM, and visibility is controlled via the CSS display property. On the other hand, elements controlled by a v-if directive are only rendered into the DOM if the conditional is truthy. This means that visibility is controlled by removing the element from the DOM entirely.
So, which one do we use and why? Generally speaking, v-show is more appropriate for use cases where we know the conditional is going to change frequently. This is because the overhead of toggling the element is much lower, as we have taken that performance hit by always rendering the element, regardless of the conditional. If the condition is unlikely to change at runtime, then we would prefer v-if, as there is a chance that the elements won't ever be rendered, saving us time upfront.
Rendering lists with v-for
Rendering lists of items is a very common requirement of most web applications, so Vue has us covered on this one with the v-for directive. Again, the syntax is very similar to Razor, and we can assign an alias to the current item in the loop. We can then reference the alias to give us access to any or all of its properties:
<template>
  <div>
    <div v-for="item in items" :key="item">
      {{ item }}
    </div>
  </div>
</template>
It is also possible to access the index of the item within the array by using an optional second argument:
<template>
  <div>
    <div v-for="(item, index) in items" :key="item">
      {{ index }} - {{ item }}
    </div>
  </div>
</template>
Although we've been using the standard syntax—for example, item in items—it is also possible to use on rather than in. This is closer to the standard JavaScript syntax, so feel free to use this version if you feel more comfortable with it.
Event handling with v-on
Vue gives us a really easy way to attach event handlers to elements using the v-on directive. With standard HTML elements, we can listen for any native DOM event:
<template>
  <div>
    <button v-on:click="clickHandler()">Click me!</button>
    <form v-on:submit="submitHandler()">
      <input type="text" />
    </form>
  </div>
</template>
Here, we are listening for a native click event on a standard HTML button, and invoking the clickHandler method each time it is clicked. We are also listening for the form's submit event to be fired, and intercepting it with the submitHandler method. You've probably noticed that we already saw some button click examples earlier when looking at some of the other directives in Vue. However, we didn't use the v-on syntax like we did here, and instead we used the @ shorthand notation. Here's the same example again using @click and @submit instead:
<template>
  <div>
    <button @click="clickHandler()">Click me!</button>
    <form @submit="submitHandler()">
      <input type="text" />
    </form>
  </div>
</template>
When writing event handler functions in jQuery, we often find ourselves needing to prevent the default event behavior or stopping the event from propagating up through the DOM. In order to do this, we would normally receive the native DOM event as an argument to the event handler function. This is also possible with Vue, as the native event is passed to the handling function, by default, as the only argument:
<template>
  <div>
    <button @click="clickHandler">Click me!</button>
  </div>
</template>
<script>
export default {
  name: 'events',
  methods: {
    clickHandler (event) {
      event.preventDefault()
      event.stopPropagation()
    }
  }
}
</script>
If you've written a lot of jQuery in the past, then this will feel right at home for you. However, it's not the only way to achieve the same result, and Vue gives us a much nicer way through the use of modifiers:
<template>
  <div>
    <button @click.prevent.stop="clickHandler">Click me!</button>
  </div>
</template>
It should be fairly self-explanatory as to what's happening here, but adding the .stop modifier is a shorthand way of calling event.stopPropagation(), and adding the .prevent modifier is a shorthand way of calling event.preventDefault(). There are a number of other modifiers available to us, including but not limited to the following:
- .native: This is used for listening to the native events on the component's root element
- .{keyCode}: This is used for listening to specific keyboard key presses, for example, @keyup.13
- .{keyAlias}: This is also used for listening to specific keyboard key presses, for example, @keyup.enter
- .left, .middle, or .right: This is used for listening to specific mouse button clicks
Notice how we also chained the prevent and stop modifiers in the preceding example. This is perfectly valid in Vue.
Event handling in Vue is incredibly flexible and powerful. We can attach as many v-on directives as we wish, but we can also attach multiple handlers using a single directive by making use of the object syntax:
<template>
  <div v-on="{ click: clickHandler, mouseover: hoverHandler }"></div>
</template>
Here, we are listening for both a click and hover event on a single div element. We can add as many properties to this object as we wish, depending on how many events we need to listen for.
Form input binding with v-model
When rendering the form input fields, it might seem obvious to make use of the v-bind directive that we've already looked at. We've already seen that binding an input element's value property can be done as follows:
<template>
  <input type="text" :value="value" />
</template>
Upon rendering of the component, you'll find that the textbox is displayed seemingly correctly with the data property prefilled. However, if you tried to change the value of the input by typing into the box, nothing would happen. This is because v-bind is a one-way binding. It is not possible to update the backing property using v-bind, and as such, the input will always display the initial value unless we change that value programmatically via some kind of component method. Following on from the preceding example, this would look like the following:
<template>
  <input type="text" :value="value" @input="onInputChange" />
</template>

<script>
export default {
  name: "form-input-binding",
  data() {
    return {
      value: "Some value"
    };
  },
  methods: {
    onInputChange(event) {
      this.value = event.target.value;
    }
  }
}
</script>
This is quite a lot of code for something as common, and simple, as binding a text input to a data property. Luckily for us, Vue has a much nicer way to create a two-way binding, and this is by using the v-model directive. Under the hood, it does a very similar job to what we've done earlier, but helps us keep our code much leaner and focused on more complicated functionality. It can also be used on all form input elements and text area elements, and automatically uses the correct way of updating the elements' values based on their types:
<template>
  <input type="text" v-model="value" />
</template>
By using v-model rather than the combination of v-on and v-bind, we completely negate the need to create a component method just to update the data property. The property is updated automatically for us by the v-model directive. As with the v-on directive, there are some modifiers that we can use to help us out in certain circumstances. These are as follows:
- .lazy: This is used to sync the input and data properties after a change event rather than an input event
- .number: This is used to automatically typecast the input value as a number rather than a string
- .trim: This is used to automatically trim the leading and trailing whitespace from the input value
Parent-child component communication
Earlier in this chapter, we looked at composing parent-child component relationships, and without explicitly saying so, we also covered the basics of how two components in such a relationship can communicate with one another.
Firstly, for a parent component to pass data down to its children, props can be used. However, this is only suitable for a one-way flow of data from parent to child. If we need to send data in the opposite direction, that is, from child to parent, we must use event handling using the v-on directive that we saw earlier. More specifically, we fire events from the child component, and instruct the parent component to listen for those events using the v-on directive. Vue is smart enough to know that we are listening to an event on a custom HTML element, and as such, it is capable of listening for custom events as well as native DOM events:
<template>
  <person @name-changed="handleNameChange" />
</template>
In this example, we render a custom person element and listen for a custom name-changed event. In order to trigger this handler, the child component must manually emit the event:
<script>
export default {
  name: 'person',
  data () {
    return {
      name: 'Stu Ratcliffe'
    }
  },
  methods: {
    save () {
      this.$emit('name-changed', this.name)
    }
  }
}
</script>
This completes our overview of Vue and the main features that we'll be using throughout the rest of this book. Let's move on and take a whistle-stop tour of ASP.NET Core. Again, if you're already familiar with ASP.NET Core or, more specifically, how it differs from previous versions of ASP.NET, you can skip straight ahead to Chapter 2, Setting up the Development Environment, where we'll get stuck straight into setting up our development environment.
ASP.NET Core – what's new?
ASP.NET Core is a complete rewrite of the ASP.NET framework, rather than a new version built on top of the existing one. It is much smaller and more modular, and is the first version of ASP.NET to have official cross-platform support. Covering everything that has changed in ASP.NET Core would require a whole book in itself, so we'll focus on the main parts that we need to know a little bit about to get us started.
Middleware pipeline
ASP.NET Core apps are built on the principle of a middleware pipeline. But what exactly do we mean by this? Web applications are all about HTTP requests and responses; a middleware pipeline is simply a set of instructions for how the application should handle each HTTP request.
Ultimately, an ASP.NET Core middleware is just a function which is invoked as a result of a HTTP request. If we need multiple middleware functions, they can be chained together in a specific order to form a pipeline to process the request. After each function finishes processing, they may decide that the request should be terminated. In this instance, it sends a response back to the previous middleware, which in turn passes it back to the middleware before that, and so on until it eventually ends up back with the client that started the request. Alternatively, if everything is successful during processing, it can simply pass the request on to the next piece of middleware defined in the chain. Each middleware can essentially perform some kind of custom logic before the request, after the request, or both. As an example, you could easily create a request timing middleware that records a timestamp before and after every request, so that the total processing time of each HTTP request can be logged somewhere.
The following diagram shows how this works in an ASP.NET Core web application:
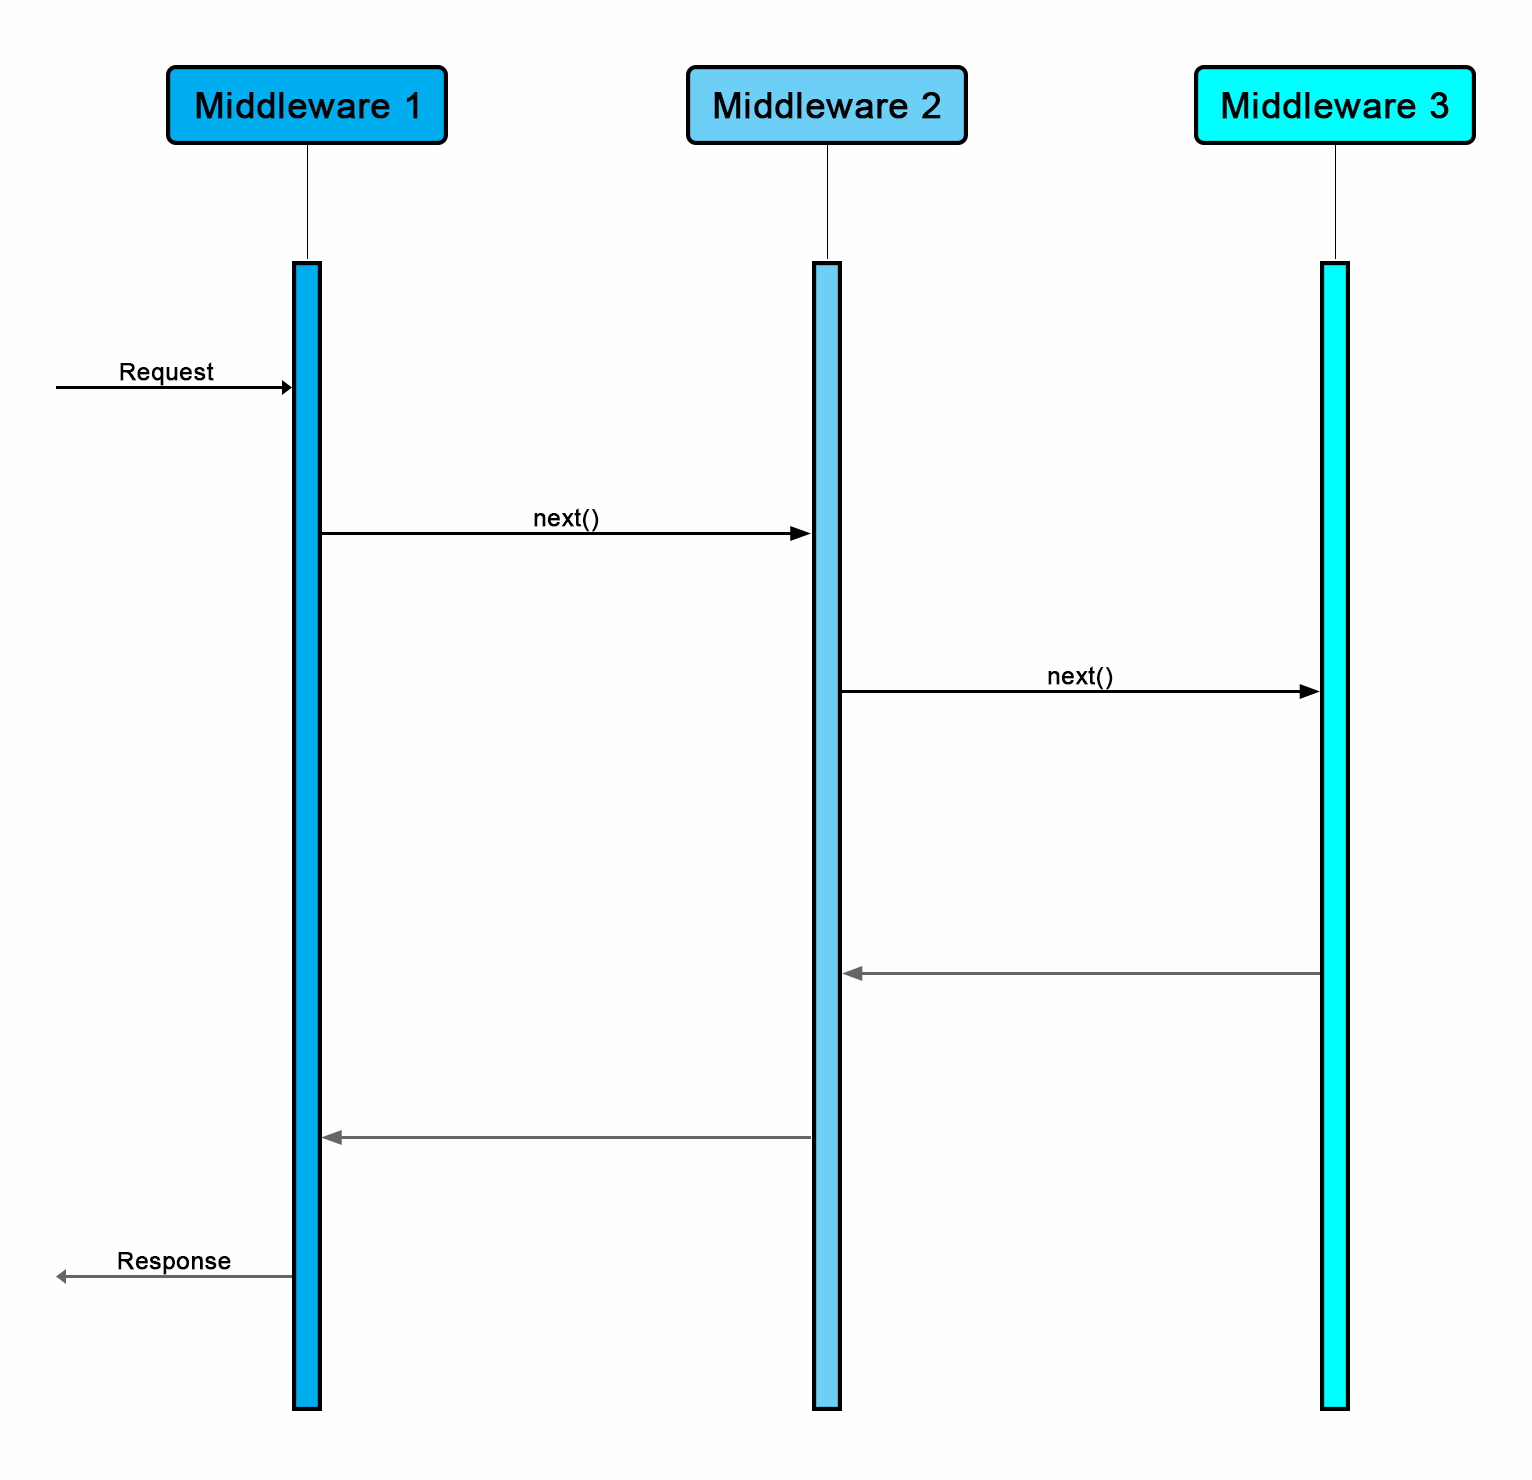
ASP.NET Core provides a number of middleware components for us to optionally make use of, and we'll see how we go about registering these with our application in the next section. The only other thing to note is that the order that we register our middleware in is extremely important. If one middleware depends on another one having processed the request before it receives it, we need to make sure that the dependent middleware is configured after the middleware it depends upon. Otherwise, our requests are likely to fail, or at least display some very strange results depending on what the middleware are designed to do.
Later in this book, we'll look at how we can build our own custom middleware and register them with the pipeline.
Application startup
All ASP.NET Core applications must have a Startup.cs file that contains a class named Startup. There are two methods we need to be aware of, and these are Configure and ConfigureServices.
Configure is a required method that is used to, as the name suggests, configure the application, specifically by setting up the request pipeline, including any optional middleware that we may need. The following sample shows how we would configure a simple ASP.NET application that uses the StaticFiles, Authentication, RequestLocalization, and MVC middleware:
public void Configure(IApplicationBuilder app, IHostingEnvironment env)
{
    app.UseStaticFiles();
    app.UseAuthentication();
    app.UseRequestLocalization();
    app.UseMvc(routes =>
    {
        routes.MapRoute(
            name: "default",
            template: "{controller=Home}/{action=Index}/{id?}");
    });
}
ConfigureServices is optional, although I've yet to find an application that doesn't implement it. It is used to configure the application's services and register them with the built-in dependency injection (DI) container. Most non-trivial applications will need to configure services such as Entity Framework (EF), ASP.NET Identity, RequestLocalization, and MVC. The following code shows a sample configuration of these services:
public void ConfigureServices(IServiceCollection services)
{
    services.AddDbContext<ApplicationDbContext>(options =>
        options.UseNpgsql(Configuration["ConnectionString"]));

    services.AddIdentity<ApplicationUser, IdentityRole>()
        .AddEntityFrameworkStores<ApplicationDbContext>()
        .AddDefaultTokenProviders();

    services.Configure<RequestLocalizationOptions>(options =>
    {
        options.DefaultRequestCulture = new RequestCulture("en-GB");
    });

    services.AddMvc();
}
You'll probably spend a fair bit of time in this class, tweaking configurations and such, so let's look into these two sections in a little more detail.
DI is a first-class citizen
ASP.NET Core has been built from the ground up with DI in mind, and in fact DI is now a pattern that is strongly encouraged for use in every application. As such, it is no longer required to use an external library for DI, as there is a simple built-in container included out of the box. On top of this, the vast majority of official supporting libraries are registered as DI services when we install them, such as EF and ASP.NET Identity. That being said, the built-in container is fairly limited in functionality, and for more advanced requirements, Microsoft is still recommending that we bring in a more fully-featured container instead.
DI is not a technique that all ASP.NET developers will be familiar with if they've only ever built fairly simple applications. As it's a core technique used in ASP.NET Core apps, if you aren't particularly comfortable with it, then I strongly recommend you go and read up on it. The Microsoft documentation for ASP.NET Core is a great place to start! We've already seen how to configure some of the built-in framework services using the extension methods provided by each package, but how do we register our own services? The answer is via a set of extension methods that provide a way of registering dependencies with different lifetimes:
services.AddTransient<ICartService, CartService>();
The services.AddSingleton() extension method is fairly self-explanatory, and is used for registering services that have a single instance which is shared by all dependent classes. The other two are slightly less obvious: services.AddScoped() is used for registering dependencies that are scoped to the lifetime of a request, that is, they are created once per request and each dependent class receives the same copy until the request terminates; services.AddTransient() is probably the most common, and simply means that each service is instantiated every time it is requested.
This is pretty much the limit of what we can do with the built-in container, and as previously mentioned, if you need any more complicated features, such as property injection and/or convention-based registrations, you'll need to look at a more complete container such as StructureMap.
EF Core – what's new?
These days, it is rare to see an ASP.NET application that doesn't make use of some kind of ORM, and even rarer to see one that uses anything other than EF. There are certainly other options, such as the much lighter Dapper and Marten, a library that takes the JSONB capabilities of PostgreSQL and uses them to turn it into a full-featured NoSQL document store. However, SQL Server is where most .NET developers' comfort lies, so we'll stick with what we know for the examples in this book.
Configuring relationships
In older versions of EF, you could get away with leaving it to do its thing without manually intervening with the way it builds out the relationships between tables in the database. It could handle one-to-one, one-to-many, and many-to-many relationships out of the box, meaning that unless you had a super complicated domain model, you didn't need to do much to get a working database.
In EF Core, only one-to-one and one-to-many relationships can be inferred without manual configuration. I don't see this as a huge problem, as it is only a few extra lines of code to tell the fluent model builder how to configure many-to-many relationships:
protected override void OnModelCreating(ModelBuilder builder)
{
    builder.Entity<OrderItem>()
           .HasKey(x => new { x.OrderId, x.ProductId });

    base.OnModelCreating(builder);
}
Notice how we only have to instruct EF what to do with the join table. From these few lines of code, it can now go away and build the database for us without any problems.
Global query filters
One of the features that other ORMs had that EF didn't was the concept of global query filters. These queries are a means of telling EF to automatically apply a LINQ statement to every query that's executed against the type of entity in the filter. A common use case for this kind of query is when an application uses the concept of soft deletes. Rather than actually deleting the data, it is marked with a Boolean flag instead.
The following image shows how we can register a global query filter on a DbContext entity to only include records where the IsDeleted flag is set to false:
protected override void OnModelCreating(ModelBuilder builder)
{
    builder.Entity<Order>()
           .HasQueryFilter(x => !x.IsDeleted);

    base.OnModelCreating(builder);
}
We could also use these global filters in multitenant applications, where each tenant should only be able to access the data associated with their tenancy. This is a much better solution than relying on applying these filters manually on every query, which is exceedingly error-prone, as it is too easy to forget.
Compiled queries
EF now supports the concept of explicitly compiled queries. These provide a number of benefits, most notably by increasing the query's performance, but also making it easy to run the same query in multiple places within the code.
The idea is pretty simple; if we have a query that is run many times within our application, then we can instruct EF to compile it. It is compiled only once, but we can run it as many times as we like, with different parameters each time. The following code shows an example of how we can define a compiled query and then execute it:
public static class CompiledQueries
{
    public static Func<ApplicationDbContext, int, Order> OrderById =
            EF.CompileQuery((ApplicationDbContext db, int id) =>
                db.Orders
                    .Single(c => c.Id == id));
}
[HttpGet]
public IActionResult CompiledQuery()
{
    var order = CompiledQueries.OrderById(_context, 147);
}
In-memory provider for testing
It has always been exceptionally difficult to write tests around the code that was dependent on an EF DbContext. To make testing easier, developers often resorted to implementing different variations of the repository pattern so that the business layer could depend on a repository interface instead. This had the desired effect of making testing easier, but the general concept of a repository pattern over the top of EF was quite simply unnecessary, as the DbContext is already an implementation of both the repository and unit of work patterns.
EF Core has addressed this issue by providing us with an in-memory version that we can use for our tests. It is now a fairly simple task to create an in-memory database and seed it with test data before each test is run. This ensures that the database is in a known state for each test, without the complexity of attempting to mock the DbContext!
The following example shows how we can configure a test DbContext and fill it in with test data:
public static ApplicationDbContext GetDbContext(params object[] seedData)
{
    var connection = new SqliteConnection("DataSource=:memory:");
    connection.Open();

    var options = new DbContextOptionsBuilder<ApplicationDbContext>()
        .UseSqlite(connection)
        .Options;

    var context = new ApplicationDbContext(options);
    context.Database.EnsureCreated();
    if (seedData != null && seedData.Length > 0)
    {
        context.AddRange(seedData);
        context.SaveChanges();
    }
    return context;
}
We can then pass this DbContext to a dependent controller within the scope of our unit tests:
[Fact]
public async Task Test()
{
    using (var context = GetDbContext())
    {
        //arrange
        var controller = new ProductsController(context);

        //act
        var result = await controller.GetProducts();

        //assert
        Assert.NotEmpty(result);
    }
}
The only thing to note when using the in-memory provider is that it isn't a full relational database, and doesn't try to mimic one. I've noticed a few weird things when using it in my applications, and found that using an in-memory SQLite provider to be far more stable and predictable. There is plenty of documentation on both options on Microsoft's own ASP.NET Core documentation pages.
Summary
In this chapter, we looked at the basic concepts that we'll need to build an application with Vue, as well as some of the most important changes to ASP.NET Core and EF Core. We also saw how Vue has a very similar syntax to that of Razor, and covers many of the same use cases where Razor and MVC views would be used in a traditional MVC-based application.