


 Download code from GitHub
Setting Up the Project
Hey there – I’m Ludovico, and I’m going to be your sherpa through this book… except I haven’t written it as a book, but more like a manual, meaning that it has a very practical approach and a concrete goal. So, think of it as a guide where you must follow its instructions to assemble your product. I’ll be developing a project during these pages, and I advise you do the same with a project of your choice; there’s no better teacher than experience in this case. Unreal Engine is a very vast piece of software and may seem intimidating at first, but it’s quite user-friendly to use once you start, so don’t wait until the end of this book to start playing with it. The best thing to do is to proceed step by step alongside me.
So, let’s get started!
The first step is to create a project, and this chapter will teach you how. You’ll learn about defining the project’s scope, activating the necessary options and plugins, and organizing a clean file structure that adheres to community standards and is ready for client iterations.
In this chapter, we’re going to cover the following main topics:
- Installing Unreal Engine and any necessary plugins
- Creating a new project in Unreal Engine, naming the project, selecting the project’s location, and configuring any desired project settings
- Defining the scope of the project (animation, stills, virtual reality (VR), and interactive) and activating plugins and features accordingly, besides picking the proper template
- Personal project
Our goal for this chapter is to lay the foundations of our scene in Unreal Engine 5 (often abbreviated as UE5), making all the right moves before diving deep into the magic of Unreal. Starting with the right foot forward, or in this case with the right template, is essential to save time and be efficient.
Technical requirements
To effectively use Unreal Engine 5 for architectural visualization, you’ll need a workstation with at least 16 GB of RAM and an RTX graphics card (2070 or higher). An SSD is ideal but not mandatory. These are not the minimum requirements, but the ones to fully utilize the potential of Unreal Engine 5 for architectural visualization. For further information on the specifications, please refer to this link: https://docs.unrealengine.com/5.1/en-US/hardware-and-software-specifications-for-unreal-engine/.
It’s important to note that although Unreal Engine 5 offers powerful modeling tools, they cannot replace the need for a third-party tool to create your 3D model and prepare it for UE5. Examples of such tools include 3ds Max, Blender, Maya, Cinema 4D, and Rhino. In this book, we’ll be using 3ds Max by Autodesk, but you’re free to choose any software that meets your needs and can handle both 3D modeling and UV coordinates creation.
The project files for the chapter can be found at https://github.com/PacktPublishing/Architectural-Visualization-in-Unreal-Engine-5
Installing Unreal Engine
The first step in installing Unreal Engine is to obtain the Epic Games Launcher, which will serve as the starting point for all subsequent operations. To do this, follow these steps:
- Navigate to https://store.epicgames.com/ and download the launcher. If you do not already have an account, you will need to create one. Once the launcher has been downloaded, open it, and enter your credentials to log in.
- To begin, navigate to the Unreal Engine page on the left-hand side. Next, click on the Library tab located at the top of the page.
- From here, click on the small + icon to add a new version of Unreal Engine. Select the latest version, such as “Unreal 5.3,” and after specifying the installation path, press Install to begin the installation process. As shown in Figure 1.1, click on the + button to add as many Unreal versions as you need:
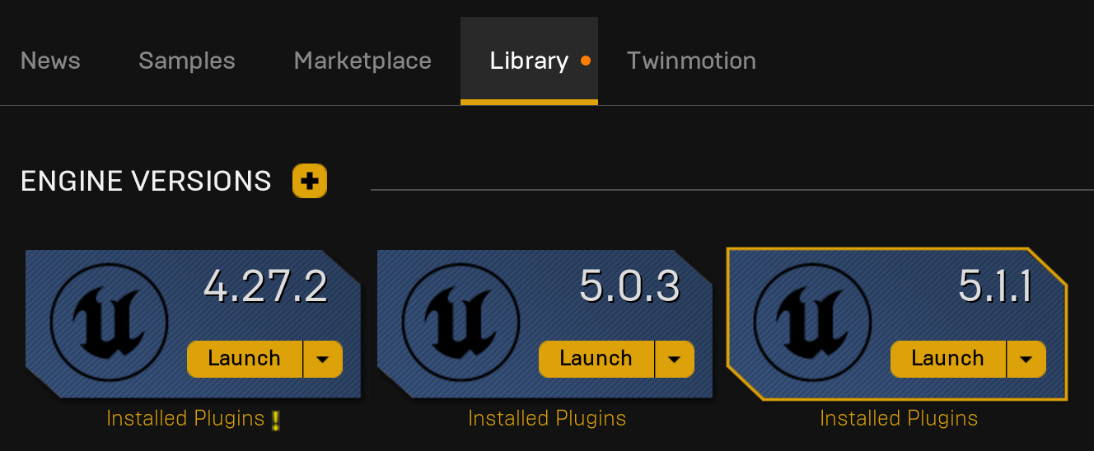
Figure 1.1: The launch screen
How to save space on disk
Unreal Engine requires a significant amount of storage space, with projects often the size of several GB. Disk space can be a crucial consideration, so it’s worth taking steps to save space where possible. One simple tip is to choose which components to install with the software. For example, if you’re using a Windows operating system and primarily developing content such as still images and animation for architectural visualization, you likely won’t need the Android, Linux, HoloLens, and iOS components. Removing these components during installation can save you almost 20 GB of space, and doing this for all your Unreal Engine versions can result in substantial storage savings over time. However, keep in mind that if you plan to develop apps for virtual reality headsets such as Meta Quest, or AR applications, you will need to install some of these components. You can add or remove those components at any time, even after installing Unreal – just click on the small tab within the Unreal icons and choose Options, as shown in Figure 1.2. Uncheck the checkboxes for Android, HoloLens, iOS, and Linux before proceeding with the installation, then click Apply.
Don’t worry about these components – you can always add them back later.
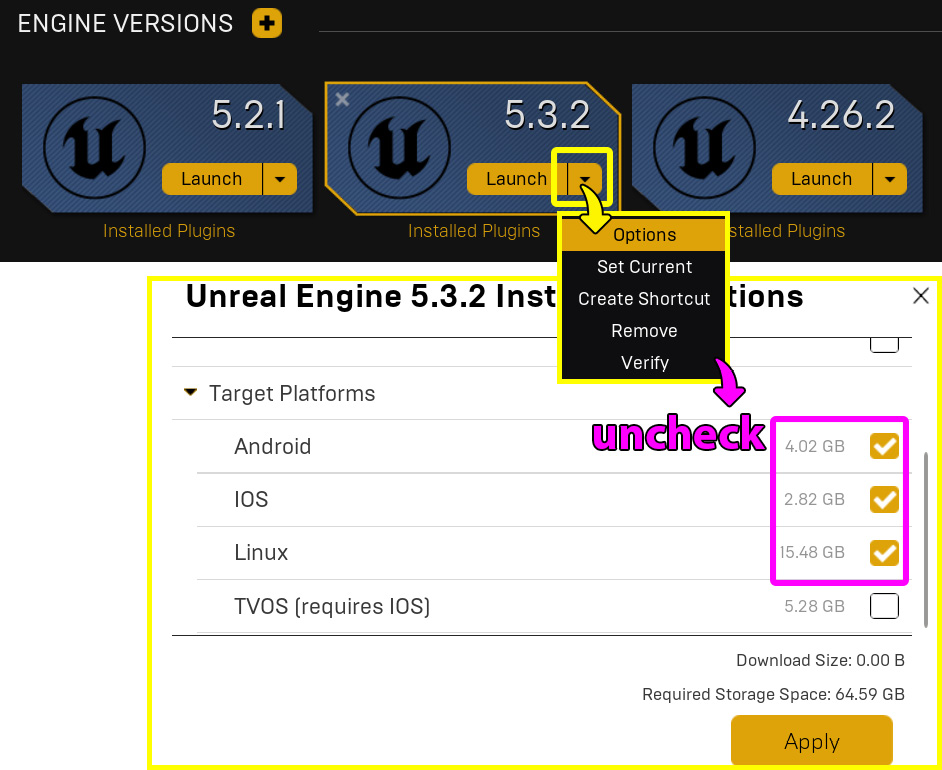
Figure 1.2: Removing unnecessary components
Now that we have Unreal Engine installed, it’s time to start having fun with it. However, before that, we have to learn how to create new projects and move around inside them.
Creating a new project
To launch Unreal Engine, you can either click on the Launch button in the top-right corner of the Epic Games Launcher and choose your desired version or double-click on the Unreal Engine icon which will likely be created on your desktop, which is linked to a specific version. The launcher is more flexible and provides more options. Once the engine has been launched, you will be presented with a window that contains multiple options. The left-hand side of the window displays five sections, each representing different fields of usage, such as game development, architecture visualization, and virtual production. Each section contains several templates, but don’t be intimidated by these choices – you can always import content and activate plugins from other templates later on.
For architectural visualization, it’s best to start from the Architecture section and choose either the Blank or Archvis template. For demonstration purposes, I will start with the Blank template:

Figure 1.3: Creating a new project
Next, you will need to choose the default location and name of your project. It’s highly recommended that you name your project properly from the beginning to avoid any future issues when packaging it. The naming convention in Unreal Engine, which is based on C++, is CamelCase, meaning a name is formed by multiple words joined together as a single word with the first letter of each word capitalized. An example is TheCliffHouse.
Once we’ve opened our newly created project, we’ll be greeted by Unreal’s sometimes intimidating interface. Don’t let it scare you – it can be overwhelming at first glance, but with a little bit of understanding, it becomes quite intuitive:
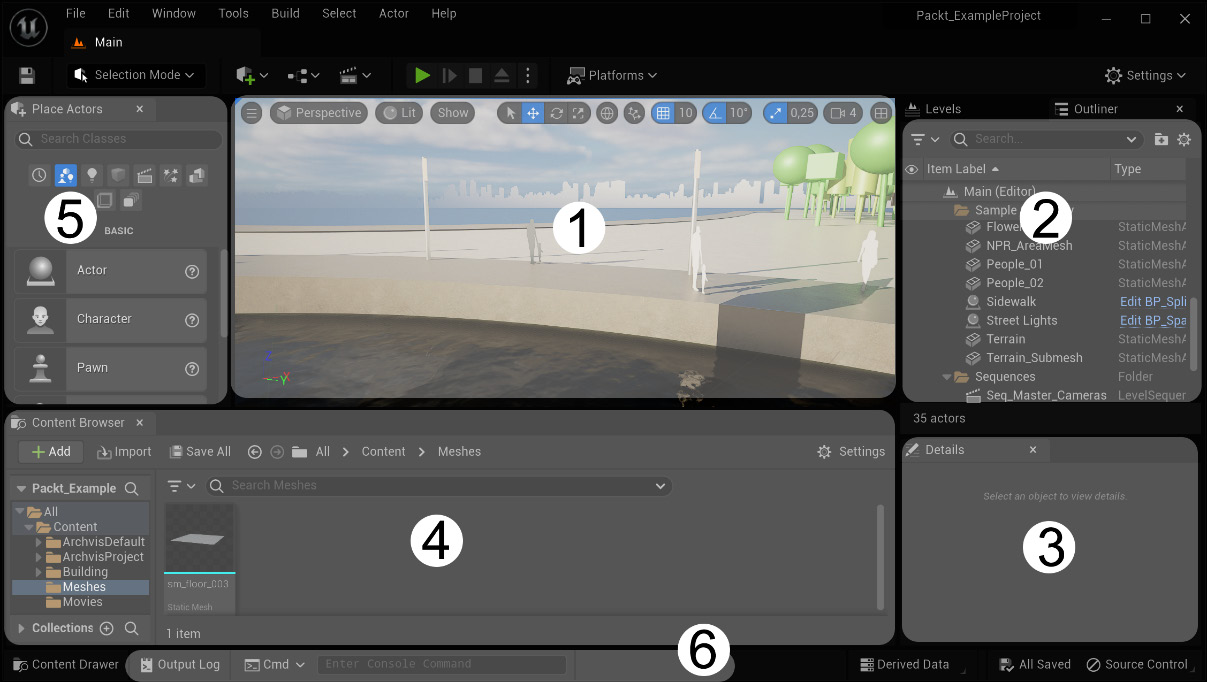
Figure 1.4: Unreal’s default interface
The interface is divided into several main areas, each with its own purpose: in the center of the screen, you can see a 3D viewport (1) depicting your scene. Several panels provide access to different tools and settings. Some of the most used panels include the scene outliner (2), which shows a hierarchical view of all the objects in the scene, and the Details panel (3), which allows you to edit the properties of an object. From the Window tab, you can add other panels and dock them anywhere within the interface.
Unreal Editor is also where you will find the Content Browser (4). This is where you can access all the assets that you have imported into your project, such as textures, models, and audio files. Last, but not least, you have the Place Actors tabs (5) from which you can insert into the scene all the main types of actors. With a little bit of practice and experimentation, you will soon become comfortable using Unreal Engine’s interface. The short command line at the bottom of the interface is the console tab (6) and is where you can type and give instructions through console commands. This part is vital and can be expanded via the Output Log button next to it.
In short, to organize your scene and assets, there are three main things you must focus on:
- Content Browser: This is where you keep everything and is arguably the most important panel.
- The outliner: This displays all the objects in the scene and allows you to organize them into folders and groups.
- The Level panel: By default, it is hidden, but it can be called by going to the menu bar, choosing Windows, then Level, and docking it on the interface. Levels, which are also known as Maps in Unreal, are scenes containing actors and can serve multiple purposes. The Level panel might resemble a layer manager, but that would be incorrect since levels are much more powerful; each is a standalone scene that can be programmed with specific instructions.
Besides these, there are some more useful functions for organizing assets, such as collections and layers, but we’ll discuss them briefly later when we cover asset management. It’s important to organize things from the start, including preparing the interface, to ensure a smooth workflow and prevent a simple scene from becoming a cluttered and disorganized monster. We’ll revisit this topic in future chapters.
Now that we’ve had our first look at Unreal from within, let’s learn how to organize our interface and project.
Organizing your workspaces
Your workspace can be customized to meet your needs by dragging tabs and panels around the interface. You can open any desired panel from the Window tab and dock it in a desired location or leave it floating. Once you’re satisfied with your interface, you can click on Window | Layout | Save Layout | Save Layout As... to save it. If needed, you can restore the default layout by going to Load Layout | Default Editor Layout:
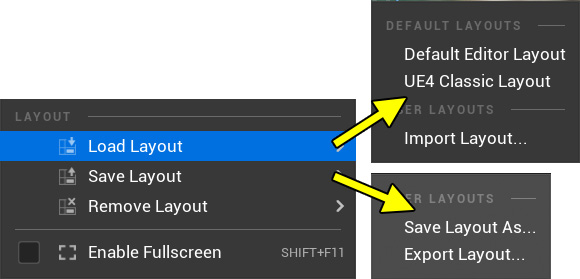
Figure 1.5: Saving the custom layout or restoring the default one
It’s worth noting that you can have multiple instances of the same panels, such as Content Browser and outliner, which can be extremely useful. For example, you can keep one Content Browser open for materials, another for textures, and so on.
How to deal with plugins
At this point, you’re almost ready to start playing around with your scene. But first, we might want to check out some plugins so that we’re good to go. Unreal is improved by various plugins that allow you to perform amazing feats. Some of these plugins come with Unreal itself, while others can be obtained for free or purchased from the official marketplace. For architectural visualization purposes, it is necessary to activate some plugins as they simplify many aspects. Most of them are enabled by default, but only if you start from one of the architectural visualization templates. In this section, we will explore how to enable a plugin and which ones are the most beneficial for architectural visualization, as well as how to locate and install plugins from the marketplace.
Enabling plugins
To activate a plugin, click on the Edit button on the menu bar and select Plugins; a pop-up window will appear. On the left-hand side, you can filter the plugins by category. Simply click the checkbox next to the plugin you want to enable and restart your system when prompted. If you need to activate multiple plugins, it is recommended to enable them all at once before restarting:
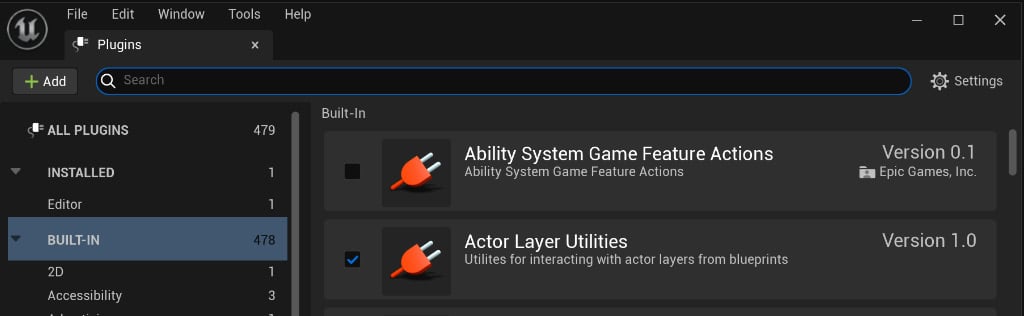
Figure 1.6: Enabling plugins
Note that plugins slow down your game when you’re loading it, so don’t enable them if they’re not necessary, and disable them if they are no longer needed.
For Archvis usage, we’re going to need the following:
- Datasmith content.
- Datasmith importer/CAD importer/C4D/glTF importer: The exact one depends on the modeling software you are using and the material your clients provide. We will return to this topic later.
- Movie Render Queue.
- Movie Render Queue Additional Passes.
Typically, if you start from the Archvis template, all these plugins will be enabled by default. If you have selected a different template to start with, you will need to activate the corresponding plugins to use the associated features.
Installing external plugins
You can locate officially released plugins on the marketplace, while those that are still in development or have not been officially released can often be found on GitHub. It is recommended to only use the marketplace initially. To access it, open the Epic Games Launcher and go to the Marketplace section, or simply navigate to the marketplace website by going to https://www.unrealengine.com/marketplace/en-US/store. Search for the plugin you need; before making a purchase, ensure that it is available for the Unreal version you are currently using for your project. Once you have confirmed this, click Install to Engine:
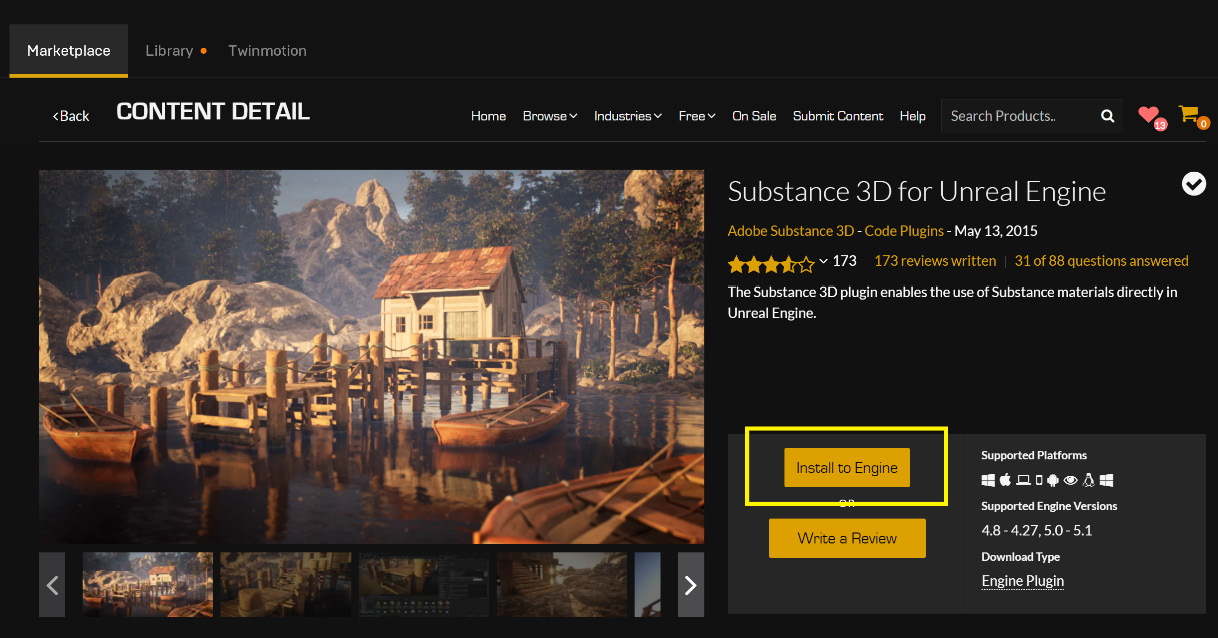
Figure 1.7: Installing a plugin
Then, select the version you wish to install. At this point, you’re good to go:

Figure 1.8: Choosing the version of Unreal for the plugin
After installation, don’t forget to activate the plugin inside your project.
Useful plugins
The following are some of the more useful plugins for Archvis:
- Quixel Bridge: This is installed and activated by default. Nevertheless, if you also download the standalone version from https://quixel.com/bridge, it can help you navigate the assets and pick your favorites before you jump into UE5.
- Substance 3D: This is very useful for texturing as the substance materials have their own shaders that can benefit from substance procedural capabilities.
- AXYZ design anima: This is not available on the marketplace but it can be installed alongside the Anima software.
Once all the necessary plugins have been enabled or checked, you can move on to the not-so-secret control room of Unreal to see what’s under the hood.
Understanding project settings
These technical settings lay the foundation for your project. It’s crucial to identify the scope of your project in the early stages to set the appropriate settings. The type of project you’re working on – whether it’s for still rendering, animation, computer VR, or mobile VR – has an impact on your workflow and project settings. It’s essential to understand that your choice of project type will shape your workflow, although this distinction may become less significant in the future.
If you’re focused on learning animation and still image creation, you can skip the next few sections as the default project settings, when using the architectural visualization templates, are optimized for these specific purposes. However, it’s still important to understand how to modify certain settings if needed as there may be other scenarios where customization is required.
Essentially, Unreal Engine was created as a game engine with the frame rate (also known as frames per second (FPS)) as a crucial factor to consider. Over time, it has evolved and now allows you to produce various outputs with varying minimum frame rates, which affects the fluidity of the scene. A smooth gaming experience requires a minimum of 30 FPS (ideally 60 FPS), which is also necessary for interactive experiences. VR outputs, on the other hand, are more demanding and require a minimum of 90 FPS. Fortunately, architectural visualization stills and animations do not pose major performance issues. A fluid scene is preferred, but there are not strict performance requirements, and the best approach is to use your judgment to prevent a slow, heavy scene. Running a scene at 20 FPS is not ideal, but it will not impact the final output for architectural visualization.
Why is this important? By default, Unreal Engine 5 has some features enabled (such as Lumen and Nanite), which are innovative but not suitable for all purposes and may slow down performance in some cases. For example, VR experiences on mobile headsets (not PC VR) will benefit from traditional techniques such as baked lights. Thus, these types of projects will require different features and project settings.
On the contrary, if you’re aiming for maximum photorealism and have a powerful machine, you might want to enable all the best features available. The Archvis templates have almost all of these features enabled by default, but if you started with a different template, you’ll need to go to Project Settings and enable the following settings in the Rendering section:
- Dynamic Global Illumination Method: Lumen
- Software Ray Tracing Mode: Detail Tracing (or choose Global to save on performance)
- Support Hardware Ray Tracing and Path Tracing: Check these boxes
Figure 1.9 shows where you can find the settings that enable maximum graphics quality:
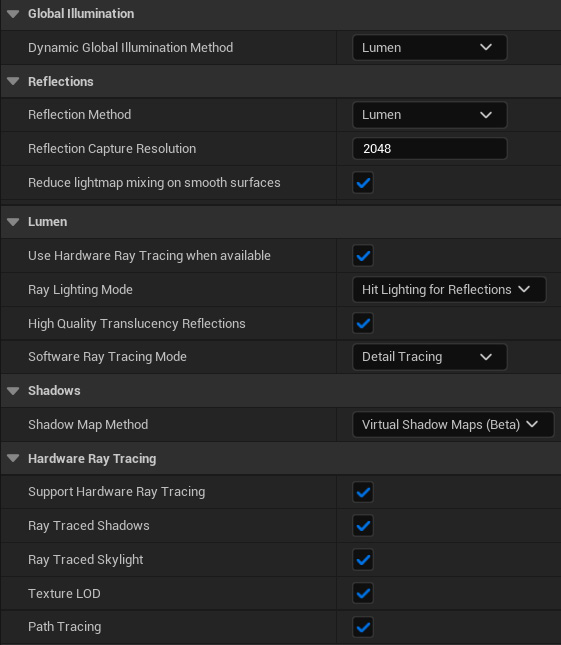
Figure 1.9: Project settings for maximum quality
Don’t activate all these settings immediately; the default settings from the Archviz template are sufficient initially. In general, a good rule of thumb would be “don’t kill flies with a cannon,” or rather start slowly and add settings and functionalities as you need them.
For our purposes, we won’t be modifying any settings. However, if you’re creating other things such as a VR experience, you may opt for a workflow with baked lighting,which would require a different approach to modeling and scene preparation. This would involve disabling lumen and possibly nanite from the Project Settings area.
Project – creating a new level
To help you better understand what we’ve covered, I will be creating a project as I progress through each chapter. This way, you will see how I apply the steps outlined in this book. It is strongly recommended that you do the same. Choose a small project you have already completed to save time on modeling and be able to focus on the creative aspects. This way, you’ll have a reference for your shots and a quality target to strive for. Ideally, the project should be a small interior scene, not cluttered with too many props and objects. I will be recreating The Cliff House by MacKay-Lyons Sweetapple Architects.
Let’s start our project:
- Launch Unreal Engine 5 and create a new project using either the Blank template or the Archvis template from the Architecture section. Remember to name the project appropriately.
- Next, we must create our main level. Right-click inside Content Browser and select New Folder or click the Add button on the left. Name it
maps. There are conventions for folders and names. While you can choose your filenames, it’s advisable to follow these conventions. The folder for levels is usually named maps, regardless of how unusual it may seem. - On the top bar, click File and then New Level. Choose Blank Archvis Template from the options provided. Although starting with a completely blank level is preferable, for teaching purposes, we’ll use the blank Archvis template as it contains some basic elements such as lights, sky, and fog; we haven’t covered these yet but they’re useful for pre-visualization purposes.
An empty level will open. Save it immediately by clicking File | Save Current Level and place it inside the
mapsfolder you created. Give it an appropriate name; in my case, this isTheCliffHouse:
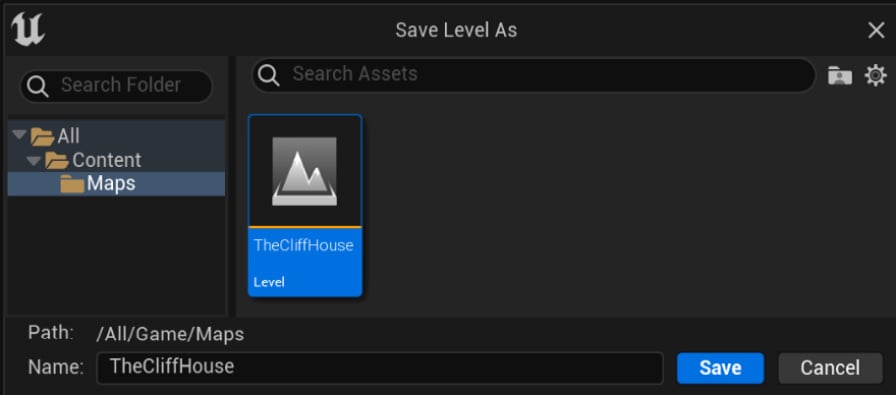
Figure 1.10: Saving the new level
- Navigate to the menu bar, select the Plugins option, and enable any necessary plugins (mainly Datasmith and Movie Render Queue; refer to the How to deal with plugins section of this chapter for more information).
- To view your scene immediately upon opening it, go to Project Settings, select Maps & Modes, and replace the current map in the Editor Startup Map and Game Default Map fields with the one you created previously. This will ensure that the default map is not displayed every time you open your scene:
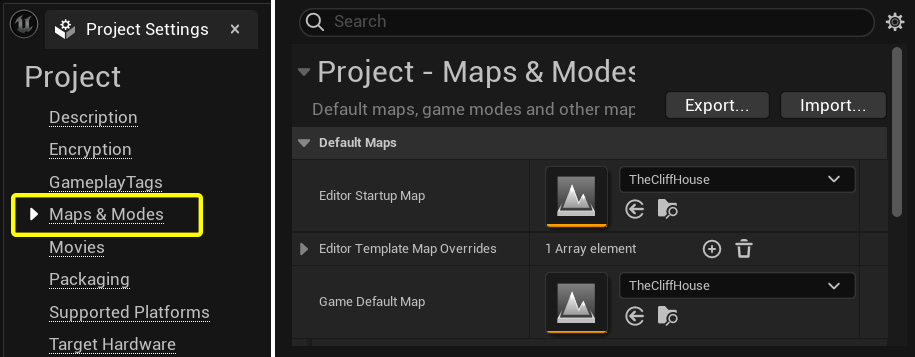
Figure 1.11: Changing the default map
Done? Great! We are ready to start building our scene.
Summary
In this chapter, we learned how to install Unreal Engine 5 and get started with the necessary materials. We also learned how to set up the right type of project by choosing from different templates, naming the project, and selecting the project’s location.
We focused on which project settings need to be enabled or configured and discovered how to activate all the necessary plugins depending on the scope of the project. In particular, we have learned which ones are most useful for Archviz.
Finally, we started our exercise project by creating the main map.
In the next few chapters, we’re going to learn how to prepare our 3D scene, import it, and set it up to bring it to life within Unreal Engine 5.
