


 Download code from GitHub
In this chapter, we will cover the following recipes:
- Determining whether your computer can run ArcGIS Pro
- Determining your ArcGIS Pro license level
- Opening an existing ArcGIS Pro project
- Opening and navigating a map
- Adding and configuring layers
- Creating a project
ArcGIS Pro represents a huge step forward in Desktop GIS. This new 64-bit solution allows GIS Professionals to take full advantage of modern computer hardware, which brings increased performance and capability that has not been available for the desktop. It also has a brand new modern ribbon interface. This is completely different from the toolbar-based interface we have become accustomed to in ArcMap or ArcCatalog. While more intuitive for completely new users, it can be a bit challenging for existing ArcGIS Desktop users.
In this chapter, you will begin exploring ArcGIS Pro. You will first determine whether your computer has the capability to run this powerful software. Then you will determine which license levels are available to you. This is important as it will impact your ability to complete some of the recipes in this book.
You will then move on to working in ArcGIS Pro. You will start by learning how to open an existing ArcGIS Pro project. Then you will open and navigate a map. From there, you will learn methods for adding new layers and configuring some of their properties.
Finally, you will learn how to create a new project from the beginning. This will include adding new maps, and importing ArcMap map documents.
Unlike the 32-bit ArcMap and ArcCatalog applications, ArcGIS Pro supports hyperthreading (use of multiple core processors), graphics processing units, and more than 4 GB of RAM. This also means ArcGIS Pro requires more computer resources to run properly.
The minimum requirements for ArcGIS Pro 2.1 are:
- Windows 64-bit OS:
- Windows 7, 8.1, or 10
- Windows Server 2008 R2, 2012, 2012 R2, or 2016
- Hyperthreaded dual core processor
- 4 GB RAM
- 32 GB hard drive space
- 2 GB video memory
- Microsoft .NET Framework 4.6.1
- Microsoft Internet Explorer 11
- DirectX 11
- OpenGL 3.3
- Shader Model 4.1
- Pixel Shader 4.0
- Vertex Shader 4.0
Keep in mind that these are the minimum requirements. The more hardware the better where ArcGIS Pro is concerned. In general, I would recommend at least 12 GB of RAM, an i5 dual core processor, and a separate video card with its own GPU and memory. For a complete set of recommended hardware specifications, you may want to look at my other book from Packt Publishing, Learning ArcGIS Pro.
In this recipe, you will learn how to use the system requirements tool to verify whether your computer can run ArcGIS Pro. This is a free tool provided by Esri.
To work through this recipe, you will need to make sure you have access to the internet and sufficient permissions to install software on your computer.
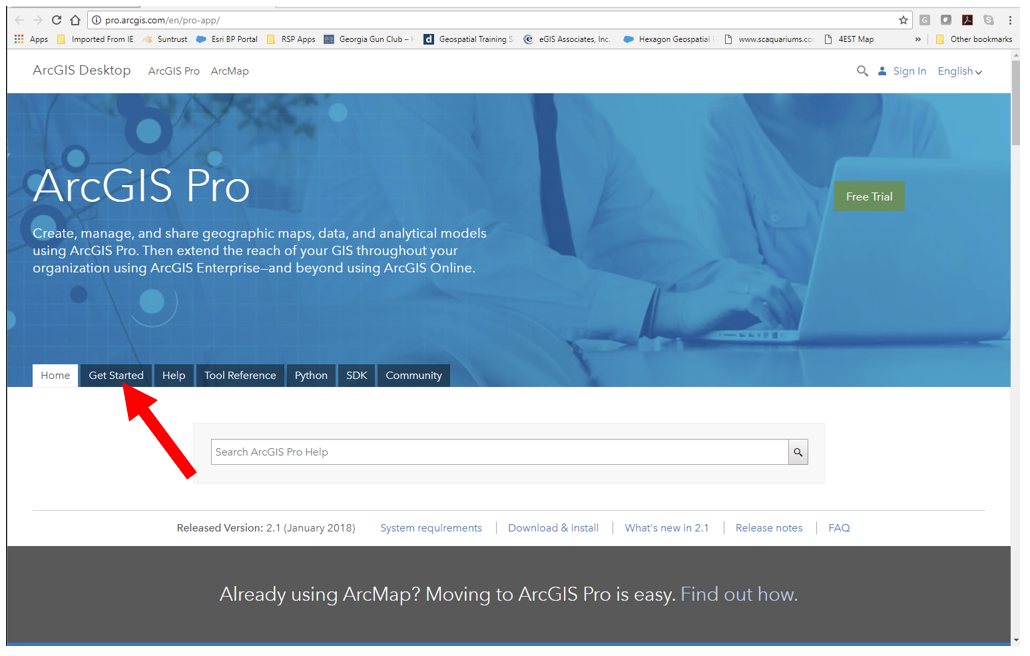
- Open your favorite web browser, such as Google Chrome, Microsoft Internet Explorer, or Firefox.
- Go to http://pro.arcgis.com.
- Click the
Get Started
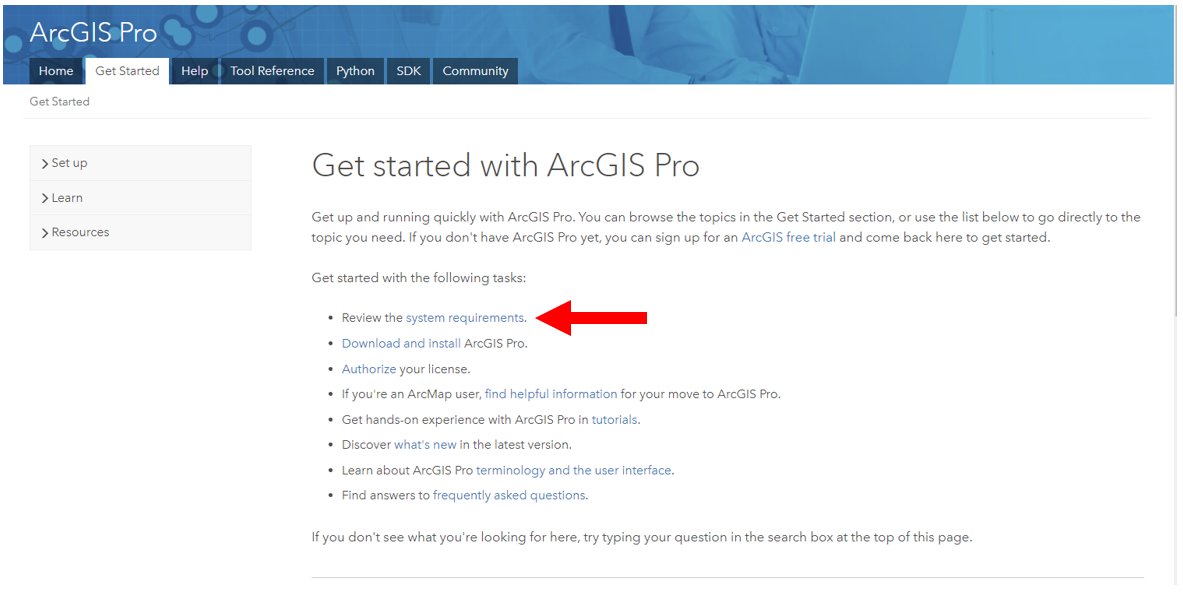
- Click the link located in
Review the system requirements.
- Click on the
Supported Operating Systemslink located on the right-hand side of the page in theIn this topicbox. - Click
Check your computer’s ability to run ArcGIS Pro 2.1:

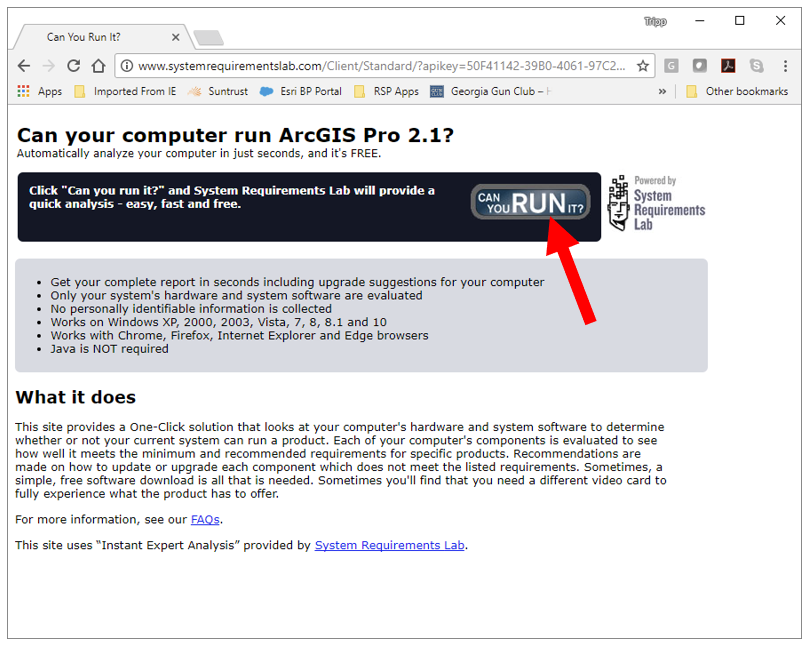
A new tab should open in your browser and take you to the Can You RUN It page powered by System Requirements Lab.
- Click the
Can You RUN Itbutton, as shown here, to download theDetection.exefile:
- Once the
Detection.exefile is downloaded, click it to run the file. This executable will check the specifications of your computer and generate a report indicating whether your computer is capable of running ArcGIS Pro. - When the hardware detection application is complete, return to your web browser to see the results. It hopefully will indicate your system passed, similar to the following screenshot:
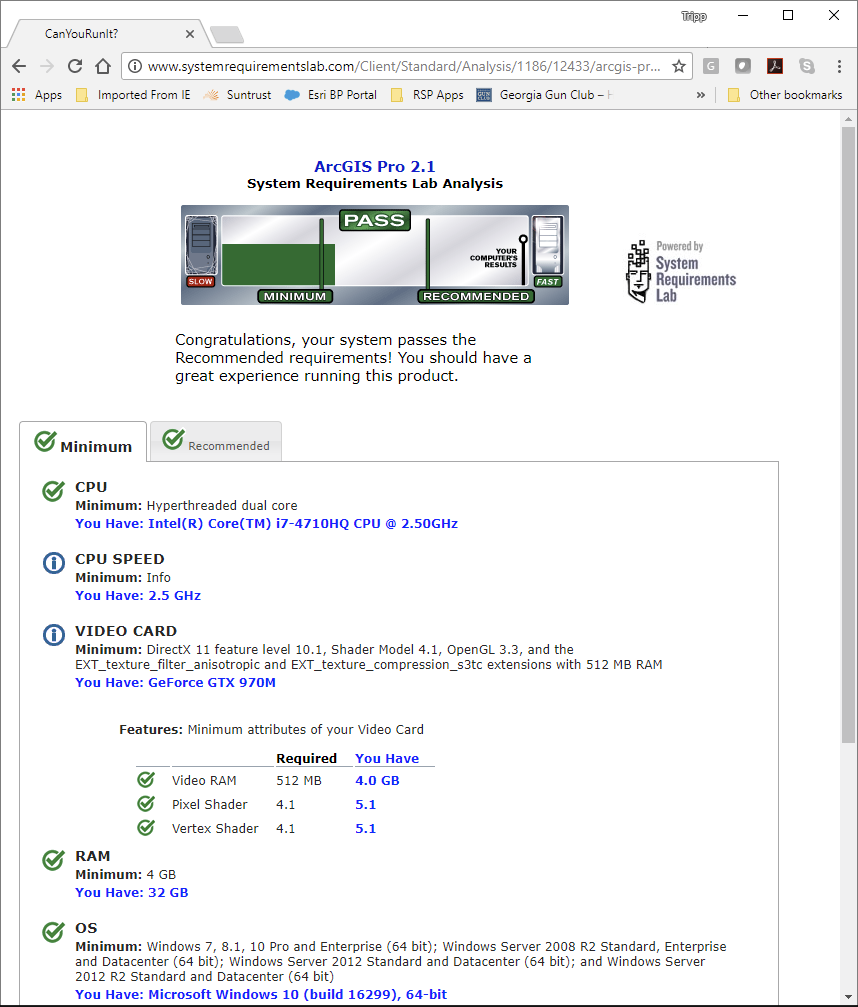
Notice that you can see whether your system meets the minimum and recommended specifications for running ArcGIS Pro. If your system just meets the minimum specifications, you can expect ArcGIS Pro to run slowly and require the application to be restarted much more frequently.
If your system failed, you will need to upgrade the components or software that the reports indicate are below the required specifications. This might be as simple as updating your drivers or Internet Explorer. It might require you to purchase new hardware if your CPU, RAM, or video card fail to meet the minimum requirements.
If your system meets or exceeds the system requirements, you may download and install ArcGIS Pro. Please refer to the installation instructions located at http://pro.arcgis.com/en/pro-app/get-started/install-and-sign-in-to-arcgis-pro.htm.
ArcGIS Pro has very specific requirements that must be met in order to run effectively. In this recipe, you downloaded and used the tool provided by Esri to verify whether your system met or exceeded those requirements. This tool checks for both hardware and software dependencies needed to successfully run ArcGIS Pro, and provides you with a detailed report so you know without a doubt whether your computer has the horsepower required.
ArcGIS Pro has three different license levels: Basic, Standard, and Advanced. The license level determines the level of functionality available to the user. Basic has the least functionality, Advanced has the most, and Standard is somewhere in between.
In general, Basic allows you to visualize GIS data, produce maps, perform simple data edits, and perform basic GIS data analysis. Standard builds on the capabilities of the Basic level, with more advanced editing and data validation tools. Advanced expands the capabilities of both Basic and Standard by adding more data analysis tools. For a complete list of the capabilities of each license level of ArcGIS Pro, go to http://pro.arcgis.com/en/pro-app/get-started/license-levels.htm.
It important for you to know what license level you are using so you know what capabilities are available to you. Some recipes in this book will require a Standard or Advanced license. In this recipe, you will learn how you can determine your ArcGIS Pro license level.
You will need to make sure that you have successfully installed ArcGIS Pro 2.0 or higher. If you have not installed ArcGIS Pro yet, please refer to http://pro.arcgis.com/en/pro-app/get-started/install-and-sign-in-to-arcgis-pro.htm for installation instructions.
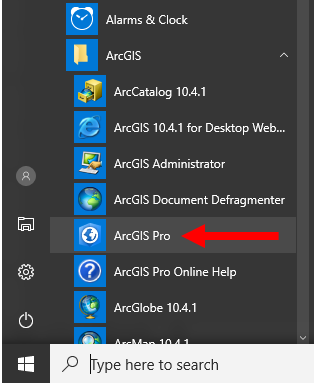
- Go to the Windows Start button, which is normally located in the lower-left corner of your screen.
- Scroll down to the
ArcGISprogram group and clickArcGIS Pro:
Note
Depending on the version of Windows you are running, your Windows Start button and display might be a bit different. You may also need to click All Programs to see the ArcGIS program group. If you right click the ArcGIS Pro icon you can select to add it to your task bar at the bottom of your display. This makes starting ArcGIS Pro faster and easier.
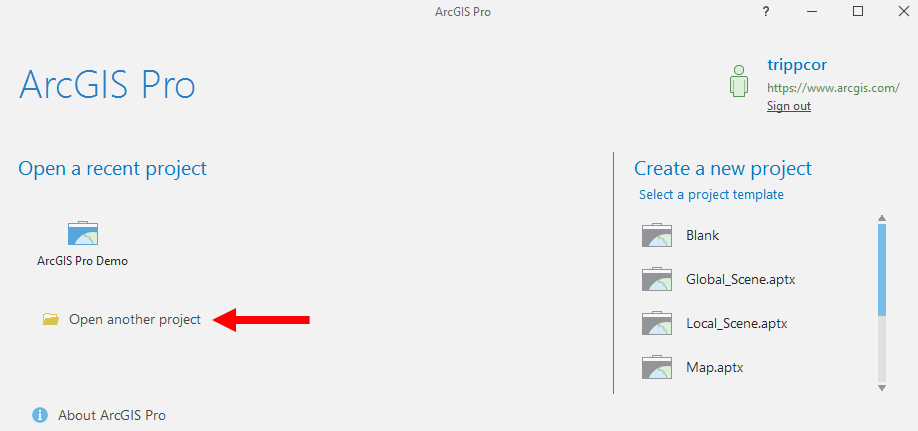
- The ArcGIS Pro start window will appear. Click
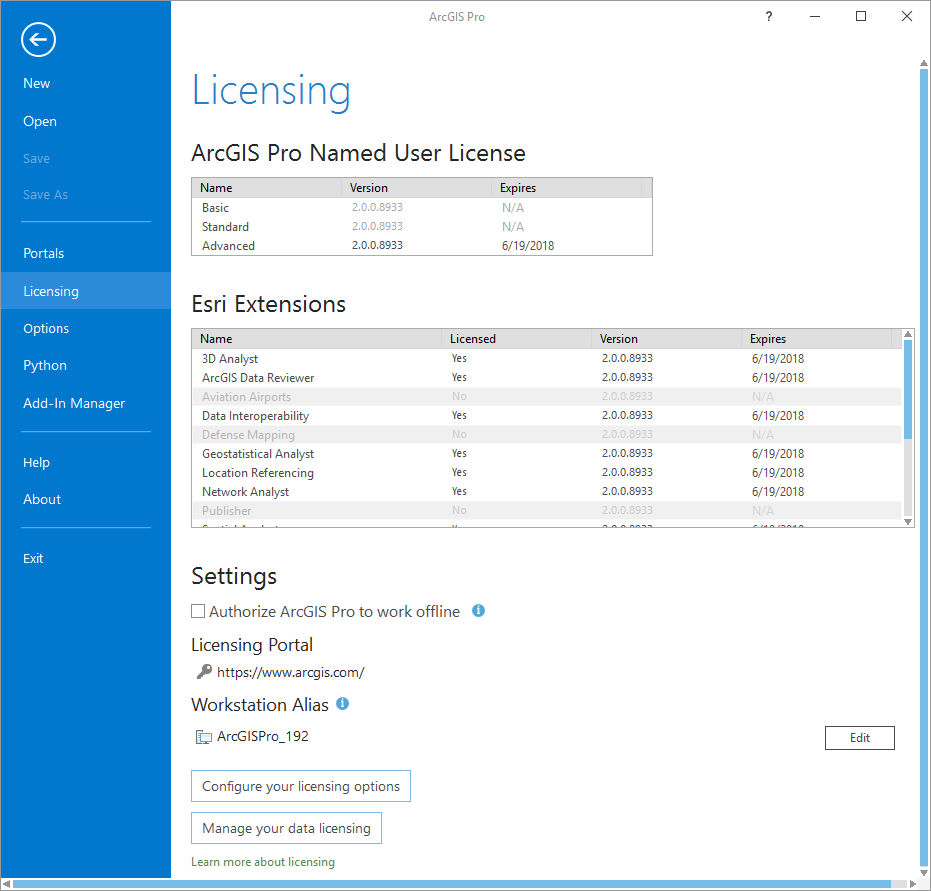
About ArcGIS Pro, located in the lower-left corner of the start window. - In the
About ArcGIS Prowindow, selectLicensing, located in the left side of the window. This will display your ArcGIS Pro licensing information:
Note
If you already have an ArcGIS Pro project open, you can access this same information from the project pane.
At the top of the Licensing window, you will see what license level you have been assigned. As you can see in the image, I have access to the Advanced license level. From here, you can also see which extensions you have access to. Extensions are add-ons for ArcGIS Pro, which provide additional functionality and are normally focused on a specific use, such as 3D analysis or network analysis. Again, in the image, you can see I have access to several extensions:
Note
Question: What license level have you been assigned, Basic, Standard or Advanced?
Answer:
Question: Do you have access to any extensions, and if so which ones?
Answer:
- Once you have determined the license level you have access to, you can close ArcGIS Pro if you are not continuing to the next recipe. If you are continuing, keep ArcGIS Pro open.
In this recipe, you learned how to determine which license level of ArcGIS Pro you had access to. You did this by going to the About ArcGIS Pro window from the ArcGIS Pro start window. From there, you accessed your license level information by clicking the Licensing option located on the left side.
The license level is important, as it determines what functionality you have access to within the program. As you will see in this book, some recipes will require you to have access to higher license levels.
The Licensing window allows you to do more than just see what license level and extensions have been assigned to you. It also allows you to determine what type of ArcGIS Pro licensing you want to use, check out a license for use in the field, and more.
ArcGIS Pro supports three basic types of licensing: single user, concurrent user, and named user. Named user is the default and requires you to have a username and password in your organization’s ArcGIS Online or ArcGIS Portal. Single user licenses are the traditional software license, where the software is licensed to a single computer. Concurrent licenses are sometimes referred to as network licenses. These make use of a license manager that is typically installed on a server and controls how many users can be running the software at once. To learn more about the types of licenses supported in ArcGIS Pro, go to http://pro.arcgis.com/en/pro-app/get-started/licensing-arcgis-pro.htm.
ArcGIS Pro makes use of project files that have a .aprx file extension. Projects store 2D maps, 3D scenes, database connections, folder connections, custom toolboxes, and more. When you start ArcGIS Pro, you must open a project.
In this recipe, you will learn how to open an existing project. Later in this chapter, you will learn how to create a new project.
To complete this recipe, you will need to make sure you have downloaded and installed the data associated with this book. If you followed the installation instructions, the data and projects should be located in C:\Student\ArcGISProCookbook. You will also need access to the internet. You will need to have ArcGIS Pro 2.1 or later installed as well. The recipe can be completed with any license level of ArcGIS Pro: Basic, Standard, or Advanced.
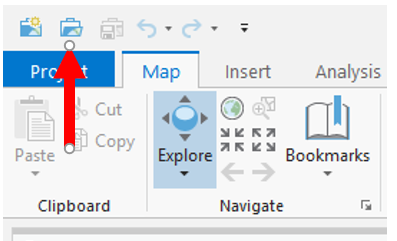
- If you closed ArcGIS Pro at the end of the last recipe, open ArcGIS Pro. If you still have ArcGIS Pro open, click the back arrow located in the top-left corner of the
About ArcGIS Prowindow.
- Click the
Browsebutton, which looks like a file folder. - Under
Computerin the left panel, selectC:\.
If you do not see anything below Computer in the panel on the left, click the small arrow head. That will expand the contents of the computer, so you should see the C:\ drive.
If you installed the book data to another drive, select the drive containing the book data.
- In the panel on the right, scroll down until you see the
Studentfolder and double click it. - Double click the
ArcGISProCookbookfolder. - Double click the
Chapter1folder. - Select the
Chapter 1 Ex 1.aprxfolder and clickOK.
You have now opened your first ArcGIS Pro project. If it opened successfully, ArcGIS Pro should look similar to this:
Before you can start working in ArcGIS Pro, you must first open a project. To open a project, you must navigate to where it is stored. In this recipe, if you installed the data in the default location, the project was stored on your computer's C:\ drive in a series of folders, so that the full path was C:\Student\ArcGISProCookbook\Chapter1. You were able to access this project by navigating to that location.
Projects can be saved to your local computer or on a network server. It is also possible to save projects to external and flash drives. You may encounter issues if you do save and try to access projects stored on these devices because of slow data transfer rates.
You are not required to close ArcGIS Pro if you want to open another project. ArcGIS Pro doesn't allow you to open a project if you already have a project open. This will close the current project and open the one you select. To do this, follow these steps.
- Click the
Openbutton located on the Quick Access Toolbar at the top of the ArcGIS Pro interface, as indicated in the following image:
- In the
Open Projectwindow that appears, navigate toC:\Student\ArcGISProCookbook\Chapter1using the same method you did to open the current project.
- Select the
Chapter 1 Ex 1A.aprxfile and clickOK.
The project you originally opened should now be closed and a new project should be open, which looks similar to this:
You have now opened two projects in ArcGIS Pro using two different methods. You will find, while using ArcGIS Pro, that there are usually at least two ways to accomplish any tasks. Often there are more.
Now that you know how to open an existing project, it is time to learn how to open a map stored within the project. Projects can contain 2D maps, 3D scenes, data connections, layouts, styles, toolboxes, and more. However, 2D maps are still the primary canvas that GIS professionals work with.
In this recipe, you will learn how to open existing 2D maps. Once open, you will learn how to navigate within the map.
If you have successfully completed all the previous recipes, you should not need to do anything more to continue with this recipe. If you have not completed the other recipes in this chapter, you will need to do so before starting this one.
- Start ArcGIS Pro if you closed it at the end of the last recipe and open the
Chapter 1 Ex 1Aproject located inC:\Student\ArcGISProCookbook\Chapter1.
Note
If you don’t remember how, you should refer back to the previous recipe or click the project name in the list of recently opened projects.
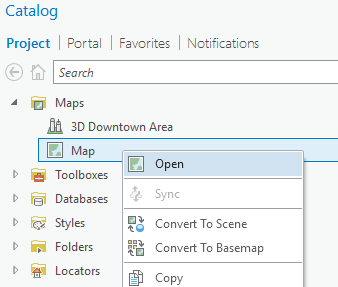
- In the
Catalogpane located on the right of the ArcGIS Pro interface, expand theMapsfolder by clicking the small arrowhead to the left of the wordMaps.
Note
If the Catalog pane is not open, check that it is not set to autohide. If it is, you will see a small tab located on the right side, named Catalog. Simply click the tab to make the Catalog pane open. If you have closed the Catalog pane, click the View tab in the ribbon. Then click the small arrowhead located below Catalog and select Catalog Pane.
- Right-click on
Mapand selectOpen, as shown here:
You have just opened an existing project map. A project can contain multiple maps that can be either 2D or 3D. 3D maps are referred to as scenes. Now you will learn how to navigate within the maps.
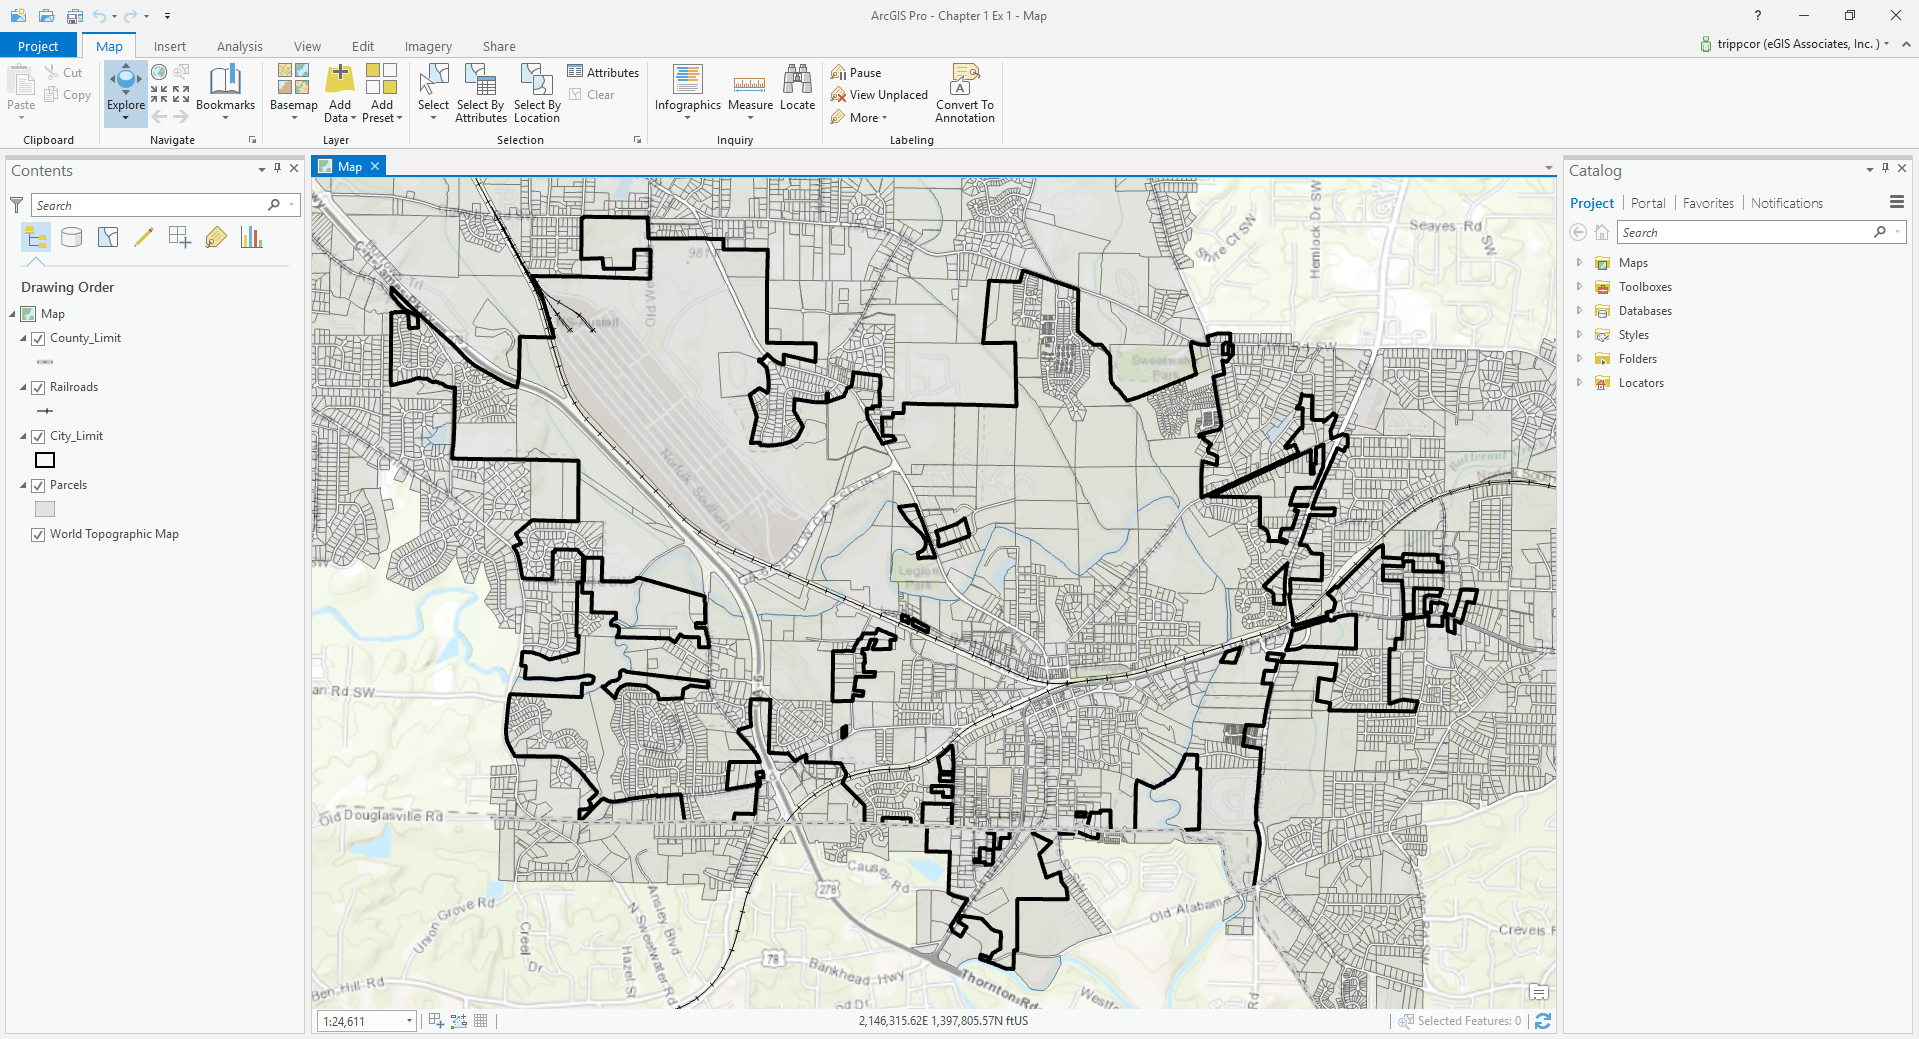
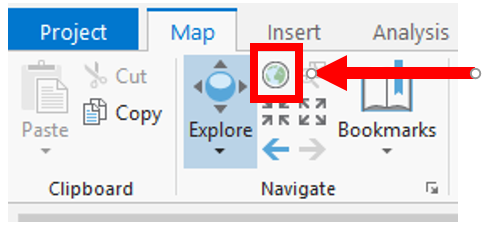
- Click the
Maptab in the ribbon. - Click the
Exploretool located on theMaptab in theNavigatetool group.
Note
The Explore tool is a jack of all trades. It allows you to pan, zoom, and access data about features in your map. For those that have used ArcMap, the Explore tool replaces the identify, zoom in, zoom out, and pan tools.
- Move your mouse pointer into the map and roll the scroll wheel on your mouse away from you to zoom into the map. Stop whenever you are zoomed in to a desired scale.
- Now roll the scroll wheel back toward you in the opposite direction to zoom out. Stop whenever you are zoomed out to a desired scale.
- To return to the full extent of the map, click the
Full Extentbutton located in theNavigategroup on theMaptab in the ribbon, as shown here:
- Click
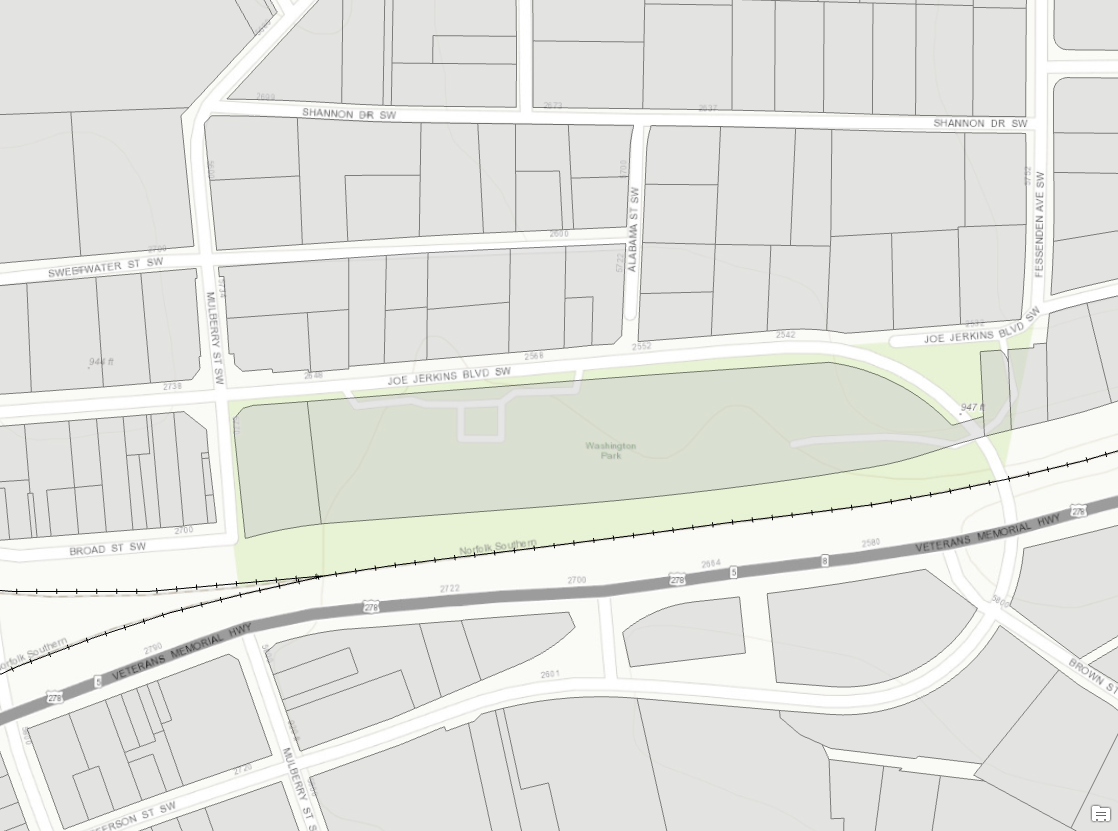
Bookmarksin theNavigategroup on theMaptab in the ribbon. - Select
Washington Parkfrom the window that appears. This will zoom you to a predefined area in your map that focuses on Washington Park. Your map should now look similar to this:
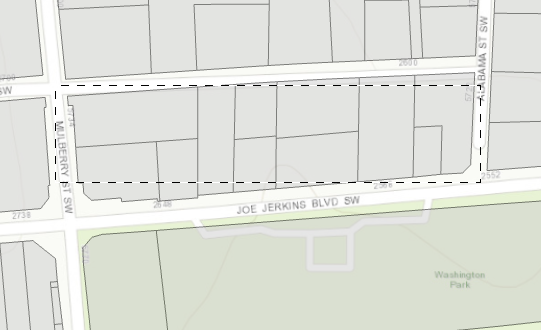
- Now you want to zoom in closer to the block just to the north of Washington Park. Select the
Exploretool again. - Hold your Shift key down and click near the intersection of
Mulberry ST SWandSweetwater ST SW. Continue holding down the Shift key and drag your mouse pointer to the southeast until you reach the intersection ofAlabama St SWandJoe Jerkins Blvd SW. As you are dragging your mouse, you should see a dashed rectangular box appear in the map. This represents the area you want to zoom into. Once you have created a box that looks similar to the following image, release both the Shift key and your mouse button:
- Ensure the
Exploretool is still active in theMaptab. - In the map, click the northwesternmost parcel in the block you just zoomed into.
If you look closely at the information window that appears, you will notice it shows the information for the City Limits and not the parcel. You need to adjust the settings for the Explore tool.
- Close the information window by clicking the small
Xlocated in the upper right corner. - Click the arrowhead located below the
Exploretool and selectVisible Layers. - Click the same parcel once again.
- On the bottom left of the information window, look at the number of features which are being identified. It should say 1 of 2.
- Click the small arrowhead located next to the number 2. This will display the information for the parcel you clicked in place of the
City Limit. - Close the information window once you are done.
- Try clicking other features in the map and using some of the other options associated with the
Exploretool to see how they work. - Click the
Full Extentbutton to return to the full extents of the map. - Save your project by clicking the
Save Projectbutton located in the Quick Access toolbar.
In this recipe, you began exploring the contents of a project by opening an existing map that was contained in a project that you opened in the last recipe. Once you opened the map from that Catalog pane, you began to navigate within it using the Explore tool. You used the Explore tool to first zoom in and out within the map. Then, you used the Full Extent button to return to the full extent of the map view. Next, you used a book mark to zoom to Washington Park in the map. From there, you zoomed into an even more specific area, using a combination of the Explore tool and the Shift key along with your mouse.
Once you zoomed into a block of parcels you were interested in, you used the Explore tool to retrieve information about a specific parcel.
Now you know how to start ArcGIS Pro and open a project so you can begin accessing functionality. You have learned how to open an existing map and navigate within the map. You can even see information about features displayed within the map using the Explore tool.
But how did those layers get added to the map? How did ArcGIS Pro know how to display the layers you saw within the map? That is your next step in your ArcGIS Pro journey.
In this recipe, you will learn various methods for adding new layers to a map. You will then discover how to configure various properties associated with a layer, such as its name and symbology.
If you have already completed the previous recipes, you should be ready for this one. If you have not completed them, you will need to do so. This recipe builds on the past ones.
- Start ArcGIS Pro and open the
Chapter 1 Ex 1A.aprxproject if you closed ArcGIS Pro at the end of the last recipe. - Open the map named
Mapif it is not already open.
As you can see, this is a very simple map. You will want to add some new layers to show additional information.
- Click the
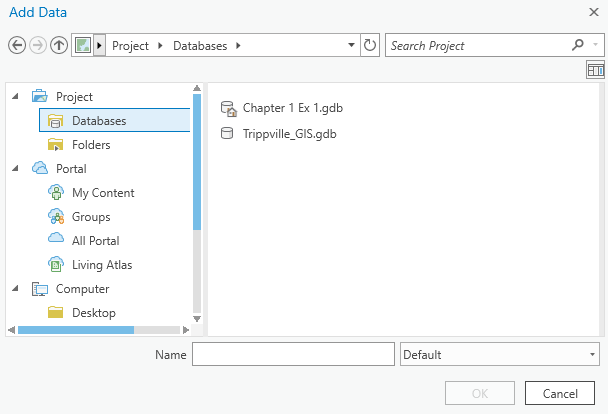
Add Databutton. Do not click the wordsAdd Data. You want to click the icon located above the words. - In the left window in the
Add Datadialog box, expandProjectby clicking the small arrowhead located to the left ofProjectif you do not see the contents in the following image.
- Double click
Databasesso you see two databases in the window to the right of the dialog box. You should see theChapter 1 Ex 1andTrippville_GISgeodatabases:
- Double-click the
Trippville_GISgeodatabase to reveal its contents. - Double click the
Basefeature dataset. - Select the
Buildingsfeature class. - While holding down the Ctrl key, click the
Natwtr_BodyandNatwtr_Streamfeature classes. - Once you have selected those three feature classes, click
OKto add them as three new layers to your map.
You have just added three new layers to your map using the Add Data button. This is just one of several methods that you can use to add a new layer to a map. You will use some other methods later in this recipe. Now, you will adjust some of the properties associated with the layers you just added.
Note
When you add a new layer to a map in ArcGIS Pro, the software will display the new layer using a random color. Also, it will automatically add the new layers to your map contents based on what type of layer it is. Point layers will be added to the top. Line layers will be added below points. Polygon layers will be added below the line layers. Raster layers are added below the polygons, and base maps are placed at the very bottom. In a map, the drawing order starts with the layers at the bottom of the list and draws each succeeding layer on top of the previous, so that the last layer drawn is the one on the top of the list.
- Right-click the
Natwtr_Streamlayer you just added to your map and selectProperties, located at the bottom of the menu that appears. - Click through the list of options located in the window on the left of the dialog box. Look at some of the properties of the layer that you can configure from this dialog box. You will make some adjustments to these as you work through the recipe.
- In the
Layer Propertiesdialog box, selectGeneralfrom the window on the left side. - In the cell located below
Name, where it saysNatwtr_Stream, replace that withStreams and Creeks. - Click
Metadatain the left window. - Type the following values into the metadata as shown in the screenshot:
Title:Streams and CreeksTags:Natural Water, Streams, CreeksSummary:Streams and Creeks located in the City of TrippvilleDescription:This layer shows the general location of most creeks and streams located in and around the City of Trippville.Credits:eGIS Associates, Inc.Use Limitations:This data is for training use only
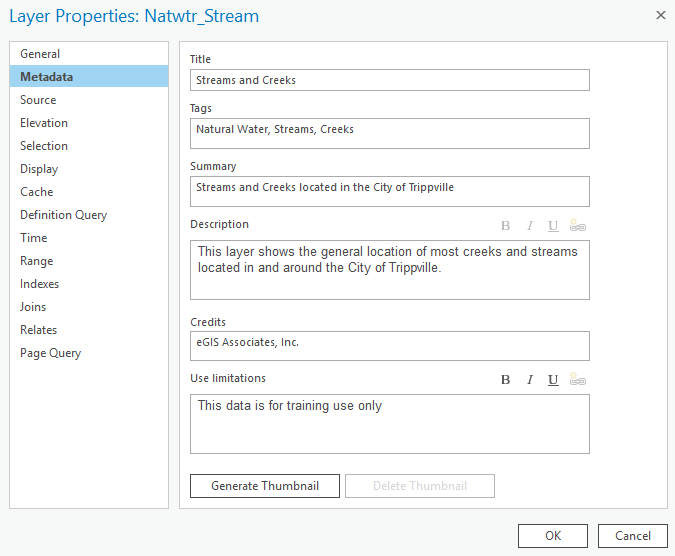
Your Layer Properties window should now look like the preceding screenshot.
- Click
OKto apply the changes you have just made to the properties of theNatwtr_Streamlayer. - Repeat this process for the
Natwtr_Bodylayer you added using the following values to update its properties. Remember to clickOKwhen you're done:- General:
Name:Lakes and Ponds - Metadata:
Title:Lakes and PondsTags:Natural Water, lakes, pondsSummary:Lakes and ponds located in the City of TrippvilleDescription:This layer shows the general location of most lakes and ponds located in and around the City of Trippville.Credits:eGIS Associates, Inc.Use Limitations:This data is for training use only
- General:
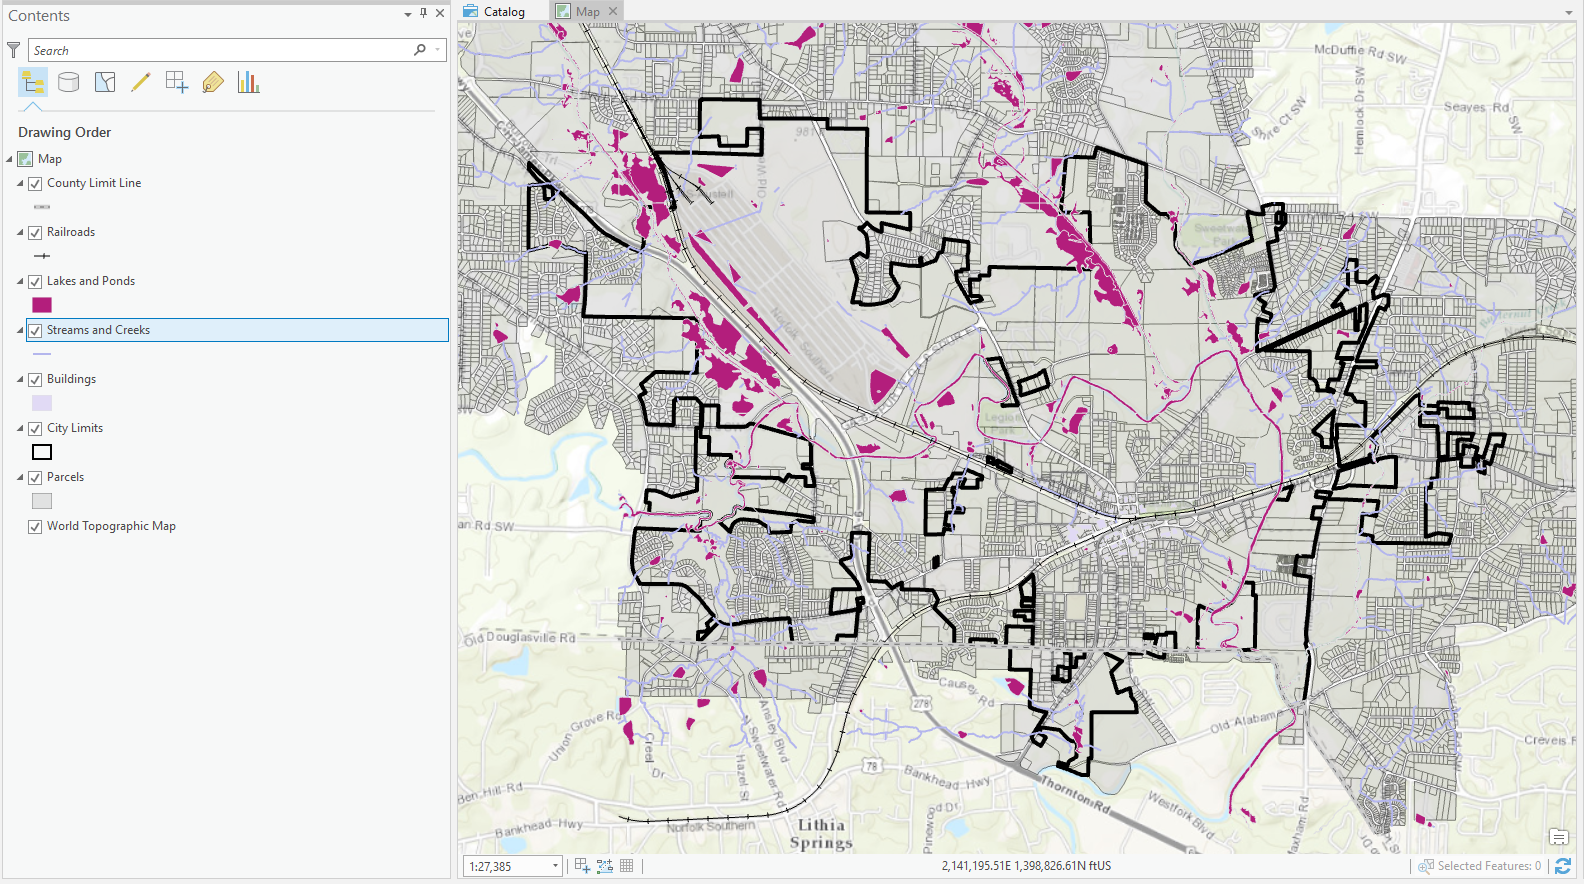
Now you will move the Streams and Creeks layer so it is beneath the Lakes and Ponds layer.
- Select the
Streams and Creekslayer in theContentspane. - Holding your left mouse button down, drag the layer so it is below the
Lakes and Pondslayer. YourContentspane should look similar to the following image when you are done. Remember, your colors may be different:
- Click the symbol patch located beneath the
Lakes and Pondslayer so you can adjust theSymbologysettings.
- The
Symbologypane will open on the right side of the interface. Make sure you are viewing theGalleryand typelakeinto the search cell:
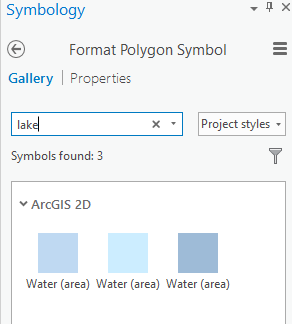
- Select one of the presented symbols. Any will work.
- Click the
Propertiestab located next toGalleryin theSymbologypane, as illustrated in the following screenshot:
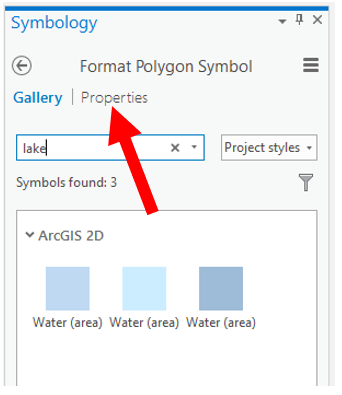
- Click the drop-down arrow for the
Outline Color, select Cretan Blue from the color palette that is presented. - Set the
Outline Widthto1 pt, as shown here:
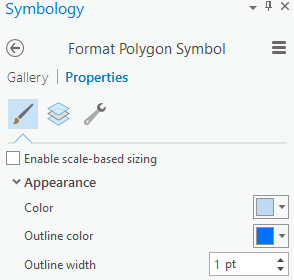
- Click
Apply, located at the bottom of theSymbologypane. - Following that same process, click the symbol patch for the
Streams and Creekslayer. - Search
Streamin theGalleryand select theWater (Line)symbol that should be presented.
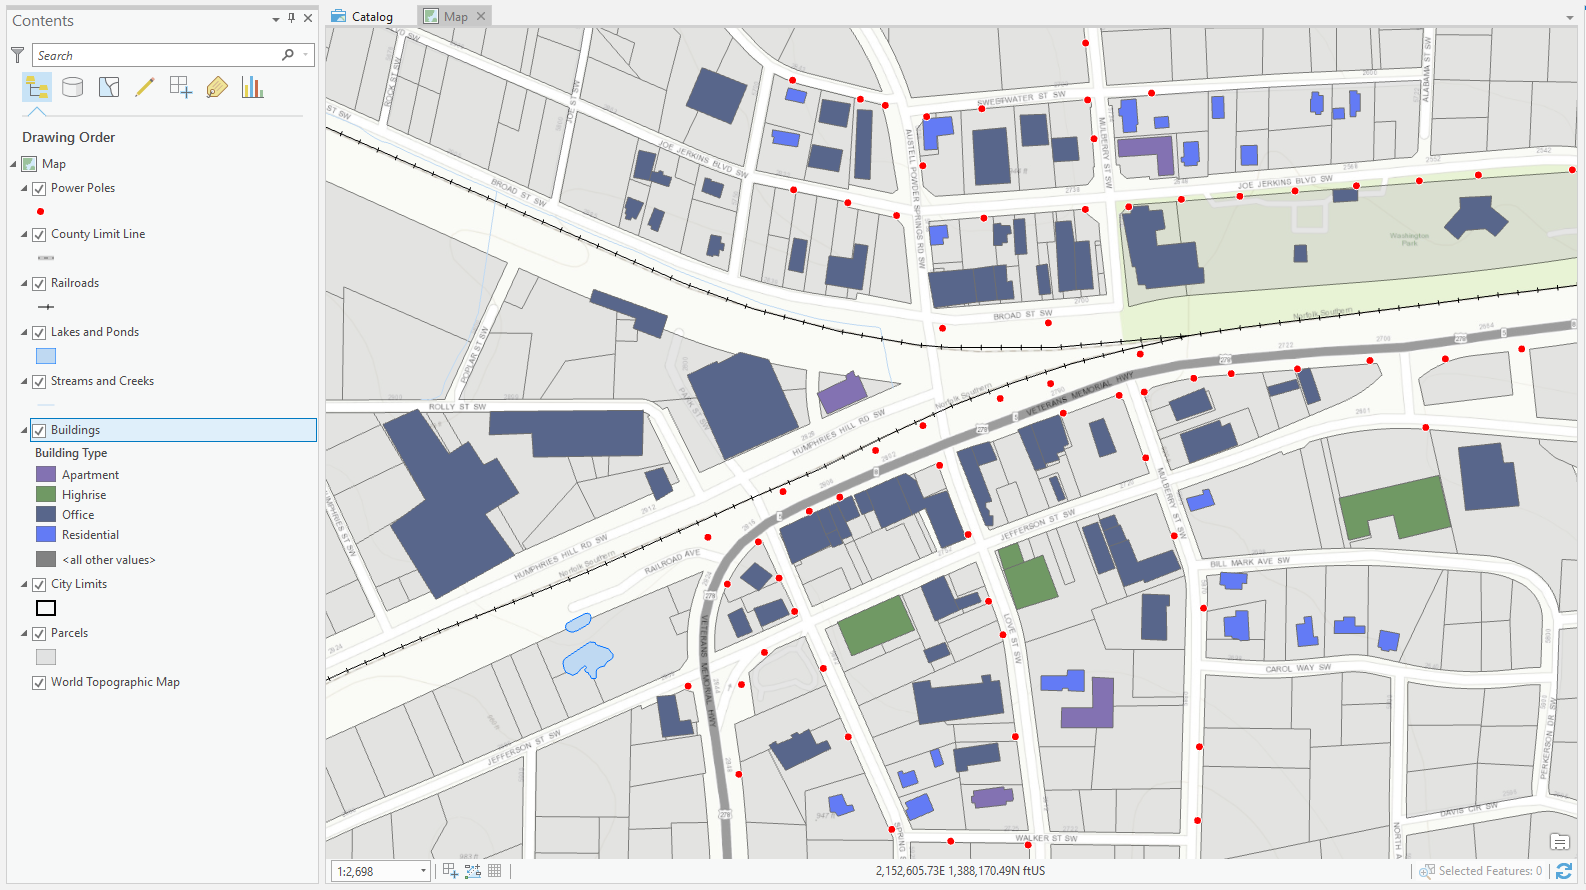
Your map should now look like this. The color of the Buildings layer may be different, depending on what ArcGIS Pro assigned it when you added the layer:
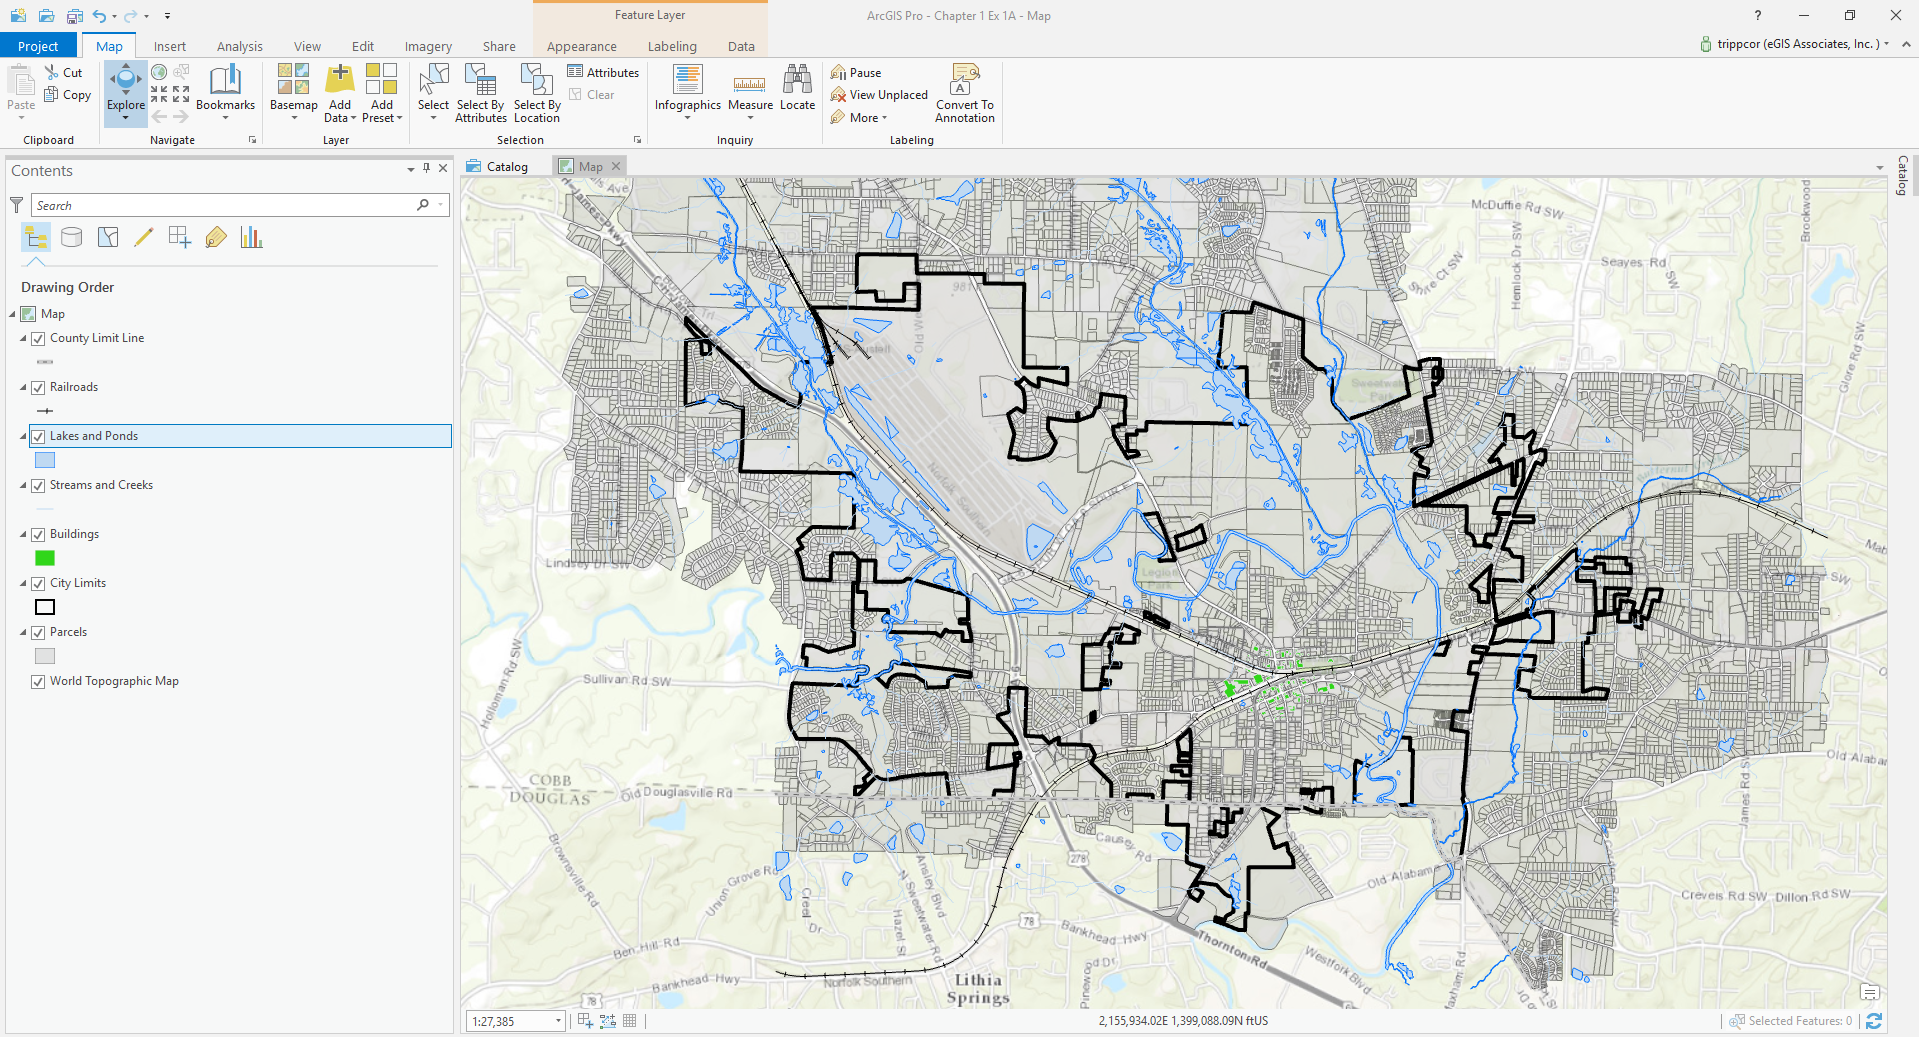
- Now you will change the symbology for the buildings so that you can determine the type. Select the
Buildingslayer in theContentspane. - Select the
Appearancetab in theFeature Layercontextualmenu in the ribbon. - Click the small arrowhead located below the
Symbologybutton. - Select
Unique Valuesfrom the presented menu. - The
Symbologypane will open once again, though it will look a bit different. Next toField 1, click the drop-down menu and selectBuilding Type. - Click the
Colorscheme and select a desired color scheme, such asBasic Random. Notice the symbology for theBuildingslayer has changed in theContentspane to reflect your new symbology settings. - Close the
Symbologypane.
- Save your project by clicking the
Projecttab in the ribbon and selectingSave.
It is recommended that you save your projects often. This will help to prevent you from losing work if ArcGIS Pro or your system experiences a problem.
- In the
Catalogpane, expand theDatabasesfolder by clicking the small arrowhead located to the left.
Note
If you accidentally close the Catalog pane or Contents pane, click on the View tab in the ribbon to reopen them.
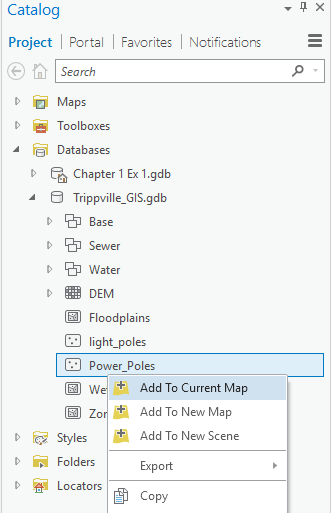
- Expand the contents of the
Trippville_GISgeodatabase. - Right-click the
Power_Polesfeature class and selectAdd to Current Map:
- The
Power Poleslayer has been added to you map. Right-click the symbol under the layer name to display a color palette.
- Select Mars Red from the color palette to change the color of the symbol for the
Power Poleslayer. Your map should now look similar to this one:
- Click the
Sharetab in the ribbon. - Select
MapFilefrom theSave Asgroup in theSharetab. - Select
C:\in the left side of theSave Map AS MAPX Filewindow. - Scroll down if needed and double-click the
Studentfolder. - Double-click the
ArcGISProCookbookfolder. - Double-click the
MyProjectsfolder. - In the
Namecell located at the bottom of theSave Map AS MAPX File, typeTrippvilleBuildingTypeMapand clickSave.
You just created a Map File that will allow you to add this same map to other projects quickly and easily. You will use this file in the next recipe.
- Close ArcGIS Pro and save your project if asked to.
In this recipe, you started by adding new layers to a map. You added multiple layers at one time using the Add Data button. Once you added the new layers, you began to adjust their properties so that they would be more useful within the map. First, you renamed the layer using a more descriptive and understandable name than the one originally associated with the feature class in the geodatabase. Then, you updated the metadata for the layer so others using the map would have a better understanding of its purpose.
After you updated some of the basic properties of the layers you added, you worked on the symbology so that the map was easier to read. You made the Streams, Creeks, Lakes, and Ponds layers blue so they resembled the features they represent, also, people are accustomed to seeing them presented this way in a map. You made these adjustments by clicking the symbol patch located beneath each layer and then changing the symbol properties in the Symbology pane.
The Buildings layer required a little more effort, because you needed to change the symbology so that you could tell each building type from within the map. This required you to base the symbology on an attribute of the buildings that was stored in a field found in the attribute table of the Buildings layer. To do this, you went to the Appearance tab and selected the Unique Values symbology. Then, you configured this symbology type to use the Building Type field from the attribute table for the layer. Once you pointed the symbology type to that field, it automatically created a unique symbol for each building type it found. In this case, it created a unique symbol allowing you to determine the type of buildings (for example, houses or apartments).
You added the Power Poles layer from the Catalog pane by right-clicking the feature class within the geodatabase and selecting Add to Current Map. You then adjusted the color of the Power Poles symbol to red by right-clicking the symbol and selecting Mars Red from the presented color palette.
Finally, you created a Map File based on the map you made, so you will be able add the map to other projects quickly and easily. The map will be added with all the layer properties and settings that you just configured, so you will not need to go through that process again.
We have mentioned several times that you must first open a project before you are able to access the functionality included in ArcGIS Pro. You have begun to experience this in the previous recipes where you opened and worked with existing projects. These were already configured, and contained several project items including maps and database connections. How were these projects created?
In this recipe, you will create a new project using one of the four project templates included with ArcGIS Pro. You will see the structure created by ArcGIS Pro when a new project is created.
To complete this recipe, all you need to do is ensure that you have ArcGIS Pro installed, access to a license, and the data for the book downloaded and installed. This recipe does not even require you to have completed the previous recipes, though it might help provide a better understanding of what you are doing.
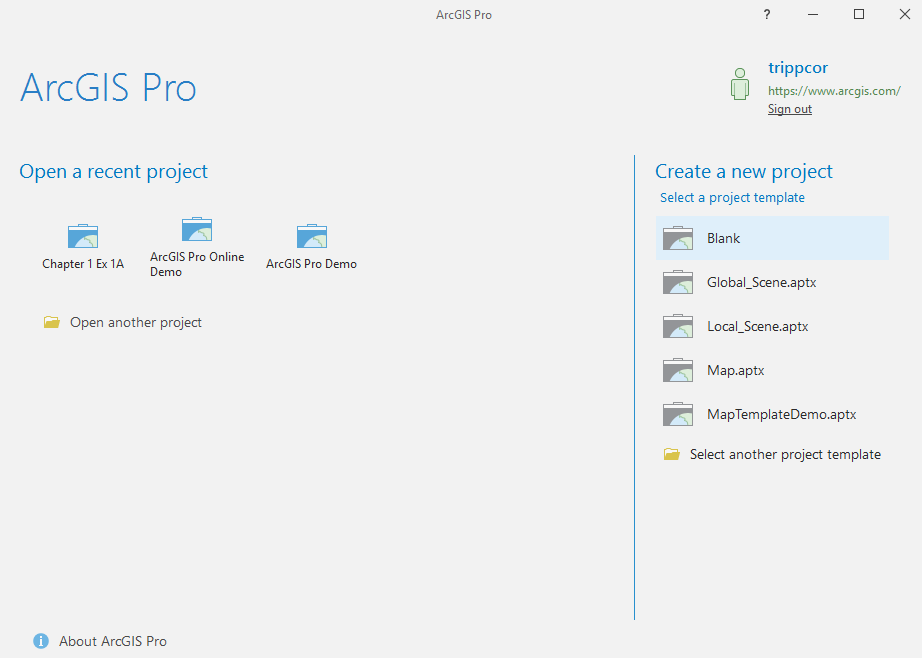
- Start ArcGIS Pro.
- When the
ArcGIS Prostart window appears, select theBlanktemplate fromCreate a new projecton the right side:
- In the
Namecell, name your new project%your name%Chapter1NewProject(for exampleTrippChapter1Newproject). - Click the
Browsebutton located next to theLocationcell. It looks like a small file folder with a blue arrow. - Under
Computer, click theC:\drive. - Scroll down and double-click the
Studentfolder. - Double-click the
ArcGISProCookbookfolder. - Select the
MyProjectsfolder and clickOK. Do not double-click it.
- Verify that your
Create a New Projectdialog window looks like this, except for the name which will include your name:
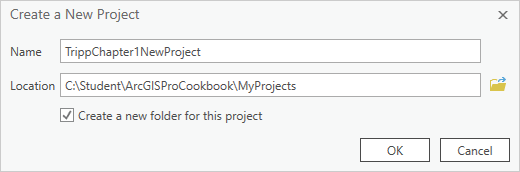
- Once you have verified that you have entered everything properly, click
OK.
You have just created your first new project in ArcGIS Pro using the Blank template. This created a new bare bones project. This project contains the minimum number of items you will find in a project. You can now begin to explore your new project.
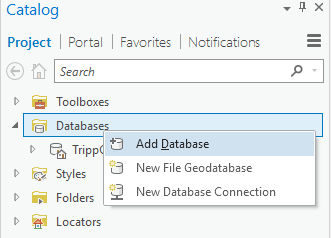
- Expand the
Toolboxesfolder in theCatalogpane.
- Expand the
Databasesfolder in theCatalogpane.
- Expand the other folders within the project.
You should have noticed that your new project contains a single custom toolbox and file geodatabase that has the same name as your project. These were automatically created by ArcGIS Pro when you created the new project. You should have also noticed that several styles and locators were also automatically connected by default.
There are three basic types of geodatabase: personal, file, and SDE. ArcGIS Pro only supports file and SDE geodatabases. It does not support the personal geodatabase. To learn more about geodatabases, go to http://pro.arcgis.com/en/pro-app/help/data/geodatabases/overview/what-is-a-geodatabase-.htm.
This new project is missing several key elements that you will need to perform any GIS work. First, it is missing a map. Second, if you expand the geodatabase that is connected to the project, you will notice it is empty. So, you also need data. Now you will connect to an existing geodatabase and then add a map.
- Click
C:\underComputerin the area located on the left of theSelect Existing Geodatabasewindow that appears. - Scroll down and double-click the
Studentfolder. - Then double-click
ArcGISProCookbookandDatabases. - Select the
Trippville_GIS.gdband clickOK. Do not double-click theTrippville_GISgeodatabase.
- Right click the
Trippville_GIS.gdbyou just added to your project and selectAdd to New Projects, as shown in the following image:
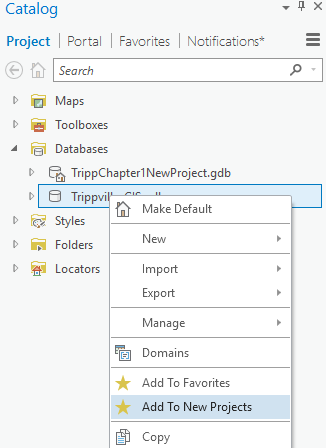
You just added a connection to the Trippville GIS geodatabase you have been using in the other recipes. In those, the database connection had already been established. Now you know how it was done. Once you added the connection, you then added it to your favorites and set it so it will automatically be added to any new projects you create.
You still need to add a map. You could do this the same way you did in the previous recipe. However, in this one you will import the Map File you created in the last recipe.
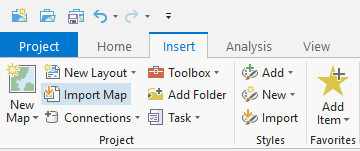
- Click the
Inserttab in the ribbon:
- Click the
Import Maptool in theProjectgroup on theInserttab in the ribbon:
- Using the same process you did to add the database connection, navigate to the
C:\Student\ArcGISProCookbook\MyProjectsfolder. - Select the
TrippvilleBuildingTypeMap.mapxfile and clickOK.
Note
If you did not complete the previous recipe, you can instead navigate to C:\Student\ArcGISProCookbook\Chapter1 and select the Chapter1Ex1AResults.mapx file.
A familiar-looking map should now be added to your project. It contains all the layers that you created in the last recipe along with the symbology and properties you configured.
- Save your project by using the Ctrl+S shortcut keys.
In this recipe, you created your first new project. You used the Blank template, which creates a very basic project for ArcGIS Pro. Projects created with the Blank template include connections to a custom toolbox and geodatabase that have the same name as the project, along with several styles and locators. The toolbox and geodatabase are automatically created by ArcGIS Pro when you create the new project. They are both empty and are intended for you to save project-specific items to them. However, in most cases, your organization will already have an established GIS database.
Once you created your project, you added a connection to an existing geodatabase, Trippville_GIS. This database contains the GIS data for the City of Trippville that you used in other recipes. This is actually the primary database that you will use in the remainder of this book. So, you added it to your favorites and set it to automatically be added to all new projects you create.
After you established a connection to the primary geodatabase, you imported a new map. This new map was based on a Map file you created in a previous recipe. The new map was added with layers already added and their properties configured, saving you a lot of effort.
In the last recipe, you created a new project using the Blank template. As you saw, this template automatically created the project structure including a project geodatabase, custom toolbox, and more. The blank template is not the only one included with ArcGIS Pro. There are several others you can use when creating a new project. Let's take a quick look at them.
As you may have noticed when you created your new project, ArcGIS Pro includes three other project templates: Global Scene, Local Scene, and Map. Each of these will create slightly different projects:
Name | Description | Project items that are created |
Map | Creates a new project that automatically includes a new 2D Map |
|
Local Scene | Creates a new project that automatically includes a new local 3D Map |
|
Global Scene | Creates a new project that automatically includes a new global 3D Map, similar to what you experience with Google Earth the first time you open it |
|
In addition, connections to standard styles, locators, and any favorites that are set to add to new projects are also added to the items created, based on the selected new project template.
Using the skills that you have learned in the previous recipes, try creating a new project using a template other than Blank. See how they differ from one another.


