


Aptana Studio 3 builds on the well-known Java IDE, Eclipse; this means that it's possible to install Aptana Studio as an Eclipse plugin or as a standalone version. In this beginner's guide, we will use the standalone version as it is much easier to install and works right away.
In this chapter we will cover:
System requirements
Where to get Aptana Studio
Installing Aptana Studio on your system
How to increase memory for Java
Keeping Aptana Studio up-to-date
Installing third party plugins
Uninstalling Aptana Studio
Aptana Studio supports both 32-bit and 64-bit architecture for the following common operating systems:
Linux: x86 architecture, GTK windowing system
Mac OS: OS X/Intel architecture, OS X 10.5 or later
Windows: x86 architecture
Minimum requirements:
Linux: 1 GB RAM, Pentium 4-level processor
Mac OS: 1 GB RAM, G5 or Intel-based machine
Windows: 1 GB RAM, Pentium 4-level processor
For larger projects and workspaces, better hardware is recommended.
Aptana Studio requires you to have Sun/Oracle Java Runtime Environment JRE 1.5.x on your Mac OS-X or Linux system (note that OpenJDK is not yet supported). Windows Installer includes a compatible version of Java.
First of all, we have to download the current version of Aptana Studio. This section will teach you how to do this.
Tip
Downloading the example code
You can download the example code files for all Packt books you have purchased from your account at http://www.packtpub.com . If you purchased this book elsewhere, you can visit http://www.packtpub.com/support and register to have the files e-mailed directly to you.
In order to download the current version of Aptana Studio, navigate to the Aptana home page at http://www.aptana.com/products/studio3/download.
Simply select your system environment on the website and download the Aptana Studio package to your
~/Downloadsfolder. You can also do this quickly by usingwgeton the command line (just replace*version*by your used version), as follows:wget http://download.aptana.com/studio3/standalone/*version*/linux/Aptana_Studio_3_Setup_Linux_x86_64_*version*.zip -P ~/Downloads
After downloading the Aptana Studio package, we only need to extract it. For this, we use the
unzipcommand, which also redirects the extracted files to the/optfolder.sudo unzip ./Aptana_Studio_3_Setup_Linux_x86_64_*version*.zip -d /opt/
We just have to create a symbolic link so that we can start Aptana Studio without typing the complete path on the command line.
sudo ln -s /opt/Aptana\ Studio\ 3/AptanaStudio3 /usr/bin/AptanaStudio3
Finally, you have to change the owner and/or group of your installation files; this will allow Aptana Studio to modify its files and carry out updates.
sudo chown thomas:thomas ./Aptana\ Studio\ 3 -R
Now, you can start Aptana Studio just by executing the following instruction on the command line:
AptanaStudio3
In order to download the current version of Aptana Studio, navigate to the Aptana homepage at http://www.aptana.com/products/studio3/download.
Simply select your system environment on the website and download the Aptana Studio package to your workstation.
Double-click the downloaded
.exefile in order to start the installation process.Now, you have to follow the installation instructions; click on Next.

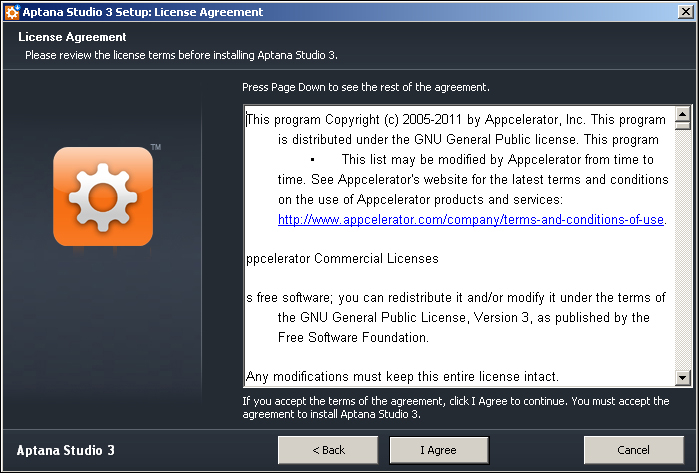
Click on the I Agree button to accept the terms of agreement.
Select a folder for Aptana Studio to be installed in.

Now, select a
Startmenu folder.
Last but not least, select the file extensions to be associated with Aptana Studio.

Now, click on the Install button in order to start the installation.
After the installation process is over, just click on the Close button to finish the installation.

In order to download the current version of Aptana Studio, navigate to the Aptana homepage at http://www.aptana.com/products/studio3/download.
Simply select your system environment on the website and download the Aptana Studio package to your workstation.
Double-click the downloaded
.dmgfile in order to extract the installation files.After that, you just have to drag Aptana Studio into your Applications folder.

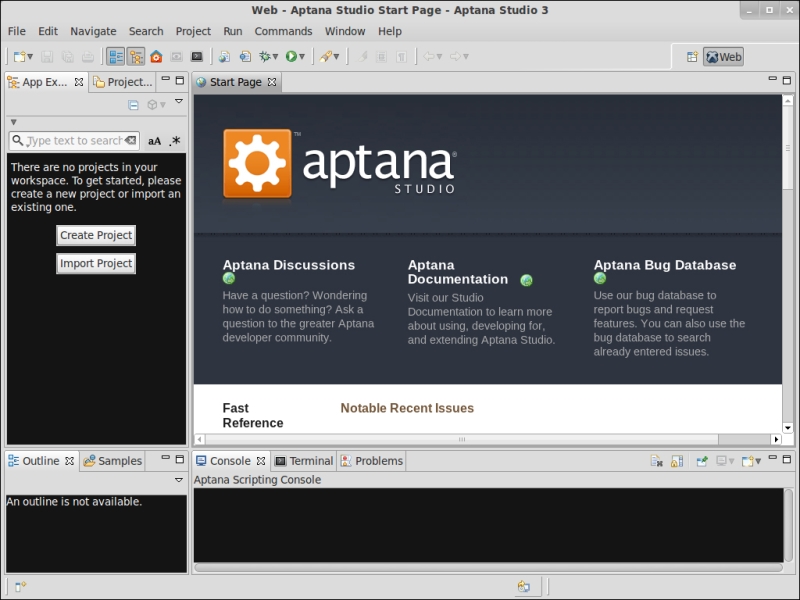
We installed Aptana Studio on a Mac operating system.
After the first start, Aptana Studio looks like the following screenshot:
Because Aptana Studio is based on Java, ensure that you allow Java to allocate the required amount of memory. In the default configuration of Aptana Studio, memory parameters are adjusted for common large projects and workspaces. Aptana Studio comes with two parameters for handling this memory usage:
But sometimes, when you have many large projects, for example, you may get better performance by increasing the maximum heap memory.
Tip
How do you display currently used memory?
In order to see your current memory usage, you must enable the Heap Status indicator. For this, navigate to Window | Preferences and select General entry within the left-hand tree. There you will find a checkbox, Show heap status, to the right; select it, and click on Apply. Now a memory display appears at the bottom-right corner of the main window. There's also a trash button available, which can run the garbage collector that is able to deallocate memory that is no longer required.
In order to increase the memory, you have to edit the
AptanaStudio3.inifile, which is contained in the installation folder. You can do this simply by using a plain-text editor and adjusting the memory parameter.nano /opt/Aptana\ Studio\ 3/AptanaStudio3.ini
In our case, because we use a Linux system, the
.inifile looks like this:--launcher.XXMaxPermSize 256m --launcher.defaultAction openFile -vmargs -Xms40m -Xmx512m -Declipse.p2.unsignedPolicy=allow -Declipse.log.size.max=10000 -Declipse.log.backup.max=5 -Djava.awt.headless=true
Here you are able to adjust the
XmsandXmxvalues and change them to the number of megabytes you require.Finally, Aptana Studio needs to restart for the changes to take effect.
It is highly recommended that we keep the system up-to-date. Aptana Studio will most likely contain some small bugs that need to be fixed so that you can work as effectively as possible without errors or possible loss of data.
Tip
Have you found a possible bug?
If you think you've found a bug, help the Aptana developer team to fix it as fast as possible and report it at http://jira.appcelerator.org/browse/APSTUD. There, you can also find out whether the bug that you have found has already been tracked by the developer team. You can report a bug from within Aptana Studio too. We will take a look at this in Chapter 12, Troubleshooting.
It's also nice to see how, after an update, there are always new and useful functions available. Personally, I always use the update site to download the latest beta releases. If you prefer to work with a more stable version, it is better to use the Aptana Studio 3 release update site. All in all, there are three update types available:
Stable releases: These are are the most tested. They are the same as those downloaded from the Aptana website.
Beta releases: These have been somewhat tested and are still in preparation for release.
Nightly updates: These come straight from the developer's server. This is the first place where the latest features and fixed bugs can be found. These versions probably contain progressive bugs. Use at your own risk!
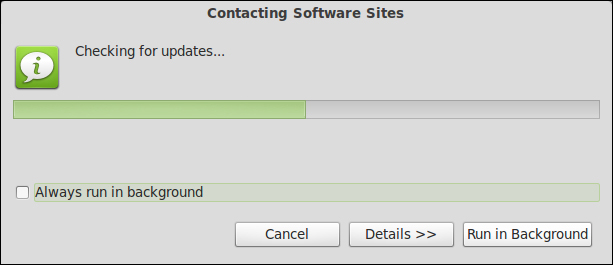
Now that we are running Aptana Studio for the first time, we want to check if there are any updates available. For this, we just navigate to Help | Check for Updates in the main menu.
If you get the the following message, maybe your system user has opened Aptana Studio without the permission to change Aptana Studio files:

Note
Ensure that the user that starts Aptana Studio has the required permissions to be able to update the Aptana Studio files! The following command, which we have already seen in this chapter, adjusts the required permissions:
sudo chown thomas:thomas /opt/Aptana\ Studio\ 3 -R
If the user has the required permission, Aptana Studio checks all of the available update sites that have been enabled, contacts them, and checks whether any updates are available.
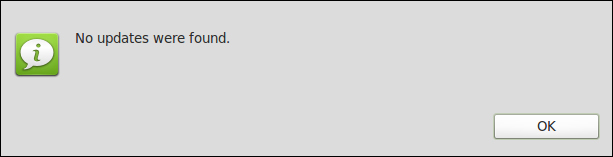
If no updates are available on any of your enabled update sites, Aptana Studio shows you the message No updates were found.
However, if there are updates available, a window appears in which all of the updates that you can install are displayed.
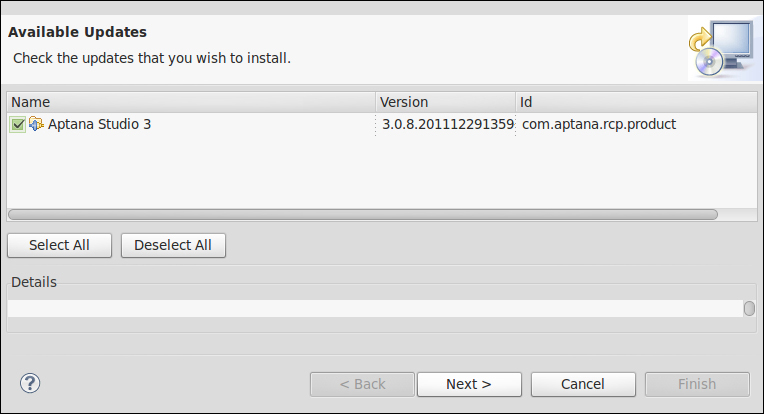
Just select the packages that you want to update and click on Next. Click on the Next button on the confirmation site too. Finally, confirm I accept the terms of the license agreements and let the update start by clicking on Finish.
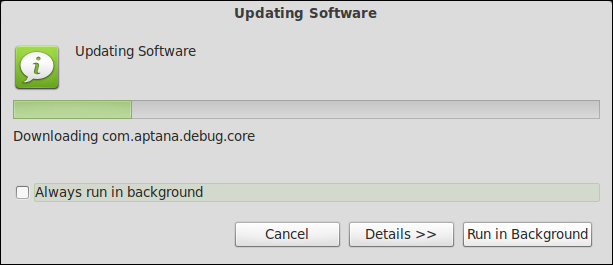
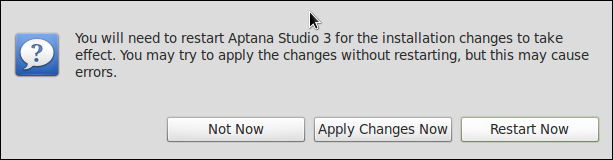
Now, Aptana Studio connects to all relevant update sites and downloads the current packages and installs them. After completing this process, Aptana Studio asks you whether you want to apply the changes or you want to restart Aptana Studio. Here, I would highly recommend always choosing to restart Aptana. Unfortunately, it takes a moment for Aptana to restart, but you can be sure that all the libraries will have been loaded successfully.
After this restart, you have finished your first Aptana Studio update.
Tip
How do you determine the installed version of Aptana Studio?
To determine the installed version of Aptana Studio, just navigate to Help | About Aptana Studio 3. If you also need to know the version of your plugins and any more information, just click on Installation Details.
But during the daily project work, we generally don't have the time to think about updates. Therefore, Aptana Studio provides you with an update reminder.
The update reminder checks, by default, after every Aptana Studio start up, whether there are some updates available or not. If there's an update, a pop up that looks like this appears at the bottom-right corner of the main window:
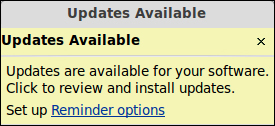
If you want to install the updates, just click within the window and the update manager comes up; it shows you the available updates.
Tip
Reminder options
You can also change the handling of the automatic updates by clicking on Reminder options within the Updates Available notice. You will be redirected to the preferences with the Automatic Updates area already selected. Here you're able to select at what time Aptana Studio should check for updates and how Aptana Studio should handle the download and update.
If you want to use Aptana Studio with other programming languages, which Aptana Studio naturally supports, you have to install a third-party plugin. The plugin system, which is provided by Eclipse, is a very sophisticated technology and makes it very easy to install additional plugins and keep them up-to-date. As an example of plugin installation, we will install the Subversion plugin from Tigris, which we will see in a later chapter.
Before we can start the installation of the Subversion plugin, we have to check for Aptana Studio updates and install them. It's highly recommended that this be done before every plugin installation.
If your system is up-to-date, open the Available Software window that you will find under Help | Install New Software....

Here you have to add the URL from the update site from where the plugin should be installed.
But, from where can you get the required update site URL for your plugin?
Most plugin developers usually provide this update site URL on their website. Sometimes, they also provide an additional package for a manual installation. But it's recommended that you install the plugin with the update manager, because the manager checks the required dependencies and prevents installation if the dependencies are not
So, just surf quickly to the Tigris Subclipse website, http://subclipse.tigris.org, and determine the URL of the required update site, which is currently available at http://subclipse.tigris.org/update_1.6.x.
Now, we go back to Aptana Studio and click on the Add... button in order to add the new location for our plugin.
For the Name, just enter a label such as
Subclipse 1.6.x. But don't forget to add the version number of the plugin. It's possible for you to have to add more and more update sites over time for the same plugin. And if there is a new major version of the Subclipse plugin, there will also be a new update site location that you'll have to add. So, prevent confusion between similar plugins, and always specify a name that identifies your update site clearly. You could even use the URL directly as the label.
Tip
Installing or updating from an archive
Often, you are unable to find an update site for the plugin you currently need, but you find a
.jaror a.zipfile of the plugin instead. No problem! Just download it and click on Archive... instead of filling in a location link, select your local file, and install it.Finally, you have to add the URL in the Location field and click on OK.
Tip
Update site
Always make sure that you have a current update site. Most plugin developers have several update sites for each major version of their plugins.
Now you have to wait for a short moment until the table is refreshed. After that, you should see an entry named Subclipse, which you can expand. Expand the Subclipse node and select the packages that we need for our purposes. In the following screenshot, you will see the packages that we need to select for our Subclipse plugin:

Click on the Next button, and Aptana Studio will check whether all dependencies are satisfied, which should be the case.

As you can see in the preceding screenshot, all dependencies are satisfied. So, we can click on Next for the second time, and before the installation starts, you only need to confirm the terms and conditions.

The moment you click Finish, Aptana Studio connects to the update site, downloads the required packages, and installs them.

The moment Aptana Studio finishes installing the plugin, a dialog appears and recommends that you restart Aptana Studio. We recommend this too; therefore, you should click on Restart Now.

After Aptana Studio starts up again, the plugin asks you if you want to send the Subclipse team anonymous usage statistics.
I think it's generally ok to support the developers with anonymous data because they also make it possible for us to use a lot of great plugins and software for free. In addition, we help them with our statistics to optimize the plugin and help to integrate users' new requirements.
Therefore, we click on OK.

If you want to change your decision later, you can do this under Window | Preferences. There, you'll have to navigate to Team | SVN | Usage Reporting.
We just installed our first third-party plugin.
After the successful installation, you will find SVN Repositiory Exploring under Window | Open Perspective | Other…. You are now able to add some repository locations and check them out here. We will do this in detail in Chapter 9, Collaborative Work with SVN and Git.
Uninstalling Aptana Studio on Linux is very easy. Just remove the Aptana Studio directory from within the opt folder:
sudo rm -r /opt/Aptana\ Studio\ 3
After deleting the Aptana Studio software folder, you can remove the symbolic link, which is now useless:
sudo rm /usr/bin/AptanaStudio3
But that's not all. During installation, Aptana Studio creates more data than you see at the first glance. There will be folders for your workspaces. The default folder for the workspace is located in your home directory, ~/Aptana Studio 3 Workspace. When you have your projects and source codes backed up, you can just delete it.
Furthermore, there is a folder for the Aptana rubles that is also created during installation. This folder contains your customized and downloaded rubles.
Tip
What is an Aptana ruble?
Ruble is short for Ruby bundle and is a runtime environment that allows the extensibility of Aptana Studio's editors by using Ruby. Rubles are compatible with TextMate bundles, so you should be able to convert them easily to Aptana rubles.
To uninstall Aptana under Windows, just use the uninstaller within the All Programs menu. Because this is so easy—just like uninstalling most other software—we don't want to cover it here.
Mac OS-X users just have to drag the Aptana folder from the Program folder into the trash.
Note that there could also be separate folders for the ruble and workspaces, on Mac OS-X and Windows. Don't forget to remove them too, if you no longer need them.
Q1. On which software framework is Aptana Studio 3 based?
Circular
Eclipse
Square
Q2. In which Aptana file are you able to adjust the memory parameter?
AptanaStudio3.iniAptanaStudio3.pdfAptanaStudio3.conf
Q3. What are the names of the parameters used to adjust the memory settings?
XlsandXmlXtcandXolXmsandXmx
In this chapter we have looked at the requirements for installing the Aptana Studio IDE. After this, we installed Aptana Studio, checked for any updates available, and installed these updates. We learned how to increase the memory for the IDE and installed the Subversion plugin for use in a later chapter. Finally, we saw how to uninstall Aptana Studio when we don't need it anymore.
Now you are ready to configure your installation of Aptana Studio and learn more about perspectives and views.