Download code from GitHub
Managing Relational Data Using SQL Server
This chapter is about managing relational data stored in SQL Server, Azure SQL Database, or Azure SQL Edge. First, you will learn how to manage the data using native Transact-SQL statements. Next, you will learn how to manage data at a low level using ADO.NET libraries (Microsoft.Data.SqlClient). Finally, you will use Dapper to make it easier to work with entity models.
This chapter will cover the following topics:
- Understanding modern databases
- Managing data with Transact-SQL
- Managing SQL Server data with low-level APIs
- Managing SQL Server data with Dapper
- Cleaning up data resources
Understanding modern databases
Two of the most common places to store data are in a Relational Database Management System (RDBMS) such as SQL Server, PostgreSQL, MySQL, and SQLite, or in a NoSQL database such as Azure Cosmos DB, MongoDB, Redis, and Apache Cassandra.
In this chapter, we will focus on the most popular RDBMS for Windows, which is SQL Server. This product is also available in a version for Linux. For cross-platform development, you can use either Azure SQL Database, which stores the data in the cloud, or Azure SQL Edge, which can run in a Docker container on Windows, macOS, or Linux, on both Intel and ARM architecture CPUs.
Using a sample relational database
To learn how to manage an RDBMS using .NET, it would be useful to have a sample one so that you can practice on a database that has a medium complexity and a decent number of sample records.
Microsoft offers several sample databases, most of which are too complex for our needs, so instead, we will use a database that was first created in the early 1990s known as Northwind.
Let’s take a minute to look at a diagram of the Northwind database and its eight most important tables. You can use the diagram in Figure 2.1 to refer to as we write code and queries throughout this book:
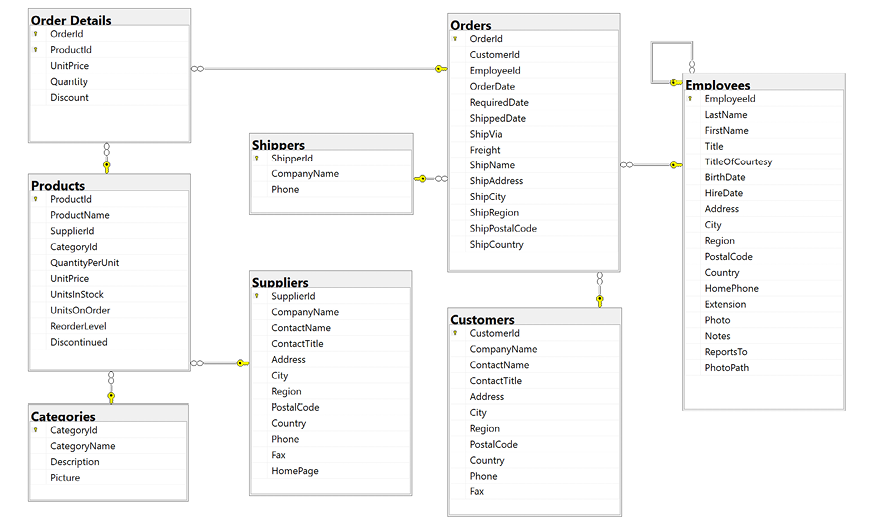
Figure 2.1: The Northwind database tables and relationships
Note that:
- Each category has a unique identifier, name, description, and picture. The picture is stored as a byte array in JPEG format.
- Each product has a unique identifier, name, unit price, number of units in stock, and other columns.
- Each product is associated with a category by storing the category’s unique identifier.
- The relationship between
CategoriesandProductsis one-to-many, meaning each category can have zero, one, or more products. - Each product is supplied by a supplier company indicated by storing the supplier’s unique identifier.
- The quantity and unit price of a product is stored for each detail of an order.
- Each order is made by a customer, taken by an employee, and shipped by a shipping company.
- Each employee has a name, address, contact details, birth, and hire dates, a reference to their manager (except for the boss, whose
ReportsTofield isnull), and a photo stored as a byte array in JPEG format. The table has a one-to-many relationship to itself because one employee can manage many other employees.
Connecting to a SQL Server database
To connect to a SQL Server database, we need to know multiple pieces of information, as shown in the following list:
- The name of the server (and the name of the instance if it has more than the default one). This can include the protocol, IP address, and port number if connecting over a network.
- The name of the database.
- Security information, such as the username and password, or if we should pass the currently logged-on user’s credentials automatically using Windows Authentication.
We specify this information in a connection string.
For backward compatibility, there are multiple possible keywords we can use in a SQL Server connection string for the various parameters, as shown in the following list:
Data Source,server, oraddr: These keywords are the name of the server (and an optional instance). You can use a dot (.) to mean the local server.Initial Catalogordatabase: These keywords are the name of the database that will be active initially. A SQL statement could change that using the command:USE <databasename>.Integrated Securityortrusted_connection: These keywords are set totrueorSSPIto pass the thread’s current user credentials using Windows Authentication.User IdandPassword: These keywords are used to authenticate with any edition of SQL Server. This is important for Azure SQL Database or Azure SQL Edge because they do not support Windows Authentication. The full edition of SQL Server on Windows supports both username with password and Windows Authentication.Authentication: This keyword is used to authenticate by using Azure AD identities that can enable password-less authentication. Values can beActive Directory Integrated,Active Directory Password, andSql Password.Persist Security Info: If set tofalse, this keyword tells the connection to remove thePasswordfrom the connection string after authenticating.Encrypt: If set totrue, this keyword tells the connections to use SSL to encrypt transmissions between client and server.TrustServerCertificate: Set totrueif hosting locally and you get the error “A connection was successfully established with the server, but then an error occurred during the login process. (provider: SSL Provider, error: 0 - The certificate chain was issued by an authority that is not trusted.)”.Connection Timeout: This keyword defaults to 30 seconds.MultipleActiveResultSets: This keyword is set totrueto enable a single connection to be used to work with multiple tables simultaneously to improve efficiency. It is used for lazy loading rows from related tables.
As described in the list above, when you write code to connect to a SQL Server database, you need to know its server name. The server name depends on the edition and version of SQL Server that you will connect to, as shown in Table 2.1:
|
SQL Server edition |
Server name \ Instance name |
|
LocalDB 2012 |
|
|
LocalDB 2016 or later |
|
|
Express |
|
|
Full/Developer (default instance) |
|
|
Full/Developer (named instance) |
|
|
Azure SQL Edge (local Docker) |
|
|
Azure SQL Database |
|
Table 2.1: Server name examples for various editions of SQL Server
Good Practice: Use a dot (.) as shorthand for the local computer name (localhost). Remember that server names for SQL Server can be made up of two parts: the name of the computer and the name of a SQL Server instance. You provide instance names during custom installation.
Installing and setting up SQL Server locally
Microsoft offers various editions of its popular and capable SQL Server product for Windows, Linux, and Docker containers. If you have Windows, then you can use a free version that runs standalone, known as SQL Server Developer Edition. You can also use the Express edition or the free SQL Server LocalDB edition that can be installed with Visual Studio 2022 for Windows.
If you do not have a Windows computer or if you want to use a cross-platform database system, then you can skip ahead to the topic Setting up Azure SQL Database, or the online-only section Installing Azure SQL Edge in Docker found at the following link:
https://github.com/markjprice/apps-services-net8/blob/main/docs/ch02-sql-edge.md
If you prefer to install SQL Server locally on Linux, then you will find instructions at the following link: https://learn.microsoft.com/en-us/sql/linux/sql-server-linux-setup.
Installing SQL Server Developer Edition for Windows
On Windows, if you want to use the full edition of SQL Server instead of the simplified LocalDB or Express editions, then you can find all SQL Server editions at the following link: https://www.microsoft.com/en-us/sql-server/sql-server-downloads.
Take the following steps:
- Download the Developer edition.
- Run the installer.
- Select the Custom installation type.
- Select a folder for the installation files and then click Install.
- Wait for the 1.5 GB of installer files to download.
- In SQL Server Installation Center, click Installation, and then click New SQL Server stand-alone installation or add features to an existing installation, as shown in Figure 2.2:
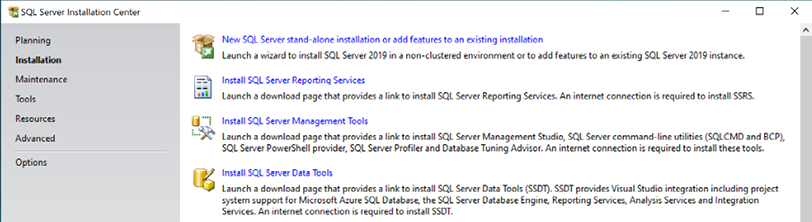
Figure 2.2: Installing a new instance of SQL Server
- Select Developer as the free edition and then click Next.
- Accept the license terms and then click Next.
- Review the Microsoft Update options and then click Next.
- Review the install rules, fix any issues although you might want to ignore any firewall warnings since you might not want to expose those ports anyway, and then click Next.
- In Feature Selection, select Database Engine Services, and then click Next.
- In Azure Extension for SQL Server, you can turn this off.
- In Instance Configuration, select Default instance, and then click Next. If you already have a default instance configured, then you could create a named instance, perhaps called
apps-services-book. - In Server Configuration, note the SQL Server Database Engine is configured to start automatically. If not already set by default, then set the SQL Server Browser to start automatically, and then click Next.
- In Database Engine Configuration, on the Server Configuration tab, set Authentication Mode to Mixed, set the sa account password to a strong password, click Add Current User, and then click Next.
- In Ready to Install, review the actions that will be taken, and then click Install.
- In Complete, note the successful actions taken, and then click Close.
- In SQL Server Installation Center, in Installation, click Install SQL Server Management Tools.
- In the browser window, click to download the latest version of SSMS, as shown in Figure 2.3:

Figure 2.3: Downloading SQL Server Management Studio (SSMS)
The direct link to download SSMS is as follows: https://learn.microsoft.com/en-us/sql/ssms/download-sql-server-management-studio-ssms.
- Run the SSMS installer and click Install.
- When the installer has finished, click Restart if needed or Close.
Azure Data Studio (ADS) is automatically installed alongside SSMS. ADS is cross-platform and open-source, so you can use it to work with SQL Server databases on any desktop operating system.
Visual Studio Code extension for working with SQL Server
There are many tools that make it easy to work with SQL Server. If you are using Visual Studio Code, then you can install the SQL Server (mssql) ms-mssql.mssql extension. If you install the extension, it adds a new view to the Primary Side Bar titled SQL Server, as shown in Figure 2.4:
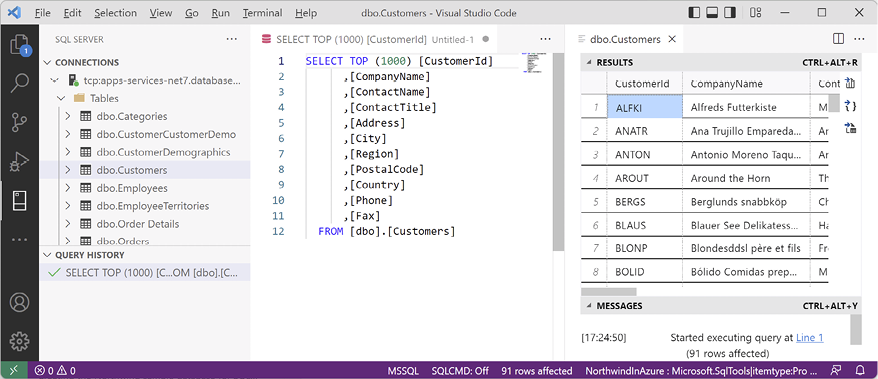
Figure 2.4: SQL Server (mssql) extension for Visual Studio Code
Creating the Northwind sample database locally
Now we can run a database script to create the Northwind sample database locally on Windows using SQL Server Management Studio (SSMS):
- If you have not previously downloaded or cloned the GitHub repository for this book, then do so now using the following link: https://github.com/markjprice/apps-services-net8/.
- In your
apps-services-net8folder, create a folder namedChapter02. - Copy the script to create the Northwind database for SQL Server from the following path in your local Git repository:
/scripts/sql-scripts/Northwind4SQLServer.sqlinto theChapter02folder. - Start SQL Server Management Studio.
- In the Connect to Server dialog, for Server name, enter
.(a dot), meaning the local computer name, and then click Connect.Warning! If you had to create a named instance, like
apps-services-book, then enter.\apps-services-book. If you see an error about the server certificate, then click the Options >> button and select the Trust server certificate check box.
- Navigate to File | Open | File....
- Browse to select the
Northwind4SQLServer.sqlfile and then click Open. - In the toolbar, click Execute, and note the Command(s) completed successfully message.
- In Object Explorer, expand the Northwind database, and then expand Tables.
- Right-click Products, click Select Top 1000 Rows, and note the returned results, as shown in Figure 2.5:
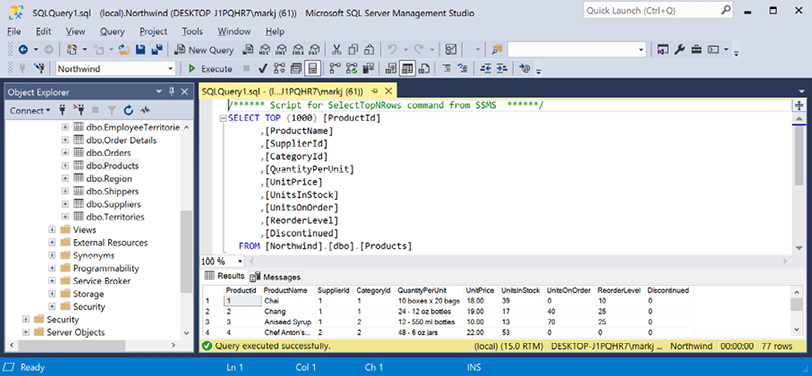
Figure 2.5: The Products table in SQL Server Management Studio
- In the Object Explorer toolbar, click the Disconnect button.
- Exit SQL Server Management Studio.
We did not have to use SQL Server Management Studio to execute the database script. We can also use tools in Visual Studio 2022, including the SQL Server Object Explorer and Server Explorer, or cross-platform tools like the Visual Studio Code extension for SQL Server, or Azure Data Studio, which you can download and install separately from the following link: https://aka.ms/getazuredatastudio.
Setting up Azure SQL Database
If you do not have a Windows computer, then you can create a cloud-hosted instance of SQL Server. You will need an Azure account. You can sign up at the following link: https://signup.azure.com. Next, you need to take the following steps:
- Log in to your Azure account: https://portal.azure.com/
- Navigate to https://portal.azure.com/#create/hub.
- Search for Resource group and then click the Create button.
- Enter a resource group name of
apps-services-bookand select a suitable region close to you, and then click the Review + create button, as shown in Figure 2.6:
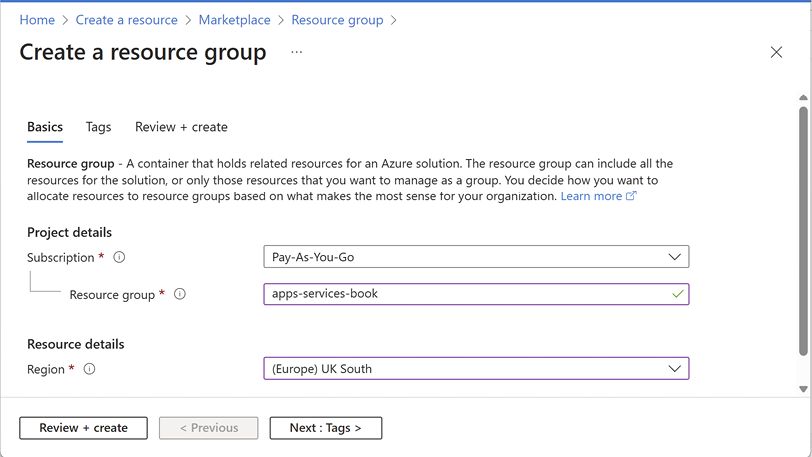
Figure 2.6: Creating a resource group in the Azure portal
- Review your choices and then click the Create button.
- Create another resource, search for SQL Database, and click Create.
- In the Create SQL Database page, in the Basics tab, for the Database name, enter
Northwind, and select the resource group that you created before. - In the Server section, click Create New.
- Enter the following details for the SQL Database server, as shown in Figure 2.7:
- Server name:
apps-services-book-[your initials]or something else entirely. The server name must be globally unique because it becomes part of a public URL. - Location: A region close to you. I chose (Europe) UK South. Not all regions support all types of resources. You will see an error if the region you select does not support SQL Database server resources.
- Authentication method: Use SQL authentication.
- Server admin login: [Your email or another username], for example, I entered
markjprice. - Password/Confirm password: [Enter a strong password].
- Server name:
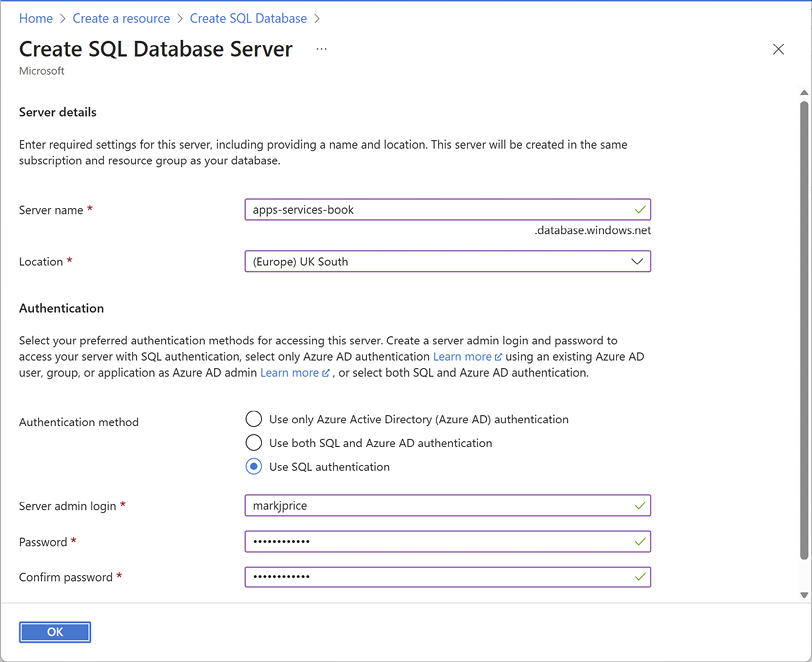
Figure 2.7: Entering the server details for a SQL Database instance
- Click OK.
- Leave Want to use SQL elastic pool set to No.
- For Workload environment, select Development (instead of Production).
- In the Create SQL Database page, in the Compute + storage section, click Configure database.
- For Service tier, select Basic (For less demanding workloads). Note the maximum database size is 2 GB and the estimated cost is about $5 per month (or less than 1 cent per hour). You can delete the resources as soon as you have completed this chapter to reduce the cost further.
- Click Apply.
- In the Create SQL Database page, set Backup storage redundancy to Locally-redundant backup storage.
- Click the Next : Networking button.
- In the Network connectivity section, select Public endpoint.
- In the Firewall rules section, set Add current client IP address to Yes.
- Click the Next : Security button.
- Review the options but leave them as the defaults.
- Click the Next : Additional settings button.
- Review the options but leave them as the defaults.
- Click the Review + create button.
- Click the Create button.
- Wait for the deployment to complete, as shown in Figure 2.8:
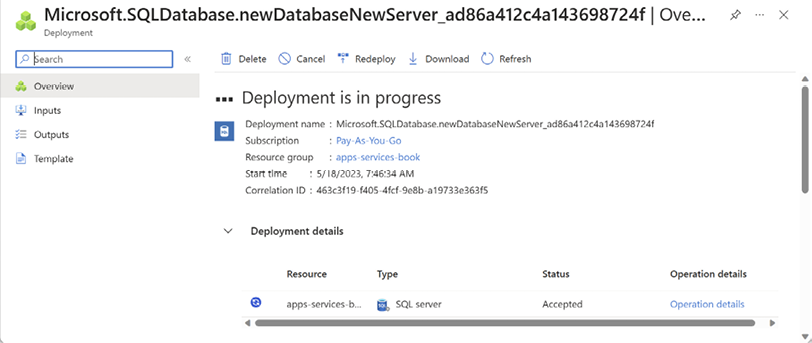
Figure 2.8: Deployment progress for SQL Database
- When deployment has completed, click Go to resource.
- Click Overview and note the database details, as shown in Figure 2.9:
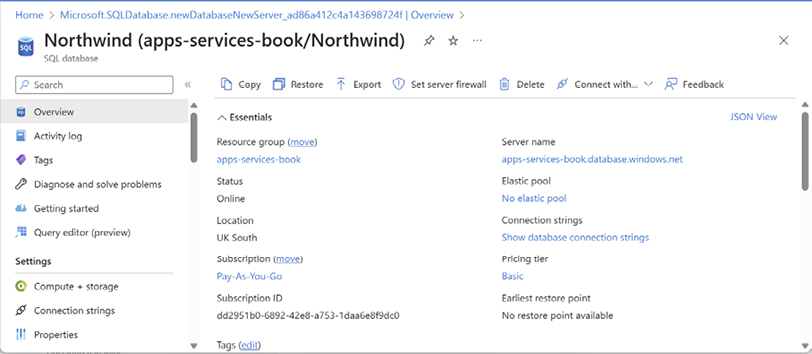
Figure 2.9: SQL Database details
- Click See connection strings (or click Connection strings in the left navigation).
- Copy the ADO.NET (SQL authentication) connection string to your clipboard.
- Start Notepad or your preferred plain text editor, paste the connection string, and add carriage returns after each semicolon to separate each part to make them easier to work with, as shown in the following text:
Server=tcp:apps-services-book.database.windows.net,1433;
Initial Catalog=Northwind;
Persist Security Info=False;
User ID=markjprice;
Password={your_password};
MultipleActiveResultSets=False;
Encrypt=True;
TrustServerCertificate=False;
Connection Timeout=30;
Your
Servervalue will be different because the custom server name part, for example,apps-services-book, is public and must be globally unique.
JetBrains Rider tool window for working with SQL Server
If you use JetBrains Rider on any operating system, then you can use the following steps to connect with a SQL Server database:
- In JetBrains Rider, select View | Tool Windows | Database.
- In the Database tool window, click Connect to database....
- Select the Use connection string option button.
- Set the Database type to Microsoft SQL Server.
- In the String box, enter the database connection string.
- Change
{your_password}to the password you chose. - Optionally, click Test Connection and correct any errors if necessary. If you get an Inconsistent language error, then you can ignore it as we are using SQL Server as the dialect.
- Click Connect to Database.
Creating the Northwind sample database in the cloud
Now we can run a database script to create the Northwind sample database in the Azure SQL Database:
- Use your preferred database tool to connect to the SQL server in Azure:
- In Visual Studio 2022, view Server Explorer.
- On Windows, start SQL Server Management Studio.
- In Visual Studio Code, view the SQL Server tool.
- In JetBrains Rider, navigate to View | Tool Windows | Database, and then click Connect to database….
- Add a data connection, and fill in the dialog box with all the required connection string information, as shown in Figure 2.10:

Figure 2.10: Connecting to your Azure SQL database from Visual Studio
You might also be prompted to Choose Data Source. Choose Microsoft SQL Server. You can select a checkbox to always use this selection.
- Right-click the data connection and choose New Query.
If you are using JetBrains Rider, then right-click the SQL Server, in the popup menu, select SQL Scripts | Run SQL Script…, and then select the
Northwind4AzureSQLdatabase.sqlfile.
- Copy and paste the contents of the
Northwind4AzureSQLdatabase.sqlfile into the query window and execute it.The main difference between the
Northwind4SQLServer.sqlandNorthwind4AzureSQLdatabase.sqlscripts is that the local SQL Server script will delete and recreate the Northwind database. The Azure SQL database script will not because the database needs to be created as an Azure resource. You can download SQL script files from the following link: https://github.com/markjprice/apps-services-net8/tree/main/scripts/sql-scripts.
- Wait to see the Command completed successfully message. This can take a few minutes.
- In Server Explorer, right-click Tables and select Refresh, and note that 13 tables have been created, for example, Categories, Customers, and Products. Also note that dozens of views and stored procedures have also been created.
You now have a running Azure SQL database in the cloud that you can connect to from a .NET project.
Managing data with Transact-SQL
Transact-SQL (T-SQL) is SQL Server’s dialect of Structured Query Language (SQL). Some pronounce it tee-sequel, others tee-es-queue-el.
Unlike C#, T-SQL is not case-sensitive; for example, you can use int or INT to specify the 32-bit integer data type, and you can use SELECT or select to start a query expression. Text data stored in SQL Server tables can be treated as case-sensitive or not, depending on the configuration.
The complete reference for T-SQL is found at the following link: https://learn.microsoft.com/en-us/sql/t-sql/language-reference. From that documentation starting page, use the left side navigation to view topics like Data types, Queries, and Statements.
T-SQL data types
T-SQL has data types that are used for columns, variables, parameters, and so on, as shown in Table 2.2:
|
Category |
Examples |
|
Numbers |
|
|
Date and time |
|
|
Text |
|
|
Binary |
|
|
Other |
|
Table 2.2: Categories of SQL Server data types
There is an xml data type but no JSON data type. Use nvarchar to store JSON values. T-SQL also has support for spatial geometry and geography types.
Documenting with comments
To comment out the rest of a line, use --, which is the equivalent of //.
To comment out a block, use /* at the start and */ at the end, just like in C#.
Declaring variables
Local variable names are prefixed with @ and they are defined using SET, SELECT, or DECLARE, as shown in the following code:
DECLARE @WholeNumber INT; -- Declare a variable and specify its type.
SET @WholeNumber = 3; -- Set the variable to a literal value.
SET @WholeNumber = @WholeNumber + 1; -- Increment the variable.
SELECT @WholeNumber = COUNT(*) FROM Employees; -- Set to the number of employees.
SELECT @WholeNumber = EmployeeId FROM Employees WHERE FirstName = 'Janet';
Global variables are prefixed with @@. For example, @@ROWCOUNT is a context-dependent value that returns the number of rows affected by a statement executed within the current scope, for example, the number of rows updated or deleted.
Specifying data types
Most types have a fixed size. For example, an int uses four bytes, a smallint uses two bytes, and a tinyint uses one byte.
For text and binary types, you can either specify a type prefixed with var or nvar (meaning variable size), which will automatically change its size based on its current value up to a maximum, as shown in the following example: varchar(40); or you can specify a fixed number of characters that will always be allocated, as shown in the following example: char(40).
For text types, the n prefix indicates Unicode, meaning it will use two bytes per character. Text types not prefixed with n use one byte per character.
Controlling flow
T-SQL has similar flow control keywords as C#, for example, BREAK, CONTINUE, GOTO, IF...ELSE, CASE, THROW, TRY...CATCH, WHILE, and RETURN. The main difference is the use of BEGIN and END to indicate the start and end of a block, the equivalent of curly braces in C#.
Operators
T-SQL has similar operators as C#, for example, = (assignment), +, -, *, /, %, <, >, <=, ==, !=, &, |, ^, and so on. It has logical operators like AND, OR, NOT, and LINQ-like operators like ANY, ALL, SOME, EXISTS, BETWEEN, and IN.
LIKE is used for text pattern matching. The pattern can use % for any number of characters. The pattern can use _ for a single character. The pattern can use [] to specify a range and set of allowed characters, for example, [0-9A-Z.-,], which looks like a simplified regular expression syntax but keep in mind that it is not regular expression syntax.
If a table or column name contains spaces, then you must surround the name in square brackets, like [Order Details]. The SQL scripts to create the Northwind database include the command set quoted_identifier on, so you can also use double quotes, like "Order Details". Single quotes are used for literal text, like 'USA'.
Data Manipulation Language (DML)
DML is used to query and change data.
The most common statement in DML is SELECT, which is used to retrieve data from one or more tables. SELECT is extremely complicated because it is so powerful. This book is not about learning T-SQL, so the quickest way to get a feel for SELECT is to see some examples, as shown in Table 2.3:
|
Example |
Description |
|
|
Get all columns of all the employees. |
|
|
Get the first and last name columns of all employees. |
|
|
Give an alias for the table name. Table name prefixes are not needed when there is only one table, but become useful to disambiguate when there are multiple tables that have columns with the same name, for example, |
|
|
Give an alias for the table name without needing the |
|
|
Give an alias for the column name. |
|
|
Filter the results to only include employees in the USA. |
|
|
Get a list of countries used as values in the |
|
|
Calculate a subtotal for each order detail row. |
|
|
Calculate a total for each order and sort with the largest order value at the top. |
|
|
Return all the company names of all customers and suppliers. |
|
|
Match every category with every product using a Cartesian join and output their names (not what you normally want!). 616 rows (8 categories x 77 products). |
|
|
Match each product with its category using a 77 rows. |
|
|
Match each product with its category using an 77 rows. |
Table 2.3: Example SELECT statements with descriptions
More Information: You can read the full documentation for SELECT at the following link: https://learn.microsoft.com/en-us/sql/t-sql/queries/select-transact-sql.
Use your favorite database querying tool, like Visual Studio’s Server Explorer or Visual Studio Code’s mssql extension, to connect to your Northwind database and try out some of the queries above, as shown in Figure 2.11 and Figure 2:12:
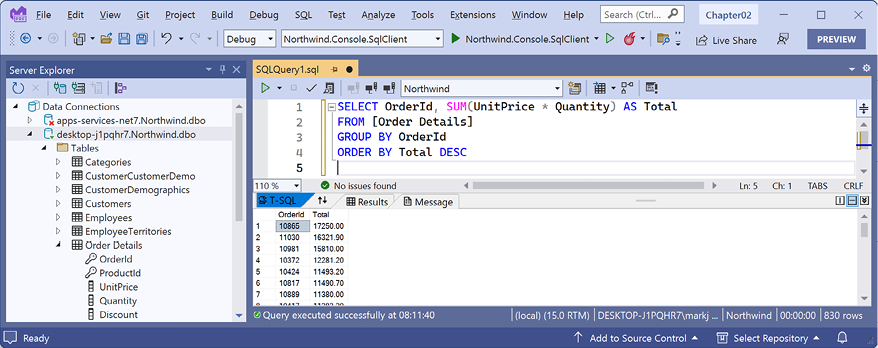
Figure 2.11: Executing T-SQL queries using Visual Studio’s Server Explorer
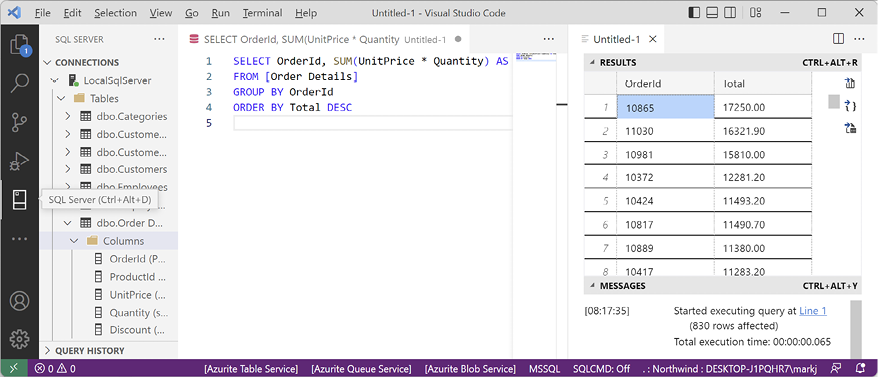
Figure 2.12: Executing T-SQL queries using Visual Studio Code’s mssql extension
DML for adding, updating, and deleting data
DML statements for adding, updating, and deleting data include those shown in Table 2.4:
|
Example |
Description |
|
|
Add a new row to the |
|
|
Update my employee row to set my |
|
|
Delete my employee row. |
|
|
Delete all rows in the |
|
|
Delete all rows in the |
Table 2.4: Example DML statements with descriptions
The above examples use the Employees table in the Northwind database. That table has referential integrity constraints that would mean that, for example, deleting all rows in the table cannot happen because every employee has related data in other tables like Orders.
Data Definition Language (DDL)
DDL statements change the structure of the database, including creating new objects like tables, functions, and stored procedures. The following table shows some examples of DDL statements to give you an idea, but the examples are simple and cannot be executed within the Northwind database, as shown in Table 2.5:
|
Example |
Description |
|
|
Create a table to store shippers. |
|
|
Add a column to a table. |
|
|
Add a non-clustered index for a column in a table. |
|
|
Change an aggregate index with multiple columns and control the sort order. |
|
|
Delete the |
|
|
Delete the |
|
|
Check if a table exists. The |
Table 2.5: Example DDL statements with descriptions
Managing data with low-level APIs
The Microsoft.Data.SqlClient package provides database connectivity to SQL Server for .NET applications. It is also known as the ADO.NET driver for SQL Server and Azure SQL Database.
More Information: You can find the GitHub repository for ADO.NET at the following link: https://github.com/dotnet/SqlClient.
The Microsoft.Data.SqlClient package supports the following .NET platforms:
- .NET Framework 4.6.2 and later.
- .NET Core 3.1 and later.
- .NET Standard 2.0 and later.
Understanding the types in ADO.NET
ADO.NET defines abstract types that represent minimal objects for working with data, like DbConnection, DbCommand, and DbDataReader. Database software manufacturers can inherit from and provide specific implementations that are optimized for and expose additional features for their database. Microsoft has done this for SQL Server. The most important types with their most used members are shown in Table 2.6:
|
Type |
Properties |
Methods |
Description |
|
|
|
|
Manage the connection to the database. |
|
|
|
|
Build a valid connection string for a SQL Server database. After setting all the relevant individual properties, get the |
|
|
|
|
Configure the command to execute. |
|
|
|
Configure a parameter for a command. |
|
|
|
|
|
Process the result set from executing a query. |
Table 2.6: Important types in ADO.NET SqlClient
SqlConnection has two useful events: StateChange and InfoMessage.
All the ExecuteXxx methods of SqlCommand will execute any command. The one you use depends on what you expect to get back:
- If the command includes at least one
SELECTstatement that returns a result set, then callExecuteReaderto execute the command. This method returns aDbDataReader-derived object for reading row-by-row through the result set. - If the command does not include at least one
SELECTstatement, then it is more efficient to callExecuteNonQuery. This method returns an integer for the number of rows affected. - If the command includes at least one
SELECTstatement that returns XML because it uses theAS XMLcommand, then callExecuteXmlReaderto execute the command.
Creating a console app for working with ADO.NET
First, we will create a console app project for working with ADO.NET:
- Use your preferred code editor to create a console app project, as defined in the following list:
- Project template: Console App /
console. - Solution file and folder:
Chapter02. - Project file and folder:
Northwind.Console.SqlClient. - Do not use top-level statements: Cleared.
- Enable native AOT publish: Cleared.
Good Practice: For all the projects that you create for this book, keep your root path short and avoid using
#in your folder and file names, or you might see compiler errors likeRSG002: TargetPath not specified for additional file. For example, do not useC:\My C# projects\as your root path! - Project template: Console App /
- In the project file, treat warnings as errors, add a package reference for the latest version of
Microsoft.Data.SqlClient, and statically and globally importSystem.Console, as shown highlighted in the following markup:<Project Sdk="Microsoft.NET.Sdk"> <PropertyGroup> <OutputType>Exe</OutputType> <TargetFramework>net8.0</TargetFramework> <ImplicitUsings>enable</ImplicitUsings> <Nullable>enable</Nullable> <TreatWarningsAsErrors>true</TreatWarningsAsErrors> </PropertyGroup> <ItemGroup> <PackageReference Include="Microsoft.Data.SqlClient" Version="5.1.2" /> </ItemGroup> <ItemGroup> <Using Include="System.Console" Static="true" /> </ItemGroup> </Project>You can check the most recent version of the package at the following link: https://www.nuget.org/packages/Microsoft.Data.SqlClient#versions-body-tab.
- Build the project to restore the referenced package.
- Add a new class file named
Program.Helpers.cs, and modify its contents to define a method to configure the console to enable special characters like the Euro currency symbol and set the current culture, and a method that will output some text to the console in a specified color, with a default color of black, as shown in the following code:using System.Globalization; // To use CultureInfo. partial class Program { private static void ConfigureConsole(string culture = "en-US", bool useComputerCulture = false) { // To enable Unicode characters like Euro symbol in the console. OutputEncoding = System.Text.Encoding.UTF8; if (!useComputerCulture) { CultureInfo.CurrentCulture = CultureInfo.GetCultureInfo(culture); } WriteLine($"CurrentCulture: {CultureInfo.CurrentCulture.DisplayName}"); } private static void WriteLineInColor(string value, ConsoleColor color = ConsoleColor.White) { ConsoleColor previousColor = ForegroundColor; ForegroundColor = color; WriteLine(value); ForegroundColor = previousColor; } }The default foreground color in the preceding code is white because I have assumed that most readers will have a default background color of black. On my computer, I set the default background color of the console to white so that I can take screenshots for this book. Set whatever default color is best for your computer.
- Add a new class file named
Program.EventHandlers.cs, and modify its contents to define methods that will act as event handlers for a database connection state change by showing the original and current states, and for when the database sends anInfoMessage, as shown in the following code:using Microsoft.Data.SqlClient; // To use SqlInfoMessageEventArgs. using System.Data; // To use StateChangeEventArgs. partial class Program { private static void Connection_StateChange( object sender, StateChangeEventArgs e) { WriteLineInColor( $"State change from {e.OriginalState} to {e.CurrentState}.", ConsoleColor.DarkYellow); } private static void Connection_InfoMessage( object sender, SqlInfoMessageEventArgs e) { WriteLineInColor($"Info: {e.Message}.", ConsoleColor.DarkBlue); } } - In
Program.cs, delete the existing statements. Add statements to connect to SQL Server locally, to Azure SQL Database, or to SQL Edge, using either SQL authentication with a user ID and password or Windows Authentication without a user ID and password, as shown in the following code:using Microsoft.Data.SqlClient; // To use SqlConnection and so on. ConfigureConsole(); #region Set up the connection string builder SqlConnectionStringBuilder builder = new() { InitialCatalog = "Northwind", MultipleActiveResultSets = true, Encrypt = true, TrustServerCertificate = true, ConnectTimeout = 10 // Default is 30 seconds. }; WriteLine("Connect to:"); WriteLine(" 1 - SQL Server on local machine"); WriteLine(" 2 - Azure SQL Database"); WriteLine(" 3 – Azure SQL Edge"); WriteLine(); Write("Press a key: "); ConsoleKey key = ReadKey().Key; WriteLine(); WriteLine(); switch (key) { case ConsoleKey.D1 or ConsoleKey.NumPad1: builder.DataSource = "."; break; case ConsoleKey.D2 or ConsoleKey.NumPad2: builder.DataSource = // Use your Azure SQL Database server name. "tcp:apps-services-book.database.windows.net,1433"; break; case ConsoleKey.D3 or ConsoleKey.NumPad3: builder.DataSource = "tcp:127.0.0.1,1433"; break; default: WriteLine("No data source selected."); return; } WriteLine("Authenticate using:"); WriteLine(" 1 – Windows Integrated Security"); WriteLine(" 2 – SQL Login, for example, sa"); WriteLine(); Write("Press a key: "); key = ReadKey().Key; WriteLine(); WriteLine(); if (key is ConsoleKey.D1 or ConsoleKey.NumPad1) { builder.IntegratedSecurity = true; } else if (key is ConsoleKey.D2 or ConsoleKey.NumPad2) { Write("Enter your SQL Server user ID: "); string? userId = ReadLine(); if (string.IsNullOrWhiteSpace(userId)) { WriteLine("User ID cannot be empty or null."); return; } builder.UserID = userId; Write("Enter your SQL Server password: "); string? password = ReadLine(); if (string.IsNullOrWhiteSpace(password)) { WriteLine("Password cannot be empty or null."); return; } builder.Password = password; builder.PersistSecurityInfo = false; } else { WriteLine("No authentication selected."); return; } #endregion #region Create and open the connection SqlConnection connection = new(builder.ConnectionString); WriteLine(connection.ConnectionString); WriteLine(); connection.StateChange += Connection_StateChange; connection.InfoMessage += Connection_InfoMessage; try { WriteLine("Opening connection. Please wait up to {0} seconds...", builder.ConnectTimeout); WriteLine(); connection.Open(); WriteLine($"SQL Server version: {connection.ServerVersion}"); } catch (SqlException ex) { WriteLineInColor($"SQL exception: {ex.Message}", ConsoleColor.Red); return; } #endregion connection.Close();Good Practice: In this coding task, we prompt the user to enter the password to connect to the database. In a real-world app you are more likely to store the password in an environment variable or secure storage like Azure Key Vault. You must definitely never store passwords in your source code!
- Run the console app, select options that work with your SQL Server setup, and note the results, including the state change event output written in dark yellow to make them easier to see, as shown in the following output:
Connect to:
  1 - SQL Server on local machine
  2 - Azure SQL Database
  3 - Azure SQL Edge
Press a key: 1
Authenticate using:
  1 - Windows Integrated Security
  2 - SQL Login, for example, sa
Press a key: 1
Data Source=.;Initial Catalog=Northwind;Integrated Security=True;Multiple Active Result Sets=True;Connect Timeout=10;Encrypt=True;Trust Server Certificate=True
Opening connection. Please wait up to 10 seconds...
State change from Closed to Open.
SQL Server version: 15.00.2101
State change from Open to Closed.
The following steps show the experience when connecting to Azure SQL Database or Azure SQL Edge, which require a username and password. If you are connecting to a local SQL Server using Windows Integrated Security, then you will not need to enter a password.
- Run the console app, select choices that require a user ID and password, for example, with Azure SQL Database, and note the result, as shown in the following output:
Enter your SQL Server user ID: markjprice Enter your SQL Server password: [censored] Data Source=tcp:apps-services-book.database.windows.net,1433;Initial Catalog=Northwind;Persist Security Info=False;User ID=markjprice;Password=[censored];Multiple Active Result Sets=True;Connect Timeout=10;Encrypt=True;Trust Server Certificate=True Opening connection. Please wait up to 10 seconds... State change from Closed to Open. SQL Server version: 12.00.5168 State change from Open to Closed. - Run the console app, select choices that require a user ID and password, enter a wrong password, and note the result, as shown in the following output:
Enter your SQL Server user ID: markjprice Enter your SQL Server password: 123456 Data Source=tcp:apps-services-book.database.windows.net,1433;Initial Catalog=Northwind;Persist Security Info=False;User ID=markjprice;Password=123456;Multiple Active Result Sets=True;Connect Timeout=10;Encrypt=True;Trust Server Certificate=True Opening connection. Please wait up to 10 seconds... SQL exception: Login failed for user 'markjprice'. - In
Program.cs, change the server name (theDataSourceproperty) to something wrong. - Run the console app and note the result (depending on where your database is hosted, the exception message might be slightly different), as shown in the following output:
SQL exception: A network-related or instance-specific error occurred while establishing a connection to SQL Server. The server was not found or was not accessible. Verify that the instance name is correct and that SQL Server is configured to allow remote connections. (provider: TCP Provider, error: 0 - No such host is known.)
When opening a SQL Server connection, the default timeout is 30 seconds for server connection problems, so be patient! We changed the timeout to 10 seconds to avoid having to wait so long.
Executing queries and working with data readers using ADO.NET
Now that we have a successful connection to the SQL Server database, we can run commands that retrieve rows from a table and process the results using a data reader:
- In
Program.cs, import the namespace for working with ADO.NET command types, as shown in the following code:using System.Data; // To use CommandType.Good Practice: To save space in this book, I will use the names
cmdandrto represent an SQL command and an SQL data reader. In your code, give variables proper word names likecommandandreader.
- Before the statement that closes the connection, add statements to define a command that selects the ID, name, and price from the
Productstable, executes it, and outputs the product IDs, names, and prices using a data reader, as shown in the following code:SqlCommand cmd = connection.CreateCommand(); cmd.CommandType = CommandType.Text; cmd.CommandText = "SELECT ProductId, ProductName, UnitPrice FROM Products"; SqlDataReader r = cmd.ExecuteReader(); string horizontalLine = new string('-', 60); WriteLine(horizontalLine); WriteLine("| {0,5} | {1,-35} | {2,10} |", arg0: "Id", arg1: "Name", arg2: "Price"); WriteLine(horizontalLine); while (r.Read()) { WriteLine("| {0,5} | {1,-35} | {2,10:C} |", r.GetInt32("ProductId"), r.GetString("ProductName"), r.GetDecimal("UnitPrice")); } WriteLine(horizontalLine); r.Close();We format the unit price using the
Cformat, which uses the current culture to format currency values. The call toConfigureConsolesets the current culture to US English so the output for all readers uses$. To test alternative cultures like French that use the Euro currency symbol, modify the call at the top of theProgram.csfile, as shown in the following code:ConfigureConsole("fr-FR");.
- Run the console app and note the results, as shown in the following partial output:
---------------------------------------------------------- | Id | Name | Price | ---------------------------------------------------------- | 1 | Chai | $18.00 | | 2 | Chang | $19.00 | ... | 76 | Lakkalikööri | $18.00 | | 77 | Original Frankfurter grüne Soße | $13.00 | ---------------------------------------------------------- - In
Program.cs, modify the SQL statement to define a parameter for the unit price and use it to filter the results to products that cost more than that unit price, as shown highlighted in the following code:Write("Enter a unit price: "); string? priceText = ReadLine(); if(!decimal.TryParse(priceText, out decimal price)) { WriteLine("You must enter a valid unit price."); return; } SqlCommand cmd = connection.CreateCommand(); cmd.CommandType = CommandType.Text; cmd.CommandText = "SELECT ProductId, ProductName, UnitPrice FROM Products" + " WHERE UnitPrice >= @minimumPrice"; cmd.Parameters.AddWithValue("minimumPrice", price); - Run the console app, enter a unit price like
50, and note the results, as shown in the following partial output:Enter a unit price: 50 ---------------------------------------------------------- | Id | Name | Price | ---------------------------------------------------------- | 9 | Mishi Kobe Niku | $97.00 | | 18 | Carnarvon Tigers | $62.50 | | 20 | Sir Rodney's Marmalade | $81.00 | | 29 | Thüringer Rostbratwurst | $123.79 | | 38 | Côte de Blaye | $263.50 | | 51 | Manjimup Dried Apples | $53.00 | | 59 | Raclette Courdavault | $55.00 | ----------------------------------------------------------
Outputting statistics
An ADO.NET connection can track useful statistics during its lifetime, including those listed in Table 2.7:
|
Key |
Description |
|
|
Data is transmitted as bytes stored in buffers. |
|
|
Cursors are an expensive operation because they require state on the server, and should be avoided when possible. |
|
|
Number of prepares (compilations), executions of prepared commands, and executions of unprepared commands. |
|
|
Number of |
|
|
Number of server round trips, result sets, and transactions. |
|
|
Time in milliseconds spent connected, executing commands, or due to the network. |
Table 2.7: Connection statistics that can be tracked
Let’s enable this and output some of those statistics:
- In
Program.Helpers.cs, import the namespaces for working with ADO.NET and common collections, as shown in the following code:using Microsoft.Data.SqlClient; // To use SqlConnection. using System.Collections; // To use IDictionary. - In
Program.Helpers.cs, in the partialProgramclass, add a method to output statistics about the current connection, with an array of string values to control which of the dozen or more statistics we want to output, as shown in the following code:private static void OutputStatistics(SqlConnection connection) { // Remove all the string values to see all the statistics. string[] includeKeys = { "BytesSent", "BytesReceived", "ConnectionTime", "SelectRows" }; IDictionary statistics = connection.RetrieveStatistics(); foreach (object? key in statistics.Keys) { if (!includeKeys.Any() || includeKeys.Contains(key)) { if (int.TryParse(statistics[key]?.ToString(), out int value)) { WriteLineInColor($"{key}: {value:N0}", ConsoleColor.Cyan); } } } } - In
Program.cs, after writing the SQL Server version to the console, add a statement to enable statistics for the connection, as shown highlighted in the following code:WriteLine($"SQL Server version: {connection.ServerVersion}"); connection.StatisticsEnabled = true; - In
Program.cs, before closing the connection, add a statement to output statistics for the connection, as shown highlighted in the following code:OutputStatistics(connection); connection.Close(); - Run the console app and note the statistics, as shown in the following partial output:
BytesReceived: 3,888
BytesSent: 336
SelectRows: 77
ExecutionTime: 25
Working with ADO.NET asynchronously
You can improve the responsiveness of data access code by making it asynchronous. You will see more details of how asynchronous operations work in Chapter 5, Multitasking and Concurrency. For now, just enter the code as instructed.
Let’s see how to change the statements to work asynchronously:
- In
Program.cs, change the statement to open the connection to make it asynchronous, as shown highlighted in the following code:await connection.OpenAsync(); - In
Program.cs, change the statement to execute the command to make it asynchronous, as shown highlighted in the following code:SqlDataReader r = await cmd.ExecuteReaderAsync(); - In
Program.cs, change the statements to read the next row and get the field values to make them asynchronous, as shown highlighted in the following code:while (await r.ReadAsync()) { WriteLine("| {0,5} | {1,-35} | {2,8:C} |", await r.GetFieldValueAsync<int>("ProductId"), await r.GetFieldValueAsync<string>("ProductName"), await r.GetFieldValueAsync<decimal>("UnitPrice")); } - In
Program.cs, change the statements to close the data reader and connection to make them asynchronous, as shown highlighted in the following code:await r.CloseAsync(); await connection.CloseAsync(); - Run the console app and confirm that it has the same results as before, but it would run better in a multithreaded system, for example, not blocking the user interface in a GUI app, and not blocking I/O threads in a website.
Executing stored procedures using ADO.NET
If you need to execute the same query or another SQL statement multiple times, it is best to create a stored procedure, often with parameters, so that it can be precompiled and optimized. Stored procedure parameters have a direction to indicate if they are inputs, outputs, or return values.
Let’s see an example that uses all three types of parameter direction. First, we will create the stored procedure in the database:
- In your preferred database tool, connect to the
Northwinddatabase. - In your preferred database tool, add a new stored procedure:
- If you are using SQL Server Management Studio, then in Object Explorer, navigate to Databases | Northwind | Programmability, right-click Stored Procedures, and select New | Stored Procedure.
- If you are using Visual Studio 2022, then in Server Explorer, right-click Stored Procedures and select Add New Stored Procedure.
- If you are using Visual Studio Code, then in SQL Server, right-click your connection profile and select New Query.
- If you are using JetBrains Rider, then in the Database toolbar, click the Jump to Query Console… button, and then remove any existing statements. As well as the following SQL statements, start with a command to set the active database to Northwind:
USE Northwind GO. This should prevent JetBrains Rider from creating the stored procedure in themasterdatabase!
- Modify the SQL statements to define a stored procedure named
GetExpensiveProductswith two parameters, an input parameter for the minimum unit price and an output parameter for the row count of matching products, as shown in the following code:CREATE PROCEDURE [dbo].[GetExpensiveProducts] @price money, @count int OUT AS PRINT 'Getting expensive products: ' + TRIM(CAST(@price AS NVARCHAR(10))) SELECT @count = COUNT(*) FROM Products WHERE UnitPrice >= @price SELECT * FROM Products WHERE UnitPrice >= @price RETURN 0The stored procedure uses two
SELECTstatements. The first sets the@countoutput parameter to a count of the matching product rows. The second returns the matching product rows. It also calls thePRINTcommand, which will raise theInfoMessageevent.
- Right-click in the SQL statements and select Execute or Execute Query.
- Right-click Stored Procedures and select Refresh. In JetBrains Rider, it is named routines.
- Expand GetExpensiveProducts and note the
@price moneyinput,@count intinput/output, and return value parameters, as shown in SQL Server Management Studio in Figure 2.13:
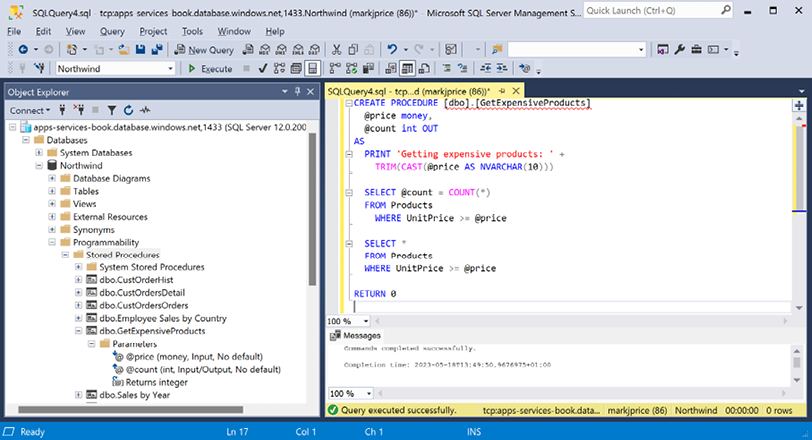
Figure 2.13: Parameters of the GetExpensiveProducts stored procedure
- Close the SQL query without saving changes.
- In
Program.cs, add statements to allow the user to choose between running the text command and the stored procedure. Add statements defining the stored procedure and its parameters, and then execute the command, as shown highlighted in the following code:SqlCommand cmd = connection.CreateCommand(); WriteLine("Execute command using:"); WriteLine(" 1 - Text"); WriteLine(" 2 - Stored Procedure"); WriteLine(); Write("Press a key: "); key = ReadKey().Key; WriteLine(); WriteLine(); SqlParameter p1, p2 = new(), p3 = new(); if (key is ConsoleKey.D1 or ConsoleKey.NumPad1) { cmd.CommandType = CommandType.Text; cmd.CommandText = "SELECT ProductId, ProductName, UnitPrice FROM Products" + " WHERE UnitPrice >= @minimumPrice"; cmd.Parameters.AddWithValue("minimumPrice", price); } else if (key is ConsoleKey.D2 or ConsoleKey.NumPad2) { cmd.CommandType = CommandType.StoredProcedure; cmd.CommandText = "GetExpensiveProducts"; p1 = new() { ParameterName = "price", SqlDbType = SqlDbType.Money, SqlValue = price }; p2 = new() { Direction = ParameterDirection.Output, ParameterName = "count", SqlDbType = SqlDbType.Int }; p3 = new() { Direction= ParameterDirection.ReturnValue, ParameterName = "rv", SqlDbType = SqlDbType.Int }; cmd.Parameters.AddRange(new[] { p1, p2, p3 }); } SqlDataReader r = await cmd.ExecuteReaderAsync(); - After the statement that closes the data reader, add statements to output the output parameter and the return value, as shown highlighted in the following code:
await r.CloseAsync();
if (key is ConsoleKey.D2 or ConsoleKey.NumPad2)
{
  WriteLine($"Output count: {p2.Value}");
  WriteLine($"Return value: {p3.Value}");
}
await connection.CloseAsync();
If a stored procedure returns result sets as well as parameters, then the data reader for the result sets must be closed before the parameters can be read.
- Run the console app and note the results if the price entered is
60, and note theInfoMessageevent handler writes a message in dark blue, as shown in the following output:Enter a unit price: 60 Execute command using: 1 - Text 2 - Stored Procedure Press a key: 2 Info: Getting expensive products: 60.00. ---------------------------------------------------------- | Id | Name | Price | ---------------------------------------------------------- | 9 | Mishi Kobe Niku | $97.00 | | 18 | Carnarvon Tigers | $62.50 | | 20 | Sir Rodney's Marmalade | $81.00 | | 29 | Thüringer Rostbratwurst | $123.79 | | 38 | Côte de Blaye | $263.50 | ---------------------------------------------------------- Output count: 5 Return value: 0 State change from Open to Closed.
Outputting streams with a data reader
In a real app or service, we would likely not output to the console. More likely, as we read each row with a data reader, we might output to a stream that writes HTML tags inside a web page, or text formats like XML and JSON for returning data from a service.
Let’s add the ability to generate a JSON file:
- In
Program.cs, import the namespace for working efficiently with JSON and to statically import theEnvironmentandPathclasses, as shown in the following code:using System.Text.Json; // To use Utf8JsonWriter, JsonSerializer. using static System.Environment; using static System.IO.Path; - In
Program.cs, before thewhilestatement that processes the data reader, add statements to define a file path for a JSON file, create a file stream, and start a JSON array, then in thewhileblock, write a JSON object that represents each product row, and finally, end the array and close the stream, as shown highlighted in the following code:// Define a file path to write to. string jsonPath = Combine(CurrentDirectory, "products.json"); await using (FileStream jsonStream = File.Create(jsonPath)) { Utf8JsonWriter jsonWriter = new(jsonStream); jsonWriter.WriteStartArray(); while (await r.ReadAsync()) { WriteLine("| {0,5} | {1,-35} | {2,10:C} |", await r.GetFieldValueAsync<int>("ProductId"), await r.GetFieldValueAsync<string>("ProductName"), await r.GetFieldValueAsync<decimal>("UnitPrice")); jsonWriter.WriteStartObject(); jsonWriter.WriteNumber("productId", await r.GetFieldValueAsync<int>("ProductId")); jsonWriter.WriteString("productName", await r.GetFieldValueAsync<string>("ProductName")); jsonWriter.WriteNumber("unitPrice", await r.GetFieldValueAsync<decimal>("UnitPrice")); jsonWriter.WriteEndObject(); } jsonWriter.WriteEndArray(); jsonWriter.Flush(); jsonStream.Close(); } WriteLineInColor($"Written to: {jsonPath}", ConsoleColor.DarkGreen); - Run the console app, enter a price of
60, and note the path to the JSON file, as shown in the following output:Written to: C:\apps-services-net8\Chapter02\Northwind.Console.SqlClient\bin\Debug\net8.0\products.json - Open the
products.jsonfile and note that the JSON is written with no whitespace, so it all appears on one line, as shown in the following file:[{"productId":9,"productName":"Mishi Kobe Niku","unitPrice":97.0000},{"productId":18,"productName":"Carnarvon Tigers","unitPrice":62.5000},{"productId":20,"productName":"Sir Rodney\u0027s Marmalade","unitPrice":81.0000},{"productId":29,"productName":"Th\u00FCringer Rostbratwurst","unitPrice":123.7900},{"productId":38,"productName":"C\u00F4te de Blaye","unitPrice":263.5000}] - If you are using Visual Studio 2022, then you can right-click and select Format Document, and note that it is now easier to read, as shown in Figure 2.14:
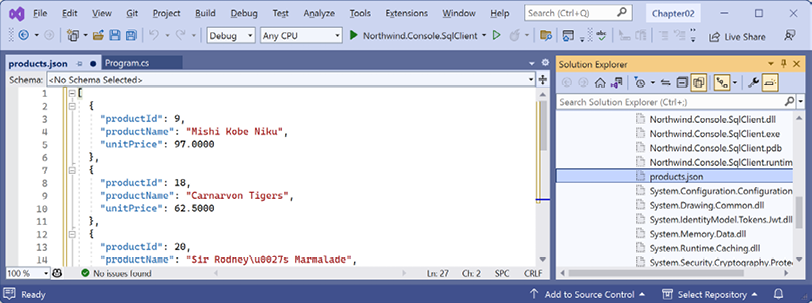
Figure 2.14: The products.json file generated from a data reader
Generating objects with a data reader
For maximum flexibility, we likely want to convert the rows in a data reader into object instances stored in an array or collection. After that, we could serialize the object graph however we want. ADO.NET does not have a built-in ability to map a data reader row to an object, so we will have to do it manually.
Let’s see an example:
- Add a new class file named
Product.cs, and modify its contents to define a class to represent just the three columns we want from each row in theProductstable, as shown in the following code:namespace Northwind.Models; public class Product { public int ProductId { get; set; } public string? ProductName { get; set; } public decimal? UnitPrice { get; set; } }Good Practice: In this task, we will use this type only for read-only instances, so we could have used an immutable
record. But later we will need to change property values after the object is created, so we have to define aclassinstead.
- At the top of
Program.cs, import theNorthwind.Modelsnamespace so we can useProduct. - In
Program.cs, before creating the file stream, instantiate a list of products with an initial storage for 77 items (but this is not a limit) because when first created the Northwind database has 77 products, as shown highlighted in the following code:List<Product> products = new(capacity: 77); await using (FileStream jsonStream = File.Create(jsonPath)) - In the
whileblock, add statements to instantiate theProducttype per row in the data reader and add it to the list, as shown highlighted in the following code:while (await r.ReadAsync()) { Product product = new() { ProductId = await r.GetFieldValueAsync<int>("ProductId"), ProductName = await r.GetFieldValueAsync<string>("ProductName"), UnitPrice = await r.GetFieldValueAsync<decimal>("UnitPrice") }; products.Add(product); ... } - Before closing the data reader, add a statement to use the static
Serializemethod of theJsonSerializerclass to write the list of products to the console, as shown highlighted in the following code:WriteLineInColor(JsonSerializer.Serialize(products), ConsoleColor.Magenta); await r.CloseAsync(); - Run the console app, enter a price of
60, and note the JSON generated from the list of products, as shown in the following output:Written to: C:\apps-services-net8\Chapter02\Northwind.Console.SqlClient\bin\Debug\net8.0\products.json [{"ProductId":9,"ProductName":"Mishi Kobe Niku","UnitPrice":97.0000},{"ProductId":18,"ProductName":"Carnarvon Tigers","UnitPrice":62.5000},{"ProductId":20,"ProductName":"Sir Rodney\u0027s Marmalade","UnitPrice":81.0000},{"ProductId":29,"ProductName":"Th\u00FCringer Rostbratwurst","UnitPrice":123.7900},{"ProductId":38,"ProductName":"C\u00F4te de Blaye","UnitPrice":263.5000}]
Instead of manually instantiating objects, to simplify even more, we can use a simple object-relational mapper (ORM) like Dapper.
Managing data with Dapper
Dapper uses ADO.NET underneath when working with SQL Server. Because it is a higher-level technology, it is not as efficient as using ADO.NET directly, but it can be easier. Dapper is an alternative ORM to EF Core. It is more efficient because it extends the low-level ADO.NET IDbConnection interface with very basic functionality without trying to be all things to all people.
Dapper connection extension methods
Dapper adds three extension methods to any class that implements IDbConnection (like SqlConnection). They are Query<T>, Query, and Execute. Dapper will automatically open and close the associated connection as needed.
The Query<T> extension method is the most used because it runs any specified SQL command and then returns the results as an IEnumerable<T> (a sequence of objects). It is designed to run commands that retrieve data like SELECT. It has several parameters, as shown in Table 2.8:
|
Parameter |
Description |
|
|
This is the only mandatory parameter. It is either the text of a SQL command or the name of a stored procedure. |
|
|
A complex object for passing parameters used in the query. This can be an anonymous type. |
|
|
To manage distributed transactions. |
|
|
By default, it will buffer the entire reader on return. With large datasets, you can minimize memory and only load objects as needed by setting |
|
|
To change the default command timeout. |
|
|
To switch to a stored procedure instead of the default of text. |
Table 2.8: Dapper’s Query<T> extension method parameters
The Query extension method is a loosely-typed equivalent so it is less frequently used.
The Execute extension method runs any specified SQL command and then returns the number of rows affected as an int. It is designed to run commands like INSERT, UPDATE, and DELETE. It has the same parameters as the Query<T> extension method.
Querying using Dapper
Let’s see a simple example that queries the Suppliers table instead of the Products table:
- In the
Northwind.Console.SqlClientproject, add a package reference forDapper, as shown highlighted in the following markup:<ItemGroup> <PackageReference Include="Microsoft.Data.SqlClient" Version="5.1.2" /> <PackageReference Include="Dapper" Version="2.1.21" /> </ItemGroup>At the time of writing, the latest version of Dapper is 2.1.21, released on November 11, 2023. You can check if it has been updated since then at the following link: https://www.nuget.org/packages/Dapper.
- Build the project to restore packages.
- Add a new class file named
Supplier.cs, and modify its contents to define a class to represent four columns from each row in theSupplierstable, as shown in the following code:namespace Northwind.Models; public class Supplier { public int SupplierId { get; set; } public string? CompanyName { get; set; } public string? City { get; set; } public string? Country { get; set; } } - At the bottom of
Program.cs, add statements to retrieveSupplierentities inGermany, enumerate the collection outputting basic information about each one, and then serialize the collection as JSON to the console, as shown in the following code:WriteLineInColor("Using Dapper", ConsoleColor.DarkGreen); connection.ResetStatistics(); // So we can compare using Dapper. IEnumerable<Supplier> suppliers = connection.Query<Supplier>( sql: "SELECT * FROM Suppliers WHERE Country=@Country", param: new { Country = "Germany" }); foreach (Supplier s in suppliers) { WriteLine("{0}: {1}, {2}, {3}", s.SupplierId, s.CompanyName, s.City, s.Country); } WriteLineInColor(JsonSerializer.Serialize(suppliers), ConsoleColor.Green); OutputStatistics(connection); - Run the console app, and in the section where we used Dapper, note the same connection was used, so its events were raised while the Dapper query was executed, the enumerated collection output, and then JSON generated from the list of suppliers, as shown in the following output:
Using Dapper 11: Heli Süßwaren GmbH & Co. KG, Berlin, Germany 12: Plutzer Lebensmittelgroßmärkte AG, Frankfurt, Germany 13: Nord-Ost-Fisch Handelsgesellschaft mbH, Cuxhaven, Germany [{"SupplierId":11, "CompanyName":"Heli S\u00FC\u00DFwaren GmbH \u0026 Co. KG", "City":"Berlin","Country":"Germany"}, {"SupplierId":12, "CompanyName":"Plutzer Lebensmittelgro\u00DFm\u00E4rkte AG", "City":"Frankfurt","Country":"Germany"}, {"SupplierId":13, "CompanyName":"Nord-Ost-Fisch Handelsgesellschaft mbH", "City":"Cuxhaven","Country":"Germany"}] BytesReceived: 1,430 BytesSent: 240 SelectRows: 3 ExecutionTime: 5 - At the bottom of
Program.cs, add statements to run theGetExpensiveProductsstored procedure, passing apriceparameter value of100, enumerate the collection outputting basic information about each one, and then serialize the collection as JSON to the console, as shown in the following code:IEnumerable<Product> productsFromDapper = connection.Query<Product>(sql: "GetExpensiveProducts", param: new { price = 100M, count = 0 }, commandType: CommandType.StoredProcedure); foreach (Product p in productsFromDapper) { WriteLine("{0}: {1}, {2}", p.ProductId, p.ProductName, p.UnitPrice); } WriteLineInColor(JsonSerializer.Serialize(productsFromDapper), ConsoleColor.Green);
Warning! With Dapper, you must pass a param object with all parameters, even if they are only used as output parameters. For example, we must define count, or an exception will be thrown. You must also remember to explicitly set the command type to stored procedure!
Run the console app, and in the section where we used Dapper to run the stored procedure to get the products that cost more than 100, note the same connection was used so its events were raised while the Dapper query was executed, the enumerated collection output, and then JSON generated from the list of products, as shown in the following output:
Info: Getting expensive products: 100.00.
29: Thüringer Rostbratwurst, 123.7900
38: Côte de Blaye, 263.5000
[{"ProductId":29,"ProductName":"Th\u00FCringer Rostbratwurst","UnitPrice":123.7900},{"ProductId":38,"ProductName":"C\u00F4te de Blaye","UnitPrice":263.5000}]
More Information: You can learn more about Dapper at the following link: https://github.com/DapperLib/Dapper/blob/main/Readme.md.
Cleaning up data resources
When you are done with a SQL Server database, you can clean up the resources used.
The Northwind database is used in most chapters of this book so if you plan to immediately continue with more chapters after this one, do not delete Northwind yet! If you created the database on your local computer, then you can leave it forever.
Removing Azure resources
To remove the resources used by SQL Database to save costs:
Warning! If you do not remove the resources used by an Azure SQL database, then you will incur costs.
- In the Azure portal, find the resource group named
apps-services-book. - Click Delete.
- Enter the name of the resource group.
- Click Delete.
Practicing and exploring
Test your knowledge and understanding by answering some questions, getting some hands-on practice, and exploring this chapter’s topics with deeper research.
Exercise 2.1 – Test your knowledge
Answer the following questions:
- Which NuGet package should you reference in a .NET project to get the best performance when working with data in SQL Server?
- What is the safest way to define a database connection string?
- What must T-SQL parameters and variables be prefixed with?
- What must you do before reading an output parameter?
- What type does Dapper add its extension methods to?
- What are the two most commonly used extension methods provided by Dapper?
Exercise 2.2 – Explore topics
Use the links on the following page to learn more details about the topics covered in this chapter:
Exercise 2.3 – Alternatives for storing secrets
Secrets like passwords and other values used in database connection strings, or values like keys to access a service, are often stored in environment variables. Other places for storing these values include App Secrets. You can learn more about them in the article Safe storage of app secrets in development in ASP.NET Core, found at the following link:
https://learn.microsoft.com/en-us/aspnet/core/security/app-secrets
For related guidance about handling connection strings, you can read the following link:
https://learn.microsoft.com/en-us/ef/core/miscellaneous/connection-strings
Summary
In this chapter, you learned:
- How to connect to an existing SQL Server database.
- How to execute a simple query and process the results using fast and low-level ADO.NET.
- How to execute a simple query and process the results using Dapper.
In the next chapter, you will learn how to use the more powerful and complex ORM from Microsoft named EF Core.