


 Download code from GitHub
Managing Relational Data Using SQL Server
This chapter is about managing relational data stored in SQL Server, Azure SQL Database, or Azure SQL Edge. First, you will learn how to manage the data using native Transact-SQL statements. Next, you will learn how to manage data at a low level using ADO.NET libraries (Microsoft.Data.SqlClient). You will also learn how to manage the data by using the higher-level object-to-data store mapping technology named Entity Framework Core (EF Core). Then, you will learn how to store entity models that use inheritance hierarchies using three different mapping strategies. Finally, you will build class libraries for a SQL Server database that will be used in code examples throughout the rest of this book.
This chapter will cover the following topics:
- Understanding modern databases
- Managing data with Transact-SQL
- Managing SQL Server data with low-level APIs
- Managing SQL Server data with EF Core
- Mapping inheritance hierarchies with EF Core
- Building a reusable entity data model
- Cleaning up data resources
Understanding modern databases
Two of the most common places to store data are in a Relational Database Management System (RDBMS) such as SQL Server, PostgreSQL, MySQL, and SQLite, or in a NoSQL database such as Azure Cosmos DB, MongoDB, Redis, and Apache Cassandra.
In this chapter, we will focus on the most popular RDBMS for Windows, which is SQL Server. This product is also available in a version for Linux. For cross-platform development, you can use either Azure SQL Database, which stores the data in the cloud, or Azure SQL Edge, which can run in a Docker container on Windows, macOS, or Linux.
Using a sample relational database
To learn how to manage an RDBMS using .NET, it would be useful to have a sample one so that you can practice on a database that has a medium complexity and a decent number of sample records. Microsoft offers several sample databases, most of which are too complex for our needs, so instead, we will use a database that was first created in the early 1990s known as Northwind.
Let’s take a minute to look at a diagram of the Northwind database and its eight most important tables. You can use the diagram in Figure 2.1 to refer to as we write code and queries throughout this book:
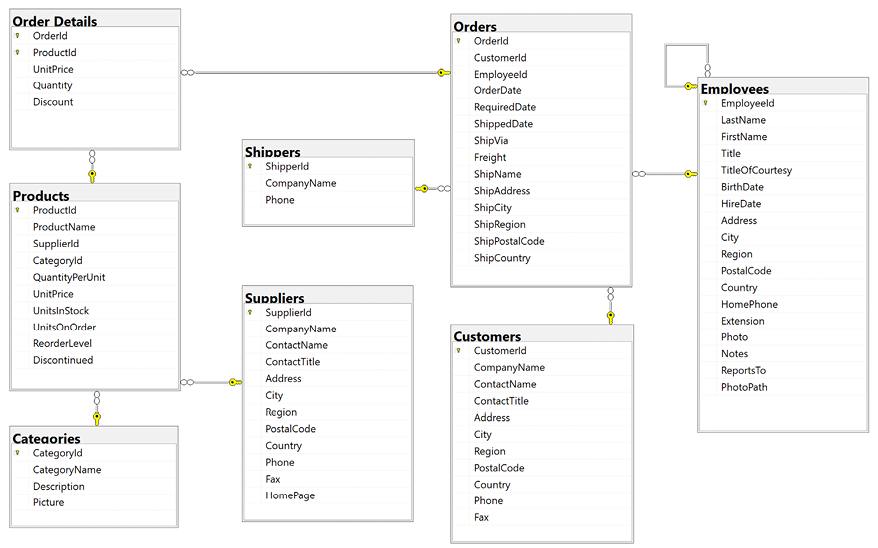
Figure 2.1: The Northwind database tables and relationships
Note that:
- Each category has a unique identifier, name, description, and picture. The picture is stored as a byte array in JPEG format.
- Each product has a unique identifier, name, unit price, number of units in stock, and other columns.
- Each product is associated with a category by storing the category’s unique identifier.
- The relationship between
CategoriesandProductsis one-to-many, meaning each category can have zero, one, or more products. - Each product is supplied by a supplier company, indicated by storing the supplier’s unique identifier.
- A quantity and unit price of a product is stored for each detail of an order.
- Each order is made by a customer, taken by an employee, and shipped by a shipping company.
- Each employee has a name, address, contact details, birth and hire dates, a reference to their manager (except for the boss whose
ReportsTofield isnull), and a photo stored as a byte array in JPEG format. The table has a one-to-many relationship to itself because one employee can manage many other employees.
Connecting to a SQL Server database
To connect to a SQL Server database, we need to know multiple pieces of information, as shown in the following list:
- The name of the server (and the instance if it has one). This can include the protocol, IP address, and port number if connecting over a network.
- The name of the database.
- Security information, such as the username and password, or if we should pass the currently logged-on user’s credentials automatically using Windows Authentication.
We specify this information in a connection string.
For backward compatibility, there are multiple possible keywords we can use in a SQL Server connection string for the various parameters, as shown in the following list:
Data Source,server, oraddr: These keywords are the name of the server (and an optional instance). You can use a dot.to mean the local server.Initial Catalogordatabase: These keywords are the name of the database.Integrated Securityortrusted_connection: These keywords are set totrueorSSPIto pass the thread’s current user credentials using Windows Authentication.User IdandPassword: These keywords are used to authenticate with any edition of SQL Server. This is important for Azure SQL Database or Azure SQL Edge because they do not support Windows Authentication. The full edition of SQL Server on Windows supports both username with password, and Windows Authentication.Authentication: This keyword is used to authenticate by using Azure AD identities that can enable password-less authentication. Values can beActive Directory Integrated,Active Directory Password, andSql Password.Persist Security Info: If set tofalse, this keyword tells the connection to remove thePasswordfrom the connection string after authenticating.Encrypt: If set totrue, this keyword tells the connections to use SSL to encrypt transmissions between client and server.TrustServerCertificate: Set totrueif hosting locally and you get the error “A connection was successfully established with the server, but then an error occurred during the login process. (provider: SSL Provider, error: 0 - The certificate chain was issued by an authority that is not trusted.)”Connection Timeout: This keyword defaults to 30 seconds.MultipleActiveResultSets: This keyword is set totrueto enable a single connection to be used to work with multiple tables simultaneously to improve efficiency. It is used for lazy loading rows from related tables.
As described in the list above, when you write code to connect to a SQL Server database, you need to know its server name. The server name depends on the edition and version of SQL Server that you will connect to, as shown in the following table:
|
SQL Server edition |
Server name \ Instance name |
|
LocalDB 2012 |
|
|
LocalDB 2016 or later |
|
|
Express |
|
|
Full/Developer (default instance) |
|
|
Full/Developer (named instance) |
|
|
Azure SQL Edge (local Docker) |
|
|
Azure SQL Database |
|
Good Practice: Use a dot . as shorthand for the local computer name. Remember that server names for SQL Server can be made up of two parts: the name of the computer and the name of a SQL Server instance. You provide instance names during custom installation.
Installing and setting up SQL Server
Microsoft offers various editions of its popular and capable SQL Server product for Windows, Linux, and Docker containers. If you have Windows, then you can use a free version that runs standalone, known as SQL Server Developer Edition. You can also use the Express edition or the free SQL Server LocalDB edition that can be installed with Visual Studio 2022 for Windows.
If you do not have a Windows computer or if you want to use a cross-platform database system, then you can skip ahead to Setting up Azure SQL Database or Installing Azure SQL Edge in Docker. Be sure to read the Creating the Northwind sample database section to learn where to find the SQL scripts that create the sample database.
Installing SQL Server Developer Edition for Windows
On Windows, if you want to use the full edition of SQL Server instead of the simplified LocalDB or Express editions, then you can find all SQL Server editions at the following link: https://www.microsoft.com/en-us/sql-server/sql-server-downloads.
To download and configure SQL Server Developer Edition, use the following steps:
- Download the Developer edition.
- Run the installer.
- Select the Custom installation type.
- Select a folder for the installation files and then click Install.
- Wait for the 1.5 GB of installer files to download.
- In SQL Server Installation Center, click Installation, and then click New SQL Server stand-alone installation or add features to an existing installation.
- Select Developer as the free edition and then click Next.
- Accept the license terms and then click Next.
- Review the Microsoft Update options, and then click Next.
- Review the install rules, fix any issues, and then click Next.
- In Feature Selection, select Database Engine Services, and then click Next.
- In Instance Configuration, select Default instance, and then click Next. If you already have a default instance configured, then you could create a named instance, perhaps called
net7book. - In Server Configuration, note the SQL Server Database Engine is configured to start automatically. Set the SQL Server Browser to start automatically, and then click Next.
- In Database Engine Configuration, on the Server Configuration tab, set Authentication Mode to Mixed, set the sa account password to a strong password, click Add Current User, and then click Next.
- In Ready to Install, review the actions that will be taken, and then click Install.
- In Complete, note the successful actions taken, and then click Close.
- In SQL Server Installation Center, in Installation, click Install SQL Server Management Tools.
- In the browser window, click to download the latest version of SSMS.
- Run the SSMS installer and click Install.
- When the installer has finished, click Restart if needed or Close.
Visual Studio Code extension for working with SQL Server
There are many tools that make it easy to work with SQL Server. If you are using Visual Studio Code, then you can install the SQL Server (mssql) ms-mssql.mssql extension.
If you install the extension, it adds a new view to the Primary Side Bar titled SQL Server, as shown in Figure 2.2:
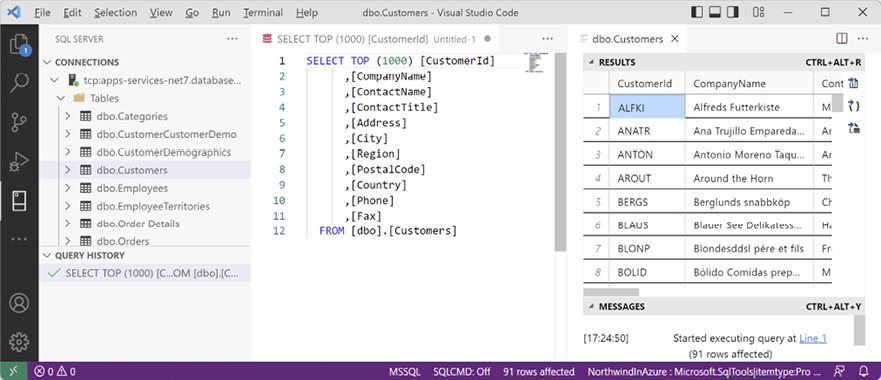
Figure 2.2: SQL Server (mssql) extension for Visual Studio Code
Creating the Northwind sample database on Windows
Now we can run a database script to create the Northwind sample database on Windows using SQL Server Management Studio (SSMS):
- If you have not previously downloaded or cloned the GitHub repository for this book, then do so now using the following link: https://github.com/markjprice/apps-services-net7/.
- In your
apps-services-net7folder, create a folder namedChapter02. - Copy the script to create the Northwind database for SQL Server from the following path in your local Git repository:
/sql-scripts/Northwind4SQLServer.sqlinto theChapter02folder. - Start SQL Server Management Studio.
- In the Connect to Server dialog, for Server name, enter
.(a dot), meaning the local computer name, and then click Connect.If you had to create a named instance, like
net7book, then enter.\net7book.
- Navigate to File | Open | File....
- Browse to select the
Northwind4SQLServer.sqlfile and then click Open. - In the toolbar, click Execute, and note the Command(s) completed successfully message.
- In Object Explorer, expand the Northwind database, and then expand Tables.
- Right-click Products, click Select Top 1000 Rows, and note the returned results, as shown in Figure 2.3:
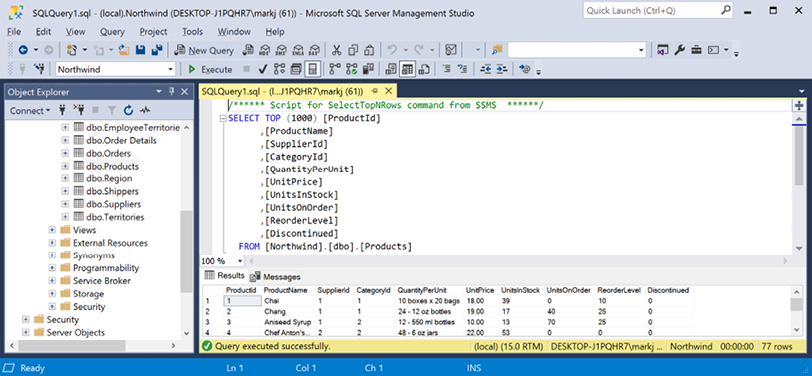
Figure 2.3: The Products table in SQL Server Management Studio
- In the Object Explorer toolbar, click the Disconnect button.
- Exit SQL Server Management Studio.
We did not have to use SQL Server Management Studio to execute the database script. We can also use tools in Visual Studio 2022, including the SQL Server Object Explorer and Server Explorer, or cross-platform tools like the Visual Studio Code extension for SQL Server, or Azure Data Studio, which you can download and install from the following link: https://aka.ms/getazuredatastudio.
Setting up Azure SQL Database
If you do not have a Windows computer, then you can create a cloud-hosted instance of SQL Server. You will need an Azure account. You can sign up at the following link: https://signup.azure.com.
- Log in to your Azure account: https://portal.azure.com/.
- Navigate to https://portal.azure.com/#create/hub.
- Search for Resource group and then click the Create button.
- Enter a resource group name of
apps-services-net7and select a suitable region close to you, and then click the Review + create button. - Review your choices and then click the Create button.
- Create another resource, search for SQL Database, and click Create.
- In the Create SQL Database page, in the Basics tab, for the Database name enter
Northwind, and select the resource group that you created before. - In the Server section, click Create New.
- Enter the following details for the SQL Database server, as shown in Figure 2.4:
- Server name:
apps-services-net7-[your initials]or something else entirely. The server name must be globally unique because it becomes part of a public URL. - Location: A region close to you. I chose (Europe) UK South. Not all regions support all types of resource. You will see an error if the region you select does not support SQL Database server resources.
- Authentication method: Use SQL authentication.
- Server admin login: [Your email or another username], for example, I entered
markjprice. - Password/Confirm password: [Enter a strong password].
- Server name:
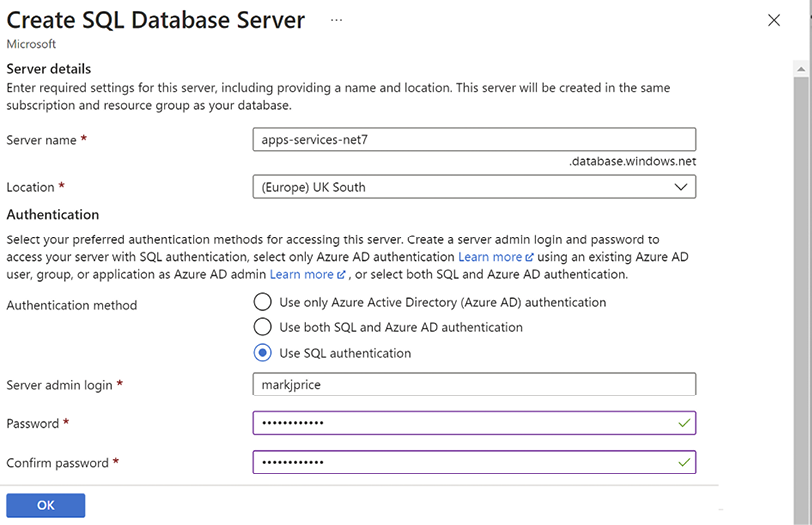
Figure 2.4: Entering the server details for a SQL Database instance
- Click OK.
- In the Create SQL Database page, in the Compute + storage section, click Configure database.
- For Service tier, select Basic (For less demanding workloads). Note the maximum database size is 2 GB and the estimated cost is about $6.23 per month. You can delete the resources as soon as you have completed this chapter to reduce the cost further.
- Click Apply.
- In the Create SQL Database page, set Backup storage redundancy to Locally-redundant backup storage.
- Click the Next : Networking button.
- In the Network connectivity section, select Public endpoint.
- In the Firewall rules section, set Add current client IP address to Yes.
- Click the Next : Security button.
- Review the options but leave them as the defaults.
- Click the Next : Additional settings button.
- Review the options but leave them as the defaults.
- Click the Review + create button.
- Click the Create button.
- Wait for the deployment, as shown in Figure 2.5:
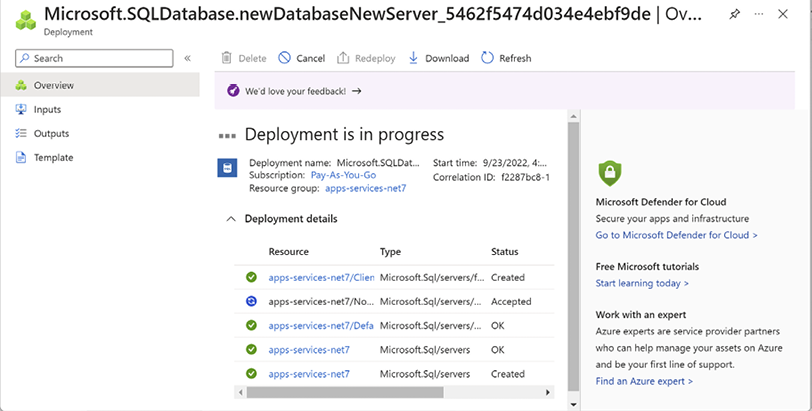
Figure 2.5: Deployment progress for SQL Database
- Click Go to resource.
- Click Overview and note the database details, as shown in Figure 2.6:
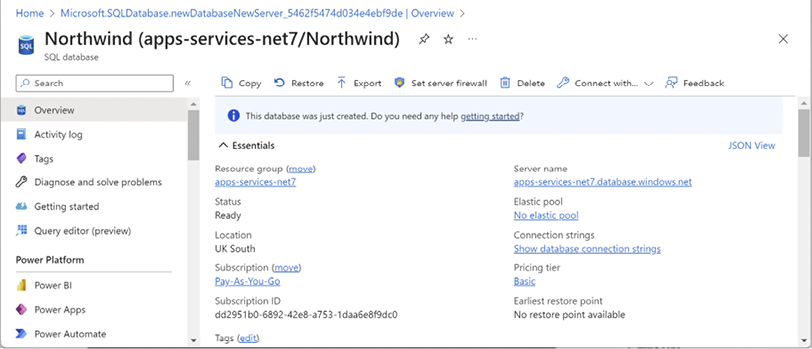
Figure 2.6: SQL Database details
- Click Show database connection strings.
- Copy the ADO.NET connection string to your clipboard.
- Start Notepad or your preferred plain text editor, paste the connection string, and add carriage returns after each semicolon to separate each part to make them easier to work with, as shown in the following text:
Server=tcp:apps-services-net7.database.windows.net,1433;
Initial Catalog=Northwind;
Persist Security Info=False;
User ID=markjprice;
Password={your_password};
MultipleActiveResultSets=False;
Encrypt=True;
TrustServerCertificate=False;
Connection Timeout=30;
Your
Servervalue will be different because the custom server name part, for example,apps-services-net7, is public and must be globally unique.
- Use your preferred database tool to connect to the SQL server:
- In Visual Studio 2022, view Server Explorer.
- On Windows, start SQL Server Management Studio.
- In Visual Studio Code, view the SQL Server tool. You can install the SQL Server (mssql) extension if you have not done so already: https://marketplace.visualstudio.com/items?itemName=ms-mssql.mssql.
- Alternatively, you can use the cross-platform Azure Data Studio. You can install it from the following link: https://aka.ms/getazuredatastudio.
- Add a data connection, and fill in the dialog box, as shown in Figure 2.7:

Figure 2.7: Connecting to your Azure SQL database from Visual Studio
In Visual Studio Server Explorer, you might also be prompted to Choose Data Source. Choose Microsoft SQL Server. You can select a checkbox to always use this selection.
- Right-click the data connection and choose New Query.
- Copy and paste the contents of the
Northwind4AzureSQLdatabase.sqlfile into the query window and execute it.The main difference between the
Northwind4SQLServer.sqlandNorthwind4AzureSQLdatabase.sqlscripts is that the local SQL Server script will delete and recreate the Northwind database. The Azure SQL database script will not, because the database needs to be created as an Azure resource. You can download SQL script files from the following link: https://github.com/markjprice/apps-services-net7/tree/main/sql-scripts.
- Wait to see the Command completed successfully message.
- In Server Explorer, right-click Tables and select Refresh, and note that 13 tables have been created, for example, Categories, Customers, and Products. Also note that dozens of views and stored procedures have also been created.
You now have a running Azure SQL database that you can connect to from a .NET project.
Installing Azure SQL Edge in Docker
If you do not have a Windows computer, and you do not want to pay for Azure resources, then you can install Docker and use a container that has Azure SQL Edge, a cross-platform minimal featured version of SQL Server that only includes the database engine.
The Docker image we will use has Azure SQL Edge based on Ubuntu 18.4. It is supported with the Docker Engine 1.8 or later on Linux, or on Docker for Mac or Windows. Azure SQL Edge requires a 64-bit processor (either x64 or ARM64), with a minimum of one processor and 1 GB RAM on the host.
- Install Docker from the following link: https://docs.docker.com/engine/install/.
- Start Docker.
- At the command prompt or terminal, pull down the latest container image for Azure SQL Edge, as shown in the following command:
docker pull mcr.microsoft.com/azure-sql-edge:latest - Note the results, as shown in the following output:
latest: Pulling from azure-sql-edge 2f94e549220a: Pull complete 830b1adc1e72: Pull complete f6caea6b4bd2: Pull complete ef3b33eb5a27: Pull complete 8a42011e5477: Pull complete f173534aa1e4: Pull complete 6c1894e17f11: Pull complete a81c43e790ea: Pull complete c3982946560a: Pull complete 25f31208d245: Pull complete Digest: sha256:7c203ad8b240ef3bff81ca9794f31936c9b864cc165dd187c23c5bfe06cf0340 Status: Downloaded newer image for mcr.microsoft.com/azure-sql-edge:latest mcr.microsoft.com/azure-sql-edge:latest - At the command prompt or terminal, run the container image for Azure SQL Edge with a strong password and name the container
azuresqledge, as shown in the following command:docker run --cap-add SYS_PTRACE -e 'ACCEPT_EULA=1' -e 'MSSQL_SA_PASSWORD=s3cret-Ninja' -p 1433:1433 --name azuresqledge -d mcr.microsoft.com/azure-sql-edgeGood Practice: The password must be at least 8 characters long and contain characters from three of the following four sets: uppercase letters, lowercase letters, digits, and symbols; otherwise, the container cannot set up the SQL Edge engine and will stop working.
- If your operating system firewall blocks access, then allow access.
- In Docker, confirm that the image is running, as shown in Figure 2.8:
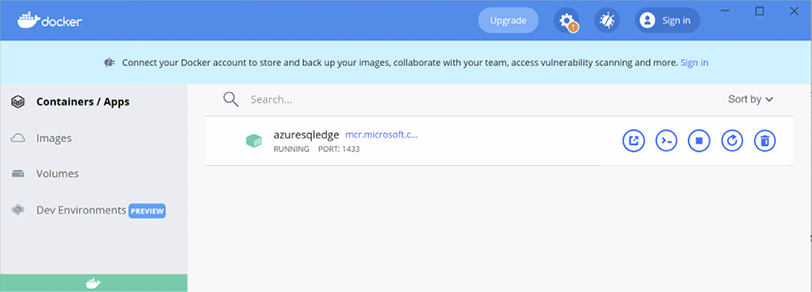
Figure 2.8: SQL Edge running in Docker Desktop on Windows
- At the command prompt or terminal, ask Docker to list all containers, both running and stopped, as shown in the following command:
docker ps -a - Note the container is “Up” and listening externally on port
1433, which is mapped to its internal port1433, as shown highlighted in the following output:CONTAINER ID IMAGE COMMAND CREATED STATUS PORTS NAMES 183f02e84b2a mcr.microsoft.com/azure-sql-edge "/opt/mssql/bin/perm…" 8 minutes ago Up 8 minutes 1401/tcp, 0.0.0.0:1433->1433/tcp azuresqledgeYou can learn more about the
docker pscommand at the following link: https://docs.docker.com/engine/reference/commandline/ps/.
- Use your preferred database tool to connect to the SQL server:
- In Visual Studio 2022, view Server Explorer.
- On Windows, start SQL Server Management Studio.
- In Visual Studio Code, view the SQL Server tool.
- Alternatively, you can use the cross-platform Azure Data Studio.
- Add a data connection, and fill in the dialog box, as shown in Figure 2.9:
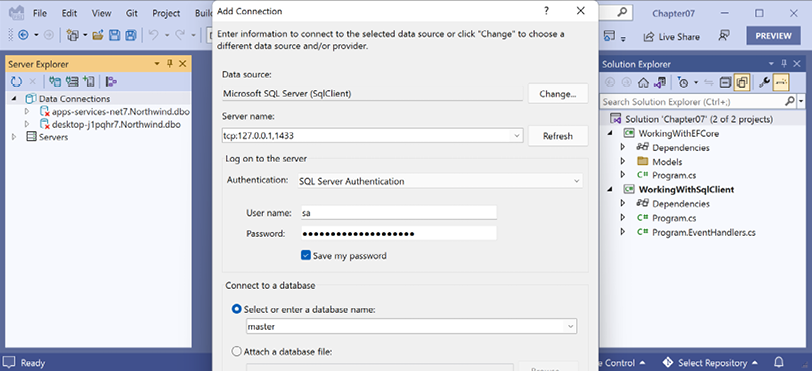
Figure 2.9: Connecting to your Azure SQL Edge server from Visual Studio
- Right-click the data connection and choose New Query.
- Copy and paste the contents of the
Northwind4AzureSQLedge.sqlfile into the query window and execute it. - Wait to see the Command completed successfully message.
- In Server Explorer, refresh the data connection if needed, right-click Tables and select Refresh, and note that 13 tables have been created, for example, Categories, Customers, and Products. Also note that dozens of views and stored procedures have also been created.
You now have a running instance of Azure SQL Edge containing the Northwind database that you can connect to from a console app.
Managing data with Transact-SQL
Transact-SQL (T-SQL) is SQL Server’s dialect of Structured Query Language (SQL). Some pronounce it tee-sequel, others tee-es-queue-el.
Unlike C#, T-SQL is not case-sensitive; for example, you can use int or INT to specify the 32-bit integer data type, and you can use SELECT or select to start a query expression. Text stored in SQL Server can be treated as case-sensitive or not depending on configuration.
The complete reference for T-SQL is found at the following link: https://learn.microsoft.com/en-us/sql/t-sql/language-reference.
T-SQL data types
T-SQL has data types that are used for columns, variables, parameters, and so on.
|
Category |
Examples |
|
Numbers |
|
|
Date and time |
|
|
Text |
|
|
Binary |
|
|
Other |
|
T-SQL also has support for spatial geometry and geography types.
Documenting with comments
To comment out the rest of a line, use -- which is the equivalent of //.
To comment out a block, use /* and the start and */ at the end, just like in C#.
Declaring variables
Local variable names are prefixed with @ and they are defined using SET, SELECT, or DECLARE, as shown in the following code:
DECLARE @WholeNumber INT; -- Declare a variable and specify its type.
SET @WholeNumber = 3; -- Set the variable to a literal value.
SET @WholeNumber = @WholeNumber + 1; -- Increment the variable.
SELECT @WholeNumber = COUNT(*) FROM Employees; -- Set to the number of employees.
SELECT @WholeNumber = EmployeeId FROM Employees WHERE FirstName = 'Janet';
Global variables are prefixed with @@. For example, @@ROWCOUNT is a context-dependent value that returns the number of rows affected by a statement executed within the current scope, for example, the number of rows updated or deleted.
Specifying data types
Most types have a fixed size. For example, an int uses four bytes, a smallint uses two bytes, and a tinyint uses one byte.
For text and binary types, you can either specify a type prefixed with var or nvar (meaning variable size) that will automatically change its size based on its current value up to a maximum, as shown in the following example: varchar(40); or you can specify a fixed number of characters that will always be allocated, as shown in the following example: char(40).
For text types, the n prefix indicates Unicode, meaning it will use two bytes per character. Text types not prefixed with n use one byte per character.
Controlling flow
T-SQL has similar flow control keywords as C#, for example, BREAK, CONTINUE, GOTO, IF...ELSE, CASE, THROW, TRY...CATCH, WHILE, and RETURN. The main difference is the use of BEGIN and END to indicate the start and end of a block, the equivalent of curly braces in C#.
Operators
T-SQL has similar operators as C#, for example, = (assignment), +, -, *, /, %, <, >, <=, ==, !=, &, |, ^, and so on. It has logical operators like AND, OR, NOT, and LINQ-like operators like ANY, ALL, SOME, EXISTS, BETWEEN, and IN.
LIKE is used for text pattern matching. The pattern can use % for any number of characters. The pattern can use _ for a single character. The pattern can use [] to specify a range and set of allowed characters, for example, [0-9A-Z.-,].
If a table or column name contains spaces, then you must surround the name in square brackets like [Order Details]. The SQL scripts to create the Northwind database include the command set quoted_identifier on, so you can also use double-quotes like "Order Details". Single quotes are used for literal text like 'USA'.
Data Manipulation Language (DML)
DML is used to query and change data.
The most common statement in DML is SELECT, which is used to retrieve data from one or more tables. SELECT is extremely complicated because it is so powerful. This book is not about learning T-SQL, so the quickest way to get a feel for SELECT is to see some examples, as shown in the following table:
|
Example |
Description |
|
|
Get all columns of all the employees. |
|
|
Get the first and last name columns of all employees. |
|
|
Give an alias for the table name. |
|
|
Give an alias for the table name. |
|
|
Give an alias for the column name. |
|
|
Filter the results to only include employees in the USA. |
|
|
Get a list of countries without duplicates. |
|
|
Calculate a subtotal for each order detail row. |
|
|
Calculate a total for each order and sort with the largest order value at the top. |
|
|
Return all the company names of all customers and suppliers. |
|
|
Match every category with every product using a Cartesian join and output their names (not what you normally want!) 616 rows (8 categories x 77 products). |
|
|
Match each product with its category using a 77 rows. |
|
|
Match each product with its category using an 77 rows. |
You can read the full documentation for SELECT at the following link: https://docs.microsoft.com/en-us/sql/t-sql/queries/select-transact-sql.
Use your favorite database querying tool, like Visual Studio Server Explorer or Visual Studio Code’s mssql extension, to connect to your Northwind database and try out some of the queries above, as shown in Figure 2.10 and Figure 2.11:
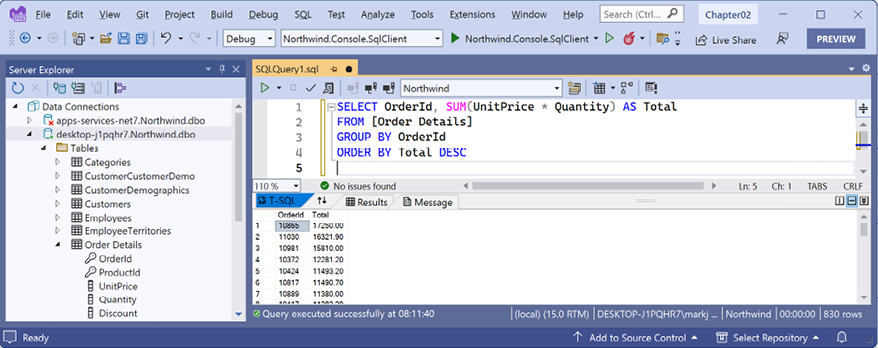
Figure 2.10: Executing T-SQL queries using Visual Studio’s Server Explorer
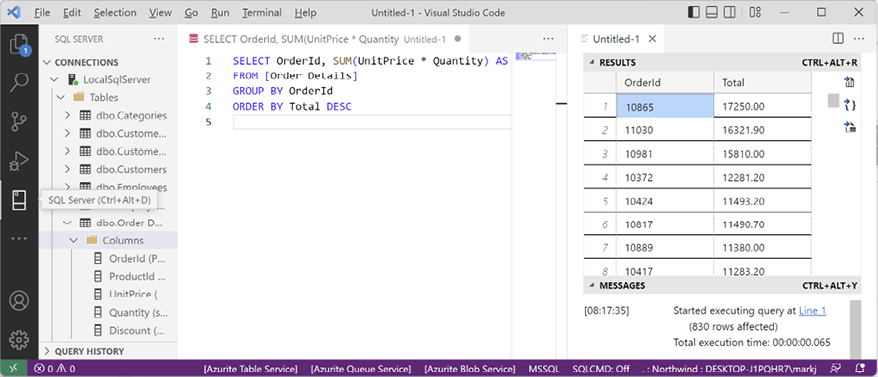
Figure 2.11: Executing T-SQL queries using Visual Studio Code’s mssql extension
DML for adding, updating, and deleting data
DML statements for adding, updating, and deleting data include:
|
Example |
Description |
|
|
Add a new row into the |
|
|
Update my employee row to set my |
|
|
Delete my employee row. |
|
|
Delete all rows in the |
|
|
Delete all rows in the |
The above examples use the Employees table in the Northwind database. That table has referential integrity constraints that mean that, for example, deleting all rows in the table cannot happen, because every employee has related data in other tables like Orders.
Data Definition Language (DDL)
DDL statements change the structure of the database, including creating new objects like tables, functions, and stored procedures. The following table shows some examples of DDL statements to give you an idea, but the examples are simple and cannot be executed within the Northwind database.
|
Example |
Description |
|
|
Create a table to store shippers. |
|
|
Add a column to a table. |
|
|
Add a non-clustered index for a column in a table. |
|
|
Change an aggregate index with multiple columns and control the sort order. |
|
|
Delete the |
|
|
Delete the |
|
|
Check if a table exists. The |
Managing data with low-level APIs
Microsoft.Data.SqlClient provides database connectivity to SQL Server for .NET applications. It is known as the Microsoft ADO.NET driver for SQL Server and Azure SQL Database.
You can find the GitHub repository for ADO.NET at the following link: https://github.com/dotnet/SqlClient.
The Microsoft.Data.SqlClient package supports the following .NET platforms:
- .NET Framework 4.6.2 and later.
- .NET Core 3.1 and later.
- .NET Standard 2.0 and later.
Understanding the types in ADO.NET
ADO.NET defines abstract types that represent minimal objects for working with data, like DbConnection, DbCommand, and DbDataReader. Database software manufacturers can inherit from and provide specific implementations that are optimized for and expose additional features for their database. Microsoft has done this for SQL Server. The most important types with their most used members are shown in the following table:
|
Type |
Properties |
Methods |
Description |
|
|
|
|
Manage the connection to the database. |
|
|
|
|
Build a valid connection string for a SQL Server database. After setting all the relevant individual properties, get the |
|
|
|
|
Configure the command to execute. |
|
|
|
Configure a parameter for a command. |
|
|
|
|
|
Process the result set from executing a query. |
SqlConnection has two useful events: StateChange and InfoMessage.
All the ExecuteXxx methods will execute any command. The one you use depends on what you expect to get back:
- If the command includes at least one
SELECTstatement that returns a result set, then callExecuteReaderto execute the command. This method returns aDbDataReader-derived object for reading row-by-row through the result set. - If the command does not include at least one
SELECTstatement, then it is more efficient to callExecuteNonQuery. This method returns an integer for the number of rows affected. - If the command includes at least one
SELECTstatement that returns XML because it uses theAS XMLcommand, then callExecuteXmlReaderto execute the command.
Creating a console app for working with ADO.NET
First, we will create a console app project for working with ADO.NET:
- Use your preferred code editor to create a new solution/workspace named
Chapter02. - Add a console app project, as defined in the following list:
- Project template: Console App/
console - Workspace/solution file and folder:
Chapter02 - Project file and folder:
Northwind.Console.SqlClient
Good Practice: For all the projects that you create for this book, keep your root path short and avoid using
#in your folder and file names, or you might see compiler errors likeRSG002: TargetPath not specified for additional file. For example, do not useC:\My C# projects\as your root path! - Project template: Console App/
- In the project file, treat warnings as errors, add a package reference for the latest version of
Microsoft.Data.SqlClient, and statically and globally importSystem.Console, as shown highlighted in the following markup:<Project Sdk="Microsoft.NET.Sdk"> <PropertyGroup> <OutputType>Exe</OutputType> <TargetFramework>net7.0</TargetFramework> <ImplicitUsings>enable</ImplicitUsings> <Nullable>enable</Nullable> <TreatWarningsAsErrors>true</TreatWarningsAsErrors> </PropertyGroup> <ItemGroup> <PackageReference Include="Microsoft.Data.SqlClient" Version="5.0.0" /> </ItemGroup> <ItemGroup> <Using Include="System.Console" Static="true" /> </ItemGroup> </Project> - Build the project to restore the referenced package.
- Add a new class file named
Program.EventHandlers.cs, and modify its contents to define methods that will act as event handlers for a database connection state change by showing the original and current states, and for when the database sends anInfoMessage, as shown in the following code:using Microsoft.Data.SqlClient; // SqlInfoMessageEventArgs using System.Data; // StateChangeEventArgs partial class Program { static void Connection_StateChange(object sender, StateChangeEventArgs e) { ConsoleColor previousColor = ForegroundColor; ForegroundColor = ConsoleColor.DarkYellow; WriteLine($"State change from {e.OriginalState} to {e.CurrentState}."); ForegroundColor = previousColor; } static void Connection_InfoMessage(object sender, SqlInfoMessageEventArgs e) { ConsoleColor previousColor = ForegroundColor; ForegroundColor = ConsoleColor.DarkBlue; WriteLine($"Info: {e.Message}."); foreach(SqlError error in e.Errors) { WriteLine($" Error: {error.Message}."); } ForegroundColor = previousColor; } } - In
Program.cs, delete the existing statements. Add statements to connect to SQL Server locally, to Azure SQL Database, or to SQL Edge, using either SQL authentication with a user ID and password or Windows Authentication without a user ID and password, as shown in the following code:using Microsoft.Data.SqlClient; // SqlConnection and so on SqlConnectionStringBuilder builder = new(); builder.InitialCatalog = "Northwind"; builder.MultipleActiveResultSets = true; builder.Encrypt = true; builder.TrustServerCertificate = true; builder.ConnectTimeout = 10; WriteLine("Connect to:"); WriteLine(" 1 - SQL Server on local machine"); WriteLine(" 2 - Azure SQL Database"); WriteLine(" 3 – Azure SQL Edge"); WriteLine(); Write("Press a key: "); ConsoleKey key = ReadKey().Key; WriteLine(); WriteLine(); if (key is ConsoleKey.D1 or ConsoleKey.NumPad1) { builder.DataSource = "."; // Local SQL Server // @".\net7book"; // Local SQL Server with an instance name } else if (key is ConsoleKey.D2 or ConsoleKey.NumPad2) { builder.DataSource = // Azure SQL Database "tcp:apps-services-net7.database.windows.net,1433"; } else if (key is ConsoleKey.D3 or ConsoleKey.NumPad3) { builder.DataSource = "tcp:127.0.0.1,1433"; // Azure SQL Edge } else { WriteLine("No data source selected."); return; } WriteLine("Authenticate using:"); WriteLine(" 1 – Windows Integrated Security"); WriteLine(" 2 – SQL Login, for example, sa"); WriteLine(); Write("Press a key: "); key = ReadKey().Key; WriteLine(); WriteLine(); if (key is ConsoleKey.D1 or ConsoleKey.NumPad1) { builder.IntegratedSecurity = true; } else if (key is ConsoleKey.D2 or ConsoleKey.NumPad2) { builder.UserID = "sa"; // Azure SQL Edge // "markjprice"; // change to your username Write("Enter your SQL Server password: "); string? password = ReadLine(); if (string.IsNullOrWhiteSpace(password)) { WriteLine("Password cannot be empty or null."); return; } builder.Password = password; builder.PersistSecurityInfo = false; } else { WriteLine("No authentication selected."); return; } SqlConnection connection = new(builder.ConnectionString); WriteLine(connection.ConnectionString); WriteLine(); connection.StateChange += Connection_StateChange; connection.InfoMessage += Connection_InfoMessage; try { WriteLine("Opening connection. Please wait up to {0} seconds...", builder.ConnectTimeout); WriteLine(); connection.Open(); WriteLine($"SQL Server version: {connection.ServerVersion}"); connection.StatisticsEnabled = true; } catch (SqlException ex) { WriteLine($"SQL exception: {ex.Message}"); return; } connection.Close(); - Run the console app, select options that work with your SQL Server set up, and note the results, as shown in the following output:
Connect to:
  1 - SQL Server on local machine
  2 - Azure SQL Database
  3 - Azure SQL Edge
Press a key: 1
Authenticate using:
  1 - Windows Integrated Security
  2 - SQL Login, for example, sa
Press a key: 1
Data Source=.;Initial Catalog=Northwind;Integrated Security=True;Multiple Active Result Sets=True;Connect Timeout=10;Encrypt=True;Trust Server Certificate=True
Opening connection. Please wait up to 10 seconds...
State change from Closed to Open.
SQL Server version: 15.00.2095
State change from Open to Closed.
The following steps show the experience when connecting to Azure SQL Database or Azure SQL Edge, which require a username and password. If you are connecting to a local SQL Server using Windows Integrated Security, then you will not need to enter a password.
- Run the console app, select either Azure SQL Database or Azure SQL Edge, enter your password, and note the result, as shown in the following output:
Connect to: 1 - SQL Server on local machine 2 - Azure SQL Database 3 - Azure SQL Edge Press a key: 3 Authenticate using: 1 - Windows Integrated Security 2 - SQL Login, for example, sa Press a key: 2 Enter your SQL Server password: s3cret-Ninja State change from Closed to Open. SQL Server version: 15.00.0041 State change from Open to Closed. - Run the console app, enter a wrong password, and note the result, as shown in the following output:
Enter your SQL Server password: silly-ninja SQL exception: Login failed for user 'sa'. - In
Program.cs, change the server name to something wrong. - Run the console app and note the result, as shown in the following output:
SQL exception: A network-related or instance-specific error occurred while establishing a connection to SQL Server. The server was not found or was not accessible. Verify that the instance name is correct and that SQL Server is configured to allow remote connections. (provider: TCP Provider, error: 0 - No such host is known.)
When opening a SQL Server connection, the default timeout is 30 seconds for server connection problems, so be patient! We changed the timeout to 10 seconds to avoid having to wait so long.
Executing queries and working with data readers using ADO.NET
Now that we have a successful connection to the SQL Server database, we can run commands and process the results using a data reader.
- In
Program.cs, import the namespace for working with ADO.NET command types, as shown in the following code:using System.Data; // CommandType - Before the statement that closes the connection, add statements to define a command that selects the ID, name, and price from the
Productstable, executes it, and outputs the product IDs, names, and prices using a data reader, as shown in the following code:SqlCommand cmd = connection.CreateCommand(); cmd.CommandType = CommandType.Text; cmd.CommandText = "SELECT ProductId, ProductName, UnitPrice FROM Products"; SqlDataReader r = cmd.ExecuteReader(); WriteLine("----------------------------------------------------------"); WriteLine("| {0,5} | {1,-35} | {2,8} |", "Id", "Name", "Price"); WriteLine("----------------------------------------------------------"); while (r.Read()) { WriteLine("| {0,5} | {1,-35} | {2,8:C} |", r.GetInt32("ProductId"), r.GetString("ProductName"), r.GetDecimal("UnitPrice")); } WriteLine("----------------------------------------------------------"); r.Close();We format the unit price using the
Cformat which uses your OS current culture to format currency values. My output uses£because I am in the UK. You will learn how to control the current culture in Chapter 7, Handling Dates, Times, and Internationalization.
- Run the console app and note the results, as shown in the following partial output:
---------------------------------------------------------- | Id | Name | Price | ---------------------------------------------------------- | 1 | Chai | £18.00 | | 2 | Chang | £19.00 | ... | 76 | Lakkalikööri | £18.00 | | 77 | Original Frankfurter grüne Soße | £13.00 | ---------------------------------------------------------- - In
Program.cs, modify the SQL statement to define a parameter for the unit price and use it to filter the results to products that cost more than that unit price, as shown highlighted in the following code:Write("Enter a unit price: "); string? priceText = ReadLine(); if(!decimal.TryParse(priceText, out decimal price)) { WriteLine("You must enter a valid unit price."); return; } SqlCommand cmd = connection.CreateCommand(); cmd.CommandType = CommandType.Text; cmd.CommandText = "SELECT ProductId, ProductName, UnitPrice FROM Products" + " WHERE UnitPrice > @price"; cmd.Parameters.AddWithValue("price", price); - Run the console app, enter a unit price like
50, and note the results, as shown in the following partial output:Enter a unit price: 50 ---------------------------------------------------------- | Id | Name | Price | ---------------------------------------------------------- | 9 | Mishi Kobe Niku | £97.00 | | 18 | Carnarvon Tigers | £62.50 | | 20 | Sir Rodney's Marmalade | £81.00 | | 29 | Thüringer Rostbratwurst | £123.79 | | 38 | Côte de Blaye | £263.50 | | 51 | Manjimup Dried Apples | £53.00 | | 59 | Raclette Courdavault | £55.00 | ----------------------------------------------------------
Working with ADO.NET asynchronously
You can improve the responsiveness of data access code by making it asynchronous. You will see more details of how asynchronous operations work in Chapter 4, Benchmarking Performance, Multitasking, and Concurrency. For now, just enter the code as instructed.
Let’s see how to change the statements to work asynchronously:
- In
Program.cs, change the statement to open the connection to make it asynchronous, as shown in the following code:await connection.OpenAsync(); - In
Program.cs, change the statement to execute the command to make it asynchronous, as shown in the following code:SqlDataReader r = await cmd.ExecuteReaderAsync(); - In
Program.cs, change the statements to read the next row and get the field values to make them asynchronous, as shown in the following code:while (await r.ReadAsync()) { WriteLine("| {0,5} | {1,-35} | {2,8:C} |", await r.GetFieldValueAsync<int>("ProductId"), await r.GetFieldValueAsync<string>("ProductName"), await r.GetFieldValueAsync<decimal>("UnitPrice")); } - In
Program.cs, change the statements to close the data reader and connection to make them asynchronous, as shown in the following code:await r.CloseAsync(); await connection.CloseAsync(); - Run the console app and confirm that it has the same results as before, but it would run better in a multithreaded system, for example, not blocking the user interface in a GUI app, and not blocking IO threads in a website.
Executing stored procedures using ADO.NET
If you need to execute the same query or another SQL statement multiple times, it is best to create a stored procedure, often with parameters, so that it can be precompiled and optimized. Parameters have a direction to indicate if they are inputs, outputs, or return values.
Let’s see an example that uses all three types of direction:
- In your preferred database tool, connect to the Northwind database.
- In your preferred database tool, add a new stored procedure. For example, if you are using SQL Server Management Studio, then right-click Stored Procedures and select Add New Stored Procedure.
- Modify the SQL statements to define a stored procedure named
GetExpensiveProductswith two parameters, an input parameter for the minimum unit price and an output parameter for the row count of matching products, as shown in the following code:CREATE PROCEDURE [dbo].[GetExpensiveProducts] @price money, @count int OUT AS SELECT @count = COUNT(*) FROM Products WHERE UnitPrice > @price SELECT * FROM Products WHERE UnitPrice > @price RETURN 0The stored procedure uses two
SELECTstatements. The first sets the@countoutput parameter to a count of the matching product rows. The second returns the matching product rows.
- Right-click in the SQL statements and select Execute.
- Right-click Stored Procedures and select Refresh.
- Expand GetExpensiveProducts and note the input and output parameters, as shown in Visual Studio’s Server Explorer in Figure 2.12:

Figure 2.12: Parameters of the GetExpensiveProducts stored procedure
- Close the SQL query without saving changes.
- In
Program.cs, add statements to allow the user to choose between running the text command and the stored procedure. Add statements defining the stored procedure and its parameters, and then execute the command, as shown highlighted in the following code:SqlCommand cmd = connection.CreateCommand(); WriteLine("Execute command using:"); WriteLine(" 1 - Text"); WriteLine(" 2 - Stored Procedure"); WriteLine(); Write("Press a key: "); key = ReadKey().Key; WriteLine(); WriteLine(); SqlParameter p1, p2 = new(), p3 = new(); if (key is ConsoleKey.D1 or ConsoleKey.NumPad1) { cmd.CommandType = CommandType.Text; cmd.CommandText = "SELECT ProductId, ProductName, UnitPrice FROM Products" + " WHERE UnitPrice > @price"; cmd.Parameters.AddWithValue("price", price); } else if (key is ConsoleKey.D2 or ConsoleKey.NumPad2) { cmd.CommandType = CommandType.StoredProcedure; cmd.CommandText = "GetExpensiveProducts"; p1 = new() { ParameterName = "price", SqlDbType = SqlDbType.Money, SqlValue = price }; p2 = new() { Direction = ParameterDirection.Output, ParameterName = "count", SqlDbType = SqlDbType.Int }; p3 = new() { Direction= ParameterDirection.ReturnValue, ParameterName = "rv", SqlDbType = SqlDbType.Int }; cmd.Parameters.Add(p1); cmd.Parameters.Add(p2); cmd.Parameters.Add(p3); } SqlDataReader r = await cmd.ExecuteReaderAsync(); - After the statement that closes the data reader, add statements to output the output parameter and the return value, as shown highlighted in the following code:
await r.CloseAsync();
WriteLine($"Output count: {p2.Value}");
WriteLine($"Return value: {p3.Value}");
await connection.CloseAsync();
If a stored procedure returns result sets as well as parameters, then the data reader for the result sets must be closed before the parameters can be read.
- Run the console app and note the results if the price entered is
60, as shown in the following output:Enter a unit price: 60 Execute command using: 1 - Text 2 - Stored Procedure Press a key: 2 ---------------------------------------------------------- | Id | Name | Price | ---------------------------------------------------------- | 9 | Mishi Kobe Niku | £97.00 | | 18 | Carnarvon Tigers | £62.50 | | 20 | Sir Rodney's Marmalade | £81.00 | | 29 | Thüringer Rostbratwurst | £123.79 | | 38 | Côte de Blaye | £263.50 | ---------------------------------------------------------- Output count: 5 Return value: 0 State change from Open to Closed.
Managing data with EF Core
EF Core is an object-relational mapper (ORM) that uses ADO.NET underneath when working with SQL Server. Because it is a higher-level technology, it is not as efficient as using ADO.NET directly but it can be easier.
EF Core 7 targets .NET 6 so it can be used with both the Long Term Support (LTS) release of .NET 6 and the Standard Term Support (STS) release of .NET 7.
Understanding Entity Framework Core
As well as traditional RDBMSes like SQL Server, EF Core supports modern cloud-based, nonrelational, schema-less data stores, such as Azure Cosmos DB and MongoDB, sometimes with third-party providers.
There are two approaches to working with EF Core:
- Database First: A database already exists, so you build a model that matches its structure and features.
- Code First: No database exists, so you build a model and then use EF Core to create a database that matches its structure and features.
We will use EF Core with an existing database.
Scaffolding models using an existing database
Scaffolding is the process of using a tool to create classes that represent the model of an existing database using reverse engineering. A good scaffolding tool allows you to extend the automatically generated classes and then regenerate those classes without losing your extended classes.
If you know that you will never regenerate the classes using the tool, then feel free to change the code for the automatically generated classes as much as you want. The code generated by the tool is just the best approximation.
Good Practice: Do not be afraid to overrule a tool when you know better.
Setting up the dotnet-ef tool
.NET has a command-line tool named dotnet. It can be extended with capabilities useful for working with EF Core. It can perform design-time tasks like creating and applying migrations from an older model to a newer model and generating code for a model from an existing database.
The dotnet-ef command-line tool is not automatically installed. You must install this package as either a global or local tool. If you have already installed an older version of the tool, then you should uninstall any existing version:
- At a command prompt or terminal, check if you have already installed
dotnet-efas a global tool, as shown in the following command:dotnet tool list --global - Check in the list if an older version of the tool has been installed, like the one for .NET 5.0, as shown in the following output:
Package Id Version Commands ------------------------------------- dotnet-ef 5.0.0 dotnet-ef - If an old version is already installed, then uninstall the tool, as shown in the following command:
dotnet tool uninstall --global dotnet-ef - Install the latest version, as shown in the following command:
dotnet tool install --global dotnet-ef --version 7.0.0 - If necessary, follow any OS-specific instructions to add the
dotnet toolsdirectory to your PATH environment variable, as described in the output of installing thedotnet-eftool.
Defining EF Core models
EF Core uses a combination of conventions, annotation attributes, and Fluent API statements to build an entity model at runtime so that any actions performed on the classes can later be automatically translated into actions performed on the actual database. An entity class represents the structure of a table, and an instance of the class represents a row in that table.
First, we will review the three ways to define a model, with code examples, and then we will create some classes that implement those techniques.
Using EF Core conventions to define the model
The code we will write will use the following conventions:
- The name of a table is assumed to match the name of a
DbSet<T>property in theDbContextclass, for example,Products. - The names of the columns are assumed to match the names of properties in the entity model class, for example,
ProductId. - The
string.NET type is assumed to be anvarchartype in the database. - The
int.NET type is assumed to be aninttype in the database. - The primary key is assumed to be a property that is named
IdorID, or when the entity model class is namedProduct, then the property can be namedProductIdorProductID. If this property is of an integer type or theGuidtype, then it is also assumed to be anIDENTITYcolumn (a column type that automatically assigns a value when inserting).Good Practice: There are many other conventions that you should know, and you can even define your own, but that is beyond the scope of this book. You can read about them at the following link: https://docs.microsoft.com/en-us/ef/core/modeling/.
Using EF Core annotation attributes to define the model
Conventions often aren’t enough to completely map the classes to the database objects. A simple way of adding more smarts to your model is to apply annotation attributes.
Some common attributes are shown in the following table:
|
Attribute |
Description |
|
|
Ensures the value is not null. |
|
|
Ensures the value is up to 50 characters in length. |
|
|
Ensures the value matches the specified regular expression. |
|
|
Specifies the column type and column name used in the table. |
For example, in the database, the maximum length of a product name is 40, and the value cannot be null, as shown highlighted in the following DDL code that defines how to create a table named Products along with its columns, data types, keys, and other constraints:
CREATE TABLE Products (
    ProductId       INTEGER       PRIMARY KEY,
    ProductName     NVARCHAR (40) NOT NULL,
    SupplierId      "INT",
    CategoryId      "INT",
    QuantityPerUnit NVARCHAR (20),
    UnitPrice       "MONEY"       CONSTRAINT DF_Products_UnitPrice DEFAULT (0),
    UnitsInStock    "SMALLINT"    CONSTRAINT DF_Products_UnitsInStock DEFAULT (0),
    UnitsOnOrder    "SMALLINT"    CONSTRAINT DF_Products_UnitsOnOrder DEFAULT (0),
    ReorderLevel    "SMALLINT"    CONSTRAINT DF_Products_ReorderLevel DEFAULT (0),
    Discontinued    "BIT"         NOT NULL
                                  CONSTRAINT DF_Products_Discontinued DEFAULT (0),
    CONSTRAINT FK_Products_Categories FOREIGN KEY (
        CategoryId
    )
    REFERENCES Categories (CategoryId),
    CONSTRAINT FK_Products_Suppliers FOREIGN KEY (
        SupplierId
    )
    REFERENCES Suppliers (SupplierId),
    CONSTRAINT CK_Products_UnitPrice CHECK (UnitPrice >= 0),
    CONSTRAINT CK_ReorderLevel CHECK (ReorderLevel >= 0),
    CONSTRAINT CK_UnitsInStock CHECK (UnitsInStock >= 0),
    CONSTRAINT CK_UnitsOnOrder CHECK (UnitsOnOrder >= 0)
);
In a Product class, we could apply attributes to specify this, as shown in the following code:
[Required]
[StringLength(40)]
public string ProductName { get; set; }
Good Practice: If you have nullability checks enabled, then you do not need to decorate a non-nullable reference type with the [Required] attribute as shown above. This is because the C# nullability will flow to the EF Core model. A string property will be required; a string? property will be optional, in other words, nullable. You can read more about this at the following link: https://docs.microsoft.com/en-us/ef/core/modeling/entity-properties?tabs=data-annotations%2Cwith-nrt#required-and-optional-properties.
When there isn’t an obvious map between .NET types and database types, an attribute can be used.
For example, in the database, the column type of UnitPrice for the Products table is money. .NET does not have a money type, so it should use decimal instead, as shown in the following code:
[Column(TypeName = "money")]
public decimal? UnitPrice { get; set; }
Another example is for the Categories table, as shown in the following DDL code:
CREATE TABLE Categories (
    CategoryId   INTEGER       PRIMARY KEY,
    CategoryName NVARCHAR (15) NOT NULL,
    Description  "NTEXT",
    Picture      "IMAGE"
);
The Description column can be longer than the maximum 8,000 characters that can be stored in a nvarchar variable, so it needs to map to ntext instead, as shown in the following code:
[Column(TypeName = "ntext")]
public string? Description { get; set; }
Using the EF Core Fluent API to define the model
The last way that the model can be defined is by using the Fluent API. This API can be used instead of attributes, as well as being used in addition to them. For example, to define the ProductName property, instead of decorating the property with two attributes, an equivalent Fluent API statement could be written in the OnModelCreating method of the database context class, as shown in the following code:
modelBuilder.Entity<Product>()
  .Property(product => product.ProductName)
  .IsRequired() // only needed if you have disabled nullability checks
  .HasMaxLength(40);
This keeps the entity model class simpler. You will see an example of this in the coding task below.
Understanding data seeding with the Fluent API
Another benefit of the Fluent API is to provide initial data to populate a database. EF Core automatically works out what insert, update, or delete operations must be executed.
For example, if we wanted to make sure that a new database has at least one row in the Product table, then we would call the HasData method, as shown in the following code:
modelBuilder.Entity<Product>()
  .HasData(new Product
  {
    ProductId = 1,
    ProductName = "Chai",
    UnitPrice = 8.99M
  });
Our model will map to an existing database that is already populated with data, so we will not need to use this technique in our code.
Defining the Northwind database model
A Northwind class will be used to represent the database. To use EF Core, the class must inherit from DbContext. This class understands how to communicate with databases and dynamically generate SQL statements to query and manipulate data.
Your DbContext-derived class should have an overridden method named OnConfiguring, which will set the database connection string.
Inside your DbContext-derived class, you must define at least one property of the DbSet<T> type. These properties represent the tables. To tell EF Core what columns each table has, the DbSet<T> properties use generics to specify a class that represents a row in the table. That entity model class has properties that represent its columns.
The DbContext-derived class can optionally have an overridden method named OnModelCreating. This is where you can write Fluent API statements as an alternative to decorating your entity classes with attributes.
- Use your preferred code editor to add a console app project, as defined in the following list:
- Project template: Console App/
console - Workspace/solution file and folder:
Chapter02 - Project file and folder:
Northwind.Console.EFCore
- Project template: Console App/
- In the
Northwind.Console.EFCoreproject, treat warnings as errors, add package references to the EF Core data provider for SQL Server, and globally and statically import theSystem.Consoleclass, as shown highlighted in the following markup:<Project Sdk="Microsoft.NET.Sdk"> <PropertyGroup> <OutputType>Exe</OutputType> <TargetFramework>net7.0</TargetFramework> <ImplicitUsings>enable</ImplicitUsings> <Nullable>enable</Nullable> <TreatWarningsAsErrors>true</TreatWarningsAsErrors> </PropertyGroup> <ItemGroup> <PackageReference Include="Microsoft.EntityFrameworkCore.Design" Version="7.0.0" /> <PackageReference Include="Microsoft.EntityFrameworkCore.SqlServer" Version="7.0.0" /> </ItemGroup> <ItemGroup> <Using Include="System.Console" Static="true" /> </ItemGroup> </Project> - Build the project to restore packages.
- At a command prompt or terminal in the
Northwind.Console.EFCorefolder, generate a model for all the tables in a new folder namedModels, as shown in the following command:dotnet ef dbcontext scaffold "Data Source=.;Initial Catalog=Northwind;Integrated Security=true;TrustServerCertificate=true;" Microsoft.EntityFrameworkCore.SqlServer --output-dir Models --namespace Northwind.Console.EFCore.Models --data-annotations --context NorthwindDbNote the following:
- The command action:
dbcontext scaffold - The connection string: This will be different depending on if you are connecting to a local SQL Server (with or without an instance name) or Azure SQL Database.
- The database provider:
Microsoft.EntityFrameworkCore.SqlServer - The output folder:
--output-dir Models - The namespace:
--namespace Northwind.Console.EFCore.Models - The use of data annotations as well as the Fluent API:
--data-annotations - Renaming the context from
[database_name]Context:--context NorthwindDb
If you are using Azure SQL Database or Azure SQL Edge, you will need to change the connection string appropriately.
- The command action:
- Note the build messages and warnings, as shown in the following output:
Build started... Build succeeded. To protect potentially sensitive information in your connection string, you should move it out of source code. You can avoid scaffolding the connection string by using the Name= syntax to read it from configuration - see https://go.microsoft.com/fwlink/?linkid=2131148. For more guidance on storing connection strings, see http://go.microsoft.com/fwlink/?LinkId=723263. - Open the
Modelsfolder and note the 25+ class files that were automatically generated. - Open
Category.csand note that it represents a row in theCategoriestable, as shown in the following code:using System; using System.Collections.Generic; using System.ComponentModel.DataAnnotations; using System.ComponentModel.DataAnnotations.Schema; using Microsoft.EntityFrameworkCore; namespace Northwind.Console.EFCore.Models { [Index("CategoryName", Name = "CategoryName")] public partial class Category { public Category() { Products = new HashSet<Product>(); } [Key] public int CategoryId { get; set; } [StringLength(15)] public string CategoryName { get; set; } = null!; [Column(TypeName = "ntext")] public string? Description { get; set; } [Column(TypeName = "image")] public byte[]? Picture { get; set; } [InverseProperty("Category")] public virtual ICollection<Product> Products { get; set; } } }Note the following:
- It decorates the entity class with the
[Index]attribute that was introduced in EF Core 5.0. This indicates properties that should have an index. In earlier versions, only the Fluent API was supported for defining indexes. Since we are working with an existing database, this is not needed. But if we want to recreate a new empty database from our code, then this information will be used to create indexes. - The table name in the database is
Categoriesbut thedotnet-eftool uses the Humanizer third-party library to automatically singularize the class name toCategory, which is a more natural name when creating a single entity. - The entity class is declared using the
partialkeyword so that you can create a matchingpartialclass for adding additional code. This allows you to rerun the tool and regenerate the entity class without losing that extra code. - The
CategoryIdproperty is decorated with the[Key]attribute to indicate that it is the primary key for this entity. - The
Productsproperty uses the[InverseProperty]attribute to define the foreign key relationship to theCategoryproperty on theProductentity class.
- It decorates the entity class with the
- Open
ProductsAboveAveragePrice.csand note it represents a row returned by a database view rather than a table, so it is decorated with the[Keyless]attribute. - Open
NorthwindDb.csand review the class, as shown in the following edited-for-space code:using System; using System.Collections.Generic; using Microsoft.EntityFrameworkCore; using Microsoft.EntityFrameworkCore.Metadata; namespace Northwind.Console.EFCore.Models { public partial class NorthwindDb : DbContext { public NorthwindDb() { } public NorthwindDb(DbContextOptions<Northwind> options) : base(options) { } public virtual DbSet<AlphabeticalListOfProduct> AlphabeticalListOfProducts { get; set; } = null!; public virtual DbSet<Category> Categories { get; set; } = null!; ... public virtual DbSet<Supplier> Suppliers { get; set; } = null!; public virtual DbSet<Territory> Territories { get; set; } = null!; protected override void OnConfiguring( DbContextOptionsBuilder optionsBuilder) { if (!optionsBuilder.IsConfigured) { #warning To protect potentially sensitive ... optionsBuilder.UseSqlServer("Data Source=.;Initial Catalog=Northwind;Integrated Security=true;TrustServerCertificate=true;"); } } protected override void OnModelCreating(ModelBuilder modelBuilder) { modelBuilder.Entity<AlphabeticalListOfProduct>(entity => { entity.ToView("Alphabetical list of products"); }); ... modelBuilder.Entity<Product>(entity => { entity.Property(e => e.ReorderLevel).HasDefaultValueSql("((0))"); entity.Property(e => e.UnitPrice).HasDefaultValueSql("((0))"); entity.Property(e => e.UnitsInStock).HasDefaultValueSql("((0))"); entity.Property(e => e.UnitsOnOrder).HasDefaultValueSql("((0))"); entity.HasOne(d => d.Category) .WithMany(p => p.Products) .HasForeignKey(d => d.CategoryId) .HasConstraintName("FK_Products_Categories"); entity.HasOne(d => d.Supplier) .WithMany(p => p.Products) .HasForeignKey(d => d.SupplierId) .HasConstraintName("FK_Products_Suppliers"); }); ... OnModelCreatingPartial(modelBuilder); } partial void OnModelCreatingPartial(ModelBuilder modelBuilder); } }Note the following:
- The
NorthwindDbdata context class ispartialto allow you to extend it and regenerate it in the future. We used the nameNorthwindDbbecauseNorthwindis used for a namespace. NorthwindDbhas two constructors: a default parameter-less one and one that allows options to be passed in. This is useful in apps where you want to specify the connection string at runtime.- The
DbSet<T>properties that represent tables are set to thenull-forgiving value to prevent static compiler analysis warnings at compile time. It has no effect at runtime. - In the
OnConfiguringmethod, if options have not been specified in the constructor, then it defaults to using the connection string used during scaffolding. It has a compiler warning to remind you that you should not hardcode security information in this connection string. - In the
OnModelCreatingmethod, the Fluent API is used to configure the entity classes, and then a partial method namedOnModelCreatingPartialis invoked. This allows you to implement that partial method in your own partialNorthwindclass to add your own Fluent API configuration, which will not be lost if you regenerate the model classes.
- The
- Delete the
#warningstatement. We are treating warnings as errors so we cannot leave this in. - Close the automatically generated class files.
Querying the Northwind model
- In
Program.cs, delete the existing statements. Add statements to create an instance of theNorthwindDbdata context class and use it to query the products table for those that cost more than a given price, as shown in the following code:using Microsoft.Data.SqlClient; // SqlConnectionStringBuilder using Microsoft.EntityFrameworkCore; // ToQueryString, GetConnectionString using Northwind.Console.EFCore.Models; // NorthwindDb SqlConnectionStringBuilder builder = new(); builder.InitialCatalog = "Northwind"; builder.MultipleActiveResultSets = true; builder.Encrypt = true; builder.TrustServerCertificate = true; builder.ConnectTimeout = 10; WriteLine("Connect to:"); WriteLine(" 1 - SQL Server on local machine"); WriteLine(" 2 - Azure SQL Database"); WriteLine(" 3 - Azure SQL Edge"); WriteLine(); Write("Press a key: "); ConsoleKey key = ReadKey().Key; WriteLine(); WriteLine(); if (key is ConsoleKey.D1 or ConsoleKey.NumPad1) { builder.DataSource = "."; // Local SQL Server // @".\net7book"; // Local SQL Server with an instance name } else if (key is ConsoleKey.D2 or ConsoleKey.NumPad2) { builder.DataSource = // Azure SQL Database "tcp:apps-services-net7.database.windows.net,1433"; } else if (key is ConsoleKey.D3 or ConsoleKey.NumPad3) { builder.DataSource = "tcp:127.0.0.1,1433"; // Azure SQL Edge } else { WriteLine("No data source selected."); return; } WriteLine("Authenticate using:"); WriteLine(" 1 - Windows Integrated Security"); WriteLine(" 2 - SQL Login, for example, sa"); WriteLine(); Write("Press a key: "); key = ReadKey().Key; WriteLine(); WriteLine(); if (key is ConsoleKey.D1 or ConsoleKey.NumPad1) { builder.IntegratedSecurity = true; } else if (key is ConsoleKey.D2 or ConsoleKey.NumPad2) { builder.UserID = "sa"; // Azure SQL Edge // "markjprice"; // change to your username Write("Enter your SQL Server password: "); string? password = ReadLine(); if (string.IsNullOrWhiteSpace(password)) { WriteLine("Password cannot be empty or null."); return; } builder.Password = password; builder.PersistSecurityInfo = false; } else { WriteLine("No authentication selected."); return; } DbContextOptionsBuilder<NorthwindDb> options = new(); options.UseSqlServer(builder.ConnectionString); using (NorthwindDb db = new(options.Options)) { Write("Enter a unit price: "); string? priceText = ReadLine(); if (!decimal.TryParse(priceText, out decimal price)) { WriteLine("You must enter a valid unit price."); return; } // We have to use var because we are projecting into an anonymous type. var products = db.Products .Where(p => p.UnitPrice > price) .Select(p => new { p.ProductId, p.ProductName, p.UnitPrice }); WriteLine("----------------------------------------------------------"); WriteLine("| {0,5} | {1,-35} | {2,8} |", "Id", "Name", "Price"); WriteLine("----------------------------------------------------------"); foreach (var p in products) { WriteLine("| {0,5} | {1,-35} | {2,8:C} |", p.ProductId, p.ProductName, p.UnitPrice); } WriteLine("----------------------------------------------------------"); WriteLine(products.ToQueryString()); WriteLine(); WriteLine($"Provider: {db.Database.ProviderName}"); WriteLine($"Connection: {db.Database.GetConnectionString()}"); } - Run the console app and note the results, as shown in the following partial output:
Enter a unit price: 60
----------------------------------------------------------
|    Id | Name                                |    Price |
----------------------------------------------------------
|     9 | Mishi Kobe Niku                     |   £97.00 |
|    18 | Carnarvon Tigers                    |   £62.50 |
|    20 | Sir Rodney's Marmalade              |   £81.00 |
|    29 | Thüringer Rostbratwurst             |  £123.79 |
|    38 | Côte de Blaye                       |  £263.50 |
----------------------------------------------------------
DECLARE @__price_0 decimal(2) = 60.0;
SELECT [p].[ProductId], [p].[ProductName], [p].[UnitPrice]
FROM [Products] AS [p]
WHERE [p].[UnitPrice] > @__price_0
Provider:   Microsoft.EntityFrameworkCore.SqlServer
Connection: Data Source=tcp:apps-services-net7.database.windows.net,1433;Initial Catalog=Northwind;Persist Security Info=False;User ID=markjprice;Password=s3cret-Ninja;Multiple Active Result Sets=False;Encrypt=True;Trust Server Certificate=False;Connection Timeout=10;
Your connection string will be different. For example, your user ID and password, and if you are using a local SQL Server with Windows integrated security authentication, then it would be Data Source=.;Initial Catalog=Northwind;Integrated Security=True;Multiple Active Result Sets=True;Connect Timeout=10;Encrypt=True;Trust Server Certificate=True.
Mapping inheritance hierarchies with EF Core
Imagine that you have an inheritance hierarchy for some C# classes to store information about students and employees, both of which are types of people. All people have a name and an ID to uniquely identify them, students have a subject they are studying, and employees have a hire date, as shown in the following code:
public abstract class Person
{
  public int Id { get; set; }
  public string? Name { get; set; }
}
public class Student : Person
{
  public string? Subject { get; set; }
}
public class Employee : Person
{
  public DateTime HireDate { get; set; }
}
By default, EF Core will map these to a single table using the table-per-hierarchy (TPH) mapping strategy. EF Core 5 introduced support for the table-per-type (TPT) mapping strategy. EF Core 7 introduces support for the table-per-concrete-type (TPC) mapping strategy. Let’s explore the differences between these mapping strategies.
Table-per-hierarchy (TPH) mapping strategy
For the Person-Student-Employee hierarchy, TPH will use a single table structure with a discriminator column to indicate which type of person, a student or employee, the row is, as shown in the following code:
CREATE TABLE [People] (
  [Id] int NOT NULL IDENTITY,
  [Name] nvarchar(max) NOT NULL,
  [Discriminator] nvarchar(max) NOT NULL,
  [Subject] nvarchar(max) NULL,
  [HireDate] nvarchar(max) NULL,
  CONSTRAINT [PK_People] PRIMARY KEY ([Id])
);
Some data in the table might look like the following:
|
Id |
Name |
Discriminator |
Subject |
HireDate |
|
1 |
Roman Roy |
Student |
History |
NULL |
|
2 |
Kendall Roy |
Employee |
NULL |
02/04/2014 |
|
3 |
Siobhan Roy |
Employee |
NULL |
12/09/2020 |
TPH requires the Discriminator column to store the class name of the type for each row. TPH requires the columns for properties of derived types to be nullable, like Subject and HireDate. This can cause an issue if those properties are required (non-null) at the class level. EF Core does not handle this by default.
The main benefits of the TPH mapping strategy are simplicity and performance, which is why it is used by default.
Good Practice: If the discriminator column has many different values, then you can improve performance even more by defining an index on the discriminator. But if there are only a few different values, an index may make overall performance worse because it affects updating time.
Table-per-type (TPT) mapping strategy
For the Person-Student-Employee hierarchy, TPT will use a table for every type, as shown in the following code:
CREATE TABLE [People] (
  [Id] int NOT NULL IDENTITY,
  [Name] nvarchar(max) NOT NULL,
  CONSTRAINT [PK_People] PRIMARY KEY ([Id])
);
CREATE TABLE [Students] (
  [Id] int NOT NULL,
  [Subject] nvarchar(max) NULL,
  CONSTRAINT [PK_Students] PRIMARY KEY ([Id])
  CONSTRAINT [FK_Students_People] FOREIGN KEY ([Id]) REFERENCES [People] ([Id])
);
CREATE TABLE [Employees] (
  [Id] int NOT NULL,
  [HireDate] nvarchar(max) NULL,
  CONSTRAINT [PK_Employees] PRIMARY KEY ([Id])
  CONSTRAINT [FK_Employees_People] FOREIGN KEY ([Id]) REFERENCES [People] ([Id])
);
Some data in the tables might look like the following.
People table:
|
Id |
Name |
|
1 |
Roman Roy |
|
2 |
Kendall Roy |
|
3 |
Siobhan Roy |
Students table:
|
Id |
Subject |
|
1 |
History |
Employees table:
|
Id |
HireDate |
|
2 |
02/04/2014 |
|
3 |
12/09/2020 |
The main benefit of the TPT mapping strategy is reduced storage due to the full normalization of the data. The main disadvantage is that a single entity is spread over multiple tables and reconstructing it takes more effort and therefore reduces overall performance. TPT is usually a poor choice, so only use it if the table structure is already normalized and cannot be restructured.
Table-per-concrete-type (TPC) mapping strategy
For the Person-Student-Employee hierarchy, TPC will use a table for each non-abstract type, as shown in the following code:
CREATE TABLE [Students] (
  [Id] int NOT NULL DEFAULT (NEXT VALUE FOR [PersonIds]),
  [Name] nvarchar(max) NOT NULL,
  [Subject] nvarchar(max) NULL,
  CONSTRAINT [PK_Students] PRIMARY KEY ([Id])
  CONSTRAINT [FK_Students_People] FOREIGN KEY ([Id]) REFERENCES [People] ([Id])
);
CREATE TABLE [Employees] (
  [Id] int NOT NULL DEFAULT (NEXT VALUE FOR [PersonIds]),
  [Name] nvarchar(max) NOT NULL,
  [HireDate] nvarchar(max) NULL,
  CONSTRAINT [PK_Employees] PRIMARY KEY ([Id])
  CONSTRAINT [FK_Employees_People] FOREIGN KEY ([Id]) REFERENCES [People] ([Id])
);
Since there is not a single table with an IDENTITY column to assign Id values, we can use the (NEXT VALUE FOR [PersonIds]) command to define a sequence shared between the two tables so they do not assign the same Id values.
Some data in the tables might look like the following.
Students table:
|
Id |
Name |
Subject |
|
1 |
Roman Roy |
History |
Employees table:
|
Id |
Name |
HireDate |
|
2 |
Kendall Roy |
02/04/2014 |
|
3 |
Siobhan Roy |
12/09/2020 |
The main benefit of the TPC mapping strategy is performance, because when querying a single concrete type only one table is needed so we avoid expensive joins. It works best for large inheritance hierarchies of many concrete types, each with many type-specific properties.
Configuring inheritance hierarchy mapping strategies
First, all types must be included in the model, as shown in the following code:
public DbSet<Person> People { get; set; }
public DbSet<Student> Students { get; set; }
public DbSet<Employee> Employees { get; set; }
For TPH, you are now finished, because it is the default! If you want to make this explicit, then in the data context class OnModelCreating method call the appropriate use mapping strategy method on the base class of the hierarchy, as shown in the following code:
modelBuilder.Entity<Person>().UseTphMappingStrategy();
To use either of the other two mapping strategies, call the appropriate method, as shown in the following code:
modelBuilder.Entity<Person>().UseTptMappingStrategy();
modelBuilder.Entity<Person>().UseTpcMappingStrategy();
Next, you can optionally specify the table name to use for each entity class, as shown in the following code:
modelBuilder.Entity<Student>().ToTable("Students");
modelBuilder.Entity<Employee>().ToTable("Employees");
The TPC strategy should have a shared sequence, so we should configure that too, as shown in the following code:
modelBuilder.HasSequence<int>("PersonIds");
modelBuilder.Entity<Person>().UseTpcMappingStrategy()
  .Property(e => e.Id).HasDefaultValueSql("NEXT VALUE FOR [PersonIds]");
Example of hierarchy mapping strategies
Now let’s see this in action:
- Use your preferred code editor to add a console app project, as defined in the following list:
- Project template: Console App/
console - Workspace/solution file and folder:
Chapter02 - Project file and folder:
Northwind.Console.HierarchyMapping
- Project template: Console App/
- In the
Northwind.Console.HierarchyMappingproject, treat warnings as errors, add package references to the EF Core data provider for SQL Server, and globally and statically import theSystem.Consoleclass, as shown highlighted in the following markup:<Project Sdk="Microsoft.NET.Sdk"> <PropertyGroup> <OutputType>Exe</OutputType> <TargetFramework>net7.0</TargetFramework> <ImplicitUsings>enable</ImplicitUsings> <Nullable>enable</Nullable> <TreatWarningsAsErrors>true</TreatWarningsAsErrors> </PropertyGroup> <ItemGroup> <PackageReference Include="Microsoft.EntityFrameworkCore.Design" Version="7.0.0" /> <PackageReference Include="Microsoft.EntityFrameworkCore.SqlServer" Version="7.0.0" /> </ItemGroup> <ItemGroup> <Using Include="System.Console" Static="true" /> </ItemGroup> </Project> - Build the project to restore packages.
- Add a new class file named
Person.cs, and modify its contents, as shown in the following code:using System.ComponentModel.DataAnnotations; namespace Northwind.Console.HierarchyMapping; public abstract class Person { public int Id { get; set; } [Required] [StringLength(40)] public string? Name { get; set; } } - Add a new class file named
Student.cs, and modify its contents, as shown in the following code:namespace Northwind.Console.HierarchyMapping; public class Student : Person { public string? Subject { get; set; } } - Add a new class file named
Employee.cs, and modify its contents, as shown in the following code:namespace Northwind.Console.HierarchyMapping; public class Employee : Person { public DateTime HireDate { get; set; } } - Add a new class file named
HierarchyDb.cs, and modify its contents, as shown in the following code:using Microsoft.EntityFrameworkCore; // DbSet<T> namespace Northwind.Console.HierarchyMapping; public class HierarchyDb : DbContext { public DbSet<Person>? People { get; set; } public DbSet<Student>? Students { get; set; } public DbSet<Employee>? Employees { get; set; } public HierarchyDb(DbContextOptions<HierarchyDb> options) : base(options) { } protected override void OnModelCreating(ModelBuilder modelBuilder) { modelBuilder.Entity<Person>() .UseTphMappingStrategy(); // Populate database with sample data. Student p1 = new() { Id = 1, Name = "Roman Roy", Subject = "History" }; Employee p2 = new() { Id = 2, Name = "Kendall Roy", HireDate = new(year: 2014, month: 4, day: 2) }; Employee p3 = new() { Id = 3, Name = "Siobhan Roy", HireDate = new(year: 2020, month: 9, day: 12) }; modelBuilder.Entity<Student>().HasData(p1); modelBuilder.Entity<Employee>().HasData(p2, p3); } } - In
Program.cs, delete the existing statements. Add statements to configure the connection string for theHierarchyDbdata context and then use it to delete and then create the database, show the automatically generated SQL script, and then output the students, employees, and people, as shown in the following code:using Microsoft.EntityFrameworkCore; // GenerateCreateScript() using Northwind.Console.HierarchyMapping; // HierarchyDb, Student, Employee DbContextOptionsBuilder<HierarchyDb> options = new(); // Modify the connection string manually to use Azure SQL Database or Edge. options.UseSqlServer("Data Source=.;Initial Catalog=HierarchyMapping;Integrated Security=true;TrustServerCertificate=true;"); using (HierarchyDb db = new(options.Options)) { bool deleted = await db.Database.EnsureDeletedAsync(); WriteLine($"Database deleted: {deleted}"); bool created = await db.Database.EnsureCreatedAsync(); WriteLine($"Database created: {created}"); WriteLine("SQL script used to create the database:"); WriteLine(db.Database.GenerateCreateScript()); if (db.Students is null || db.Students.Count() == 0) { WriteLine("There are no students."); } else { foreach (Student student in db.Students) { WriteLine("{0} studies {1}", student.Name, student.Subject); } } if (db.Employees is null || db.Employees.Count() == 0) { WriteLine("There are no employees."); } else { foreach (Employee employee in db.Employees) { WriteLine("{0} was hired on {1}", employee.Name, employee.HireDate); } } if (db.People is null || db.People.Count() == 0) { WriteLine("There are no people."); } else { foreach (Person person in db.People) { WriteLine("{0} has ID of {1}", person.Name, person.Id); } } } - Start the console app, and note the results including the single table named
Peoplethat is created, as shown in the following output:Database deleted: False Database created: True SQL script used to create the database: CREATE TABLE [People] ( [Id] int NOT NULL IDENTITY, [Name] nvarchar(40) NOT NULL, [Discriminator] nvarchar(max) NOT NULL, [HireDate] datetime2 NULL, [Subject] nvarchar(max) NULL, CONSTRAINT [PK_People] PRIMARY KEY ([Id]) ); GO IF EXISTS (SELECT * FROM [sys].[identity_columns] WHERE [name] IN (N'Id', N'Discriminator', N'Name', N'Subject') AND [object_id] = OBJECT_ID(N'[People]')) SET IDENTITY_INSERT [People] ON; INSERT INTO [People] ([Id], [Discriminator], [Name], [Subject]) VALUES (1, N'Student', N'Roman Roy', N'History'); IF EXISTS (SELECT * FROM [sys].[identity_columns] WHERE [name] IN (N'Id', N'Discriminator', N'Name', N'Subject') AND [object_id] = OBJECT_ID(N'[People]')) SET IDENTITY_INSERT [People] OFF; GO IF EXISTS (SELECT * FROM [sys].[identity_columns] WHERE [name] IN (N'Id', N'Discriminator', N'HireDate', N'Name') AND [object_id] = OBJECT_ID(N'[People]')) SET IDENTITY_INSERT [People] ON; INSERT INTO [People] ([Id], [Discriminator], [HireDate], [Name]) VALUES (2, N'Employee', '2014-04-02T00:00:00.0000000', N'Kendall Roy'), (3, N'Employee', '2020-09-12T00:00:00.0000000', N'Siobhan Roy'); IF EXISTS (SELECT * FROM [sys].[identity_columns] WHERE [name] IN (N'Id', N'Discriminator', N'HireDate', N'Name') AND [object_id] = OBJECT_ID(N'[People]')) SET IDENTITY_INSERT [People] OFF; GO Roman Roy studies History Kendall Roy was hired on 02/04/2014 00:00:00 Siobhan Roy was hired on 12/09/2020 00:00:00 Roman Roy has ID of 1 Kendall Roy has ID of 2 Siobhan Roy has ID of 3 - In your preferred database tool, view the contents of the
Peopletable, as shown in Figure 2.13:
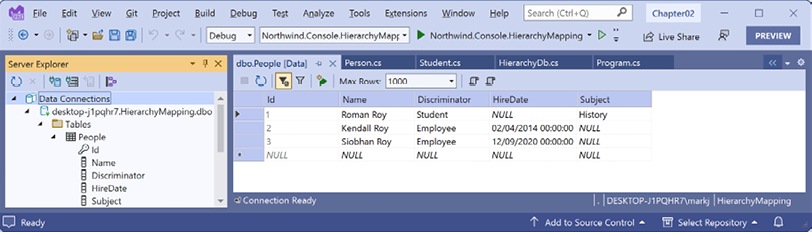
Figure 2.13: The People table when using the TPH mapping strategy
- Close the connection to the
HierarchyMappingdatabase. - In
HierarchyDb.cs, comment out the method call that configures TPH and add a call to the method that configures TPT, as shown highlighted in the following code:protected override void OnModelCreating(ModelBuilder modelBuilder) { modelBuilder.Entity<Person>() // .UseTphMappingStrategy(); .UseTptMappingStrategy(); - Start the console app, and note the results including the three tables named
People,Students, andEmployeesthat are created, as shown in the following partial output:Database deleted: True Database created: True SQL script used to create the database: CREATE TABLE [People] ( [Id] int NOT NULL IDENTITY, [Name] nvarchar(40) NOT NULL, CONSTRAINT [PK_People] PRIMARY KEY ([Id]) ); GO CREATE TABLE [Employees] ( [Id] int NOT NULL, [HireDate] datetime2 NOT NULL, CONSTRAINT [PK_Employees] PRIMARY KEY ([Id]), CONSTRAINT [FK_Employees_People_Id] FOREIGN KEY ([Id]) REFERENCES [People] ([Id]) ); GO CREATE TABLE [Students] ( [Id] int NOT NULL, [Subject] nvarchar(max) NULL, CONSTRAINT [PK_Students] PRIMARY KEY ([Id]), CONSTRAINT [FK_Students_People_Id] FOREIGN KEY ([Id]) REFERENCES [People] ([Id]) ); GO - In your preferred database tool, view the contents of the tables, as shown in Figure 2.14:
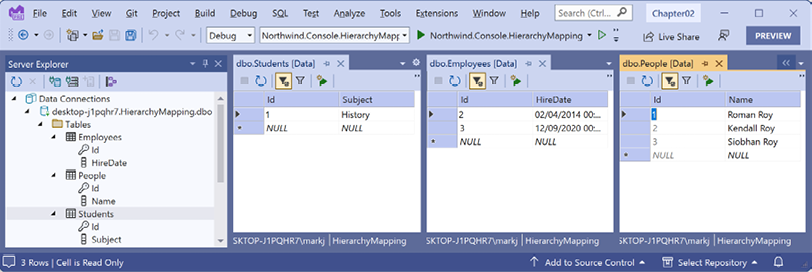
Figure 2.14: The tables when using the TPT mapping strategy
- Close the connection to the
HierarchyMappingdatabase. - In
HierarchyDb.cs, comment out the method call that configures TPT. Add a call to the method that configures TPC and configure a sequence to track assigned ID values starting at four because we always add three sample rows, as shown highlighted in the following code:protected override void OnModelCreating(ModelBuilder modelBuilder) { modelBuilder.Entity<Person>() // .UseTphMappingStrategy(); // .UseTptMappingStrategy(); .UseTpcMappingStrategy() .Property(person => person.Id) .HasDefaultValueSql("NEXT VALUE FOR [PersonIds]"); modelBuilder.HasSequence<int>("PersonIds", builder => { builder.StartsAt(4); }); - Start the console app, and note the results including the two tables named
StudentsandEmployeesthat are created as well as the shared sequence that starts at 4, as shown in the following partial output:CREATE SEQUENCE [PersonIds] AS int START WITH 4 INCREMENT BY 1 NO MINVALUE NO MAXVALUE NO CYCLE; GO CREATE TABLE [Employees] ( [Id] int NOT NULL DEFAULT (NEXT VALUE FOR [PersonIds]), [Name] nvarchar(40) NOT NULL, [HireDate] datetime2 NOT NULL, CONSTRAINT [PK_Employees] PRIMARY KEY ([Id]) ); GO CREATE TABLE [Students] ( [Id] int NOT NULL DEFAULT (NEXT VALUE FOR [PersonIds]), [Name] nvarchar(40) NOT NULL, [Subject] nvarchar(max) NULL, CONSTRAINT [PK_Students] PRIMARY KEY ([Id]) ); GO - In your preferred database tool, view the contents of the tables, as shown in Figure 2.15:
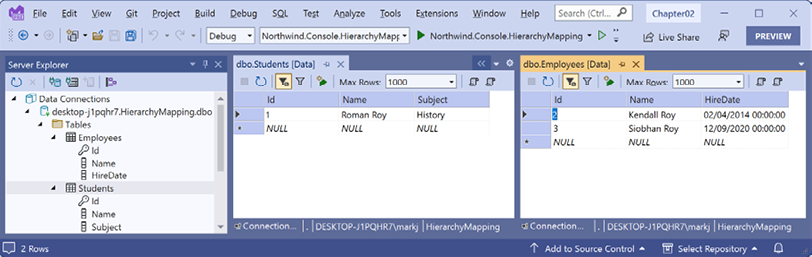
Figure 2.15: The tables when using the TPC mapping strategy
Building a reusable entity data model
Practical applications usually need to work with data in a relational database or another data store. Earlier in this chapter, we defined EF Core models in the same console app project that we used them in. Now, we will define an entity data model for the Northwind database as a pair of reusable class libraries. One part of the pair will define the entities like Product and Customer. The second part of the pair will define the tables in the database, default configuration for how to connect to the database, and use fluent API to configure additional options for the model. This pair of class libraries will be used in many of the apps and services that you create in subsequent chapters.
Good Practice: You should create a separate class library project for your entity data models. This allows easier sharing between backend web servers and frontend desktop, mobile, and Blazor WebAssembly clients.
Creating a class library for entity models using SQL Server
You will now create the entity models using the dotnet-ef tool:
- Add a new project, as defined in the following list:
- Project template: Class Library/
classlib - Project file and folder:
Northwind.Common.EntityModels.SqlServer - Workspace/solution file and folder:
Chapter02
- Project template: Class Library/
- In the
Northwind.Common.EntityModels.SqlServerproject, treat warnings as errors, and add package references for the SQL Server database provider and EF Core design-time support, as shown highlighted in the following markup:<Project Sdk="Microsoft.NET.Sdk"> <PropertyGroup> <TargetFramework>net7.0</TargetFramework> <ImplicitUsings>enable</ImplicitUsings> <Nullable>enable</Nullable> <TreatWarningsAsErrors>true</TreatWarningsAsErrors> </PropertyGroup> <ItemGroup> <PackageReference Include="Microsoft.EntityFrameworkCore.SqlServer" Version="7.0.0" /> <PackageReference Include="Microsoft.EntityFrameworkCore.Design" Version="7.0.0"> <PrivateAssets>all</PrivateAssets> <IncludeAssets>runtime; build; native; contentfiles; analyzers; buildtransitive</IncludeAssets> </PackageReference> </ItemGroup> </Project> - Delete the
Class1.csfile. - Build the
Northwind.Common.EntityModels.SqlServerproject. - Open a command prompt or terminal for the
Northwind.Common.EntityModels.SqlServerfolder.The next step assumes a database connection string for a local SQL Server authenticated with Windows Integrated security. Modify it for Azure SQL Database or Azure SQL Edge with a user ID and password if necessary.
- At the command line, generate entity class models for all tables, as shown in the following commands:
dotnet ef dbcontext scaffold "Data Source=.;Initial Catalog=Northwind;Integrated Security=true;TrustServerCertificate=True;" Microsoft.EntityFrameworkCore.SqlServer --namespace Packt.Shared --data-annotationsNote the following:
- The command to perform:
dbcontext scaffold - The connection string:
"Data Source=.;Initial Catalog=Northwind;Integrated Security=true;TrustServerCertificate=True;" - The database provider:
Microsoft.EntityFrameworkCore.SqlServer - The namespace for the generated classes:
--namespace Packt.Shared - To use data annotations as well as the Fluent API:
--data-annotations
- The command to perform:
- Note that 28 classes were generated, from
AlphabeticalListOfProduct.cstoTerritory.cs. - In
Customer.cs, thedotnet-eftool correctly identified that theCustomerIdcolumn is the primary key and it is limited to a maximum of five characters, but we also want the values to always be uppercase. So, add a regular expression to validate its primary key value to only allow uppercase Western characters, as shown highlighted in the following code:[Key] [StringLength(5)] [RegularExpression("[A-Z]{5}")] public string CustomerId { get; set; } = null!;
Creating a class library for the data context using SQL Server
Next, you will move the context model that represents the database to a separate class library:
- Add a new project, as defined in the following list:
- Project template: Class Library/
classlib - Project file and folder:
Northwind.Common.DataContext.SqlServer - Workspace/solution file and folder:
Chapter02 - In Visual Studio Code, select
Northwind.Common.DataContext.SqlServeras the active OmniSharp project.
- Project template: Class Library/
- In the
DataContextproject, treat warnings as errors, add a project reference to theEntityModelsproject, and add a package reference to the EF Core data provider for SQL Server, as shown highlighted in the following markup:<Project Sdk="Microsoft.NET.Sdk"> <PropertyGroup> <TargetFramework>net7.0</TargetFramework> <ImplicitUsings>enable</ImplicitUsings> <Nullable>enable</Nullable> <TreatWarningsAsErrors>true</TreatWarningsAsErrors> </PropertyGroup> <ItemGroup> <PackageReference Include="Microsoft.EntityFrameworkCore.SqlServer" Version="7.0.0" /> </ItemGroup> <ItemGroup> <ProjectReference Include="..\Northwind.Common.EntityModels .SqlServer\Northwind.Common.EntityModels.SqlServer.csproj" /> </ItemGroup> </Project>Warning! The path to the project reference should not have a line break in your project file.
- In the
Northwind.Common.DataContext.SqlServerproject, delete theClass1.csfile. - Build the
Northwind.Common.DataContext.SqlServerproject. - Move the
NorthwindContext.csfile from theNorthwind.Common.EntityModels.SqlServerproject/folder to theNorthwind.Common.DataContext.SqlServerproject/folder. - In the
Northwind.Common.DataContext.SqlServerproject, inNorthwindContext.cs, remove the compiler warning about the connection string. - In the
Northwind.Common.DataContext.SqlServerproject, add a class namedNorthwindContextExtensions.cs, and modify its contents to define an extension method that adds the Northwind database context to a collection of dependency services, as shown in the following code:using Microsoft.EntityFrameworkCore; // UseSqlServer using Microsoft.Extensions.DependencyInjection; // IServiceCollection namespace Packt.Shared; public static class NorthwindContextExtensions { /// <summary> /// Adds NorthwindContext to the specified IServiceCollection. Uses the SqlServer database provider. /// </summary> /// <param name="services"></param> /// <param name="connectionString">Set to override the default.</param> /// <returns>An IServiceCollection that can be used to add more services.</returns> public static IServiceCollection AddNorthwindContext( this IServiceCollection services, string connectionString = "Data Source=.;Initial Catalog=Northwind;" + "Integrated Security=true;MultipleActiveResultsets=true;Encrypt=false") { services.AddDbContext<NorthwindContext>(options => { options.UseSqlServer(connectionString); options.LogTo(Console.WriteLine, new[] { Microsoft.EntityFrameworkCore .Diagnostics.RelationalEventId.CommandExecuting }); }); return services; } } - Build the two class libraries and fix any compiler errors.
Good Practice: We have provided an optional argument for the AddNorthwindContext method so that we can override the SQL Server database connection string. This will allow us more flexibility, for example, to load these values from a configuration file.
Calculated properties on entity creation
EF Core 7 adds an IMaterializationInterceptor interface that allows interception before and after an entity is created, and when properties are initialized. This is useful for calculated values.
For example, when a service or client app requests entities to show to the user, it might want to cache a copy of the entity for a period of time. To do this, it needs to know when the entity was last refreshed. It would be useful if this information was automatically generated and stored with each entity.
To achieve this goal, we must complete four steps:
- First, define an interface with the extra property.
- Next, at least one entity model class must implement the interface.
- Then, define a class that implements the interceptor interface with a method named
InitializedInstancethat will execute on any entity, and if that entity implements the custom interface with the extra property, then it will set its value. - Finally, we must create an instance of the interceptor and register it in the data context class.
Now let’s implement this for Northwind Employee entities:
- In the
Northwind.Common.EntityModels.SqlServerproject, add a new file namedIHasLastRefreshed.cs, and modify its contents to define the interface, as shown in the following code:namespace Packt.Shared; public interface IHasLastRefreshed { DateTimeOffset LastRefreshed { get; set; } } - In the
Northwind.Common.EntityModels.SqlServerproject, inEmployee.cs, implement the interface, as shown highlighted in the following code:public partial class Employee : IHasLastRefreshed { ... [NotMapped] public DateTimeOffset LastRefreshed { get; set; } } - In the
Northwind.Common.DataContext.SqlServerproject, add a new file namedSetLastRefreshedInterceptor.cs, and modify its contents to define the interceptor, as shown in the following code:// IMaterializationInterceptor, MaterializationInterceptionData using Microsoft.EntityFrameworkCore.Diagnostics; namespace Packt.Shared; public class SetLastRefreshedInterceptor : IMaterializationInterceptor { public object InitializedInstance( MaterializationInterceptionData materializationData, object entity) { if (entity is IHasLastRefreshed entityWithLastRefreshed) { entityWithLastRefreshed.LastRefreshed = DateTimeOffset.UtcNow; } return entity; } } - In the
Northwind.Common.DataContext.SqlServerproject, inNorthwindContext.cs, register the interceptor, as shown highlighted in the following code:public partial class NorthwindContext : DbContext { private static readonly SetLastRefreshedInterceptor setLastRefreshedInterceptor = new(); ... protected override void OnConfiguring(DbContextOptionsBuilder optionsBuilder) { if (!optionsBuilder.IsConfigured) { optionsBuilder.UseSqlServer("..."); } optionsBuilder.AddInterceptors(setLastRefreshedInterceptor); } ... } - Save changes.
Creating a test project to check the integration of the class libraries
Since we will not be creating a client project in this chapter that uses the EF Core model, we should create a test project to make sure the database context and entity models integrate correctly:
- Use your preferred coding tool to add a new xUnit Test Project [C#]/
xunitproject namedNorthwind.Common.EntityModels.Teststo theChapter02workspace/solution. - In
Northwind.Common.EntityModels.Tests.csproj, modify the configuration to treat warnings as errors and to add an item group with a project reference to theNorthwind.Common.DataContext.SqlServerproject, as shown in the following markup:<ItemGroup> <ProjectReference Include="..\Northwind.Common.DataContext .SqlServer\Northwind.Common.DataContext.SqlServer.csproj" /> </ItemGroup>Warning! The path to the project reference should not have a line break in your project file.
- Build the
Northwind.Common.EntityModels.Testsproject.
Writing unit tests for entity models
A well-written unit test will have three parts:
- Arrange: This part will declare and instantiate variables for input and output.
- Act: This part will execute the unit that you are testing. In our case, that means calling the method that we want to test.
- Assert: This part will make one or more assertions about the output. An assertion is a belief that, if not true, indicates a failed test. For example, when adding 2 and 2, we would expect the result to be 4.
Now, we will write some unit tests for the NorthwindContext and entity model classes:
- Rename the file
UnitTest1.cstoNorthwindEntityModelsTests.csand then open it. - In Visual Studio Code, rename the class to
NorthwindEntityModelsTests. (Visual Studio prompts you to rename the class when you rename the file.) - Modify the
NorthwindEntityModelsTestsclass to import thePackt.Sharednamespace and have some test methods for ensuring the context class can connect, ensuring the provider is SQL Server, and ensuring the first product is namedChai, as shown in the following code:using Packt.Shared; namespace Northwind.Common.EntityModels.Tests { public class NorthwindEntityModelsTests { [Fact] public void CanConnectIsTrue() { using (NorthwindContext db = new()) // arrange { bool canConnect = db.Database.CanConnect(); // act Assert.True(canConnect); // assert } } [Fact] public void ProviderIsSqlServer() { using (NorthwindContext db = new()) { string? provider = db.Database.ProviderName; Assert.Equal("Microsoft.EntityFrameworkCore.SqlServer", provider); } } [Fact] public void ProductId1IsChai() { using(NorthwindContext db = new()) { Product product1 = db.Products.Single(p => p.ProductId == 1); Assert.Equal("Chai", product1.ProductName); } } [Fact] public void EmployeeHasLastRefreshedIn10sWindow() { using (NorthwindContext db = new()) { Employee employee1 = db.Employees.Single(p => p.EmployeeId == 1); DateTimeOffset now = DateTimeOffset.UtcNow; Assert.InRange(actual: employee1.LastRefreshed, low: now.Subtract(TimeSpan.FromSeconds(5)), high: now.AddSeconds(5)); } } } }
Running unit tests using Visual Studio 2022
Now we are ready to run the unit tests and see the results:
- In Visual Studio 2022, navigate to Test | Run All Tests.
- In Test Explorer, note that the results indicate that some tests ran, and all passed.
Running unit tests using Visual Studio Code
Now we are ready to run the unit tests and see the results:
- In Visual Studio Code, in the
Northwind.Common.EntityModels.Testsproject’s TERMINAL window, run the tests, as shown in the following command:dotnet test - In the output, note that the results indicate that some tests ran, and all passed.
As an optional task, can you think of other tests you could write to make sure the database context and entity models are correct?
Cleaning up data resources
When you are done with a SQL Server database, you can clean up the resources used.
Removing Azure resources
You can now remove the resources used by SQL Database to save costs:
Warning! If you do not remove the resources used by an Azure SQL Database, then you will incur costs.
- In the Azure portal, find the resource group named
apps-services-net7. - Click Delete.
- Enter the name of the resource group.
- Click Delete.
Removing Docker resources
You could now remove the resources used by Docker, but many of the other chapters in this book will need to connect to a Northwind database in SQL Server.
If you have completed all the chapters in the book, or plan to use full SQL Server or Azure SQL Database, and now want to remove all the Docker resources, then follow these steps:
- At the command prompt or terminal, stop the
azuresqledgecontainer, as shown in the following command:docker stop azuresqledge - At the command prompt or terminal, remove the
azuresqledgecontainer, as shown in the following command:docker rm azuresqledgeRemoving the container will delete all data inside it.
Practicing and exploring
Test your knowledge and understanding by answering some questions, getting some hands-on practice, and exploring this chapter’s topics with deeper research.
Exercise 2.1 – Test your knowledge
Answer the following questions:
- Which NuGet package should you reference in a .NET project to get the best performance when working with data in SQL Server?
- What is the safest way to define a database connection string for SQL Server?
- What must T-SQL parameters and variables be prefixed with?
- What must you do before reading an output parameter of a command executed using
ExecuteReader? - What can the
dotnet-eftool be used for? - What type would you use for the property that represents a table, for example, the
Productsproperty of a data context? - What type would you use for the property that represents a one-to-many relationship, for example, the
Productsproperty of aCategoryentity? - What is the EF Core convention for primary keys?
- Why might you choose the Fluent API in preference to annotation attributes?
- Why might you implement the
IMaterializationInterceptorinterface in an entity type?
Exercise 2.2 – Practice benchmarking ADO.NET against EF Core
In the Chapter02 solution/workspace, create a console app named Ch02Ex02_ADONETvsEFCore that uses Benchmark.NET to compare retrieving all the products from the Northwind database using ADO.NET (SqlClient) and using EF Core.
You can learn how to use Benchmark.NET by reading Chapter 4, Benchmarking Performance, Multitasking, and Concurrency.
Exercise 2.3 – Explore topics
Use the links on the following page to learn more details about the topics covered in this chapter:
Exercise 2.4 – Explore Dapper
Dapper is an alternative ORM to EF Core. It is more efficient because it extends the low-level ADO.NET IDbConnection interface with very basic functionality.
In the Northwind.Console.SqlClient project, add a package reference for Dapper, and then add a class to represent a supplier, as shown in the following code:
public class Supplier
{
  public int SupplierId { get; set; }
  public string? CompanyName { get; set; }
  public string? City { get; set; }
  public string? Country { get; set; }
}
In Program.cs, add statements to retrieve Supplier entities in Germany, as shown in the following code:
IEnumerable<Supplier> suppliers = connection.Query<Supplier>(
  sql: "SELECT * FROM Suppliers WHERE Country=@Country",
  param: new { Country = "Germany" });
foreach (Supplier supplier in suppliers)
{
  WriteLine("{0}: {1}, {2}, {3}",
    supplier.SupplierId, supplier.CompanyName,
    supplier.City, supplier.Country);
}
You can learn more about Dapper at the following link:
https://github.com/DapperLib/Dapper/blob/main/Readme.md
I am considering adding a section about Dapper to the next edition of this book. Please let me know if this if something that I should prioritize. Thanks!
Summary
In this chapter, you learned:
- How to connect to an existing SQL Server database.
- How to execute a simple query and process the results using fast and low-level ADO.NET.
- How to execute a simple query and process the results using the slower but more object-oriented EF Core.
- How to configure and decide between three mapping strategies for type hierarchies.
- How to implement calculated properties on entity creation.
In the next chapter, you will learn how to use cloud-native data storage with Azure Cosmos DB.