In this chapter, we will cover:
Building with Windows and Views
Adding a TabGroup to your app
Creating and formatting Labels
Creating TextFields for user input
Working with keyboards and keyboard toolbars
Enhancing your App with Sliders and Switches
Passing custom variables between windows
Creating buttons and capturing click events
Informing your users with dialogs and alerts
Creating charts using Raphael JS
The ability to create user-friendly layouts with rich, intuitive controls is an important factor in successful app design. With mobile apps and their minimal screen real estate, this becomes even more important. Titanium leverages a huge amount of native controls found in both the iPhone/iPod Touch and Android platforms, allowing the developer to create apps just as rich in functionality as those created by native language developers.
How does this compare to the mobile web? When it comes to HTML/CSS only mobile apps, savvy users can definitely tell the difference in comparison to a platform like Titanium, which allows you to use platform-specific conventions and access your iPhone or Android device's latest and greatest features. An application written in Titanium feels and operates like a native app since essentially all of the UI components are native. This means crisp, responsive UI components utilizing the full capabilities and power of your device.
Most other books at this point would start explaining the fundamental principles of Titanium and maybe give you a rundown on the architecture and expand on the required syntax.
Yawn...
We're not going to do that. Instead, we will be jumping straight into the fun stuff, building your user interface and making a real-world app! In this chapter, you'll learn:
How to build an app using
WindowsandViews, and understanding the differences between the twoPutting together a UI using all of the common components, including
TextFields,LabelsandSwitchesJust how similar Titanium component properties are to CSS when formatting your UI
You can pick and choose any recipe from the chapter if you want since each one is a self-contained example that will explain a specific component or process. Alternatively, you can follow each chapter from beginning to end to put together a real-world app for calculating loan repayments which we will call LoanCalc from here on in.
We are going to start off with the very building blocks of all Titanium applications, Windows and Views. By the end of this recipe you will understand how to implement a Window and add Views to it, as well as understand the fundamental difference between the two, which is not as obvious as it may seem at first glance.
If you are intending to follow the entire chapter and build the LoanCalc app, then pay careful attention to the first few steps of this chapter, as you will need to perform these steps again for each subsequent app in the book.
Note
We are assuming that you have already downloaded and installed Titanium Studio and either Apple XCode with the iOS SDK or Google's Android SDK, or both. If not, you can follow along with the installation process via the online tutorial at http://boydlee.com/titanium-appcelerator-cookbook/setup.
To follow this recipe you will need Titanium Studio installed. We are using version 1.0.7, which is the latest version at the time of writing. Additionally, you will also need either the iOS SDK with XCode or the Google Android SDK installed. All of our examples generally work on either platform unless specified explicitly at the start of a chapter. You will also need an IDE to write your code. Any IDE including Notepad, TextMate, Dashcode, Eclipse, and so on, can be used. However, since June 2011, Appcelerator has been providing its own IDE called "Titanium Studio", which is based on Aptana. Titanium Studio allows developers to build, test, and deploy iOS, Android, Blackberry, and mobile web apps from within a single development environment. All of the recipes within this book are based on the assumption that you are using the Titanium Studio product, which can be downloaded for free from https://my.appcelerator.com/auth/signup/offer/community.
To prepare for this recipe, open Titanium Studio and log in if you have not already done so. If you need to register a new account, you can do so for free directly from within the application. Once you are logged in, click on File | New | New Titanium Mobile Project, and the details window for creating a new project will appear. Enter in LoanCalc the name of the app, and fill in the rest of the details with your own information as shown in the following screenshot. You can also uncheck the "iPad" option, as we will only be building our application for the iPhone and Android platforms.

Note
Pay attention to the app identifier, which is written normally in reverse domain notation (that is, com.packtpub.loancalc). This identifier cannot be easily changed after the project is created and you will need to match it exactly when creating provisioning profiles for distributing your apps later on.
Complete source code for this recipe can be found in the /Chapter1/Recipe1 folder.
First, open the app.js file in Titanium Studio. If this is a new project, by default Titanium Studio creates a sample app containing a couple of Windows inside of a TabGroup which is certainly useful but we will cover TabGroups in a later recipe, so go ahead and remove all of the generated code. Now let's create a Window object to which we will add a View object. This View object will hold all of our controls, such as TextFields and Labels.
In addition to creating our base Window and View, we will also create an ImageView component to display our app logo before adding it to our View (you can get the image we used from the source code for chapter).
Finally, we'll call the open() method on the Window to launch it:
//create the window
var win1 = Titanium.UI.createWindow({
  width: 320,
  height: 480,
  top: 0,
  left: 0,
  backgroundImage: 'background.png'
});

//create the view, this will hold all of our UI controls
//note the height of this view is the height of the window //minus 40px for the status bar and padding
var view = Titanium.UI.createView({
  width: 300,
  height: win1.height - 40,
  left: 10,
  top: 10,
  backgroundColor: '#fff',
  borderRadius: 5
});

//we will give the logo a left margin so it centers neatly //within our view
var _logoMarginLeft = (view.width - 253) / 2;

//now let's add our logo to an imageview and add that to our //view object
var logo = Titanium.UI.createImageView({
  image: 'logo.png',
  width: 253,
  height: 96,
  left: _logoMarginLeft,
  top: 0
});
view.add(logo);

//add the view to our window
win1.add(view);

//finally, open the window to launch the app
win1.open();
Tip
Downloading the example code
You can download the example code files for all Packt books you have purchased from your account at http://www.PacktPub.com. If you purchased this book elsewhere, you can visit http://www.PacktPub.com/support and register to have the files e-mailed directly to you.
Firstly, it's important to explain the differences between Windows and Views as there are a few fundamental differences that may influence your decision on using one compared to the other. Unlike Views, Windows have some additional abilities including an open() and close() method. If you come from a desktop development background, you can imagine a Window as the equivalent of a form or screen. If you prefer web analogies, then a Window is more like a page whereas Views are more like a Div. In addition to these methods, Windows also have display properties such as fullscreen and modal which are not available in Views. You will also notice that when creating a new object the create keyword pops up, that is Titanium.UI.createView(). This naming convention is used consistently throughout the Titanium API, and almost all components are instantiated this way.
Windows and Views can be thought of as the building blocks of your Titanium application. All of your UI components are added to either a Window, or a View, which is a child of a Window. There are a number of formatting options available for both of these objects, the properties and syntax of which will be very familiar to anyone who has used CSS in the past. Font, Color, BorderWidth, BorderRadius, Width, Height, Top, and Left are all properties that function exactly the same way as you would expect them to in CSS and apply to Windows and almost all Views.
Tip
It's important to note that your app requires at least one Window to function and that Window must be called from within your entry point which is the app.js file.
You may have also noticed that we sometimes instantiated objects or called methods using Titanium.UI.createXXX, and at other times used Ti.UI.createXXX. Using "Ti" is simply a short-hand namespace designed to save your time during coding, and will execute your code in exactly the same manner as the full "Titanium" namespace does.
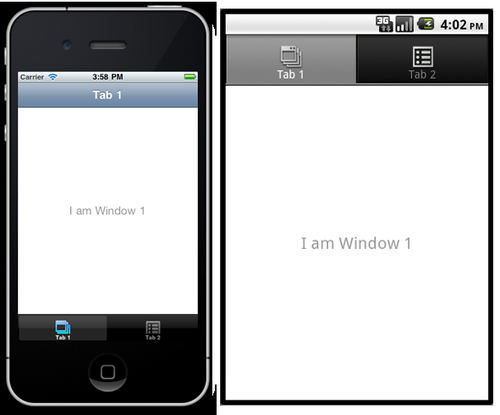
TabGroups are one of the most commonly used UI elements and form the basis of the layout for many iPhone and Android apps on the market today. The TabGroup consists of a sectioned set of tabs each containing an individual window, which in turn contains a navigation bar and title. On the iPhone, these tabs appear in a horizontal list on the bottom of the screen. On Android devices, by default, they appear as 'upside-down' tabs at the top of the screen, as shown in the next screenshot:
The complete source code for this recipe can be found in the /Chapter 1/Recipe 2 folder.
We are going to create two separate Windows—one of these will be defined in-line and the other Window will be loaded from an external JavaScript file called window2.js. Before writing any code, create a new JavaScript file called window2.js and save it to your Resources directory—the same folder where your app.js currently resides.
If you have been following along with the LoanCalc app so far, then delete the current code we created and replace it with the source below:
//create tab group
var tabGroup = Ti.UI.createTabGroup();

//create the window
var win1 = Titanium.UI.createWindow({
  width: 320,
  height: 480,
  top: 0,
  left: 0,
  backgroundImage: 'background.png',
  title: 'Loan Calculator',
  barImage: 'navbar.png'
});

//create the view, this will hold all of our UI controls
//note the height of this view is the height of the window //minus 134px for the status bar and padding and adjusted for //navbar
var view = Titanium.UI.createView({
  width: 300,
  height: win1.height - 134,
  left: 10,
  top: 10,
  backgroundColor: '#fff',
  borderRadius: 5
});

//we will give the logo a left margin so it centers neatly //within our view
var _logoMarginLeft = (view.width - 253) / 2;

//now let's add our logo to an imageview and add that to our //view object
var logo = Titanium.UI.createImageView({
  image: 'logo.png',
  width: 253,
  height: 96,
  left: _logoMarginLeft,
  top: 0
});
view.add(logo);

//add the view to our window
win1.add(view);

//add the first tab and attach our window object (win1) to it
var tab1 = Ti.UI.createTab({
    icon:'icon_calculator.png',
    title:'Calculate',

    window: win1
});

//create the second window for settings tab
var win2 = Titanium.UI.createWindow({
  width: 320,
  height: 480,
  top: 0,
  left: 0,
  backgroundImage: 'background.png',
  url: 'window2.js',
  title: 'Settings',
  barImage: 'navbar.png'
});

//add the second tab and attach our external window object //(win2 / window2.js) to it
var tab2 = Ti.UI.createTab({
    icon:'icon_settings.png',
    title:'Settings',
    window: win2
});

//now add the tabs to our tabGroup object
tabGroup.addTab(tab1);
tabGroup.addTab(tab2);

//finally, open the tabgroup to launch the app
tabGroup.open();Logically, it is important to realize that the TabGroup, when used, is the root of the application and cannot be included from any other UI component. Each Tab within the TabGroup is essentially a wrapper for a single Window that can either be defined in-line or by providing the location of an external JavaScript file using the url property. These Windows are loaded only when that Tab gains focus for the first time, normally via the user tapping the Tab icon to gain focus to that particular Window.
The Tab icon is loaded from an image file, generally a PNG, but it's important to note that in both Android and the iPhone, all icons will be rendered in greyscale with alpha transparency—any color information will be discarded when you run the application.
Apple can be particularly picky when it comes to using icons in your apps. Whenever a standard icon has been defined by Apple (such as the gears icon for settings) you should use the same.
A great set of additional 200 free tab bar icons are available at: http://glyphish.com.
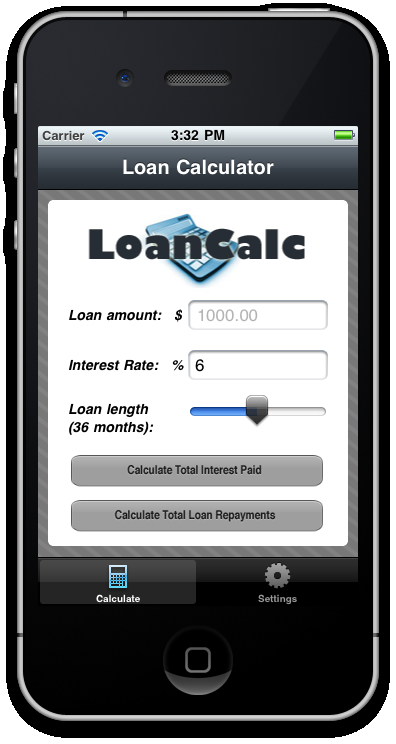
Whether it's for presenting text content to the screen, identifying an input field, or displaying data within a TableRow, Labels are one of the cornerstone UI elements that you'll find yourself using all of the time with Titanium. Through them, you will display the majority of your information to the user, so it is important to know how to create and format them properly.
In this recipe we will create three different labels, one for each input component that we will be adding to our app later on. Using these examples, we will explain how to position your label, give it a text value, and format it.
The complete source code for this recipe can be found in the /Chapter 1/Recipe 3 folder.
Open up your app.js file and begin by putting the following two variables at the top of your code file, directly under the TabGroup creation declaration. These are going to be the default values for our interest rate and loan length for the app:
//application variables
var numberMonths = 36; //loan length
var interestRate = 6.0; //interest rate
Let's create labels to identify the input fields we will be implementing later on. Type in the following source code in your app.js file. If you are following along with the LoanCalc sample app, this code should go after your ImageView logo which was added to the View from the previous recipe:
//create a label to identify the textfield to the user
var labelAmount = Titanium.UI.createLabel({
    width: 'auto',
    height: 30,
    top: 100,
    left: 20,
    font: {fontSize: 14, fontFamily: 'Helvetica',
          fontWeight:'bold'},},
    text: 'Loan amount:   $'
});
view.add(labelAmount);

//create a label to identify the textfield to the user
var labelInterestRate = Titanium.UI.createLabel({
    width: 'auto',
    height: 30,
    top: 150,
    left: 20,
    font: {fontSize: 14, fontFamily: 'Helvetica',
          fontWeight: 'bold'},
    text: 'Interest Rate:  %'
});
view.add(labelInterestRate);

//create a label to identify the textfield to the user
var labelLoanLength = Titanium.UI.createLabel({
    width: 100,
    height: 'auto',
    top: 200,
    left: 20,
    font: {fontSize: 14, fontFamily: 'Helvetica',
          fontWeight: 'bold'},
    text: 'Loan length (' + numberMonths + ' months):'
});

view.add(labelLoanLength);You should notice a trend by now in the way that Titanium instantiates objects and adds them to Views/Windows, as well as a trend in the way formatting is applied to most basic UI elements using the JavaScript object properties. Margins and padding are added using the absolute positioning values of top and left, while font styling is done with the standard CSS font properties; fontSize, fontFamily and fontWeight in the case of our example code.
A couple of important points to note:
The
widthproperty of our first two labels is set toauto, which means Titanium will automatically calculate the width of the Label depending on the content inside (a string value in this case). Thisautoproperty can be used for both the width and height of many other UI elements as well (as you can see in the third label we created which has a dynamic height to match the Label's text). When no height or width properties are specified, the UI component will assume the exact dimensions of the parent view or window that encloses it.The
textAlignproperty of the labels works the same way you'd expect it to in HTML. However, you will only notice the alignment of the text if the width of your label is not set toauto, unless that Label happens to spread over multiple lines.
TextFields in Titanium are single-line textboxes used for capturing user input via the keyboard and usually form the most common UI element for user input in any application, along with Labels and Buttons. In this recipe we'll show you how to create a TextField, add it to your application's View, and use it to capture user input. We will style our TextField component by using a Constant value for the first time.
The complete source code for this recipe can be found in the /Chapter 1/Recipe 4 folder.
Type in the following code after the View is created but before we add that view to our Window. If you have been following along from the previous recipe, this code should be entered after your Labels were created:
//creating the textfield for our loan amount input
var tfAmount = Titanium.UI.createTextField({
  width: 140,
  height: 30,
  top: 100,
  right: 20,
   borderStyle:Titanium.UI.INPUT_BORDERSTYLE_ROUNDED,
   returnKeyType:Titanium.UI.RETURNKEY_DONE,
  hintText: '1000.00'
});
view.add(tfAmount);

//creating the textfield for our percentage interest
//rate input
var tfInterestRate = Titanium.UI.createTextField({
  width: 140,
  height: 30,
  top: 150,
  right: 20,
   borderStyle:Titanium.UI.INPUT_BORDERSTYLE_ROUNDED,
   returnKeyType:Titanium.UI.RETURNKEY_DONE,
  value: interestRate
});

view.add(tfInterestRate);In this example, we are creating a couple of basic TextFields with a rounded border style and introducing some new property types that don't appear in Labels and ImageViews including hintText. The hintText property displays a value in the TextField that disappears when that TextField has focus (for example, when a user taps it to enter some data using their keyboard).
The user input is available in the TextField's property called value. As you will note in the previous recipe, accessing this value is simply a case of assigning it to a variable (that is var myName = txtFirstName.value), or alternatively using the value property directly.
TextFields are one of the most common components in any application, and in Titanium, there are a couple of points and options to consider whenever using them.
It is important to note that when you want to retrieve the text a user has typed into a TextField, you need to reference the value property and not text, like many of the other string-based controls!
Try experimenting with other TextField border styles to give your app a different appearance. Other possible values are:
Titanium.UI.INPUT_BORDERSTYLE_BEZEL
Titanium.UI.INPUT_BORDERSTYLE_LINE
Titanium.UI.INPUT_BORDERSTYLE_NONE
Titanium.UI.INPUT_BORDERSTYLE_ROUNDED
When a TextField or TextArea control gains focus in either the iPhone or Android, the default keyboard is what springs up onto the screen. However, there will be times when you wish to change this behavior example, you may only want to have the user input numeric characters into a TextField when they are providing a numerical amount (such as their age, or a monetary value). Additionally, Keyboard Toolbars can be created to appear above the keyboard itself, which will allow you to provide the user with other options such as removing the keyboard from the Window, or allowing copy/paste operations via a simple button tap.
In the following recipe, we are going to create a toolbar that contains both a system button, and another system component called FlexibleSpace. These will be added to the top of our numeric keyboard which will appear whenever the TextField for amount or interest rate gains focus. Note that in this example we have updated the tfAmount and tfInterestRate TextField objects to now contain keyboardType and returnKeyType properties.
Note that toolbars are iPhone-specific, and that they may not be available for Android in the current Titanium SDK.
Open up your app.js file and type in the following code. If you have been following along from the previous recipe, this code should replace the previous recipe's code for adding the amount and interest rate TextFields:
//flexible space for button bars
var flexSpace = Titanium.UI.createButton({
  systemButton:Titanium.UI.iPhone.SystemButton.FLEXIBLE_SPACE
});

//done system button
var buttonDone = Titanium.UI.createButton({
    systemButton:Titanium.UI.iPhone.SystemButton.DONE,
	 bottom: 0
});

//add the event listener 'click' event to our done button
buttonDone.addEventListener('click', function(e){
    tfAmount.blur();
   tfInterestRate.blur();
   tfInterestRate.top = 150;
   labelInterestRate.top = 150;
   interestRate = tfInterestRate.value;
   tfAmount.visible = true;
   labelAmount.visible = true;
});

//creating the textfield for our loan amount input
var tfAmount = Titanium.UI.createTextField({
   width: 140,
   height: 30,
   top: 100,
   right: 20,
    borderStyle:Titanium.UI.INPUT_BORDERSTYLE_ROUNDED,
    returnKeyType:Titanium.UI.RETURNKEY_DONE,
   hintText: '1000.00',
   keyboardToolbar: [flexSpace,buttonDone],
    keyboardType:Titanium.UI.KEYBOARD_PHONE_PAD
});
view.add(tfAmount);
//creating the textfield for our percentage interest rate //input
var tfInterestRate = Titanium.UI.createTextField({
   width: 140,
   height: 30,
   top: 150,
   right: 20,
    borderStyle:Titanium.UI.INPUT_BORDERSTYLE_ROUNDED,
    returnKeyType:Titanium.UI.RETURNKEY_DONE,
   value: interestRate,
   keyboardToolbar: [flexSpace,buttonDone],
    keyboardType:Titanium.UI.KEYBOARD_PHONE_PAD
});

//if the interest rate is focused change its top value so we //can see it (only for the iphone platform though!)
tfInterestRate.addEventListener('focus', function(e){
  if(Ti.Platform.osname == 'iphone') {
    tfInterestRate.top = 100;
    labelInterestRate.top = 100;
    tfAmount.visible = false;
    labelAmount.visible = false;
  }
});
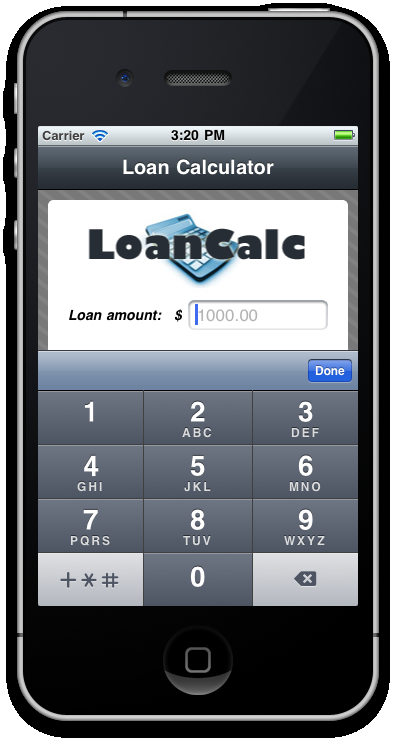
view.add(tfInterestRate);In this recipe we are creating a TextField and adding it to our View. By now, you should have noticed how many properties are universal among the different UI components; width, height, top, and right are just four that are used in our TextField called tfAmount that have been used in previous recipes for other components. Many touch screen phones do not have physical keyboards; instead we are using a touch screen keyboard to gather our input data. Depending on the data you require, you may not need a full keyboard with all of the QWERTY keys and may want to just display a numeric keyboard (as seen in the following screenshot); such as when you were using the telephone dialling features on your iPhone or Android device. Additionally, you may require the QWERTY keys but in a specific format; custom keyboards make user input quicker and less frustrating for the user by presenting custom options such as keyboards for inputting web addresses and emails with all of the 'www' and '@' symbols in convenient touch locations.
Try experimenting with other Keyboard styles in your Titanium app!
Sliders and Switches are two UI components that are simple to implement and can bring an extra level of interactivity to your apps. Switches, as the name suggests, have only two states—on and off—which are represented by Boolean values (true and false).
Sliders, on the other hand, take two float values, a minimum and maximum, and allow the user to select any number between and including these two values. In addition to it's default styling, the Slider API also allows you to use images for both sides of the 'track' and the 'slider thumb' image that runs along it. This allows you to create some truly customised designs.
We are going to add a Switch to indicate an on/off state and a Slider to hold the loan length, with values ranging from a minimum of 6 to a maximum of 72 months. Also, we'll add some event handlers to capture the changed value from each component, and in the case of the Slider, update an existing Label with the new Slider value. Don't worry if you aren't 100 percent sure about how event handlers work yet, as we will explain this in further detail in Chapter 6, Getting To Grips With Events & Properties.
The complete source code for this recipe can be found in the /Chapter 1/Recipe 6 folder.
If you are following with the LoanCalc app, the code below should be placed into your window2.js file for the Switch. We'll also add in a label to identify what the Switch component does and a View component to hold it all together:
//reference the current window
var win1 = Titanium.UI.currentWindow;

//create the view, this will hold all of our UI controls
var view = Titanium.UI.createView({
  width: 300,
  height: 70,
  left: 10,
  top: 10,
  backgroundColor: '#fff',
  borderRadius: 5
});

//create a label to identify the switch control to the user
var labelSwitch = Titanium.UI.createLabel({
    width: 'auto',
    height: 30,
    top: 20,
    left: 20,
    font: {fontSize: 14, fontFamily: 'Helvetica',
          fontWeight: 'bold'},
    text: 'Auto Show Chart?'
});
view.add(labelSwitch);

//create the switch object
var switchChartOption = Titanium.UI.createSwitch({
  right: 20,
  top: 20,
  value: false
});
view.add(switchChartOption);


win1.add(view);
Now, let's write Slider code. Go back to your app.js file and type in the following code underneath the line view.add(tfInterestRate);:
//create the slider to change the loan length
var lengthSlider = Titanium.UI.createSlider({
  width: 140,
  top: 200,
  right: 20,
  min: 12,
  max: 60,
  value: numberMonths,
  thumbImage: 'sliderThumb.png',
  selectedThumbImage: 'sliderThumbSelected.png',
  highlightedThumbImage: 'sliderThumbSelected.png'
});

lengthSlider.addEventListener('change', function(e){
  //output the value to the console for debug
   Ti.API.info(lengthSlider.value);
   //update our numberMonths variable
  numberMonths = Math.round(lengthSlider.value);
   //update label
  labelLoanLength.text = 'Loan length (' + Math.round(numberMonths) + ' months):';
});
view.add(lengthSlider);In this recipe we are adding two new components to two separate Views within two separate Windows. The first component, a Switch, is fairly straight forward, and apart from the standard layout and positioning properties, takes one main Boolean value to determine its on or off status. It also has only the one event, change, which is executed whenever the Switch changes from the on to off position or vice versa.
On the Android platform, the Switch can be altered to appear as a toggle button (default) or as a checkbox. Additionally, Android users can also display a text label using the title property, which can be changed programmatically using the titleOff and titleOn properties.
The Slider component is more interesting and has many more properties than a Switch. Sliders are useful in instances where you want to allow the user to choose between a range of values, in our case, a numeric range of months from 12 to 60. For instance, this is a much more effective method of choosing a number from a range than it would be to list all of the possible options in a Picker, and a much safer way than letting a user enter in possibly invalid values via a TextField or TextArea component.
Pretty much all of the Slider can be styled using the default properties available in the Titanium API, including thumbImage, selectedThumbImage, and highlightedThumbImage as we have done in this recipe. The highlightedThumbImage works similar to how you might be used to in CSS. The image for the thumbnail in this case changes only when a user taps and holds on to the component in order to change its value.
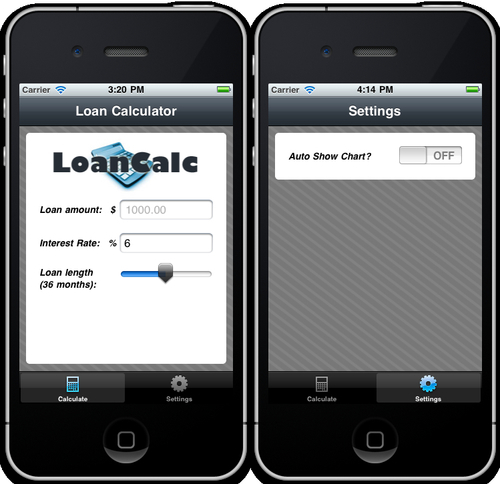
You will often find a need to pass variables and objects between different screen objects, such as Windows, in your apps. One example is between a master and child view. For example, if you have a tabular list of data that perhaps only shows a small amount of information per row and you wish to view the full description, you might pass that description data as a variable to the child window.
In this recipe, we are going to apply that same principle to a variable on the settings window (in the second tab of our LoanCalc app), by setting the variable in one window and then passing it back for use in our main window.
The complete source code for this recipe can be found in the /Chapter 1/Recipe 7 folder.
Under the declaration for your second window (win2) in your app.js file, add the following additional property called autoShowChart and set it to false. This is a custom property, that is, a property not already defined by the Titanium API. It is often handy to add additional properties to your objects if you require certain parameters that the API does not provide by default:
//
//////set the initial value of win2's custom property
win2.autoShowChart = false;
Now in the window2.js file that holds all of the sub components for your second window, add the following code extending the existing Switch control so it can update the referenced window's autoShowChart variable:
//create the switch object
var switchChartOption = Titanium.UI.createSwitch({
  right: 20,
  top: 20,
  value: false
});

//add the event listener for the switch when it changes
switchChartOption.addEventListener('change', function(e){
  win2.autoShowChart = switchChartOption.value;
});

//add the switch to the view
view.add(switchChartOption);This code is actually pretty straightforward. When an object is created in Titanium, all of the standard properties are accessible in a dictionary object of key-value pairs. All we are doing here is extending that dictionary object to add a property of our own.
We can do this in one of the two ways. First, as shown in our recipe's source code this can be done after the instantiation of the Window (win2) object. Second, it can also be done immediately within the instantiation code. In the source code of the second window, we are simply referencing this same object, so all of its properties are already available for us to read from and write to.
In any given app, you will find that creating buttons and capturing their click events is one of the most common tasks you will do. This recipe will show you how to declare a Button control in Titanium and attach the click event to it. Within that click event, we will perform a task and log it to the Info window in Titanium Studio.
This recipe will also demonstrate how to implement some of the default styling mechanisms available to you via the API.
The complete source code for this recipe can be found in the /Chapter 1/Recipe 8 folder.
Open up your app.js file and type in the following code. If you're following along with the LoanCalc app, this code should go after you created and added the TextField controls to the View:
//calculate the interest for this loan button
var buttonCalculateInterest = Titanium.UI.createButton({
   image: 'calculateInterestButton.png',
  id: 1,
  top: 255,
  width: 252,
  height: 32,
  left: 23
});

//add the event listener
buttonCalculateInterest.addEventListener('click', calculateAndDisplayValue);

//add the first button to our view
view.add(buttonCalculateInterest);

//calculate the interest for this loan button
var buttonCalculateRepayments = Titanium.UI.createButton({
   image: 'calculateRepaymentsButton.png',
  id: 2,
  top: 300,
  width: 252,
  height: 32,
  left: 23
});

//add the event listener
buttonCalculateRepayments.addEventListener('click',
                          calculateAndDisplayValue);

//add the second and final button to our view
view.add(buttonCalculateRepayments);
Now that we have created our two buttons and added their event listeners, let's extend the calculateAndDisplayValue() function to do some simple fixed interest mathematics and produce the results that we will log to the Titanium Studio console:
//add the event handler which will be executed when either of //our calculation buttons are tapped
function calculateAndDisplayValue(e)
{
   //log the button id so we can debug which button was tapped
  Ti.API.info('Button id = ' + e.source.id);

    if (e.source.id == 1)
    {
       //Interest (I) = Principal (P) times Rate Per Period
       //(r) times Number of Periods (n) / 12
       var totalInterest = (tfAmount.value * (interestRate /
       100) * numberMonths) / 12;

      //log result to console
      Ti.API.info(totalInterest);
    }
    else
    {
      //Interest (I) = Principal (P) times Rate Per Period (r)
      //times Number of Periods (n) / 12
      var totalInterest = (tfAmount.value * (interestRate /
      100) * numberMonths) / 12;

      var totalRepayments = Math.round(tfAmount.value) +
      totalInterest;

      //log result to console
      Ti.API.info(totalRepayments);
    }

} //end functionMost controls in Titanium are capable of firing one or more events, such as focus, onload, or as in our recipe, click. The click event is undoubtedly the one you will use more often than any other. In the previous source code, you'll note that in order to execute code from this event we are adding an event listener to our button, which has a signature of 'click'. This signature is a string and forms the first part of our event listener, the second part is the executing function for the event.
It's important to note that other component types can also be used in a similar manner. For example, an ImageView could be declared which contains a custom button image, and could have a click event attached to it in exactly the same way a regular button can.
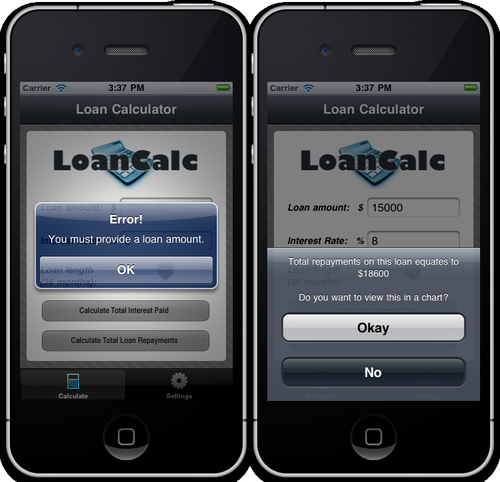
There are a number of dialogs available for you to use in the Titanium API, but for the purposes of this recipe we will be concentrating on the two main ones—the AlertDialog and the OptionDialog. These two simple components perform two similar roles, but with a key difference. The AlertDialog is normally only used to show the user a message, while the OptionDialog shows the user a message plus requires a response from them from a number of buttons. Generally, an AlertDialog only allows two standard responses from the user, OK or Cancel, whereas the OptionDialog can contain many more.
There are also key differences in the layout of these two dialog components which will become obvious in the recipe below.
The complete source code for this recipe can be found in the /Chapter 1/Recipe 9 folder.
First, we'll create an AlertDialog that simply notifies the user of an action that cannot be completed due to missing information—in our case, they have not provided a value for the loan amount in the tfAmount TextField:
if (tfAmount.value == '' || tfAmount.value == null)
{
    var errorDialog = Titanium.UI.createAlertDialog({
      title: 'Error!',
      message: 'You must provide a loan amount.'
    });
    errorDialog.show();
}
}
Now let's add the OptionDialog. The OptionDialog is going to display the result from our calculation and then give the user the choice to view the results as a Pie Chart (in a new window) or alternatively to cancel and remain on the same screen:
//check our win2 autoShowChart boolean value first (coming //from the switch on window2.js)
if (win2.autoShowChart == true)
{
   openChartWindow();
 }
 else
 {
	var resultOptionDialog = Titanium.UI.createOptionDialog({
				title: optionsMessage + '\n\nDo you want to
                  view this in a chart?',
				options: ['Okay', 'No'],
				cancel: 1
	});

  //add the click event listener to the option dialog
  resultOptionDialog.addEventListener('click', function(e){
		Ti.API.info('Button index tapped was: ' + e.index);
		if (e.index == 0)
      {
		   openChartWindow();
		}
  });

  resultOptionDialog.show();

} //end ifThe AlertDialog is a very simple component that simply presents the user with a message as a modal and only has one possible response which closes the alert. Note that you should be careful not to call an AlertDialog more than once while a pending alert is still visible, for example, if you're calling that alert from within a loop.
The OptionDialog is a much larger modal component that presents a series of buttons with a message from the bottom of the screen and is generally used to allow the user to pick from a selection of more than one item. In our code, the resultOptionDialog presents the user with a choice of two options—"Okay" or "No". One interesting property on this dialog is cancel, which dismisses the dialog without firing the click event and also styles the button at the requested index in a manner that differentiates it from the rest of the group of buttons.
Just like the Window object, both of these dialogs are not added to another View but are presented by calling the show() method instead. You should only call the show() method after the dialog has been properly instantiated and any event listeners have been created.
The following screenshots show the difference between the AlertDialog and Option Dialog respectively:
Let's perform one final task for this application and for our first chapter; displaying charts and graphs. Titanium is without a native charting API, however, there are some open source options for implementing charts such as Google Charts. While the Google solution is free, it requires your apps to be online every time you need to generate a chart. This might be okay for some circumstances, but it's not the best solution for any application that is meant to be used offline. Plus, Google Charts returns a generated JPG or PNG file at the requested size and in a rasterized format which is not great for zooming in when viewed on an iPhone or iPad.
A better solution is to use the open source and MIT licensed Raphael library which, luckily for us, has a charting component! Not only is it free, but Raphael is also completely vector based, meaning any charts you create will look great on any resolution, and can be zoomed in without a loss of quality.
Note
Note that this recipe may not work on all Android devices as the current version of Raphael is not supported by non-webkit mobile browsers. However, it will work as described here for the iPhone and iPod Touch.
Download the main Raphael JS library from http://raphaeljs.com (Direct link: http://github.com/DmitryBaranovskiy/raphael/raw/master/raphael-min.js).
Download the main Charting library from http://g.raphaeljs.com (Direct link: http://github.com/DmitryBaranovskiy/g.raphael/blob/master/g.raphael-min.js?raw=true) and any other charting libraries you wish to use.
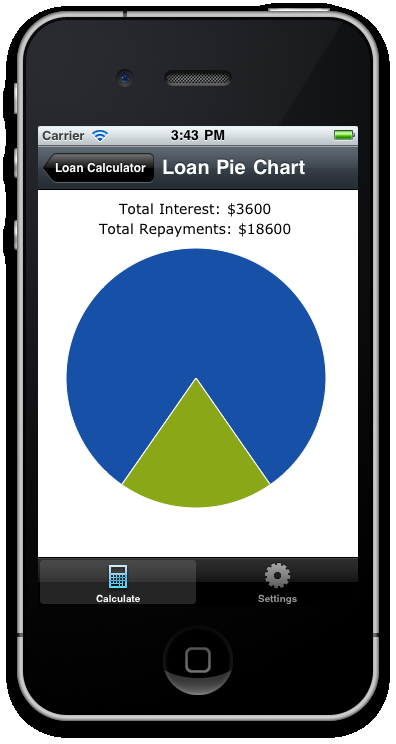
For this example, we are implementing the Pie Chart, which is here: http://github.com/DmitryBaranovskiy/g.raphael/blob/master/g.pie-min.js?raw=true.
Create a new project in Titanium Studio (or alternatively, if you're following along with the LoanCalc example app, then open your project directory), and put your downloaded files into a new folder called charts under your Resources directory. You could put them into the root folder if you wish, but bear in mind, you'd need to ensure your references in the following steps are correct.
The next step is to rename your
raphael-min.jsfile toraphael-min.lib. The main reason is that if your file is a known JavaScript file (as in it ends in '.js'), the JSLint validator in Titanium will try to validate the Raphael JS library and fail, causing Titanium to lock up. This means you won't be able to run your app and will need to restart Titanium Studio!Create a WebView in your app, referencing a variable holding the HTML code to display a Raphael chart, which we will call chartHTML. A WebView is a UI component that allows you to display web pages or HTML in your application. It does not include any features of a fully-fledged browser such as navigation controls or an address bar. Type in the following code at the top of your
chartwin.jsfile, just after you have included the charting library and created titles for the chart view:var chartWin = Titanium.UI.currentWindow; //include the chart library Titanium.include('charts/chart.js'); //create the chart title using the variables we passed in from //app.js (our first window) var chartTitleInterest = 'Total Interest: $' + chartWin.totalInterest; var chartTitleRepayments = 'Total Repayments: $' + chartWin.totalRepayments; //create the chart using the sample html from the //raphaeljs.com website var chartHTML = '<html><head> <title>RaphaelJS Chart</title><meta name="viewport" content="width=device-width, initial-scale=1.0"/> <script src="charts/raphael.js.lib" type="text/javascript" charset="utf-8"></script> <script src="charts/g.raphael-min.lib" type="text/javascript" charset="utf-8"></script> <script src="charts/g.pie-min.lib" type="text/javascript" charset="utf-8"></script> <script type="text/javascript" charset="utf-8"> window.onload = function () { var r = Raphael("chartDiv"); r.g.txtattr.font = "12px Verdana, Tahoma, sans-serif"; r.g.text(150, 10, "'; chartHTML = chartHTML + chartTitleInterest + '").attr({"font-size": 14}); r.g.text(150, 30, "' + chartTitleRepayments + '").attr({"font-size": 14});'; chartHTML = chartHTML + ' r.g.piechart(150, 180, 130, [' + Math.round(chartWin.totalInterest) + ',' + Math.round(chartWin.principalRepayments) + ']); }; </script> </head><body> <div id="chartDiv" style="width:320px; height: 320px; margin: 0"></div> </body></html>'; //add a webview to contain our chart var webview = Titanium.UI.createWebView({ width: 320, height: 367, top: 0, html: chartHTML }); chartWin.add(webview);Now back in your
app.jsfile, create a new function calledopenChartWindow()which will be executed when the user chooses "Okay" from the previous recipe's option dialog. This function will create a new Window object based on thechartwin.jsfile and pass to it the values needed to show the chart://we'll call this function if the user opts to view the loan //chart function openChartWindow(totalInterest, total) { //Interest (I) = Principal (P) times Rate Per Period (r) //times Number of Periods (n) / 12 var totalInterest = (tfAmount.value * (interestRate / 100) * numberMonths) / 12; var totalRepayments = Math.round(tfAmount.value) + totalInterest; var chartWindow = Titanium.UI.createWindow({ url: 'chartwin.js', title: 'Loan Pie Chart', barImage: 'navbar.png', barColor: '#000', numberMonths: numberMonths, interestRate: interestRate, totalInterest: totalInterest, totalRepayments: totalRepayments, principalRepayments: (totalRepayments - totalInterest) }); tab1.open(chartWindow); }
Essentially what we are doing here is wrapping the Raphael library, something that originally was built for the desktop browser, into a format that can be consumed and displayed using the iPhone's WebKit browser. Raphael was originally created to simplify vector graphics generation on the web and was extended later on as gRaphael in order to render both static and interactive charts.
There is a series of documentation on Raphael at http://raphaeljs.com and http://g.raphaeljs.com on how it renders charts via its JavaScript library. We will not be explaining this in detail but rather the implementation of the library to work with Titanium.
Our implementation consists firstly of including the charts.js library from Raphael into our Titanium project. This is the main source file used by the library. From there, we are creating a new type of component, a WebView, which will (in this case) hold the HTML data that we constructed in the variable chartHTML. This HTML data contains all of the includes necessary to render the charts, which are listed in item #2 of the Getting Ready section of this recipe. If you had a chart with static data, you could also reference the HTML from a file using the url property of the WebView object instead of passing in all of the HTML as a string. The chart itself is created using some simple JavaScript embedded in HTML data string, r.g.piechart(150, 180, 130, n1, n2), where n1 and n2 are the two values we wish to display as slices in the Pie Chart. The other values define the center point of the chart from the top and left respectively, followed by the chart radius.
All of this is wrapped up in a new Window defined by the chartwin.js file, which accesses properties passed in from the first tab's Window in our LoanCalc app. This data is passed using exactly the same mechanism as explained in the previous "Passing Custom Variables Between Windows" recipe.
The following screenshot shows the Raphael JS Library being used to show a pie chart based on our loan data: