


In this chapter, we will set up Spark and configure it. This chapter contains the following recipes:
- Leveraging Databricks Cloud
- Deploying Spark using Amazon EMR
- Installing Spark from binaries
- Building the Spark source code with Maven
- Launching Spark on Amazon EC2
- Deploying Spark on a cluster in standalone mode
- Deploying Spark on a cluster with Mesos
- Deploying Spark on a cluster with YARN
- Understanding SparkContext and SparkSession
- Understanding Resilient Distributed Datasets (RDD)
Apache Spark is a general-purpose cluster computing system to process big data workloads. What sets Spark apart from its predecessors, such as Hadoop MapReduce, is its speed, ease of use, and sophisticated analytics.
It was originally developed at AMPLab, UC Berkeley, in 2009. It was made open source in 2010 under the BSD license and switched to the Apache 2.0 license in 2013. Toward the later part of 2013, the creators of Spark founded Databricks to focus on Spark's development and future releases.
Databricks offers Spark as a service in the Amazon Web Services(AWS) Cloud, called Databricks Cloud. In this book, we are going to maximize the use of AWS as a data storage layer.
Talking about speed, Spark can achieve subsecond latency on big data workloads. To achieve such low latency, Spark makes use of memory for storage. In MapReduce, memory is primarily used for the actual computation. Spark uses memory both to compute and store objects.
Spark also provides a unified runtime connecting to various big data storage sources, such as HDFS, Cassandra, and S3. It also provides a rich set of high-level libraries for different big data compute tasks, such as machine learning, SQL processing, graph processing, and real-time streaming. These libraries make development faster and can be combined in an arbitrary fashion.
Though Spark is written in Scala--and this book only focuses on recipes on Scala--it also supports Java, Python, and R.
Spark is an open source community project, and everyone uses the pure open source Apache distributions for deployments, unlike Hadoop, which has multiple distributions available with vendor enhancements.
The following figure shows the Spark ecosystem:

Spark's runtime runs on top of a variety of cluster managers, including YARN (Hadoop's compute framework), Mesos, and Spark's own cluster manager called Standalone mode. Alluxio is a memory-centric distributed file system that enables reliable file sharing at memory speed across cluster frameworks. In short, it is an off-heap storage layer in memory that helps share data across jobs and users. Mesos is a cluster manager, which is evolving into a data center operating system. YARN is Hadoop's compute framework and has a robust resource management feature that Spark can seamlessly use.
Apache Spark, initially devised as a replacement of MapReduce, had a good proportion of workloads running in an on-premises manner. Now, most of the workloads have been moved to public clouds (AWS, Azure, and GCP). In a public cloud, we see two types of applications:
- Outcome-driven applications
- Data transformation pipelines
For outcome-driven applications, where the goal is to derive a predefined signal/outcome from the given data, Databricks Cloud fits the bill perfectly. For traditional data transformation pipelines, Amazon's Elastic MapReduce (EMR) does a great job.
Databricks is the company behind Spark. It has a cloud platform that takes out all of the complexity of deploying Spark and provides you with a ready-to-go environment with notebooks for various languages. Databricks Cloud also has a community edition that provides one node instance with 6 GB of RAM for free. It is a great starting place for developers. The Spark cluster that is created also terminates after 2 hours of sitting idle.
Note
All the recipes in this book can be run on either the InfoObjects Sandbox or Databricks Cloud community edition. The entire data for the recipes in this book has also been ported to a public bucket called sparkcookbook on S3. Just put these recipes on the Databricks Cloud community edition, and they will work seamlessly.

- Click on
Sign Up:

- Choose
COMMUNITY EDITION

- Fill in the details and you'll be presented with a landing page, as follows:

- Click on
Clusters, thenCreate Cluster(showing community edition below it):

- Enter the cluster name, for example,
myfirstcluster, and choose Availability Zone (more about AZs in the next recipe). Then click onCreate Cluster:

- Once the cluster is created, the blinking green signal will become solid green, as follows:

- Now go to
Homeand click onNotebook. Choose an appropriate notebook name, for example,config, and chooseScalaas the language:

- Then set the AWS access parameters. There are two access parameters:
ACCESS_KEY: This is referred to asfs.s3n.awsAccessKeyIdin SparkContext's Hadoop configuration.SECRET_KEY: This is referred to asfs.s3n.awsSecretAccessKeyin SparkContext's Hadoop configuration.
- Set
ACCESS_KEYin theconfignotebook:
        sc.hadoopConfiguration.set("fs.s3n.awsAccessKeyId", "<replace
with your key>")- Set
SECRET_KEYin theconfignotebook:
        sc.hadoopConfiguration.set("fs.s3n.awsSecretAccessKey","
<replace with your secret key>")- Load a folder from the
sparkcookbookbucket (all of the data for the recipes in this book are available in this bucket:
        val yelpdata =
spark.read.textFile("s3a://sparkcookbook/yelpdata")- The problem with the previous approach was that if you were to publish your notebook, your keys would be visible. To avoid the use of this approach, use Databricks File System (DBFS).
Note
DBFS is Databricks Cloud's internal file system. It is a layer above S3, as you can guess. It mounts S3 buckets in a user's workspace as well as caches frequently accessed data on worker nodes.
- Set the access key in the Scala notebook:
val accessKey = "<your access key>"- Set the secret key in the Scala notebook:
val secretKey = "<your secret key>".replace("/","%2F")- Set the bucket name in the Scala notebook:
val bucket = "sparkcookbook"- Set the
mountname in the Scala notebook:
val mount = "cookbook"- Mount the bucket:
        dbutils.fs.mount(s"s3a://$accessKey:$secretKey@$bucket",
s"/mnt/$mount")- Display the contents of the bucket:
display(dbutils.fs.ls(s"/mnt/$mount"))Let's look at the key concepts in Databricks Cloud.
The concept of clusters is self-evident. A cluster contains a master node and one or more slave nodes. These nodes are EC2 nodes, which we are going to learn more about in the next recipe.
Notebook is the most powerful feature of Databricks Cloud. You can write your code in Scala/Python/R or a simple SQL notebook. These notebooks cover the whole 9 yards. You can use notebooks to write code like a programmer, use SQL like an analyst, or do visualization like a Business Intelligence (BI) expert.
There is a reason why deploying Spark on Amazon EMR is added as one of the first recipes in this edition of the book. The majority of the production deployments of Spark happen on EMR (in fact, the majority, and increasingly so, big data deployments happen on EMR). If you understand this recipe well, you may skip the rest of the recipes in this chapter, unless you are doing an on-premises deployment.
Note
Since this topic is of paramount importance in the current context, a lot more theory is being provided than what a typical cookbook would have. You can skip the theory section and directly go to the How to do it.. section, but I encourage you not to do so.
What EMR represents is far more than meets the eye. Most of the enterprise workloads are migrating to public clouds at an accelerated pace. Once migrated, these workloads get rearchitected to leverage cloud-based services as opposed to simply using it as Infrastructure as a Service (IaaS). EC2 is an IaaS compute service of AWS, while EMR is the leading Platform as a Service (PaaS) service of AWS, with more big data workloads running on EMR than the alternatives combined.
Hadoop's core feature is data locality, that is, taking compute to where the data is. AWS disrupts this concept by separating storage and compute. AWS has multiple storage options, including the following:
- Amazon S3: S3 is general-purpose object storage.
- Amazon Redshift: This is a distributed cloud data warehouse.
- Amazon DynamoDB: This is a NoSQL database.
- Amazon Aurora: This is a cloud-based relational database.
Amazon S3 is the cheapest and most reliable cloud storage available, and this makes it the first choice, unless there is a compelling reason not to do so. EMR also supports attaching elastic block storage (EBS) volumes to compute instances (EC2) in order to provide a lower latency option.
Which option to choose depends upon what type of cluster is being created. There are two types of clusters:
- Persistent cluster: It runs 24 x 7. Here, there is a continuous analysis of data for use cases such as fraud detection in the financial industry or clickstream analytics in ad tech. For these purposes, HDFS mounted on EBS is a good choice.
- Transient cluster: Here, workloads are run inconsistently, for example, genome sequencing or holiday surge in retail. In this case, the cluster is only spawned when needed, making Elastic Map Reduce File System (EMRFS) based on S3 a better choice.
- Log in to https://aws.amazon.com with your credentials.
- Click on
Servicesand select/search for EMR:

- Click on
Create clusterand select the last option in theApplicationsoption box:

- Click on
Create Clusterand the cluster will start as follows:

- Once the cluster is created with the given configuration, the
My Clusterstatus will change toWaiting, as shown in the following screenshot:

- Now add a step to select the JAR file; it takes the input file from the S3 location and produces the output file and stores it in the desired S3 bucket:

- The wordcount step's status will change to completed, indicating a successful completion of the step, as shown in the following screenshot:

- The output will be created and stored in the given S3 location. Here, it is in the output folder under the
io.playgroundbucket:

Let's look at the options shown in step 3:
- Cluster name: This is where you provide an appropriate name for the cluster.
- S3 folder: This is the folder location where the S3 bucket's logs for this cluster will go to.
- Launch mode:
- Cluster: The cluster will continue to run until you terminate it.
- Step execution: This is to add steps after the application is launched.
- Software configuration:
- Vendor: This is Amazon EMI with the open source Hadoop versus MapR's version.
- Release: This is self-evident.
- Applications:
- Core Hadoop: This is focused on the SQL interface.
- HBase: This is focused on partial no-SQL-oriented workloads.
- Presto: This is focused on ad-hoc query processing.
- Spark: This is focused on Spark.
- Hardware configuration:
- Instance type: This topic will be covered in detail in the next section.
- Number of instances: This refers to the number of nodes in the cluster. One of them will be the master node and the rest slave nodes.
- Security and access:
- EC2 key pair: You can associate an EC2 key pair with the cluster that you can use to connect to it via SSH.
- Permissions: You can allow other users besides the default Hadoop user to submit jobs.
- EMR role: This allows EMR to call other AWS services, such as EC2, on your behalf.
- EC2 instance profile: This provides access to other AWS services, such as S3 and DynamoDB, via the EC2 instances that are launched by EMR.
EC2 instances are the most expensive part of a company's AWS bill. So, selecting the right instance type is the key through which you can optimize your bill. The following section is a quick overview of the different instance types. Instance types, both in the cloud and on premises, are defined by four factors:
- Number of cores
- Memory
- Storage (size and type)
- Network performance
To see a quick illustration of how these factors affect each other, visit http://youtube.com/infoobjects.
In the EC2 world, these factors have been modified slightly to vCPU. vCPU is a virtualized unit of:
- Memory
- Storage (size and type)
- Network performance
Instance type families are defined by the ratio of these factors, especially vCPU to memory. In a given family, this ratio remains unchanged (T2 excluded). Different instance families serve different purposes, almost like different types of automobiles. In fact, we are going to use the automobile metaphor in this section to illustrate these families.
The T2 instance type is a gateway drug in the AWS world, the reason being it belongs to Free Tier. Developers who sign up for AWS get this instance type for up to a year. This tier has six subtypes:
Instance Type | vCPUs | CPU Credit/Hr | Memory (GiB) |
t2.micro | 1 | 6 | 1 |
t2.small | 1 | 12 | 2 |
t2.medium | 2 | 24 | 4 |
t2.large | 2 | 36 | 6 |
t2.xlarge | 4 | 54 | 6 |
t2.2xlarge | 8 | 81 | 32 |
M4 is the instance type you use when in doubt. Developers who sign up for AWS get this instance type for up to a year. This tier has six subtypes:
Instance Type | vCPUs | Memory (GiB) | Dedicated Bandwidth |
m4.large | 2 | 8 | 450 mbps |
m4.xlarge | 4 | 16 | 750 mbps |
m4.2xlarge | 8 | 32 | 1,000 mbps |
m4.4xlarge | 16 | 64 | 2,000 mbps |
m4.10xlarge | 40 | 160 | 4,000 mbps |
m4.16xlarge | 64 | 256 | 10,000 mbps |
This tier has five subtypes:
Instance Type | vCPUs | Memory (GiB) | Dedicated Bandwidth |
c4.large | 2 | 3.75 | 500 mbps |
c4.xlarge | 4 | 7.5 | 750 mbps |
c4.2xlarge | 8 | 15 | 1,000 mbps |
c4.4xlarge | 16 | 30 | 2,000 mbps |
c4.8xlarge | 36 | 60 | 4,000 mbps |
This tier has two subtypes:
Instance Type | vCPUs | Memory (GiB) | Dedicated Bandwidth |
x1.16xlarge | 2 | 8 | 450 mbps |
x1.32xlarge | 4 | 16 | 750 mbps |
This tier has six subtypes:
Instance Type | vCPUs | Memory (GiB) | Dedicated Bandwidth |
r4.large | 2 | 15.25 | 10 gbps |
r4.xlarge | 4 | 30.5 | 10 gbps |
r4.2xlarge | 8 | 61 | 10 gbps |
r4.4xlarge | 16 | 122 | 10 gbps |
r4.8xlarge | 32 | 244 | 10 gbps |
r4.16xlarge | 64 | 488 | 20 gbps |
This tier has three subtypes:
Instance Type | vCPUs | Memory (GiB) | GPUs | GPU Memory (GiB) |
p2.xlarge | 4 | 61 | 1 | 12 |
p2.8xlarge | 32 | 488 | 8 | 96 |
p2.16xlarge | 64 | 732 | 16 | 192 |
This tier has six subtypes:
Instance Type | vCPUs | Memory (GiB) | Storage (GB) |
i3.large | 2 | 15.25 | 475 NVMe SSD |
i3.xlarge | 4 | 30.5 | 950 NVMe SSD |
i3.2xlarge | 8 | 61 | 1,900 NVMe SSD |
i3.4xlarge | 16 | 122 | 2x1,900 NVMe SSD |
i3.8xlarge | 32 | 244 | 4x1,900 NVMe SSD |
i3.16xlarge | 64 | 488 | 8x1,900 NVMe SSD |
You can build Spark from the source code, or you can download precompiled binaries from http://spark.apache.org. For a standard use case, binaries are good enough, and this recipe will focus on installing Spark using binaries.
At the time of writing, Spark's current version is 2.1. Please check the latest version from Spark's download page at http://spark.apache.org/downloads.html. Binaries are developed with the most recent and stable version of Hadoop. To use a specific version of Hadoop, the recommended approach is that you build it from sources, which we will cover in the next recipe.
All the recipes in this book are developed using Ubuntu Linux, but they should work fine on any POSIX environment. Spark expects Java to be installed and the JAVA_HOME environment variable set.
In Linux/Unix systems, there are certain standards for the location of files and directories, which we are going to follow in this book. The following is a quick cheat sheet:
Directory | Description |
| This stores essential command binaries |
| This is where host-specific system configurations are located |
| This is where add-on application software packages are located |
| This is where variable data is located |
| This stores the temporary files |
| This is where user home directories are located |
Here are the installation steps:
- Open the terminal and download the binaries using the following command:
$ wget http://d3kbcqa49mib13.cloudfront.net/spark-2.1.0-bin-hadoop2.7.tgz- Unpack the binaries:
$ tar -zxf spark-2.1.0-bin-hadoop2.7.tgz- Rename the folder containing the binaries by stripping the version information:
$ sudo mv spark-2.1.0-bin-hadoop2.7 spark- Move the configuration folder to the
/etcfolder so that it can be turned into a symbolic link later:
$ sudo mv spark/conf/* /etc/spark- Create your company-specific installation directory under
/opt. As the recipes in this book are tested on theinfoobjectssandbox, useinfoobjectsas the directory name. Create the/opt/infoobjectsdirectory:
$ sudo mkdir -p /opt/infoobjects- Move the
sparkdirectory to/opt/infoobjects, as it's an add-on software package:
$ sudo mv spark /opt/infoobjects/- Change the permissions of the
sparkhome directory, namely0755 = user:read-write-execute group:read-execute world:read-execute:
$ sudo chmod -R 755 /opt/infoobjects/spark- Move to the
sparkhome directory:
$ cd /opt/infoobjects/spark- Create the symbolic link:
$ sudo ln -s /etc/spark conf- Append Spark binaries path to
PATHin.bashrc:
$ echo "export PATH=$PATH:/opt/infoobjects/spark/bin" >> /home/hduser/.bashrc- Open a new terminal.
- Create the
logdirectory in/var:
$ sudo mkdir -p /var/log/spark- Make
hduserthe owner of Spark'slogdirectory:
$ sudo chown -R hduser:hduser /var/log/spark- Create Spark's
tmpdirectory:
$ mkdir /tmp/spark- Configure Spark with the help of the following command lines:
     $ cd /etc/spark
     $ echo "export HADOOP_CONF_DIR=/opt/infoobjects/hadoop/etc/hadoop" >> spark-env.sh
     $ echo "export YARN_CONF_DIR=/opt/infoobjects/hadoop/etc/Hadoop" >> spark-env.sh
     $ echo "export SPARK_LOG_DIR=/var/log/spark" >> spark-env.sh
     $ echo "export SPARK_WORKER_DIR=/tmp/spark" >> spark-env.sh
- Change the ownership of the
sparkhome directory toroot:
$ sudo chown -R root:root /opt/infoobjects/sparkInstalling Spark using binaries works fine in most cases. For advanced cases, such as the following (but not limited to), compiling from the source code is a better option:
- Compiling for a specific Hadoop version
- Adding the Hive integration
- Adding the YARN integration
The following are the prerequisites for this recipe to work:
- Java 1.8 or a later version
- Maven 3.x
The following are the steps to build the Spark source code with Maven:
- Increase
MaxPermSizeof the heap:
$ echo "export _JAVA_OPTIONS="-XX:MaxPermSize=1G""  >>
/home/hduser/.bashrc- Open a new terminal window and download the Spark source code from GitHub:
$ wget https://github.com/apache/spark/archive/branch-2.1.zip- Unpack the archive:
$ unzip branch-2.1.zip- Rename unzipped folder to
spark:
$ mv spark-branch-2.1 spark- Move to the
sparkdirectory:
$ cd spark- Compile the sources with the YARN-enabled, Hadoop version 2.7, and Hive-enabled flags and skip the tests for faster compilation:
$ mvn -Pyarn -Phadoop-2.7 -Dhadoop.version=2.7.0 -Phive -
DskipTests clean package- Move the
conffolder to theetcfolder so that it can be turned into a symbolic link:
$ sudo mv spark/conf /etc/- Move the
sparkdirectory to/optas it's an add-on software package:
$ sudo mv spark /opt/infoobjects/spark- Change the ownership of the
sparkhome directory toroot:
$ sudo chown -R root:root /opt/infoobjects/spark- Change the permissions of the
sparkhome directory, namely0755 = user:rwx group:r-x world:r-x:
$ sudo chmod -R 755 /opt/infoobjects/spark- Move to the
sparkhome directory:
$ cd /opt/infoobjects/spark- Create a symbolic link:
$ sudo ln -s /etc/spark conf- Put the Spark executable in the path by editing
.bashrc:
$ echo "export PATH=$PATH:/opt/infoobjects/spark/bin" >>
/home/hduser/.bashrc- Create the
logdirectory in/var:
$ sudo mkdir -p /var/log/spark- Make
hduserthe owner of Spark'slogdirectory:
$ sudo chown -R hduser:hduser /var/log/spark- Create Spark's
tmpdirectory:
$ mkdir /tmp/spark- Configure Spark with the help of the following command lines:
$ cd /etc/spark
$ echo "export HADOOP_CONF_DIR=/opt/infoobjects/hadoop/etc/hadoop"
       >> spark-env.sh
$ echo "export YARN_CONF_DIR=/opt/infoobjects/hadoop/etc/Hadoop"
       >> spark-env.sh
$ echo "export SPARK_LOG_DIR=/var/log/spark" >> spark-env.sh
$ echo "export SPARK_WORKER_DIR=/tmp/spark" >> spark-env.sh
Amazon Elastic Compute Cloud (Amazon EC2) is a web service that provides resizable compute instances in the cloud. Amazon EC2 provides the following features:
- On-demand delivery of IT resources via the Internet
- Provisioning of as many instances as you like
- Payment for the hours during which you use instances, such as your utility bill
- No setup cost, no installation, and no overhead at all
- Shutting down or terminating instances when you no longer need them
- Making such instances available on familiar operating systems
EC2 provides different types of instances to meet all your compute needs, such as general-purpose instances, microinstances, memory-optimized instances, storage-optimized instances, and others. They also have a Free Tier of microinstances for trial purposes.
The spark-ec2 script comes bundled with Spark and makes it easy to launch, manage, and shut down clusters on Amazon EC2.
Before you start, do the following things: log in to the Amazon AWS account via http://aws.amazon.com.
- Click on
Security Credentialsunder your account name in the top-right corner. - Click on
Access KeysandCreate New Access Key:

- Download the key file (let's save it in the
/home/hduser/kpfolder asspark-kp1.pem). - Set permissions on the key file to
600. - Set environment variables to reflect
access key IDandsecret access key(replace the sample values with your own values):
$ echo "export AWS_ACCESS_KEY_ID="AKIAOD7M2LOWATFXFKQ"" >> /home/hduser/.bashrc
$ echo "export
       AWS_SECRET_ACCESS_KEY="+Xr4UroVYJxiLiY8DLT4DLT4D4sxc3ijZGMx1D3pfZ2q"" >>
         /home/hduser/.bashrc
$ echo "export PATH=$PATH:/opt/infoobjects/spark/ec2" >> /home/hduser/.bashrc
- Spark comes bundled with scripts to launch the Spark cluster on Amazon EC2. Let's launch the cluster using the following command:
$ cd /home/hduser
$ spark-ec2 -k <key-pair> -i <key-file> -s <num-slaves> launch <cluster-name>
<key-pair> - name of EC2 keypair created in AWS
<key-file> the private key file you downloaded
<num-slaves> number of slave nodes to launch
<cluster-name> name of the cluster
- Launch the cluster with the example value:
$ spark-ec2 -k kp-spark -i /home/hduser/keypairs/kp-spark.pem --hadoop-major-
version 2 -s 3 launch spark-cluster- Sometimes, the default availability zones are not available; in that case, retry sending the request by specifying the specific availability zone you are requesting:
$ spark-ec2 -k kp-spark -i /home/hduser/keypairs/kp-spark.pem -z us-east-1b --
hadoop-major-version 2 -s 3 launch spark-cluster- If your application needs to retain data after the instance shuts down, attach EBS volume to it (for example, 10 GB space):
$ spark-ec2 -k kp-spark -i /home/hduser/keypairs/kp-spark.pem --hadoop-major-
version 2 -ebs-vol-size 10 -s 3 launch spark-cluster- If you use Amazon's spot instances, here is the way to do it:
$ spark-ec2 -k kp-spark -i /home/hduser/keypairs/kp-spark.pem -spot-price=0.15
          --hadoop-major-version 2  -s 3 launch spark-cluster
Note
Spot instances allow you to name your own price for Amazon EC2's computing capacity. You simply bid for spare Amazon EC2 instances and run them whenever your bid exceeds the current spot price, which varies in real time and is based on supply and demand (source: www.amazon.com).
- After completing the preceding launch process, check the status of the cluster by going to the webUI URL that will be printed at the end:

- Check the status of the cluster:

- Now, to access the Spark cluster on EC2, connect to the master node using secure shell protocol (SSH):
$ spark-ec2 -k spark-kp1 -i /home/hduser/kp/spark-kp1.pem login spark-cluster- The following image illustrates the result you'll get:

- Check the directories in the master node and see what they do:
Directory | Description |
| This is the Hadoop instance for which data is ephemeral and gets deleted when you stop or restart the machine. |
| Each node has a very small amount of persistent storage (approximately 3 GB). If you use this instance, data will be retained in that space. |
| This refers to the native libraries that support Hadoop, such as snappy compression libraries. |
| This refers to the Scala installation. |
| This refers to the Shark installation (Shark is no longer supported and is replaced by Spark SQL). |
| This refers to the Spark installation. |
| This refers to the files that support this cluster deployment. |
| This refers to the Tachyon installation. |
- Check the HDFS version in an ephemeral instance:
$ ephemeral-hdfs/bin/hadoop version
Hadoop 2.0.0-chd4.2.0
- Check the HDFS version in a persistent instance with the following command:
$ persistent-hdfs/bin/hadoop version
Hadoop 2.0.0-chd4.2.0
- Change the configuration level of the logs:
$ cd spark/conf- The default log level information is too verbose, so let's change it to Error:

- Create the
log4.propertiesfile by renaming the template:
$ mv log4j.properties.template log4j.properties- Open
log4j.propertiesin vi or your favorite editor:
$ vi log4j.properties- Change the second line from
| log4j.rootCategory=INFO, consoleto| log4j.rootCategory=ERROR, console.
- Copy the configuration to all the slave nodes after the change:
$ spark-ec2/copydir spark/conf- You should get something like this:

- Destroy the Spark cluster:
$ spark-ec2 destroy spark-clusterCompute resources in a distributed environment need to be managed so that resource utilization is efficient and every job gets a fair chance to run. Spark comes with its own cluster manager, which is conveniently called standalone mode. Spark also supports working with YARN and Mesos cluster managers.
The cluster manager you choose should be mostly driven by both legacy concerns and whether other frameworks, such as MapReduce, share the same compute resource pool. If your cluster has legacy MapReduce jobs running and all of them cannot be converted into Spark jobs, it is a good idea to use YARN as the cluster manager. Mesos is emerging as a data center operating system to conveniently manage jobs across frameworks, and it is very compatible with Spark.
If the Spark framework is the only framework in your cluster, then the standalone mode is good enough. As Spark is evolving as a technology, you will see more and more use cases of Spark being used as the standalone framework, serving all your big data compute needs. For example, some jobs may use Apache Mahout at present because MLlib does not have a specific machine-learning library, which the job needs. As soon as MLlib gets its library, this particular job can be moved to Spark.
Let's consider a cluster of six nodes as an example setup--one master and five slaves (replace them with the actual node names in your cluster):
Master
m1.zettabytes.com
Slaves
s1.zettabytes.com
s2.zettabytes.com
s3.zettabytes.com
s4.zettabytes.com
s5.zettabytes.com
- Since Spark's standalone mode is the default, all you need to do is have Spark binaries installed on both master and slave machines. Put
/opt/infoobjects/spark/sbinin the path on every node:
$ echo "export PATH=$PATH:/opt/infoobjects/spark/sbin" >> /home/hduser/.bashrc- Start the standalone master server (SSH to master first):
hduser@m1.zettabytes.com~] start-master.shNote
Master, by default, starts on port 7077, which slaves use to connect to it. It also has a web UI at port 8088.
- Connect to the master node using a Secure Shell (SSH) connection and then start the slaves:
hduser@s1.zettabytes.com~] spark-class org.apache.spark.deploy.worker.Worker
          spark://m1.zettabytes.com:7077
Argument | Meaning |
| IP address/DNS service to listen on |
| Port for the service to listen on |
| This is the port for the web UI (by default, 8080 is for the master and 8081 for the worker) |
| These refer to the total CPU core Spark applications that can be used on a machine (worker only) |
| These refer to the total RAM Spark applications that can be used on a machine (worker only) |
| These refer to the directory to use for scratch space and job output logs |
Note
For fine-grained configuration, the above parameters work with both master and slaves. Rather than manually starting master and slave daemons on each node, it can also be accomplished using cluster launch scripts. Cluster launch scripts are outside the scope of this book. Please refer to books about Chef or Puppet.
- First, create the
conf/slavesfile on a master node and add one line per slave hostname (using an example of five slave nodes, replace the following slave DNS with the DNS of the slave nodes in your cluster):
hduser@m1.zettabytes.com~] echo "s1.zettabytes.com" >> conf/slaves
hduser@m1.zettabytes.com~] echo "s2.zettabytes.com" >> conf/slaves
hduser@m1.zettabytes.com~] echo "s3.zettabytes.com" >> conf/slaves
hduser@m1.zettabytes.com~] echo "s4.zettabytes.com" >> conf/slaves
hduser@m1.zettabytes.com~] echo "s5.zettabytes.com" >> conf/slaves
Once the slave machine is set up, you can call the following scripts to start/stop the cluster:
Script name | Purpose |
| Starts a master instance on the host machine |
| Starts a slave instance on each node of the slaves file |
| Starts both the master and slaves |
| Stops the master instance on the host machine |
| Stops the slave instance on all the nodes of the slaves file |
| Stops both the master and slaves |
- Connect an application to the cluster through
Scala code:
        val sparkContext = new SparkContext(new
          SparkConf().setMaster("spark://m1.zettabytes.com:7077")Setting master URL for
spark-shell- Connect to the cluster through
Spark shell:
$ spark-shell --master spark://master:7077In standalone mode, Spark follows the master-slave architecture, very much like Hadoop, MapReduce, and YARN. The compute master daemon is called Spark master and runs on one master node. Spark master can be made highly available using ZooKeeper. You can also add more standby masters on the fly if needed.
The compute slave daemon is called a worker, and it exists on each slave node. The worker daemon does the following:
- Reports the availability of the compute resources on a slave node, such as the number of cores, memory, and others, to the Spark master
- Spawns the executor when asked to do so by the Spark master
- Restarts the executor if it dies
There is, at most, one executor per application, per slave machine.
Both Spark master and the worker are very lightweight. Typically, memory allocation between 500 MB to 1 GB is sufficient. This value can be set in conf/spark-env.sh by setting the SPARK_DAEMON_MEMORY parameter. For example, the following configuration will set the memory to 1 gigabits for both the master and worker daemon. Make sure you have sudo as the super user before running it:
$ echo "export SPARK_DAEMON_MEMORY=1g" >> /opt/infoobjects/spark/conf/spark-env.shBy default, each slave node has one worker instance running on it. Sometimes, you may have a few machines that are more powerful than others. In that case, you can spawn more than one worker on that machine with the following configuration (only on those machines):
$ echo "export SPARK_WORKER_INSTANCES=2" >> /opt/infoobjects/spark/conf/spark-env.shThe Spark worker, by default, uses all the cores on the slave machine for its executors. If you would like to limit the number of cores the worker could use, you can set it to the number of your choice (for example, 12), using the following configuration:
$ echo "export SPARK_WORKER_CORES=12" >> /opt/infoobjects/spark/conf/spark-env.shThe Spark worker, by default, uses all of the available RAM (1 GB for executors). Note that you cannot allocate how much memory each specific executor will use (you can control this from the driver configuration). To assign another value to the total memory (for example, 24 GB) to be used by all the executors combined, execute the following setting:
$ echo "export SPARK_WORKER_MEMORY=24g" >> /opt/infoobjects/spark/conf/spark-env.shThere are some settings you can do at the driver level:
- To specify the maximum number of CPU cores to be used by a given application across the cluster, you can set the
spark.cores.maxconfiguration inSpark submitorSpark shellas follows:
$ spark-submit --conf spark.cores.max=12- To specify the amount of memory that each executor should be allocated (the minimum recommendation is 8 GB), you can set the
spark.executor.memoryconfiguration inSpark submitorSpark shellas follows:
$ spark-submit --conf spark.executor.memory=8gThe following diagram depicts the high-level architecture of a Spark cluster:

To find more configuration options, refer to the following URL:
Mesos is slowly emerging as a data center operating system for managing all the compute resources across a data center. Mesos runs on any computer running the Linux operating system. It is built using the same principles as the Linux kernel. Let's see how we can install Mesos.
Mesosphere provides a binary distribution of Mesos. The most recent package of the Mesos distribution can be installed from the Mesosphere repositories by performing the following steps:
- Execute Mesos on a Ubuntu OS with the trusty version:
$ sudo apt-key adv --keyserver keyserver.ubuntu.com --recv E56151BF
          DISTRO=$(lsb_release -is | tr '[:upper:]' '[:lower:]') CODENAME=$(lsb_release
            -cs)
$ sudo vi /etc/apt/sources.list.d/mesosphere.list
deb http://repos.mesosphere.io/Ubuntu trusty main
- Update the repositories:
$ sudo apt-get -y update- Install Mesos:
$ sudo apt-get -y install mesos- To connect Spark to Mesos and to integrate Spark with Mesos, make Spark binaries available to Mesos and configure the Spark driver to connect to Mesos.
- Use the Spark binaries from the first recipe and upload them to HDFS:
$ hdfs dfs -put spark-2.1.0-bin-hadoop2.7.tgz spark-2.1.0-bin-hadoop2.7.tgz- The master URL of a single master Mesos is
mesos://host:5050; the master URL of a ZooKeeper-managed Mesos cluster ismesos://zk://host:2181. - Set the following variables in
spark-env.sh:
$ sudo vi spark-env.sh
export MESOS_NATIVE_LIBRARY=/usr/local/lib/libmesos.so
export SPARK_EXECUTOR_URI= hdfs://localhost:9000/user/hduser/spark-2.1.0-bin-
          hadoop2.7.tgz
- Run the following commands from the Scala program:
Val conf = new SparkConf().setMaster("mesos://host:5050")
Val sparkContext = new SparkContext(conf)
- Run the following command from the Spark shell:
$ spark-shell --master mesos://host:5050Note
Mesos has two run modes:
- Fine-grained: In the fine-grained (default) mode, every Spark task runs as a separate Mesos task.
- Coarse-grained: This mode will launch only one long-running Spark task on each Mesos machine
- To run in the coarse-grained mode, set the
spark.mesos.coarseproperty:
Conf.set("spark.mesos.coarse","true")Yet Another Resource Negotiator (YARN) is Hadoop's compute framework that runs on top of HDFS, which is Hadoop's storage layer.
YARN follows the master-slave architecture. The master daemon is called ResourceManager and the slave daemon is called NodeManager. Besides this application, life cycle management is done by ApplicationMaster, which can be spawned on any slave node and would be alive during the lifetime of an application.
When Spark is run on YARN, ResourceManager performs the role of the Spark master and NodeManagers works as executor nodes.
While running Spark with YARN, each Spark executor is run as a YARN container.
Running Spark on YARN requires a binary distribution of Spark that has YARN support. In both the Spark installation recipes, we have taken care of this.
- To run Spark on YARN, the first step is to set the configuration:
HADOOP_CONF_DIR: to write to HDFS
YARN_CONF_DIR: to connect to YARN ResourceManager
$ cd /opt/infoobjects/spark/conf (or /etc/spark)
$ sudo vi spark-env.sh
export HADOOP_CONF_DIR=/opt/infoobjects/hadoop/etc/Hadoop
export YARN_CONF_DIR=/opt/infoobjects/hadoop/etc/hadoop
- You can see this in the following screenshot:

- The following command launches YARN Spark in the
yarn-clientmode:
$ spark-submit --class path.to.your.Class --master yarn --deploy-mode client
          [options] <app jar> [app options]
Here's an example:
$ spark-submit --class com.infoobjects.TwitterFireHose --master yarn --deploy-
          mode client --num-executors 3 --driver-memory 4g --executor-memory 2g --
executor-cores 1 target/sparkio.jar 10- The following command launches
Spark shellin theyarn-clientmode:
$ spark-shell --master yarn --deploy-mode client - The command to launch the spark application in the
yarn-clustermode is as follows:
$ spark-submit --class path.to.your.Class --master yarn --deploy-mode cluster
          [options] <app jar> [app options]
Here's an example:
$ spark-submit --class com.infoobjects.TwitterFireHose --master yarn --deploy-
          mode cluster --num-executors 3 --driver-memory 4g --executor-memory 2g --
executor-cores 1 target/sparkio.jar 10Spark applications on YARN run in two modes:
yarn-client: Spark Driver runs in the client process outside of the YARN cluster, andApplicationMasteris only used to negotiate the resources fromResourceManager.yarn-cluster: Spark Driver runs inApplicationMaster, spawned byNodeManageron a slave node.
The yarn-cluster mode is recommended for production deployments, while the yarn-client mode is good for development and debugging, where you would like to see the immediate output. There is no need to specify the Spark master in either mode as it's picked from the Hadoop configuration, and the master parameter is either yarn-client or yarn-cluster.
The following figure shows how Spark is run with YARN in the client mode:

The following figure shows how Spark is run with YARN in the cluster mode:

In the YARN mode, the following configuration parameters can be set:
--num-executors: To configure how many executors will be allocated--executor-memory: RAM per executor--executor-cores: CPU cores per executor
SparkContext and SparkSession are the entry points into the world of Spark, so it is important you understand both well.
SparkContext is the first object that a Spark program must create to access the cluster. In spark-shell, it is directly accessible via spark.sparkContext. Here's how you can programmatically create SparkContext in your Scala code:
import org.apache.spark.SparkContext
import org.apache.spark.SparkConf
val conf = new SparkConf().setAppName("my app").setMaster("master url")
new SparkContext(conf)
SparkContext, though still supported, was more relevant in the case of RDD (covered in the next recipe). As you will see in the rest of the book, different libraries have different wrappers around SparkContext, for example, HiveContext/SQLContext for Spark SQL, StreamingContext for Streaming, and so on. As all the libraries are moving toward DataSet/DataFrame, it makes sense to have a unified entry point for all these libraries as well, and that is SparkSession. SparkSession is available as spark in the spark-shell. Here's how you do it:
import org.apache.spark.SparkContext
import org.apache.spark.SparkConf
val sparkSession = SparkSession.builder.master("master url").appName("my app").getOrCreate()
Though RDD is getting replaced with DataFrame/DataSet-based APIs, there are still a lot of APIs that have not been migrated yet. In this recipe, we will look at how the concept of lineage works in RDD.
Externally, RDD is a distributed, immutable collection of objects. Internally, it consists of the following five parts:
- Set of partitions (
rdd.getPartitions) - List of dependencies on parent RDDs (
rdd.dependencies) - Function to compute a partition, given its parents
- Partitioner, which is optional (
rdd.partitioner) - Preferred location of each partition, which is optional (
rdd.preferredLocations)
The first three are needed for an RDD to be recomputed in case data is lost. When combined, it is called lineage. The last two parts are optimizations.
A set of partitions is how data is divided into nodes. In the case of HDFS, it means InputSplits, which are mostly the same as the block (except when a record crosses block boundaries; in that case, it will be slightly bigger than a block).
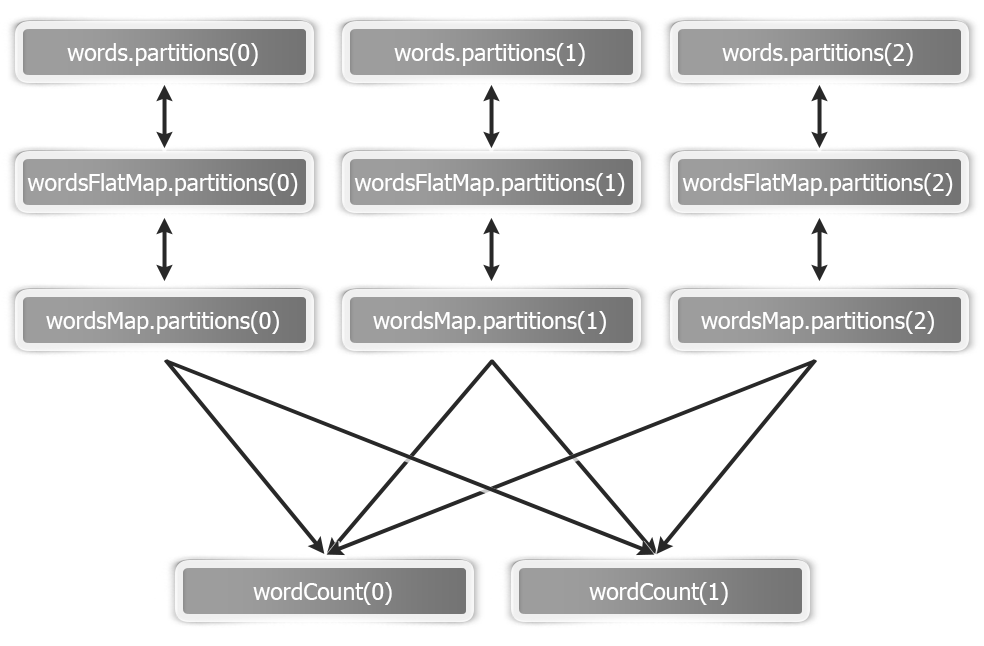
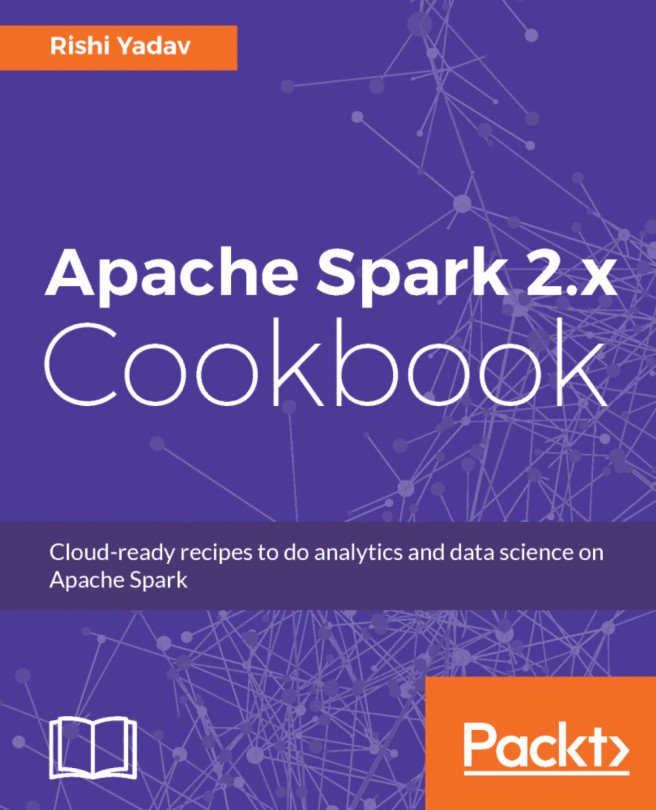
Let's revisit our word count example to understand these five parts. This is how an RDD graph looks for wordCount at the dataset level view:
Basically, this is how the flow goes:
- Load the
wordsfolder as an RDD:
scala> val words = sc.textFile("hdfs://localhost:9000/user/hduser/words")The following are the five parts of the words RDD:
Part | Description |
Partitions | One partition per HDFS inputsplit/block ( |
Dependencies | None |
Compute function | To read the block |
Preferred location | The HDFS block's location |
Partitioner | None |
- Tokenize the words of the
wordsRDD with each word on a separate line:
scala> val wordsFlatMap = words.flatMap(_.split("W+"))The following are the five parts of the wordsFlatMap RDD:
Part | Description |
Partitions | Same as the parent RDD, that is, |
Dependencies | Same as the parent RDD, that is, |
Compute function | To compute the parent and split each element, which flattens the results |
Preferred location | Ask parent RDD |
Partitioner | None |
- Transform each word in the
wordsFlatMapRDD into the (word,1) tuple:
scala> val wordsMap = wordsFlatMap.map( w => (w,1))The following are the five parts of the wordsMap RDD:
Part | Description |
Partitions | Same as the parent RDD, that is, wordsFlatMap (org.apache.spark.rdd.HadoopPartition) |
Dependencies | Same as the parent RDD, that is, wordsFlatMap (org.apache.spark.OneToOneDependency) |
Compute function | To compute the parent and map it to PairRDD |
Preferred Location | Ask parent RDD |
Partitioner | None |
- Reduce all the values of a given key and sum them up:
scala> val wordCount = wordsMap.reduceByKey(_+_)The following are the five parts of the wordCount RDD:
Part | Description |
Partitions | One per reduce task ( |
Dependencies | Shuffle dependency on each parent ( |
Compute function | To perform additions on shuffled data |
Preferred location | None |
Partitioner | HashPartitioner ( |
This is how an RDD graph of wordcount looks at the partition level view: