


At the core of Apache OFBiz lies a powerful toolkit facilitating all aspects of software development—the MVC (Model-View-Controller) framework.
The MVC framework is an organizational structure for software. It covers three aspects: data (model), front-end (view or user interface), and logic (controller, the flow of the software). With this powerful toolkit alone, we can build a web-based software quickly. But OFBiz is more than that. OFBiz is also a collection or suite of ready-made ERP (Enterprise Resource Planning) components. Many of these components are so reusable and tried and tested, they have become quite core to OFBiz and to businesses that employ OFBiz.
The most prominent and polished aspects in OFBiz are ecommerce, product management, and order processing components. Aside from the commonly used ecommerce and related aspects, OFBiz also has a wide array of ready-made functions . These range from the commonly required accounting facilities to the more specialized manufacturing workflow.
In this chapter, we will be looking at:
Obtaining OFBiz
Compiling and running OFBiz
Taking a quick first tour
Downloading OFBiz requires Subversion (SVN)—a version control system. For now, think of SVN as 'downloader software' that lets us download OFBiz, much like how 'browser software' (for example: IE, Firefox) lets us download TortoiseSVN (for Windows users) from http://tortoisesvn.net/downloads. TortoiseSVN is a graphical SVN client for Windows. It is neatly integrated with the ubiquitous and well-known Windows Explorer.
We only need the SVN client to talk to OFBiz project's SVN server in order to download a copy of OFBiz. We will use TortoiseSVN for the SVN client. Linux users can use the command line SVN client available from the Subversion website.
There is another means of downloading OFBiz—the Nightly Builds release. This is not the way recommended by OFBiz developers. The download method that uses version control software, such as SVN or CVS, is usually reserved for developers. Such a download method lets us check-out the source code that makes up the software (OFBiz in this case). In contrast, the download method meant for general (usually non-technical) audience involves downloading a single file that is usually an all-in-one installer and the software, which is to be installed. An example is the .msi installation file for TortoiseSVN.
OFBiz has so, far been targeted at developers, not the general folks who know or care little about programming software. We will now see how to download OFBiz using the recommended method.
We begin by obtaining the required 'downloader software' which is TortoiseSVN. TortoiseSVN is not the only Subversion client. Since TortoiseSVN carries a performance overhead and can slow Windows Explorer, many people choose to use the SVN from the command line using the Command Line client available from the Subversion website. For those already used to working with Eclipse, the Java Development Environment, there is also a handy plug-in called Subclipse. Full details of all Third Party clients and the Subversion command live installer are available on the Subversion Tigris.org website:http://subversion.tigris.org.
For the sake of the examples and tutorials, TortoiseSVN has been selected for its ease of use and simplicity, in spite of its performance overheads.
We will first need to download TortoiseSVN http://tortoisesvn.net/downloads. There should be two versions: one for 32-bit operating systems and the other for 64-bit ones. Most of us will need the 32-bit version. If your Windows operating sys3.em has the term "x64" in its name, you'll need the 64-bit version. Download the appropriate one for your Windows operating system. Follow the on-screen instructions to complete the installation process.
Create a folder where you want to store the OFBiz files. Let's call this the "OFBiz installation folder", hereafter referred to as ${OFBizInstallFolder}. Any folder will do because OFBiz does not need to be in any special place in your operating system in order to run. It is highly recommended, however, to store OFBiz in a location that has no spaces in its path, as this can sometimes cause strange errors. A good place could be C:\workspace\ofbiz4.0, since we are going to work with OFBiz 4.0 and eventually build an Eclipse workspace.
Go to the OFBiz installation folder using the Windows Explorer. Right-click on an empty area inside the Windows Explorer to bring up the "context menu".
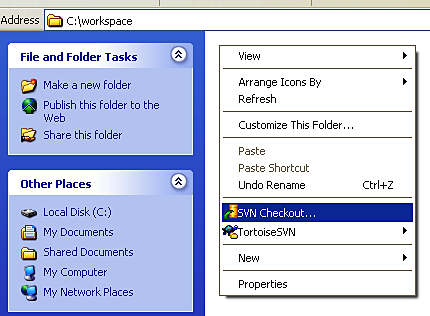
Left-click SVN Checkout to bring up the Checkout dialog box. In the field URL of repository, enter http://svn.apache.org/repos/asf/ofbiz/branches/release4.0.
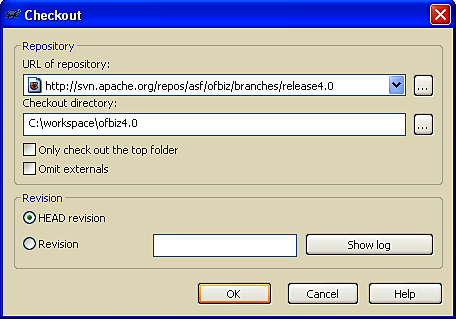
If the folder ofbiz4.0 does not exist, you will first be informed and asked if you wish to create it.
You should now see the files being checked out in the SVN information box. Once you complete the final message in the box will say Completed and give the revision number of the version that was checked out.
At the time of writing, the total size of the checkout was 25.69 MB. It should be noted that this includes all of the source code and libraries that OFBiz needs to run. Needless to say, the length of time it takes to check-out the code depends on the speed of the connection.
When the check-out process is completed, we will see our OFBiz SVN workspace.
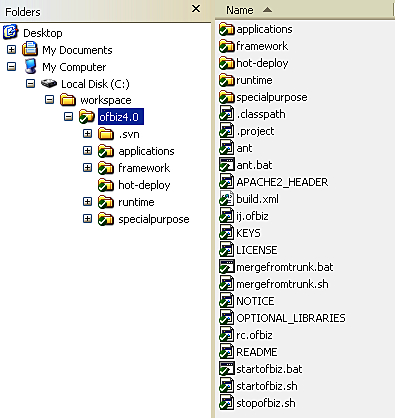
Depending on your Windows Explorer settings, you may or may not see hidden folders and files. You may see grayed out (hidden).svn folder which contains the SVN control files, something we should not have to bother with.
As we proceed and begin to change files, you may see the green ticks change to:

This means the folder (or the contents of the folder rather) has changed locally since the last update (or initial checkout). For now we do not need to worry too much about the workings of SVN. Since we will not be committing the changes back into this SVN server, we can ignore these icons.
Before we can run OFBiz, we will need to compile it.
OFBiz is written largely in Java, and the framework is entirely in Java. Code written in Java needs to be pre-parsed and pre-compiled before it can be executed. To compile OFBiz, we will need the Java Development Kit (JDK) 5.0 [http://java.sun.com/javase/downloads/index_jdk5.jsp.] The latest JDK 5 version at the time of writing is JDK 5.0 update 13. That is the version we will be using in this book. Later revisions (or "updates") of JDK 5.0 should also work the same.
Strictly speaking, OFBiz 4.0 only requires Java 1.4. However, since the current ("trunk" branch) OFBiz development uses Java 5, and the next OFBiz release will likely use Java 5, we should get used to Java 5 now. Note that full Java 5 syntax is not yet supported in BeanShell, a scripting language will be used throughout this book, so we will still be doing Java 4 syntax when writing in BeanShell.
On the JDK 5.0 download page, we should see at the top of the download items list the version for Windows Platform. We want the Windows Offline Installation, Multi-language download (at 51.42 megabytes).
The technical name for JDK 5.0 is really JDK 1.5, as can be seen from the filename jdk-1_5_0_13-windows-i586-p.exe. JDK 1.5 came in after JDK 1.4. JDK 1.5 was named JDK 5.0, possibly for marketing purposes. More details about the change of naming convention are at http://java.sun.com/j2se/1.5.0/docs/relnotes/version-5.0.html.
The version we're working with is for the operating system MS Windows 32-bit. If you're using a 64-bit operating system, you can try the version under Windows x64 Platform. The filename jdk-1_5_0_13-windows-amd64.exe suggests it may only be for an AMD 64-bit computer, but that binary should also be compatible with Intel 64-bit computers.
In case you encounter any problems with the download of the JDK 5.0, see the Sun Download and Installation Notes at http://java.sun.com/j2se/1.5.0/install.html.
Double-click on jdk-1_5_0_13-windows-i586-p.exe to start the installer. In the installation setup screen, change the Install to value to C:\Java\jdk1.5.0_13\. By default, the Java Installer may suggest to install to C:\Program Files. Installing to the default location has been seen to cause errors, particularly in the RMI (Remote Method Invocation) code on startup. This is due to the white space between Program and Files. Leave the feature Development Tools selected, and leave all other features unselected. For our purposes here, we only need the JDK and the private JRE 5.0. Proceed to complete the installation process.

Once the installation of the JDK is complete, we need to check that the environment variable JAVA_HOME is set correctly. To do this, click Start Button | Control Panel | System and select the Advanced Tab
Towards the bottom of the dialog box, you should see the Environment Variables button. There are two things to check here, first ensure that there is a variable set up called JAVA_HOME, pointing to the location C:\Java\jdk1.5.0_13 and then ensure that there is an entry under the PATH variable pointing to C:\Java\jdk1.5.0_13\bin.Entries in the PATH must be separated by a semi colon(;). If in the unlikely event these don't exist, they must be added manually, preferably as System Variables.
As an alternative to SVN, if you prefer to see how OFBiz works, you may use the Nightly Builds page at http://build.hotwaxmedia.com. Then simply follow the instructions on this page. Please remember that this book is intended to be used with Release 4.0
Eclipse, like OFBiz, is an open-source project. It is an IDE (Integrated Development Environment) used by Java Developers all over the world. It is available free of charge for Windows, Linux, and Mac OS X and is the most commonly used Java Development Environment available.
To download Eclipse, head to the Eclipse project download page at http://www.eclipse.org/downloads and select the option Eclipse IDE for Java Developers. You will be offered a preferred mirror site to download from. Simply select it and save the zip file to the root of your C:\ drive.
At the time of writing, the file was around 80MB. Unlike the TortoiseSVN program we installed earlier, this program does not need to be installed. The zip file can be de-compressed and the executable (program) file can be run straight away. Once the file has downloaded, right-click on it, select Extract All, then change the suggested location toC:\ and press Next.
This will place a new folder on your hard drive called C:\eclipse. This is all the installation that eclipse needs to run. If you go into the C:\eclipse folder you will see the spherical Eclipse icon. For ease, you could create a shortcut by right-clicking and selecting Create Shortcut, then drag-and-drop this onto the desktop. Double-click it to start Eclipse.
When Eclipse is run for the first time, something like the following appears:
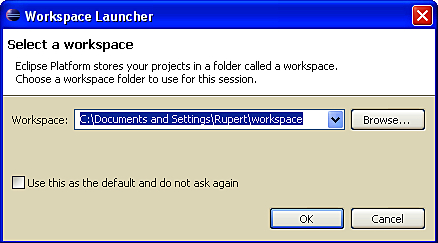
Since the OFBiz code has already been checked out to C:\workspace, make this location the Eclipse workspace and select the Use this as the default checkbox and click OK. Unless you want to explore the features of Eclipse before you begin, close down the welcome tab and click File | New Java Project.
In the Project name text field, type ofbiz4.0 and change the Contents to Create project from existing source.
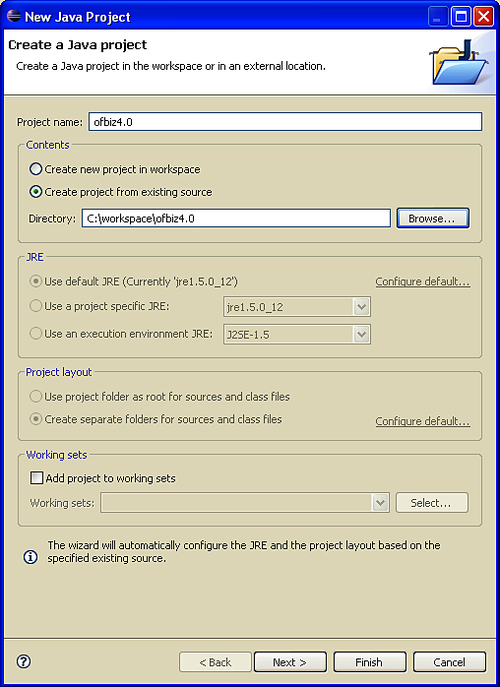
Click Finish to continue and the project will be created. By default, Eclipse will show the Package Explorer view, with all the Java source folders (packages) appearing on the left-hand-side of the screen. Experienced Java developers will be used to working like this, however, because of the amount of different files we will be looking at throughout the course of this book, it is easier to change the View to the Navigator view, by clicking Window from the main bar and selecting Show View and Navigator. This view is the file structure of your project and looks similar to the layout we saw in Windows Explorer, but now navigating around the project and opening, saving, and closing the files is much simpler. There is a free plug-in for Eclipse to turn it into a FreeMarker editor (http://freemarker.sourceforge.net/editors.html). This is highly recommended to aid working with FreeMarker files.
We can even compile and build our project from within Eclipse. Before compiling, it may be worthwhile to check that Eclipse is using the JDK we installed; it may try and use a JRE that was previously installed on the system. To check this, go to Window | Preferences and search for Installed JREs, and check that it's using the correct one. To compile the project, find the build.xml file (the one with the picture of the ant on it) in the root of the project, right-click and choose Run As | Ant Build. You've just compiled all the code and built an OFBiz project for the very first time.
There is one more thing to do in Eclipse that will make life somewhat easier. Return to the Window option from the top menu bar, choose Show View, and this time select Ant. On the right-hand side you should see the Ant box. This will be empty at first, but you can quickly add the main build file by going back to the Navigator box and dragging it over. With this view open while you are working, it is quick to build the whole project, or if you choose you can add other component's build.xml files from within the project to the Ant box. Although we will not be running the project from within Eclipse, individual components can be navigated to and compiled quickly and independently of the main project.
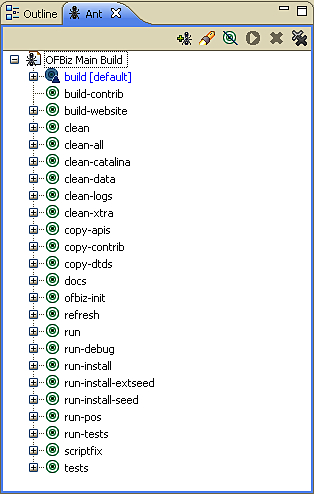
Alternatively, you may right-click on a build.xml file and just use Run as the option in the context menu and then use the first available option. You will then be able to use the specific icon Run in the menu bar to easily set and run builds.
OFBiz comes pre-packaged with Apache Derby, an open source Relational Database Management System (RDBMS) implemented entirely in Java. The default OFBiz configuration uses Derby, so there's nothing we need to do to connect to a database. How to change the database settings and which database OFBiz uses are well documented in the OFBiz Entity Engine Configuration guide at the OFBiz website at http://ofbiz.apache.org/docs/entityconfig.html. We will be investigating the Entity Engine in depth, for now think of this as the database.
Expand the OFBiz Main Build entry in the Ant View Box in Eclipse by clicking on the + sign. We can now see the first target is in blue and called build[default]. The default target is the one that is executed when you double-click (or right-click and Run As) on the OFBiz Main Build entry. This default build target reads and executes each component's build.xml file. Quite simply, the full build process for a component is:
delete the build folder containing existing compiled code
re-compile the java code, "including any changes made since the last compilation"
re-create the jar
place in a new build folder
However, to begin with, we want to go a step further than this. Ant targets have been included in the main script that performs the build process, and allows the database structure to be automatically created, including all necessary database indices and constraints. OFBiz then loads some "seed data" that it needs to start up. An example of an important piece of "seed data" that is loaded into the database is information on the administrator user that we will need to login to the OFBiz components. If we were to start OFBiz without loading this, we will not get very far as we cannot login. Make sure that the Console window is open and in view at the bottom of Eclipse (it is open by default), then double-click the run-install target in the Ant view window.
Debug messages should now be scrolling away within the Console window. They may be scrolling too fast to be seen by the naked eye. Do not worry if they are, this information is also being saved to the ofbiz.log found in ${OFBizInstallFolder}\runtime\logs.
The first half of the log shows the compilation process itself. It should end with [echo] [build] ========== Done Building (Compile) ==========. There should be six warnings, which are due to some outdated code in the "order" component. They can be seen right above the line that says:
[jar] Building jar: ${OFBizInstallFolder}\applications\order\build\ lib\ofbiz-order.jar
These warnings can be safely ignored. Search for the keyword error to spot compilation errors. Look for unanticipated warnings. Any signs of those will mean the compilation process was not entirely successful, and has to be redone. The compilation logs will not be written to the ofbiz.log file, since the application has not yet been started.
The next half of the log shows the data loading process that loads the start-up data for OFBiz. This is the lengthy part of the ant run-install process and, depending on the speed of your computer, this part of the process could take five or even ten minutes. In comparison, the compilation process is very short, merely one to two minutes long. On successful completion of the build and seed data install, you should see a similar message to this:
BUILD SUCCESSFUL
Total time: 8 minutes 33 seconds
There are two kinds of anomalies to watch out for whose keywords are WARN and ERROR. The absence of ERROR should mean a successful data-loading process. Unfortunately, as the log message format is right now, there is no easy way to spot the truly problematic WARN logs.
Readers with some ability with Linux and the grep utility may find it useful to filter out lines containing the regular expression WARN ] .*has no table in the database. Even once these messages have been removed, we may still see other WARN logs that are problematic but not fatal show-stoppers. The stock OFBiz is still a "work-in-progress", but is not difficult to enhance quickly. As we become more competent with OFBiz, we may be able to help enhance OFBiz over time and improve the error-reporting format for the data-loading process.
Because the initial data-loading process can take so long, we should try to avoid doing it more than once. Some folks may have faster computers that can do it all in a couple of minutes, but even these folks need to consider the typical cycle of activity when dealing with software development:
Change (the software code)
Test (the new changes)
Reset (the data to prepare for next test case)
Test (the next test case)
Revise change (if we encounter bugs)
The cycle goes on until we have confirmed that the new change we made satisfies our requirements and has been tested enough for us to be reasonably sure it is bug-free.
It's like performing a science experiment or trying to perfect a food recipe. After every attempt or experiment, the cooking or science apparatus need to be washed and "reset" to a clean state so that the results of subsequent attempts or experiments will not be tainted by prior ones.
In software testing, every test will change the data in some way, unless the test involves mere data retrieval. Three of the four database activities CRUD (create, retrieve, update, delete) will change the data. Even for mere retrieval tests, the software may need to write "retrieval logs", which will translate into "create-related" tests.
As can be seen, it can take five to ten minutes to wash the cooking apparatus and start over (data-loading from scratch takes that long). Perhaps buying an automatic dish-washer will cut that "reset" time down to two minutes. Now imagine if we could "reset" in just seconds.
It must be noted that any changes to the seed data itself will require a new data-loading process from scratch.
The Derby data files are in ${OFBizInstallFolder}\runtime\data\derby, contained in a folder named ofbiz.
Go to ${OFBizInstallFolder-}\runtime\data\derby and zip up the Derby data files into a single archive which you can call ofbiz_4_0_r589272.zip. Keep the archive safe somewhere. Removing the Derby data files in ${OFBizInstallFolder}\runtime\data\derby and replacing them with those in the archive will quickly "reset" our OFBiz data state.
For now, we just back up the Derby data files and move on.
Now that we've gone through the necessary pre-startup steps, it's almost time to start OFBiz. But before we start we'll need to check our available memory.
To check our memory availability, bring up the Windows Task Manager by pressing Ctrl+Shift+Esc. Click on the tab named Performance.
Another way to access the Windows Task Manager is by right-clicking on an empty space on your task bar (try the space around your clock in the bottom-right of your desktop), and then left clicking on Task Manager select the Performance tab.
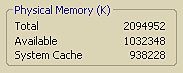
The remaining available physical memory we have is stated under the Physical Memory section, beside the label Available. It is in units of kilobytes (or "K" in short). OFBiz's memory switches are in units of Megabytes. 1 megabyte is about 1000 Kilobytes (slightly more, actually). In our system, we have about 1,000 Megabytes (1 Gigabyte) available.
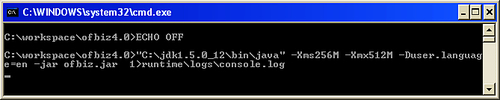
The amount of memory used by OFBiz is determined by some switches in the file ${OFBizInstallFolder}\startofbiz.bat (Linux users can see the .sh equivalent). Edit that file, and look for the following line:
"%JAVA_HOME%\bin\java" -Xms256M -Xmx512M -Duser.language=en -jar ofbiz.jar > runtime\logs\console.log
The number 256M (representing 256 Megabytes) right after -Xms is the minimum amount of memory that OFBiz will use. OFBiz will set aside that amount of memory when it starts. The number 512M right after -Xmx is the maximum amount of memory OFBiz will use. OFBiz will grow in memory usage, if necessary during the course of operation and depending on memory availability, up to this size.
The minimum size is set aside during start-up, so we should set this figure to use an amount of memory that we are confident will always be available. In our example, we have 1 GB of memory available, and should set OFBiz's minimum memory usage to less than that, probably 512M or less. Also try to make sure the maximum size is not larger than our available memory. 768M is a safe bet in our case.
If you have less than 128 megabytes of physical memory, OFBiz will run awfully slowly. It will still run because Windows (and other operating systems) has the concept of "virtual memory", which really is your hard disk space. Hard disk access is slower than RAM (physical memory chips) access.
For production with Linux servers it is advisable to assign at least 2 GB of RAM to OFBiz. There is no reason why you cannot assign the minimum amount and the maximum amount of memory OFBiz will use both to 2048 MB. This will ensure that 2 GB is assigned at all times. Windows is not able to allocate more than 1.5GB to a JVM instance unless we use a 64 bit version.
Now, we start the engines! Navigate to the ${OFBizInstallFolder} in Windows Explorer and double-click the file startofbiz.bat. An un-editable command prompt window will appear. And OFBiz will startup.
As we will be frequently starting the OFBiz application, it is a good idea to make the start process quick to access. The Windows Task Bar is an ideal place to click from, as no matter what you are working on, you can start OFBiz. This can be done by right clicking on the startofbiz.bat file, creating a shortcut and then dragging and dropping the shortcut to the unlocked taskbar.

The only reliable way to confirm that OFBiz has finished its start-up process is to look at the file ${OFBizInstallFolder}\runtime\logs\console.log and check for the following lines.
Connector AJP/1.3 @ 8009 - not-secure [org.apache.jk.server.JkCoyoteHandler] started. Connector HTTP/1.1 @ 8080 - not-secure [org.apache.coyote.http11.Http11Protocol] started. Connector TLS @ 8443 - secure [org.apache.coyote.http11.Http11Protocol] started. Started Apache Tomcat/5.5.20
To make sure that OFBiz was started without any problems, search the console.log for keywords Exception and Error. The absence of those should mean that OFBiz started without any problems.
It may, at times, be convenient to see the logs in real time, rather than locating the logs to see what happened after the event. This can be done by removing the> runtime\logs\console.log part of the line in the startofbiz.bat file. The logs will no longer appear in console.log and will instead scroll inside the command prompt. The logs will still be recorded in the ofbiz.log file.
OFBiz listens on a number of ports. Think of "ports" as a house or door number. Server programs receive incoming requests from "client" components (each one operated by some end-user). There can be many programs running on one computer, with each program receiving incoming requests from any number of "client" components. Therefore, each incoming request will need to specify the port it is "knocking on", so that the server computer will know where to direct the request.
One possible problem during start-up is that any one of the ports OFBiz listens on are already occupied by another program. In this case, ${OFBizInstallFolder}\runtime\logs\console.log may contain the following lines:
[ Http11BaseProtocol.java:140:ERROR] Error initializing endpoint java.net.BindException: Address already in use: JVM_Bind:8080
which indicates port 8080 is already in use. Full instructions on changing the ports to which OFBiz listens can be found in the Apache OFBiz Production Setup Guide at http://docs.ofbiz.org/display/OFBTECH/Apache+OFBiz+Technical+Production+Setup+Guide.
Some commonly used programs including Skype, MSN Messenger, and Apple iTunes often use ports 80 and 1099 which will cause problems with start-up. If problems are experienced, these programs should be stopped.
Some customizations require that we first shut down OFBiz. Many other types of customizations don't. As we progress on our journey it will become clear which require a restart, which will require a restart and compile, and which will require nothing more than a refresh of the browser.
Shutting down OFBiz is as simple as focusing on (selecting, clicking on) the OFBiz start-up shell, and pressing Ctrl+C. We'll see the shell display a prompt Terminate batch job (Y/N)?. Reply Y. In ${OFBizInstallFolder}\runtime\logs\console.log, we'll see a series of shutdown logs:
[ ContainerLoader.java:93 :INFO ] Shutting down containers [ ServiceDispatcher.java:176:INFO ] De-Registering dispatcher: example [ ServiceDispatcher.java:176:INFO ] De-Registering dispatcher: partymgr ... ... [ ServiceDispatcher.java:176:INFO ] De-Registering dispatcher: RMIDispatcher
Any shutdown errors (these are very rare) will be shown in the console.log as well.
It should be noted that if you close the shell window by pressing the top-right X, as you would with any other window, OFBiz will shutdown.
It's time to step on the gas pedal and take in the sights! We'll be zipping through some often used (and most developed) areas of OFBiz, touring from the perspective of an end-user (not from a developer or programmer). Our aim is to take a quick look at what OFBiz is capable of, as well as to learn the common pattern of accessing OFBiz webapps (such as "ecommerce" and "ordermgr").
The term webapp will be explained further in Chapter 2. End-users access OFBiz through its webapps. The term component, which is related to webapps, will also be discussed in Chapter 2.
OFBiz is accessed through the web-browser and works just as well through Internet Explorer as it does Firefox. By typing an address into the URL we are sending a request to the application.
Firing a request to OFBiz involves giving at least three pieces of information, with an optional fourth:
The server name in our case will be localhost.
The port will be 8080 for protocol http (unsecured access), and 8443 for https (secured access). Therefore, in this book, all URLs to OFBiz will start with http://localhost:8080/ or https://localhost:8443/.
The fourth piece of information is optional in most cases. If missing, this will default to a request for some welcome or "main" screen, if such a screen is set up. From here on, when we talk about firing a request, that request will be just this piece of information, not including the other three pieces of information. For example, firing an http request ecommerce/index.html will mean an URL of http://localhost:8080/ecommerce/index.html, whereas an https request will mean the URL starts with https://localhost:8443/.
Often, we will say "fire a request<request string> to webapp <webapp name>". For example, firing a request index.html to webapp ecommerce is the same as firing a request ecommerce/index.html. When we are to fire an empty request string to some webapp, say ecommerce, we will say "fire an http request to webapp ecommerce", which should be taken to mean an URL of http://localhost:8080/ecommerce.
Fire an http request to webapp ecommerce and note how we are redirected to the welcome screen at request control/main. Note how the two requests show the same screen.
To access the running OFBiz ecommerce application, open an internet browser in the same computer that is running OFBiz. Assuming that we were able to use the default OFBiz ports, a typical end-user request to OFBiz looks like http://localhost:8080/ecommerce, which calls on the webapp ecommerce in OFBiz.
From here on, instead of saying "open an internet browser and enter a URL address of whatever to fire a request to some OFBiz webapp", this book will simply say "fire a request <request name> to webapp <webapp name>".
Fire an http request to webapp ecommerce. The main screen of the webapp "ecommerce" shows the list of Featured Products available for ordering via the OFBiz ecommerce site.
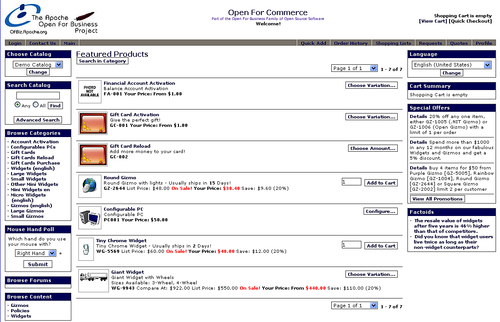
Buy 4 Round Gizmo (fourth item down the Featured Products list, product ID GZ-2644) by entering 4 into the text field beside the item and clicking the Add to Cart button beside it. We'll see the cart (top-right of screen) now contains four items.
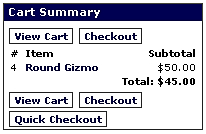
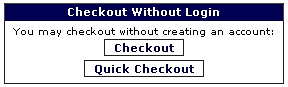
Click on Checkout in the Cart Summary screenlet (a screenlet is simply a sub screen, a part of the main screen). Because we're currently not logged in, OFBiz brings us to the "Login" screen. If this is the first time that you have accessed this login screen, you may notice that the URL jumps from being http://localhost:8080 to https://localhost:8443 and a warning will appear asking you if you wish to accept the certificate, in spite of a domain name mismatch. Depending on your browser, click Yes or OK to accept the temporary SSL certificate. This acceptance only applies for the "localhost" address and is perfectly safe.
For now, we do a Checkout Without Login. Click the Quick Checkout button.
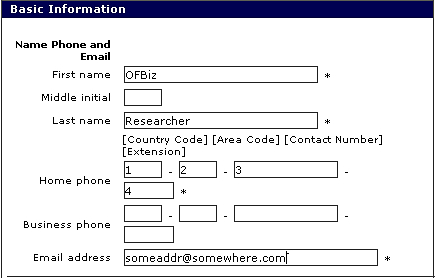
The Quick Checkout button brings us to the "Shopper's Personal Info" page. In the Name Phone and Email section, enter any value for First name, Last name, Home phone, and Email address, fields that are mandatory.
In the Shipping Address section, simply fill in some values for the mandatory fields (marked by *).
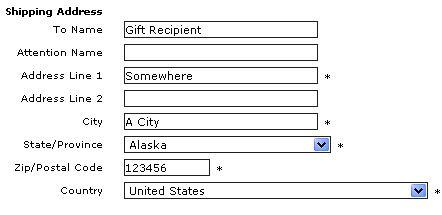
Check the checkbox labeled Billing address is the same as the shipping address.

Click the Continue button at the bottom-center of the screen to confirm the shopper's (that's us!) personal info and to continue to the next step.
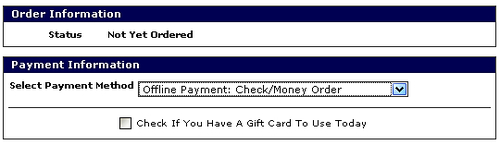
This brings us to the "Final Checkout Review" screen. In the Payment Information section, select Offline Payment: Check/Money Order.
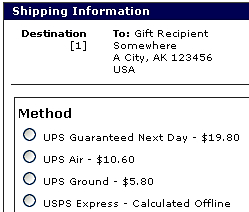
In the Shipping Information section, select any shipping method desired (try the first one so we're playing with the same options).
Finally, take one last look at our order before we submit the order.
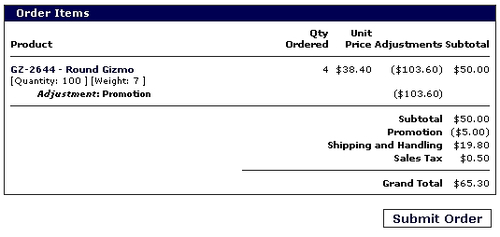
Submit the order by clicking Submit Order.
Our order will be processed and created. We are brought to the Order Confirmation screen next, which tells us that our order was successfully created.
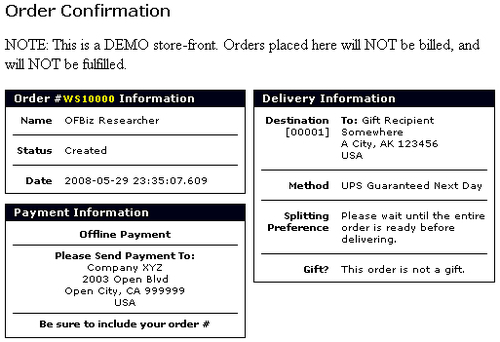
We can take a look at the items we have successfully ordered further down the screen.
After buying something from the ecommerce site as an anonymous shopper, we will now log in as a back office member of staff to process the newly created order.
Fire an http request to webapp ordermgr. We'll be brought to the login screen of webapp ordermgr, where we log in with username of admin and password of ofbiz.
The main screen of the webapp ordermgr is the Order List screen, which lists existing orders. So far, there should only be one order, which we created in the last section in ecommerce. Click on that order to view its details.
Click on the Receive Payment button in the Payment Information screenlet.
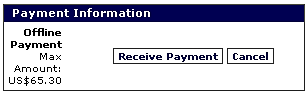
There will be many options for receiving various types of payments, such as through credit cards or paypal or gift cards (vouchers) or cash/check. Let's choose to receive cash. Enter 65.30 ($65.30) in the cash Amount field, and any random string (say cash123456) in the Reference field. Then click the Save button to confirm the receipt. You may notice that the status of the order has now moved from Created to Approved.
An Offline Payment in OFBiz is simply a convenient, manual process for receiving payments, especially for payment methods that have no automated processing implemented yet. Credit cards will usually have automated payment gateways that OFBiz can talk to for automated payment processing without human intervention. Use "Offline Payment" when encountering say an unknown credit card for which there is no automated payment processing.
Note how the Quick Ship Entire Order option now appears in the Shipment Information screenlet. Before we ship the ordered item to fulfill the order, we need to be paid.
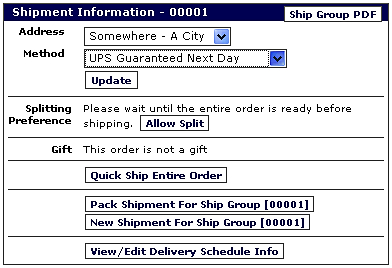
Since we have received payment in full, it is now time to ship the order. Click on the button that says Quick Ship Entire Order.
There are actually a series of actions to be performed in order to ship and fulfill the order. This convenient quick ship function performs those actions with some default values. The order should now be fulfilled.
OFBiz components and webapps are inter-linked, forming an integrated system that qualifies as an ERP application. Let's take a peek into the webapp "accounting" to see some integration and automation in action. In the Payment Information screenlet, in the row Invoices, click on the invoice number to view the automatically generated invoice.
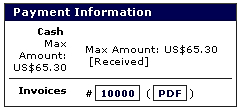
Note how the invoice has a zero Open amount, and has Applied Payments of $65.30. The payment that we received earlier has been automatically applied to this invoice.
We have now successfully completed an end-to-end tour from making a purchase with the webapp ecommerce to processing and fulfilling the sales order with the webapp ordermgr. As can be seen, OFBiz already provides quite a comprehensive and usable package for businesses "out of the box", that is without any amendments at all.
Our quick tour brings us through only a tiny fraction of OFBiz. As we go through this book, we will see more possibilities with OFBiz.
Spend some time familiarizing yourself with the back-end management consoles. Don't forget, you are only working on a test system and anything you do can be quickly reverted. In the next chapter we will find out how to revert the changes to the data in the most time efficient way.
In this chapter, we learned to:
Obtain and install SVN, the software required to obtain OFBiz
Use SVN to download OFBiz
Obtain and install JDK, the tool required to compile and run OFBiz
Download OFBiz ready to launch
Create an Eclipse Project
Compile OFBiz
Load seed data into OFBiz
Backup OFBiz data so that we don't need to re-do the lengthy data-loading process in future
Start OFBiz
Access OFBiz (URL pattern to construct commands to send to OFBiz)
In the next chapter, we'll be doing some initial tweaks to OFBiz—our first customizations! We will also be learning the structure of OFBiz, so that our customizations can be organized in a sensible way that is compatible.

