


 Download code from GitHub
Ansible Automation – Introduction
Ansible is open source automation and orchestration software that can be used for automating most of your operations with IT infrastructure components including servers, storage, networks, and application platforms. Ansible is one of the most popular automation tools in the IT world now and has strong community support with more than 5,000 contributors around the world.
In this chapter we are going to cover the following topics:
- What is Ansible? Where should I use this automation tool?
- Deploying Ansible
- Configuring your managed nodes
As of today, Ansible is only available on Linux/Unix platforms, but that doesn't mean you cannot use Ansible to automate other operating systems (OSs) or devices. It is possible to use Ansible to automate almost all components involved in the IT infrastructure, as there are thousands of supported modules available to support Ansible automation.
Technical requirements
The following are the technical requirements to proceed with this chapter:
- A basic understanding of the Linux OS and how to handle basic operations in Linux
- One or more Linux machines
The codes and snippets used in the chapter are tested in Red Hat Enterprise Linux 8 (RHEL8). All the Ansible code, Ansible playbooks, commands, and snippets for this chapter can be found in the GitHub repository at https://github.com/PacktPublishing/Ansible-for-Real-life-Automation/tree/main/Chapter-01.
Hello engineers!
The primary role of a systems engineer is building and managing IT infrastructure for hosting applications and their data. In the olden days, the number of applications used was a lot less, hence the infrastructure size. As the applications and components grew, the IT infrastructure also grew, and systems engineers and system administrators started experiencing resource conjunction. In other ways, systems engineers are spending more time on building, maintaining, and supporting the infrastructure rather than spending time on improving the infrastructure designs and optimizing them.
For the support team, 90% of the event tickets are simple fixes including disk space full, user account locked, volumes not mounted, and so on. But the support engineer still needs to manually log in to each and every server and fix the issues one by one.
The task can be fixing a low disk space issue on servers, installing some packages, patching OSs, creating virtual machines, or resetting a user password; engineers are doing the same job repeatedly for multiple systems, and this led to the invention of automated operations. Initially, the solution for automation was custom scripts developed and maintained by individual engineers, but it was never a real solution for the enterprises as there was no collaboration, maintenance, or accountability for such custom automation scripts. If the developer leaves the organization, the script will become an orphan and the next engineer will create their own custom scripts.
With the introduction of DevOps methodologies and practices, developers, systems engineers, operations teams, and other platform teams started working together, the boundaries between them became thinner, and a better accountable ecosystem evolved. Everyone started building and maintaining the applications and the underlying IT infrastructure, which, in turn, made the automation use case list bigger and more complex.
What is Ansible? Where should I use this tool?
Ansible is an open source automation tool that was written and released by Michael DeHaan on February 20, 2012. In 2013, Ansible, Inc. (originally AnsibleWorks, Inc.) was founded by Michael DeHaan, Timothy Gerla, and Saïd Ziouani, and their intention was to commercially support and sponsor Ansible. In 2015, Ansible was acquired by Red Hat, and Red Hat supports and promotes Ansible as per the expectations of the open source community.
As of today, the Ansible control node is only available for Linux/Unix based platforms (most of the general-purpose OSs, such as Red Hat Enterprise Linux, CentOS, Fedora, Debian, or Ubuntu) and you cannot install it on Windows natively (it is possible to use Windows Subsystem for Linux or virtual machines for the same). This does not mean that you cannot use Ansible to automate your Windows operations. It is possible to use the Ansible control node on Linux and manage your Windows machines together, with other devices and platforms such as network devices, firewall devices, cloud platforms, and container platforms. There are more than 3,200 Ansible modules (as of today) available to use and, for Windows alone, there are more than 100 Ansible modules to automate Windows OS-based operations.
Ansible-Supported Windows OSs
Ansible can manage desktop OSs including Windows 7, 8.1, and 10, and server OSs including Windows Server 2008, 2008 R2, 2012, 2012 R2, 2016, and 2019. Refer to https://docs.ansible.com/ansible/latest/user_guide/windows_setup.html#host-requirements for more details.
The community version of Ansible is free to use like other open source software, but there is also a product offering from Red Hat based on Ansible called Red Hat Ansible Automation Platform, which is available with a paid subscription. Use either the community version of Ansible or the Red Hat-supported version with a subscription. Ansible Automation Platform is for enterprise use with functionalities such as role-based access control (RBAC), graphical user interface (GUI), Application Programming Interface (API), redundancy, and scalability. Consider these options when you expand your automation use cases with a bigger team with many engineers working on automation and when you need auditing, tracing, and other integrations. Read more about Ansible Automation Platform at https://www.ansible.com/products/automation-platform.
Red Hat Ansible Automation Platform
The enterprise automation product from Red Hat was known as Ansible Tower until the announcement of the Red Hat Ansible Automation Platform in September 2019 (https://www.ansible.com/blog/introducing-red-hat-ansible-automation-platform). The components inside Ansible Automation Platform were renamed with more meaningful names, such as automation controller and execution environment. Read more about Ansible Automation Platform at https://www.redhat.com/en/technologies/management/ansible.
Ansible documentation is available at https://docs.ansible.com.
Prerequisites
We will write automation steps in a YAML file called an Ansible playbook. Ansible will parse the playbook file and execute the tasks on target machines:
- You should know the basics of Linux; as I mentioned earlier, it is possible to install Ansible on a Linux or Unix machine only at the current time. That does not mean that you should be a Linux subject matter expert, but you need to be able to handle basic operations in Linux, such as file management and file editing.
- You need to understand the YAML syntax, which is easy, as YAML is one of the easiest human-readable file formats.
Ansible is based on the Python programming language, but you don't need to learn Python or any kind of programming language to develop Ansible automation playbooks.
What is YAML?
YAML Ain't Markup Language (YAML) is a human-readable language format used for most modern tools and software, including Ansible, Kubernetes, and OpenShift. YAML is often used as a file format for application data and configuration, for example.
Ansible control node requirements
There are no specific hardware requirements for the Ansible control node machine. It is possible to use a machine with 512 MB memory and one virtual central processing unit (vCPU). Follow some standard virtual machine (VM) specifications, such as 4 GB or higher, as you may need more memory when you have more managed nodes and more tasks to run in parallel. For the disk, you may follow standard VM specifications, as Ansible is a small program and does not require much disk space. Use any Linux/Unix machine with Python 3.8 or newer installed.
Ansible Control Node Requirements
Find the Ansible control node requirements at https://docs.ansible.com/ansible/latest/installation_guide/intro_installation.html#control-node-requirements.
Ansible managed node requirements
The target nodes (managed nodes) should be installed with Python 2.6 or later (3.x is recommended) to execute the task. For Windows machines, you need to install PowerShell and .NET.
Ansible is also supported for the following:
- Network devices
- VMware
- Public clouds such as AWS, Azure, and GCP
- Security devices
Python 2.x EOL
Install Ansible on a machine with Python 2.x, but Python 2.x is already end-of-life (EOL) by January 1, 2020, and it is best practice to use the latest Python version. For more detailsabout Python 2 end of life, visit https://www.python.org/doc/sunset-python-2/.
Ansible is agentless
There are two types of machines involved in Ansible automation. The machine in which you install the Ansible program is known as the Ansible control node. The control node can be any machine, a dedicated server, or even your workstation, and it will have your Ansible playbook and other configurations. Then, the machines or devices that you want to automate are known as managed hosts. You will run the Ansible jobs and playbooks from the control node and the jobs will be executed on the target nodes or managed nodes.
The following diagram shows the basic components of Ansible:

Figure 1.1 – Ansible and components
Ansible is agentless and you do not need to install any kind of agents on the managed nodes. Ansible uses default connection methods to communicate with managed nodes, such as ssh, WinRM, http, or other appropriate protocols. During the onboarding, you need to configure the credentials for the managed nodes, such as an SSH credential, with SSH keys, or an SSL certificate for WinRM connection. This is a one-time setup, and it is possible to configure or change this anytime. It is possible to use the same or different credentials for different managed nodes, and configure this for individual nodes or a group of managed nodes. You will learn about managed nodes and inventory in the next sections of this chapter.
Ansible architecture
The following diagram shows the Ansible internals and its components' structure:

Figure 1.2 – Ansible and components
Ansible inventory
The Ansible inventory is a file or script that will provide the details about the managed nodes, including the hostname, connection methods, credential to use, and many other details. It is possible to pass the inventory to Ansible using static inventory files, dynamic inventory scripts, or using the configuration management database (CMDB). The CMDB is the same CMDB that can provide the managed nodes information. It is best practice to integrate CMDB with Ansible in an environment to avoid frequent updates on the static inventory files, but this is not a mandatory component.
It is possible to add any number of managed nodes inside the inventory file, as follows:

Figure 1.3 – Ansible inventory with managed nodes
It is best practice to separate the managed nodes information in multiple inventory files based on the criticality, server types, and environment. You will learn more about inventory best practices in Chapter 16, Storing Remote Host Information – Inventory Best Practices.
Dynamic inventory plugins will collect the details of managed nodes from your virtualization platforms such as VMware, OpenStack, AWS, Azure, and GCP, or from other container platforms such as Kubernetes. There are more than 40 dynamic inventory plugins available to use in the Ansible GitHub repository. Use them if needed or create your own dynamic inventory scripts if those are not suitable for your requirements.
Ansible Dynamic Inventory
For more details about the Ansible dynamic inventory, look it up at https://docs.ansible.com/ansible/latest/user_guide/intro_dynamic_inventory.html and https://github.com/ansible/ansible/tree/stable-2.9/contrib/inventory.
Ansible plugins
Ansible plugins are small pieces of code that help to enable a flexible and expandable architecture. You have Ansible executable, and add plugins as needed for other features and capabilities like any other software. There are different types of plugins in Ansible such as connection plugins, action plugins, become plugins, and inventory plugins. For example, the default connection plugin you will be using is called ssh, and it is possible to use connection plugins called docker or buildah for connecting to containers. If you need to, install and use these plugins.
Ansible Plugins
Read more about Ansible plugins at https://docs.ansible.com/ansible/latest/plugins/plugins.html.
Ansible modules
An Ansible module is a piece of reusable and standalone script that can be used to achieve some specific tasks. Modules provide a defined interface with options to accept arguments and return information to Ansible in JSON format. When you execute a task using a module, the module script will be executed on the target machine using Python or using PowerShell for Windows machines.
For example, the following Ansible content is using a ping module to verify the connectivity to the target machine and another task with the yum module for installing httpd package on a managed node using the yum package manager:

Figure 1.4 – Ansible ping module and yum module
I said earlier that we can automate network devices and firewall devices using Ansible, but, we all know that we cannot install Python or PowerShell on those devices. Unlike most of the Ansible modules, network modules do not run on network devices. Instead, these modules will be executed from the Ansible control node itself and run the appropriate commands on target network devices to achieve the task. From the user's point of view, there is no difference in the execution of network modules as you still use them like any other modules. It is possible to manage the network devices like other Linux machines and Windows machines but with different connection methods, such as network_cli, netconf, and httpapi.
Read: How Network Automation Is Different
Go to https://docs.ansible.com/ansible/latest/network/getting_started/network_differences.html to learn more about network device automation.
Ansible content collections
Before version 2.10, Ansible was a big package with all modules and libraries inside, but the community grew very fast and thousands of new modules were contributed to Ansible. Whenever there is a new module or new version of a module available from the community or vendors, then users need to wait for the next release of Ansible to get the updated module. To resolve this dependency, a new way of distribution has started in which Ansible modules are separated from the Ansible base and distributed as Ansible content collections, or simply Ansible collections. You have the choice of installing Ansible alone or installing the Ansible package including Ansible collections. If you need to manage some different set of nodes or systems (for example, managing the VMware private cloud or automating Fortigate firewall devices), then install the required Ansible collection and use it. This modularity allows you to install only the required modules and plugins rather than all available modules.
The following diagram shows the transition of the Ansible collection from old Ansible:

Figure 1.5 – Ansible to Ansible core and Ansible collection transformation
Also, note some of the changes in the Ansible base and Ansible collection restructuring:
- Before version 2.9.x: The package included
ansibleand all the Ansible modules and other plugins. - From version 2.10++: Ansible was renamed to
ansible-baseand modules were moved to Ansible collections (vendors and communities). - From version 2.11++:
ansible-basewas renamed toansible-core. - When you install Ansible 3.x or Ansible 4.x, then you are installing the Ansible community package, which includes
ansible-coreand all the Ansible collections (vendor and community).
Restructuring the Ansible Project
Read the blog post ansible.com/blog/thoughts-on-restructuring-the-ansible-project and ansible.com/blog/the-future-of-ansible-content-delivery to know more about Ansible collection transition.
Ansible playbook
The Ansible playbook is a simple file written in YAML format with the instruction list of automation tasks. The following diagram explains the components, syntax, and structure of an Ansible playbook:

Figure 1.6 – Ansible playbook basic components
Each task in the play runs a module to do some specific job on the target node. You can have multiple tasks in a play and multiple plays inside a single playbook, as shown in the diagram. The plays, tasks, and module arguments are identified by the indentation in YAML format. In this example, we have a playbook with two plays.
In the first play, Enable Intranet Services, we are running the tasks against node1 – see the hosts: node1 line.
Under the tasks, see two tasks:
- The first task is using the
yummodule and installing thehttpdpackage. - The second task is using the
servicemodule to start thehttpdservice.
Then, we have a second play, Test intranet web server, in the playbook, in which you have only one task:
- Using the
urimodule to test the intranet web server
Ansible will parse this playbook and execute the tasks one by one on the target nodes.
Ansible use cases
It is possible to build, manage, or maintain almost all components in IT infrastructure using Ansible:
- Servers and storages
- Network devices, firewalls, software-defined networks (SDNs), and load balancers
- Application components
- Containers and container platforms
- Database applications
- Public cloud and private cloud
You need to find the use cases from your day-to-day work and find the highest number of tasks you are repeating every day and consider those tasks as automation candidates. The following is a sample list of such use cases:
- OS patching
- Application and package deployment
- Orchestration of application
- Configuration management
- Infrastructure provisioning
- Continuous delivery
- Security and compliance auditing and remediation
- Database provisioning and management
In the following section, we will learn how to install and configure Ansible.
Installing Ansible
There are multiple ways to install Ansible on your system, such as using the default package manager (yum, apt, dnf), using Python’s pip, or installing the source code itself. Depending on your environment and restrictions, follow any of the methods provided in the official documentation (https://docs.ansible.com/ansible/latest/installation_guide/intro_installation.html). If you are using the OS package manager, such as dnf, yum, or apt, then you need sudo privileges (or root access) to install Ansible.
Please note, you do not require root or sudo access on the Ansible control node for using Ansible. In the following snippet, sudo access is used for installing and updating packages.
Verify dependencies
As you learned that Ansible needs Python to work, you need to check the Python installation first:
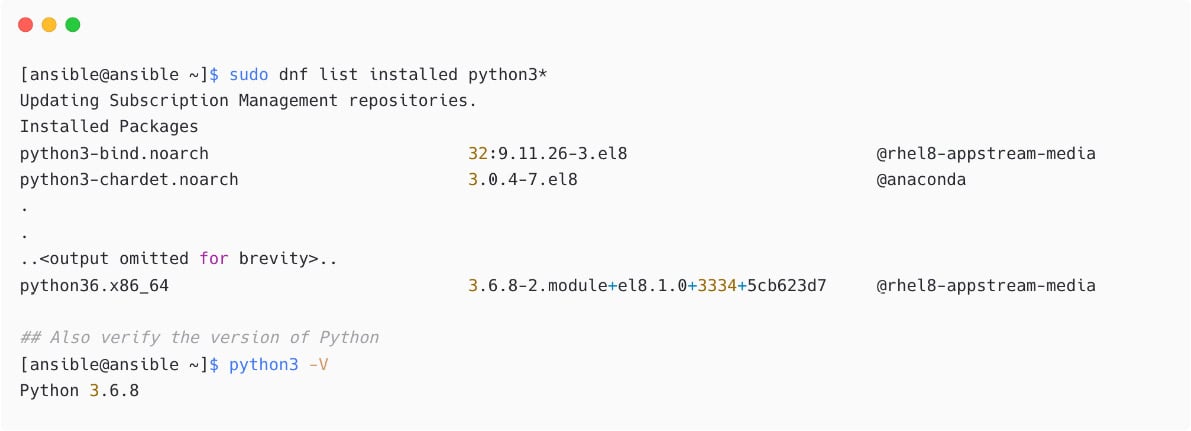
Figure 1.7 – Checking installed Python packages and version
If you have a supported Python version installed, then proceed with the Ansible installation as explained in the next section.
Installing Ansible using the package manager
Depending on the OS, you need to add and enable the appropriate repositories before installing Ansible. For example, if you are using Red Hat Enterprise Linux (RHEL), then you need to ensure the Red Hat subscriptions are in place and repositories are enabled to install Ansible:

Figure 1.8 – Installing Ansible package
Verify an installed Ansible version with the following command:
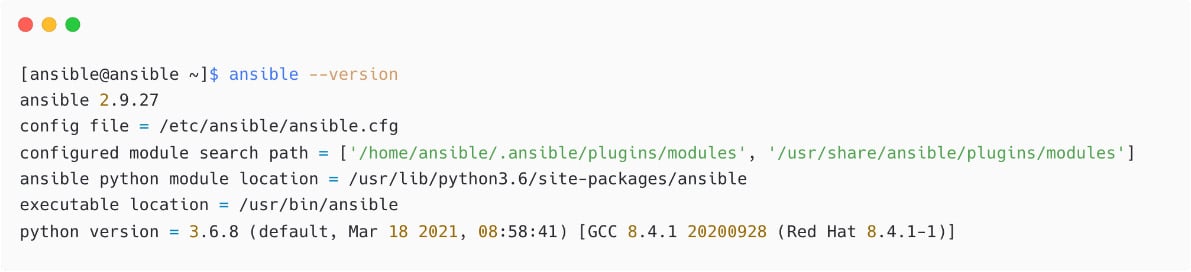
Figure 1.9 – Verifying Ansible installation
From this output, see the version of Ansible (2.9.27), the default configuration file used(config file = /etc/ansible/ansible.cfg), the module search path, the Python version in use, and other details.
The preceding Ansible version is coming from the default repository that you have configured on the OS. If you want to install the latest or different version of Ansible, then you need to follow different methods.
Installing Ansible using Python pip
You need to install pip if it is not already available on the system and then install Ansible using Python pip as follows:

Figure 1.10 – Installing Ansible using Python pip
Please note, when you execute pip install ansible, you are installing the Ansible package, which contains ansible-core and Ansible collections. I have already explained Ansible collections earlier in this chapter.
Pip-Based Ansible Installation and Support
It is best practice to follow the installation based on the OS package manager to get the appropriate support and updates automatically. Also, pip-based installations are hard to maintain and upgrade when there are newer versions of software available.
If you want to install a specific version of ansible, ansible-base, or ansible-core, then use the version information as follows:
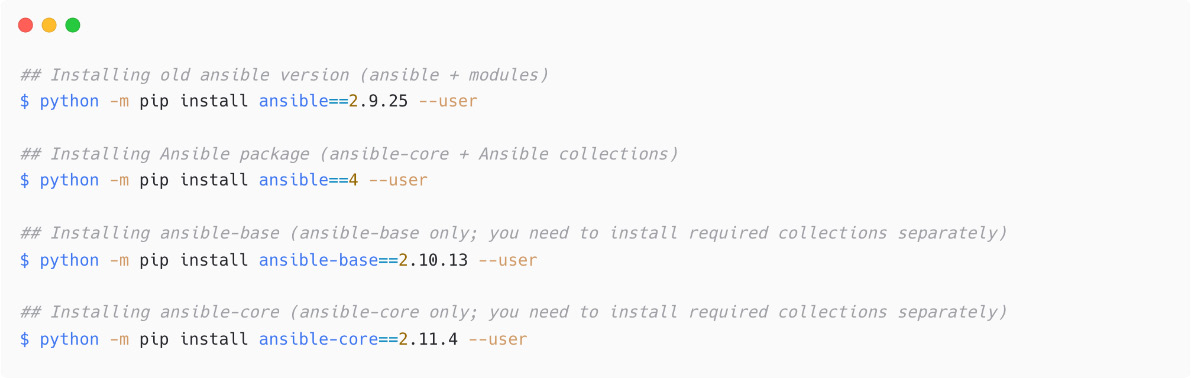
Figure 1.11 – Installing specific version of Ansible using pip
Let's check the Ansible version now:

Figure 1.12 – Check Ansible version
See the DEPRECATION WARNING message and ignore that in a development environment. But in the production environment, you need to make sure you are using the supported Python version for Ansible.
Ansible Installation
Check the Ansible documentation for instructions for different OSs and methods at https://docs.ansible.com/ansible/latest/installation_guide/intro_installation.html.
Deploying Ansible
Before you start with automation jobs, you need to configure Ansible for your environment using the ansible.cfg file. Ansible will look for a configuration file in four places in order, as listed in the following:
$ANSIBLE_CONFIG: Configuration file path in an environment variable./ansible.cfg: Configuration file in the current directory~/.ansible.cfg: Configuration file in the home directory/etc/ansible/ansible.cfg: Default configuration file
It is a best practice to keep the project-specific ansible.cfg file in the project directory:

Figure 1.13 – Creating the ansible.cfg file
Add some basic configurations inside the ansible.cfg file:

Figure 1.14 – Content of the ansible.cfg file
It is not a best practice to keep remote_user = devops in ansible.cfg; instead, configure it inside the inventory for different hosts and host groups. You will learn about this later in this chapter, in the Creating an Ansible inventory section.
Now, check the Ansible version again to see the difference and see that Ansible is taking /home/ansible/ansible-demo/ansible.cfg as the configuration:

Figure 1.15 – Checking which ansible.cfg is taken by Ansible
You have many other parameters to configure in ansible.cfg but not all of them are mandatory as if you have not specified parameters in your custom ansible.cfg file, then Ansible will load the default configurations as needed.
See another sample ansible.cfg file, which contains some of the important parameters, deciding the privilege escalation in Ansible. These parameters decide the sudo or su operation on the target nodes:
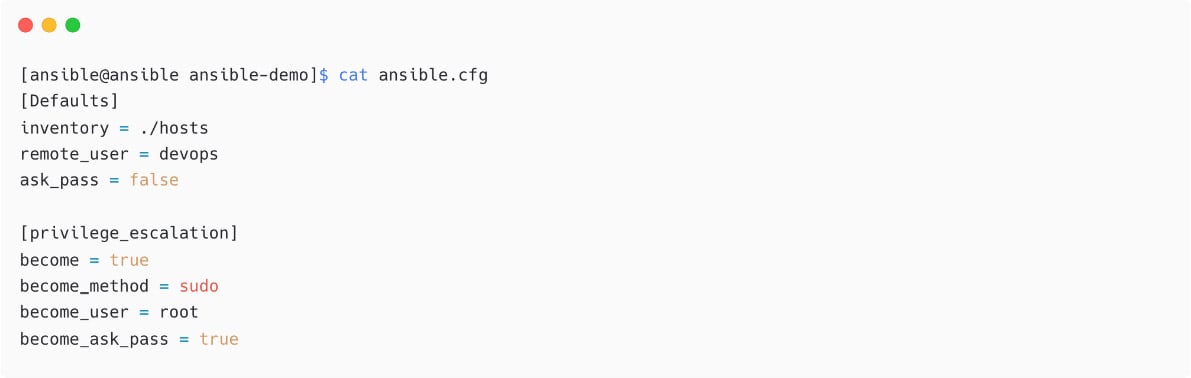
Figure 1.16 – Another ansible.cfg sample with privilege escalation parameters
In the preceding example, the following happens:
- Ansible will log in to the remote node as a
devopsuser and without asking for a password (ask_pass = false). - Ansible will automatically escalate privilege (
become = true) toroot(become_user = root) by using thesudomethod (become_method = sudo) and it will also ask for asudopassword for the user. Turn this off with thebecome_ask_pass = falsesetting.
Configure different credentials for different nodes in the Ansible inventory. You will learn about that in a later section of this chapter.
Also note, in the preceding example I have not created any inventory files yet. I just mentioned the inventory filename there as ./hosts.
Creating an Ansible inventory
Use any name for your inventory file, such as hosts, inventory, myhosts, or production-servers. Do not confuse this hosts file with the /etc/hosts file. When you have more and more managed nodes in inventory files, split the inventory into groups or into separate inventory files. For example, put production servers and devices in a file called production-hosts, and staging nodes into the staging-hosts file; there are no restrictions on this. Also note, if you are installing Ansible using the yum or apt utilities, then there will be a default inventory file called /etc/ansible/hosts with sample inventory content. Refer to that file to start with, but it is best practice to create your project-specific inventory file inside your project directory itself. It is possible to create inventory files in the ini or yaml formats as follows:

Figure 1.17 – Creating inventory file inside project directory
Add content inside the file as follows and save the file:

Figure 1.18 – Sample inventory file
You do not need to add localhost as the localhost entry is implicit in Ansible. That means we can still call the localhost node and Ansible will create an implicit entry. In the preceding demonstration, I have added this to show an entry as a sample. Since localhost is the local machine, you will not be using an SSH connection and it is possible tell Ansible the connection type for localhost as local:
localhost ansible_connection=local
It is not easy to remember the nodes with IP addresses or nodes with long hostnames. In Ansible, use any name for your hosts, and mention the actual name or IP address using the ansible_host parameter.
Update your inventory with the correct entry name now. Please note, this is optional, but it is a best practice to use human-readable names rather than IP addresses and long Fully Qualified Domain Names (FQDNs):
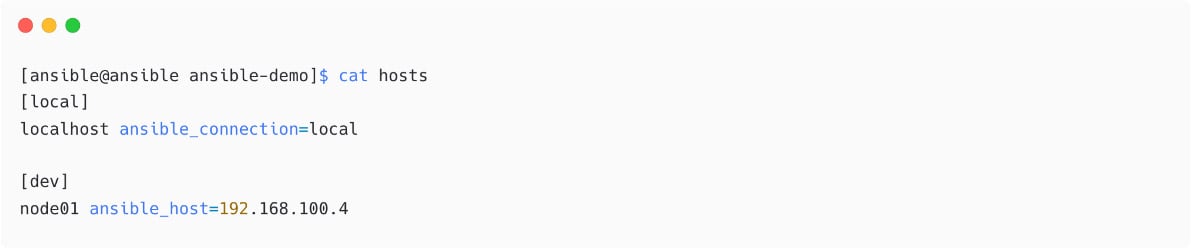
Figure 1.19 – Ansible inventory with human-readable names and ansible_host
The default ansible_connection is ssh and you do not need to mention that in the inventory. If you are using any other connection types, then you need to mention them, such as local, winrm, or paramiko.
Add any number of nodes here with multiple host groups (as the dev host group in the preceding example).
Now, test your inventory to make sure Ansible is able to read and understand your inventory and hosts. Please note that you are not connecting to the hosts from Ansible using this command:

Figure 1.20 – List inventory hosts
Create another inventory file with some dummy managed nodes:
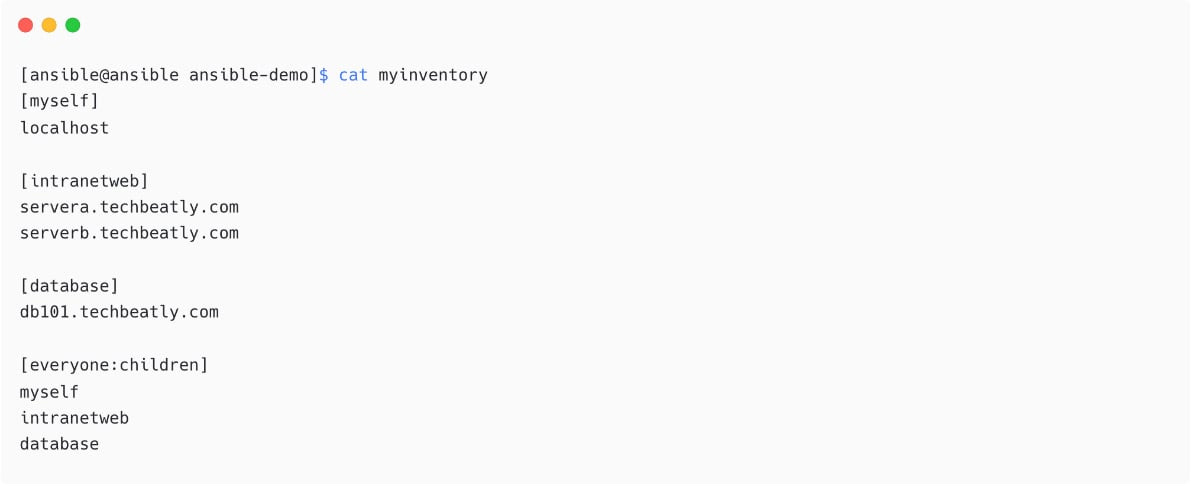
Figure 1.21 – Another Ansible inventory with more hosts and groups
In the preceding inventory, see the following:
- You have four host groups:
myself,intranet,database, andeveryone. everyoneis the parent of themyself,intranet, anddatabasehost groups.
You have two inventory files here now:

Figure 1.22 – Multiple inventory files in project directory
To use a different inventory file, you do not need to change the content of ansible.cfg; instead, use the -i switch to specify the inventory file dynamically. Ansible will take the mentioned inventory files instead of the one configured in the ansible.cfg file as follows:
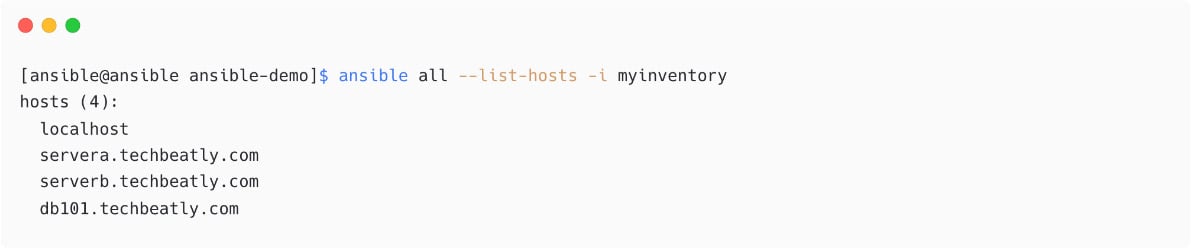
Figure 1.23 – List inventory hosts with different a inventory file
Use the --help options to see all the available switches with the Ansible command:

Figure 1.24 – List inventory hosts with different a inventory file
It is also possible to use patterns to filter the managed hosts with supported patterns. For example, let us display only managed nodes with *techbeatly.com:
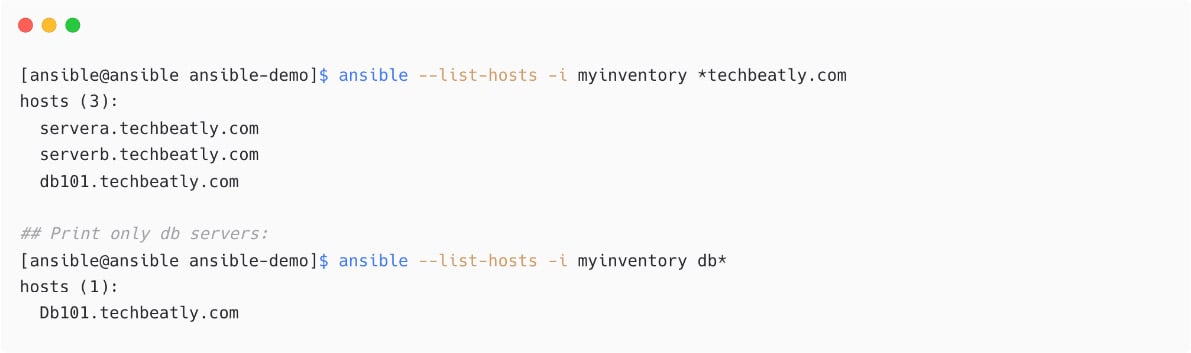
Figure 1.25 – Host selection using patterns
Ansible host patterns
Look up more information about patterns, targeting hosts, and groups at https://docs.ansible.com/ansible/latest/user_guide/intro_patterns.html.
Look up more information about the Ansible dynamic inventory at https://docs.ansible.com/ansible/latest/user_guide/intro_dynamic_inventory.html and https://github.com/ansible/ansible/tree/stable-2.9/contrib/inventory.
In the next section, we will learn how to configure managed nodes and connections.
Configuring your managed nodes
Use any supported authentication mechanisms to connect from the Ansible control node to managed node, such as SSH key-based authentication, username and password-based authentication, and SSL certificate authentication, for example.
Setting up SSH key-based authentication
It is possible to automate most of the following steps using Ansible ad hoc commands, but we will be using the manual approach to understand what backend configurations are needed.
The steps to create a user (for example devops) and enable SSH key based access on node-1 are as follows:
- Create a dedicated user on the target node (e.g.: node01) as follows. (This is not mandatory, and it is possible to use any existing user accounts and configure that in Ansible.):
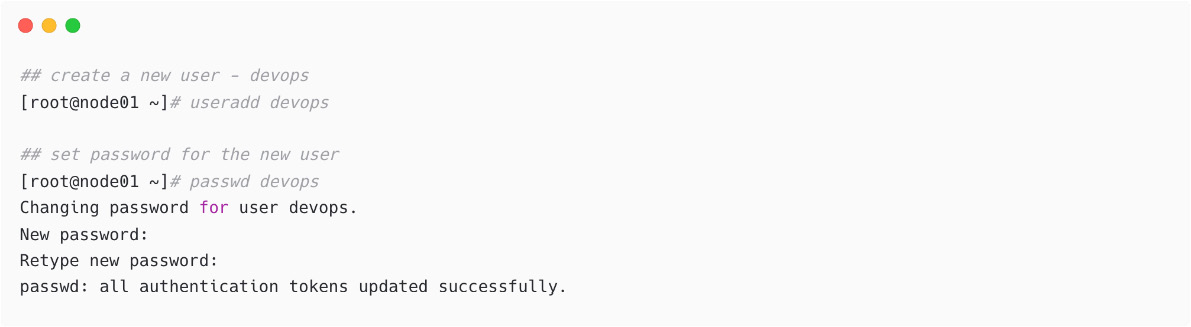
Figure 1.26 – Create new user and set password
If you do not have Domain Name System (DNS) servers in the network, then directly use the IP address with the ansible_host option, or add entries in /etc/hosts as local DNS resolution.
- Enable the
sudoaccess for the new user because, for any kind of privileged operation on the target node, you will be required to have this access:

Figure 1.27 – Enabled privileged access for the new user
- Create an
SSHkey pair on the Ansible control node. It is possible to create any supported type and size. Please note, if you have any existing key with the same name, please remember to use a different name or backup the original SSH key pairs:
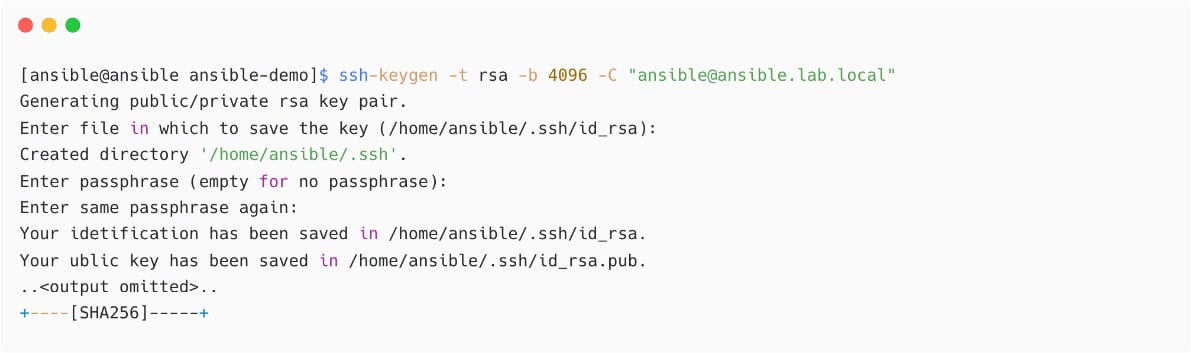
Figure 1.28 – Generating SSH key pair on Ansible control node
- Verify the SSH key permissions:
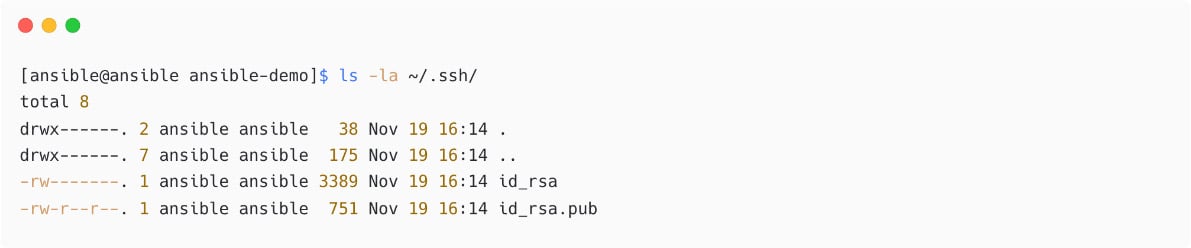
Figure 1.29 – Verify SSH key permission
- Copy the SSH public key from the Ansible control node to managed nodes under the
devopsuser using thessh-copy-idcommand:
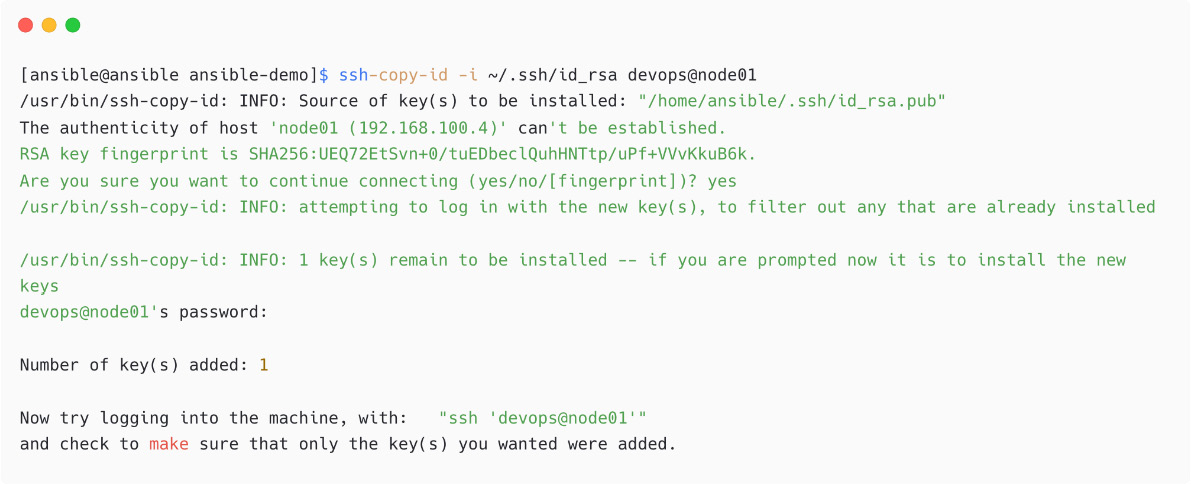
Figure 1.30 – Copy SSH public key to managed node
If you have issues with password authentication or copying, then manually copy the public key content from /home/ansible/.ssh/id_rsa.pub to the /home/devops/.ssh./authorized_keys file on the managed node.
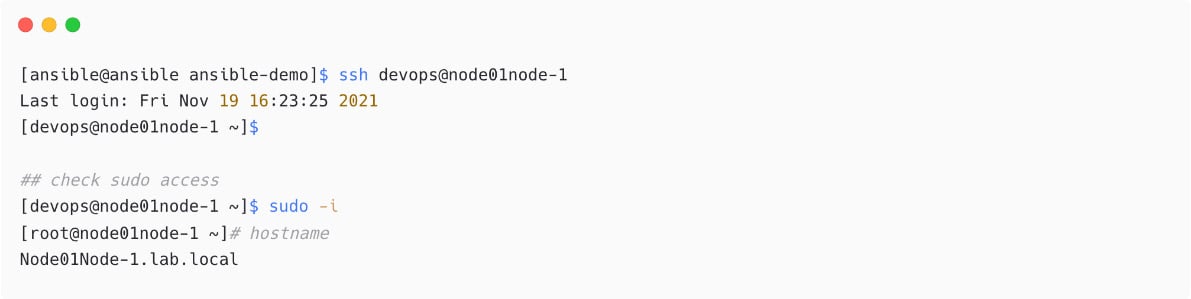
Figure 1.31 – Login to managed node without password
How to Set Up SSH Key-Based Authentication
Check out the steps on how to set up SSH key-based authentication at https://www.techbeatly.com/2018/06/how-to-setup-ssh-key-based-authentication.html.
In the next section, we will explore the option to use multiple credential for different managed nodes.
Multiple users and credentials
If you have different credentials for different managed nodes, then configure the remote username, SSH key to be used, and more in your inventory file. Let me show a sample for our node01 managed node in our inventory:
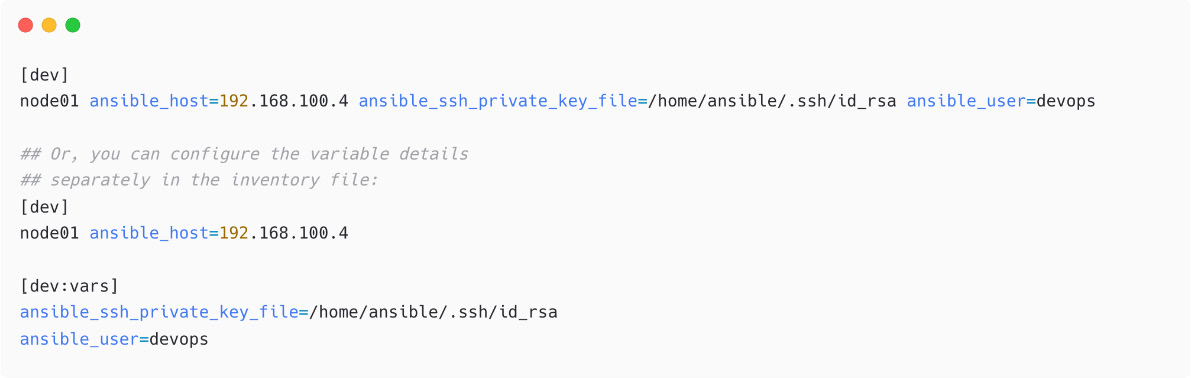
Figure 1.32 – Configuring SSH key information for managed nodes
In the latter example, we have used a variable section for the dev host group and mentioned the SSH key and remote user details.
Ansible ad hoc commands
The ansible command can be used to execute single jobs on managed nodes without a playbook; this is called an Ansible ad hoc command. It can be a simple connectivity check (ping) to the managed nodes, creating a user account, copying some files, or restarting a service, and execute these tasks without writing an Ansible playbook.
For example, it is possible to use the ping module to test the connection from Ansible to the managed node, node01, using this user and SSH key pair:
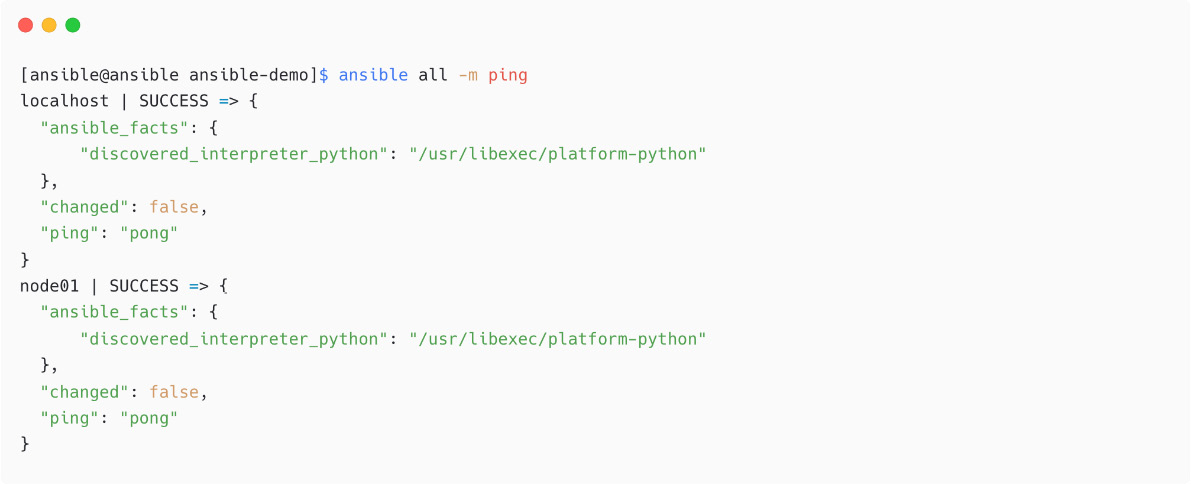
Figure 1.33 – Ansible ad hoc command using ping module
In the preceding snippet, as you have localhost also in the inventory (by implicit), the task will be executed on both localhost and node01 nodes when you mention all. The Ansible ping module is not just a regular network ping (ICMP); instead, it will log in to the managed node and return the result, pong.
Execute another Ansible ad hoc command using the shell module to check what remote user Ansible is using for connection:

Figure 1.34 – Ansible ad hoc command using shell module
From the preceding output, see that localhost is executed with the default ansible user and the dev node with the devops user.
Now, execute multiple commands using the shell module:
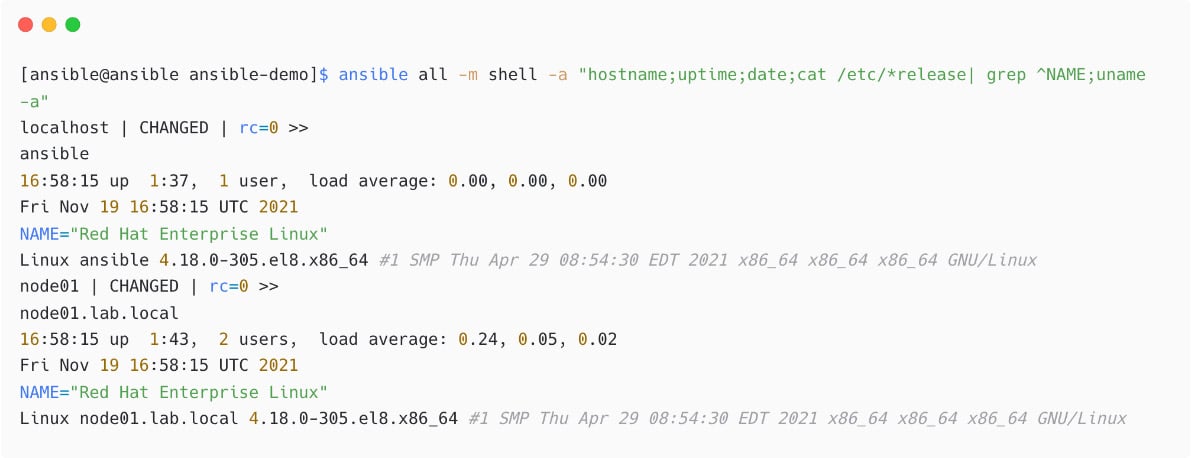
Figure 1.35 – Multiple commands in shell module
Please note that the preceding example was used to demonstrate the shell module, and similar details can be collected using ansible_facts without such tasks.

Figure 1.36 – Ansible ad hoc command using setup module
You will learn more about ansible_facts in Chapter 3, Automating Your Daily Jobs.
Installing a package using Ansible
You need to ensure that you have package repositories (yum or apt) configured and enabled on the target machine.
Install the vim package on node01:
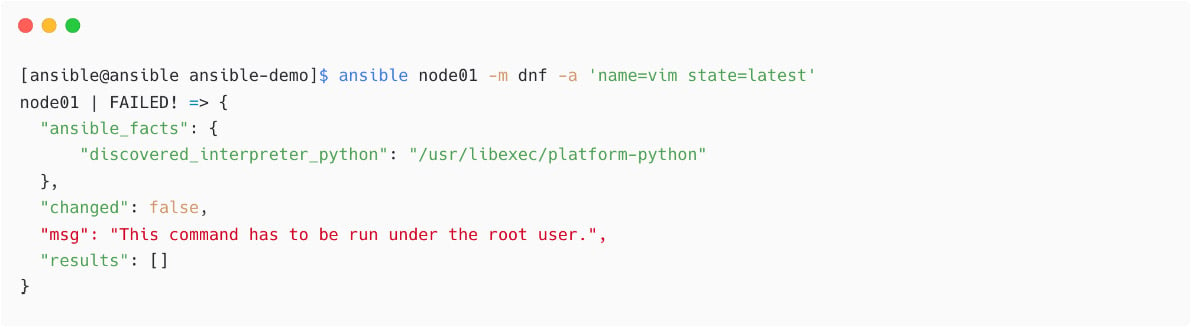
Figure 1.37 – Ansible ad hoc command using dnf module
From the preceding output, see that you are using the devops user for connecting to managed nodes, which is a normal user. You do not need to add the become details in ansible.cfg; instead, pass this become switch while executing the ansible command, which is -b. (For Ansible playbooks, you can enable or disable the privilege escalation at the play level or tasks level):
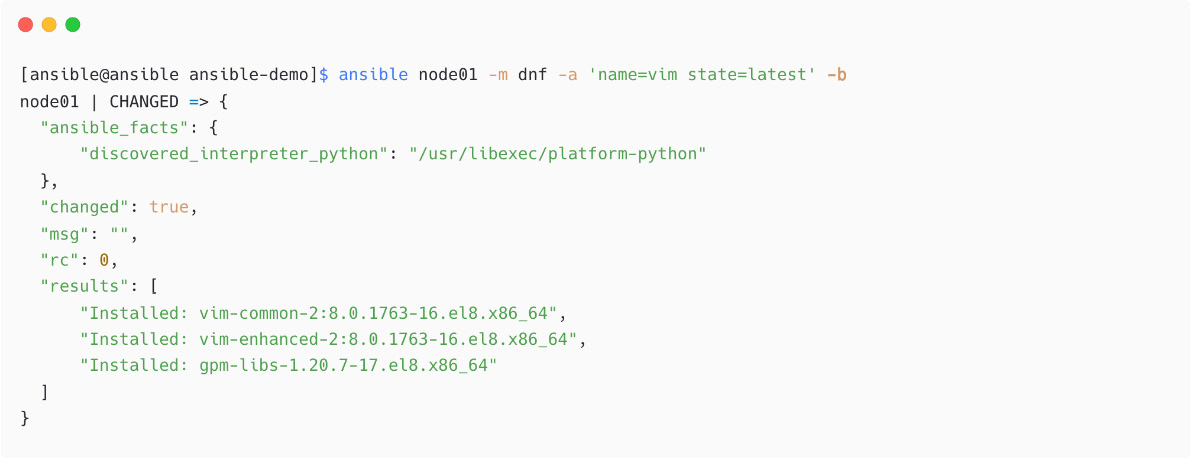
Figure 1.38 – Installing package using dnf module and privileged mode
The package installation is successful as per the output.
The preceding ad hoc execution can be written in a playbook as follows:

Figure 1.39 – Package installation using an Ansible playbook
You will learn more about writing playbooks in Chapter 2, Starting with Simple Automation.
Now, remove the same package using an Ansible ad hoc command; instead of state=latest, use state=absent:
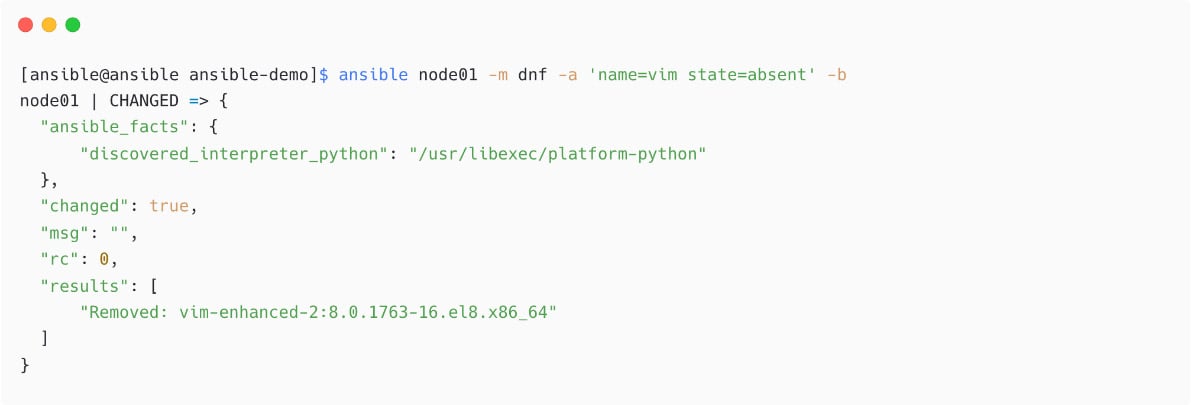
Figure 1.40 – Removing package using Ansible ad hoc command
We have now successfully installed and uninstalled a package using Ansible.
Summary
In this chapter, you have learned about the core concepts of Ansible, how Ansible works, and the key terminology, including Ansible inventory, playbooks, tasks, Ansible control node, managed nodes, and modules. You have also learned about basic Ansible installation, configuration, and deployment, and the importance of managed node configuration, SSH key credentials, and passwordless SSH.
In the next chapter, you will learn how to start with simple automation playbooks and execution. Then, you will learn how to find suitable Ansible modules for playbook development and remote node connection methods.
Further reading
- Ansible documentation: https://docs.ansible.com/ansible/latest/index.html
- Ansible control node requirements: https://docs.ansible.com/ansible/latest/installation_guide/intro_installation.html#control-node-requirements
- Ansible dynamic inventory: https://docs.ansible.com/ansible/latest/user_guide/intro_dynamic_inventory.html and https://github.com/ansible/ansible/tree/stable-2.9/contrib/inventory
- Ansible Automation Platform: https://www.ansible.com/blog/introducing-red-hat-ansible-automation-platform
- Installing Ansible: https://docs.ansible.com/ansible/latest/installation_guide/intro_installation.html
- How network automation is different: https://docs.ansible.com/ansible/latest/network/getting_started/network_differences.html