


The Android SDK provides a powerful tool for programming mobile devices, and the best way to master such a tool is to get our hands dirty right from the very beginning.
You can work through this book step by step as a complete guide, and if you have ideas for your own applications, which I'm sure you do, then just look up the relevant chapter and recipe and dive right in.
The Activity class provides one of the fundamental building blocks of Android development, forming the primary interface between the user and an application.
Activities are the elements of an application that the user sees and interacts with and they are generally displayed within a rectangular portion (if not all) of the screen. For those with a background in Java, an activity can be thought of as being similar in function to the Swing JFrame.
This chapter explains how to declare and launch activities within an application, and how to manage several activities at once by sharing data between them, requesting results from them, and by calling one activity from within another.
This chapter also briefly explores the Intent object, which is often used in conjunction with activities (as well as other fundamental components) and is very handy for starting an activity from any point.
Note
Before following the recipes in this book you will need to install the Android SDK, the Android AVD manager, and the Eclipse IDE, along with the ADT plugin. The ADT plugin, which stands for Android Development Tools, provides a seamless way to add Android-specific controls to the Eclipse IDE.
Instructions on how to do this can be found at http://developer.android.com/sdk/installing.html.
Activities and other application components, such as services, are declared in the AndroidManifest XML file. Declaring an activity is how we tell Android about how the activity can be requested, and what code to run when it is requested. For example, an application will usually indicate that at least one activity should be visible as a desktop icon and serve as the main entry point to the application.
As with most recipes, we will be using the Eclipse IDE. If you have not done so already, start up Eclipse and ensure that you have installed the ADT Plugin.
Android projects are built against a target platform or API level. Here we have used API level 8, which corresponds to the Android 2.2 platform (FroYo). It is quite possible to use any level for this task but if you intend to make use of the 'holographic' UI you will need to look at the recipe about optimizing for 3.0 in Chapter 2, Layouts.
The Eclipse Android project wizard is as good a place to start building an application as any and it will automatically generate a manifest file that includes a basic activity declaration:
Run the project wizard. From the Eclipse File menu select New and then Android Project.
Enter the details of your project as you can see in the next screenshot and click on Finish:

Open up the manifest file from the Package Explorer, and then click on the AndroidManifest.xml tab at the bottom to display the code that the IDE has produced.
Within the
<activity>element, find the following attributes:android:name=".DeclaringAnActivity" android:label="@string/app_name"
Edit the code so that it matches the following snippet:
<activity
  android:name=".DeclaringAnActivity"
  android:label="Welcome to the Android 3.0 Cookbook"
  android:screenOrientation="portrait">
  ...
</activity>
Run the application on a device or emulator. The title bar and screen orientation now reflect the changes that we have made. If you have not done this before, instructions can be found at http://developer.android.com/guide/developing/building/building-eclipse.html.
Note
Note that the use of string literals, as in "Welcome to the Android 3.0 Cookbook", is not considered good practice, as it makes translation next to impossible. String constants should be defined in a separate XML file; a literal is used here (and elsewhere in the book) only to simplify examples.
An activity represents a single task that the user can perform, such as editing some text or selecting a media file from a list. Each of our activities must be declared in the AndroidManifest XML file, which resides in the root directory of the project.

The project wizard provides us with two basic attributes:
The name DeclaringAnActivity refers to the Java subclass that will contain our activity's methods and fields.
The label app_name acts as a title for our application. It is displayed on the title bar of the device at runtime and also as the text under the application icon.
We also added an attribute of our own, screenOrientation, which does exactly what you might expect it to.
The manifest is used to control an activity's start-up state and to apply features such as themes, or as just demonstrated, screen orientation. As we will see later though, most attributes can be set and changed dynamically through Java code as well.
Tip
Downloading the example code
You can download the example code files for all Packt books you have purchased from your account at http://www.PacktPub.com. If you purchased this book elsewhere, you can visit http://www.PacktPub.com/support and register to have the files e-mailed directly to you.
The Android application model can be seen as a service-oriented one, with activities as components and intents as the messages sent between them. Here, an intent is used to start an activity that displays the user's call log, but intents can be used to do many things and we will encounter them throughout this book.
To keep things simple, we are going to use an intent object to start one of Android's built-in activities, rather than create a new one. This only requires a very basic application, so start a new Android project with Eclipse and call it ActivityStarter or something like that.
We are going to edit the Java subclass responsible for the main activity: the one declared in the manifest file. This class extends the activity class, and by overriding its onCreate() method we can introduce code that will be executed when the application is first launched:
Using the Package Explorer, open the Java file inside the
srcfolder of the project. It will have the same name as the activity, entered when the project was created: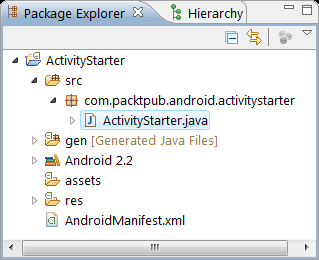
Add a new method to the class, similar to this one:
void startActivity() {
  Intent myIntent = new Intent();
  myIntent.setAction(Intent.ACTION_CALL_BUTTON);
  startActivity(myIntent);
}
Now, call this method from the
onCreate()method so that it executes when the application is launched:@Override public void onCreate(Bundle state) { super.onCreate(state); setContentView(R.layout.main); startActivity(); }Save and run the project. The application now displays the user's call log.
If this generates an error message, it may be that the correct libraries have not been imported. To use intents we have to import the relevant library, which can be done with
import android.content.Intent; however it's easy to get Eclipse to import any missing libraries simply by pressing Shift + Ctrl + O.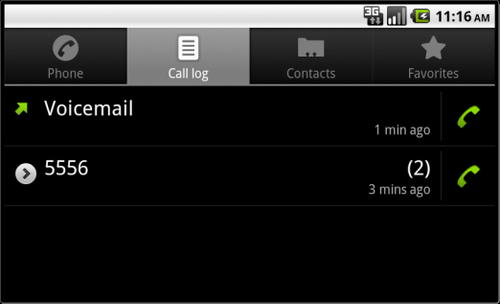
Press the back button on the device (or emulator) to see that the call log activity was actually called from our original main activity.
Intents operate as asynchronous messages sent between application components and they are used to activate services and broadcast receivers as well as activities. Intents are passive data structures that provide an infrastructure for our activities and other components.
The onCreate() method is called as soon as the activity starts and so calling our startActivity() method from within it means that we are immediately taken to the call log activity. More often than not we would use a button or menu item to perform such an action, and we haven't done so in order to simplify the demonstration and make it easier to incorporate in your own application.
Again, note that this project was built against Android 2.2 (API level 8) but this choice was arbitrary as the libraries used have been available since Android 1.5 and you should, ideally, build against the target device that you are testing on.
The previous example required only an action to be set but most intent objects make use of a setData() method as well as the setAction() method used.
Replace the setAction() statement in the example with these two lines:
myIntent.setAction(Intent.ACTION_VIEW);
myIntent.setData(android.provider.MediaStore.Images.Media.INTERNAL_CONTENT_URI);
This will open the device's image gallery when run and utilize both data and action parts of the intent.
Eclipse's auto-complete function allows us to explore Android's other baked-in activities. Simply start entering the code here and then scroll through the lists presented:
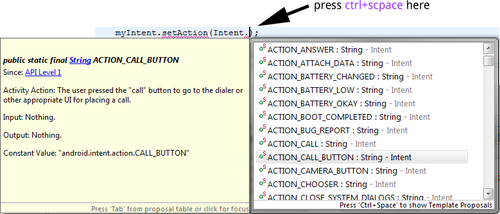
If the drop-down list fails to appear, press Ctrl + Space but note that when components share methods you may well see actions that correspond to other classes such as services or broadcasts, although the inline documentation is quite thorough and will mention when specific data or extra parameters are required.
To start an activity from a menu selection, see the recipe Handling menu selections in Chapter 4, Menus.
Often we will want to activate one activity from within another. Although this is not a difficult task, it will require more setting up than the previous two recipes as it will need two activities to be declared in the Manifest, a new Class to serve as our second activity, and a button along with a click listener to perform the switch.
This recipe can be started from scratch, so create a new Android project in Eclipse and call it ActivitySwitcher. Creating a project with the wizard automatically generates the first of our activities. This example can be built against any platform target and here we have used 2.2 (API level 8).
First we create a new public class that we will use to create the second activity:
Create a new public class in the same location as the original activity subclass using the tool bar's New Java Class icon or the package's context menu from the Package Explorer, selecting New and then Class.
Name the class
MySubActivityor something similar and make sure to complete the Superclass field as seen in the following screenshot: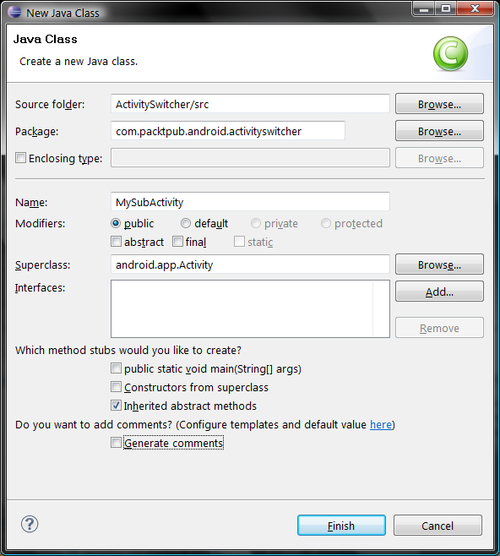
Next, we need to declare our new activity in the manifest file. Open the
AndroidManifest.xmlfile from the Package Explorer and select the Application tab.Under Application Nodes, click on the Add... button and then select Activity.
In the panel on the right-hand side, fill in the Name field as
.MySubActivityand the Label field asmy sub activity.Open the AndroidManifest.xml tab and check whether these changes are reflected in the XML, which should look similar to the following snippet:
<activity
  android:name=".MySubActivity"
  android:label="my sub activity">
</activity>
Next, we must add a button that the user can click on to switch activities. This is set up through the
main.xmlfile which resides in theres/layoutfolder in the Package Explorer.Open the
main.xmlfile and click on the XML tab at the bottom so that the code can be edited.Add the following
<Button>element just after the<TextView>element that was generated automatically:<Button android:text="click to switch activities" android:id="@+id/main_activity_button" android:layout_width="wrap_content" android:layout_height="wrap_content"> </Button>
Now open the original Java activity class,
ActivitySwitcheror whatever you called it.Add the following code to the
onCreate()method after thesetContentView(R.layout.main);statement, making sure to replace the package and class parameters in thesetClassName()call with your own, as they will most likely be different:Button switchButton = (Button) findViewById(R.id.main_activity_button); switchButton.setOnClickListener(new OnClickListener() { @Override public void onClick(View v) { Intent intent = new Intent(); String packageName = "com.packtpub.android.activityswitcher"; String className = "com.packtpub.android.activityswitcher.MySubActivity"; intent.setClassName(packageName, className); startActivity(intent); } });Run the application on a device or emulator. Clicking on the button will now start the sub activity.
This new activity is not a very exciting application. Our activity does nothing but demonstrate how to switch from one activity to another, which of course will form a fundamental aspect of almost any application that we develop.
In most cases there would be a separate layout declaration alongside main.xml in the res/layout folder for each new activity. Also a button, or some other object, to return us to our original activity would be quite reasonable but these features have been omitted here simply to save us the extra typing, and of course, the user can always use the device's own Back button to achieve this.
We have seen how to create a new subclass for each new activity and how to declare these in the manifest. We have also seen how a UI element such as a button is declared in an XML file, main.xml, and then associated with a data member in Java with the findViewById() method.
Again we have made use of the intent object, not only to start the new activity but also to specify which activity class to run.
To learn more about embedding widgets like the Button, see Chapter 3, Widgets.
Being able to start one activity from another is all well and good, but we will often need to know how the called activity has fared in its task or even which activity has been called. The startActivityForResult() method provides the most straightforward way to do this.
Returning a result from an activity is not that different from calling one the way we did in the previous recipe. Start up a new Android project in Eclipse and call it GettingResults.
In this recipe we will need to create a new activity class, provide it with an onCreate() method, then edit our default class and include our new activity in the manifest file:
Create a new class called
MyNewActivityin the same package as theGettingResultsclass and give it the Superclassandroid.app.Activity.Extend the class as an activity, provide it with an
onCreate()method, and fill it out as given next.Pressing Ctrl + Space once you have typed as far as
public void onCreawill prompt Eclipse to complete most of this method for you:public class MyNewActivity extends Activity { @Override public void onCreate(Bundle state) { super.onCreate(state); setResult(42); finish(); } }Press Ctrl + Shift + O. This will import the following libraries:
import android.app.Activity;
import android.os.Bundle;
Open the
GettingResultsclass and edit it to look like this:public class GettingResults extends Activity { @Override public void onCreate(Bundle state) { super.onCreate(state); setContentView(R.layout.main); Intent i = new Intent(this, MyNewActivity.class); startActivityForResult(i, 0); } @Override protected void onActivityResult(int requestCode, int resultCode, Intent data) { super.onActivityResult(requestCode, resultCode, data); Toast.makeText(this, Integer.toString(resultCode), Toast.LENGTH_LONG).show(); } }Import any library the class needs with Ctrl + Shift + O.
Open the manifest file and include a new
<activity>element underneath the one that is already there. Include the following attributes:<activity android:name=".MyNewActivity" android:label="my new activity"> </activity>
Run the application on a device or an emulator. A small pop-up appears in the initial activity that has been passed from the called one:

Here, the called activity used setResult() to return a result code back to the calling activity. We used an arbitrary value in our example but a result code can be used to represent an outcome such as the index of a selected item.
The corresponding member in the calling activity is the onActivityResults() method. Besides the result code that we just sent from the called activity, the method receives a request code. This is simply the integer value that was passed with the startActivityForResult() call which takes the form:
startActivityForResult(Intent intent, int requestCode);
We used 0 as our request code because we knew where it came from—but this value can be used to identify where the request originated in less trivial applications with several activities.
Note
If startActivityForResult() is called with a negative request code it will act exactly as if it were a call to startActivity()—that is, it will not return a result.
Activity results are always handled by the calling activity's onActivityResults() method, which makes use of the
request code as well as the result code.
We made use of the Toast object which is a neat little pop-up view that can be used to unobtrusively inform the user of some event or the other. It also functions as a handy little tool for on-the-fly debugging as it doesn't need setting up or screen estate.
In the previous example, we only returned an integer with setResult() but there is an alternative format.
To learn more about creating new activity classes refer to the previous recipe, Switching between activities.
For more information on Toasts see the recipe Making a Toast in Chapter 7, Notifying the user.
A smart phone is a dynamic environment for software to exist in and an application can be interrupted for any number of reasons. Even turning the handset on its side will cause an activity to reload in orientation sensitive programs.
Android provides SQLite for storing and retrieving data but this would a little heavy handed for storing an instance value or two and fortunately the activity class has built-in methods that we can override and use to store primitive name or value pairs.
Our recipes get a little more involved from here on and so we will not be able to include all the code in the given examples. We will assume that the reader is familiar with the subjects covered in the past few recipes and will be able to create applications with the necessary elements without recourse to the exact text. If not, have a quick look through the preceding recipes. We will not introduce any new subjects without fully explaining them.
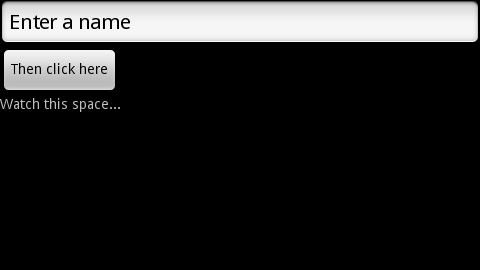
Create a new application project and call it
StateSaver.Include these elements within the
main.xmllayout file:An EditText
A Button
A TextView
Provide them with the following android:ids:
@+id/edit_text
@+id/button
@+id/text_view
Change the text in the boxes to match the following screenshot:
In this recipe we will create a simple application that 'remembers' a line of text that we enter when the activity is reloaded. To do this we override the activity's onSaveInstanceState() and onRestoreInstanceState() methods:
Declare the three UI elements that we just created as class-wide fields in the activity Java file, as follows:
public class StateSaver extends Activity {
  private EditText mEditText;
  private Button mButton;
  private TextView mTextView;
We also need a
Stringconstant:private static final String KEY = null;
Inside the
onCreate()method and after thesetContentView()statement associate these views with their Resource IDs:mEditText = (EditText) findViewById(R.id.edit_text); mButton = (Button) findViewById(R.id.button); mTextView = (TextView) findViewById(R.id.text_view);
Create a click listener for our button (also inside
onCreate()):mButton.setOnClickListener(new OnClickListener() { @Override public void onClick(View v) { mTextView.setText(mEditText.getText().toString); } });Now is a good time to import any libraries. Pressing Shift + Ctrl + O will cause Eclipse to offer you a choice between
android.view.View.OnClickListenerandandroid.content.DialogInterface.OnClickListener. Make sure that you selectandroid.view.View.Beneath the
onCreate()method, add theonSaveInstanceState()method:@Override public void onSaveInstanceState(Bundle state) { state.putString(KEY, mTextView.getText().toString()); super.onSaveInstanceState(state); }Beneath this last method, include the
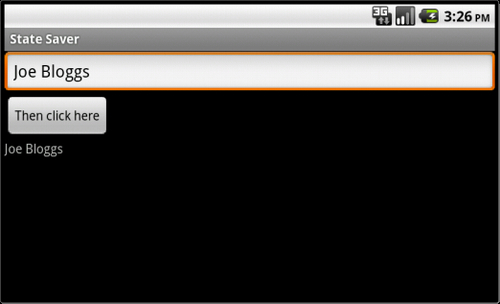
onRestoreInstanceState()method:@Override public void onRestoreInstanceState(Bundle state) { super.onRestoreInstanceState(state); mTextView.setText(state.getString(KEY)); }Run the project on a device or emulator. Enter some text into the EditText view and click on the button. Then restart the activity by exiting and restarting or by rotating the handset. When the activity begins afresh, the TextView restores to its remembered state.
The way these state saving methods work is really quite simple. When our application is dropped from memory, a Bundle of name/value pairs can be stored with the onSaveInstanceState() method. This Bundle is then handed back when the activity restarts to both the onRestoreInstanceState() and the onCreate() methods. This is an important point as the Bundle is made available to both procedures and gives us a choice over where and how to handle activity restarts. This is because onRestoreInstanceState() is not called until after onStart() meaning we can apply any initialization that we may need before restoring our values.
The two methods introduced here are not the only way to ensure that a screen component's state is stored.
Internal memory can also be used to store other private data and details on how to do this can be found in the recipe Using internal storage for private data in Chapter 5, Data and Security.
The recipe Storing public data on external storage in Chapter 5, Data and Security demonstrates how to use SD cards to store data available from outside an application.
Being able to store information about our activities on a temporary basis is very useful but more often than not we want our application to remember things across multiple sessions.
Obviously we can use an SQLite database, but this is a bit extreme if all we want to store the user's name or some preference or the other. Android provides a lightweight technique for doing this in the shape of the SharedPreferences interface.
It is possible to use SharedPreferences in any activity (as well as other application components). The example we use here makes use of a TextView, an EditText, and a Button to permanently store the user's name:
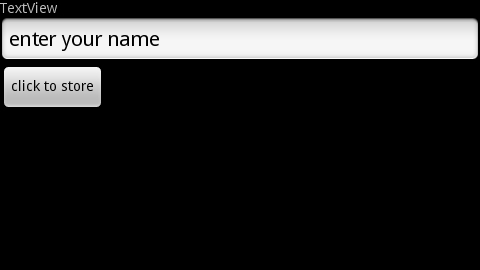
In this recipe the persistent data that we want to store is a string value used to represent the user's name. We will store this during the activity's onPause() method and restore the value in the onCreate() method (as they are called when we most likely need to restore and retrieve our preferences) but SharedPreferences can be applied anywhere:
Declare a class-wide String field,
mUserNameand a String constant KEY with value null.Include the following lines in the
onCreate()method after thefindViewById()statements:SharedPreferences settings = getPreferences(MODE_PRIVATE); mUserName = settings.getString(KEY, "new user"); mTextView.setText("Welcome " + mUserName);Override the
onPause()method and complete it as shown here:@Override protected void onPause() { super.onPause();SharedPreferences settings = getPreferences(MODE_PRIVATE); SharedPreferences.Editor editor = settings.edit(); editor.putString(KEY, mUserName); settings.edit().putString(KEY, mUserName).commit(); }
Add a button and a listener to the
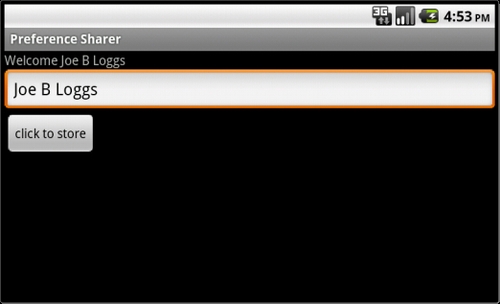
onCreate()method so that we can actually enter a value to be stored, as follows:mButton.setOnClickListener(new OnClickListener() { @Override public void onClick(View v) { mUserName = mEditText.getText().toString(); mTextView.setText("Welcome " + mUserName); } });Run the application on a device or an emulator. Once a new value has been entered it will persist across sessions. In fact we would have to clear it using the device's Applications Manager in Settings, or uninstall and reinstall the application to completely reset it.
We stored just one value here, the string KEY, but we could have stored any number of primitive name/value pairs. Each data type has equivalent getters and setters, for example SharedPreferences.getBoolean() or SharedPreferences.setInt().
When we retrieve the value, in the onCreate() method we provided a string literal "new user". This will be used in the absence of a stored value when the file has not yet been saved and is very useful for handling first-run events.
The saving of our preferences requires the services of the
SharedPreferences.Editor. This is evoked with edit() and accepts remove() and clear() procedures as well as setters like the putString() one we used. Note that we must conclude any storing we do here with the commit() statement.
There is a slightly more sophisticated variant of the getPreferences() accessor, getSharedPreferences(), which can be used for storing multiple preference sets.
Using getSharedPreferences() is no different from its counterpart but it allows for more than one preference file. It takes the following form:
getSharedPreferences(String name, int mode)
Here name is the file and the mode can be one of MODE_PRIVATE, MODE_WORLD_READABLE or MODE_WORLD_WRITABLE and describe the file's access levels.
To store more complex data, see the recipe Creating an SQLite database in Chapter 5, Data and Security.
The Android OS is a dangerous place for an activity. The demand for resources on a battery-operated platform is managed quite ruthlessly by the system. Our activities can be dumped from memory when it's running low, without even a moment's notice, along with any data they contain.
It is therefore essential that we understand the activity lifecycle and where our activities are on the back stack.
Android supplies a series of callbacks that are executed at each stage of the activity lifecycle and can be overridden, enabling us to anticipate user actions and execute code when the state of an activity changes.
To prepare for this exercise, start up a new Android project in Eclipse.
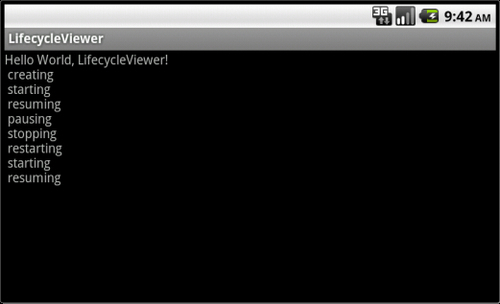
We are going to record each lifecycle state with a persistent TextView whenever any of the activity's callbacks are executed:
In the
main.xmlfile, define the default TextView withandroid:id—we usedandroid:id="@+id/text_view".Open the main Java activity source file and declare a class-wide TextView to correspond with the one we just defined in XML:
private TextView mTextView;
Next, complete the
onCreate()method as follows:@Override public void onCreate(Bundle state) { super.onCreate(state); setContentView(R.layout.main); mTextView = (TextView) findViewById(R.id.text_view); mTextView.append("\n created"); }Now, override the
onPause()callback like so:@Override public void onPause() { super.onPause(); mTextView.append("\n pausing"); }Override the
onResume()method in a similar fashion:@Override public void onResume() { super.onResume(); mTextView.append("\n resuming"); }Repeat this for each of the remaining lifecycle callbacks,
onStart(),onRestart(),onStop(), andonDestroy().Run the application and observe what happens when the activity is interrupted by pressing the Back and Home keys or when a call is sent to or from the phone.
Take a look at the next diagram. Our activity can exist in one of three states: active, paused, or stopped. There is also a fourth state, destroyed, but we can safely ignore it:
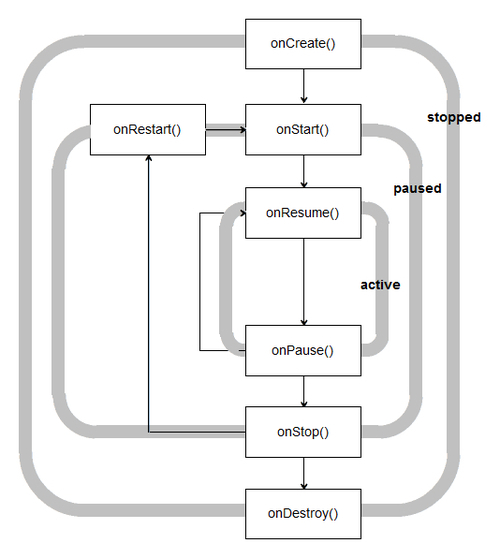
An activity is in the
active state when its interface is available to the user. It persists from onResume() until onPause() which is brought about when another activity is pushed onto the stack. If this new activity does not entirely obscure ours, then ours will remain in the paused state until the new activity is finished or dismissed. It will then immediately call onResume() and continue.
When a newly started activity fills the screen or makes our activity otherwise invisible then our activity will enter the stopped state and resumption will always invoke a call to onRestart().
When an activity is in either the paused or stopped state, the operating system can (and will) remove it from memory when memory is low or when other applications demand it.
Note
In circumstances where resources are demanded suddenly, for example if the user receives a phone call, Android may kill our activity without even running the code in our onDestroy() method. Where possible we should use onPause() or onStop() to enable the user to navigate back to our activity seamlessly.
It is worth noting that we never actually see the results of the onDestroy() method, as by this point the activity has been removed. If you want to explore these methods further then it is well worth employing Activity.isFinishing() to see if the activity is really
finishing before onDestroy() is executed, as seen in the following snippet:
@Override
  public void onPause() {
  super.onPause();

  mTextView.append("\n pausing");

  if (isFinishing()){
    mTextView.append(" ... finishing");
  }

}Despite the effort that we have had to put into preventing Android from shutting down our components prematurely, there are times when we want to deliberately exit an activity. Despite Android's robust approach to resource management it will not wipe our application if there is no demand or if memory is readily available. Although an activity that persists in this way is unlikely to have much of a negative impact, the user will most likely not see it that way and blame our application for draining their battery.
To shut down an activity, directly call its finish() method, which in turn calls onDestroy(). To perform the same action from a child activity use the finishFromChild(Activity child) where child is the calling sub-activity.
It is often useful to know whether an activity is being shut down or merely paused, and the isFinishing(boolean) method returns a value indicating which of these two states the activity is in.
In this chapter we have seen the fundamental role that the Activity class plays in an Android application. Now that we can control the general structure of our projects, it's time to look more closely at the individual components such as layouts and fragments, components that make up the detail of our applications.