In this chapter, we're going to take a look at the main components needed for structuring a game in AndEngine. The topics include:
Know the life cycle
Choosing our engine type
Selecting a resolution policy
Creating object factories
Creating the game manager
Introducing sounds and music
Working with different types of textures
Applying texture options
Using AndEngine font resources
Creating the resource manager
Saving and loading game data
The most appealing aspect of AndEngine is the incredible ease of creating games. The possibility of designing and coding a game in a matter of weeks after first looking into AndEngine is not too farfetched, but that's not to say it will be a perfect game. The coding process can be a tedious task when we do not understand how the engine works. It is a good idea to understand the main building blocks of AndEngine and the game structure in order to create precise, organized, and expandable projects.
In this chapter, we're going to go over a few of the most necessary components of AndEngine and general game programming. We're going to take a look at some classes that will aid us in quickly and efficiently creating a foundation for all sorts of games. Additionally, we'll cover some of the differences between resources and object types, which play the biggest role in shaping the overall look and feel of our games. It is encouraged to keep tabs on this chapter as reference if needed.
It is important to understand the order of operations when it comes to the initialization of our games. The basic needs for a game include creating the engine, loading the game's resources, and setting up the initial screen and settings. This is all it takes in order to create the foundation for an AndEngine game. However, if we plan on more diversity within our games, it is wise to get to know the full life cycle included in AndEngine.
The AndEngine life cycle includes a few methods that we are responsible for defining directly. These methods include creating the EngineOptions object, creating the Scene object, and populating the scene with child entities. These methods are called in the following order:
Define the
onCreateEngineOptions()method:@Override public EngineOptions onCreateEngineOptions() { // Define our mCamera object mCamera = new Camera(0, 0, WIDTH, HEIGHT); // Declare & Define our engine options to be applied to our Engine object EngineOptions engineOptions = new EngineOptions(true, ScreenOrientation.LANDSCAPE_FIXED, new FillResolutionPolicy(), mCamera); // It is necessary in a lot of applications to define the following // wake lock options in order to disable the device's display // from turning off during gameplay due to inactivity engineOptions.setWakeLockOptions(WakeLockOptions.SCREEN_ON); // Return the engineOptions object, passing it to the engine return engineOptions; }Define the
onCreateResources()method:@Override public void onCreateResources( OnCreateResourcesCallback pOnCreateResourcesCallback) { /* We should notify the pOnCreateResourcesCallback that we've finished * loading all of the necessary resources in our game AFTER they are loaded. * onCreateResourcesFinished() should be the last method called. */ pOnCreateResourcesCallback.onCreateResourcesFinished(); }Define the
onCreateScene()method:@Override public void onCreateScene(OnCreateSceneCallback pOnCreateSceneCallback) { // Create the Scene object mScene = new Scene(); // Notify the callback that we're finished creating the scene, returning // mScene to the mEngine object (handled automatically) pOnCreateSceneCallback.onCreateSceneFinished(mScene); }Define the
onPopulateScene()method:@Override public void onPopulateScene(Scene pScene, OnPopulateSceneCallback pOnPopulateSceneCallback) { // onPopulateSceneFinished(), similar to the resource and scene callback // methods, should be called once we are finished populating the scene. pOnPopulateSceneCallback.onPopulateSceneFinished(); }
The code found in this recipe's class is the foundation for any AndEngine game. We've set up a main activity class which serves as the entry point into our application. The activity contains the four main methods included in AndEngine's activity life cycle that we are responsible for, beginning with creating the EngineOptions options, creating the resources, creating the scene, and populating the scene.
In the first step, we are overriding the Engine's onCreateEngineOptions() method. Inside this method, our main focus is to instantiate our Camera object as well as our EngineOptions object. These two object's constructors allow us to define the display properties of our application. Additionally, we've disabled the screen from automatically turning off during application inactivity via the engineOptions.setWakeLockOptions(WakeLockOptions.SCREEN_ON) method call.
In step two, we continue to override the onCreateResources() method, which gives us a specified method for creating and setting up any resources needed within our game. These resources may include textures, sounds and music, and fonts. In this step and the following two, we are required to make a call to the respective method callbacks in order to proceed through the application's life cycle. For the onCreateResources() method, we must call pOnCreateResourcesCallback.onCreateResourcesFinished(), which should be included at the end of the method.
Step three involves instantiating and setting up the Scene object. Setting up the Scene can be as simple as displayed in this recipe, or for more complex projects, it may include setting up touch event listeners, update handlers, and more. Once we've finished setting up the Scene, we must make a call to the pOnCreateSceneCallback.onCreateSceneFinished(mScene) method, passing our newly created mScene object to the Engine to be displayed on the device.
The final step to take care of includes defining the onPopulateScene() method. This method is in place specifically for attaching child entities to the Scene. As with the previous two steps, we must make a call to pOnPopulateSceneCallback.onPopulateSceneFinished() in order to proceed with the remaining AndEngine life cycle calls.
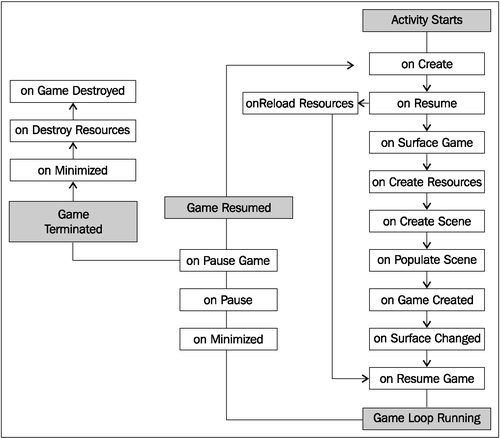
In the following list, we will cover the life cycle methods in the order they are called from the start up of an activity to the time it is terminated.
The life cycle calls during launch are as follows:
onCreate: This method is the Android SDK's native application entry point. In AndEngine development, this method simply calls theonCreateEngineOptions()method in ourBaseGameActivityclass then applies the returned options to the game engine.onResume: This is another Android SDK native method. Here, we simply acquire the wake lock settings from ourEngineOptionsobject and proceed to call theonResume()method for the engine'sRenderSurfaceViewobject.onSurfaceCreated: This method will either callonCreateGame()during the initial startup process of our activity or register a Boolean variable astruefor resource reloading if the activity had previously been deployed.onReloadResources: This method reloads our game resources if our application is brought back into focus from minimization. This method is not called on the initial execution of an application.onCreateGame: This is in place to handle the order of execution of the next three callbacks in the AndEngine life cycle.onCreateResources: This method allows us to declare and define our application's initial resources needed during the launch of our activity. These resources include, but are not limited to, textures, sounds and music, and fonts.onCreateScene: Here, we handle the initialization of our activity's Scene object. It is possible to attach entities to the Scene within this method, but for the sake of keeping things organized, it's usually best to attach entities withinonPopulateScene().onPopulateScene: In theonPopuplateScene()method of the life cycle we are just about finished setting up the scene, though there are still a few life cycle calls which will be handled automatically by the Engine. This method should be used to define the visual result of the Scene when our application first starts up. Note that the Scene is already created and applied to the Engine at this point. It is possible in some cases to see the entities being attached to the Scene if there is no loading screen or splash screen in place and if there are a large number of entities to attach.onGameCreated: It signals that theonCreateGame()sequence has finished, reloadinresources if necessary, otherwise doing nothing. Reloading resources depends on the Boolean variable briefly mentioned in theonSurfaceCreatedmethod five life cycle calls back.onSurfaceChanged: This method is called every time our application's orientation changes from landscape to portrait mode or vice versa.onResumeGame: Here we have the final method call which takes place during an activity's startup cycle. If our activity reaches this point without any problems, the engine'sstart()method is called, bringing the game's update thread to life.
The life cycle calls during minimzation/termination are as follows:
onPause: The first method call when an activity is minimized or terminated. This is the native android pause method which calls the pause method for theRenderSurfaceViewobjects and reverts the wake lock settings appled by the game engine.onPauseGame: Next, AndEngine's implementation ofonPause()which simply calls thestop()method on the Engine, causing all of the Engine's update handlers to halt along with the update thread.onDestroy: In theonDestroy()method, AndEngine clears all graphical resources contained withinArrayListobjects held by the Engine's manager classes. These managers include theVertexBufferObjectManagerclass, theFontManagerclass, theShaderProgramManagerclass, and finally theTextureManagerclass.onDestroyResources: This method name may be a little misleading since we've already unloaded the majority of resources inonDestroy(). What this method really does is release all of the sound and music objects stored within the respective managers by calling theirreleaseAll()methods.onGameDestroyed: Finally, we reach the last method call required during a full AndEngine life cycle. Not a whole lot of action takes place in this method. AndEngine simply sets anmGameCreatedBoolean variable used in the Engine tofalse, which stats that the activity is no longer running.
In the following image, we can see what the life cycle looks like in action when the game is created, minimized, or destroyed:
In the previous section of this recipe, we covered the main BaseGameActivity class. The following classes can be used as alternatives to the BaseGameActivity class, each providing their own slight differences.
The LayoutGameActivity class is a useful activity class that allows us to incorporate the AndEngine scene-graph view into an ordinary Android application. On the other hand, with this class we are also able to include native Android SDK views, such as buttons, seek bars, spinners, additional layouts, or any other view into our game. However, the most popular reason for using this sort of activity is to allow easy implementation of advertisments into games for a means to gain revenue.
There are a few additional steps for setting up a LayoutGameActivity class.
Add the following line to the project's default layout XML file. This file is usually called
main.xml. The following code snippet adds the AndEngineRenderSurfaceViewclass to our layout file. This is theview that will display our game on the device:<org.andengine.opengl.view.RenderSurfaceView android:id="@+id/gameSurfaceView" android:layout_width="fill_parent" android:layout_height="fill_parent"/>
The second and final additional step for this activity type is to reference the layout XML file and
RenderSurfaceViewin step one, in theLayoutGameActivityoverridden methods. The following code is assuming the layout file is calledmain.xmlin theres/layout/folder; in which case they can be copied/pasted into ourLayoutGameActivityclass after step one has been completed:@Override protected int getLayoutID() { return R.layout.main; } @Override protected int getRenderSurfaceViewID() { return R.id.gameSurfaceView; }
The SimpleBaseGameActivity and the SimpleLayoutGameActivity classes, as suggested, make the overridden life cycle methods somewhat easier to deal with. They do not require us to override the
onPopulateScene() method and on top of that, we are not required to make calls to the method callbacks when we are finished defining the overridden methods. With these activity types, we can simply add the unimplemented life cycle methods and AndEngine will handle the callbacks for us.
The final game activity class we will talk about is the SimpleAsyncGameActivity class. This class includes three alternative life cycle methods called onCreateResourcesAsync(), onCreateSceneAsync(), and onPopulateSceneAsync() along with the usual onCreateEngineOptions() method. The main difference between this activity and others is that it provides us with loading bars for each of the "Async" methods. The following snippet shows how we can increment the loading bar in the event of a texture being loaded:
@Override
public void onCreateResourcesAsync(IProgressListener pProgressListener)
    throws Exception {

  // Load texture number one
  pProgressListener.onProgressChanged(10);

  // Load texture number two
  pProgressListener.onProgressChanged(20);

  // Load texture number three
  pProgressListener.onProgressChanged(30);

  // We can continue to set progress to whichever value we'd like
  // for each additional step through onCreateResourcesAsync...
}
Tip
Downloading the example code
You can download the example code files for all Packt books you have purchased from your account at http://www.PacktPub.com. If you purchased this book elsewhere, you can visit http://www.PacktPub.com/support and register to have the files e-mailed directly to you.
Before we start programming our game, it is a good idea to come up with the performance needs of the game. AndEngine includes a few different types of engines we can choose to use, each with their own benefits. The benefits,of course, depend on the type of game we plan to create.
Carry out the Know the life cycle recipe in this chapter to get a basic AndEngine project set up in our IDE, then continue on to the How to do it... section.
In order for us to properly define a specific Engine object for our game to use, we must override the onCreateEngine() method, which is part of AndEngine's startup process. Add the following code to any base AndEngine activity in order to handle the Engine's creation manually:
/* The onCreateEngine method allows us to return a 'customized' Engine object
* to the Activity which for the most part affects the way frame updates are
* handled. Depending on the Engine object used, the overall feel of the
* gameplay can alter drastically.
*/
@Override
public Engine onCreateEngine(EngineOptions pEngineOptions) {
  return super.onCreateEngine(pEngineOptions);
  /* The returned super method above simply calls:
      return new Engine(pEngineOptions);
  */
}The following is an overview of the various Engine objects available in AndEngine, as well as a brief code snippet displaying how to set up each of the Engine objects:
Engine: First and foremost, we have the ordinaryEngineobject. TheEngineobject is not ideal for most game development as it has absolutely no limitations in regards to frames per second. On two separate devices, it is very likely that you will notice differences in the speed of the game. One way to think of this is if two separate devices are watching a video which was started at the same time, the faster device is likely to finish the video first rather than both finishing at the same time. For this reason, noticeable issues can arise in devices which might not run as fast, especially when physics are a big part of the game. There are no extra steps involved in incorporating this type of engine into our game.FixedStepEngine: The second type of engine we have at our disposal is theFixedStepEngine. This is the ideal engine used in game development as it forces the game loop to update at a constant speed regardless of the device. This is done by updating the game based on the time passed rather than the device's ability to execute code faster.FixedStepEnginerequires us to pass theEngineOptionsobject, as well as anintvalue, in that order. Theintvalue defines the number of steps per second that the engine will be forced to run at. The following code creates an engine that will run at a constant60steps per second:@Override public Engine onCreateEngine(EngineOptions pEngineOptions) { // Create a fixed step engine updating at 60 steps per second return new FixedStepEngine(pEngineOptions, 60); }LimitedFPSEngine: TheLimitedFPSEngineengine allows us to set a limit on the frames per second that the Engine will run at. This will cause the Engine to do some internal calculations, and if the difference between the preferred FPS is greater than the current FPS that the Engine is achieving, the Engine will wait a fraction of a second before proceeding with the next update.LimitedFPSEnginerequires two parameters in the constructor, including theEngineOptionsobject and anintvalue specifying the maximum frames per second. The following code creates an engine that will run at a maximum of 60 frames per second:@Override public Engine onCreateEngine(EngineOptions pEngineOptions) { // Create a limited FPS engine, which will run at a maximum of 60 FPS return new LimitedFPSEngine(pEngineOptions, 60); }SingleSceneSplitScreenEngineandDoubleSceneSplitScreenEngine: TheSingleSceneSplitScreenEngineengine andDoubleSceneSplitScreenEngineengine allow us to create a game with two separate cameras, either with a single scene, most generally used for single player games, or two scenes for multiplayer games on a single device. These are just examples, however, but these two engine's can have a wide range of uses, including mini-maps, multiple perspectives, menu systems, and much more. See Chapter 4, Creating a Split-screen Game, for more specific details on setting up these types ofEngineobject.
Choosing a resolution policy can be a sensitive topic, especially since we're dealing with a platform which currently runs on devices ranging from 3-inch displays up to 10.1-inch for the most part. Generally developers and users alike prefer that a game takes up the full width and height of the device's display, but in some cases our resolution policy may need to be carefully selected in order to properly display our scenes as we—the developer—see fit. In this recipe, we're going to discuss the various resolution policies included in AndEngine, which will help us decide which policy might best fit our application's needs.
The resolution policy that we choose to adhere to must be included as a parameter in the EngineOptions constructor which is created in the onCreateEngineOptions() method of AndEngine's life cycle. The following code creates our EngineOptions object using the FillResolutionPolicy class, which will be explained later in the chapter:
EngineOptions engineOptions = new EngineOptions(true,
    ScreenOrientation.LANDSCAPE_FIXED, new FillResolutionPolicy(),
    mCamera);
We can select a different resolution policy by simply passing another variation of the resolution policy classes to this constructor.
The following is an overview of AndEngine's BaseResolutionPolicy subtypes. These policies are used to specify how AndEngine will handle our application's display width and height based on various factors:
FillResolutionPolicy: TheFillResolutionPolicyclass is the typical resolution policy if we simply want our application to take up the full width and height of the display. While this policy allows our application to run in true full screen mode, it may cause some noticeable stretching in order for our scene to take up the full available dimensions of the display. We can select this resolution policy by simply includingnew FillResolutionPolicy()as our resolution policy parameter in theEngineOptionsconstructor.FixedResolutionPolicy: TheFixedResolutionPolicyclass allows us to apply a fixed display size for our application, regardless of the size of the device's display orCameraobject dimensions. This policy can be passed toEngineOptionsvianew FixedResolutionPolicy(pWidth, pHeight), wherepWidthdefines the final width that the application's view will cover, andpHeightdefines the final height that the application's view will cover. For example, if we pass a width of800and a height of480to this policy-types constructor, on a tablet with a resolution of 1280 x 752, we'd be left with an empty black area since there will be no compensation between the resolution policy and the actual display size.RatioResolutionPolicy: TheRatioResolutionPolicyclass is the best choice for resolution policies if we need to obtain the maximum display size without causing any distortion of sprites. On the other hand, due to the wide range of Android devices spanning many display sizes, it is possible that some devices may see "black bars" either on the top and bottom, or left and right sides of the display. This resolution policy's constructor can be passed either afloatvalue, which defines a preferred ratio value for the display dimensions, or a width and a height parameter from which a ratio value will be extracted by dividing the width by the height. For example,new RatioResolutionPolicy(1.6f)to define a ratio, ornew RatioResolutionPolicy(mCameraWidth, mCameraHeight), assumingmCameraWidthandmCameraHeightare the definedCameraobject dimensions.RelativeResolutionPolicy: This is the final resolution policy. This policy allows us to apply scaling, either larger or smaller, to the overall application view based on a scaling factor with1fbeing the default value. We can apply general scaling to the view with the constructor—new RelativeResolutionPolicy(1.5f)—which will increase the scale of both the width and height by1.5times, or we can specify individual width and height scales, for example,new RelativeResolutionPolicy(1.5f, 0.5f). One thing to note with this policy is that we must be careful with the scaling factors, as scaling too large will cause an application to close without warning. Try to keep the scaling factor to less than1.8f; otherwise make sure to do extensive testing on various devices.
Object factories are a useful design pattern used in all sorts of areas in programming. In game development specifically, a factory might be used to spawn enemy objects, spawn bullet objects, particle effects, item objects, and much more. In fact, AndEngine even uses the factory pattern when we create sounds, music, textures, and fonts, among other things. In this recipe, we'll find out how we can create an object factory and discuss how we can use them to provide simplicity in object creation within our own projects.
In this recipe, we're using the ObjectFactory class as a way for us to easily create and return subtypes of the BaseObject class. However, in a real-world project, the factory would not normally contain inner classes.
Before we create our object factory, we should create our base class as well as at least a couple subtypes extending the base class:
public static class BaseObject {

  /* The mX and mY variables have no real purpose in this recipe, however in
   * a real factory class, member variables might be used to define position,
   * color, scale, and more, of a sprite or other entity.   */
  private int mX;
  private int mY;

  // BaseObject constructor, all subtypes should define an mX and mY value on creation
  BaseObject(final int pX, final int pY){
    this.mX = pX;
    this.mY = pY;
  }
}
Once we've got a base class with any number of subtypes, we can now start to consider implementing the factory design pattern. The
ObjectFactoryclass contains the methods which will handle creating and returning objects of typesLargeObjectandSmallObjectin this case:public class ObjectFactory { // Return a new LargeObject with the defined 'x' and 'y' member variables. public static LargeObject createLargeObject(final int pX, final int pY){ return new LargeObject(pX, pY); } // Return a new SmallObject with the defined 'x' and 'y' member variables. public static SmallObject createSmallObject(final int pX, final int pY){ return new SmallObject(pX, pY); } }
In the first step of this recipe, we are creating a BaseObject class. This class includes two member variables called mX and mY, which we can imagine would define the position on the device's display if we are dealing with AndEngine entities. Once we've got our base class set up, we can start creating subtypes of the base class. The BaseObject class in this recipe has two inner classes which extend it, one named LargeObject and the other, SmallObject. The object factory's job is to determine which subtype of the base class that we need to create, as well as define the object's properties, or mX and mY member variables in this instance.
In the second step, we are taking a look at the ObjectFactory code. This class should contain any and all variations for object creation relating to the specific object-types that the factory deals with. In this case, the two separate objects simply require an mX and mY variable to be defined. In a real-world situation, we may find it helpful to create a SpriteFactory class. This class might contain a few different methods for creating ordinary sprites, button sprites, or tiled sprites, via SpriteFactory.createSprite(), SpriteFactory.createButtonSprite(), and SpriteFactory.createTiledSprite(). On top of that, each of these methods would probably require parameters that define the position, scale, texture region, color, and more. The most important aspect to this class is that its methods return a new subtype of an object as this is the whole purpose behind the factory class.
The game manager is an important part of most games. A game manager is a class that should contain data relating to gameplay; including, but not limited to keeping track of score, credits/currency, player health, and other general gameplay information. In this topic, we're going to take a look at a game manager class to gain an understanding of how they work into our game structure.
The game manager we're going to introduce will be following the singleton design pattern. This means that we will only create a single instance of the class throughout the entire application life cycle and we can access its methods across our entire project. Follow these steps:
Create the game manager singleton:
private static GameManager INSTANCE;

// The constructor does not do anything for this singleton
GameManager(){
}

public static GameManager getInstance(){
  if(INSTANCE == null){
    INSTANCE = new GameManager();
  }
  return INSTANCE;
}
Create the member variables with corresponding getters and setters which should keep track of gameplay data:
// get the current score
public int getCurrentScore(){
  return this.mCurrentScore;
}

// get the bird count
public int getBirdCount(){
  return this.mBirdCount;
}

// increase the current score, most likely when an enemy is destroyed
public void incrementScore(int pIncrementBy){
  mCurrentScore += pIncrementBy;
}

// Any time a bird is launched, we decrement our bird count
public void decrementBirdCount(){
  mBirdCount -= 1;
}
Create a reset method that will revert all data back to their initial values:
// Resetting the game simply means we must revert back to initial values.
public void resetGame(){
  this.mCurrentScore = GameManager.INITIAL_SCORE;
  this.mBirdCount = GameManager.INITIAL_BIRD_COUNT;
  this.mEnemyCount = GameManager.INITIAL_ENEMY_COUNT;
}
Depending on the type of game being created, the game manager is bound to have different tasks. This recipe's GameManager class is meant to resemble that of a certain emotional bird franchise. We can see that the tasks involved in this particular GameManager class are limited, but as gameplay becomes more complex, the game manager will often grow as it has more info to keep track of.
In the first step for this recipe, we're setting up the GameManager class as a singleton. The singleton is a design pattern that is meant to ensure that there is only one static instance of this class that will be instantiated throughout the entire application's life cycle. Being static, this will allow us to make calls to the game manager's methods on a global level, meaning we can reach its methods from any class in our project without having to create a new GameManager class. In order to retrieve the GameManager class' instance, we can call GameManager.getInstance() in any of our project's classes. Doing so will assign a new GameManager class to INSTANCE, if the GameManager class has not yet been referenced. The INSTANCE object will then be returned, allowing us to make calls to the GameManager class' data-modifying methods, for example, GameManager.getInstance().getCurrentScore().
In step two, we create the getter and setter methods that will be used to modify and obtain the data being stored in the GameManager class. The GameManager class in this recipe contains three int values that are used to keep track of important gameplay data; mCurrentScore, mBirdCount, and mEnemyCount. Each of these variables have their own corresponding getters and setters that allow us to easily make modifications to the game data. During gameplay, if an enemy happened to be destroyed then we could call GameManager.getInstance().decrementEnemyCount() along with GameManager.getInstance().incrementScore(pValue), where pValue would likely be provided by the enemy object being destroyed.
The final step involved in setting up this game manager is to provide a reset method for game data. Since we are working with a singleton, whether we move from gameplay to the main menu, to the shop, or any other scene, our GameManager class' data will not automatically revert back to default values. This means that any time a level is reset, we must reset the game manager's data as well. In the GameManager class, we've set up a method called resetGame(), whose job is to simply revert data back to original values.
When starting a new level, we can call GameManager.getInstance().resetGame() in order to quickly revert all data back to the initial values. However, this is a general GameManager class and it is entirely up to the developer which data should be reset pending level reset or level loading. If the GameManager class is storing credit/currency data, it might be wise not to reset that particular variable back to default for use in a shop, for example.
Sound and music plays a big role in gameplay for the user. If used properly, they can give a game the extra edge it needs to allow the player to become fully immersed while playing. On the other hand, they can also cause annoyance and disapproval if used incorrectly. In this recipe, we're going to jump into the subject of Sound and Music objects in AndEngine, covering the "how-to's" of loading them through to modifying their rates and more.
Complete the Know the life cycle recipe given in this chapter, so that we've got a basic AndEngine project set up in our IDE. Additionally, we should create a new subfolder in our project's assets/ folder. Name this folder as sfx and add a sound file named sound.mp3 and another named music.mp3. Once this is done, continue on to the How to do it... section.
Perform the following steps to set up a game to use the Sound and Music objects. Note that Sound objects are meant for sound effects, such as explosions, collisions, or other short audio playback events. The Music objects are meant for long audio playback events such as looping menu music or game music.
The first step involves making sure that our
Engineobject recognizes that we plan to useSoundandMusicobjects in our game. Add the following lines in theonCreateEngineOptions()method of our activity's life cycle after theEngineOptionsobject has been created:engineOptions.getAudioOptions().setNeedsMusic(true); engineOptions.getAudioOptions().setNeedsSound(true);
In step two, we will set our asset paths for the sound and music factories, then load the
SoundandMusicobjects.SoundandMusicobjects are resources, so as you may have guessed, the following code can be dropped into theonCreateResources()method of our activity's life cycle:/* Set the base path for our SoundFactory and MusicFactory to * define where they will look for audio files. */ SoundFactory.setAssetBasePath("sfx/"); MusicFactory.setAssetBasePath("sfx/"); // Load our "sound.mp3" file into a Sound object try { Sound mSound = SoundFactory.createSoundFromAsset(getSoundManager(), this, "sound.mp3"); } catch (IOException e) { e.printStackTrace(); } // Load our "music.mp3" file into a music object try { Music mMusic = MusicFactory.createMusicFromAsset(getMusicManager(), this, "music.mp3"); } catch (IOException e) { e.printStackTrace(); }Once the
Soundobjects are loaded into theSoundManagerclass, we can play them as we see fit by callingplay()on them, be it during a collision, button click, or otherwise:// Play the mSound object mSound.play();
The
Musicobjects should be handled in a different manner toSoundobjects. In cases where ourMusicobject should loop continuously throughout the game, which is in most cases, we handle allplay()andpause()methods within the activity life cycle:/* Music objects which loop continuously should be played in * onResumeGame() of the activity life cycle */ @Override public synchronized void onResumeGame() { if(mMusic != null && !mMusic.isPlaying()){ mMusic.play(); } super.onResumeGame(); } /* Music objects which loop continuously should be paused in * onPauseGame() of the activity life cycle */ @Override public synchronized void onPauseGame() { if(mMusic != null && mMusic.isPlaying()){ mMusic.pause(); } super.onPauseGame(); }
In the first step for this recipe, we are required to let the Engine know whether we will be taking advantage of AndEngine's ability to play Sound or Music objects. Failing to address this step will cause an error in the application, so before we move forward in implementing audio into our game, make sure this step is done before returning EngineOptions in the onCreateEngineOptions() method.
In the second step, we are visiting the onCreateResources() method of the application's life cycle. Firstly, we are setting the base path of both SoundFactory and MusicFactory. As mentioned in the Getting ready section, we should have a folder for our audio files in the assets/sfx folder in our project, which includes all of our audio files. By calling setAssetBasePath("sfx/") on each of the two factory classes used for audio, we are now pointing to the proper folder to look for audio files. Once this is done, we can load our Sound objects through the use of the SoundFactory class and Music objects through the use of the MusicFactory class. The Sound and Music objects require us to pass the following parameters: mEngine.getSoundManager() or mEngine.getMusicManager() depending on the type of audio object we're loading, the Context class which is BaseGameActivity, or this activity, and the name of the audio file in string format.
In the third step, we can now call the
play() method on the audio object that we wish to play. However, this method should only be called after the onCreateResources()callback has been notified that all resources have been loaded. To be safe, we should simply not play any Sound or Music objects until after the onCreateResources() portion of AndEngine's life cycle.
In the final step, we are setting up our Music object to call its play() method when our activity starts up and onResumeGame() is called from the life cycle. On the other end, during onPauseGame(), the Music object's
pause() method is called. It is best practice in most cases to set our Music objects up this way, especially due to the eventual inevitability of application interruptions, such as phone calls or accidental pop-up clicking. This approach will allow our Music object to automatically be paused when the application leaves focus and start back up once we return from minimization, including execution.
Note
In this recipe, and others relating to resource loading, the names of the files have been hardcoded in to the code snippets. This is done to add simplicity, but it is advisable to use the strings.xml Android resource file provided for our project in order to keep strings organized and easy to manage.
AndEngine uses Android native sound classes to provide audio entertainment within our games. These classes include a few additional methods aside from play() and pause() that allow us to have more control over the audio objects during runtime.
The following list includes methods provided for the Music objects:
seekTo: TheseekTo(pMilliseconds)method allows us to define where the audio playback of a specificMusicobject should start from.pMillisecondsis equal to the position of the audio track, in milliseconds, where we'd like to start playback upon callingplay()on theMusicobject. In order to obtain the duration of aMusicobject in milliseconds, we can callmMusic.getMediaPlayer().getDuration().setLooping: ThesetLooping(pBoolean)method simply defines whether or not theMusicobject should replay from the beginning once it reaches the end of its duration. IfsetLooping(true), theMusicobject will continuously repeat until the application is closed or untilsetLooping(false)is called.setOnCompletionListener: This method allows us to apply a listener into theMusicobject, which gives us the opportunity to execute a function pending track completion. This is done by addingOnCompletionListenerto ourMusicobject, as follows:mMusic.setOnCompletionListener(new OnCompletionListener(){ /* In the event that a Music object reaches the end of its duration, * the following method will be called */ @Override public void onCompletion(MediaPlayer mp) { // Do something pending Music completion } });setVolume: With thesetVolume(pLeftVolume, pRightVolume)method, we are able to adjust the left and/or right stereo channels independently. The minimum and maximum range for volume control is equal to0.0ffor no volume and1.0ffor full volume.
The following list includes methods provided for the Sound objects:
setLooping: See theMusicobject'ssetLoopingmethod's description above for details. Additionally,Soundobjects allow us to set how many times the audio track will loop withmSound.setLoopCount(pLoopCount), wherepLoopCountis anintvalue defining the number of times to loop.setRate: ThesetRate(pRate)method allows us to define the rate, or speed, at which theSoundobject will play, wherepRateis equal to the rate as a floating point value. The default rate is equal to1.0f, while decreasing the rate will lower the audio pitch and increasing the rate will increase audio pitch. Keep in mind, the Android API documentation states that the rate accepts values between a range of0.5fthrough to2.0f. Exceeding this range on a negative or positive scale may cause errors in playback.setVolume: See theMusicobject'ssetVolumemethod's description above for details.
Note
For those of us who are not geared toward audio creativity, there are plenty of resources out there which are free to use. There are plenty of free sound databases that can be found online that we can use in public projects, such as http://www.soundjay.com. Keep in mind, most free-to-use databases require attribution for the files used.
Getting to know how to manage textures should be one of the main priorities for every game developer. Of course, it's possible to build a game while only knowing the basics of texturing, but down the road that can very well lead to performance issues, texture bleeding, and other unwanted results. In this recipe, we're going to take a look at how we can build textures into our games in order to provide efficiency, while reducing the possibility of texture padding issues.
Perform the Know the life cycle recipe given in this chapter, so that we've get a basic AndEngine project set up in our IDE. Additionally, this recipe will require three images in PNG format. The first rectangle will be named rectangle_one.png, at 30 pixels wide by 40 pixels in height. The second rectangle named rectangle_two.png, is 40 pixels wide by 30 pixels in height. The final rectangle is named rectangle_three.png, at 70 pixels wide by 50 pixels in height. Once these rectangle images have been added to the project's assets/gfx/ folder, continue on to the How to do it... section.
There are two main components involved when building a texture in AndEngine. In the following steps, we will be creating what is known as a texture atlas that will store three texture regions out of the three rectangle PNG images mentioned in the Getting ready section.
This step is optional. We point the
BitmapTextureAtlasTextureRegionFactoryclass to the folder in which our graphical images are located. The factory is pointed to theassets/folder by default. By appendinggfx/to the default base path of the factory, it will now look inassets/gfx/for our images:BitmapTextureAtlasTextureRegionFactory.setAssetBasePath("gfx/");Next, we will create
BitmapTextureAtlas. The texture atlas can be thought of as a map which contains many different textures. In this case, our "map" orBitmapTextureAtlas, will have a size of 120 x 120 pixels:// Create the texture atlas at a size of 120x120 pixels BitmapTextureAtlas mBitmapTextureAtlas = new BitmapTextureAtlas(mEngine.getTextureManager(), 120, 120);
Once we have
BitmapTextureAtlasto work with, we can now create ourITextureRegionobjects and place them onto specific locations within theBitmapTextureAtlastexture. We will use theBitmapTextureAtlasTextureRegionFactoryclass, which helps us with binding our PNG images to a specificITextureRegionobject as well as define a position to place theITextureRegionobject within theBitmapTextureAtlastexture atlas we'd created in the previous step:/* Create rectangle one at position (10, 10) on the mBitmapTextureAtlas */ ITextureRegion mRectangleOneTextureRegion = BitmapTextureAtlasTextureRegionFactory.createFromAsset(mBitmapTextureAtlas, this, "rectangle_one.png", 10, 10); /* Create rectangle two at position (50, 10) on the mBitmapTextureAtlas */ ITextureRegion mRectangleTwoTextureRegion = BitmapTextureAtlasTextureRegionFactory.createFromAsset(mBitmapTextureAtlas, this, "rectangle_two.png", 50, 10); /* Create rectangle three at position (10, 60) on the mBitmapTextureAtlas */ ITextureRegion mRectangleThreeTextureRegion = BitmapTextureAtlasTextureRegionFactory.createFromAsset(mBitmapTextureAtlas, this, "rectangle_three.png", 10, 60);The final step is to load our
ITextureRegionobjects into memory. We can do this in one call to theBitmapTextureAtlasatlas which contains the saidITextureRegionobjects:mBitmapTextureAtlas.load();
In AndEngine development, there are two main components we will use in order to create textures for our projects. The first component is known as BitmapTextureAtlas, which can be thought of as a flat surface with a maximum width and height that can store sub-textures within its width and height boundaries. These sub-textures are called texture regions, or ITextureRegion objects in AndEngine to be specific. The purpose of the ITextureRegion object is to act solely as a reference to a specific texture in memory, which is located at position x and y within a BitmapTextureAtlas atlas. One way to look at these two components is to picture a blank canvas, which will represent a texture atlas, and a handful of stickers, which will represent the texture regions. A canvas would have a maximum size, and within that area we can place the stickers wherever we'd like. With this in mind, we place a handful of stickers on the canvas. We've now got all of our stickers neatly laid out on this canvas and accessible to grab and place wherever we'd like. There is a little bit more to it as well, but that will be covered shortly.
With the basics of BitmapTextureAtlas and ITextureRegion objects out of the way, the steps involved in creating our textures should now make more sense. As mentioned in the first step, setting the base path of the
BitmapTextureAtlasTextureRegionFactory class is completely optional. We are simply including this step as it saves us from having to repeat saying which folder our images are in once we move on to creating the ITextureRegion objects. For example, if we were not to set the base path, we'd have to reference our images as gfx/rectangle_one.png, gfx/rectangle_two.png, and so on.
In the second step, we are creating our BitmapTextureAtlas object. This step is pretty straightforward as we must simply specify the Engine's TextureManager object which will handle the loading of textures, as well as a width and height for the texture atlas, in that order. Since we're only dealing with three small images in these steps, 120 x 120 pixels will be just fine.
One important thing to keep in mind about texture atlases is to never create excessive texture atlases; as in do not create an atlas that is 256 x 256 for holding a single image which is 32 x 32 pixels for example. The other important point is to avoid creating texture atlases which are larger than 1024 x 1024 pixels. Android devices vary in their maximum texture sizes and while some may be able to store textures up to 2048 x 2048 pixels, a large number of devices have a maximum limit of 1024 x 1024. Exceeding the maximum texture size will either cause a force-closure on startup or simply fail to display proper textures depending on the device. If there is no other option and a large image is absolutely necessary, see Background stitching in Chapter 4, Working with Cameras.
In the third step of this recipe, we are creating our ITextureRegion objects. In other words, we are applying a specified image to the mBitmapTextureAtlas object as well as defining where, exactly, that image will be placed on the atlas. Using the BitmapTextureAtlasTextureRegionFactory class, we can call the createFromAsset(pBitmapTextureAtlas, pContext, pAssetPath, pTextureX, pTextureY) method, which makes creating the texture region a piece of cake. In the order the parameters are listed from left to right, the pBitmapTextureAtlas parameter specifies the texture atlas which we'd like the ITextureRegion object to be stored in. The pContext parameter allows the class to open the image from the gfx/ folder. The pAssetPath parameter defines the name of the specific file we're looking for; example, rectangle_one.png. And the final two parameters, pTextureX and pTextureY, define the location on the texture atlas in which to place the ITextureRegion object. The following image represents what the three ITextureRegion objects would look like as defined in step three. Note that the positions are consistent between the code and image:

In the previous image, notice that there is a minimum gap of 10 pixels between each of the rectangles and the texture edge. The ITextureRegion objects are not spaced out like this to make things more understandable, although it helps. They are actually spaced out in order to add what is known as
texture atlas source spacing. What this spacing does is that it prevents the possibility of texture overlapping when a texture is applied to a sprite. This overlapping is called texture bleeding. Although creating textures as seen in this recipe does not completely mitigate the chance of texture bleeding, it does reduce the likelihood of this issue when certain texture options are applied to the texture atlas.
See the Applying texture options recipe given in this chapter for more information on texture options. Additionally, the There's more... section in this topic describes another method of creating texture atlases, which completely solves the texture bleeding issue! It is highly recommended.
There is an abundance of different approaches we can take when it comes to adding textures into our game. They all have their own benefits and some even have negative aspects involved.
The BuildableBitmapTextureAtlas object is a great way to implement ITextureRegion objects into our texture atlases without having to manually define positions. The purpose of the BuildableBitmapTextureAtlas texture atlas is to automatically place its ITextureRegion objects onto the atlas by applying them to the most convenient coordinates. This approach to creating textures is the easiest and most efficient method as it can become time-consuming and sometimes even error-prone when building large games with many texture atlases. In addition to BuildableBitmapTextureAtlas being automated, it also allows for the developer to define transparent padding to the texture atlas sources, removing any occurrence of texture bleeding. This was one of the most prominent visual issues in AndEngine's GLES 1.0 branch as there was no built-in method for supplying padding to the texture atlases.
Using a BuildableBitmapTextureAtlas atlas differs slightly from the BitmapTextureAtlas route. See the following code for this recipe's code using a BuildableBitmapTextureAtlas atlas instead:
/* Create a buildable bitmap texture atlas - same parameters required
* as with the original bitmap texture atlas */
BuildableBitmapTextureAtlas mBuildableBitmapTextureAtlas = new BuildableBitmapTextureAtlas(mEngine.getTextureManager(), 120, 120);

/* Create the three ITextureRegion objects. Notice that when using
 * the BuildableBitmapTextureAtlas, we do not need to include the final
 * two pTextureX and pTextureY parameters. These are handled automatically! */
ITextureRegion mRectangleOneTextureRegion = BitmapTextureAtlasTextureRegionFactory.createFromAsset(mBuildableBitmapTextureAtlas, this, "rectangle_one.png");
ITextureRegion mRectangleTwoTextureRegion = BitmapTextureAtlasTextureRegionFactory.createFromAsset(mBuildableBitmapTextureAtlas, this, "rectangle_two.png");
ITextureRegion mRectangleThreeTextureRegion = BitmapTextureAtlasTextureRegionFactory.createFromAsset(mBuildableBitmapTextureAtlas, this, "rectangle_three.png");

// Buildable bitmap texture atlases require a try/catch statement
try {
  /* Build the mBuildableBitmapTextureAtlas, supplying a BlackPawnTextureAtlasBuilder
    * as its only parameter. Within the BlackPawnTextureAtlasBuilder's parameters, we
    * provide 1 pixel in texture atlas source space and 1 pixel for texture atlas source
    * padding. This will alleviate the chance of texture bleeding.
    */
  mBuildableBitmapTextureAtlas.build(new BlackPawnTextureAtlasBuilder<IBitmapTextureAtlasSource, BitmapTextureAtlas>(0, 1, 1));
} catch (TextureAtlasBuilderException e) {
  e.printStackTrace();
}

// Once the atlas has been built, we can now load
mBuildableBitmapTextureAtlas.load();
As we can see in this code, there are some minor differences between the BuildableBitmapTextureAtlas and the BitmapTextureAtlas atlases. The first main point to note is that when creating our ITextureRegion objects, we no longer have to specify where the texture region should be placed on the texture atlas. The second minor change when using the BuildableBitmapTextureAtlas alternative is that we must call the build(pTextureAtlasBuilder) method on mBuildableBitmapTextureAtlas before we call the load() method. Within the build(pTextureAtlasBuilder) method, we must provide a BlackPawnTextureAtlasBuilder class, defining three parameters. In this order, the parameters are pTextureAtlasBorderSpacing, pTextureAtlasSourceSpacing, and pTextureAtlasSourcePadding. In the previous code snippet, we will remove the likelihood of texture bleeding in almost all cases. However, in extreme cases, if there is texture bleeding, then simply increase the third parameter, this will help to alleviate any issues.
A tiled texture region is essentially the same object as a normal texture region. The difference between the two is that a tiled texture region allows us to pass a single image file to it and create a sprite sheet out of it. This is done by specifying the number of columns and rows within our sprite sheet. From there, AndEngine will automatically divide the tiled texture region into evenly distributed segments. This will allow us to navigate through each segment within the TiledTextureRegion object. This is how the tiled texture region will appear to create a sprite with animation:

Note
A real sprite sheet should not have outlines around each column and row. They are in place in the previous image to display how a sprite sheet is divided up into equal segments.
Let's assume that the previous image is 165 pixels wide and 50 pixels high. Since we have 11 individual columns and a single row, we could create the TiledTextureRegion object like so:
TiledTextureRegion mTiledTextureRegion = BitmapTextureAtlasTextureRegionFactory.createTiledFromAsset(mBitmapTextureAtlas, context,"sprite_sheet.png",11,1);
What this code does is it tells AndEngine to divide the sprite_sheet.png image into 11 individual segments, each 15 pixels wide (since 165 pixels divided by 11 segments equals 15). We can now use this tiled texture region object to instantiate a sprite with animation.
In addition to the more common image types (.bmp, .jpeg, and .png), AndEngine also has built-in support for PVR and ETC1 compressed textures. The main benefit in using compressed textures is the impact it has on reducing the load time and possibly increasing frame rates during gameplay. On that note, there are also disadvantages in using compressed textures. ETC1, for example, doesn't allow for an alpha channel to be used in its textures. Compressed textures may also cause a noticeable loss of quality in your textures. The use of these types of textures should be relevant to the significance of the object being represented by the compressed texture. You most likely wouldn't want to base your entire game's texture format on compressed textures, but for large quantities of subtle images, using compressed textures can add noticeable performance to your game.
We've discussed the different types of textures AndEngine provides; now let's go over the options we can supply our textures with. The contents in this topic tend to have noticeable effects on the quality and performance of our games.
Perform the Working with different types of textures recipe given in this chapter, so that we've got a basic AndEngine project set up with BitmapTextureAtlas or BuildableBitmapTextureAtlas loading in place.
In order to modify a texture atlas' option and/or format, we need to add a parameter or two to the BitmapTextureAtlas constructor depending on whether we'd like to define either the options, format, or both. See the following code for modifying both, texture format and texture options:
BitmapTextureAtlas mBitmapTextureAtlas = new BitmapTextureAtlas(mEngine.getTextureManager(), 1024, 1024, BitmapTextureFormat.RGB_565, TextureOptions.BILINEAR);
From here on, all texture regions placed on this specific texture atlas will have the defined texture format and option applied to it.
AndEngine allows us to apply texture options and formats to our texture atlases. The various combination of options and formats applied to a texture atlas will affect the overall quality and performance impact that sprites have on our game. Of course, that is if the mentioned sprites are using ITextureRegion objects, which are related to the modified BitmapTextureAtlas atlas.
The base texture options available in AndEngine are as follows:
Nearest: This texture option is applied to texture atlases by default. This is the fastest-performing texture option we can apply to a texture atlas, but also the poorest in quality. This option means that the texture will apply blending of pixels that make up the display by obtaining the nearest texel color to a pixel. Similar to how a pixel represents the smallest element of a digital image, a texel represents the smallest element of a texture.
Bilinear: The second main texture filtering option in AndEngine is called bilinear texture filtering. This approach takes a hit performance-wise, but the quality of scaled sprites will increase. Bilinear filtering obtains the four nearest texels per pixel in order to provide smoother blending to an onscreen image.
Take a look at the following figure to see a comparison between bilinear filtering and nearest filtering:
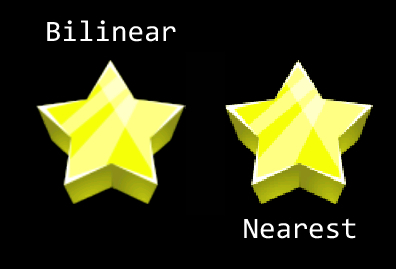
These two images are rendered in the highest bitmap format. The difference between nearest and bilinear filtering is very clear in this case. In the left-hand side of the image, the bilinear star has almost no jagged edges and the colors are very smooth. On the right-hand side, we've got a star rendered with the nearest filtering. The quality level suffers as jagged edges are more apparent and if observed closely, the colors aren't as smooth.
The following are a few additional texture options:
Repeating: The repeating texture option allows the sprite to "repeat" the texture assuming that the ITextureRegion object's width and height has been exceeded by the size of the sprite. In most games, the terrain is usually generated by creating a repeating texture and stretching the size of the sprite, rather than creating many separate sprites to cover the ground.
Let's take a look at how to create a repeating texture:
    /* Create our repeating texture. Repeating textures require width/height which are a power of two */
    BuildableBitmapTextureAtlas texture = new BuildableBitmapTextureAtlas(engine.getTextureManager(), 32, 32, TextureOptions.REPEATING_BILINEAR);

    // Create our texture region - nothing new here
    mSquareTextureRegion = BitmapTextureAtlasTextureRegionFactory.createFromAsset(texture, context, "square.png");

    try {
      // Repeating textures should not have padding
      texture.build(new BlackPawnTextureAtlasBuilder<IBitmapTextureAtlasSource, BitmapTextureAtlas>(0, 0, 0));
      texture.load();

    } catch (TextureAtlasBuilderException e) {
      Debug.e(e);
    }
The previous code is based on a square image which is 32 x 32 pixels in dimension. Two things to keep in mind when creating repeating textures are as follows:
Texture atlases using the repeating texture option format require the power of two dimensions (2, 4, 8, 16, and so on)
If you are using a buildable texture atlas, do not apply padding or spacing during the
build()method, as it will be taken into account in the repeating of the texture, breaking the first rule of repeating textures
Next, we have to create a sprite which uses this repeated texture:
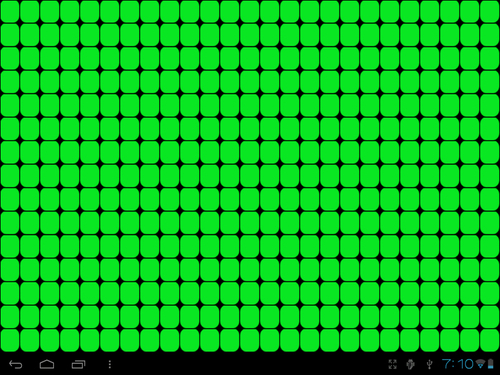
/* Increase the texture region's size, allowing repeating textures to stretch up to 800x480 */
ResourceManager.getInstance().mSquareTextureRegion.setTextureSize(800, 480);
// Create a sprite which stretches across the full screen
Sprite sprite = new Sprite(0, 0, 800, 480, ResourceManager.getInstance().mSquareTextureRegion, mEngine.getVertexBufferObjectManager());
What we're doing here is increasing the texture region's size to 800 x 480 pixels in dimension. This doesn't alter the size of the image while the repeating option is applied to a texture, rather it allows the image to be repeated up to 800 x 480 pixels. This means that if we create a sprite and supply the repeating texture, we can scale the sprite up to 800 x 480 pixels in dimension, while still displaying a repeat effect. However, if the sprite exceeds the width or height dimensions of the texture region, no texture will be applied to the exceeding area.
Here's the outcome taken from a device screenshot:
Pre-multiply alpha: Lastly, we have the option to add the pre-multiply alpha texture option to our textures. What this option does is multiply each of the RGB values by the specified alpha channel and then apply the alpha channel in the end. The main purpose of this option is to allow us to modify the opacity of the colors without loss of color. Keep in mind, modifying the alpha value of a sprite directly may introduce unwanted effects when using pre-multiplied alpha values. Sprites will likely not appear fully transparent when this option is applied to sprites with an alpha value of 0.
When applying texture options to our texture atlases, we can choose either nearest or bilinear texture filtering options. On top of these texture filtering options, we can include either the repeating option, the pre-multiply alpha option, or even both.
Aside from texture options, AndEngine also allows us to set the texture format of each of our texture atlases. Texture formats, similar to texture options, are often decided upon depending on its purpose. The format of a texture can greatly affect both the performance and quality of an image even more noticeably than the texture options. Texture formats allow us to choose the available color ranges of the RGB values in a texture atlas. Depending on the texture format being used, we may also allow or disallow a sprite from having any alpha value which affects the transparency of the textures.
The texture format naming conventions are not very complicated. All formats have a name similar to RGBA_8888, where the left-hand side of the underscore refers to the color or alpha channels available to the texture. The right-hand side of the underscore refers to the bits available to each of the color channels.
The following texture formats are available:
RGBA_8888: Allows the texture to use red, green, blue, and alpha channels, assigned 8 bits each. Since we have 4 channels each assigned 8 bits (4 x 8), we're left with a 32-bit texture format. This is the slowest texture format of the four.RGBA_4444: Allows the texture to use red, green, blue, and alpha channels, assigned 4 bits each. Following the same rule as the previous format, we're left with a 16-bit texture format. You will notice an improvement with this format overRGBA_8888as we're only saving half as much information as the 32-bit format. The quality will suffer noticeably; see the following image:
In this image, we compare the difference between two texture formats. The stars are both rendered with the default texture option (nearest), which has nothing to do with the RGBA format of the image. What we're more interested here is the color quality of the two stars. The left-hand side star is rendered with full 32-bit color capabilities, the right with 16-bit. The difference between the two stars is rather apparent.
RGB_565: Another 16-bit texture format, though this one does not include an alpha channel; textures using this texture format will not allow for transparency. Due to the lack of transparency, the need for this format is limited, but it is still valuable. One example of this texture format being used would be to display a fullscreen image such as a background. Backgrounds don't require transparency, so it is wise to keep this format in mind when introducing a background. The performance saved is fairly noticeable.A_8: Finally, we have the last texture format, which is an 8-bit alpha channel (does not support colors). Another limited-use format; the A_8 format is generally used as an alpha mask (overlay) for sprites which have colors. One example of a use for this format is a screen fading in or out by simply overlaying a sprite with this texture, then altering the transparency as time passes.
When creating your texture atlases, it is a good idea to think about which types of sprites will use which type of texture regions and pack them into texture atlases accordingly. For more important sprites, we'll most likely want to use the RGBA_8888 texture format, since these sprites will be the main focus of our games. These objects might include the foreground sprites, main character sprites, or anything on the screen that would be more visually prominent. Backgrounds underlay the entire surface area of the device, so we most likely have no use for transparency. We will use RGB_565 for these sprites in order to remove the alpha channel, which will help improve performance. Finally, we have objects which might not be very colorful, might be small, or simply may not need as much visual appeal. We can use the texture format RGBA_4444 for these types of sprites in order to cut the memory needed for these textures in half.
Know the life cycle in this chapter.
Working with different types of textures in this chapter.
Bringing a scene to life with sprites in Chapter 2, Working with Entities.
AndEngine fonts are simple to set up and include for use in our Text objects to be displayed on screen. We can choose from preset fonts or we can add our own via the assets folder.
Perform the Know the life cycle recipe given in this chapter, so that we've got a basic AndEngine project set up in our IDE, then continue on to the How to do it... section.
The following code snippets display the four different options we have for creating preset, custom asset, preset stroke, and custom asset stroke font objects. Font creation should take place in the onCreateResources() method of our BaseGameActivity class.
The
create()method for preset fonts is as follows:Font mFont = FontFactory.create(mEngine.getFontManager(), mEngine.getTextureManager(), 256, 256, Typeface.create(Typeface.DEFAULT, Typeface.NORMAL), 32f, true, org.andengine.util.adt.color.Color.WHITE_ABGR_PACKED_INT) mFont.load();
The
createFromAsset()method for custom fonts is as follows:Font mFont = FontFactory.createFromAsset(mEngine.getFontManager(), mEngine.getTextureManager(), 256, 256, this.getAssets(), "Arial.ttf", 32f, true, org.andengine.util.adt.color.Color.WHITE_ABGR_PACKED_INT); mFont.load();
The
createStroke()andcreateStrokeFromAsset()methods for outlined fonts are:BitmapTextureAtlas mFontTexture = new BitmapTextureAtlas(mEngine.getTextureManager(), 256, 256, TextureOptions.BILINEAR); Font mFont = FontFactory.createStroke(mEngine.getFontManager(), mFontTexture, Typeface.create(Typeface.DEFAULT, Typeface.BOLD), 32, true, org.andengine.util.adt.color.Color.WHITE_ABGR_PACKED_INT, 3, org.andengine.util.adt.color.Color.BLACK_ABGR_PACKED_INT); mFont.load();
As we can see, there are different approaches we can take to create our Font objects depending on how we'd like the font to look. However, all fonts share the need for us to define a texture width and texture height, whether it be directly as parameters in the FontFactory class' create methods or indirectly through the use of a BitmapTextureAtlas object. In the previous code snippets, we'd created all three Font objects using a texture size of 256 pixels in width by 256 pixels in height. Unfortunately, there is currently no easy way to automatically determine the texture size needed at runtime in order to support different languages, text sizes, stroke value, or font style.
For now, the most common approach is to set the texture width and height to about 256 pixels and make small adjustments upward or downward until the texture is just the right size so as to not cause artifacts in the Text objects. The font size plays the biggest role in determining the final texture size needed for the Font object, so exceedingly large fonts, such as 32 and higher, may need larger texture sizes.
Note
All Font objects require a method call to load() before they can properly display characters in the Text objects.
Let's take a look at how each of the methods presented in the How to do it... section work:
The
create()method: Thecreate()method doesn't allow for too much customization. This method's parameters, starting at the fifth parameter, include supplying a typeface, font size, anti-aliasing option, and a color. We're using the Android native typeface class which only supports a few different fonts and styles.The
createFromAsset()method: We can use this method in order to introduce custom fonts into our project via ourassetsfolder. Let's assume that we have a true-type font calledArial.ttflocated in our project'sassetsfolder. We can see that the general creation is the same. In this method, we must pass the activity'sAssetManagerclass, which can be obtained through our activity'sgetAssets()method. The parameter following that is the true type font we would like to import.The
createStroke()andcreateStrokeFromAsset()methods: Finally, we have our stroke fonts. The stroke font gives us the ability to add outlines to the characters in ourTextobject. These fonts are useful in situations where we would like our text to "pop". For creating stroke fonts, we'll need to supply a texture atlas as the second parameter rather than passing the engine's texture manager. From this point, we can either create the stroke font via a typeface or through ourassetsfolder. Additionally, we're given the option to define two new color values which have been added as the final two parameters. With these new parameters, we are able to adjust the thickness of the outline as well as the color.
The way the Font class is currently set up, it is best to preload the characters that we expect to display via a Text object. Unfortunately, AndEngine currently makes calls to the garbage collector when new letters are still to be drawn, so in order to avoid hiccups when a Text object is first getting "acquainted" with the letters, we can call the method:
mFont.prepareLetters("abcdefghijklmnopqrstuvwxyz".toCharArray())This method call would prepare the lowercase letters from a to z. This method should be called during a loading screen at some point within the game in order to avoid any noticeable garbage collection. There's one more important class that we should discuss before moving off the topic of Font objects. AndEngine includes a class called FontUtils that allows us to retrieve information regarding a Text object's width on the screen via the measureText(pFont, pText) method. This is important when dealing with dynamically-changing strings as it gives us the option to relocate our Text object, assuming that the width or height of the string in pixels has changed.
Know the life cycle in this chapter.
Working with different types of textures in this chapter.
Applying text to a layer in Chapter 2, Working with Entities.
In this topic, we're finally going to look at our resources from a bigger picture. With the resource manager in place, we will easily be able to make a single call to methods such as loadTextures(), loadSounds(), or loadFonts() in order to load the different types of resources needed by our game, all from a single, convenient location.
The ResourceManager class is designed with the singleton design pattern in mind. This allows for global access to all of our game's resources through a simple call to ResourceManager.getInstance(). The main purpose of the ResourceManager class is to store resource objects, load resources, and unload resources. The following steps display how we can use ResourceManager to handle textures of one of our game's scenes.
Declare all of the resources that will be used throughout the different scenes in our game:
/* The variables listed should be kept public, allowing us easy access
to them when creating new Sprites, Text objects and to play sound files */
public ITextureRegion mGameBackgroundTextureRegion;
public ITextureRegion mMenuBackgroundTextureRegion;
public Sound  mSound;

public Font  mFont;
Provide
loadmethods that will handle loading the audio, graphical, and font resources declared in theResourceManagerclass:public synchronized void loadGameTextures(Engine pEngine, Context pContext){ // Set our game assets folder in "assets/gfx/game/" BitmapTextureAtlasTextureRegionFactory.setAssetBasePath("gfx/game/"); BuildableBitmapTextureAtlas mBitmapTextureAtlas = new BuildableBitmapTextureAtlas(pEngine.getTextureManager(), 800, 480); mGameBackgroundTextureRegion = BitmapTextureAtlasTextureRegionFactory.createFromAsset(mBitmapTextureAtlas, pContext, "game_background.png"); try { mBitmapTextureAtlas.build(new BlackPawnTextureAtlasBuilder<IBitmapTextureAtlasSource, BitmapTextureAtlas>(0, 1, 1)); mBitmapTextureAtlas.load(); } catch (TextureAtlasBuilderException e) { Debug.e(e); } }The third step involves providing a method of unloading all resources corresponding to our
ResourceManagerclass'loadmethods:public synchronized void unloadGameTextures(){ // call unload to remove the corresponding texture atlas from memory BuildableBitmapTextureAtlas mBitmapTextureAtlas = (BuildableBitmapTextureAtlas) mGameBackgroundTextureRegion.getTexture(); mBitmapTextureAtlas.unload(); // ... Continue to unload all textures related to the 'Game' scene // Once all textures have been unloaded, attempt to invoke the Garbage Collector System.gc(); }
By implementing a ResourceManager class into our project, we can easily load our various scene resources completely indepenently of one another. Because of this, we must make sure that our public class methods are synchronized in order to make sure that we're running in a thread-safe environment. This is especially important with the use of singletons, as we've only got one instance of the class, with the potential for multiple threads accessing it. On top of that, we now only require one line of code when it comes to loading our scene resources which helps greatly in keeping our main activity class more organized. Here is what our onCreateResources() methods should look like with the use of a resource manager:
@Override
public void onCreateResources(
    OnCreateResourcesCallback pOnCreateResourcesCallback) {

  // Load the game texture resources
  ResourceManager.getInstance().loadGameTextures(mEngine, this);

  // Load the font resources
  ResourceManager.getInstance().loadFonts(mEngine);

  // Load the sound resources
  ResourceManager.getInstance().loadSounds(mEngine, this);

  pOnCreateResourcesCallback.onCreateResourcesFinished();
}
In the first step, we are declaring all of our resources, including Font objects, ITextureRegion objects, and Sound/Music objects. In this particular recipe, we're only working with a limited number of resources, but in a fully-functional game, this class may include 50, 75, or even more than 100 resources. In order to obtain a resource from our ResourceManager class, we can simply include the following line into any class within our project:
ResourceManager.getInstance().mGameBackgroundTextureRegion.
In the second step, we create the
loadGameTextures(pEngine, pContext) method which is used to load the Game scene textures. For every additional scene within our game, we should have a separate load method in place. This allows for easy loading of resources on the fly.
In the final step, we're creating unload methods which handle unloading the resources corresponding to each of the load methods. However, if there are any number of resources which happen to be used throughout a number of our game's scenes, it might be necessary to create a load method which doesn't come with an accompanying unload method.
In larger projects, sometimes we may find ourselves passing main objects to classes very frequently. Another use for the resource manager is to store some of the more important game objects such as the Engine or Camera. This way we no longer have to continuously pass these objects as parameters, rather we can call respective get methods in order to get the game's Camera, Engine, or any other specific object we'll need to reference throughout the classes.
In the final topic for the game structure chapter, we're going to set up a class that can be used in our project to manage data and settings. The more obvious game data we must save should include character stats, high scores, and other various data we may have included in our game. We should also keep track of certain options a game might have, such as whether the user has sounds muted or not, gore effects, and more. In this recipe, we're going to work with a class called SharedPreferences, which will allow us to easily store data to a device for retrieval at a later time.
Note
The SharedPreferences class is a great way to quickly store and retrieve primitive datatypes. However, as the data size increases, so will the needs of the method we use to store data. If our games do require a large amount of data to be stored, something to consider is to take a look into SQLite databases for data storage.
In this recipe, we're setting up a UserData class that will store a Boolean variable to determine sound muting and an int variable that will define the highest, unlocked level a user has reached. Depending on the needs of the game, there may be more or less datatypes to include within the class for different reasons, be it high score, currency, or other game-related data. The following steps describe how to set up a class to contain and store user data on a user's device:
The first step involves declaring our constant
Stringvariables, which will hold references to our preference file, as well as "key" names, which will hold references to data within the preference file, as well as corresponding "value" variables. Additionally, we declare theSharedPreferencesobject as well as an editor:// Include a 'filename' for our shared preferences private static final String PREFS_NAME = "GAME_USERDATA"; /* These keys will tell the shared preferences editor which data we're trying to access */ private static final String UNLOCKED_LEVEL_KEY = "unlockedLevels"; private static final String SOUND_KEY = "soundKey"; /* Create our shared preferences object & editor which will be used to save and load data */ private SharedPreferences mSettings; private SharedPreferences.Editor mEditor; // keep track of our max unlocked level private int mUnlockedLevels; // keep track of whether or not sound is enabled private boolean mSoundEnabled;
Create an initialization method for our
SharedPreferencesfile. This method will be called when our game is first launched, either creating a new file for our game if one does not already exist, or load existing values from our preference file if it does exist:public synchronized void init(Context pContext) { if (mSettings == null) { /* Retrieve our shared preference file, or if it's not yet * created (first application execution) then create it now */ mSettings = context.getSharedPreferences(PREFS_NAME, Context.MODE_PRIVATE); /* Define the editor, used to store data to our preference file */ mEditor = mSettings.edit(); /* Retrieve our current unlocked levels. if the UNLOCKED_LEVEL_KEY * does not currently exist in our shared preferences, we'll create * the data to unlock level 1 by default */ mUnlockedLevels = mSettings.getInt(UNLOCKED_LEVEL_KEY, 1); /* Same idea as above, except we'll set the sound boolean to true * if the setting does not currently exist */ mSoundEnabled = mSettings.getBoolean(SOUND_KEY, true); } }Next, we will provide getter methods for each of the values that are meant to be stored in our
SharedPreferencesfile, so that we can access the data throughout our game:/* retrieve the max unlocked level value */ public synchronized int getMaxUnlockedLevel() { return mUnlockedLevels; }And finally, we must provide setter methods for each of the values that are meant to be stored in our
SharedPreferencesfile. The setter methods will be responsible for saving the data to the device:public synchronized void unlockNextLevel() { // Increase the max level by 1 mUnlockedLevels++; /* Edit our shared preferences unlockedLevels key, setting its * value our new mUnlockedLevels value */ mEditor.putInt(UNLOCKED_LEVEL_KEY, mUnlockedLevels); /* commit() must be called by the editor in order to save * changes made to the shared preference data */ mEditor.commit(); }
This class demonstrates just how easily we are able to store and retrieve a game's data and options through the use of the SharedPreferences class. The structure of the UserData class is fairly straightforward and can be used in this same fashion in order to adapt to various other options we might want to include in our games.
In the first step, we simply start off by declaring all of the necessary constants and member variables that we'll need to handle different types of data within our game. For constants, we have one String variable named PREFS_NAME that defines the name of our game's preference file, as well as two other String variables that will each act as references to a single primitive datatype within the preference file. For each key constant, we should declare a corresponding variable that preference file data will be stored to when it is first loaded.
In the second step, we provide a means of loading the data from our game's preference file. This method only needs to be called once, during the startup process of a game in order to load the
UserData classes member variables with the data stored in the SharedPreferences file. By first calling context.getSharedPreferences(PREFS_NAME, Context.MODE_PRIVATE), we check to see whether or not a SharedPreference file exists for our application under the PREFS_NAME string, and if not, then we create a new one a—MODE_PRIVATE, meaning the file is not visible to other applications.
Once that is done, we can call getter methods from the preference file such as mUnlockedLevels = mSettings.getInt(UNLOCKED_LEVEL_KEY, 1). This will pass the data stored in the UNLOCKED_LEVEL_KEY key of the preference file to mUnlockedLevels. If the game's preference file does not currently hold any value for the defined key, then a default value of 1 is passed to mUnlockedLevels. This would continue to be done for each of the datatypes being handled by the UserData class. In this case, just the levels and sound.
In the third step, we set up the getter methods that will correspond to each of the datatypes being handled by the UserData class. These methods can be used throughout the game; for example, we could call UserData.getInstance().isSoundMuted() during level loading to determine whether or not we should call play() on the Music object.
In the fourth step, we create the methods that save data to the device. These methods are pretty straightforward and should be fairly similar regardless of the data we're working with. We can either take a value from a parameter as seen with setSoundMuted(pEnableSound) or simply increment as seen in unlockNextLevel().
When we want to finally save the data to the device, we use the mEditor object, using putter methods which are suitable for the primitive datatype we wish to store, specifying the key to store the data as well as the value. For example, for level unlocking, we use the method, mEditor.putInt(UNLOCKED_LEVEL_KEY, mUnlockedLevels) as we are storing an int variable. For a boolean variable, we call putBoolean(pKey, pValue), for a String variable, we call putString(pKey, pValue), and so on..
Unfortunately, when storing data on a client's device, there's no way of guaranteeing that a user will not have access to the data in order to manipulate it. On the Android platform, most users will not have access to the SharedPreferences file that holds our game data, but users with rooted devices on the other hand will be able to see the file and make changes as they see fit. For the sake of explanation, we used obvious key names, such as soundKey and unlockedLevels. Using some sort of misconstruction can help to make the file look more like gibberish to an average user who had accidentally stumbled upon the game data with their rooted device.
If we feel like going further to protect the game data, then the even more secure approach would be to encrypt the preference file. Java's javax.crypto.* package is a good place to start, but keep in mind that encryption and decryption does take time and will likely increase the duration of loading times within the game.