


This chapter provides an introduction to the planning and preparation required to test complex and hardened environments. You will be introduced to the following topics:
Introduction to advanced penetration testing
How to successfully scope your testing
What needs to occur prior to testing
Setting your limits – nothing lasts forever
Planning for action
Detail management with MagicTree
Exporting your results into various formats using MagicTree
Team-based data collection and information sharing with Dradis
Creating reusable templates in Dradis
Penetration testing is necessary to determine the true attack footprint of your environment. It may often be confused with vulnerability assessment and thus it is important that the differences should be fully explained to your clients.
Vulnerability assessments are necessary for discovering potential vulnerabilities throughout the environment. There are many tools available that automate this process so that even an inexperienced security professional or administrator can effectively determine the security posture of their environment. Depending on scope, additional manual testing may also be required. Full exploitation of systems and services is not generally in scope for a normal vulnerability assessment engagement. Systems are typically enumerated and evaluated for vulnerabilities, and testing can often be done with or without authentication. Most vulnerability management and scanning solutions provide actionable reports that detail mitigation strategies such as applying missing patches, or correcting insecure system configurations.
Penetration testing expands upon vulnerability assessment efforts by introducing exploitation into the mix
Tip
The risk of accidentally causing an unintentional denial of service or other outage is moderately higher when conducting a penetration test than it is when conducting vulnerability assessments. To an extent, this can be mitigated by proper planning, and a solid understanding of the technologies involved during the testing process. Thus, it is important that the penetration tester continually updates and refines the necessary skills.
Penetration testing allows the business to understand if the mitigation strategies employed are actually working as expected; it essentially takes the guesswork out of the equation. The penetration tester will be expected to emulate the actions that an attacker would attempt and will be challenged with proving that they were able to compromise the critical systems targeted. The most successful penetration tests result in the penetration tester being able to prove without a doubt that the vulnerabilities that are found will lead to a significant loss of revenue unless properly addressed. Think of the impact that you would have if you could prove to the client that practically anyone in the world has easy access to their most confidential information!
Penetration testing requires a higher skill level than is needed for vulnerability analysis. This generally means that the price of a penetration test will be much higher than that of a vulnerability analysis. If you are unable to penetrate the network you will be ensuring your clientele that their systems are secure to the best of your knowledge. If you want to be able to sleep soundly at night, I recommend that you go above and beyond in verifying the security of your clients.
Some environments will be more secured than others. You will be faced with environments that use:
Effective patch management procedures
Managed system configuration hardening policies
Multi-layered DMZ's
Centralized security log management
Host-based security controls
Network intrusion detection or prevention systems
Wireless intrusion detection or prevention systems
Web application intrusion detection or prevention systems
Effective use of these controls increases the difficulty level of a penetration test significantly. Clients need to have complete confidence that these security mechanisms and procedures are able to protect the integrity, confidentiality, and availability of their systems. They also need to understand that at times the reason an attacker is able to compromise a system is due to configuration errors, or poorly designed IT architecture.
Note that there is no such thing as a panacea in security. As penetration testers, it is our duty to look at all angles of the problem and make the client aware of anything that allows an attacker to adversely affect their business.
Advanced penetration testing goes above and beyond standard penetration testing by taking advantage of the latest security research and exploitation methods available. The goal should be to prove that sensitive data and systems are protected even from a targeted attack, and if that is not the case, to ensure that the client is provided with the proper instruction on what needs to be changed to make it so.
Note
A penetration test is a snapshot of the current security posture. Penetration testing should be performed on a continual basis.
Many exploitation methods are poorly documented, frequently hard to use, and require hands-on experience to effectively and efficiently execute. At DefCon 19 Bruce "Grymoire" Barnett provided an excellent presentation on "Deceptive Hacking". In this presentation, he discussed how hackers use many of the very same techniques used by magicians. It is my belief that this is exactly the tenacity that penetration testers must assume as well. Only through dedication, effort, practice, and the willingness to explore unknown areas will penetration testers be able to mimic the targeted attack types that a malicious hacker would attempt in the wild.
Often times you will be required to work on these penetration tests as part of a team and will need to know how to use the tools that are available to make this process more endurable and efficient. This is yet another challenge presented to today's pentesters. Working in a silo is just not an option when your scope restricts you to a very limited testing period.
In some situations, companies may use non-standard methods of securing their data, which makes your job even more difficult. The complexity of their security systems working in tandem with each other may actually be the weakest link in their security strategy.
Before we commence with testing, there are requirements that must be taken into consideration. You will need to determine the proper scoping of the test, timeframes and restrictions, the type of testing (Whitebox, Blackbox), and how to deal with third-party equipment and IP space. The Penetration Testing Execution Standard (PTES) lists these scoping items as part of the "Pre-Engagement Interaction" stage. I highly recommend that you review this phase at: http://www.pentest-standard.org/index.php/Pre-engagement.
Note
Although this book does not follow the PTES directly, I will attempt to point out the sections of the PTES where the material relates.
Before you can accurately determine the scope of the test, you will need to gather as much information as possible. It is critical that the following is fully understood prior to starting testing procedures:
Who has the authority to authorize testing?
What is the purpose of the test?
What is the proposed timeframe for the testing? Are there any restrictions as to when the testing can be performed?
Does your customer understand the difference between a vulnerability assessment and a penetration test?
Will you be conducting this test with, or without cooperation of the IT Security Operations Team? Are you testing their effectiveness?
Is social engineering permitted? How about Denial of Service attacks?
Are you able to test physical security measures used to secure servers, critical data storage, or anything else that requires physical access? For example, lock picking, impersonating an employee to gain entry into a building, or just generally walking into areas that the average unaffiliated person should not have access to.
Are you allowed to see the network documentation or to be informed of the network architecture prior to testing to speed things along? (Not necessarily recommended as this may instill doubt for the value of your findings. Most businesses do not expect this to be easy information to determine on your own.)
What are the IP ranges that you are allowed to test against? There are laws against scanning and testing systems without proper permissions. Be extremely diligent when ensuring that these devices and ranges actually belong to your client or you may be in danger of facing legal ramifications.
What are the physical locations of the company? This is more valuable to you as a tester if social engineering is permitted because it ensures that you are at the sanctioned buildings when testing. If time permits, you should let your clients know if you were able to access any of this information publicly in case they were under the impression that their locations were secret or difficult to find.
What to do if there is a problem or if the initial goal of the test has been reached. Will you continue to test to find more entries or is the testing over? This part is critical and ties into the question of why the customer wants a penetration test in the first place.
Are there legal implications that you need to be aware of such as systems that are in different countries, and so on? Not all countries have the same laws when it comes to penetration testing.
Will additional permission be required once a vulnerability has been exploited? This is important when performing test on segmented networks. The client may not be aware that you can use internal systems as pivot points to delve deeper within their network.
How are databases to be handled? Are you allowed to add records, users, and so on?
This listing is not all-inclusive and you may need to add items to the list depending on the requirements of your clients. Much of this data can be gathered directly from the client, but some will have to be handled by your team.
If there are legal concerns, it is recommended that you seek legal counsel to ensure you fully understand the implications of your testing. It is better to have too much information than not enough, once the time comes to begin testing. In any case, you should always verify for yourself that the information you have been given is accurate. You do not want to find out that the systems you have been accessing do not actually fall under the authority of the client!
Note
It is of utmost importance to gain proper authorization in writing before accessing any of your clients systems. Failure to do so may result in legal action and possibly jail. Use proper judgement! You should also consider that Errors and Omissions insurance is a necessity when performing penetration testing.
Setting proper limitations is essential if you want to be successful at performing penetration testing. Your clients need to understand the full ramifications involved, and should be made aware of any residual costs incurred if additional services beyond those listed within the contract are needed.
Be sure to set defined start and end dates for your services. Clearly define the rules of engagement and include IP ranges, buildings, hours, and so on, that may need to be tested. If it is not in your rules of engagement documentation, it should not be tested. Meetings should be predefined prior to the start of testing, and the customer should know exactly what your deliverables will be.
Every penetration test will need to start with a rules of engagement document that all involved parties must have. This document should at minimum cover several items:
Proper permissions by appropriate personnel.
Begin and end dates for your testing.
The type of testing that will be performed.
Limitations of testing.
What type of testing is permitted? DDOS? Full Penetration? Social Engineering? These questions need to be addressed in detail.
Can intrusive tests as well as unobtrusive testing be performed?
Does your client expect cleanup to be performed afterwards or is this a stage environment that will be completely rebuilt after testing has been completed?
IP ranges and physical locations to be tested.
How the report will be transmitted at the end of the test. (Use secure means of transmission!)
Which tools will be used during the test? Do not limit yourself to only one specific tool; it may be beneficial to provide a list of the primary toolset to avoid confusion in the future. For example, we will use the tools found in the most recent edition of the BackTrack Suite.
Let your client know how any illegal data that is found during testing would be handled: Law enforcement should be contacted prior to the client. Please be sure to understand fully the laws in this regard before conducting your test.
How sensitive information will be handled: You should not be downloading sensitive customer information; there are other methods of proving that the clients' data is not secured. This is especially important when regulated data is a concern.
Important contact information for both your team and for the key employees of the company you are testing.
An agreement of what you will do to ensure the customer's system information does not remain on unsecured laptops and desktops used during testing. Will you need to properly scrub your machine after this testing? What do you plan to do with the information you gathered? Is it to be kept somewhere for future testing? Make sure this has been addressed before you start testing, not after.
The rules of engagement should contain all the details that are needed to determine the scope of the assessment. Any questions should have been answered prior to drafting your rules of engagement to ensure there are no misunderstandings once the time comes to test. Your team members need to keep a copy of this signed document on their person at all times when performing the test.
Imagine you have been hired to assert the security posture of a client's wireless network and you are stealthily creeping along the parking lot on private property with your gigantic directional Wi-Fi antenna and a laptop. If someone witnesses you in this act, they will probably be concerned and call the authorities. You will need to have something on you that documents you have a legitimate reason to be there. This is one time where having the contact information of the business leaders that hired you will come in extremely handy!
Once the time has come to start your testing, you will want to be prepared. This entails having an action plan available, all of your equipment and scripts up and running, and of course having some mechanism for recording all steps and actions taken. This will provide you with a reference for yourself and other team members. You may remember the steps you took to bypass that firewall now, but what about four months from now when you are facing the same challenge? Taking good notes is critical to a successful penetration test.
For the purpose of this book, we will review the installation of the BackTrack suite using VirtualBox, which is made available by Oracle under the GNU General Public License (GPL). This open source virtualization tool can be used to build your virtual testing environment on platforms such as Linux, OSX, and Windows.
Tip
I highly recommend the use of the BackTrack OS for your testing needs. If you are unfamiliar with BackTrack, PacktPub has recently released an excellent book on the subject titled BackTrack 4: Assuring Security by Penetration Testing. This book will go into detail on various installation methods of the BackTrack suite, and gives a full review of all of the tools you can find within. If you are still new to penetration testing, you will more than likely benefit from reviewing this book. As the focus of Advanced Penetration Testing of Highly Secured Environments is on advanced attack methods we will not cover all tools within the BackTrack suite.
You can also find more information about BackTrack at the BackTrack forum site located at: http://www.backtrack-linux.org/forums/backtrack-5-forums/. The developers of BackTrack are very professional and offer a great deal of time and effort to the security community.
At this point in time the Windows operating system is still the most common desktop operating system, thus I will be detailing the installation of VirtualBox using Windows 7. However, the installation is straightforward for all OS's, so you should not shy away from installing it on your favorite platform.
Note
Almost every tool we use throughout the book is Linux or FreeBSD based. Because many people use Windows as their primary desktop we will provide instructions on installing VirtualBox on Windows 7. Once you have it up and running, you will be able to follow along regardless of which operating system is used as the host machine for your virtual test environment.
Go to http://www.virtualbox.org/.
Click on the Downloads link on the left side of the page.
Download the latest version of VirtualBox for Windows hosts x86/amd64.
Begin the installation (you may need to begin the installation as administrator depending on your system configuration).
Click on Next> at the initial setup window.
Ensure that the installation location is where you would like the program to be installed and that all options to be installed are selected and click on Next>.
Select the options you prefer in regards to desktop shortcuts and click on Next >.
Click on Yes if you would like to proceed with the installation using the settings you selected on the previous screens.
Click on Install to proceed with installation. This step may take some time depending on your system performance. You may be asked to install device software as well, at which point you will have to click on Install in the pop-up window.
Click on Finish to be presented with the Oracle VirtualBox Manager.
You will now have VirtualBox up and running and can begin the first step of creating the virtual testing environment to be used for hands-on practice throughout the book!
Note
We will be referring to the system and virtual network names used in these installation instructions when discussing attack and defense strategies.
There are two primary methods of installing BackTrack as a virtual machine. One is to use the LiveCD ISO to install BackTrack just as you would on a physical machine; the other is to download a pre-prepared virtual machine. This is the VMWare image option seen on the BackTrack-Linux.org download site.
We will be using the LiveCD for our BackTrack installation, as that allows us the flexibility to determine hard drive size and other settings. Another benefit of using the ISO is that you will know how to install BackTrack to physical machines in the future. If using whole disk installation, the install process will be very similar to the virtual machine installation.
BackTrack can be downloaded at http://www.backtrack-linux.org/. Be sure to choose the appropriate ISO version in regards to 32 or 64 bit architecture. If you do not have a 64-bit operating system running on what will be the host machine, you will not be able to run a 64-bit operating system on the guest instances either. If running a 64-bit operating system on the host, you may choose either 32 bit or 64 bit for your guest machine operating systems.
Note
The host machine is the primary operating system that you installed VirtualBox on. Virtualized operating system images installed with VirtualBox will be referred to as guest machines.
Once the BackTrack ISO is obtained it is time to begin.
Start the Oracle VM VirtualBox Manager by selecting it from your Start menu.
Click on the New icon in the top-left corner.
At the Welcome to the New Virtual Machine Wizard screen click on the Next button.
You will be prompted to enter the name of the guest machine. Enter
BT5_R1_Tester1, select Linux as the Operating System, and Linux 2.6 (32 bit or 64 bit) as the Version, and then click on Next.
On the Memory screen you will need to choose a Base Memory Size using the slider. If your system has more than 2 GB of RAM you should use at least 512 MB for this system. You can still follow the examples with a less RAM but you may experience some system lag. After choosing your RAM size click on Next.
Virtual Hard Disk: Ensure that the Start-Up Disk checkbox is selected and the Create new hard disk radial button is also selected and click on Next.
A new pop up will open in which VDI (VirtualBox Disk Image) should be selected. Click on Next.
When asked to select the Virtual disk storage details choose Dynamically allocated and continue the installation by clicking on Next.
Now it is time to select the Location where the virtual guest machines files will be stored. Select the folder icon to the right of the Location text entry field.
Create and select a new folder named
APT_VirtualLabin which we will be storing all guest machines dedicated to this lab. Ensure that the drive you have chosen has sufficient space to store several virtual machines.Size the virtual disk to be at least 10 GB. We will be using this machine extensively throughout the book and although technically possible, it is better to avoid having to resize the VDI. Click on Next to continue.

Validate that the data on the Summary page is accurate and click on Create.
If everything has been successful you are once again prompted with the VirtualBox Manager application window with your new guest machine.

We will want to have two network adapters available to this machine. Select BT5_R1_Tester1 and then click on Settings followed by the Network option on the left menu bar.

Click on the Adapter 2 and select the Enable Network Adapter checkbox.
The Attached to: drop-down box will need to be set to Internal Network.
Change the Name: textbox to Vlab_1 and click on OK.
Now you have completed the preparation required for installing an operating system on your virtual disk. This process does not vary considerably when preparing for other operating systems, and VirtualBox makes many of the configuration changes trivial. Sometimes you may want to tweak the settings on your guest machines to increase their performance. Playing around with some of the settings will give you an idea of the power of this tool.
Now the virtual machine is installed and we are ready to install BackTrack. Thanks to the hard work of the Backtrack-Linux.org team, this process is simple and uncomplicated.
Open the VM VirtualBox Manager and select your BT5_R1_Tester1 guest machine on the left of the screen. Click on the large Start icon on the top bar of the application to start the virtual machine instance.
Your machine will now boot up. As we have not yet selected an image to be used to boot the system with, we will need to select this using the menu options that will appear prior to the initial system initialization.
You may be prompted with an informative window explaining that the Auto Capture Keyboard option is turned on. Click on the OK button to continue the system initialization.
The First Run Wizard will only appear the first time the virtual machine is started. It allows you to easily choose the ISO you wish to boot up from.
It is also possible to add the installation media in the Virtual Machine Settings in the Storage category.
Click on Next to continue.

On the Select Installation Media screen you will need to click on the folder icon to the right of the Media Source bar. You will then need to browse to the folder where you have downloaded the BackTrack ISO, and select it so that it appears as displayed in the following screenshot. Click on Next when ready.

Verify your summary information and click on Start to initiate the machine. If the machine hangs at the
boot:command, press Enter and the system will continue to boot. Allow it to fully load up the LiveCD (Default bootup option). You may be prompted with Keyboard Host Capture messages. Simply click on OK to these as needed.Type
startxat theroot@root:~#prompt.
Now that we have the BackTrack ISO up and running on our virtual machine, we need to add persistence so that changes we make remain. Click on the Install BackTrack icon to begin the short installation process:

Select your preferred language and click on Forward.
Let the install know where you are in the world. This will affect your time settings and will also help with choosing servers that are closer to you for updates. Click on Forward to continue.
Select your preferred keyboard layout and click on Forward.
For the sake of simplicity we will be using the entire available disk space without manual partitioning. Choose the Erase and use the entire disk radial button and click on Forward.
Click on Install to initialize the changes. This stage may take a few minutes to complete.

When the install has finished you will be required to reboot the system. Click on the Restart Now button and then unload the ISO. You will need to choose Devices | CD/DVD Devices | {Your BackTrack ISO image name}. This will eject the ISO image before the system reboots. Press Enter to reboot.

Congratulations, you now have one of the most powerful collections of penetration tools available and ready for your usage. Entire books are dedicated to covering the excellent collection of tools that are part of the BackTrack Linux platform. This toolkit will definitely save you a lot of time out in the field.
After logging in, we should change this default password as soon as possible. You can do this by typing passwd at the prompt and replacing 1NewPassWordHere as seen in the example with your own secure password.
root@bt:~# passwd
Enter new UNIX password: 1NewPassWordHere!
Retype new UNIX password: 1NewPassWordHere!
passwd: password updated successfully
root@bt:~#
Tip
If you are having issues with screen resolution or experiencing other minor annoyances, you may want to install the VirtualBox Guest Additions. With the guest machine running, click on Devices and then Install Guest Additions to initiate this install. You will be required to restart BackTrack afterwards.
Your virtual machine network cards are currently configured to allow your BackTrack installation to access your host system's Internet connection using NAT. In order to update the operating system there are a few commands that you should become familiar with.
One thing to keep in mind is that BackTrack is based on Ubuntu and as with any other operating system, patching is required in order to ensure that the latest security patches are applied. It is also important to keep applications up-to-date so that the latest testing techniques and tools can be taken advantage of!
By default, BackTrack is set up to use only the BackTrack repositories. If curious, you can see what these are by looking at the /etc/apt/sources.list file.
The first command that will need to be initialized is the advanced packaging tools (APT) update function. This will synchronize the package index files to ensure that you have information about the latest packages available. The update functionality should always be used prior to installing any software or updating your installed packages.
# apt-get update
After this update is complete you may initialize apt's upgrade command. All installed packages will be updated to the latest release found within your repositories.
# apt-get upgrade
There is another apt command that is used to update your system. dist-upgrade will bring BackTrack to the latest release. For example, if you are running BackTrack 4 and would like to upgrade instead of downloading and installing the latest version BackTrack 5 release, you may do so by typing:
# apt-get dist-upgrade
Note
You need not worry about dependencies; all of this is handled automatically by the apt-get dist-upgrade command!
Now that your system has been updated, it is time to start up the graphical user interface (type startx at the prompt again) and have a look around at your new toolkit. We will be making extensive use of these tools throughout the course of this book.
There may be times when you need to open up a spreadsheet to review IP ranges, or to quickly review your ROE. Sometimes it is even nice to have your data collection tool export your data directly into a word processor from within BackTrack. There are many open source alternatives to Microsoft Word these days and OpenOffice is at the top of the list. It has been adopted by many businesses and can output various file formats. To install OpenOffice from within BackTrack simply open a terminal session and type:
# apt-get update
# apt-get install openoffice.org
Accept the download by pressing Y and after a few moments, you will have successfully added a very powerful Office Suite to your BackTrack toolset.
A variety of tools will be used during the process of performing a penetration test. Almost all of these will have output that you will want to keep. One major challenge is to be able to combine all of this data in one place so that it may easily be used to enhance testing efforts by providing you with a holistic view of your data, and shorten the report generation phase.
MagicTree, a Java application created by Gremwell, is an actively supported data collection and reporting tool. It manages your data using nodes in a tree-structure. This hierarchical storage method is particularly efficient at managing host and network data. The true power of MagicTree is unleashed when attempting to analyze data. For instance, a search for all IIS web servers found during a scan of a large network would take mere moments.
In addition to providing an excellent data collection mechanism, MagicTree also enables you to create actionable reports based on priorities of your choosing. Reports generated with MagicTree are completely customizable, and easily tailored to meet your reporting requirements. You can even use it to export your data into OpenOffice!
MagicTree allows for XML data imports and has XSLT transforms for many popular formats such as:
Note that the developers of MagicTree are pentesters by trade. When exploring MagicTree, it becomes obvious that they understand the challenges that testers face on a daily basis. One example of this is the functionality they made available that allows you to create your own XSLT transforms for the tool. If the XML data you need cannot be imported using the provided transforms, you can make your own!
As with most tools we will be using throughout this book, this one comes preinstalled on BackTrack 5 R1.
To launch MagicTree from BackTrack we select Applications | BackTrack | Reporting Tools | Evidence Management | magictree. After the splash screen and license agreement has been displayed (the license will need to be accepted) you will be presented with the main application workspace.

To add a node, press Ctrl+N and type 127.0.0.1 into the Input pop-up box. This will populate the tree with two additional nodes. One for testdata and one for host 127.0.0.1.
There are several node types available when storing your data. To be able to use the tool effectively you will need to familiarize yourself with the various node types:
Branch nodes: Used to create the structure of your tree, make sure not to include spaces when using this node type.
Simple nodes: Most common node type, will be used to store simple data such as an IP address or fully qualified domain name.
Text nodes: Stores text data within the node and could be used to provide information about your testing, or data that you would like to appear in your reports.
Data nodes: Store non-image and non-XML attachments in the project file folder.
Image nodes: Can store images such as screenshots or other important evidence.
Cross-references: Creates a link between nodes to avoid duplication of information.
Overview nodes: Used to enter testing results and recommended mitigation strategies. Can be linked to affected hosts.
Special nodes: Created automatically and used by the application to perform certain tasks. Are not user created.
Let's collect some data about 127.0.0.1. In addition to being able to select scan results from tools you have run outside of MagicTree, you can also scan directly from within the tool and use variables to select your target ranges or hosts.
Select the host 127.0.0.1 node in the Tree View menu, click on the Q* button which represents Query All and type the following into the Command text field (which must be clicked in to make it active):
# nmap -vv -O -sS -A -p- P0 -oX $out.xml $host
This will initiate an Nmap scan against 127.0.0.1 and place the results in an XML file named $out.xml.
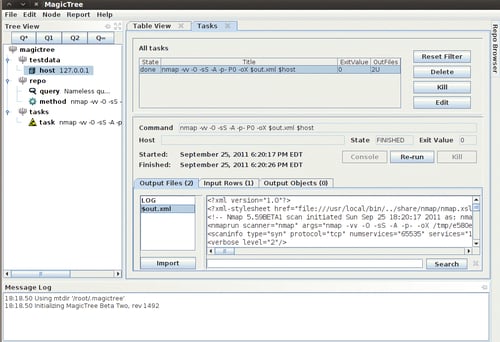
We will select $out.xml and click on the Import button to have MagicTree automatically generate our node structure based on the scan results.
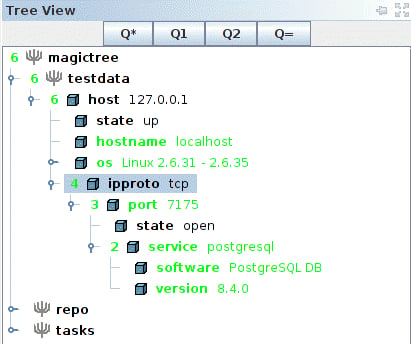
MagicTree has imported the Nmap results and merged them with our host. Looks like we have postgresql version 8.4.0 running on our BackTrack virtual machine on port 7175!
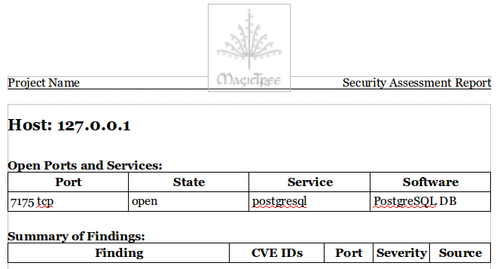
Now that we have some results, we will look at how simple report generation can be. The installation that comes preinstalled with BackTrack 5 R1 has five report templates for OpenOffice preconfigured that can be used as a reference for creating your own templates or just as they are.
At the top from the menu bar, select the Report option followed by Generate Report. This will initiate the Generate Report template selection screen. Select open-ports-and-summary-of-findings-by-host.odt by using the browse option and then click on Generate Report. After a few moments, OpenOffice will open up the automatically generated report listing all open ports by host along with any findings you may have had.
This has just been a quick introduction to the MagicTree project. This tool is immensely powerful and it will take you a bit of practice before its true potential has been unlocked. The documentation provided with MagicTree is well written and frequently updated. If you are primarily performing your penetration testing in very small teams, or in teams of one, then MagicTree will probably be the only data collection tool you will ever want.
The Dradis Framework is a Rails application that can be used to help manage the data overload that can occur when pentesting. With its user friendly web-based interface it simplifies data collection throughout the testing cycle, and is priceless when sharing data with your team members.
When combining disparate data sources, such as Nmap, Nessus, and even Metasploit you would typically need to build out some sort of database and then use various methods of managing the imports. Dradis has plugins that allow you to import this data with just a few clicks. Dradis also allows you to upload attachments such as screenshots or to add your own notes to the database.
The Dradis server can be started by either clicking through the shortcuts menu Applications | BackTrack | Reporting Tools | Evidence Management | Dradis, or by typing the following into the terminal:
# cd /pentest/misc/Dradis/
# ./start.sh
Once the server has started you may open up your browser and type https://127.0.0.1:3004 which takes you to the intro screen of the Dradis application.
Note
The browser will present you with warnings, as the certificate is self-signed. Add the certificate to your exceptions list and continue to the site. You may also want to choose Allow 127.0.0.1 in No Script browser add-on.
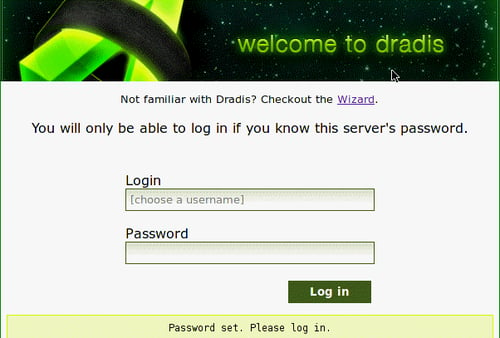
You will be greeted by the "What is Dradis" screen. In order to set the shared password for the server you will need to click on the back to the app link in the top-right corner of the page.

The Dradis framework uses a password that is shared by all team members. Enter a password of your choice in the Password field.
Click on the Initialize button to continue. This will set up the new password and accept the default Meta-Server options.
You will now be able to choose a new username in the Login field. The user login field is used for informational purposes only and will not affect the work area. Type the shared server password into the Password field. Once you click on the Log in button, you are presented with the primary Dradis work area.
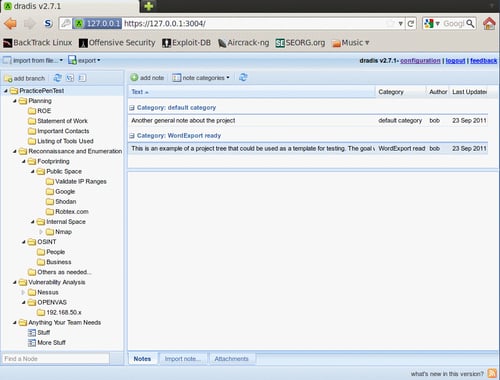
We will begin setting up our Dradis environment by creating a new branch to represent our penetration test. These branches allow you to manage your findings based on various user-created criteria.
Click on the add branch button displayed in the toolbar at the top of the application window.
The new branch will be ready for you to rename it. Overwrite branch #2 with
PracticePenTestand press Enter.Right-click PracticePenTest and select add child to start your hierarchy.
Experiment a bit and add additional folders. Start thinking about how you would like to have your data arranged for easy access and manageability.
Here is an example of a project tree that could hypothetically be used for data collection during a penetration test:
Testing will consist of a series of planned stages and procedures that do not fluctuate much from one test to another. To take full advantage of this fact, we will be creating a reusable template.
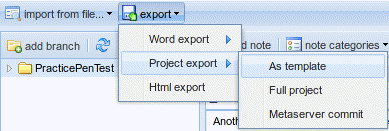
With the PracticePenTest node selected, we will click on the export icon in the top menu bar. When expanding the Project export menu we are presented with the as template option. Clicking this will allow us to save the project template to a location of our choice as an .xml file.
Save the file to your BackTrack Desktop folder and keep the default name of dradis-template.xml. Go back to your Dradis web application window, select the PracticePenTest node, and delete it by right-clicking on it and then choosing Delete node.
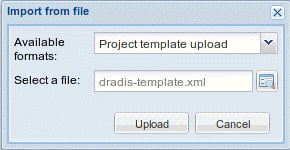
The PracticePenTest node has been deleted along with the rest of our data. Now it is time for us to reuse it, so we need to import the dradis-template.xml file. Click on Import from file from the menu bar and then select old importer. Select Project template upload from the drop-down menu and click on Upload to complete the import sequence and once it has refreshed the screen, we now have two new folders in place: one named Uploaded files, and then of course our original PracticePenTest node structure.
To fully appreciate the value of the Dradis framework, we will be generating some test results using some of the tools commonly used in penetration and vulnerability testing. Most of you probably have some familiarity with these tools, so we will not cover them in depth.
The first thing we need to do is to get our BT5_R1_Tester1 instance up and running if it isn't already. Once you have logged into the BackTrack guest machine and started the graphical user interface with startx, start a new terminal session by clicking on the Terminal icon in the top bar.
Tip
You may have noticed that you are running as root. Many of the tools you will be using require administrative rights to function properly.
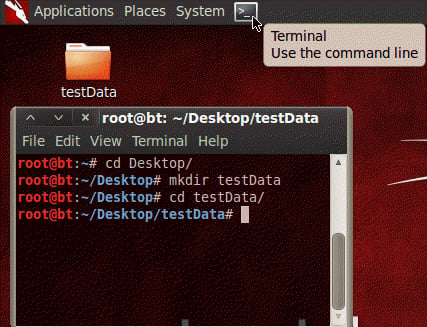
Change the directory to Desktop and then make yourself a new directory named testData. This will be used to store the few exports we will be using. Change your present working directory to /Desktop/testData.
# cd Desktop/
# mkdir testData
# cd testData/
Now we will be using Nmap to generate data that will later be imported into Dradis:
nmap -vv -O -sS -A -p- P0 -oA nmapScan 127.0.0.1
This command initializes Nmap to run against the localhost and instructs it to send the results to three file types: XML, standard, and grepable. As a directory was not specified, the files will be placed into the present working directory. We are performing a very verbose TCP SYN scan against all ports with OS and version detection in which the command treats all hosts as online.
With the Dradis web console open, and the PracticePenTest project tree loaded, select Import from file, old importer, and then in the Import from file menu select the Nmap upload format, and click on the folder icon to the right of the Select a file: input field. Browse to and highlight the nmapScan.xml file and click on Open.
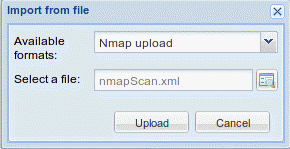
Clicking on Upload will complete the import. It will take a few moments to process the data. The length of time it takes to process is proportional to the amount of data you have.
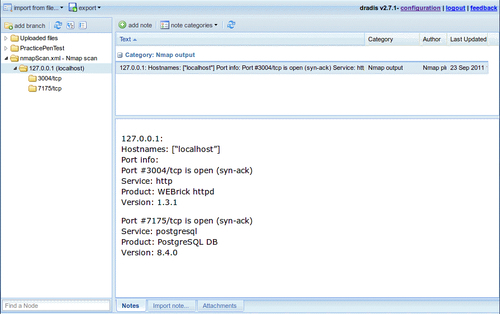
The import has added an additional node to our tree. This can be moved to whichever location in the PracticePenTest node you would like it to be in, by dragging it with the left mouse button. By moving the 127.0.0.1 scan result into the logical hierarchy of PracticePenTest it is now easy to associate it with this penetration test and other correlating data.
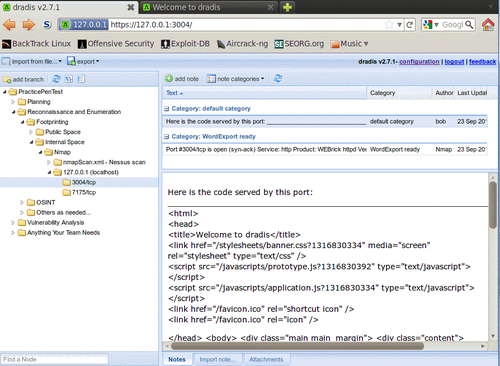
One of the benefits of using this type of centralized data collection is that you will be able to set certain flags on notes to have the data exported into PDF, MS Word, or HTML format.
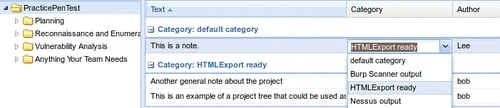
With Dradis up and running, we will need to select the PracticePenTest node and click on the Add note button in the workspace to the right of your project tree. Type "This is a note" into the editor that pops up and then click on Save. This will add your note to the list.
You will not always want to export everything into your reporting formats. To address this fact, the Dradis development team added the Category field. This field will flag the data to be exported into the various formats available. In this case we will double-click on the text default category listed to the right of our new note titled "This is a note." Choose the HTMLExport ready option from the drop-down menu.
To see our data, select the export option on the top toolbar and click on HTML export. You will be presented with an HTML output of all PracticePenTest notes that are members of the HTMLExport category throughout the project tree.
As you can see the output is very nice, but what if you would like to have something that is a bit more customized? The standard templates can be changed to customize the look and feel of the export. Here is an example of how to change the footer of the document:
Change the current working directory to the export plugin of choice. In this case we will be modifying the html_export/template.html.erb file.
# cd /pentest/misc/dradis/server/vendor/plugins/html_export
To modify template.html.erb we will be using nano, a very powerful-easy to use text editor.
# nano template.html.erb
The file will be displayed within the Nano text editor. The Nano commands will be listed on the bottom of the application if reference is needed. We are presented with the HTML that makes up the template.html.erb file. Make a small change to the template by placing <h1>You can change this template to suite your needs.</h1> into the template HTML right below the <title><%= title %></title> line.
<title><%= title %></title>
<h1>You can change this template to suite your needs.</h1>
Save the changes in Nano using Ctrl+O which will write out the file to disk. You will be asked what filename you would like to use to save the file; accept the defaults by pressing Enter on your keyboard.
To see your changes in action, go back to the Dradis web console, select PraticePenTest and click on export then HTML export from toolbar menu. Your new template will load and your change will be visible in the report export. The template is very customizable and can be made to have the look and feel you want it to with a bit of effort and HTML skill.
Tip
Please note that the MS Word export functionality requires you to have MS Office installed.
This means that we cannot use our BackTrack instance to fully appreciate the power of Dradis. The Word templates are easily customized to include your company information, list the data in your preferred formatting, and to add standard footers and headers to the document.
Because Dradis is very portable, if you need the power to export into MS Word, but do not have a license available to install it in BackTrack, install Dradis on your Windows machine that has Microsoft Office installed, export the Dradis project from BackTrack, and re-import it into the Windows Dradis installation.
In this chapter, we focused on all that is necessary to prepare and plan for a successful penetration test. We discussed the differences between penetration testing and vulnerability assessments.
The steps involved with proper scoping were detailed, as were the necessary steps to ensure all information has been gathered prior to testing. One thing to remember is that proper scoping and planning is just as important as ensuring you test against the latest and greatest vulnerabilities.
We have also discussed the installation of VirtualBox and BackTrack and have provided the instructions necessary to not only install BackTrack from the ISO, but also how to keep it updated. In addition to this, we have also provided instructions on how to install OpenOffice on BackTrack.
Last but not least, we have discussed two very powerful tools that allow you to perform data collections and that offer reporting features. MagicTree, which is a powerhouse of data collection and analysis, and Dradis, which is incredible in its ability to allow for centralized data collection and sharing.
In the next chapter, we learn about various reconnaissance techniques and why they are needed. Some of these include effective use of Internet search engines to locate company and employee data, manipulating and reading metadata from various file types, and fully exploiting the power of DNS to make the task of penetration testing easier.

