


The business process is important for any organization, but managing it is of equal importance. Business requirements frequently change for an organization. To change, manage, and understand the current business process is very hard without Business Process Management (BPM), where the execution of each system depends on the business process. For developers, implementing a business process without following any standards leads to complexity. To explain a business process to a non-technical person without any graphics leads to misunderstanding. In such situations, Activiti comes to the rescue, as it is one of the best BPM frameworks for implementing business processes in your organization. Activiti provides a platform to create a business process on a canvas, build it, and execute it on the fly. It is open source, written in Java, and distributed under the Apache V2 license.
To implement a business process using Activiti, you first have to understand the skeleton of Activiti BPM. In this chapter, we will show you how to download and install Activiti.
In this chapter, we will cover the following topics:
Overview of Activiti BPM
Downloading Activiti BPM
Installing the Activiti framework
Building your first business process
By the end of this chapter, you will be able to install and access the Activiti framework and implement your own business process.
So, let's take a tour of Activiti, set it up, and implement a business process.
Let's take a quick tour of the Activiti components so you can get an idea of what the core modules are in the Activiti BPM that make it a lightweight and solid framework. You can refer to the following figure for an overview of the Activiti modules:

In this figure, you can see that Activiti is divided into various modules. Activiti Modeler, Activiti Designer, and Activiti Kickstart are part of Modelling, and they are used to design your business process. Activiti Engine can be integrated with your application, and is placed at its center as a part of Runtime. To the right of Runtime, there are Activiti Explorer and Activiti Rest, which are part of Management and used in handling business processes.
Let's see each component briefly to get an idea about it.
The Activiti Engine is a framework that is responsible for deploying the process definitions, starting the business process instance, and executing the tasks.
The following are the important features of the Activiti Engine:
Performs various tasks of a process engine
Runs a BPMN 2 standard process
It can be configured with JTA and Spring
Easy to integrate with other technology
Rock-solid engine
Execution is very fast
Easy to query history information
Provides support for asynchronous execution
It can be built with cloud for scalability
Ability to test the process execution
Provides support for event listeners, which can be used to add custom logic to the business process
Using Activiti Engine APIs or the REST API, you can configure a process engine
Workflow execution using services
You can interact with Activiti using various available services. With the help of process engine services, you can interact with workflows using the available APIs. Objects of process engines and services are threadsafe, so you can place a reference to one of them to represent a whole server.

In the preceding figure, you can see that the Process Engine is at the central point and can be instantiated using ProcessEngineConfiguration. The Process Engine provides the following services:
RepositoryService: This service is responsible for storing and retrieving our business process from the repository
RuntimeService: Using this service, we can start our business process and fetch information about a process that is in execution
TaskService: This service specifies the operations needed to manage human (standalone) tasks, such as the claiming, completing, and assigning of tasks
IdentityService: This service is useful for managing users, groups, and the relationships between them
ManagementService: This service exposes engine, admin, and maintenance operations, which have no relation to the runtime execution of business processes
HistoryService: This service provides services for getting information about ongoing and past process instances
FormService: This service provides access to form data and renders forms for starting new process instances and completing tasks
The Activiti Modeler is an open source modeling tool provided by the KIS BPM process solution. Using the Activiti Modeler, you can manage your Activity Server and the deployments of business processes. It's a web-based tool for managing your Activiti projects. It also provides a web form editor, which helps you to design forms, make changes, and design business processes easily.
The Activiti Designer is used to add technical details to an imported business process model or the process created using the Activiti Modeler, which is only used to design business process workflows. The Activiti Designer can be used to graphically model, test, and deploy BPMN 2.0 processes. It also provides a feature to design processes, just as the Activiti Modeler does. It is mainly used by developers to add technical detail to business processes. The Activiti Designer is an IDE that can only be integrated with the Eclipse plugin.
The Activiti Explorer is a web-based application that can be easily accessed by a non-technical person who can then run that business process. Apart from running the business process, it also provides an interface for process-instance management, task management, and user management, and also allows you to deploy business processes and to generate reports based on historical data.
The Activiti REST provides a REST API to access the Activiti Engine. To access the Activiti REST API, we need to deploy activiti-rest.war to a servlet container, such as Apache Tomcat. You can configure Activiti in your own web application using the Activiti REST API. It uses the JSON format and is built upon Restlet. Activiti also provides a Java API. If you don't want to use the REST API, you can use the Java API.
To start with Activiti, we will first download it. To download Activiti, just go through its website at http://activiti.org/download.html and download the latest version, activiti-5.x.zip, into your local system. Now extract that ZIP file and you will get all the directories for all the operating systems (the file structures will be the same). You will get the list of directories and files as shown in the following screenshot:
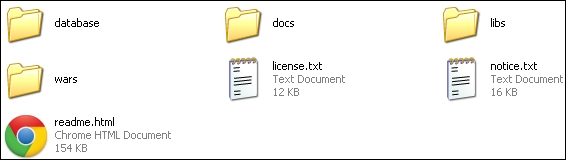
In the database directory, you will find the entire SQL scripting file. The wars directory contains activiti-explorer.war and activiti-rest.war. You can also find Java documents and the user guide in the docs directory. The libs directory contains all the Activiti JAR files.
Before starting the installation of Activiti, there are some prerequisite software applications that should be installed on your system.
Activiti runs on a version of JDK higher than or equal to Version 6. Go to http://www.oracle.com/technetwork/java/javase/downloads/index.html and click on the Download JDK button. There are installation instructions on this page. To verify that your installation was successful, run the following command in the command prompt:
java -version
Execution of this command should print the installed version of your JDK.
Eclipse will be required when you start working with Activiti Designer as the Activiti Designer only works with Indigo or Juno. Hence, download Eclipse Juno or Indigo from http://www.eclipse.org/downloads/, unzip the downloaded file, and you can start Eclipse from within the Eclipse folder.
We have already set up all the prerequisites on our system. Let us extract Activiti 5.13 onto one of our drives.

To install the Activiti framework on the system, we will use Apache Tomcat; perform the following steps:
Download the latest Apache Tomcat from http://tomcat.apache.org/download-70.cgi and extract it onto your local system.
Copy
activiti-explorer.warfrom theactiviti-5.x\warsfolder and place it in theapache-tomcat-7.0.33\webappsfolder, as shown in the following screenshot:
Now we will start the Apache Tomcat server so that the
activiti-explorer.warfile is deployed to thewebappsfolder.For the Windows operating system, browse to
apache-tomcat-7.0.33\binand double-click onstartup.bat, as shown in the following screenshot:
Now, the
startup.batfile will start executing and deploying the Activiti Explorer on the system. During installation, it will set up the Activiti Engine, H2 database, default users, and much more. The result of this installation can be seen in the following screenshot:
All the directories of the Activiti Explorer will be created on the
apache-tomcat-7.0.33\webapps\activiti-explorerpath once the installation is completed.For the Linux operating system, we can use the command prompt to start Apache Tomcat.
The location of the
warfile will be the same as that for the Windows operating system. To start Apache Tomcat, we need to browse to the../apache-tomcat-7.0.33/binpath using the command prompt and execute the following command:sh catalina.sh run
The result of executing the previous command is shown in the following screenshot:

Note
Activiti is installed; but, to verify whether or not the installation was done properly, open your favorite browser and type the localhost:8080/activiti-explorer URL container and press Enter. If you get the Activiti login screen, it means you have set up Activiti successfully. If you face any problems, make sure that Tomcat has started and also check whether or not Activiti-explorer.war is deployed successfully.
Now is the right time to look at one simple process in Activiti. We will be using the Eclipse IDE for designing the business process (the details of configuration are covered in Chapter 3, Designing Your Process Using the Activiti Designer). For now, we will just gain an understanding about creating a process.
We will create a simple leave process for employees in which we will have a script task and a user task. A script task is used for adding some logic within a process and a user task is used to indicate that there is some human interaction required in the process (there is a detailed explanation regarding tasks in Chapter 2, Modeling Using the Activiti Modeler).
Perform the following steps to create a process in Activiti:
Create a new Activiti project in Eclipse by navigating to File | New | Project | Activiti Project and name your project
SimpleLeave-Process.The
SimpleLeave-Processproject will have a folder structure as shown in the following screenshot:
Now create an Activiti Diagram in the
src/main/rersource/diagramsfolder structure.To create a diagram, navigate to File | New | Other | Activiti Diagram and name your diagram
SimpleLeaveProcess. The folder structure is shown in the following screenshot:
On opening the
.bpmnfile, a white canvas will appear on which you can design the business process.To draw a business process, there is a Palette option available which contains most of the BPMN diagrams for designing the business process. First, we will be adding a StartEvent on the canvas from the Event tab of the Palette option. All these options are shown in the following screenshot:

To add a script task, click on StartEvent and it will display the options as shown in the following screenshot. From those options, select the new element option, which will list down all the elements; from those elements, select Create script task, as shown in the following screenshot:

To add a user task, click on Script Task and select new user task, which is the option displayed with a human icon as shown in the following screenshot:

As each and every business process should have at least one end event, to add an end event, click on User Task and select the new end event option, as shown in the following screenshot:

After adding the end event to the process, your business process should look similar to the following screenshot:

Now we have to make some changes to the properties of the process.
First, we will change the properties of the start event. Select the start event, open the Properties tab, and add Form Properties in the Form tab using the New button as shown in the following screenshot:

Now, edit the properties for the script task. In the Main config tab, there is a Script field available; within that, insert the print statement
out:println"ApplyforLeaveby"+Empname;. TheEmpnameproperty is the form property that we created in the start event. The script task will print the message on the console when it is executed, as shown in the following screenshot:
Now we will edit the user task properties. In the General tab, we will populate the Name property, which will be displayed in the user task node, as shown in the following screenshot:

As the user task is to be performed by a specific user, we have to provide the name of the user who will be responsible for executing it.
We have to populate the Assignee property of the Main config tab with the name of the person to whom the task should be assigned; as shown in the following screenshot, we will be assigning it to
kermit:
We can also view the
.bpmnfile in the XML format. Right-click on theSimpleLeaveProcess.bpmnfile, browse to OpenWith | XML Editor, and it will be available in the XML format. The result of this step is shown in the following screenshot:
Now we will test the business process that we created. For this, we will have to perform the following steps:
Right-click on the
SimpleLeaveProcess.bpmnfile and browse to Activiti | Generate unit test, as shown in the following screenshot:
On performing the previous step, a test class file is created in
src/test/java package, as shown in the following screenshot:
In the
ProcessTestMyProcess.javafile, replace the code with the following:@Test public void startProcess() throws Exception { RepositoryService repositoryService = activitiRule.getRepositoryService(); repositoryService.createDeployment().addInputStream("SimpleLeaveProcess.bpmn20.xml", new FileInputStream(filename)).deploy(); RuntimeService runtimeService = activitiRule.getRuntimeService(); Map<String, Object> variableMap = new HashMap<String, Object>(); variableMap.put("Empname", "Irshad"); ProcessInstance processInstance = runtimeService.startProcessInstanceByKey("leaveProcess", variableMap); assertNotNull(processInstance.getId()); System.out.println("id " + processInstance.getId() + " " + processInstance.getProcessDefinitionId()); }To view the test result, you can right-click on the
ProcessTestMyProcessclass file and browse to Run As | JUnit Test, as shown in the following screenshot:
The output after executing the test case is shown in the following screenshot:

Oh great! We have finished Chapter 1, Installing Activiti. We have learned how to install Activiti on our system and how to use the Activiti Explorer for creating a simple business process. We also performed unit testing for a business process. Using the Activiti Explorer, we have deployed the employee leave process. In the next chapter, we will learn how to use the Activiti Modeler to design different business processes.

