


 Download code from GitHub
Setting Up Our System for Development
The aim of this book is to provide a blueprint for a web app running in a production environment and utilizing as many industrial best practices as possible. To do this, we will build a working to-do app, codenamed Tozo, that allows users to track a list of tasks. You can see the finished app in Figure 1.1:
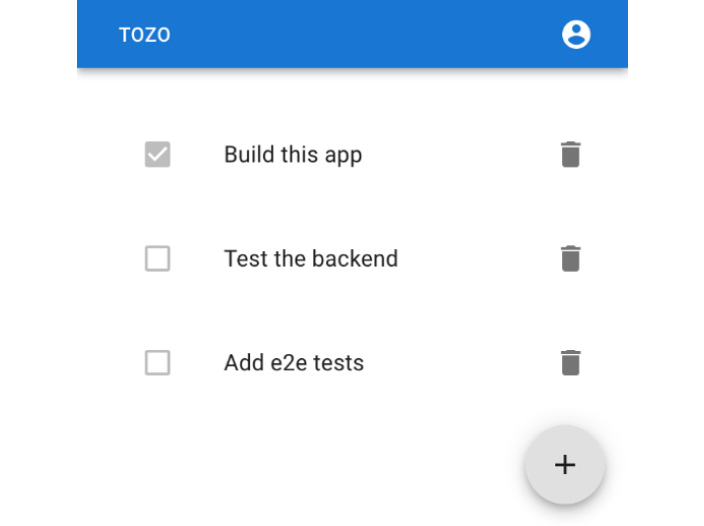
Figure 1.1: The to-do app we’ll build in this book
While the aim is to build a working to-do app, we’ll focus on features that are useful to any app, with much of the functionality and many of the techniques being the same as in the app built here. For example, users will need to log in, change their password, and so on. Therefore, my hope is that you can take this blueprint, remove the small amount of specific to-do code, and build your own app.
In this chapter, we will take a new machine without any tooling and set it up for development. We’ll also set up systems to develop and test the app automatically. Specifically, we’ll install a system package manager and use it to install the various language runtimes and tooling before setting up a remote repository and activating continuous integration. By the end of this chapter, you’ll have everything you need to be able to focus solely on developing the app. This means that you will be able to quickly build and test the features you need in your app for your users.
So, in this chapter, we will cover the following topics:
- Aiming for fast development
- Setting up our system
- Installing Python for backend development
- Installing NodeJS for frontend development
- Installing Terraform for infrastructure development
- Installing PostgreSQL for database development
- Adopting a collaborative development process using GitHub
Technical requirements
I’ve built the app described in this book and you can use it by visiting the following link: https://tozo.dev. The code is also available at https://github.com/pgjones/tozo (feel free to use that code or the code in this book under the MIT license).
I’m going to assume you have a working knowledge of TypeScript and Python, as these are the languages we’ll use to write the app. However, we’re going to avoid any esoteric language features and I hope the code is easily understandable. I’m also going to assume you are happy using the command line, rather than focusing on GUI instructions, as most tooling is optimized for command-line usage, and this is something that should be advantageous.
To follow the development in this chapter, use the companion repository at https://github.com/pgjones/tozo and see the commits between the r1-ch1-start and r1-ch1-end tags.
Aiming for fast development
Before we start setting up our system to build the to-do app, it’s important to understand what we are aiming for when building any app, which is to solve our customer’s needs by shipping solutions as quickly as possible. This means that we must understand their needs, translate them into working code, and crucially, deploy the solution with confidence that it works as expected.
When we are developing an app, the shorter the time between making a change to the code and being able to run and see the effect of the change, the better. This is why we will run all of the code locally, with auto-reloading enabled; this should mean that any change we make is testable in our local browser within a few seconds.
Hot/auto-reloading
In development, we ideally want any changes we make to the code to take effect immediately so that we can check that the changes have the desired effect. This feature is called hot or auto-reloading and is active with the React and Quart development servers we are using in this book.
I also like to use tooling to help speed up development and gain confidence that the code works as expected. This tooling should run as frequently as possible, ideally as part of an automated process. I have split this tooling into auto-formatting, linting, and testing categories.
Auto-formatting the code
The format and style of code matter as a different style to the one you are used to will take longer for you to understand. This will mean more bugs as you spend more of your time comprehending the style rather than logic. Also, while you can be consistent, almost everyone has a different preferred style, and I’ve found that these preferences change over time.
In the past, I’ve used tooling to check the styling and report on any inconsistencies. This is helpful but wasteful as every inconsistency must be fixed manually. Fortunately, most languages now have an official, or dominant, auto-formatter that both defines a style and changes all of the code to match it. Using the most popular auto-formatter means that most developers will recognize your code.
We’ll aim to set up our tooling so that there are auto-formatters for as much of the code as possible.
Linting the code
I think of linting in two parts: type checking and static analysis. Type checking requires that we include types when writing the code. I use type hinting, or typed languages, where possible, as this catches a large number of the errors I typically make. Typing also helps document the code, meaning that it makes it clear what objects (types) are expected. While typing costs more effort to write, I think it easily pays off in bugs avoided. Therefore, checking the typing should be our first aim of linting.
The second part, static analysis, allows linters to look for potential issues in naming, usage of functions, possible bugs, security issues, and unused code, and to flag code that is too complex or poorly constructed. These linters are a very low-cost sanity check as they are quick and easy to run and give few false issues (positives).
Testing the code
While linting will identify bugs and issues with the code, it cannot detect logical issues where correctly written code does the wrong thing. To identify these, we need to write tests that check that the execution of the code results in the expected output. Therefore, it is important that we write tests as we write the code, especially when we discover bugs. We will focus on writing tests that provide an easy way to test that the app works as expected.
Test coverage
Test coverage is used to measure how much of the code has been tested by the test suite. This is typically done by measuring the ratio of lines executed by the tests to the total lines of code. I find this metric unhelpful as it focuses on lines executed rather than use cases that matter to the user. Therefore, I’d encourage you to focus on testing the use cases you think your users require. However, if you’d like to measure coverage this way, you can install pytest-cov using pdm.
Using auto-formatters, linters, and a testing suite allows us to develop with greater confidence and therefore speed, which in turn means a better experience for our users. However, in order to use these tools, we will first need to set up our system effectively.
Setting up our system
To effectively develop our app, we will need to be able to develop and run it. This means we will need tooling to manage changes to the code, test and check the app for errors, and run it. This tooling can be installed via a system package manager, of which there are many choices depending on your operating system. I recommend that you install Homebrew on Linux (https://linuxbrew.sh) and macOS (https://brew.sh), or Scoop (https://scoop.sh) on Windows. I’ll show both brew and scoop commands in this book, but you should only use the command that works on your operating system.
You will also need a code editor to write the code in and a browser to run the app. I recommend that you install VS Code (https://code.visualstudio.com) and Chrome (https://www.google.com/chrome) via the directions given on their websites. With these tools installed, we can now consider how we’ll manage the code.
Managing the code
As we develop our app, we will inevitably make mistakes and want to return to the previous working version. You may also want to share the code with others, or just keep a backup for yourself. This is why we need to manage the code via a version control system. While there are many different version control systems, the majority in this industry use git (https://git-scm.com). It can be installed via the system package manager as follows:
brew install git
scoop install git
Using git
This book can be completed using git add to add files to the repository, git commit to create commits, and git push to update the remote repository. I consider these to be the basic git commands. However, git can still be very confusing to use, and you may end up with your repository in a mess. It does get easier with practice and there is plenty of help online. You can always delete your local repository and start again from the remote version (as I have done many times before).
Now we have git installed, let’s set the author information as follows:
git config --global user.name "Phil Jones"
git config --global user.email "pgjones@tozo.dev"
The highlighted values should be changed to your name and email address.
Next, we can create a repository for our code by creating a directory called tozo and running the following command within it:
git init .
This will create a .git directory that can be safely ignored. This results in the following project structure:
tozo
└── .git
As we develop, we will want git to ignore certain files and paths. We will do this by creating .gitignore files that list the filenames and file paths that we do not want to be part of our repository.
Writing good commits
The history of changes stored by git can serve as an excellent companion document for your code if git is used well. This is something that won’t seem advantageous at the start, but after a year of development, it will be something you’ll sorely miss if you hadn’t done it from the beginning. So, I strongly recommend you write good commits.
A good commit contains a single atomic change to the code. This means it is focused (doesn’t combine different changes into one commit) and that it is complete (every commit leaves the code working).
A good commit is also well described and reasoned. This means the commit message explains why the change has been made. This contextual information is invaluable as it will be forgotten quickly and is often required to understand the code.
With git installed, we can start committing changes; however, we should establish how we intend to combine changes, which, in my opinion, should be done by rebasing.
Rebasing rather than merging
As I put a lot of value on the git commit history, I recommend using rebases rather than merges when combining changes. The former will move local new commits on top of any remote changes, rewriting and leaving a linear clear history, whereas the latter will introduce a merge commit. To make this change, run the following code:
git config --global pull.rebase true
We’ve now set up our system with a package manager and version control. Next, we can install the specific tooling we need for the various aspects of the app.
Installing Python for backend development
There are a variety of languages that are suitable for backend development, and any would be a fine choice for your app. In this book, I’ve chosen to use Python as I find that the code is more accessible and easier to follow than other languages.
As we will be writing the backend for our app in Python, we will need to have it installed locally. While you may have a Python version already installed, I’d recommend you use the one installed by the system package manager, as follows:
brew install python
scoop install python
The package manager we’ve used so far doesn’t know how to install and manage Python packages, so we also need another package manager. There are many choices in Python, and I think PDM is the best. PDM can be installed with the system package manager on Linux and macOS systems, as follows:
brew install pdm
For Windows systems, it can be installed by running the following commands:
scoop bucket add frostming https://github.com/frostming/scoop-frostming.git
scoop install pdm
We’ll keep the backend code separate in a backend folder, so please create a backend folder at the top level of the project with the following folder structure:
tozo
└── backend
    ├── src
    │   └── backend
    └── tests
Next, we need to inform git that there are files that we don’t want to be tracked in the repository and hence it should ignore them by adding the following to backend/.gitignore:
/__pypackages__
/.mypy_cache
.pdm.toml
.pytest_cache
.venv
*.pyc
For PDM to manage our project, we need to run the following command in the backend directory:
pdm init
When prompted, you should choose the Python version installed using the system package manager earlier.
We can now focus on the specific Python tooling for fast development.
Formatting the code
Python does not have an official format or formatter; however, black is the de facto formatter for code and isort is the de facto formatter for imports. We can add both to our project by running the following command in the backend directory:
pdm add --dev black isort
The dev flag
We use the --dev flag here as these tools are only required for developing the backend and therefore do not need to be installed when running in production.
black and isort require the following configuration to work well together. This should be added to the end of the backend/pyproject.toml file (you may have to change the target-version if you are using a version of Python other than 3.10) as follows:
[tool.black]
target-version = ["py310"]
[tool.isort]
profile = "black"
The following commands will run black and isort on our code in the src and tests folders:
pdm run black src tests
pdm run isort src tests
We’ll be using Jinja templates for emails sent by our app. While these templates are code, they are not Python and hence require a different formatter. Thankfully, djhtml can be used to format the templates and is added by running the following command in the backend folder:
pdm add --dev djhtml
The following command will run djhtml on our template code:
djhtml src/backend/templates --tabwidth 2 --check
We’ve now installed the tooling we need to format the code in the backend. Next, we can install the tooling we need to lint the code.
Linting the code
Python supports type hints that describe the expected types of variables, functions, and so on. We’ll use type hints and tooling to check that we haven’t introduced any type-related bugs. The most popular type checking tool for Python is mypy. It is installed by running the following command in the backend directory:
pdm add --dev mypy
The following command will run mypy over the backend code:
pdm run mypy src/backend/ tests/
With mypy helping us find type errors, we can add Flake8 to help us find other bugs. Flake8 is installed with pdm as follows:
pdm add --dev flake8
Flake8 must be configured to work with black and mypy by adding the following to backend/setup.cfg:
[flake8]
max-line-length = 88
extend-ignore = E203
Flake8 is used by running the following command:
pdm run flake8 src/ tests/
There is another type of bug that we can use tooling to help us find, and these are related to security. A good example would be checking for a SQL injection vulnerability. Bandit is another linter that helps identify these bugs, and it is installed by running the following command in the backend directory:
pdm add --dev bandit
Bandit only needs to lint the src code as the test code does not run during production. To run Bandit over the src code, the following command is used:
pdm run bandit -r src/
Bandit ModuleNotFoundErrors
Bandit may fail to run with the error ModuleNotFoundError: No module named ‘pkg_resources’. If this happens, then run pdm add --dev setuptools to add the missing module.
We now have tooling looking for bugs, but we can also add tooling to look for unused code. This is helpful as code can often be forgotten during refactoring, leaving files that are much more complex to read and understand than they should be. I like to use vulture to find unused code, and it is installed by running the following command in the backend directory:
pdm add --dev vulture
Unfortunately, vulture can report false positives, so I like to configure it to be 100% confident when reporting issues by adding the following configuration to backend/pyproject.toml:
[tool.vulture]
min_confidence = 100
Like Bandit, it is best to run vulture over the src code only (not the tests) via the following command:
pdm run vulture src/
Now, let’s look at what we need to test the code.
Testing the code
Python has unittest as part of its standard library, however, I think using pytest is superior. pytest is very feature-rich and allows for very simple and clear tests, such as the following small example that tests that a simple addition is correct:
def test_addition():
    assert 1 + 1 == 2
pytest requires the pytest-asyncio plugin to test async code, and they are both installed with pdm as follows:
pdm add --dev pytest pytest-asyncio
pytest is best configured to show local variables on test failure as this makes it much easier to understand why the test is failing. In addition, the asyncio mode should be set to auto to make writing async tests easier. The following configuration should be placed in backend/pyproject.toml:
[tool.pytest.ini_options]
addopts = "--showlocals"
asyncio_mode = "auto"
pythonpath = ["src"]
To run the tests, pytest is invoked with the tests path as follows:
pdm run pytest tests
Now that we’ve installed all of the tooling, we need some simple commands to run it.
Scripting the commands
We’ve added a lot of useful tooling to our project; however, each one had a different unique command that we’d have to remember. This is something we can simplify by making use of PDM’s scripting feature as it can be used to map PDM commands to the required commands. We will add the following three PDM scripting commands:
pdm run formatto run the formatting tooling and format the codepdm run lintto run the linting tooling and lint the codepdm run testto run the tests
PDM’s scripting requires these script commands to be added to the backend/pyproject.toml file as follows:
[tool.pdm.scripts]
format-black = "black src/ tests/"
format-djhtml = "djhtml src/backend/templates -t 2 --in-place"
format-isort = "isort src tests"
format = {composite = ["format-black", "format-djhtml", "format-isort"]}
lint-bandit = "bandit -r src/"
lint-black = "black --check --diff src/ tests/"
lint-djhtml = "djhtml src/backend/templates -t 2 --check"
lint-flake8 = "flake8 src/ tests/"
lint-isort = "isort --check --diff src tests"
lint-mypy = "mypy src/backend tests"
lint-vulture = "vulture src"
lint = {composite = ["lint-bandit", "lint-black", "lint-djhtml", "lint-flake8", "lint-isort", "lint-mypy", "lint-vulture"]}
test = "pytest tests/"
With the backend tooling in place and accessible via easy-to-remember commands, we can now do the same for the frontend.
Installing NodeJS for frontend development
As we want our app to run in the browser, we will need to write the frontend in JavaScript or a language that compiles to it. There are many good choices, but I’ve chosen to use TypeScript as it is JavaScript with the addition of typing (as in, it is the same basic language). This means it is close to the required runtime language and has the additional safety and documentation from the typing.
As we will be writing the frontend in TypeScript, we will need NodeJS installed to compile TypeScript to the JavaScript that will run in the browser. NodeJS is best installed with the system package manager as follows:
brew install node
scoop install nodejs
Unlike Python, where we installed a specific package manager, NodeJS comes with one called npm. We’ll use npm to manage the frontend dependencies and tooling. npm also includes the npx tool that we will use to run one-off scripts.
As with the backend, we’ll separate the frontend code into a frontend folder. Then, we’ll use the create-react-app tool in this new folder to set everything up by running the following command in the project directory:
npx create-react-app frontend --template typescript
It should give the following folder structure:
tozo
└── frontend
    ├── node_modules
    ├── public
    └── src
Of the files also installed, only the frontend/package.json, frontend/package-lock.json, frontend/tsconfig.json, frontend/.gitignore, frontend/src/react-app-env.d.ts, and frontend/public/index.html files matter at the moment, so you can delete or adapt the other files as you’d like.
We can now focus on the specific NodeJS tooling for fast development.
Formatting the code
TypeScript does not have an official format/formatter; however, Prettier is the de facto formatter. We should add it to the project as a development dependency by running the following command in the frontend directory:
npm install --save-dev prettier
The --save-dev flag
We use the --save-dev flag here as these tools are only required to develop the frontend, and therefore do not need to be installed when running in production.
By default, Prettier does not add trailing commas, which is different from the style used in Python. To be consistent and therefore not have to think about this, Prettier can be configured by adding the following section to frontend/package.json:
"prettier": {
  "trailingComma": "all"
}
The following command will then run Prettier over our code:
npx prettier --parser typescript --write "src/**/*.{ts,tsx}"
We’ve now installed the tooling to format the code and we can focus on the tooling to lint it.
Linting the code
In the preceding section, we required a linter to type check our Python code, however, as we are using TypeScript, we do not need to install anything extra to type check. However, we can install linters to check for other bugs; the de facto linter for TypeScript and JavaScript is eslint, which is installed by running the following command in the frontend directory:
npm install --save-dev eslint
By default, eslint is not compatible with Prettier; fortunately, the eslint-config-prettier package configures eslint to be compatible. It is installed by running the following command in the frontend directory:
npm install --save-dev eslint-config-prettier
As with the backend, we should order our imports using eslint-plugin-import, which is installed with npm as follows:
npm install --save-dev eslint-plugin-import
These linters are then configured by replacing the existing eslintConfig section with the following in frontend/package.json:
"eslintConfig": {
  "extends": [
    "react-app",
    "react-app/jest",
    "plugin:import/errors",
    "plugin:import/warnings",
    "plugin:import/typescript",
    "prettier"
  ]
}
The highlighted lines will already be present.
eslint can be run over our code via the following command:
npx eslint "src/**/*.{ts,tsx}"
eslint can also fix some of the issues it identifies via the use of the --fix flag as follows:
npx eslint --fix "src/**/*.{ts,tsx}"
We’ve now installed the tooling to lint the code and we can focus on the tooling to test it.
Testing the code
The create-react-app tool used earlier also installed a test runner called Jest, which we can invoke by running the following:
npm run test
Jest allows for tests to be written using an expect syntax, as shown in the following example:
test('addition', () => {
  expect(1 + 1).toBe(2);
});
With the testing tooling present, we can focus on analyzing the built bundle.
Analyzing the bundle
The frontend code will be delivered as bundles (in chunks) to the user. These bundles, especially the main bundle, should be small so that the user isn’t waiting too long for the code to be downloaded. To check the bundle size and analyze what is included in each bundle, I use source-map-explorer, which is installed by running the following command in the frontend directory:
npm install --save-dev source-map-explorer
Before we can analyze the bundle sizes, we first need to build them by running the following command:
npm run build
Then, we can analyze them via this command:
npx source-map-explorer build/static/js/*.js
The output from the preceding command is shown in Figure 1.2:
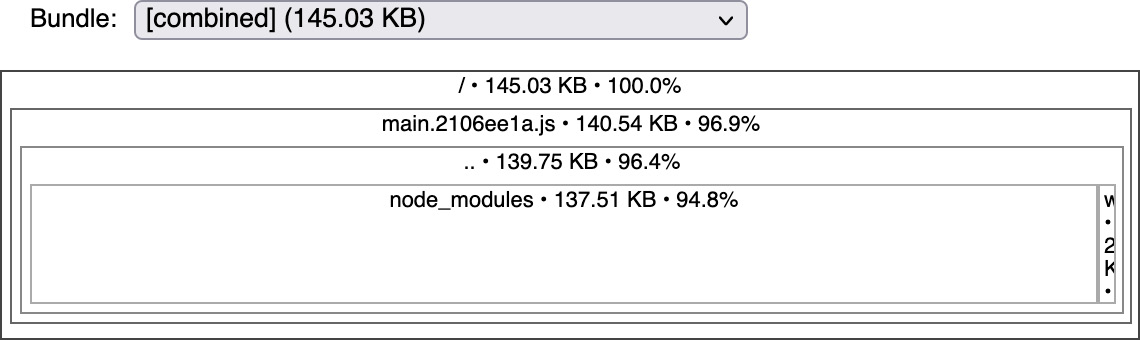
Figure 1.2: The output from source-map-explorer showing that the main bundle is 141 KB
Each bundle should be as small as possible, with a good rule of thumb being that bundles should be split when the bundle exceeds 1 MB. We’ll find that we need to do this when we add a password complexity analyzer to the frontend in Chapter 4, Creating a Reusable Frontend with React.
Scripting the commands
To match the backend, we want to add the following commands:
npm run analyzeto run the bundle analyzernpm run formatto run the formatting tooling and format the codenpm run lintto run the linting toolingnpm run testto run the tests
As npm run test is already present, we only need to add the other three. This is done by adding the following to the scripts section in frontend/package.json:
"scripts": {
  "analyze": "npm run build && source-map-explorer \"build/static/js/*.js\"",
  "format": "eslint --fix \"src/**/*.{ts,tsx}\" && prettier --parser typescript --write \"src/**/*.{ts,tsx}\"",
  "lint": " eslint \"src/**/*.{ts,tsx}\" && prettier --parser typescript --list-different  \"src/**/*.{ts,tsx}\"",
  "start": "react-scripts start",
  "build": "react-scripts build",
  "test": "react-scripts test",
  "eject": "react-scripts eject"
}
The highlighted lines will already be present in the section.
With the frontend tooling in place and accessible via the easy-to-remember commands, we can now do the same for the infrastructure.
Installing Terraform for infrastructure development
We’ll need to create and manage remote infrastructure, starting with a remote repository that we will use to develop the app with other developers or to simply backup our code. This remote infrastructure could be created manually, for example, using GitHub’s web interface. However, by using an Infrastructure as a Code tool, we can record all of the changes we make, and then if anything goes wrong, we can rerun our code and restore everything to a known state.
I find Terraform to be the best tool to manage infrastructure, which we can install as follows:
brew install terraform
scoop install terraform
With Terraform installed, we can create a folder within our repository for the infrastructure code as follows:
mkdir infrastructure
Our repository should now have the following structure:
tozo
├── backend
├── frontend
└── infrastructure
As with the backend and frontend, we’ll need to install tooling to help development. In addition, for the infrastructure, we’ll need tooling to manage secrets.
Managing secrets
To allow Terraform to manage our infrastructure, we will need to provide passwords, keys, and other secrets. These secrets will need to be stored (and used) in a secure fashion – simply storing passwords in plain text in the repository is a common way to be hacked. We will instead encrypt the secrets and store the encrypted file in the repository. This means we’ll have to keep the encryption key secret, which I recommend you do by using a password manager such as BitWarden.
To encrypt the secrets, we can use ansible-vault, which is installed using the Python package manager, pip, as follows:
pip install ansible-vault
pip or PDM
pip is a tool for installing packages, whereas PDM is a project management tool. As we don’t have an infrastructure project to manage, it makes more sense to use pip to install ansible-vault. However, this is the only time we’ll directly use pip.
To configure ansible-vault, we need to provide the encryption key. To do so, add your encryption key to infrastructure/.ansible-vault and inform Ansible that it is stored there by adding the following to infrastructure/ansible.cfg:
[defaults]
vault_password_file = .ansible-vault
We’ll need to encrypt two files: Terraform’s state, terraform.tfstate, and our collection of secret variables, secrets.auto.tfvars. The commands to do so are the following:
ansible-vault encrypt secrets.auto.tfvars --output=secrets.auto.tfvars.vault
ansible-vault encrypt terraform.tfstate --output=terraform.tfstate.vault
We will also need to decrypt these files, which is done via the following commands:
ansible-vault decrypt secrets.auto.tfvars.vault --output=secrets.auto.tfvars
ansible-vault decrypt terraform.tfstate.vault --output=terraform.tfstate
To ensure that the password file, encrypted files, and general Terraform autogenerated files aren’t considered part of the repository, the following should be added to infrastructure/.gitignore:
.ansible-vault
secrets.auto.tfvars
terraform.tfstate
*.backup
.terraform.lock.hcl
.terraform/
Terraform is now set up and ready to use, which means we can focus on the development tooling.
Formatting, linting, and testing the code
Terraform comes with a built-in formatter, which is invoked via the following command:
terraform fmt
This formatter also supports a check mode to use when linting, as follows:
terraform fmt --check=true
Terraform also comes with a tool to lint your code, as follows:
terraform validate
Testing Terraform code is harder as almost all of the code depends on an interaction with a third-party service. Instead, I find running and checking that the output makes sense to be the only way to test what the code will do. Terraform will provide an output of what it plans to do by running the following command:
terraform plan
This is all we need to install and set up to manage all of the infrastructure we’ll install in this book. We can now focus on the database.
Installing PostgreSQL for database development
Our app will need to store data (the to-dos) in a structured form, which makes a database an ideal choice. This database will need to be running locally to allow us to develop with it, so we need to install it. The database I prefer is PostgreSQL, which is a SQL-based relational database. I prefer it as it is very widely supported, and very powerful.
PostgreSQL is installed using the system package manager as follows:
brew install postgres
scoop install postgresql
If using brew, you will likely need to start postgresql as a service that runs in the background, as follows:
brew services start postgresql
In addition, when using brew, we need to create a superuser, which by convention is called postgres. This user is created with the following command:
createuser -s postgres
However, with scoop, you will have to start the PostgreSQL database whenever you wish to use it with the following command:
pg_ctl start
With the addition of the database tooling, we have all of the local tooling we need to develop our app. This means we can focus on the remote tooling, a GitHub repository.
Adopting a collaborative development process using GitHub
While you may be working on your own, it is good practice to adopt a development process that allows others to collaborate and one that ensures that the code is always ready to be deployed to production. We will achieve both aims by using a remote repository and Continuous Integration (CI).
A remote repository acts as a backup for all your code and makes it much easier to set up CI (testing, linting, and so on). We’ll use GitHub as I find it to have all the features needed, although other platforms, such as GitLab, are also valid and commonly used in the industry.
Rather than creating the repository through GitHub’s UI, we’ll use Terraform as set up earlier. To do so, we’ll first need a personal access token from GitHub, as explained at https://docs.github.com/en/authentication/keeping-your-account-and-data-secure/creating-a-personal-access-token. The token will need the repo, workflow, and delete_repo scopes. This token is a secret and hence best placed in infrastructure/secrets.auto.tfvars and encrypted as described earlier in the Managing secrets section. The code should be placed into infrastructure/secrets.auto.tfvars as follows (replace abc1234 with your token):
github_token = "abc1234"
Terraform itself does not know how to interact with GitHub, which means that we need to install the GitHub provider to do so. This is done by adding the following code to infrastructure/main.tf:
terraform {
  required_providers {
    github = {
      source  = "integrations/github"
      version = "~> 4.0"
    }
  }
  required_version = ">=1.0"
}
With the provider present, we can describe the repository we would like to exist by adding the following code to infrastructure/github.tf:
variable "github_token" {
  sensitive = true
}

provider "github" {
  token = var.github_token
}

resource "github_repository" "tozo" {
  name       = "tozo"
  visibility = "private"
}
Finally, to actually create the repository, we need to initialize and apply Terraform as follows:
terraform init
terraform apply
We should now set up git so that it knows about the remote repository. To do this, we’ll need the correct path, which will depend on your GitHub account name and the name of your project. As my GitHub account name is pgjones and this project is called tozo, the path is pgjones/tozo, making the following command:
git remote add origin git@github.com:pgjones/tozo.git
To have our local branch track the remote origin main branch, run the following command:
git push --set-upstream origin main
To push our local changes on our main branch to the remote feature branch, run the following command:
git push origin main:feature
To pull the remote main branch to update our local branch, run the following command:
git pull origin main
Most in this industry operate a development workflow based on merge (pull) requests, which we’ll also adopt. This workflow consists of the following steps:
- Develop a feature locally consisting of as few commits as makes sense (small changes).
- Push the feature to a remote
featurebranch. - Open a merge request based on that branch.
- Review the merge request, merging it to the
mainbranch only if CI passes. - Pull the latest
mainbranch and repeat.
With the repository created, we can now look at adding CI.
Adding continuous integration
GitHub provides a CI system called Actions that has a free tier, which we’ll use. To start, we need to create the following folder structure:
tozo
└── .github
    └── workflows
Now we can configure a workflow that runs jobs on every change to the main branch and every merge request by adding the following code to .github/workflows/ci.yml:
name: CI

on:
  push:
    branches: [ main ]
  pull_request:
    branches: [ main ]
  workflow_dispatch:

jobs:
This allows us to add jobs for the infrastructure, backend, and frontend.
Adding CI for the infrastructure code
We previously set up the commands to format and lint the infrastructure code as follows:
terraform fmt --check=true
terraform validate
To have these run as part of CI, we need to add the following job to the .github/workflows/ci.yml file within the jobs section:
  infrastructure:
    runs-on: ubuntu-latest

    steps:
      - name: Install Terraform
        run: |
          sudo apt-get update && sudo apt-get install -y gnupg             software-properties-common curl
          curl -fsSL https://apt.releases.hashicorp.com/gpg |             sudo apt-key add -
          sudo apt-add-repository "deb [arch=amd64] https://            apt.releases.hashicorp.com $(lsb_release -cs) main"
          sudo apt-get update && sudo apt-get install terraform
      - uses: actions/checkout@v3

      - name: Initialise Terraform
        run: terraform init

      - name: Check the formatting
        run: terraform fmt --check=true --recursive

      - name: Validate the code
        run: terraform validate
We can now add a job for the backend code.
Adding CI for the backend code
We previously set up the commands to format, lint, and test the backend code as follows:
pdm run format
pdm run lint
pdm run test
To have these run as part of CI, we will need to have a database service running as well, as the tests run against the database. Fortunately, GitHub supports PostgreSQL database services by running a PostgreSQL database alongside the CI job. We can make use of this database service and run the commands by adding the following job to the jobs section in .github/workflows/ci.yml:
  backend:
    runs-on: ubuntu-latest

    container: python:3.10.1-slim-bullseye

    services:
      postgres:
        image: postgres
        env:
          POSTGRES_DB: tozo_test
          POSTGRES_USER: tozo
          POSTGRES_PASSWORD: tozo
          POSTGRES_HOST_AUTH_METHOD: "trust"
        options: >-
          --health-cmd pg_isready
          --health-interval 10s
          --health-timeout 5s
          --health-retries 5
    defaults:
      run:
        working-directory: backend

    env:
      TOZO_QUART_DB_DATABASE_URL: "postgresql://tozo:tozo@        postgres:5432/tozo_test"

    steps:
      - uses: actions/checkout@v3

      - name: Install system dependencies
        run: apt-get update && apt-get install -y postgresql           postgresql-contrib

      - name: Initialise dependencies
        run: |
          pip install pdm
          pdm install

      - name: Linting
        run: pdm run lint

      - name: Testing
        run: pdm run test
We can now add a job for the frontend code.
Adding CI for the frontend code
We previously set up the commands to format, lint, test, and build the frontend code as follows:
npm run format
npm run lint
npm run test
npm run build
We can make use of the service and run the commands by adding the following job to the jobs section of .github/workflows/ci.yml:
  frontend:
    runs-on: ubuntu-latest

    defaults:
      run:
        working-directory: frontend

    steps:
      - name: Use Node.js
        uses: actions/setup-node@v2
        with:
          node-version: '18'

      - uses: actions/checkout@v3

      - name: Initialise dependencies
        run: npm ci --cache .npm --prefer-offline
      - name: Check formatting
        run: npm run format

      - name: Linting
        run: npm run lint

      - name: Testing
        run: npm run test

      - name: Build
        run: npm run build
We now have everything we need in place to start developing our app. The folder structure at this stage is as follows:
tozo
├── .github
│   └── workflows
├── backend
│   ├── src
│   │   └── backend
│   └── tests
├── frontend
│   ├── public
│   └── src
└── infrastructure
We now have all of our checks running on every change to the main branch and for every pull request. This should ensure that our code remains at a high quality and alert us to any issues that may otherwise be missed.
Summary
In this chapter, we set up all of the tooling we need to develop our app. We started by installing a system package manager, which we then used to install and set up git. With git, we created our local repository and started to commit code. We installed Python, NodeJS, Terraform, and the tooling required to format, lint, and test the code. Finally, we used Terraform to create and set up a remote GitHub repository with working CI, ensuring that our code is automatically checked on every change.
The tooling we’ve installed in this chapter is required to develop the app described in the following chapters. It will also allow you to do so quickly, as the tooling will help you quickly identify issues and errors with the code.
In the next chapter, we’ll start developing the backend of our app, with the focus being on setting up the app framework and extensions that support the features we want, for example, authentication.
Further reading
It is often useful to switch versions of Python and NodeJS to test the app before upgrading it. To do this, I’d recommend pyenv (https://github.com/pyenv/pyenv) and n (https://github.com/tj/n) for Python and NodeJS, respectively.