Download code from GitHub
2. Models and Migrations
Overview
This chapter introduces you to the concept of databases and their importance in building web applications. You will start by creating a database using an open-source database visualization tool called SQLite DB Browser. You will then perform some basic Create Read Update Delete (CRUD) database operations using SQL commands. Then, you will learn about Django's Object Relational Mapping (ORM), using which your application can interact and seamlessly work with a relational database using simple Python code, eliminating the need to run complex SQL queries. You will learn about models and migrations, which are a part of Django's ORM, that are used to propagate database schematic changes from the application to the database, and also perform database CRUD operations. Toward the end of the chapter, you will study the various types of database relationships and use that knowledge to perform queries across related records.
Introduction
Data is at the core of most web applications. Unless we're talking about a very simple application such as a calculator, in most cases we need to store data, process it, and display it to the user on a page. Since most operations in user-facing web applications involve data, there is a need to store data in places that are secure, easily accessible, and readily available. This is where databases come in handy. Imagine a library operational before the advent of computers. The librarian would have to maintain records of book inventories, records of book lending, returns from students, and so on. All of these would have been maintained in physical records. The librarian, while carrying out their day-to-day activities, would modify these records for each operation, for example, when lending a book to someone or when the book was returned.
Today, we have databases to help us with such administrative tasks. A database looks like a spreadsheet or an Excel sheet containing records, with each table consisting of multiple rows and columns. An application can have many such tables. Here is an example table of a book inventory in a library:
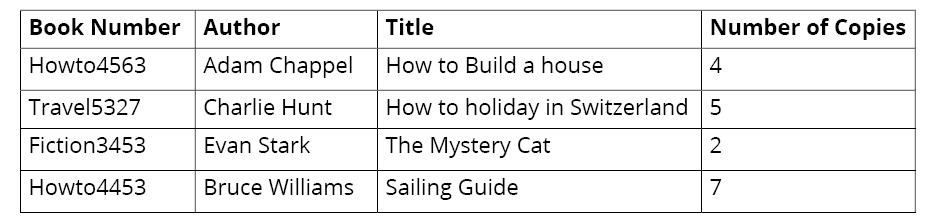
Figure 2.1: Table of a book inventory for a library
In the preceding table, we can see that there are columns with details about various attributes of the books in the library, while the rows contain entries for each book. To manage a library, there can be many such tables working together as a system. For example, along with an inventory, we may have other tables such as student information, book lending records, and so on. Databases are built with the same logic, where software applications can easily manage data.
In the previous chapter, we had a brief introduction to Django and its use in developing web applications. Then we learned about the Model-View-Template (MVT) concept. Later, we created a Django project and started the Django development server. We also had a brief discussion about Django's views, URLs, and templates.
In this chapter, we will start by learning about the types of databases and a few basic database operations using SQL. After that, we will move on to the concept of models and migrations in Django, which assist in faster development by providing a layer of abstraction to facilitate database operations using Python objects.
Databases
A database is a structured collection of data that helps manage information easily. A software layer called the Database Management System (DBMS) is used to store, maintain, and perform operations on the data. Databases are of two types, relational databases and non-relational databases.
Relational Databases
Relational databases or Structured Query Language (SQL) databases store data in a pre-determined structure of rows and columns called tables. A database can be made up of more than one such table, and these tables have a fixed structure of attributes, data types, and relations with other tables. For example, as we just saw in Figure 2.1, the book inventory table has a fixed structure of columns comprising Book Number, Author, Title, and Number of Copies, and the entries form the rows in the table. There could be other tables as well, such as Student Information and Lending Records, which could be related to the inventory table. Also, whenever a book is lent to a student, the records will be stored per the relationships between multiple tables (say, the Student Information and the Book Inventory tables).
This pre-determined structure of rules defining the data types, tabular structures, and relationships across different tables acts like scaffolding or a blueprint for a database. This blueprint is collectively called a database schema. When applied to a database, it will prepare the database to store application data. To manage and maintain these databases, there is a common language for relational databases called SQL. Some examples of relational databases are SQLite, PostgreSQL, MySQL, and OracleDB.
Non-Relational Databases
Non-relational databases or NoSQL (Not Only SQL) databases are designed to store unstructured data. They are well suited to large amounts of generated data that does not follow rigid rules, as is the case with relational databases. Some examples of non-relational databases are Cassandra, MongoDB, CouchDB, and Redis.
For example, imagine that you need to store the stock value of companies in a database using Redis. Here, the company name will be stored as the key and the stock value as the value. Using the key-value type NoSQL database in this use case is appropriate because it stores the desired value for a unique key and is faster to access.
For the scope of this book, we will be dealing only with relational databases as Django does not officially support non-relational databases. However, if you wish to explore, there are many forked projects, such as Django non-rel, that support NoSQL databases.
Database Operations Using SQL
SQL uses a set of commands to perform a variety of database operations, such as creating an entry, reading values, updating an entry, and deleting an entry. These operations are collectively called CRUD operations, which stands for Create, Read, Update, and Delete. To understand database operations in detail, let's first get some hands-on experience with SQL commands. Most relational databases share a similar SQL syntax; however, some operations will differ.
For the scope of this chapter, we will use SQLite as the database. SQLite is a lightweight relational database that is a part of Python standard libraries. That's why Django uses SQLite as its default database configuration. However, we will also learn more about how to perform configuration changes to use other databases in Chapter 17, Deployment of a Django Application (Part 1 – Server Setup). This chapter can be downloaded from the GitHub repository of this book, from http://packt.live/2Kx6FmR.
Data Types in Relational databases
Databases provide us with a way to restrict the type of data that can be stored in a given column. These are called data types. Some examples of data types for a relational database such as SQLite3 are given here:
INTEGERis used for storing integers.TEXTcan store text.REALis used for floating-point values.
For example, you would want the title of a book to have TEXT as the data type. So, the database will enforce a rule that no type of data, other than text data, can be stored in that column. Similarly, the book's price can have a REAL data type, and so on.
Exercise 2.01: Creating a Book Database
In this exercise, you will create a book database for a book review application. For better visualization of the data in the SQLite database, you will install an open-source tool called DB Browser for SQLite. This tool helps visualize the data and provides a shell to execute the SQL commands.
If you haven't done so already, visit the URL https://sqlitebrowser.org and from the downloads section, install the application as per your operating system and launch it. Detailed instructions for DB Browser installation can be found in the Preface.
Note
Database operations can be performed using a command-line shell as well.
- After launching the application, create a new database by clicking
New Databasein the top-left corner of the application. Create a database namedbookr, as you are working on a book review application:
Figure 2.2: Creating a database named bookr
- Next, click the
Create Tablebutton in the top-left corner and enterbookas the table name.Note
After clicking the
Savebutton, you may find that the window for creating a table opens up automatically. In that case, you won't have to click theCreate Tablebutton; simply proceed with the creation of the book table as specified in the preceding step. - Now, click the
Add fieldbutton, enter the field name astitle, and select the type asTEXTfrom the dropdown. HereTEXTis the data type for thetitlefield in the database:
Figure 2.3: Adding a TEXT field named title
- Similarly, add two more fields for the table named
publisherandauthorand selectTEXTas the type for both the fields. Then, click theOKbutton:
Figure 2.4: Creating TEXT fields named publisher and author
This creates a database table called book in the bookr database with the fields title, publisher, and author. This can be seen as follows:
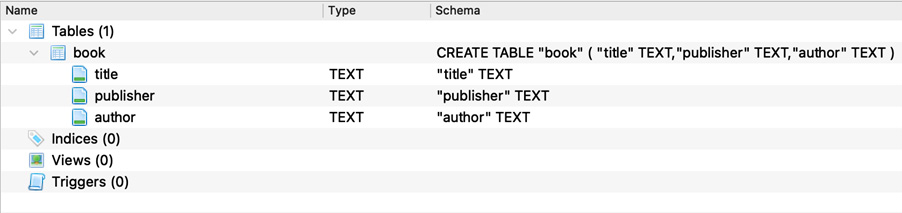
Figure 2.5: Database with the fields title, publisher, and author
In this exercise, we used an open-source tool called DB Browser (SQLite) to create our first database called bookr, and in it, we created our first table named book.
SQL CRUD Operations
Let's assume that the editors or the users of our book review application want to make some modifications to the book inventory, such as adding a few books to the database, updating an entry in the database, and so on. SQL provides various ways to perform such CRUD operations. Before we dive into the world of Django models and migrations, let's explore these basic SQL operations first.
For the CRUD operations that follow, you will be running a few SQL queries. To run them, navigate to the Execute SQL tab in DB Browser. You can type in or paste the SQL queries we've listed in the sections that follow in the SQL 1 window. You can spend some time modifying your queries, and understanding them, before you execute them. When you're ready, click the icon that looks like a Play button or press the F5 key to execute the command. The results will show up in the window below the SQL 1 window:
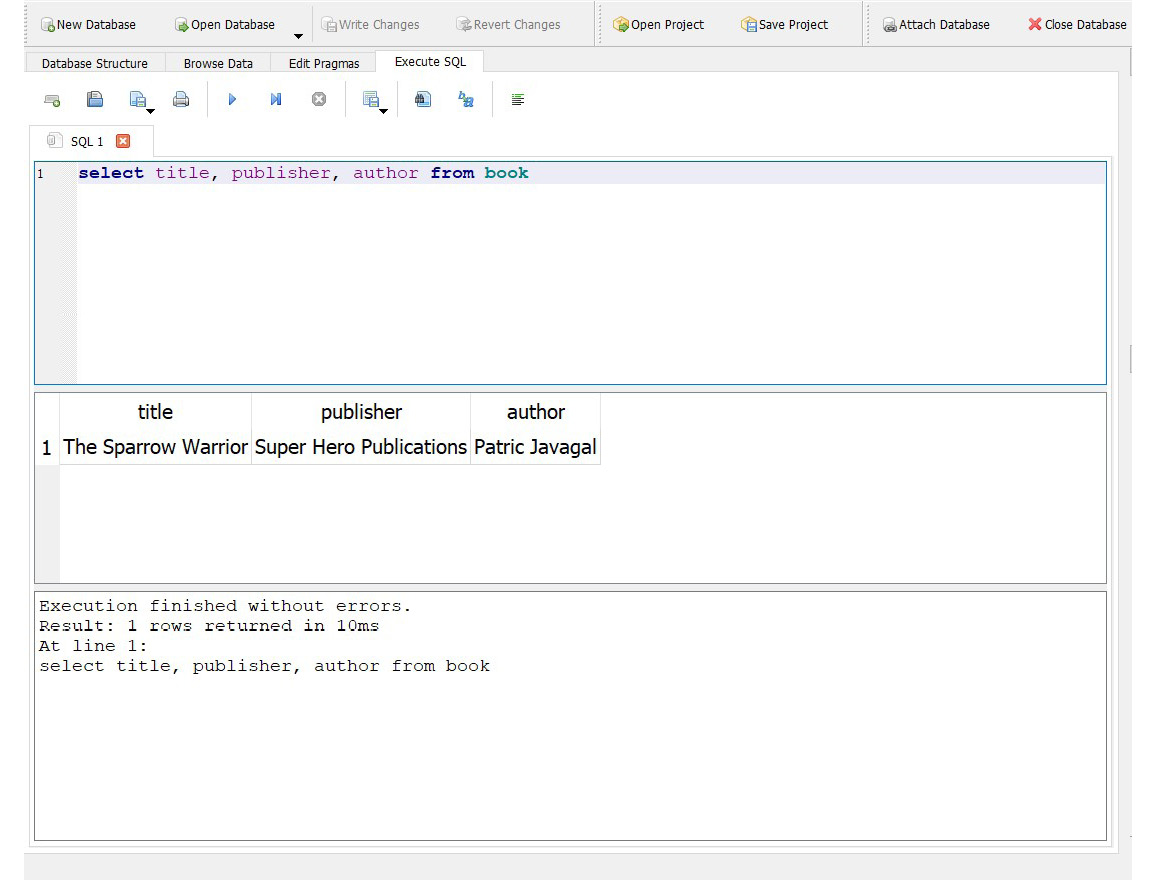
Figure 2.6: Executing SQL queries in DB Browser
SQL Create Operations
The Create operation in SQL is performed using the insert command, which, as the name implies, lets us insert data into the database. Let's go back to our bookr example. Since we have already created the database and the book table, we can now create or insert an entry in the database by executing the following command:
insert into book values ('The Sparrow Warrior', 'Super Hero Publications', 'Patric Javagal');
This inserts into the table named book the values defined in the command. Here, The Sparrow Warrior is the title, Super Hero Publications is the publisher, and Patric Javagal is the author of the book. Note that the order of insertion corresponds with the way we have created our table; that is, the values are inserted into the columns representing title, publisher, and author respectively. Similarly, let's execute two more inserts to populate the book table:
insert into book values ('Ninja Warrior', 'East Hill Publications',   'Edward Smith');
insert into book values ('The European History', 'Northside   Publications', 'Eric Robbins');
The three inserts executed so far will insert three rows into the book table. But how do we verify that? How would we know whether those three entries we inserted were entered into the database correctly? Let's learn how to do that in the next section.
SQL Read Operations
We can read from the database using the select SQL operation. For example, the following SQL select command retrieves the selected entries created in the book table:
select title, publisher, author from book;
You should see the following output:
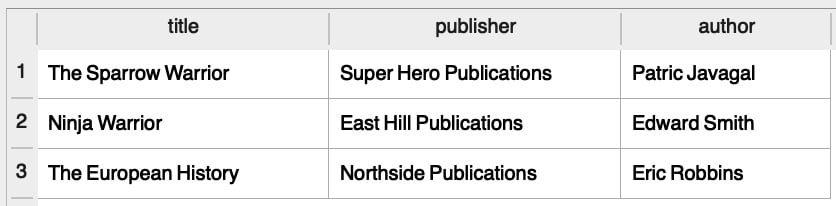
Figure 2.7: Output after using the select command
Here, select is the command that reads from the database, and the fields title, publisher, and author are the columns that we intend to select from the book table. Since these are all the columns the database has, the select statement has returned all the values present in the database. The select statement is also called a SQL query. An alternate way to get all the fields in the database is by using the wildcard * in the select query instead of specifying all the column names explicitly:
select * from book;
This will return the same output as shown in the preceding figure. Now, suppose we want to get the author name for the book titled The Sparrow Warrior; in this case, the select query would be as follows:
select author from book where title="The Sparrow Warrior";
Here, we have added a special SQL keyword called where so that the select query returns only the entries that match the condition. The result of the query, of course, will be Patric Javagal. Now, what if we wanted to change the name of the book's publisher?
SQL Update Operations
In SQL, the way to update a record in the database is by using the update command:
update book set publisher = 'Northside Publications' where title='The Sparrow Warrior';
Here, we are setting the value of publisher to Northside Publications if the value of the title is The Sparrow Warrior. We can then run the select query we ran in the SQL Read Operations section to see how the updated table looks after running the update command:
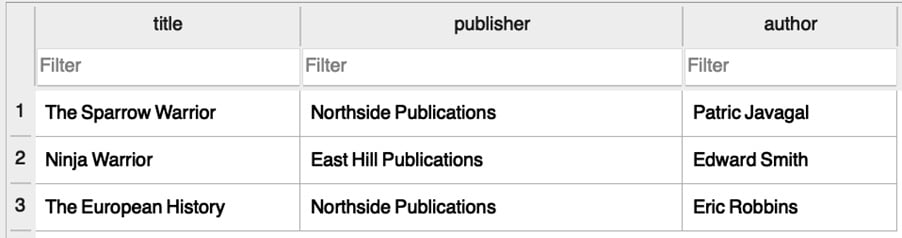
Figure 2.8: Updating the value of publisher for the title The Sparrow Warrior
Next, what if we wanted to delete the title of the record we just updated?
SQL Delete Operations
Here is an example of how to delete a record from the database using the delete command:
delete from book where title='The Sparrow Warrior';
delete is the SQL keyword for delete operations. Here, this operation will be performed only if the title is The Sparrow Warrior. Here is how the book table will look after the delete operation:

Figure 2.9: Output after performing the delete operation
These are the basic operations of SQL. We will not go very deep into all the SQL commands and syntax, but feel free to explore more about database base operations using SQL.
Note
For further reading, you can start by exploring some advanced SQL select operations with join statements, which are used to query data across multiple tables. For a detailed course on SQL, you can refer to The SQL Workshop (https://www.packtpub.com/product/the-sql-workshop/9781838642358).
Django ORM
Web applications constantly interact with databases, and one of the ways to do so is using SQL. If you decide to write a web application without a web framework like Django and instead use Python alone, Python libraries such as psycopg2 could be used to interact directly with the databases using SQL commands. But while developing a web application with multiple tables and fields, SQL commands can easily become overly complex and thus difficult to maintain. For this reason, popular web frameworks such as Django provide a level of abstraction using which we can easily work with databases. The part of Django that helps us do this is called ORM, which stands for Object Relational Mapping.
Django ORM converts object-oriented Python code into actual database constructs such as database tables with data type definitions and facilitates all the database operations via simple Python code. Because of this, we do not have to deal with SQL commands while performing database operations. This helps in faster application development and ease in maintaining the application source code.
Django supports relational databases such as SQLite, PostgreSQL, Oracle Database, and MySQL. Django's database abstraction layer ensures that the same Python/Django source code can be used across any of the above relational databases with very little modification to the project settings. Since SQLite is part of the Python libraries and Django is configured by default to SQLite, for the scope of this chapter, we shall use SQLite while we learn about Django models and migrations.
Database Configuration and Creating Django Applications
As we have already seen in Chapter 1, Introduction to Django, when we create a Django project and run the Django server, the default database configuration is of SQLite3. The database configuration will be present in the project directory, in the settings.py file.
Note
Make sure you go through the settings.py file for the bookr app. Going through the entire file once will help you understand the concepts that follow. You can find the file at this link: http://packt.live/2KEdaUM.
So, for our example project, the database configuration will be present at the following location: bookr/settings.py. The default database configuration present in this file, when a Django project is created, is as follows:
DATABASES = {\
             'default': {\
                         'ENGINE': 'django.db.backends.sqlite3',\
                         'NAME': os.path.join\
                                 (BASE_DIR, 'db.sqlite3'),}}
Note
The preceding code snippet uses a backslash ( \ ) to split the logic across multiple lines. When the code is executed, Python will ignore the backslash, and treat the code on the next line as a direct continuation of the current line.
The DATABASES variable is assigned with a dictionary containing the database details for the project. Inside the dictionary, there is a nested dictionary with a key as default. This holds the configuration of a default database for the Django project. The reason we have a nested dictionary with default as a key is that a Django project could potentially interact with multiple databases, and the default database is the one used by Django for all operations unless explicitly specified. The ENGINE key represents which database engine is being used; in this case, it is sqlite3.
The NAME key defines the name of the database, which can have any value. But for SQLite3, since the database is created as a file, NAME can have the full path of the directory where the file needs to be created. The full path of the db file is processed by joining (or concatenating) the previously defined path in BASE_DIR with db.sqlite3. Note that BASE_DIR is the project directory as already defined in the settings.py file.
If you are using other databases, such as PostgreSQL, MySQL, and so on, changes will have to be made in the preceding database settings as shown here:
DATABASES = {\
             'default': {\
                         'ENGINE': 'django.db\
                                    .backends.postgresql',\
                         'NAME': 'bookr',\
                         'USER': <username>,\
                         'PASSWORD': <password>,\
                         'HOST': <host-IP-address>,\
                         'PORT': '5432',}}
Here, changes have been made to ENGINE to use PostgreSQL. The host IP address and port number of the server need to be provided for HOST and PORT respectively. As the names suggest, USER is the database username and PASSWORD is the database password. In addition to changes in the configuration, we will have to install the database drivers or bindings along with the database host and credentials. This will be covered in detail in later chapters, but for now, since we are using SQLite3, the default configuration will be sufficient. Note that the above is just an example to show the changes you'll need to make to use a different database such as PostgreSQL, but since we are using SQLite, we shall use the database configuration that exists already, and there is no need to make any modifications to the database settings.
Django Apps
A Django project can have multiple apps that often act as discrete entities. That's why, whenever required, an app can be plugged into a different Django project as well. For example, if we are developing an e-commerce web application, the web application can have multiple apps, such as a chatbot for customer support or a payment gateway to accept payments as users purchase goods from the application. These apps, if needed, can also be plugged into or reused in a different project.
Django comes with the following apps enabled by default. The following is a snippet from a project's settings.py file:
INSTALLED_APPS = ['django.contrib.admin',\
                  'django.contrib.auth',\
                  'django.contrib.contenttypes',\
                  'django.contrib.sessions',\
                  'django.contrib.messages',\
                  'django.contrib.staticfiles',]
These are a set of installed or default apps used for the admin site, authentication, content types, sessions, messaging, and an application to collect and manage static files. In the upcoming chapters, we shall study this in-depth. For the scope of this chapter, though, we shall understand why Django migration is needed for these installed apps.
Django Migration
As we have learned before, Django's ORM helps make database operations simpler. A major part of the operation is to transform the Python code into database structures such as database fields with stated data types and tables. In other words, the transformation of Python code into database structures is known as migration. Instead of creating dozens of tables by running SQL queries, you would write models for them in Python, something you'll learn to do in an upcoming section titled Creating Models and Migrations. These models will have fields, which form the blueprints of database tables. The fields, in turn, will have different field types giving us more information about the type of data stored there (recall how we specified the data type of our field as TEXT in step 4 of Exercise 2.01, Creating a Book Database).
Since we have a Django project set up, let's perform our first migration. Although we have not added any code yet to our project, we can migrate the applications listed in INSTALLED_APPS. This is necessary because Django's installed apps need to store the relevant data in the database for their operations, and migration will create the required database tables to store the data in the database. The following command should be entered in the terminal or shell to do this:
python manage.py migrate
Note
For macOS, you can use python3 instead of python in the preceding command.
Here, manage.py is a script that was automatically created when the project was created. It is used for carrying out managerial or administrative tasks. By executing this command, we create all the database structures required by the installed apps.
As we are using DB Browser for SQLite to browse the database, let's take a look at the database for which changes have been made after executing the migrate command.
The database file will have been created in the project directory under the name db.sqlite3. Open DB Browser, click Open Database, navigate until you find the db.sqlite3 file, and open it. You should see a set of newly created tables created by the Django migration. It will look as follows in DB Browser:
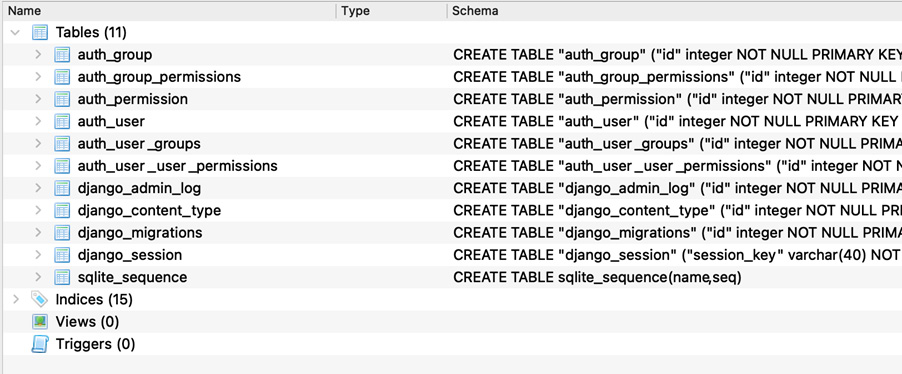
Figure 2.10: Contents of the db.sqlite3 file
Now, if we browse through the newly created database structure by clicking the database tables, we see the following:
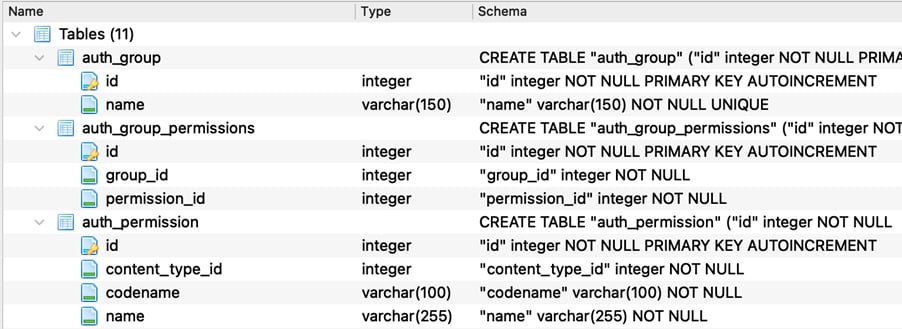
Figure 2.11: Browsing through the newly created database structure
Notice that the database tables created have different fields, each with their respective data types. Click the Browse data tab in DB Browser and select a table from the dropdown. For instance, after clicking the auth_group_permissions table, you should see something like this:

Figure 2.12: Viewing the auth_group_permissions table
You will see that there is no data available for these tables yet because Django migration only creates the database structure or the blueprint, and the actual data in the database is stored during the operation of the application. Now since we have migrated the built-in or default Django apps, let's try to create an app and perform a Django migration.
Creating Django Models and Migrations
A Django model is essentially a Python class that holds the blueprint for creating a table in a database. The models.py file can have many such models, and each model transforms into a database table. The attributes of the class form the fields and relationships of the database table as per the model definitions.
For our reviews application, we need to create the following models and their database tables consequently:
- Book: This should store information about books.
- Contributor: This should store information about the person(s) who contributed to writing the book, such as author, co-author, or editor.
- Publisher: As the name implies, this refers to the book publisher.
- Review: This should store all the books' reviews written by the users of the application.
Every book in our application will need to have a publisher, so let's create Publisher as our first model. Enter the following code in reviews/models.py:
from django.db import models
class Publisher(models.Model):
    """A company that publishes books."""
    name = models.CharField\
           (max_length=50, \
            help_text="The name of the Publisher.")
    website = models.URLField\
              (help_text="The Publisher's website.")
    email = models.EmailField\
            (help_text="The Publisher's email address.")
Note
You can take a look at the complete models.py file for the bookr app by clicking the following link: http://packt.live/3hmFQxn.
The first line of code imports the Django's models module. While this line will be autogenerated at the time of the creation of the Django app, do make sure you add it if it is not present. Following the import, the rest of the code is defining a class named Publisher, which will be a subclass of Django's models.Model. Furthermore, this class will have attributes or fields such as name, website, and email.
Field Types
As we can see, each of these fields is defined to have the following types:
CharField: This field type is used to store shorter string fields, for example, Packt Publishing. For very large strings, we useTextField.EmailField: This is similar toCharField, but validates whether the string represents a valid email address, for example, customersupport@packtpub.com.URLField: This is again similar toCharField, but validates whether the string represents a valid URL, for example, https://www.packtpub.com.
Field Options
Django provides a way to define field options to a model's field. These field options are used to set a value or a constraint, and so on. For example, we can set a default value for a field using default=<value>, to ensure that every time a record is created in the database for the field, it is set to a default value specified by us. Following are the two field options that we have used while defining the Publisher model:
help_text: This is a field option that helps us add descriptive text for a field that gets automatically included for Django forms.max_length: This option is provided toCharFieldwhere it defines the maximum length of the field in terms of the number of characters.
Django has many more field types and field options that can be explored from the extensive official Django documentation. As we go about developing our sample book review application, we shall learn about those types and fields that are used for the project. Now let's migrate the Django models into the database. Execute the following command in the shell or terminal to do that (run it from the folder where your manage.py file is stored):
python manage.py makemigrations reviews
The output of the command looks like this:
Migrations for 'reviews':
  reviews/migrations/0001_initial.py
    - Create model Publisher
The makemigrations <appname> command creates the migration scripts for the given app; in this case, for the reviews app. Notice that after running makemigrations, there is a new file created under the migrations folder:

Figure 2.13: New file under the migrations folder
This is the migration script created by Django. When we run makemigrations without the app name, the migration scripts will be created for all the apps in the project. Next, let's list the project migration status. Remember that earlier, we applied migrations to Django's installed apps and now we have created a new app, reviews. The following command, when run in the shell or terminal, will show the status of model migrations throughout the project (run it from the folder where your manage.py file is stored):
python manage.py showmigrations
The output for the preceding command is as follows:
admin
 [X] 0001_initial
 [X] 0002_logentry_remove_auto_add
 [X] 0003_logentry_add_action_flag_choices
auth
 [X] 0001_initial
 [X] 0002_alter_permission_name_max_length
 [X] 0003_alter_user_email_max_length
 [X] 0004_alter_user_username_opts
 [X] 0005_alter_user_last_login_null
 [X] 0006_require_contenttypes_0002
 [X] 0007_alter_validators_add_error_messages
 [X] 0008_alter_user_username_max_length
 [X] 0009_alter_user_last_name_max_length
 [X] 0010_alter_group_name_max_length
 [X] 0011_update_proxy_permissions
contenttypes
 [X] 0001_initial
 [X] 0002_remove_content_type_name
reviews
 [ ] 0001_initial
sessions
 [X] 0001_initial
Here, the [X] mark indicates that the migrations have been applied. Notice the difference that all the other apps' migrations have applied except that of reviews. The showmigrations command can be executed to understand the migration status, but this is not a mandatory step while performing model migrations.
Next, let's understand how Django transforms a model into an actual database table. This can be understood by running the sqlmigrate command:
python manage.py sqlmigrate reviews 0001_initial
We should see the following output:
BEGIN;
--
-- Create model Publisher
--
CREATE TABLE "reviews_publisher" ("id" integer \
    NOT NULL PRIMARY KEY AUTOINCREMENT, "name" \
    varchar(50) NOT NULL, "website" varchar(200) \
    NOT NULL, "email" varchar(254) NOT NULL);
COMMIT;
The preceding snippet shows the SQL command equivalent used when Django migrates the database. In this case, we are creating the reviews_publisher table with the fields name, website, and email with the defined field types. Furthermore, all these fields are defined to be NOT NULL, implying that the entries for these fields cannot be null and should have some value. The sqlmigrate command is not a mandatory step while doing the model migrations.
Primary Keys
Let's assume that a database table called users, as its name suggests, stores information about users. Let's say it has more than 1,000 records and there are at least 3 users with the same name, Joe Burns. How do we uniquely identify these users from the application? The solution is to have a way to uniquely identify each record in the database. This is done using Primary Keys. A primary key is unique for a database table, and as a rule, a table cannot have two rows with the same primary key. In Django, when the primary key is not explicitly mentioned in the database models, Django automatically creates id as the primary key (of type integer), which auto increments as new records are created.
In the previous section, notice the output of the python manage.py sqlmigrate command. While creating the Publisher table, the SQL CREATE TABLE command was adding one more field called id to the table. id is defined to be PRIMARY KEY AUTOINCREMENT. In relational databases, a primary key is used to uniquely identify an entry in the database. For example, the book table has id as the primary key, which has numbers starting from 1. This value increments by 1 as new records are created. The integer value of id is always unique across the book table. Since the migration script has already been created by executing makemigrations, let's now migrate the newly created model in the reviews app by executing the following command:
python manage.py migrate reviews
You should get the following output:
Operations to perform:
    Apply all migrations: reviews
Running migrations:
    Applying reviews.0001_initial... OK
This operation creates the database table for the reviews app. The following is a snippet from DB Browser indicating the new table reviews_publisher has been created in the database:

Figure 2.14: reviews_publisher table created after executing the migration command
So far, we have explored how to create a model and migrate it into the database. Let's now work on creating the rest of the models for our book review application. As we've already seen, the application will have the following database tables:
Book: This is the database table that holds the information about the book itself. We have already created aBookmodel and have migrated this to the database.Publisher: This table holds information about the book publisher.Contributor: This table holds information about the contributor, that is, the author, co-author, or editor.Review: This table holds information about the review comments posted by the reviewers.
Let's add the Book and Contributor models, as shown in the following code snippet, into reviews/models.py:
class Book(models.Model):
    """A published book."""
    title = models.CharField\
            (max_length=70, \
             help_text="The title of the book.")
    publication_date = models.DateField\
                       (verbose_name=\
                        "Date the book was published.")
    isbn = models.CharField\
           (max_length=20, \
            verbose_name="ISBN number of the book.")
class Contributor(models.Model):
"""
A contributor to a Book, e.g. author, editor, \
co-author.
"""
  first_names = models.CharField\
                (max_length=50, \
                 help_text=\
                 "The contributor's first name or names.")
    last_names = models.CharField\
                 (max_length=50, \
                  help_text=\
                  "The contributor's last name or names.")
    email = models.EmailField\
            (help_text="The contact email for the contributor.")
The code is self-explanatory. The Book model has the fields title, publication_date, and isbn. The Contributor model has the fields first_names and last_names fields and the email ID of the contributor. There are some newly added models as well, apart from the ones we have seen in the Publisher model. They have DateField as a new field type, which, as the name suggests, is used to store a date. A new field option called verbose_name is also used. It provides a descriptive name for the field.
Relationships
One of the powers of relational databases is the ability to establish relationships between data stored across database tables. Relationships help maintain data integrity by establishing the correct references across tables, which in turn helps maintain the database. Relationship rules, on the other hand, ensure data consistency and prevent duplicates.
In a relational database, there can be the following types of relations:
- Many to one
- Many to many
- One to one
Let's explore each relationship in detail.
Many to One
In this relationship, many records (rows/entries) from one table can refer to one record (row/entry) in another table. For example, there can be many books produced by one publisher. This is a case of a many-to-one relationship. To establish this relationship, we need to use the database's foreign keys. A foreign key in a relational database establishes the relationship between a field from one table and a primary key from a different table.
For example, say you have data about employees belonging to different departments stored in a table called employee_info with their employee ID as the primary key alongside a column that stores their department name; this table also contains a column that stores that department's department ID. Now, there's another table called departments_info, which has department ID as the primary key. In this case, then, the department ID is a foreign key in the employee_info table.
In our bookr app, the Book model can have a foreign key referring to the primary key of the Publisher table. Since we have already created the models for Book, Contributor, and Publisher, now let's establish a many-to-one relationship across the Book and Publisher models. For the Book model, add the last line:
class Book(models.Model):
    """A published book."""
    title = models.CharField\
            (max_length=70, \
             help_text="The title of the book.")
    publication_date = models.DateField\
                       (verbose_name=\
                        "Date the book was published.")
    isbn = models.CharField\
           (max_length=20, \
            verbose_name="ISBN number of the book.")
    publisher = models.ForeignKey\
                (Publisher, on_delete=models.CASCADE)
Now the newly added publisher field is establishing a many-to-one relationship between Book and Publisher using a foreign key. This relationship ensures the nature of a many-to-one relationship, which is that many books can have one publisher:
models.ForeignKey: This is the field option to establish a many-to-one relationship.Publisher: When we establish relationships with different tables in Django, we refer to the model that creates the table; in this case, thePublishertable is created by thePublishermodel (or the Python class Publisher).on_delete: This is a field option that determines the action to be taken upon the deletion of the referenced object. In this case, theon_deleteoption is set toCASCADE(models.CASCADE), which deletes the referenced objects.
For example, assume a publisher has published a set of books. For some reason, if the publisher has to be deleted from the application, the next action is CASCADE, which means delete all the referenced books from the application. There are many more on_delete actions, such as the following:
PROTECT: This prevents the deletion of the record unless all the referenced objects are deleted.SET_NULL: This sets a null value if the database field has been previously configured to store null values.SET_DEFAULT: Sets to a default value on the deletion of the referenced object.
For our book review application, we will be using only the CASCADE option.
Many to Many
In this relationship, multiple records in a table can have a relationship with multiple records in a different table. For example, a book can have multiple co-authors and each author (contributor) could have written multiple books. So, this forms a many-to-many relationship between the Book and Contributor tables:
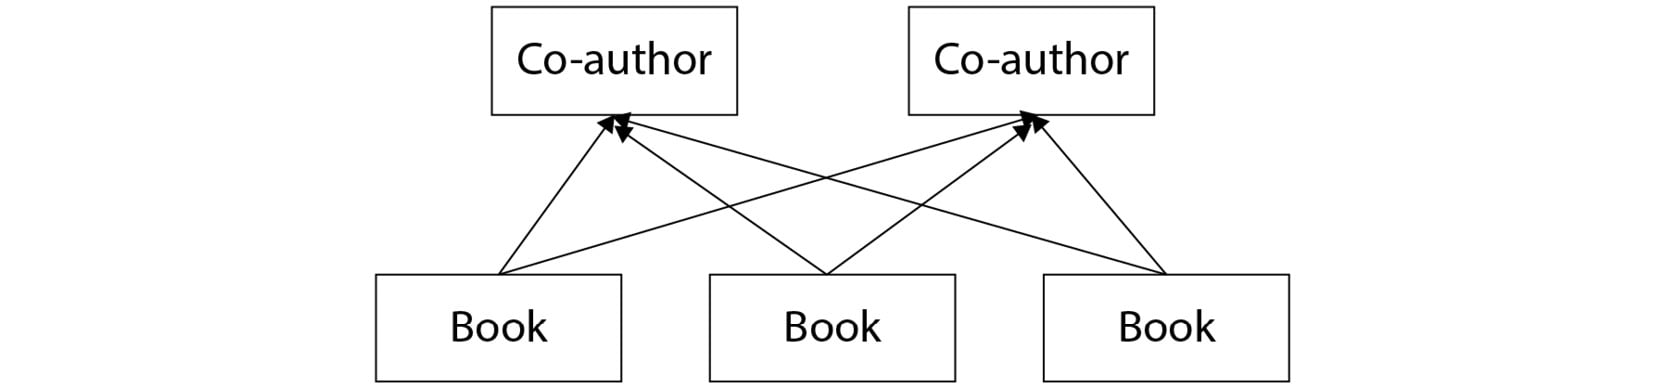
Figure 2.15: Many-to-many relationship between books and co-authors
In models.py, for the Book model, add the last line as shown here:
class Book(models.Model):
    """A published book."""
    title = models.CharField\
            (max_length=70, \
             help_text="The title of the book.")
    publication_date = models.DateField\
                       (verbose_name=\
                        "Date the book was published.")
    isbn = models.CharField\
           (max_length=20, \
            verbose_name="ISBN number of the book.")
    publisher = models.ForeignKey\
                (Publisher, on_delete=models.CASCADE)
    contributors = models.ManyToManyField\
                   ('Contributor', through="BookContributor")
The newly added contributors field establishes a many-to-many relationship with Book and Contributor using the ManyToManyField field type:
models.ManyToManyField: This is the field type to establish a many-to-many relationship.through: This is a special field option for many-to-many relationships. When we have a many-to-many relationship across two tables, if we want to store some extra information about the relationship, then we can use this to establish the relationship via an intermediary table.
For example, we have two tables, namely Book and Contributor, where we need to store the information on the type of contributor for the book, such as Author, Co-author, or Editor. Then the type of contributor is stored in an intermediary table called BookContributor. Here is how the BookContributor table/model looks. Make sure you include this model in reviews/models.py:
class BookContributor(models.Model):
    class ContributionRole(models.TextChoices):
        AUTHOR = "AUTHOR", "Author"
        CO_AUTHOR = "CO_AUTHOR", "Co-Author"
        EDITOR = "EDITOR", "Editor"
    book = models.ForeignKey\
           (Book, on_delete=models.CASCADE)
    contributor = models.ForeignKey\
                  (Contributor, \
                   on_delete=models.CASCADE)
    role = models.CharField\
           (verbose_name=\
            "The role this contributor had in the book.", \
            choices=ContributionRole.choices, max_length=20)
Note
The complete models.py file can be viewed at this link: http://packt.live/3hmFQxn.
An intermediary table such as BookContributor establishes relationships by using foreign keys to both the Book and Contributor tables. It can also have extra fields that can store information about the relationship the BookContributor model has with the following fields:
book: This is a foreign key to theBookmodel. As we saw previously,on_delete=models.CASCADEwill delete an entry from the relationship table when the relevant book is deleted from the application.Contributor: This is again a foreign key to theContributormodel/table. This is also defined asCASCADEupon deletion.role: This is the field of the intermediary model, which stores the extra information about the relationship betweenBookandContributor.class ContributionRole(models.TextChoices): This can be used to define a set of choices by creating a subclass ofmodels.TextChoices. For example,ContributionRoleis a subclass created out ofTextChoices, which is used by the roles field to define Author, Co-Author, and Editor as a set of choices.choices: This refers to a set of choices defined in the models, and they are useful when creating DjangoFormsusing the models.Note
When the through field option is not provided while establishing a many-to-many relationship, Django automatically creates an intermediary table to manage the relationship.
One-to-One Relationships
In this relationship, one record in a table will have a reference to only one record in a different table. For example, a person can have only one driver's license, so a person to their driver's license could form a one-to-one relationship:

Figure 2.16: Example of a one-to-one relationship
The OneToOneField can be used to establish a one-to-one relationship, as shown here:
class DriverLicence(models.Model):
    person = models.OneToOneField\
             (Person, on_delete=models.CASCADE)
    licence_number = models.CharField(max_length=50)
Now that we have explored database relationships, let's come back to our bookr application and add one more model there.
Adding the Review Model
We've already added the Book and Publisher models to the reviews/models.py file. The last model that we are going to add is the Review model. The following code snippet should help us do this:
from django.contrib import auth
class Review(models.Model):
    content = models.TextField\
              (help_text="The Review text.")
    rating = models.IntegerField\
             (help_text="The rating the reviewer has given.")
    date_created = models.DateTimeField\
                   (auto_now_add=True, \
                    help_text=\
                    "The date and time the review was created.")
    date_edited = models.DateTimeField\
                  (null=True, \
                   help_text=\
                   "The date and time the review was last edited.")
    creator = models.ForeignKey\
              (auth.get_user_model(), on_delete=models.CASCADE)
    book = models.ForeignKey\
           (Book, on_delete=models.CASCADE, \
            help_text="The Book that this review is for.")
Note
The complete models.py file can be viewed at this link: http://packt.live/3hmFQxn.
The review model/table will be used to store user-provided review comments and ratings for books. It has the following fields:
content: This field stores the text for a book review, hence the field type used isTextFieldas this can store a large amount of text.rating: This field stores the review rating of a book. Since the rating is going to be an integer, the field type used isIntegerField.date_created: This field stores the time and date when the review was written, hence the field type isDateTimeField.date_edited: This field stores the date and time whenever a review is edited. The field type is againDateTimeField.Creator: This field specifies the review creator or the person who writes the book review. Notice that this is a foreign key toauth.get_user_model(), which is referring to theUsermodel from Django's built-in authentication module. It has a field optionon_delete=models.CASCADE. This explains that when a user is deleted from the database, all the reviews written by that user will be deleted.Book: Reviews have a field calledbook, which is a foreign key to theBookmodel. This is because for a book review application, reviews have to be written, and a book can have many reviews, so this is a many-to-one relationship. This is also defined with a field option,on_delete=models.CASCADE, because once the book is deleted, there is no point in retaining the reviews in the application. So, when a book is deleted, all the reviews referring to the book will also get deleted.
Model Methods
In Django, we can write methods inside a model class. These are called model methods and they can be custom methods or special methods that override the default methods of Django models. One such method is __str__(). This method returns the string representation of the Model instances and can be especially useful while using the Django shell. In the following example, where the __str__() method is added to the Publisher model, the string representation of the Publisher object will be the publisher's name:
class Publisher(models.Model):
    """A company that publishes books."""
    name = models.CharField\
           (max_length=50, \
            help_text="The name of the Publisher.")
    website = models.URLField\
              (help_text="The Publisher's website.")
    email = models.EmailField\
            (help_text="The Publisher's email address.")
    def __str__(self):
        return self.name
Add the _str_() methods to Contributor and Book as well, as follows:
class Book(models.Model):
    """A published book."""
    title = models.CharField\
            (max_length=70, \
             help_text="The title of the book.")
    publication_date = models.DateField\
                       (verbose_name=\
                        "Date the book was published.")
    isbn = models.CharField\
           (max_length=20, \
            verbose_name="ISBN number of the book.")
    publisher = models.ForeignKey\
                (Publisher, \
                 on_delete=models.CASCADE)
    contributors = models.ManyToManyField\
                   ('Contributor', through="BookContributor")
    def __str__(self):
        return self.title
class Contributor(models.Model):
"""
A contributor to a Book, e.g. author, editor, \
co-author.
"""
    first_names = models.CharField\
                  (max_length=50, \
                   help_text=\
                   "The contributor's first name or names.")
    last_names = models.CharField\
                 (max_length=50, \
                  help_text=\
                  "The contributor's last name or names.")
    email = models.EmailField\
            (help_text=\
             "The contact email for the contributor.")
    def __str__(self):
        return self.first_names
Migrating the Reviews App
Since we have the entire model file ready, let's now migrate the models into the database, similar to what we did before with the installed apps. Since the reviews app has a set of models created by us, before running the migration, it is important to create the migration scripts. Migration scripts help in identifying any changes to the models and will propagate these changes into the database while running the migration. Execute the following command to create the migration scripts:
python manage.py makemigrations reviews
You should get an output similar to this:
  reviews/migrations/0002_auto_20191007_0112.py
    - Create model Book
    - Create model Contributor
    - Create model Review
    - Create model BookContributor
    - Add field contributors to book
    - Add field publisher to book
Migration scripts will be created in a folder named migrations in the application folder. Next, migrate all the models into the database using the migrate command:
python manage.py migrate reviews
You should see the following output:
Operations to perform:
  Apply all migrations: reviews
Running migrations:
  Applying reviews.0002_auto_20191007_0112... OK
After executing this command, we have successfully created the database tables defined in the reviews app. You may use DB Browser for SQLite to explore the tables you have just created after the migration. To do so, open DB Browser for SQLite, click the Open Database button (Figure 2.17), and navigate to your project directory:

Figure 2.17: Click the Open Database button
Select the database file named db.sqlite3 to open it (Figure 2.18).
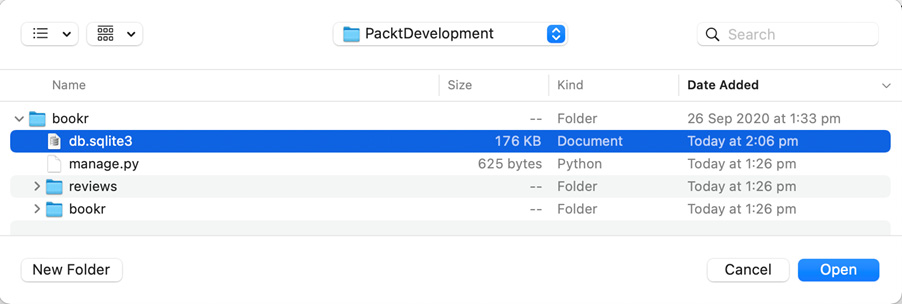
Figure 2.18: Locating db.sqlite3 in the bookr directory
You should now be able to browse the new sets of tables created. The following figure shows the database tables defined in the reviews app:
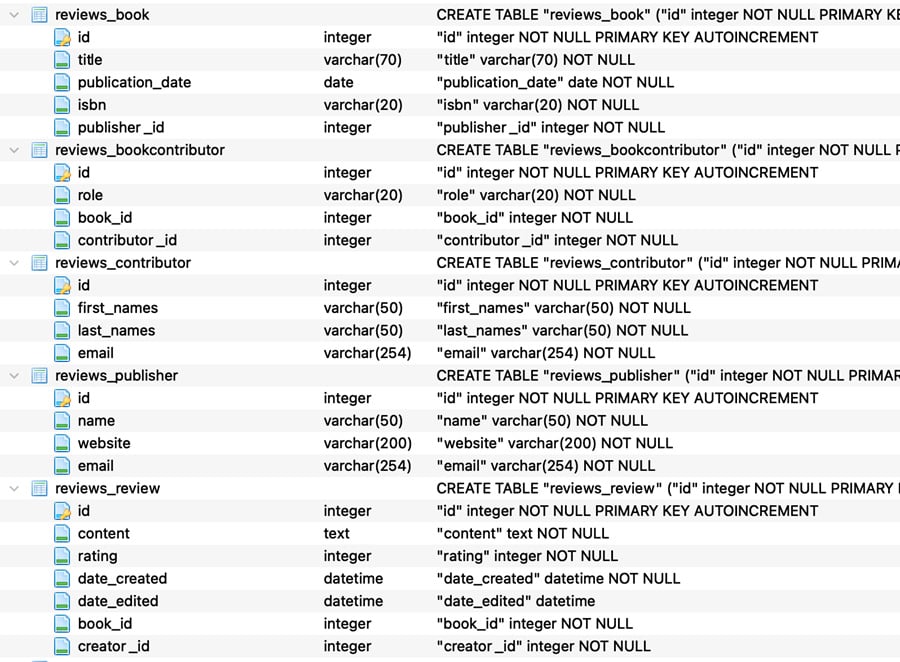
Figure 2.19: Database tables as defined in the reviews app
Django's Database CRUD Operations
As we have created the necessary database tables for the book review application, let's work on understanding the basic database operations with Django.
We've already briefly touched on database operations using SQL statements in the section titled SQL CRUD Operations. We tried creating an entry into the database using the Insert statement, read from the database using the select statement, updated an entry using the update statement, and deleted an entry from the database using the delete statement.
Django's ORM provides the same functionality without having to deal with the SQL statements. Django's database operations are simple Python code, hence we overcome the hassle of maintaining SQL statements among the Python code. Let's take a look at how these are performed.
To execute the CRUD operations, we will enter Django's command-line shell by executing the following command:
python manage.py shell
Note
For this chapter, we will designate Django shell commands using the >>> notation (highlighted) at the start of the code block. While pasting the query into DB Browser, make sure you exclude this notation every time.
When the interactive console starts, it looks as follows:
Type "help", "copyright", "credits" or "license" for more information.
(InteractiveConsole)
>>>
Exercise 2.02: Creating an Entry in the Bookr Database
In this exercise, you will create a new entry in the database by saving a model instance. In other words, you will create an entry in a database table without explicitly running a SQL query:
- First, import the
Publisherclass/model fromreviews.models:>>>from reviews.models import Publisher
- Create an object or an instance of the
Publisherclass by passing all the field values (name, website, and email) required by thePublishermodel:>>>publisher = Publisher(name='Packt Publishing', website='https://www.packtpub.com', email='info@packtpub.com')
- Next, to write the object into the database, it is important to call the
save()method, because until this is called there will not be an entry created in the database:>>>publisher.save()
Now you can see a new entry created in the database using DB Browser:

Figure 2.20: Entry created in the database
- Use the object attributes to make any further changes to the object and save the changes to the database:
>>>publisher.email
'info@packtpub.com'
>>> publisher.email = 'customersupport@packtpub.com'
>>> publisher.save()
You can see the changes using DB Browser as follows:

Figure 2.21: Entry with the updated email field
In this exercise, you created an entry in the database by creating an instance of the model object and used the save() method to write the model object into the database.
Note that by following the preceding method, the changes to the class instance are not saved until the save() method is called. However, if we use the create() method, Django saves the changes to the database in a single step. We'll use this method in the exercise that follows.
Exercise 2.03: Using the create() Method to Create an Entry
Here, you will create a record in the contributor table using the create() method in a single step:
- First, import the Contributor class as before:
>>> from reviews.models import Contributor
- Invoke the
create()method to create an object in the database in a single step. Ensure that you pass all the required parameters (first_names, last_names, andemail):>>> contributor = Contributor.objects.create(first_names="Rowel", last_names="Atienza", email="RowelAtienza@example.com")
- Use DB Browser to verify that the contributor record has been created in the database. If your DB Browser is not already open, open the database file
db.sqlite3as we just did in the previous section. ClickBrowse Dataand select the desired table – in this case, thereviews_contributortable from theTabledropdown, as shown in the screenshot – and verify the newly created database record:
Figure 2.22: Verifying the creation of the record in DB Browser
In this exercise, we learned that using the create() method, we can create a record for a model in a database in a single step.
Creating an Object with a Foreign Key
Similar to how we created a record in the Publisher and Contributor tables, let's now create one for the Book table. If you recall, the Book model has a foreign key to Publisher that cannot have a null value. So, a way to populate the publisher's foreign key is by providing the created publisher object in the book's publisher field as shown in the following exercise.
Exercise 2.04: Creating Records for a Many-to-One Relationship
In this exercise, you will create a record in the Book table including a foreign key to the Publisher model. As you already know, the relationship between Book and Publisher is a many-to-one relationship, so you have to first fetch the Publisher object and then use it while creating the book record:
- First, import the
Publisherclass:>>>from reviews.models import Book, Publisher
- Retrieve the
publisherobject from the database using the following command. Theget()method is used to retrieve an object from the database. We still haven't explored database read operations. For now, use the following command; we will go deeper into database read/retrieve in the next section:>>>publisher = Publisher.objects.get(name='Packt Publishing')
- When creating a book, we need to supply a
dateobject as publication_date is a date field in theBookmodel. So, importdatefrom datetime so that a date object can be supplied when creating thebookobject as shown in the following code:>>>from datetime import date
- Use the
create()method to create a record of the book in the database. Ensure that you pass all the fields, namelytitle,publication_ date,isbn, and thepublisherobject:>>>book = Book.objects.create(title="Advanced Deep Learning with Keras", publication_date=date(2018, 10, 31), isbn="9781788629416", publisher=publisher)
Note that since
publisheris a foreign key and it is not nullable (cannot hold anullvalue), it is mandatory to pass apublisherobject. When the mandatory foreign key object publisher is not provided, the database will throw an integrity error.Figure 2.23 shows the
Booktable where the first entry is created. Notice that the foreign key field (publisher_id) points to the id (primary key) of thePublishertable. The entrypublisher_idin the book's record is pointing to aPublisherrecord that hasid(primary key)1as shown in the following two screenshots:
Figure 2.23: Foreign key pointing to the primary key for reviews_book

Figure 2.24: Foreign key pointing to the primary key for reviews_publisher
In this exercise, we learned that while creating a database record, an object can be assigned to a field if it is a foreign key. We know that the Book model also has a many-to-many relationship with the Contributor model. Let's now explore the ways to establish many-to-many relations as we create records in the database.
Exercise 2.05: Creating Records with Many-to-Many Relationships
In this exercise, you will create a many-to-many relationship between Book and Contributor using the relationship model BookContributor:
- In case you have restarted the shell and lost the
publisherand thebookobjects, retrieve them from the database by using the following set of Python statements:>>>from reviews.models import Book >>>from reviews.models import Contributor >>>contributor = Contributor.objects.get(first_names='Rowel') book = Book.objects.get(title="Advanced Deep Learning with Keras")
- The way to establish a many-to-many relationship is by storing the information about the relationship in the intermediary model or the relationship model; in this case, it is
BookContributor. Since we have already fetched the book and the contributor records from the database, let's use these objects while creating a record for theBookContributorrelationship model. To do so, first, create an instance of theBookContributorrelationship class and then save the object to the database. While doing so, ensure you pass the required fields, namely thebookobject,contributorobject, androle:>>>from reviews.models import BookContributor >>>book_contributor = BookContributor(book=book, contributor=contributor, role='AUTHOR') >>> book_contributor.save()
Notice that we specified the role as
AUTHORwhile creating thebook_contributorobject. This is a classic example of storing relationship data while establishing a many-to-many relationship. The role can beAUTHOR,CO_AUTHOR, orEDITOR.This established the relationship between the book Advanced Deep Learning with Keras and the contributor Rowel (Rowel being the author of the book).
In this exercise, we established a many-to-many relationship between Book and Contributor using the BookContributor relationship model. With regards to the verification of the many-to-many relationship that we just created, we will see this in detail in a few exercises later on in this chapter.
Exercise 2.06: A Many-to-Many Relationship Using the add() Method
In this exercise, you will establish a many-to-many relationship using the add() method. When we don't use the relationship to create the objects, we can use through_default to pass in a dictionary with the parameters defining the required fields. Continuing from the previous exercise, let's add one more contributor to the book titled Advanced Deep Learning with Keras. This time, the contributor is an editor of the book:
- If you have restarted the shell, run the following two commands to import and fetch the desired book instance:
>>>from reviews.models import Book, Contributor
>>>book = Book.objects.get(title="Advanced Deep Learning with   Keras")
- Use the
create()method to create a contributor as shown here:>>>contributor = Contributor.objects.create(first_names='Packt', last_names='Example Editor', email='PacktEditor@example.com')
- Add the newly created contributor to the book using the
add()method. Ensure you provide the relationship parameterroleasdict. Enter the following code:>>>book.contributors.add(contributor, through_defaults={'role': 'EDITOR'})
Thus, we used the add() method to establish a many-to-many relationship between the book and contributor while storing the relationship data role as Editor. Let's now take a look at other ways of doing this.
Using create() and set() Methods for Many-to-Many Relationships
Assume the book Advanced Deep Learning with Keras has a total of two editors. Let's use the following method to add another editor to the book. If the contributor is not already present in the database, then we can use the create() method to simultaneously create an entry as well as to establish the relation with the book:
>>>book.contributors.create(first_names='Packtp', last_names= 'Editor Example', email='PacktEditor2@example.com', through_defaults={'role': 'EDITOR'})
Similarly, we can also use the set() method to add a list of contributors for a book. Let's create a publisher, a set of two contributors who are the co-authors, and a book object. First, import the Publisher model, if not already imported, using the following code:
>>>from reviews.models import Publisher
The following code will help us do so:
>>> publisher = Publisher.objects.create(name='Pocket Books',   website='https://pocketbookssampleurl.com', email='pocketbook@example.com')
>>> contributor1 = Contributor.objects.create(first_names=  'Stephen', last_names='Stephen', email='StephenKing@example.com')
>>> contributor2 = Contributor.objects.create(first_names=  'Peter', last_names='Straub', email='PeterStraub@example.com')
>>> book = Book.objects.create(title='The Talisman',   publication_date=date(2012, 9, 25), isbn='9781451697216',     publisher=publisher)
Since this is a many-to-many relationship, we can add a list of objects in just one go, using the set() method. We can use through_defaults to specify the role of the contributors; in this case, they are co-authors:
>>> book.contributors.set([contributor1, contributor2], through_defaults={'role': 'CO_AUTHOR'})
Read Operations
Django provides us with methods that allow us to read/retrieve from the database. We can retrieve a single object from the database using the get() method. We have already created a few records in the previous sections, so let's use the get() method to retrieve an object.
Exercise 2.07: Using the get() Method to Retrieve an Object
In this exercise, you will retrieve an object from the database using the get() method:
- Fetch a
Publisherobject that has anamefield with the valuePocket Books:>>>from reviews.models import Publisher >>> publisher = Publisher.objects.get(name='Pocket Books')
- Re-enter the retrieved
publisherobject and press Enter:>>> publisher <Publisher: Pocket Books>
Notice that the output is displayed in the shell. This is called a string representation of an object. It is the result of adding the model method
__str__()as we did in the Model Methods section for thePublisherclass. - Upon retrieving the object, you have access to all the object's attributes. Since this is a Python object, the attributes of the object can be accessed by using
.followed by the attribute name. So, you can retrieve the publisher's name with the following command:>>> publisher.name 'Pocket Books'
- Similarly, retrieve the publisher's website:
>>> publisher.website 'https://pocketbookssampleurl.com'
The publisher's email address can be retrieved as well:
>>> publisher.email 'pocketbook@example.com'
In this exercise, we learned how to fetch a single object using the get() method. There are several disadvantages to using this method, though. Let's find out why.
Returning an Object Using the get() Method
It is important to note that the get() method can only fetch one object. If there is another object carrying the same value as the field mentioned, then we can expect a "returned more than one" error message. For example, if there are two entries in the Publisher table with the same value for the name field, we can expect an error. In such cases, there are alternate ways to retrieve those objects, which we will be exploring in the subsequent sections.
We can also get a "matching query does not exist" error message when there are no objects returned from the get() query. The get() method can be used with any of the object's fields to retrieve a record. In the following case, we are using the website field:
>>> publisher = Publisher.objects.get(website='https://pocketbookssampleurl.com')
After retrieving the object, we can still get the publisher's name, as shown here:
>>> publisher.name
'Pocket Books'
Another way to retrieve an object is by using its primary key – pk, as can be seen here:
>>> Publisher.objects.get(pk=2)
<Publisher: Pocket Books>
Using pk for the primary key is a more generic way of using the primary key field. But for the Publisher table, since we know that id is the primary key, we can simply use the field name id to create our get() query:
>>> Publisher.objects.get(id=2)
<Publisher: Pocket Books>
Note
For Publisher and all the other tables, the primary key is id, which was automatically created by Django. This happens when a primary key field is not mentioned at the time of the creation of the table. But there can be instances where a field can be explicitly declared as a primary key.
Exercise 2.08: Using the all() Method to Retrieve a Set of Objects
We can use the all() method to retrieve a set of objects. In this exercise, you will use this method to retrieve the names of all contributors:
- Add the following code to retrieve all the objects from the
Contributortable:>>>from reviews.models import Contributor >>> Contributor.objects.all() <QuerySet [<Contributor: Rowel>, <Contributor: Packt>, <Contributor: Packtp>, <Contributor: Stephen>, <Contributor: Peter>]>
Upon execution, you will get a
QuerySetof all the objects. - We can use list indexing to look up a specific object or to iterate over the list using a loop to do any other operation:
>>> contributors = Contributor.objects.all()
- Since
Contributoris a list of objects, you can use indexing to access any element in the list as shown in the following command:>>> contributors[0] <Contributor: Rowel>
In this case, the first element in the list is a contributor with a
first_namesvalue of'Rowel'and alast_namesvalue of'Atienza', as you can see from the following code:>>> contributors[0].first_names 'Rowel' >>> contributors[0].last_names 'Atienza'
In this exercise, we learned how to retrieve all the objects using the all() method and we also learned how to use the retrieved set of objects as a list.
Retrieving Objects by Filtering
If we have more than one object for a field value, then we cannot use the get() method since the get() method can return only one object. For such cases, we have the filter() method, which can retrieve all the objects that match a specified condition.
Exercise 2.09: Using the filter() Method to Retrieve Objects
In this exercise, you will use the filter() method to get a specific set of objects for a certain condition. Specifically, you will retrieve all the contributors' names who have their first name as Peter:
- First, create two more contributors:
>>>from reviews.models import Contributor
>>> Contributor.objects.create(first_names='Peter', last_names='Wharton', email='PeterWharton@example.com')
>>> Contributor.objects.create(first_names='Peter', last_names='Tyrrell', email='PeterTyrrell@example.com')
- To retrieve those contributors who have the value of
first_namesasPeter, add the following code:>>> Contributor.objects.filter(first_names='Peter') <QuerySet [<Contributor: Peter>, <Contributor: Peter>, <Contributor: Peter>]>
- The
filter()method returns the object even if there is only one. You can see this here:>>>Contributor.objects.filter(first_names='Rowel') <QuerySet [<Contributor: Rowel>]>
- Furthermore, the
filter()method returns an emptyQuerySetif there is none matching the query. This can be seen here:>>>Contributor.objects.filter(first_names='Nobody') <QuerySet []>
In this exercise, we saw the use of filters to retrieve a set of a few objects filtered by a certain condition.
Filtering by Field Lookups
Now, let's suppose we want to filter and query a set of objects using the object's fields by providing certain conditions. In such a case, we can use what is called a double-underscore lookup. For example, the Book object has a field named publication_date; let's say we want to filter and fetch all the books that were published after 01-01-2014. We can easily look these up by using the double-underscore method. To do this, we will first import the Book model:
>>>from reviews.models import Book
>>>book = Book.objects.filter(publication_date__gt=date(2014, 1, 1))
Here, publication_date__gt indicates the publication date, which is greater than (gt) a certain specified date – in this case, 01-01-2014. Similar to this, we have the following abbreviations:
lt: Less thanlte: Less than or equal togte: Greater than or equal to
The result after filtering can be seen here:
>>> book
<QuerySet [<Book: Advanced Deep Learning with Keras>]>
Here is the publication date of the book that is part of the query set, which confirms that the publication date was after 01-01-2014:
>>> book[0].publication_date
datetime.date(2018, 10, 31)
Using Pattern Matching for Filtering Operations
For filtered results, we can also look up whether the parameter contains a part of the string we are looking for:
>>> book = Book.objects.filter(title__contains=
    'Deep learning')
Here, title__contains looks for all those objects with titles containing 'Deep learning' as a part of the string:
>>> book
<QuerySet [<Book: Advanced Deep Learning with Keras>]>
>>> book[0].title
'Advanced Deep Learning with Keras'
Similarly, we can use icontains if the string match needs to be case-insensitive. Using startswith matches any string starting with the specified string.
Retrieving Objects by Excluding
In the previous section, we learned about fetching a set of objects by matching a certain condition. Now, suppose we want to do the opposite; that is, we want to fetch all those objects that do not match a certain condition. In such cases, we can use the exclude() method to exclude a certain condition and fetch all the required objects. This will be clearer with an example. The following is a list of all contributors:
>>> Contributor.objects.all()
<QuerySet [<Contributor: Rowel>, <Contributor: Packt>,   <Contributor: Packtp>, <Contributor: Stephen>,     <Contributor: Peter>, <Contributor: Peter>,       <Contributor: Peter>]>
Now, from this list, we will exclude all those contributors who have the value of first_names as Peter:
>>> Contributor.objects.exclude(first_names='Peter')
<QuerySet [<Contributor: Rowel>, <Contributor: Packt>,   <Contributor: Packtp>, <Contributor: Stephen>]>
We see here that the query returned all those contributors whose first name is not Peter.
Retrieving Objects Using the order_by() Method
We can retrieve a list of objects while ordering by a specified field, using the order_by() method. For example, in the following code snippet, we order the books by their publication date:
>>> books = Book.objects.order_by("publication_date")
>>> books
<QuerySet [<Book: The Talisman>, <Book: Advanced Deep Learning   with Keras>]>
Let's examine the order of the query. Since the query set is a list, we can use indexing to check the publication date of each book:
>>> books[0].publication_date
datetime.date(2012, 9, 25)
>>> books[1].publication_date
datetime.date(2018, 10, 31)
Notice that the publication date of the first book with index 0 is older than the publication date of the second book with index 1. So, this confirms that the queried list of books has been properly ordered as per their publication dates. We can also use a prefix with the negative sign for the field parameter to order results in descending order. This can be seen from the following code snippet:
>>> books = Book.objects.order_by("-publication_date")
>>> books
<QuerySet [<Book: Advanced Deep Learning with Keras>,   <Book: The Talisman>]>
Since we have prefixed a negative sign to the publication date, notice that the queried set of books has now been returned in the opposite order, where the first book object with index 0 has a more recent date than the second book:
>>> books[0].publication_date
datetime.date(2018, 10, 31)
>>> books[1].publication_date
datetime.date(2012, 9, 25)
We can also order by using a string field or a numerical. For example, the following code can be used to order books by their primary key or id:
>>>books = Book.objects.order_by('id')
<QuerySet [<Book: Advanced Deep Learning with Keras>,   <Book: The Talisman>]>
The queried set of books has been ordered as per book id in ascending order:
>>> books[0].id
1
>>> books[1].id
2
Again, to order in descending order, the negative sign can be used as a prefix, as follows:
>>> Book.objects.order_by('-id')
<QuerySet [<Book: The Talisman>, <Book: Advanced Deep Learning   with Keras>]>
Now, the queried set of books has been ordered per book id in descending order:
>>> books[0].id
2
>>> books[1].id
1
To order by a string field in alphabetical order, we can do something like this:
>>>Book.objects.order_by('title')
<QuerySet [<Book: Advanced Deep Learning with Keras>, <Book:   The Talisman>]>
Since we have used the title of the book to order by, the query set has been ordered in alphabetical order. We can see this as follows:
>>> books[0]
<Book: Advanced Deep Learning with Keras>
>>> books[1]
<Book: The Talisman>
Similar to what we've seen for the previous ordering types, the negative sign prefix can help us sort in reverse alphabetical order, as we can see here:
>>> Book.objects.order_by('-title')
<QuerySet [<Book: The Talisman>, <Book: Advanced Deep Learning   with Keras>]>
This will lead to the following output:
>>> books[0]
<Book: The Talisman>
>>> books[1]
<Book: Advanced Deep Learning with Keras>
Yet another useful method offered by Django is values(). It helps us get a query set of dictionaries instead of objects. In the following code snippet, we're using this for a Publisher object:
>>> publishers = Publisher.objects.all().values()
>>> publishers
<QuerySet [{'id': 1, 'name': 'Packt Publishing', 'website':   'https://www.packtpub.com', 'email':     'customersupport@packtpub.com'}, {'id': 2, 'name':       'Pocket Books', 'website': 'https://pocketbookssampleurl.com',        'email': 'pocketbook@example.com'}]>
>>> publishers[0]
{'id': 1, 'name': 'Packt Publishing', 'website':  'https://www.packtpub.com', 'email':     'customersupport@packtpub.com'}
>>> publishers[0]
{'id': 1, 'name': 'Packt Publishing', 'website':   'https://www.packtpub.com', 'email':    'customersupport@packtpub.com'}
Querying Across Relationships
As we have studied in this chapter, the reviews app has two kinds of relationships – many-to-one and many-to-many. So far, we have learned various ways of making queries using get(), filters, field lookups, and so on. Now let's study how to perform queries across relationships. There are several ways to go about this – we could use foreign keys, object instances, and more. Let's explore these with the help of some examples.
Querying Using Foreign Keys
When we have relationships across two models/tables, Django provides a way to perform a query using the relationship. The command shown in this section will retrieve all the books published by Packt Publishing by performing a query using model relationships. Similar to what we've seen previously, this is done using the double-underscore lookup. For example, the Book model has a foreign key of publisher pointing to the Publisher model. Using this foreign key, we can perform a query using double underscores and the field name in the Publisher model. This can be seen from the following code:
>>> Book.objects.filter(publisher__name='Packt Publishing')
<QuerySet [<Book: Advanced Deep Learning with Keras>]>
Querying Using Model Name
Another way of querying is where we can use a relationship to do the query backward, using the model name in lowercase. For instance, let's say we want to query the publisher who published the book Advanced Deep Learning with Keras using model relationships in the query. For this, we can execute the following statement to retrieve the Publisher information object:
>>> Publisher.objects.get(book__title='Advanced Deep Learning   with Keras')
<Publisher: Packt Publishing>
Here, book is the model name in lowercase. As we already know, the Book model has a publisher foreign key with the value of name as Packt Publishing.
Querying Across Foreign Key Relationships Using the Object Instance
We can also retrieve the information using the object's foreign key. Suppose we want to query the publisher's name for the title The Talisman:
>>> book = Book.objects.get(title='The Talisman')
>>> book.publisher
<Publisher: Pocket Books>
Using the object here is an example where we use the reverse direction to get all the books published by a publisher by using the set.all() method:
>>> publisher = Publisher.objects.get(name='Pocket Books')
>>> publisher.book_set.all()
<QuerySet [<Book: The Talisman>]>
We can also create queries using chains of queries:
>>> Book.objects.filter(publisher__name='Pocket Books').filter(title='The Talisman')
<QuerySet [<Book: The Talisman>]>
Let's perform some more exercises to shore up our knowledge of the various kinds of queries we have learned about so far.
Exercise 2.10: Querying Across a Many-to-Many Relationship Using Field Lookup
We know that Book and Contributor have a many-to-many relationship. In this exercise, without creating an object, you will perform a query to retrieve all the contributors who contributed to writing the book titled The Talisman:
- First, import the
Contributorclass:>>> from reviews.models import Contributor
- Now, add the following code to query for the set of contributors on The Talisman:
>>>Contributor.objects.filter(book__title='The Talisman')
You should see the following:
<QuerySet [<Contributor: Stephen>, <Contributor: Peter>]>
From the preceding output, we can see that Stephen and Peter are the contributors who contributed to writing the book The Talisman. The query uses the book model (written in lowercase) and does a field lookup for the title field using the double underscore as shown in the command.
In this exercise, we learned how to perform queries across many-to-many relationships using field lookup. Let's now look at using another method to carry out the same task.
Exercise 2.11: A Many-to-Many Query Using Objects
In this exercise, using a Book object, search for all the contributors who contributed to writing the book with the title The Talisman. The following steps will help you do that:
- Import the Book model:
>>> from reviews.models import Book
- Retrieve a book object with the title The Talisman, by adding the following line of code:
>>> book = Book.objects.get(title='The Talisman')
- Then retrieve all the contributors who worked on the book The Talisman using the
bookobject. Add the following code to do so:>>>book.contributors.all() <QuerySet [<Contributor: Stephen>, <Contributor: Peter>]>
Again, we can see that Stephen and Peter are the contributors who worked on the book The Talisman. Since the book has a many-to-many relationship with contributors, we have used the contributors.all() method to get a query set of all those contributors who worked on the book. Now, let's try using the set method to perform a similar task.
Exercise 2.12: A Many-to-Many Query Using the set() Method
In this exercise, you will use a contributor object to fetch all the books written by the contributor named Rowel:
- Import the
Contributormodel:>>> from reviews.models import Contributor
- Fetch a
contributorobject whosefirst_namesis'Rowel'using theget()method:>>> contributor = Contributor.objects.get(first_names='Rowel')
- Using the
contributorobject and thebook_set()method, get all those books written by the contributor:>>> contributor.book_set.all() <QuerySet [<Book: Advanced Deep Learning with Keras>]>
Since Book and Contributor have a many-to-many relationship, we can use the set() method to query a set of objects associated with the model. In this case, contributor.book_set.all() returned all the books written by the contributor.
Exercise 2.13: Using the update() Method
In this exercise, you will use the update() method to update an existing record:
- Change
first_namesfor a contributor who has the last nameTyrrell:>>> from reviews.models import Contributor >>> Contributor.objects.filter(last_names='Tyrrell'). update(first_names='Mike') 1
The return value shows the number of records that have been updated. In this case, one record has been updated.
- Fetch the contributor that was just modified using the
get()method and verify that the first name has been changed toMike:>>> Contributor.objects.get(last_names='Tyrrell').first_names 'Mike'
Note
If the filter operation has more than one record, then the
update()method will update the specified field in all the records returned by the filter.
In this exercise, we learned how to use the update() method to update a record in the database. Now, finally, let's try deleting a record from the database using the delete() method.
Exercise 2.14: Using the delete() Method
An existing record in the database can be deleted using the delete() method. In this exercise, you will delete a record from the contributors table that has the value of last_name as Wharton:
- Fetch the object using the
getmethod and use thedeletemethod as shown here:>>> from reviews.models import Contributor >>> Contributor.objects.get(last_names='Wharton').delete() (1, {'reviews.BookContributor': 0, 'reviews.Contributor': 1})Notice that you called the
delete()method without assigning thecontributorobject to a variable. Since theget()method returns a single object, you can access the object's method without actually creating a variable for it. - Verify the
contributorobject withlast_nameas'Wharton'has been deleted:>>> Contributor.objects.get(last_names='Wharton') Traceback (most recent call last): File "<console>", line 1, in <module> File "/../site-packages/django/db/models/manager.py", line 82, in manager_method return getattr(self.get_queryset(), name)(*args, **kwargs) File "/../site-packages/django/db/models/query.py", line 417, in get self.model._meta.object_name reviews.models.Contributor.DoesNotExist: Contributor matching query does not exist.
As you can see upon running the query, we got an object does not exist error. This is expected since the record has been deleted. In this exercise, we learned how to use the delete method to delete a record from the database.
Activity 2.01: Create Models for a Project Management Application
Imagine you are developing a project management application called Juggler. Juggler is an application that can track multiple projects, and each project can have multiple tasks associated with it. The following steps will help you complete this activity:
- Using the techniques we have learned so far, create a Django project called
juggler. - Create a Django app called
projectp. - Add the app projects in the
juggler/settings.pyfile. - Create two related model classes called
ProjectandTaskinprojectp/models.py. - Create migration scripts and migrate the models' definitions to the database.
- Open the Django shell now and import the models.
- Populate the database with an example and write a query displaying the list of tasks associated with a given project.
Note
The solution to this activity can be found at http://packt.live/2Nh1NTJ.
Populating the Bookr Project's Database
Although we know how to create database records for the project, in the next few chapters, we will have to create a lot of records to work with the project. For that reason, we have created a script that can make things easy for us. This script populates the database by reading a .csv (Comma-Separated Values) file consisting of many records. Follow the next few steps to populate the project's database:
- Create the following folder structure inside the project directory:
bookr/reviews/management/commands/
- Copy the
loadcsv.pyfile from the following location andWebDevWithDjangoData.csvinto the folder created. This can be found on the GitHub repository for this book at http://packt.live/3pvbCLM.Because
loadcsv.pyis placed inside themanagement/commandsfolder, now it works like a Django custom management command. You can go through theloadcsv.pyfile and read more about writing Django custom management commands at this link: https://docs.djangoproject.com/en/3.0/howto/custom-management-commands/. - Now let's recreate a fresh database. Delete your SQL database file present in the project folder:
rm reviews/db.sqlite3
- To create a fresh database again, execute the Django
migratecommand:python manage.py migrate
Now you can see the newly created
db.sqlite3file under thereviewsfolder. - Execute the custom management command
loadcsvto populate the database:python manage.py loadcsv --csv reviews/management/commands/WebDevWithDjangoData.csv
- Using DB Browser for SQLite, verify that all the tables created by the
bookrproject are populated.
Summary
In this chapter, we learned about some basic database concepts and their importance in application development. We used a free database visualization tool, DB Browser for SQLite, to understand what database tables and fields are, how records are stored in a database, and further performed some basic CRUD operations on the database using simple SQL queries.
We then learned how Django provides a valuable abstraction layer called ORM that helps us interact seamlessly with relational databases using simple Python code, without having to compose SQL commands. As a part of ORM, we learned about Django models, migrations, and how they help propagate the changes to the Django models in the database.
We shored up our knowledge of databases by learning about database relationships, and their key types, in relational databases. We also worked with the Django shell, where we used Python code to perform the same CRUD queries we performed earlier using SQL. Later, we learned how to retrieve our data in a more refined manner using pattern matching and field lookups. As we learned these concepts, we made considerable progress on our Bookr application as well. We created models for our reviews app and gained all the skills we need to interact with the data stored inside the app's database. In the next chapter, we will learn how to create Django views, URL routing, and templates.