


Getting Started with 3D Printing and SketchUp
3D printing is an amazing technology that allows you to take things directly from your imagination and make them into real items that you can hold in your hand. 3D printing has been around long enough that I believe we can skip over the history of the subject or listing out the reasons you might want to print something. In this book, we will assume that you have access to a 3D printer and have a reason to print. Alongside that, based on the title of this book, we will also assume that you want to use SketchUp to get your 3D print created.
There are a few steps between imagining an item and finally making it exist in the real world, however. In this first chapter, we will look at the multiple steps involved in creating a successful 3D print and where SketchUp plays a part in this process. Once we’ve covered the basic workflow, we will dive into a few details and see some examples of SketchUp being used to create or prepare various files for 3D printing. Once you’ve completed this chapter, you will know exactly where SketchUp can be used as a useful tool in your 3D printing software tool kit!
In this chapter, we will cover these main topics:
- Understanding where SketchUp fits in the 3D printing workflow
- Knowing what SketchUp can produce
- Using SketchUp as a creation tool
- Using SketchUp as an editor
- Using SketchUp as a repair tool
Understanding where SketchUp fits in the 3D printing workflow
3D printing is not a simple process of just pushing the “Print” button on your 3D printer and sitting back and waiting for the print to finish. To get your printer started on a print, you first have to create the geometry that will make up that print. This file then has to be made into a format that your printer will understand. Telling your printer to start printing the file is actually one of the final steps in the 3D printing workflow.
To understand where SketchUp fits into this workflow, let’s take a look at the whole thing, step by step, from idea to final print. I think that the easiest way to visualize this workflow is shown in Figure 1.1:
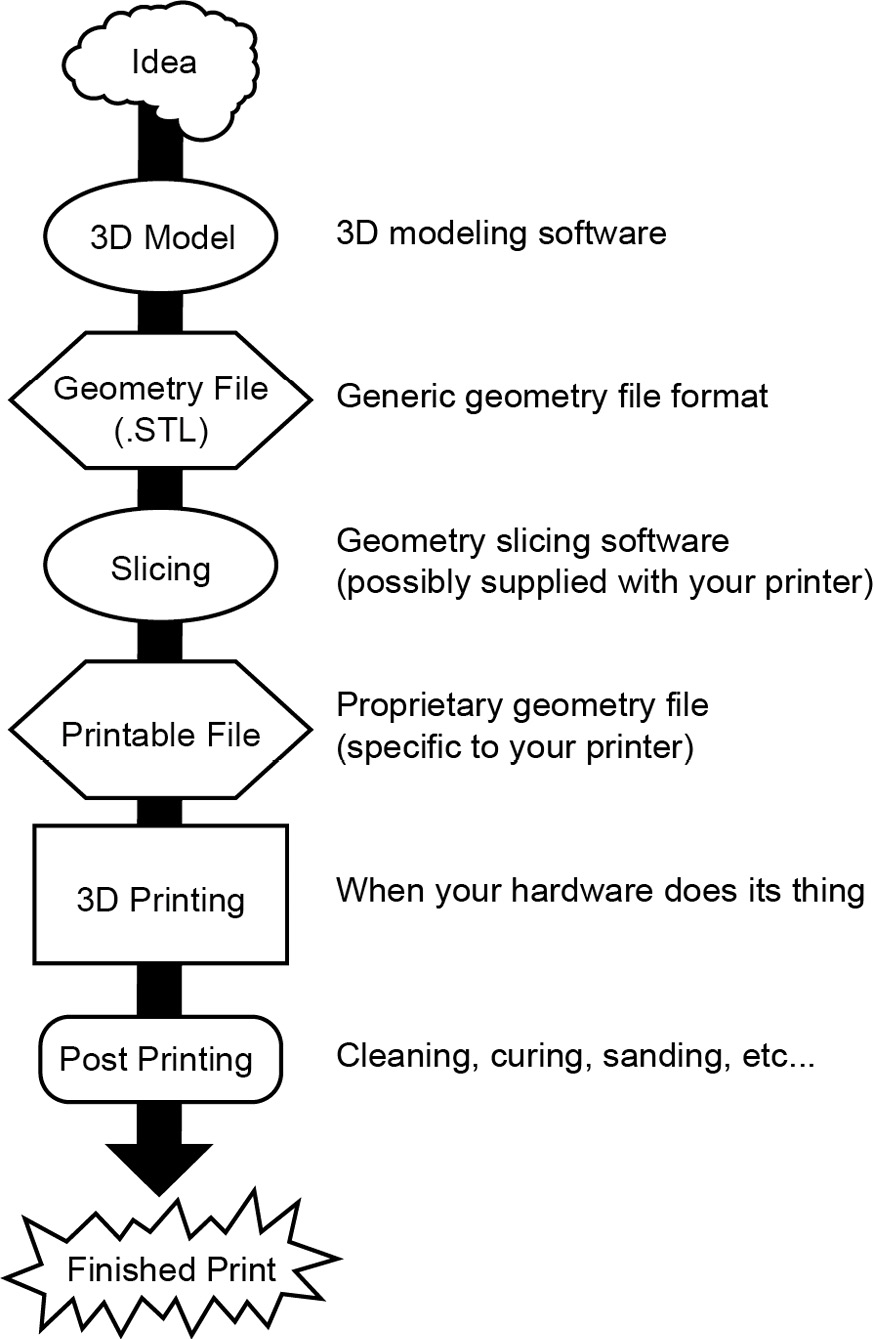
Figure 1.1 – Brief 3D printing workflow overview
While this is a general overview and may miss a specific step or two from your final workflow, this does cover the basics. To see exactly where SketchUp fits into this workflow, let me walk you through the process with an actual 3D print project:
- Idea – This is where it all starts. Whether it is the need to replace a broken knob on your stove, create a piece for a board game, or bring a piece of art into the world, the first step is identifying what you want to create. I decided that I wanted to create a tiny coffee cup. Often, in the afternoon, my wife will ask for a cup of coffee. Since she does not want to be kept up at night, she will ask if I can make her a cup of “baby caffeine” coffee, which is made with mostly decaf coffee grounds and a little bit of regular. Next time she asks for this, I will pour her some coffee in a baby coffee cup!
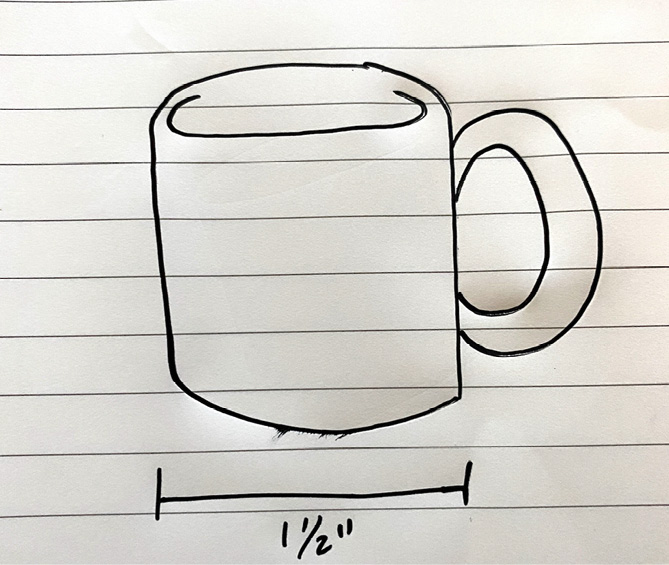
Figure 1.2 – A hand drawing of my idea
- 3D Model – The next step is turning your idea into a 3D model. In some cases, this may mean finding an existing model to use as a starting point, while in other cases, it may mean starting from scratch. Regardless, you will need to create a three-dimensional representation of the thing that you want to print. This step is where SketchUp comes into play. In SketchUp, I can create a 3D model of the baby coffee cup. Any details I want in this print are included in the model and the final model will be at the proper scale.
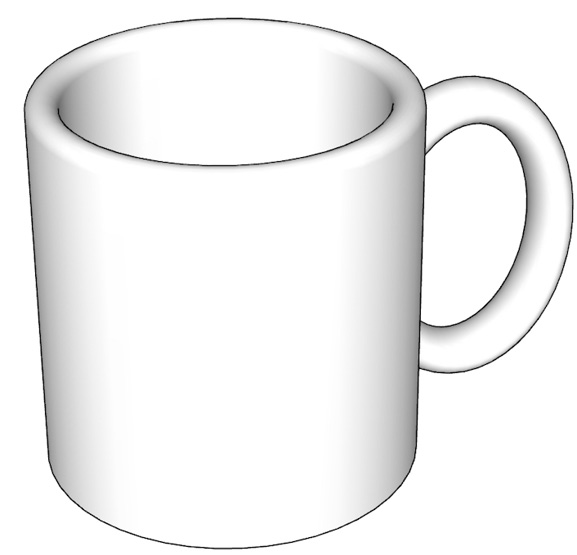
Figure 1.3 – A 3D model of my baby coffee cup
- Geometry file – While there are multiple file formats that can contain 3D geometry, most 3D prints end up, sooner or later, as a
.stlfile. This type of file contains simple information about 3D geometry, breaking it down into a bunch of connected triangles and showing where they exist in relation to each other. Once I completed my model in SketchUp, I exported it as a.stlfile. In Figure 1.4, you can see that saving my coffee cup as a.stlfile revealed all the triangular surfaces used to make up the smooth surfaces:

Figure 1.4 – The original SketchUp model on the left, the .stl file geometry on the right
- Slicing – Now that the geometry is in a format that any program can read, it needs to be broken down into layers of 2D geometry that the printer will be able to create. Whether this file will end up being printed on an FDM or SLA printer, it will need to be sliced so that the printer can create the model one layer at a time. For my print, I used ChituBox to prepare my model (angling the model from the build plate, adding supports, and slicing for the printer). In the following figure, you can see the file that will be sent to the printer:
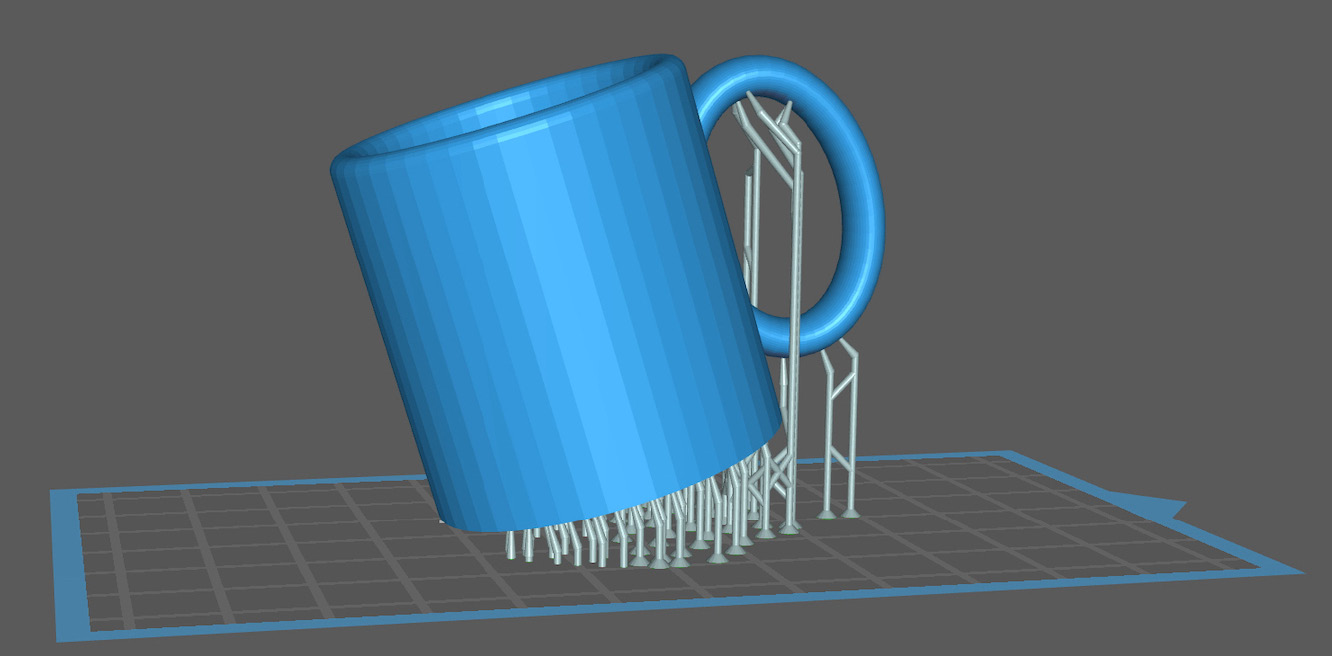
Figure 1.5 – My baby coffee cup design, sliced and supported
- Printable file – Once the slicing software is done, it will export a file that can be read by the 3D printer. This file may be in a proprietary format (specific to the printer). Often, 3D printer users will use the slicing software that came with the printer, while others may use third-party software. This is largely a personal choice. The important part is that you end up with the files that will tell the printer what to print. In my case, as I am printing to an Elegoo printer, which reads ChituBox files, I exported a
.ctbfile format onto a USB drive. - 3D Printing – Once the file is exported, it needs to find its way to the printer. This may happen via a USB cable, a flash drive, or over Wi-Fi. Once the file is on the printer, the magic happens. Well, it is actually less “magic” and more “waiting to see if the printer will print the whole thing without hitting any issues.” This step is the part that you see in all the YouTube videos about 3D printing. This is where you get to see your idea come to life! With this step, my baby coffee cup has come to life!
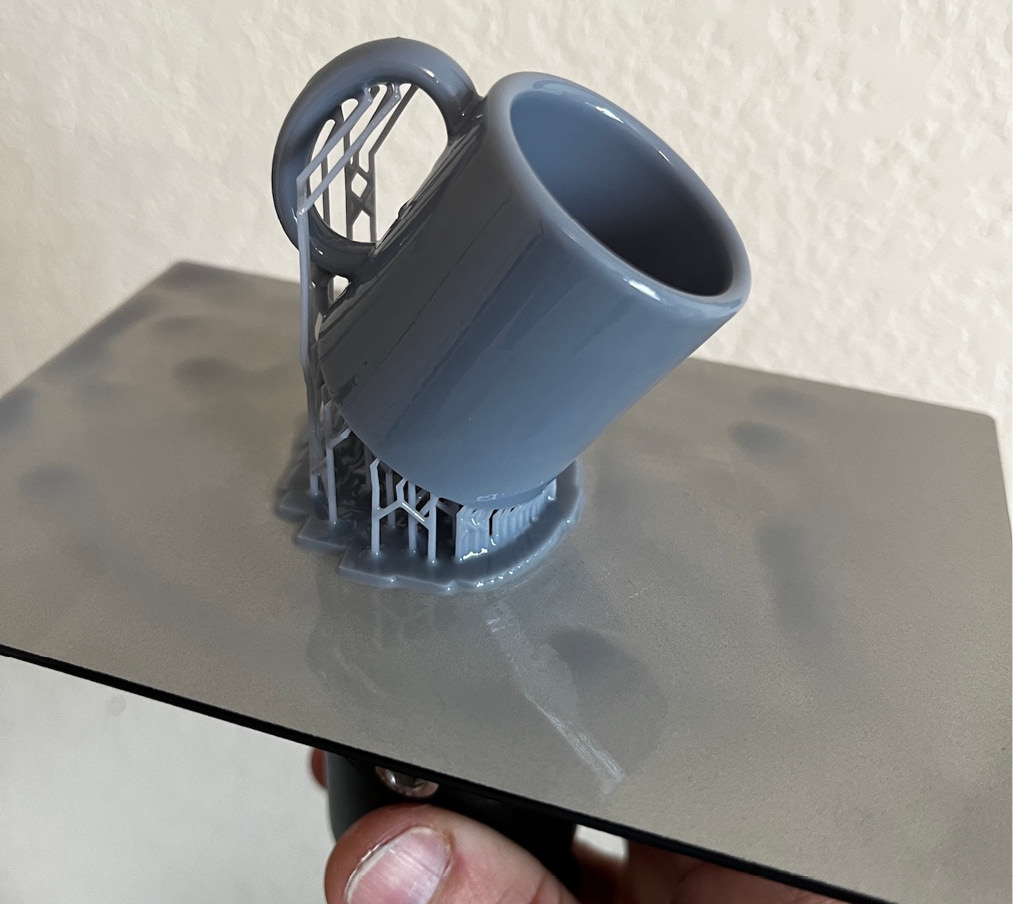
Figure 1.6 – The baby coffee cup exists!
- Post printing – I mention this step only because I am a realist. 3D printers are great in their ability to create real geometry from nothing. Fused plastic or cured resin turns our ideas into actual matter, which is awesome. Before you are done, however, you do have to clip support material, sand, and polish. There may even be some curing and painting before your vision is finally realized. For my project, this meant removing the supports, washing the cup in alcohol, curing the model in UV, then some light sanding and painting.
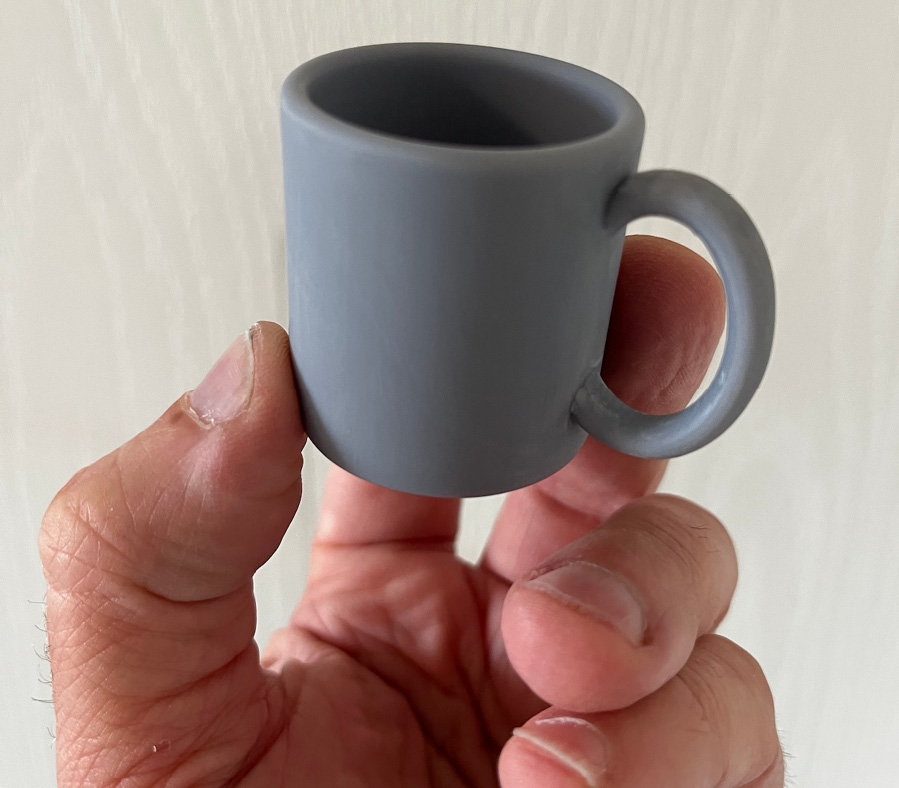
Figure 1.7 – This is my baby coffee cup, ready for paint
- Finished Print – Eight simple steps later, you are holding your idea in your hand! My baby coffee cup is ready for my wife’s next order of a “baby caffeine” afternoon coffee!
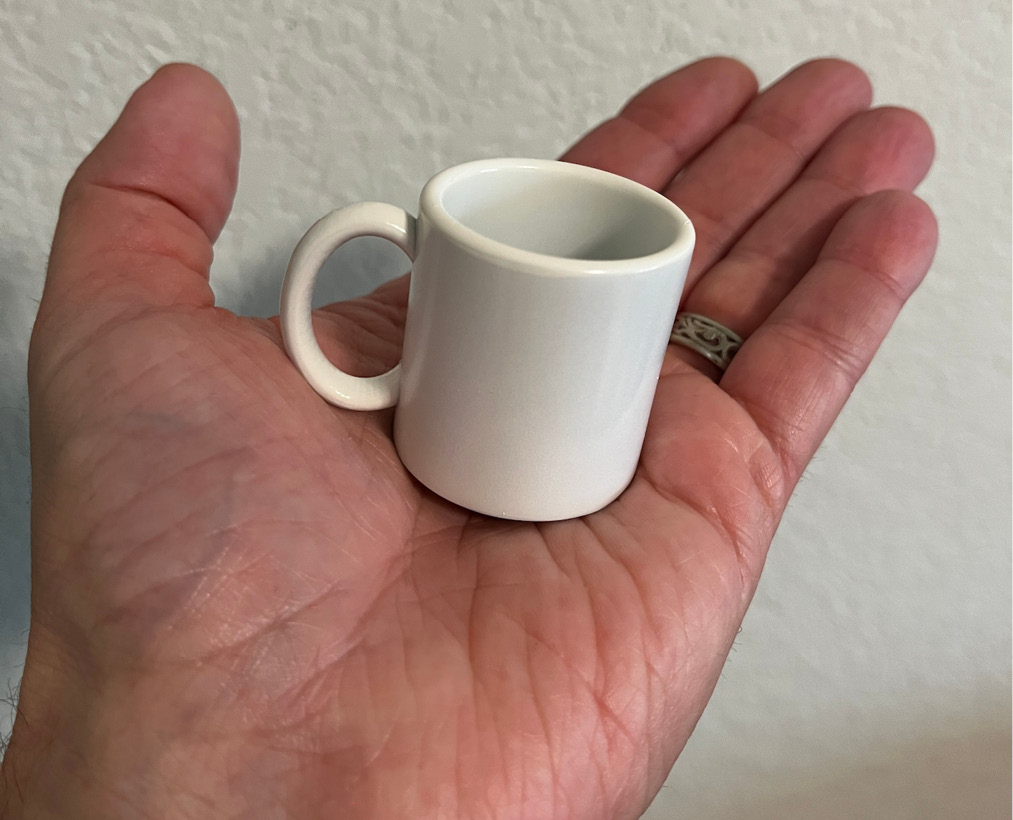
Figure 1.8 – The final print, painted and ready for use
When you step back and look at the steps, you will realize that there are quite a few of them. SketchUp will help you with two specific and very important steps. While all of these steps are necessary, the one that we will be focusing on in this book is the creation of 3D geometry and export of the .stl file.
Now that we are familiar with the broad strokes, let’s dive deeper into the creation of a brand-new 3D model and a .stl file in the next section.
Knowing what SketchUp can produce
SketchUp is well known for being great software for creating 3D models. Users enjoy how easy it is to learn and how quickly they can generate 3D models of their ideas. SketchUp is used in dozens of industries, from architecture to product design, and has a large group of 3D printing enthusiasts using it for professional and hobby printing.
The most important point to understand is exactly what SketchUp can and cannot create. As we discussed in the Understanding where SketchUp fits in section, the 3D printing workflow is a process that includes multiple software packages and file formats. While it would be great if SketchUp could be the all-encompassing software, allowing you to go from an idea to a 3D print in one place, it just is not possible. Since different printers require different proprietary file formats, and users want different capabilities in their slicing software, it is impossible to cover the entire workflow with one software.
Despite the need for multiple pieces of software, SketchUp takes the most important step in this workflow in the creation of the 3D model. Based on the 3D printing hardware you own or have access to, you may be required to use one specific slicing software or to choose a specific software based on your own experience. Regardless, you can use SketchUp to create the initial 3D model and export the geometry file (.stl) that will be used by the slicing software.
There are also other ways to create 3D models for printing. In fact, there are probably dozens of software packages on the market right now that can create a 3D model and export it as a .stl file. All of them have strengths and weaknesses, and many excel at the creation of one type of geometry or another. Since this book is about 3D printing with SketchUp, let’s focus on the advantages of using SketchUp in our 3D printing workflow and the types of modeling best suited to SketchUp.
Advantages of using SketchUp
Let’s start by looking at the attributes of SketchUp that make it a great solution for creating 3D print-ready models:
- Easy to learn – SketchUp is very intuitive software. When you consider that most of the tens of millions of SketchUp users around the world are self-taught, you realize how quickly one can learn to use SketchUp.
- Powerful – Despite being easy to learn, SketchUp is extremely powerful. Not only is it a favorite among hobbyists, it is also a tool used in professional settings across the globe.
- Multiple versions – SketchUp offers multiple versions for different uses and budgets. SketchUp Free, SketchUp Go, or SketchUp Pro can be used to create 3D models that can be used for 3D printing. Whatever your budget is for software, there is a SketchUp version that should work for you.
- .Stl support – SketchUp natively supports the creation and editing of
.stlfiles. This is the primary file format used to pass geometry around in the world of 3D printing. - Multiple file formats – In addition to
.stlfiles, SketchUp supports a dozen of other file formats. While not all of these are regularly used to import or export 3D geometry, many of the common formats (such as.dxf,.obj, or.daefiles) are available.
There are quite a few options out there when it comes to 3D modeling software that can be used to create a file for 3D printing. When given this list, however, you can see why so many people end up using SketchUp as a part of their 3D printing workflow!
Model types ideal for SketchUp
While SketchUp is a commonly used tool in the realm of modeling for 3D printing, it is not perfect for everything that you might want to 3D print. Like other 3D modeling software, there are types of geometry that it excels at. SketchUp works best when modeling these types of geometry:
- Hard-sided modeling – SketchUp was originally created to be an architectural modeling software. As a result, many of the native tools and capabilities work great for creating hard-sided geometry (as opposed to more organic modeling). Things such as models of buildings or parts defined by distinct geometric shapes are easy to model in SketchUp.
This does not mean that organic or flowing shapes cannot be created. SketchUp can absolutely make these sorts of shapes but, in some instances, may require additional software in the form of an extension to do so.
- Scaled models – SketchUp has great tools in place that will allow you to work on a model at two scales. This is a great option to have if you are modeling something that exists in the real world but will need to be printed on a smaller scale.
For example, if you wanted to model the house you live in and print out a version that could sit on your desk, you would want to model it using dimensions that you could take from the real house. You could then use SketchUp to scale the model down so that it is only 4” long. The nice part is that scaling does not have to be done after you have finished modeling full size, but can instead be part of the modeling process from the start.
- Multi-part models – Another thing that SketchUp allows you to do in real time is to break your model into smaller pieces while you are modeling. If the model you are printing is bigger than what will fit on your printer, you can use SketchUp to break it into smaller pieces and include mechanical connections between the two pieces in the working model.
Hopefully, you can see that SketchUp is a great tool for working with 3D geometry for printing. Now let’s dive into the different ways you can use SketchUp to create print-ready models.
Using SketchUp as a creation tool
My primary use of SketchUp for 3D printing has been as a tool to create geometry for printing from scratch. I have created many prints from SketchUp models, and most of the time I was working from an idea or basic drawing to create the model that ended up being printed. In these cases, I get to use SketchUp starting from an empty file and start modeling the geometry that I want to print, as I see it in my mind.
As an example, let me show you my haunted house model. This model was created as a prop for a children’s book (I never got around to finishing) and was modeled completely from my imagination:

Figure 1.9 – My haunted house model in SketchUp
When I created this, I was able to start with basic shapes in SketchUp (literally a bunch of boxes) that I could push around until I found the right shape for the house. Once the general layout was created, I broke the whole thing down into pieces.
Since I knew that I wanted to print this fairly big (around 6” wide), I knew that I could not print it as a single piece. The printer I was using at the time (an Elegoo Mars) had a build volume of 4.7” x 2.6” x 6.1”. This was limiting, but I knew that I could break this house down into pieces that would fit. Additionally, I wanted to print this house hollow. In the end, it would be large enough that I would need an entire bottle of resin if I were to print it solid. To achieve all of this, I broke up the model as if it were a model kit.

Figure 1.10 – Exploded view of the haunted house pieces
These pieces could be printed, in some cases multiple pieces in a single run, and glued together. There was some learning on my part regarding how to best orient these rather thin and long chunks of geometry so that they would print well. In the end, I got my process dialed and was able to get all the pieces printed and assembled.

Figure 1.11 – The final print, assembled and painted
I allowed myself to create something that I had no actual reference for, other than an image in my head. Additionally, with SketchUp I was able to break the house down into printable pieces and experiment with geometry, until I found the ideal pieces to print.
While working from scratch is great, there are times that you may be working from an existing geometry. Fortunately, SketchUp makes that easy to do as well, as we will see in the next section.
Using SketchUp as an editor
One of the most amazing things about the 3D printing community is the members’ willingness to share their printable creations. In some cases, you may purchase models from a creator or a company, or even use online tools to generate models of things, such as characters for games. In other cases, you may be able to download shared models for free and print them right away.
Depending on the model you download and your specific use for the print, you may want to make a change to the geometry before printing. This may be as simple as changing the size of the model but may be more involved, such as adding a figure to a custom base, or adding or removing geometry so that the model can serve a specific purpose in the real world.
Resizing models in the slicer
Every single slicing program I have used has had the option to set the scale of the imported geometry. This works just fine if you want to make it a little bigger or a little smaller, or if you need to scale to get your model to fit on the build plate. Where this can fall short, however, is if you want the model to be a specific height or length.
Take, for example, this ghost print. I printed a copy, but the bottom of the print did not sit flat. To fix this, I decided to add a base. I started by importing the .stl file in to SketchUp.
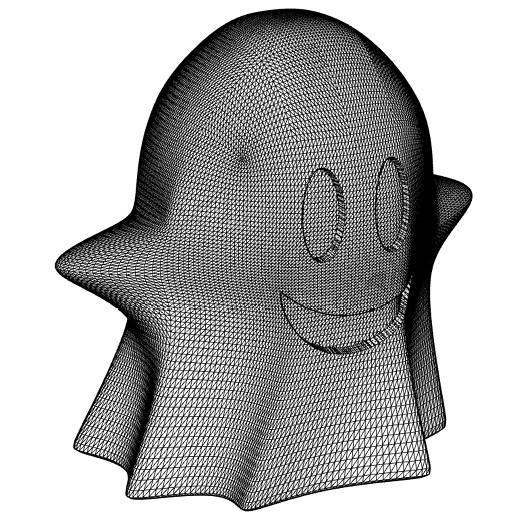
Figure 1.12 – Imported .stl ghost mesh
Once the mesh was imported, I modeled a quick circular base in SketchUp and merged the two pieces together. This created a new model that I could print that I know will sit flat on my desk.

Figure 1.13 – The imported ghost mesh merged with the new base geometry
Edits to imported models can be much more extensive and can include things such as breaking models into smaller, printable chunks or adding mechanical connection points between pieces. Basically, if you have a .stl file of a model and want to change anything about it, then you can make those changes in SketchUp.
Occasionally, you will have an issue with a model that just needs to be fixed, as opposed to any kind of edits. Let’s talk about repairing geometry in the next section.
Using SketchUp as a repair tool
At times, you may come across a 3D model that your slicing software will not accept. While it would be great to think that a 3D model would be ready to print any time anyone created and shared it, this is just not always the case. It is not too hard to find examples of a .stl file that is missing faces from the mesh, or a 3D model that is completely the wrong size.
While it is easy to have a “plenty of fish in the sea” mentality and throw out these models and go look for alternatives, there are situations where you may have found the perfect file for your needs, but you just cannot get it to print. In that case, you may want to try importing the model into SketchUp and see if you can take care of the problems, manually.
Fixing it in the slicing program
It should be noted that many slicing programs out there have some repair options built into them. In some cases (such as a single missing face in the mesh), a fix might be as simple as clicking a button and letting the slicer fill in the gap. In many cases that I have seen, however, these repair tools are very basic and cannot fix anything but the most basic of issues.
I have this .stl file of a dog model that I want to print for a friend:

Figure 1.14 – A .stl file that looks good from a distance
The model looks good, but when I take it into my slicer it ends up looking weird. The problem is that there are holes in the mesh, and my slicer can’t seem to be able to figure out how to fix the problem.
Using SketchUp, I can spin the model around quickly in 3D and zoom in on the mesh to see if I can identify any holes (I can even use a few different tools or extensions to help speed up the process, but we will get into them in Chapter 7, Importing and Modifying Existing 3D Models). In this specific example, if I orbit around the dog and take a look at the bottom of his front foot, I will see an issue.
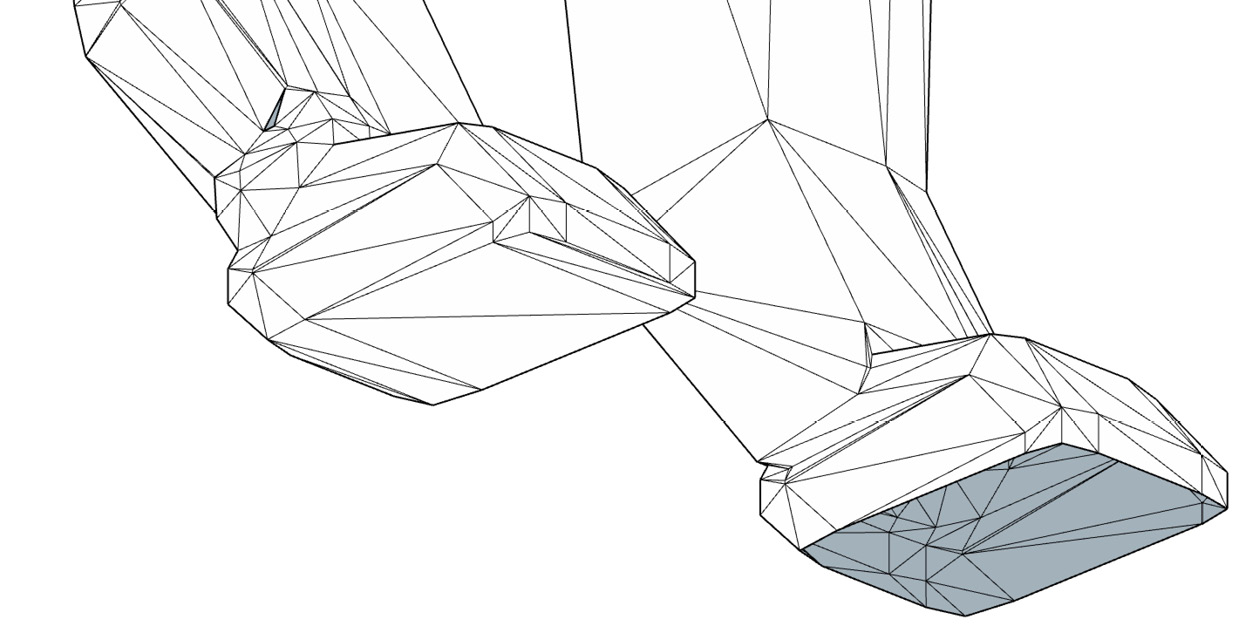
Figure 1.15 – Faces missing from the bottom of the dog’s foot
This is very easy to fix but, once it’s repaired, there is still an issue with this mesh. If I continue to explore the file, I find that the dog’s other front foot is missing a tiny little triangle.
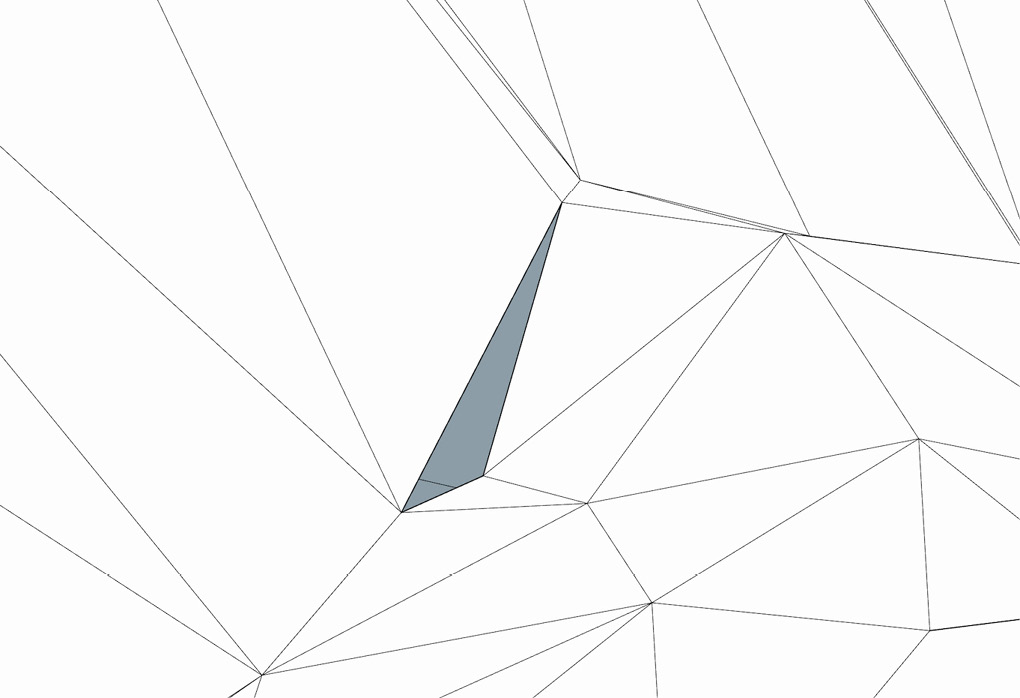
Figure 1.16 – One more missing face in the mesh
Once I use SketchUp to create some very basic geometry to fill the holes, I can export a new .stl file and send it off to my slicer to get it ready for printing.
Summary
Hopefully, this chapter gave you a good idea of what the entire 3D modeling and printing workflow looks like and where SketchUp fits in. You should now know what sort of modeling can be produced with SketchUp and have at least an idea of how it can be used to create models from scratch, edit existing models, and can be used as a repair tool.
I believe that the best way to learn to use a tool such as SketchUp is to use it, so we will spend quite a bit of time modeling and editing models in SketchUp. Before we do that, however, let’s talk about which version of SketchUp you should use and some ways to get your SketchUp ready to create print-ready models in Chapter 2, Setting Up Your SketchUp Environment for 3D Printing.