


In this chapter, we will cover the following recipes:
3D scanning with a digital camera
Processing a 3D scan with 123D Catch
Viewing your scene with 123D Catch
Stitching photos with 123D Catch
Changing mesh resolutions with 123D Catch
Cleaning up the model with 123D Catch
Using the Autodesk 3D Print Utility
Slicing the models with Slic3r
Slicing the models with Skeinforge
3D printing is an amazing technology for creating physical objects from a digital design. However, for many of us the digital fabrication of our idea is the most difficult aspect of the process. 3D modeling programs generally have a steep learning curve and for the inexperienced, the journey required for building the necessary skills can become a time consuming endeavor. One simple solution is to 3D scan an existing object.
We'll learn how the 3D scanning process works by scanning some common objects. Almost any object can be chosen, irrespective of whether the object can be handheld or is the size of a house. We'll learn how to make a model from a 3D scan that's suitable for printing. It's the perfect solution for creating some models that we can use as learning examples in the course of this book.
We'll also be introduced to a variety of software options that will help us improve our 3D scans for printing. They will become important components in our toolbox for making repairs of surface imperfections and modifying the integrity of the model's mesh, for optimal printing.
At the close of the next few chapters, we'll continue using these models for testing purposes, when we focus more on the mechanics of 3D printing. Each of these models will introduce different challenges in the 3D printing process and in turn, give us an opportunity to explore solutions for solving difficult printing issues.
The 123D Catch scanning process requires the use of an ordinary digital camera to take a series of 40 or more photographs while moving around an object. Virtually, any stationary object can be chosen, provided that you have a complete 360-degree unobstructed view around the object, and it can be photographed with good lighting.
For the following recipes to be more useful as a learning exercise, it will be helpful if you find objects that are similar to the ones shown in the following image:

The following are the specifications of the objects shown in the preceding image:
A coin measuring 30 mm across (any small object with very fine surface details)
A toy block measuring 60 x 30 x 55 mm (any basic geometric form with solid walls and some curves)
A statue measuring 68 cm high (any human form that is squatting or kneeling would be best)
A monument measuring 4 m high (any simple object that tapers towards the top with minimal obtrusions)
It is important to choose objects that do not contain protrusions, which span far out from the object, such as the outspread arms of a standing figure. It's also best to avoid large recesses or holes. Simplicity of the object's form is best when making your choice.
Acquiring objects with a variety of sizes and complexities, similar to the preceding examples, will help us test the basic capabilities of 123D Catch. They will also help us test different problems in the 3D printing process.
For this recipe, you'll need a digital camera with a good focus and exposure control. You'll also need the four objects that you have selected for scanning. For smaller objects, a flat surface such as a tabletop is required.

Prepare your work surface for the smaller objects. Try to avoid a shiny surface where there can be a lot of reflection. If possible, mask out a work area with a sheet of newspaper. This will provide a dull surface. For all of the objects, make sure there is consistent illumination. Don't use flash! If you are photographing outside, an overcast day or shade is preferable rather than the harsh lighting of direct sunlight, which can create deep shadows.
We will proceed as follows:
With the smaller objects, place them at the center of your work surface.
Position the camera at about a 45-degree angle, looking down on the model.
When photographing the large objects, position the camera as high as possible and place the object at the center of the picture frame, keeping the background detail behind the object in focus.
Take a photograph and continue to move around the object, taking photographs every 18 degrees or so. You'll need to move completely around the object. By the time you circle the object and reach your starting point, you should have about 20 evenly spaced photos.

Position the camera lower this time, almost at eye level with the object. Repeat the process by taking another 20 shots at this angle.

Save the series of photographs for each object in its own folder.
When we photograph smaller objects, the camera's depth of field is short, and this will generally produce a blurred background. It's good to have an initial series of photographs that retains the sharp detail around the object. By placing a smaller object on a newspaper, the printed lines will act as registration points and help in sequencing all of the photos in proper order. With the larger objects, the camera's depth of field will generally be longer, and the background will be in focus, providing enough background information for registration. Moving around the object twice and photographing with high and low angles will help record more detail of the object's form.
Sometimes, when photographing an object, there can be a glare on the surface from a light source that is improperly angled or is too close to the object. If possible, adjust the object or the light source to remove the glare. Sometimes, a shiny surface will have reflections, which can cause distortion. The following are several solutions that can be implemented:
Use light that has been softened with photographic diffusion gels or umbrellas.
Apply a dulling spray to the object. This can be purchased at many craft stores.
Coat the model in a water-soluble tempera paint that can be washed off when you are finished. This will flatten out the object's sheen.
In this case, the toy block was reflecting too much of its surroundings. 123D Catch interpolated the reflections as holes. By painting the block grey, the block was properly modeled, shown as follows:

With the series of photographs that we took of our objects, we'll use 123D Catch to merge them together to make a three-dimensional scene.
You'll need to visit the Autodesk website at http://www.123dapp.com/catch. Here, you will be able to download the application for use on a PC, or use the web app if you're using a Mac or Linux OS. A free account will need to be set up with Autodesk, or you can use your social networking account, such as Facebook, to log in.
Note
This book uses 123D Catch v2.3.3. It's also available for use on iPads and iPhones. These applications will have a different approach than what is outlined in this recipe, but the concepts are the same.
You'll also need the folder containing the series of photographs of your objects.
Connect to the Internet, open 123D Catch, and sign in to the Autodesk server, if necessary. Proceed as follows:
Select the top-left button, Create a New Capture. The Select Photos window will open, allowing you to find the directory containing the folder with your photos. Select all the
.jpgfiles that create your scan, and click on Open.At the upper-left side, you should see a large, green, check-mark button. Under this, the total count of photos should be selected for upload. Click on Create Project.
Initially, you'll see a pop-up window asking for a quick registration and your e-mail. Fill this out and click on Send.
Next, you'll be given an option to tag, categorize, and provide a description of your object before uploading it to the Autodesk cloud for processing. These fields must be filled in, or the upload will not complete.
Now, the photos can be uploaded. You'll be given a choice to wait for your scene to be compiled, or you can have the results e-mailed. For this recipe, choose the e-mail option. Processing can take up to 45 minutes or more.
Repeat these steps for each of the four objects that you have photographed.
A photograph is basically a flat two-dimensional record of a three-dimensional space. It contains most of the information of this three-dimensional space, except for the data needed to provide information about its depth. By taking more photographs, we supply more information. When we took a series of photographs around our object, we not only recorded the shapes, colors, and textures, but also mapped out a three-dimensional scene.
When the photo files are uploaded to the Autodesk servers, their system begins the tedious process of correlating all the images together. It first determines the camera position and aiming angles of each photograph and then uses a system of triangulation to map out the space. It then creates a 3D mesh of your scene from this information.
In this recipe, we will cover some of the basic operations of 123D Catch. These include operations such as loading a scene and navigation.
You'll need a processed 3D scene of your object. Autodesk will e-mail you with a notification that your capture has been successful. A link will be provided to download the Photo Scene data file (.3dp). The filename will start with the word Capture, the date it was created, and a series of numbers. Create a new folder and download the file into it.
Open 123D Catch and proceed as follows:
Select the middle-left button, Open an Existing Capture. From the Select the project to open window, find the directory containing the folder with your Photo Scene data file. Select the file and click on Open. The workspace appears, and Autodesk loads the project files. This takes several minutes. When the scene appears, it should look similar to following screenshot:

At the center of the workspace, we see the object that we scanned and the area that surrounds it. This is the content of the 3D scene. A series of cameras connected by a line surround the model. This shows the chronology of the photos taken. Below the workspace is a thumbnail strip containing the photos you took. Click on Animation Path at the top of the first thumbnail. From the drop-down menu, choose Create default animation path.

The camera track of the scene is now highlighted, as shown in the preceding screenshot. A new thumbnail series also appears. These are the keyframes of the animation. To play, click on the arrow pointing to the right, and to stop, click on the square icon.
Let's return to the global view. We'll do this by pressing Space bar twice.
We can view the individual thumbnails by scrolling along the bottom. Each thumbnail will be highlighted if we hover over it. Select a thumbnail by left- clicking on it. The photo will now be in view.
To return to the global view, press Space bar once. The view will show the particular camera within the chronology track (which took the selected thumbnail) highlighted in green.
When you opened the Photo Scene data file, two things happened. First, there were additions made to the folder where the .3dp file is stored; photos that comprised your scene were added, and another folder was created with the same name as your .3dp file (this folder contains two Autodesk files that we should not touch). Secondly, the scene was loaded on your workspace.
This scene includes a visual track of the movements you made when photographing your object. This enables a convenient review of the photos for the purpose of editing or fixing stitching problems that may occur. Stitching is the term that 123D Catch uses for describing the correlation of photos in a sequence. We'll examine stitching in greater detail in the next recipe.
Stitching is the correlation of the photos you took of your object. It aligns the photos to each other to make a proper sequence. Sometimes, the Autodesk server will have a difficult time choosing the proper photo for stitching; it will either discard the photo from the sequence or choose the wrong placement of a photo. These problems can be fixed by manually stitching the photos. In this recipe, we'll learn how to do this.
Hopefully, you don't have any stitching problems with the four objects you scanned, but we will need a photo sequence with stitching problems for this recipe. There's an easy way to illustrate the repair of unstitched photos, even with a good processed scan. Choose one of your Photo Scene data files for the following recipe, and make a copy of the folder and all of its contents. Use the copy for this recipe.
Open 123D Catch and sign in. Open an existing capture and proceed as follows:
Choose a photo from the thumbnail strip at the bottom. Right-click on it, and choose Unstitch Photo from the pop up. As shown in the following screenshot, the thumbnail darkens with an embedded yellow warning symbol:

The photo sequence now has an unstitched photo. To repair it, double-click on the darkened photo. A new window opens, as shown in the following screenshot:

At the bottom-left side, the Manual Stitch window outlines the basic procedure in three steps. Review these steps before continuing.
The first step is to choose the best photos to align. 123D Catch chose two photos, and they are displayed on the right-hand side of the window. We can keep these or change them by scrolling through the thumbnails by clicking on the arrows.
For the second step, we need to choose a point on the unstitched photo that correlates with the same exact point on the other two photos. Left- click and hold on the point. A magnifier opens, giving us a better definition of the immediate area. This is illustrated in the following screenshot:

Release the mouse when you determine your point. A yellow marker appears. If you're not happy with your choice, right-click on the yellow marker and choose Delete Point in Image from the pop up.
On the photo in the top-right corner of the window, repeat the selection for the proper correlation point. When the point is accepted, a suggested point will be automatically made on the third photo in the bottom-right corner. Instead of a circle registration point, it will be a square. Left-click on it and hold to determine if it's correct. If it is, release the mouse. When all the points are accepted, they will turn green.
For the third step, repeat the first and second steps until all the four matched points are made. Your project should look similar to the following screenshot:

When all the four points are matched, a pop up will appear and prompt you to update your scene. Choose Submit. Another pop up will appear and prompt you with a Continue option. The processing must take place at the Autodesk server. This requires the upload of the changes and a wait time. When the processing of the scene is finished, a new file will be returned.
For our recipe, we intentionally unstitched a photo from our sequence. This gave us a situation to repair it using manual stitching. Sometimes, we may find that it's important to unstitch a photo that has been incorrectly processed by the Autodesk server. This can occur when similar sides, such as the sides of a cube, are confused in the interpolation of the scene and an erratic camera track is produced. Sometimes, unstitching a photo out of sequence and restitching it where it belongs will solve the problem.
There are situations when the incorrect exposure or focus of an image is undesirable. This can be the case when the output is for export as an animation. By unstitching the problematic photo, the result will be better.
There are three different mesh resolutions available for our scene. The program's default setting produces a low-resolution draft. In this recipe, we will learn how to change the mesh resolutions of our scene for higher quality.
It is good practice to make a backup of your folder containing the Photo Scene data files and photos. Keep all the backups of the originals together in a folder. In the following recipe, multiple resolutions will be generated for each scene. Keeping all of your data files organized is very important!
Open 123D Catch and sign in. Open an existing capture and proceed as follows:
-
Click on the Generate Mesh icon [
 ] on the toolbar. A window opens, giving us three choices for the output quality of our mesh. Let's begin by choosing Mobile.
A new window will open, informing us that the scene will now close. Click on OK.
A Create New Capture window will open. Here, you can rename your model. It is a good idea to attach a tag to designate that it's a mobile mesh, as we'll be experimenting with all three mesh resolutions for all the four models. When you have renamed the model, choose the e-mail notification for processing it.
Repeat the preceding procedure, and save the model as a Standard and Maximum resolution file. Keep in mind that Autodesk will close your window each time after you request a resolution update. You will have to reload your initial scene for each save.
Repeat these steps for the remaining scenes.
When Autodesk first processed your photos, it generated a very low-resolution draft of your scene. This draft is just a little lower in resolution than a Mobile resolution export. The following chart compares the resolution of a typical scene saved in all three resolutions:

We would typically assume that picking the highest resolution would be the best for 3D printing. However, by experimenting with the various resolutions with each model, you may find that a lower resolution is either better or more interesting than a higher-resolution export.
A useful set of editing tools is available in 123D Catch. They provide us with the ability to remove all the unwanted 3D material that surrounds the model. In the following screenshot, we can see that a large portion of the 3D scene contains the newspaper surrounding the toy block:

In this recipe, we will learn how to use these tools to remove the unwanted 3D material from around our model.
Choose a scene with the mesh resolution you desire. Keep in mind that once you make changes to the scene, they will be permanent.
Open 123D Catch and sign in. Open an existing capture and proceed as follows:
-
First, we will clear the camera track from our view so that we can see our model better. We will do this by clicking on the Display Settings icon [
 ] on the toolbar and deselecting the Cameras button. This will give us a clear view of the model.
-
While in Display Settings, switch over to Wireframe Only by selecting the cube icon on the left-hand side [
 ].
].
-
We need to be able to move around the model. We'll do this by selecting the Orbit tool icon [
 ].
].
-
By left-clicking and holding on the model, we can move around it. By selecting the Pan tool icon [
 ], we can left-click and hold on the model and adjust its position on the workspace. Using the middle track on the mouse, we can zoom in and out of the model.
-
Select the Rectangle Selection tool icon [
 ] and drag it out on a large area of the background. When you release the mouse, the selected area will turn red. If you don't like the area or a part of the model has been accidentally selected, clicking on the red area will deselect it.
When you have finished selecting it, press Delete on the keyboard. The selected area is removed. Keep in mind that once an area is removed, it's permanent. There isn't an undo function.
Continue doing this, cleaning all the space around the model.
-
Select the Lasso Selection tool icon [
 ].
].
The tool works in a manner that is similar to the rectangle select tool. Use the lasso to clean up close to the model's base, as shown in the following screenshot:
Save the mesh. Go to the menu and select File. Scroll down and select Export Capture As. Choose
.objand click on Save.
The editing tools in 123D Catch are similar in function to their counterpart tools in many 2D graphics programs, and therefore, they should be intuitive in their use. Care must be exercised, however, when selecting areas in the image. Unlike a 2D image, where the selection is clearly seen on a flat surface, a selection in a 3D scene is what you see and what you don't see on the back side of the model.
Cleaning up the model with these tools can be done offline, but the results can only be saved using the Autodesk .3dp file format. The ability to export as an .obj file can only be attained when you are online.
From the 123D Catch menu, the Autodesk 3D Print Utility (A3DP) can be accessed. It's a standalone program that repairs and optimizes your model for 3D printing. Though many features of the A3DP are designed for specific commercial 3D printers, the results can be exported to a file for use on any 3D printer. In the following recipe, we'll use the basic functions to create a properly scaled and watertight model.
You'll need a 3D scene open in 123D Catch with a model that is cleaned and ready for export. Go to File in the menu and select 3D print. Follow the download and install instructions for the utility. Once the initial installation has been completed, the program can be accessed from the menu.
We will proceed as follows:
With a scene ready for processing in 123D Catch, select 3D print in the File menu. This will open the Autodesk 3D Print Utility window and immediately begin the automatic processing of your model. It makes repairs to the model's mesh and positions the model properly on the build platform.
Once the processing of the model is finished, it will appear in the build envelope. The pyramid object that's used as an example in this book can be seen in the following screenshot:

-
A series of navigation controls can be found in the top-right corner of the window. The basic controls allow for orbit, pan, zoom, center, and eye-level movements. They are accessed from the icon strip in which there's also a navigation cube icon [
 ].
].
Left-click on the cube's front side. The view levels to a frontal view. Zoom in on the model using the magnifying glass icon, or use your scroll wheel on your mouse. The model should be clearly seen and should be similar to the pyramid model in the following screenshot:

For each axis of the model, the A3DP Utility has given us a measurement in millimeters. This is the real-world measurement of our model if we were to print it. Our model was processed by 123D Catch without any information relating to its actual size in the physical world. Using the Scale function of A3DP, we can adjust the size of our model for final printing. To do this, take the recorded measurement of any one axis and determine its actual size. Enter the percentage of change for Scale and select Apply.
If you're not sure how much the percentage should be, but you know your target size, use the following method to calculate the percentage. In this case, I'm using the z axis, which shows a measurement of 30.88 mm. I would like this height to be changed to 53 mm. Divide 53 by 30.88 and then take the quotient, 1.72, and multiply it by 100. The product gives me a 172 percent change. Enter this percentage for Scale and select Apply.
Select Save to export the model as an STL file.
The A3DP Utility provides an easy solution for preparing a model, as follows:
It automatically places the model properly on the build platform
It repairs the holes and other mesh imperfections in the model
It allows for manual scaling of the object
There are other options available in the utility, but they're not useful unless the model is exported for printing for one of the specified commercial machines, such as the MakerBot Replicator 2 (which is the default setting). These options are as follows:
Support material
Optimization
Copies
Even with limited options, the A3DP Utility acts as an efficient tool in preparing models ready for slicing. A convenient feature of this utility is that it also works as a standalone program. Any .obj file, whether it is processed by 123D Catch or a 3D modeling program, can be loaded into the A3DP Utility, and it can be repaired and exported.
When the A3DP Utility processes a model ready for printing, it also automatically decimates the model, that is, it reduces the polygon count of the mesh. This enables more efficient printing, but at the cost of losing detail. Let's compare the original model of the statue after 123D Catch processing and the same model after it was processed with the A3DP Utility.

The original 123D Catch model has a polygon count of 151950, and the model processed with the A3DP Utility has a polygon count of 18670. This is a great difference, and it can be clearly seen in the preceding comparison. This is something to keep in mind when a higher-resolution print is required for finer details.
We began the chapter by choosing four objects from our physical world, and then we created a digital likeness of each of them. Using two programs, 123D Catch and the Autodesk 3D Print Utility, we were able to accomplish this with relative ease.
The resulting 3D models that were made of the example objects used in this book are shown in the following image:

Each of these models consists of a single watertight mesh. These models are saved as STL files, the proper file format for 3D printing. They are almost ready for printing, but one last step in the process is required.
We need to write a set of instructions for each model that tells our 3D printer how the model is to be printed. We do this using a slicer that generates G-code. G-code is a numerical control programming language that controls the automated functions of a 3D printer. The slicer generates G-code by taking the STL file of the model and slicing it up into many layers. For each of these layers, the variables set in the slicer profile are recorded. The finished G-code generated by the slicer will then instruct the extruder tool head how to move in an x, y, and z coordinate system. The 3D model will be built layer by layer.
In the next two recipes, we will become acquainted with two of the most popular slicers, Slic3r and Skeinforge. We will also run a basic print test of the models using both the slicers and then compare the results.
It's fair to assume that if you are new to 3D printing and have limited experience, you've probably been using Slic3r. Slic3r has been in development since November 2011 and has become one of the most popular slicers in use. It has an easy user interface, good documentation, regular updates, and good user support on many forums.
You need a RepRap-based 3D printer and have the basic skills to operate it. If you are using Repetier-Host or another host that has Slic3r built in, use the standalone version. This can be found at http://slic3r.org/download.
Note
This book uses Slic3r release v0.9.9. If you would like to use older versions, they can be downloaded at http://dl.slic3r.org/win/old/.
Download the application for your operating system (available for Windows, Mac, and Linux) and follow the installation instructions. This version will have a Plater window, as illustrated in the following screenshot:

If you are presently a Slic3r user, you can ignore the configuration part of this recipe. Open Slic3r and proceed as follows:
When Slic3r is initially started, a configuration wizard will prompt you to supply some basic information about your printer. There are six settings in this configuration. They are as follows:
Firmware Type: This indicates the type of firmware to be used. Most RepRap kits will be using Marlin/Sprinter. This is the default setting in Slic3r. Check with the builder of your machine if you are not sure what firmware your printer is using.
Bed Size: This is the length of travel along the x and y axes. For most RepRap printers, this will be 200 mm by 200 mm. This is the default setting in Slic3r.
Nozzle Diameter: This size should be specified by markings on the nozzle, by the extruder manufacturer or the builder of your printer. Common sizes are 0.35 mm and 0.5 mm. The default setting in Slic3r is 0.5 mm.
Filament Diameter: This is the precise diameter size of the filament you are extruding. The two available sizes are 3 mm and 1.75 mm, but it can vary in size between manufacturers. Take multiple measurements and an average of the total. The default setting in Slic3r is 3 mm.
Extrusion Temperature: Different filament materials require different extrusion temperatures. Enter the correct temperature for the material you are using. The default temperature in Slic3r is 200 degrees Celsius.
Bed Temperature: Different filament materials require different bed temperatures. Enter the correct temperature for the material you are using. The default temperature in Slic3r is 0 degrees.
Choose one of your models to start. Take the STL file and drag-and-drop it on the Plater. The shape of the model's bottom can be seen when it is fully loaded. This is illustrated in the following screenshot:

To generate the G-code, select Export G-code. A pop-up window appears, allowing you to name and save the G-code file. Choose a place to store the file. There's a progress bar in the lower-right corner of the Plater. When the G-code is complete, a message at the bottom of the window will show that the G-code has been exported.
Open your host and load the G-code. Your model is now ready to be printed.
When you open Slic3r for the first time, a simplified interface version is presented. All of the configuration selections you made earlier are stored under the Filament Settings and Printer Settings tabs. Any changes you may need to make to your configuration can be done there.
The Print Settings tab has six sections where slicer settings can be made. We can see the options available in the following screenshot:

For this recipe, we used the default values as a starting point. This will become our reference point for all the future changes. Later, in the following chapters, we will open the expert mode and experiment with the various settings.
Note
A manual created by Gary Hodgson can be found at http://wiki.techstories.de/download/attachments/7143623/Slic3r-Manual2.pdf.
Skeinforge is by far the most versatile slicer available, and it can be the most intimidating one because of its complexity. Taking the time to unravel its mysteries will pay off in the end. The amount of control one can exercise over the numerous setting options can sometimes overcome printing difficulties that other slicers cannot achieve.
You need a RepRap-based 3D printer and have the basic skills to operate it. If you are using Repetier-Host or another host that has Skeinforge built in, make sure you are using the latest version. Its latest update can be found at http://fabmetheus.crsndoo.com/. It has not been updated since March 15, 2012.
To use Skeinforge as a standalone program, you will need to install Python. Python can be found at https://www.python.org/download/. Install Python Version 2.7.6.
In order to create a default settings profile for Skeinforge, we will need to add a profile that is not included in the latest version. This profile will make a good starting point and also provide us with a reference point for future changes. It can be downloaded at https://github.com/romscraj/skeinforge41/zipball/master. Open the folder and navigate into the .skeinforge folder, then into the profiles folder, and finally into the extrusion folder. Copy the Durbie-Normal folder.
Locate the .skeinforge folder that is created by Skeinforge when it is initially opened. It should be in your computer's personal folder if you are using Windows or in your computer's home in Mac or Linux OS. Once it is located, add the Durbie-Normal folder into the extrusion folder nested in the profiles folder. Now, the added profile is available in the Profile Selection menu.
We will proceed as follows:
Open Skeinforge by double-clicking on the Skeinforge Python file in the
skeinforge_applicationfolder.When the Skeinforge window opens, you will be confronted with a menu and an array of tabs for many different plugins. Initially, maneuvering through the selections can be overwhelming, but we are only going to concern ourselves with configuring the printer and filament settings. First, choose the Profile tab and select the Durbie-Normal option from Profile Selection. We can see how this looks in the following screenshot:

Now, we are ready to configure the slicer to your 3D printer. Select the Craft tab. There are 34 tabs that offer options to control your printer. These can be seen in the following screenshot:

We'll make our configuration adjustments by selecting three of these tabs.
Select the Carve tab. This is seen in the following screenshot:

Here is where we tell Skeinforge what size of nozzle we are using and how thick our printing layer will be. Unlike Slic3r, we don't simply enter a nozzle size. Skeinforge uses a ratio of edge width over height to determine the nozzle size. If you're using a 0.5 mm nozzle, this is the Durbie-Normal profile default. If you're using a 0.35 mm nozzle, change the
1.55value in Edge Width over Height (ratio) to1.4. Then, change the Layer Height (mm) from0.4to0.3.
Note
Refer to Chapter 3, Scanning and Printing with a Higher Resolution, to learn how these values are selected for different nozzle sizes and layer heights.
Select the Dimension tab. This is seen in the following screenshot:
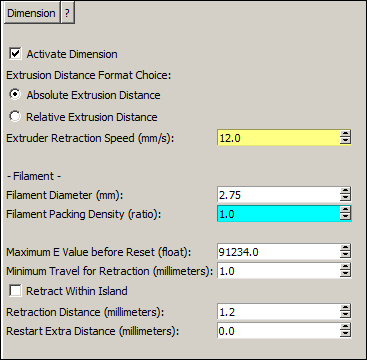
Place your filament size in the Filament Diameter (mm) window. The Durbie-Normal default value is
2.75mm.
Select the Inset tab. This is seen in the following screenshot:

The infill width over thickness ratio should be kept similar to the edge width over height ratio in the Carve plugin. The Durbie-Normal default value is
1.55.
Select Save All at the bottom of the window.
To generate the G-code, we need to left-click on the Skeinforge button at the bottom-left corner of the program window. From the pop up, choose STL files from the extension list.
Choose one of your models to begin with. Locate the STL file and click on Open. Skeinforge begins to compile the G-code.
When the G-code has been compiled, two windows containing analytical information will appear. Close these windows and locate the G-code file by checking the bottom lines in the Python.exe window. It will show you where the file was exported.
Open your host and load the G-code. You are now ready to print the model.
For a new user, the adjustments in Skeinforge may seem arcane. For example, instead of simply entering the size of the print nozzle, Skeinforge requires a ratio of the width to height of the extruded filament. This becomes more complicated as variables change. This is just one aspect of Skeinforge's complexity in comparison to other slicers. Yet, with this additional complexity, far more control can be mastered. Throughout the course of this book, we'll be exploring many different features offered by the Skeinforge plugins.
It won't be unusual for us to have many different profiles and a need to label and store them in Profile Selection. To make a profile, start by selecting one that's similar to your target profile. Make your alterations and select the Profile tab, as shown in the following screenshot:
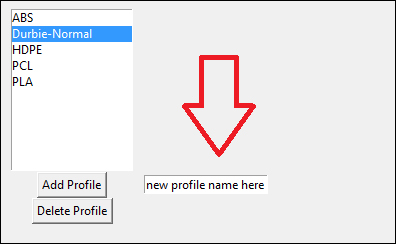
Enter the name of the new profile in the window and select Add Profile. This is shown in the preceding screenshot.
Both the slicers, with their default settings, printed well with minor to average problems. The major difference between the two slicers was the amount of time it took to compile the results of the G-code. Slic3r is fast in comparison to Skeinforge.
In the following image, we can see that the coin suffers from a lack of detail. It's difficult for 123D Catch to capture fine surface detail.

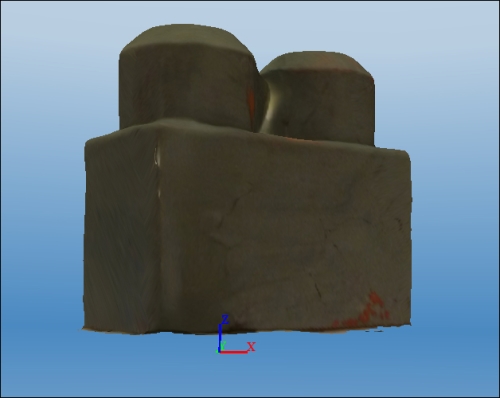
In the following image, we can see the results of the toy block. There's a lot of distortion caused by the 3D scanning process of the model. Both Slic3r and Skeinforge produced similar printing results.

The 3D scan of the following figure produced a successful result, but both suffer from a common problem encountered in 3D printing. When a complex model has angles of more than 45 degrees, the filament may lose support and sag.
Note
Refer to Chapter 6, Making the Impossible, for a method of creating a removable support. This will eliminate the sagging filament.

The 3D scan of the pyramid was successful, however, both slicers had difficulty with printing the uneven base of the pyramid, as seen in the following image:

Slic3r has an additional issue at the tip of the pyramid. It's distorted is caused by inadequate cooling of filament layers. As each layer is extruded at more than 200 degrees Celsius, there must be an opportunity for each layer to cool for another hot layer to be deposited. The default cooling settings in Slic3r were not sufficient, but in later chapters we'll learn how to optimize Slic3r's cooling features in the following chapters.


