


This chapter will provide you with a brief overview of the fundamentals of 3D graphics. We will create a number of useful classes and systems that will make work easier later on and provide us with a flexible framework for building games. This chapter will focus mainly on models, how they work, and how to view them with cameras. We will build a number of different types of camera that can be used in many situations we may encounter while building games. Next, we will look at a way to improve performance with a "view frustum culling" system, and finally, we'll build a small game that allows the player to fly a spaceship using keyboard controls.
The first step in any game is to set up the XNA game project in Visual Studio.
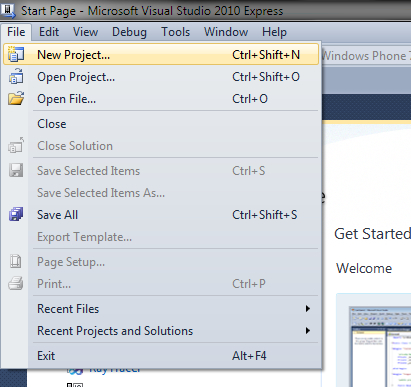
To begin with, ensure that XNA and Visual Studio are installed by following the guide available at creators.xna.com and launch Visual Studio. Once it has loaded, create a new project:
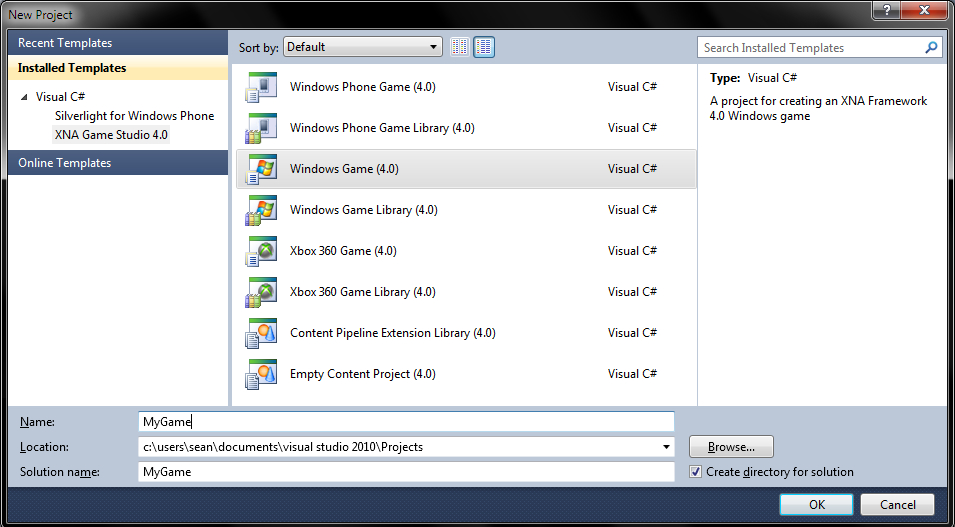
From the left-hand side, choose the version of XNA you want to work with. Generally, you should pick the most recent version available, unless you are specifically targeting an older version. If you've just installed XNA, there will be only one version of XNA to choose from. At the time of this writing, the most recent version was XNA 3.1. From the box on the right, specify that you want to create a Windows Game, and give it a name:
Click on OK, and you will be taken to the main file of the game project called
Game1.cs. XNA will have created this file and added it to your project automatically. TheGame1class is the main class in an XNA game. By default, this class is automatically instantiated when the game is loaded, and its member functions will be called automatically when they should perform their respective tasks.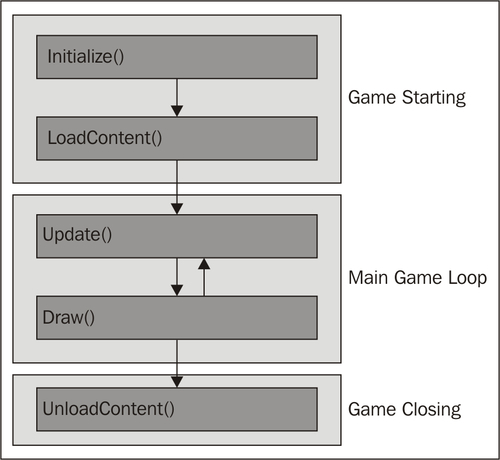
The automatically generated Game1 class contains a lot of excess comments and code, so once you have familiarized yourself with the class and its functions, simplify it to the following:
public class Game1 : Microsoft.Xna.Framework.Game
{
   GraphicsDeviceManager graphics;
   SpriteBatch spriteBatch;

   public Game1()
   {
     graphics = new GraphicsDeviceManager(this);
     Content.RootDirectory = "Content";
   }

   // Called when the game should load its content
   protected override void LoadContent()
   {
   }

   // Called when the game should update itself
   protected override void Update(GameTime gameTime)
   {
      base.Update(gameTime);
   }

   // Called when the game should draw itself
   protected override void Draw(GameTime gameTime)
   {
      GraphicsDevice.Clear(Color.CornflowerBlue);

      base.Draw(gameTime);
   }
}
One thing that all 3D systems hold in common is a coordinate system. Coordinate systems are important because they allow us to represent points in 3D space in a consistent manner as distances from a center point called the origin along a number of axes. You're probably used to the idea of a 2D coordinate system from your math classes in school—the origin was at (0, 0) and the X and Y axes grew to the right and up respectively. A 3D coordinate system is very similar, except for the addition of a third axis labeled the Z- axis. XNA uses what is called a "right-handed" coordinate system, meaning that the X and Y axes grow the way you're used to (to the right and up respectively), and the Z-axis grows "towards" you. If the X and Y axes were placed flat on your computer screen, you can imagine the Z-axis as growing out of the screen towards you.
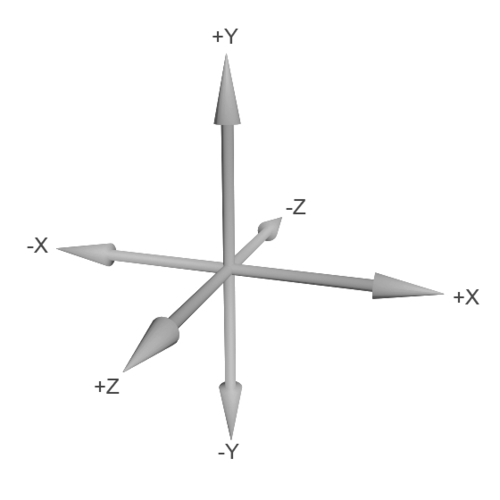
With this coordinate system, we can define points in space. For example, let's assume that our coordinate system uses meters as units. Say for a moment, we were sitting at the origin (0, 0, 0) and were facing down the negative portion of the Z-axis. If we wanted to note the location of an object sitting five meters in front of us, three meters to the right, on a table one meter tall, we would say that the object was at (3, 1, -5).
Matrices are mathematical structures that are used in 3D graphics to represent transformations—operations performed on a point to move it in some way. The three common transformations are translation (movement), rotation, and scaling (changing size). When a transformation is applied to a model, each vertex in the model is multiplied by the transformation's matrix until the entire model has been transformed.
Matrices can be combined by multiplying them together. It is worth noting that matrix multiplication is done from right to left, so the last matrix to be multiplied will be the first to affect the model and so on. This means that rotating and then moving a model will not have the same effect as moving and then rotating it. Generally, unless you mean to do otherwise, the matrices should be multiplied in the following order: scaling * rotation * transformation.
In the 3D graphics world, there are usually three matrices that must be calculated to draw an object onto the screen: the world, view, and projection matrices. The world matrix is the result of all of our transformation matrices multiplied together. Once this transformation has been applied, the model has moved from what is called "local" or "object space" to "world space". Each model in a scene has a different world matrix, as they all have different locations, orientations, and so on. It is also possible that each "piece" of a model (or mesh) may have its own world matrix. For example, the head and leg of a human model will likely have their own matrices to offset them from the center of the model (its root). When the model is drawn, each mesh has its transformation multiplied by the entire model's world matrix to calculate the final world matrix.
The view matrix is used to transform the scene from world space into view space: the world as seen by the camera. The world matrix for each model is simply multiplied by the view matrix to transform the scene. The projection matrix then transforms the three-dimensional position of each vertex in the scene into the two-dimensional projection of the scene that is drawn onto the screen. When the 3D world/view matrix combination is multiplied by the projection matrix, the scene is flattened out so that it can be drawn onto a 2D screen.
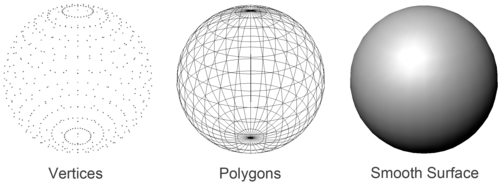
A model is a file exported from a 3D modeling package such as 3D Studio Max or Blender. The file basically contains a list of points called vertices, which form the edges of polygons that, joined together, give the appearance of a smooth surface:
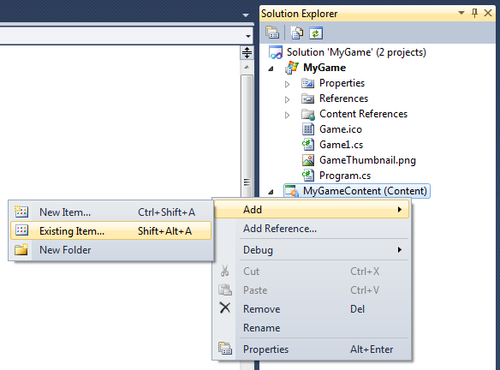
To load a model, we must add it to our game's content project. XNA will automatically build all of the content in our content project so that we can use it in our game. To add a model to the content project, open the Solution Explorer, right-click on the content project (labeled Content), and click on Add Existing Item.
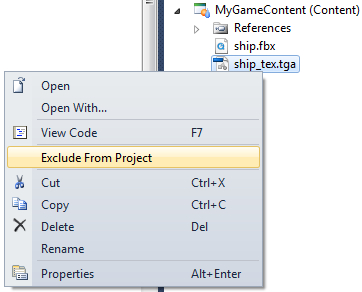
In addition to building all of the content in the content project, XNA builds any files referenced by a piece of content. Because our model references its texture, we need to exclude the texture from the list of content to build or it will be built twice. Right-click on the texture and then select Exclude From Project. This will remove the texture from the content project but will not delete the file itself, which will allow XNA to find it when building the model but still only build it once.
Now that the content pipeline is building our model for us, we can load it into our game. We do this with the ContentManager class—a class used to access the runtime functionality of the content pipeline. The Game class already has an instance of the ContentManager class built-in, so we can go ahead and use it in the LoadContent() method.
First, an instance of the Model class will be needed. The Model class contains all the data necessary to draw and work with a model. We will also need an array of matrices representing the model's built-in mesh transformations. Add the following member definitions:
Model model;
Matrix[] transforms;
Now, in the LoadContent() method, we can use the ContentManager to load the model. The Load() function of the ContentManager class takes the name of the resource to load—the original filename without its extension. Note that this means we can't have multiple files with the same name only varying by extension.
model = Content.Load<Model>("ship");

transforms = new Matrix[model.Bones.Count];
model.CopyAbsoluteBoneTransformsTo(transforms);
In XNA, a model is made up of pieces called
meshes. As described earlier, each model has its own transformation in 3D space, and each mesh also has its own transformation relative to the model's transformation as a whole. The Model class stores these transformations as a skeleton structure with each mesh attached to a bone. The last two lines in the previous code snippet copied that skeleton into the transforms array.
Now that the model has been loaded, we are ready to draw it. We do this in the Draw() function of our game. Games redraw dozens of times per second, and each redraw is called a
frame. We need to clear the screen before drawing a new frame, and we do so using XNA's GraphicsDevice.Clear() function. The single argument allows us to change the color to which the screen is cleared:
GraphicsDevice.Clear(Color.CornflowerBlue);
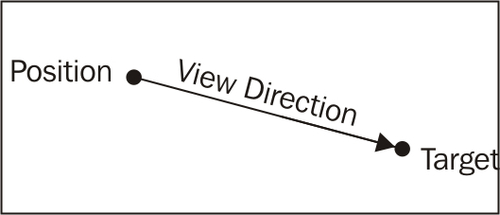
The first step of drawing the model itself is to calculate the view and projection matrices. To calculate the view matrix, we will use the CreateLookAt() static function of the Matrix class, which accepts as arguments a camera position, target, and up direction. The position is simply where in 3D space the camera should be placed, the
target is the point the camera should be looking at, and the up vector is literally the direction that is "up" relative to the camera position. This code will go in the Draw() function after the GraphicsDevice is cleared:
Matrix view = Matrix.CreateLookAt(new Vector3(200, 300, 900),new Vector3(0, 50, 0),Vector3.Up);
There are some exceptions, but usually we calculate the projection matrix using the Matrix class' CreatePerspectiveFieldOfView() function, which accepts, in order, a field of view (in radians), the aspect ratio, and the near and far plane distances. These values define the shape of the view frustum as seen in the following figure. It is used to decide which objects and vertices are onscreen and which are not when drawing, and how to squish the scene down to fit onto the two-dimensional screen.
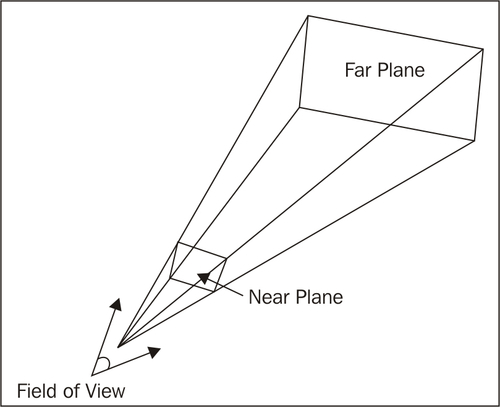
The near plane and far plane determine the distances at which objects will start and stop being drawn. Outside of the range between the two planes, objects will be
clipped—meaning they will not be drawn. The field of view determines how "wide" the area seen by the camera is. Most first person shooters use an angle between 45 and 60 degrees for their field of view as anything beyond that range would start to distort the scene. A fish eye lens, on the other hand, would have a field of view closer to 180 degrees. This allows it to see more of the scene without moving, but it also distorts the scene at the edges. 45 degrees is a good starting point as it matches human vision closest without warping the image. The final value, the aspect ratio , is calculated by dividing the width of the screen by the height of the screen, and is used by the CreatePerspectiveFieldOfView() function to determine the "shape" of the screen in regards to its width and height. The
GraphicsDevice has a precalculated aspect ratio value available that we can use when calculating the projection matrix:
Matrix projection = Matrix.CreatePerspectiveFieldOfView(MathHelper.ToRadians(45), GraphicsDevice.Viewport.AspectRatio,0.1f, 10000.0f);
The last matrix needed to draw the model is the world matrix. However, as discussed earlier, each mesh in the model has its own transformation relative to the model's overall transformation. This means that we will need to calculate a world matrix for each mesh. We'll start with the overall transformation and add the transformations from the modelTransformations array per mesh. Each mesh also has what is called an
effect. We will look at effects in much more depth in the coming chapters, but for now, just remember that they are used to determine the appearance of a model. We will be using one of XNA's built-in effects (called
BasicEffect) for now, so all we need to do is set its World, View, and Projection properties:
// Calculate the starting world matrix
Matrix baseWorld = Matrix.CreateScale(0.4f) * Matrix.CreateRotationY(MathHelper.ToRadians(180));

foreach (ModelMesh mesh in model.Meshes)
{
   // Calculate each mesh's world matrix
   Matrix localWorld = modelTransforms[mesh.ParentBone.Index]
        * baseWorld;

   foreach (ModelMeshPart part in mesh.MeshParts)
   {
      BasicEffect e = (BasicEffect)part.Effect;

      // Set the world, view, and projection matrices to the effect
      e.World = localWorld;
      e.View = view;
      e.Projection = projection;

      e.EnableDefaultLighting();
   }

   // Draw the mesh
   mesh.Draw();
}
XNA will already have added the last piece of code for you as well, but it is important to ensure that this code is still in place at the end of the Draw() function. This line of code simply calls the Draw() function of the base Game class, ensuring that the game runs correctly.
base.Draw(gameTime);
The complete code for the Game1 class is now as follows:
public class Game1 : Microsoft.Xna.Framework.Game
{
GraphicsDeviceManager graphics;
SpriteBatch spriteBatch;
Model model;
Matrix[] modelTransforms;
public Game1()
{
graphics = new GraphicsDeviceManager(this);
Content.RootDirectory = "Content";
graphics.PreferredBackBufferWidth = 1280;
graphics.PreferredBackBufferHeight = 800;
}
// Called when the game should load its content
protected override void LoadContent()
{
spriteBatch = new SpriteBatch(GraphicsDevice);
model = Content.Load<Model>("ship");
modelTransforms = new Matrix[model.Bones.Count];
model.CopyAbsoluteBoneTransformsTo(modelTransforms);
}
// Called when the game should update itself
protected override void Update(GameTime gameTime)
{
base.Update(gameTime);
}
// Called when the game should draw itself
protected override void Draw(GameTime gameTime)
{
GraphicsDevice.Clear(Color.CornflowerBlue);
Matrix view = Matrix.CreateLookAt(new Vector3(200, 300, 900),new Vector3(0, 50, 0),Vector3.Up);
Matrix projection = Matrix.CreatePerspectiveFieldOfView(MathHelper.ToRadians(45), GraphicsDevice.Viewport.AspectRatio,0.1f, 10000.0f);
// Calculate the starting world matrix
Matrix baseWorld = Matrix.CreateScale(0.4f) * Matrix.CreateRotationY(MathHelper.ToRadians(180));
foreach (ModelMesh mesh in model.Meshes)
{
// Calculate each mesh's world matrix
Matrix localWorld = modelTransforms[mesh.ParentBone.Index]* baseWorld;
foreach (ModelMeshPart part in mesh.MeshParts)
{
BasicEffect e = (BasicEffect)part.Effect;
// Set the world, view, and projection
// matrices to the effect
e.World = localWorld;
e.View = view;
e.Projection = projection;
e.EnableDefaultLighting();
}
// Draw the mesh
mesh.Draw();
}
base.Draw(gameTime);
}
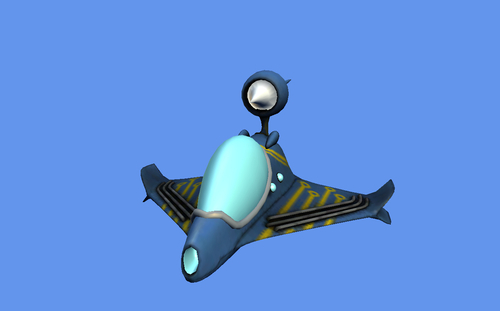
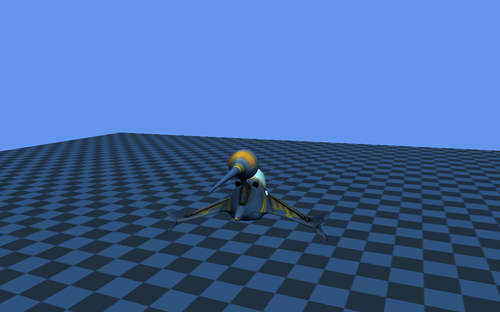
}Run the game (Debug | Start Debugging, or F5) and you should see our spaceship in all its glory:
The previous code works for drawing one model, but what if we wanted to draw more than one? More than ten? Writing the previous code out for each model would quickly become unmanageable. To make our lives a little easier, we'll take the previous code and put it into a new class called
CModel (for custom model). This class will handle loading the transformations from a model, setting the matrices to the mesh part effects, and so on. Later on, it will handle setting custom effects, manage textures, and more. For now, we will keep it simple:
public class CModel
{
  public Vector3 Position { get; set; }
  public Vector3 Rotation { get; set; }
  public Vector3 Scale { get; set; }

  public Model Model { get; private set; }
  private Matrix[] modelTransforms;

  private GraphicsDevice graphicsDevice;
  public CModel(Model Model, Vector3 Position, Vector3 Rotation,Vector3 Scale, GraphicsDevice graphicsDevice)
  {
    this.Model = Model;

    modelTransforms = new Matrix[Model.Bones.Count];
    Model.CopyAbsoluteBoneTransformsTo(modelTransforms);

    this.Position = Position;
    this.Rotation = Rotation;
    this.Scale = Scale;

    this.graphicsDevice = graphicsDevice;
  }

  public void Draw(Matrix View, Matrix Projection)
  {
     // Calculate the base transformation by combining
     // translation, rotation, and scaling
     Matrix baseWorld = Matrix.CreateScale(Scale)* Matrix.CreateFromYawPitchRoll(Rotation.Y, Rotation.X, Rotation.Z)* Matrix.CreateTranslation(Position);

     foreach (ModelMesh mesh in Model.Meshes)
     {
       Matrix localWorld = modelTransforms[mesh.ParentBone.Index]* baseWorld;

       foreach (ModelMeshPart meshPart in mesh.MeshParts)
       {
         BasicEffect effect = (BasicEffect)meshPart.Effect;

         effect.World = localWorld;
         effect.View = View;
         effect.Projection = Projection;

         effect.EnableDefaultLighting();
       }

       mesh.Draw();
     }
  }
}
We can now simplify the Game1 class to draw a list of models:
GraphicsDeviceManager graphics;
SpriteBatch spriteBatch;

List<CModel> models = new List<CModel>();
As a demonstration, let's add nine copies of our spaceship to that list in the LoadContent() method:
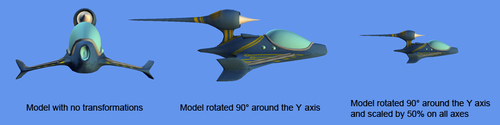
for (int y = 0; y < 3; y++)
  for (int x = 0; x < 3; x++)
  {
    Vector3 position = new Vector3(-600 + x * 600, -400 + y * 400, 0);

    models.Add(new CModel(Content.Load<Model>("ship"), position,new Vector3(0, MathHelper.ToRadians(90) * (y * 3 + x), 0),new Vector3(0.25f), GraphicsDevice));
  }
We can now update our Draw() method to draw a list of models, then we can run the game and see the result:
// Called when the game should draw itself
protected override void Draw(GameTime gameTime)
{
  GraphicsDevice.Clear(Color.CornflowerBlue);

  Matrix view = Matrix.CreateLookAt(new Vector3(0, 300, 2000),new Vector3(0, 0, 0),
        Vector3.Up);

  Matrix projection = Matrix.CreatePerspectiveFieldOfView(MathHelper.ToRadians(45), GraphicsDevice.Viewport.AspectRatio,0.1f, 10000.0f);

  foreach (CModel model in models)
    model.Draw(view, projection);

  base.Draw(gameTime);
}
Much like we did with the CModel class, let's create a reusable Camera class. We'll start with a base class that represents a camera at its lowest level: simply the view and projection matrices. We use a base class that all camera types will inherit from because we want to be able to use all camera types interchangeably. This Camera base class will also take care of calculating the projection matrix unless derived classes choose to do so themselves.
public abstract class Camera
{
  public Matrix View { get; set; }
  public Matrix Projection { get; set; }
  protected GraphicsDevice GraphicsDevice { get; set; }

  public Camera(GraphicsDevice graphicsDevice)
  {
     this.GraphicsDevice = graphicsDevice;
     generatePerspectiveProjectionMatrix(MathHelper.PiOver4);
  }

  private void generatePerspectiveProjectionMatrix(float FieldOfView)
  {
    PresentationParameters pp = GraphicsDevice.PresentationParameters;

    float aspectRatio = (float)pp.BackBufferWidth / (float)pp.BackBufferHeight;
    this.Projection = Matrix.CreatePerspectiveFieldOfView(MathHelper.ToRadians(45), aspectRatio, 0.1f, 1000000.0f);
 }

  public virtual void Update()
  {
  }
}
Now that we have our base class, let's create the most basic type of camera—the target camera. This is simply a camera with two components—a position and a target. The camera points from the position towards the target, similar to the "camera" we used when we first drew our model:
This data is more or less directly passed into the CreateLookAt() function in the Matrix class to calculate the view matrix. The call in the constructor to the Camera base class' constructor ensures that the projection matrix and other matrices are calculated for us:
public class TargetCamera : Camera
{
  public Vector3 Position { get; set; }
  public Vector3 Target { get; set; }

  public TargetCamera(Vector3 Position, Vector3 Target,GraphicsDevice graphicsDevice) : base(graphicsDevice)
  {
     this.Position = Position;
     this.Target = Target;
  }

  public override void Update()
  {
    Vector3 forward = Target - Position;
    Vector3 side = Vector3.Cross(forward, Vector3.Up);
    Vector3 up = Vector3.Cross(forward, side);
    this.View = Matrix.CreateLookAt(Position, Target, up);
  }
}
As you can see, the Position and Target values can be set freely through their public properties or through the constructor to position the camera any way desired at any time, as the Update() function will update the view matrix as necessary. We can now once again update the Game1 class to use the TargetCamera instead of doing all the camera calculations itself. In addition to our list of models, we will also need a camera:
List<CModel> models = new List<CModel>();
Camera camera;
We will need to initialize the camera along with any models in the LoadContent() method:
models.Add(new CModel(Content.Load<Model>("ship"),Vector3.Zero, Vector3.Zero, new Vector3(0.6f), GraphicsDevice));

camera = new TargetCamera(new Vector3(300, 300, -1800),Vector3.Zero, GraphicsDevice);
We need to update the camera in the Update() method:
// Called when the game should update itself
protected override void Update(GameTime gameTime)
{
  camera.Update();

  base.Update(gameTime);
}
Finally, we can use the View and Projection properties of camera in the Draw() method:
// Called when the game should draw itself
protected override void Draw(GameTime gameTime)
{
  GraphicsDevice.Clear(Color.CornflowerBlue);

  foreach (CModel model in models)
     model.Draw(camera.View, camera.Projection);

  base.Draw(gameTime);
}
We now have two classes, TargetCamera and CModel, which can be reused easily, and a base class for creating any type of camera we could need. We'll use the rest of this chapter to look at other types of cameras, and to add a system that will speed up the game by keeping it from drawing (culling) objects that are not in the camera's view.
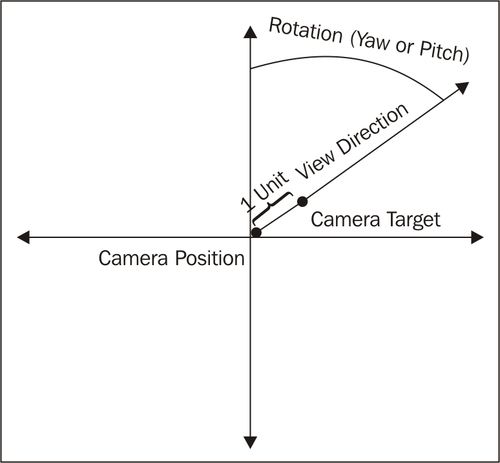
At the moment, we can put our camera at one point and aim it at another. This works for a static scene, but it doesn't allow for any freedom in a real game. Most games would be pretty difficult to play if the camera can't move around, so this will be our next task. The free camera we will create will operate like those found in First-Person-Shooter (FPS) games, which allow the player to move around with the W, S, A, and D keys (for forward, back, left, and right respectively), and look around with the mouse. On the Xbox 360, we would use the left joystick for movement and the right joystick to rotate the camera.
public class FreeCamera : Camera
{
  public float Yaw { get; set; }
  public float Pitch { get; set; }

  public Vector3 Position { get; set; }
  public Vector3 Target { get; private set; }

  private Vector3 translation;

  public FreeCamera(Vector3 Position, float Yaw, float Pitch,GraphicsDevice graphicsDevice) : base(graphicsDevice)
  {
    this.Position = Position;
    this.Yaw = Yaw;
    this.Pitch = Pitch;

    translation = Vector3.Zero;
  }
}
The FreeCamera class adds two new values that the TargetCamera class didn't have—yaw and pitch. These two values (in radians) determine the amount that the camera has been rotated around the Y and X axes, respectively. The yaw and pitch values can be modified (usually based on mouse movements) through the new Rotate() method. There is also a new value called translation that accumulates the amount that the camera has moved (in the direction the camera is facing) between frames. The Move() function modifies this value (usually based on keyboard or joystick input):
public void Rotate(float YawChange, float PitchChange)
{
  this.Yaw += YawChange;
  this.Pitch += PitchChange;
}

public void Move(Vector3 Translation)
{
  this.translation += Translation;
}
The Update() function does the math to calculate the new view matrix:
public override void Update()
{
  // Calculate the rotation matrix
  Matrix rotation = Matrix.CreateFromYawPitchRoll(Yaw, Pitch, 0);

  // Offset the position and reset the translation
  translation = Vector3.Transform(translation, rotation);
  Position += translation;
  translation = Vector3.Zero;

  // Calculate the new target
  Vector3 forward = Vector3.Transform(Vector3.Forward, rotation);
  Target = Position + forward;

  // Calculate the up vector
  Vector3 up = Vector3.Transform(Vector3.Up, rotation);

  // Calculate the view matrix
  View = Matrix.CreateLookAt(Position, Target, up);
}
Once again we are ready to modify the Game1 class, this time to switch to our new camera and add keyboard and mouse control. First, we need to change the type of camera we are creating in the LoadContent() function:
camera = new FreeCamera(new Vector3(1000, 0, -2000), MathHelper.ToRadians(153), // Turned around 153 degreesMathHelper.ToRadians(5), // Pitched up 13 degreesGraphicsDevice);
Let's start by adding mouse control. In order to measure the amount of mouse movement between frames, we need to be able to store the last frame's mouse state. We can then compare that mouse state to the current mouse state. To store the last frame's mouse state, we will add a MouseState member variable:
List<CModel> models = new List<CModel>();
Camera camera;

MouseState lastMouseState;
This value needs to be initialized once before the Update method so that the game doesn't crash when trying to access it on the first frame, so we will grab the mouse state at the end of the LoadContent method:
lastMouseState = Mouse.GetState();
Now, we can create a new function that the Update() method will use to update the camera:
// Called when the game should update itself
protected override void Update(GameTime gameTime)
{
  updateCamera(gameTime);

  base.Update(gameTime);
}

void updateCamera(GameTime gameTime)
{
  // Get the new keyboard and mouse state
  MouseState mouseState = Mouse.GetState();
  KeyboardState keyState = Keyboard.GetState();

  // Determine how much the camera should turn
  float deltaX = (float)lastMouseState.X - (float)mouseState.X;
  float deltaY = (float)lastMouseState.Y - (float)mouseState.Y;

  // Rotate the camera
  ((FreeCamera)camera).Rotate(deltaX * .01f, deltaY * .01f);

  Vector3 translation = Vector3.Zero;
  // Determine in which direction to move the camera
  if (keyState.IsKeyDown(Keys.W)) translation += Vector3.Forward;
  if (keyState.IsKeyDown(Keys.S)) translation += Vector3.Backward;
  if (keyState.IsKeyDown(Keys.A)) translation += Vector3.Left;
  if (keyState.IsKeyDown(Keys.D)) translation += Vector3.Right;

  // Move 3 units per millisecond, independent of frame rate
  translation *= 3 * (float)gameTime.ElapsedGameTime.TotalMilliseconds;

  // Move the camera
  ((FreeCamera)camera).Move(translation);

  // Update the camera
  camera.Update();

  // Update the mouse state
  lastMouseState = mouseState;
}
Run the game again, and you should be able to move and rotate the camera with the mouse and W, S, A, and D keys.
It is often convenient for us to have a simplified representation of the geometry of a model. Because complex models are made of hundreds if not thousands of vertices, it is often too inefficient to check for object intersection per vertex between every object in the scene when doing collision detection, for example. To simplify collision checks, we will use what is called a bounding volume , specifically a bounding sphere. Let's add some functionality to our CModel class to calculate bounding spheres for us. To start, we need to add a new BoundingSphere member variable to the CModel class:
private Matrix[] modelTransforms;
private GraphicsDevice graphicsDevice;
private BoundingSphere boundingSphere;
Next, we will create a function to calculate this bounding sphere based on our model's geometry:
private void buildBoundingSphere()
{
  BoundingSphere sphere = new BoundingSphere(Vector3.Zero, 0);

  // Merge all the model's built in bounding spheres
  foreach (ModelMesh mesh in Model.Meshes)
  {
     BoundingSphere transformed = mesh.BoundingSphere.Transform(
        modelTransforms[mesh.ParentBone.Index]);

     sphere = BoundingSphere.CreateMerged(sphere, transformed);
  }

  this.boundingSphere = sphere;
}
We need to be sure to call this function in our constructor:
public CModel(Model Model, Vector3 Position, Vector3 Rotation,Vector3 Scale, GraphicsDevice graphicsDevice)
{
  this.Model = Model;

  modelTransforms = new Matrix[Model.Bones.Count];
  Model.CopyAbsoluteBoneTransformsTo(modelTransforms);

  buildBoundingSphere();

  ...
However, there is one problem with this approach: this bounding sphere is centered at the origin, so if we were to move our model, the bounding sphere would no longer contain the model. To solve this problem, we will add a public property that translates our origin-centered boundingSphere value to the model's current
position and scales it based on our model's scale:
public BoundingSphere BoundingSphere
{
  get
  {
    // No need for rotation, as this is a sphere
    Matrix worldTransform = Matrix.CreateScale(Scale)* Matrix.CreateTranslation(Position);

   BoundingSphere transformed = boundingSphere;
   transformed = transformed.Transform(worldTransform);

   return transformed;
  }
}One usage of our new bounding sphere system is to determine which objects are onscreen. This is useful when, for example, we are drawing a large number of objects: if we first check whether an object is onscreen before drawing it, we have a chance of improving the performance of our games if some of the objects in the scene leave the player's view. This is called view frustum culling because we are checking if an object's bounding sphere intersects the view frustum, and if it doesn't, we cull it (refrain from drawing it). It is worth noting that this method of culling is not an all-encompassing method of optimization—if you are drawing many small objects, it may not be worth the time to cull objects because the graphics card won't process pixels that are offscreen anyway.
The first thing we need to do is to actually calculate a view frustum. We can do this very simply once we know our view and projection matrices. Let's go back to our abstract Camera class and add a BoundingFrustum. The BoundingFrustum class has a function to check if a BoundingSphere is in view.
public BoundingFrustum Frustum { get; private set; }The view and projection matrices can change frequently, so we need to update the frustum whenever they change. We will do this by calling the generateFrustum() function that we will write shortly in the View and Projection properties' set accessors:
Matrix view;
Matrix projection;

public Matrix Projection
{
  get { return projection; }
  protected set
  {
     projection = value;
     generateFrustum();
  }
}

public Matrix View
{
  get { return view; }
  protected set
  {
    view = value;
    generateFrustum();
  }
}

private void generateFrustum()
{
  Matrix viewProjection = View * Projection;
  Frustum = new BoundingFrustum(viewProjection);
}
Finally, we will make things a little easier on ourselves by adding some shortcuts to check if bounding boxes and bounding spheres are visible. Because we are doing this in the base class, these functions will conveniently work for any camera type.
public bool BoundingVolumeIsInView(BoundingSphere sphere)
{
  return (Frustum.Contains(sphere) != ContainmentType.Disjoint);
}

public bool BoundingVolumeIsInView(BoundingBox box)
{
  return (Frustum.Contains(box) != ContainmentType.Disjoint);
}
Finally, we can update the Game1 class to use this new system. Our new Draw() function will check if the bounding sphere of each model to be drawn is in view, and if so, it will draw the model. If it doesn't end up drawing any models, it will clear the screen to red so we can tell if models are being culled correctly:
// Called when the game should draw itself
protected override void Draw(GameTime gameTime)
{
  GraphicsDevice.Clear(Color.CornflowerBlue);

  int nModelsDrawn = 0;

  foreach (CModel model in models)
   if (camera.BoundingVolumeIsInView(model.BoundingSphere))
   {
      nModelsDrawn++;
      model.Draw(camera.View, camera.Projection);
   }

   if (nModelsDrawn == 0)
    GraphicsDevice.Clear(Color.Red);

   base.Draw(gameTime);
}
Once you have tried this out and are convinced this system works, feel free to remove the extra code that clears the screen to red:
// Called when the game should draw itself
protected override void Draw(GameTime gameTime)
{
  GraphicsDevice.Clear(Color.CornflowerBlue);

  foreach (CModel model in models)
    if (camera.BoundingVolumeIsInView(model.BoundingSphere))
       model.Draw(camera.View, camera.Projection);

  base.Draw(gameTime);
}We will spend the rest of this chapter looking at two other camera types, and finally at the end we will use one of them to build a small game where the player gets to fly the spaceship that we've been looking at thus far around. The first camera type is the Arc-Ball camera.
An Arc-Ball camera is essentially the opposite of a free camera. Instead of sitting at a point and looking at a target, the target sits at one point and the camera rotates around it. As an example, this type of camera is commonly used when editing the appearance of a vehicle or character in a 3D game. The camera is free to "float around" the object, but it can't turn around or leave the object, as the target of the camera is at the center of the sphere the camera is allowed to travel on.
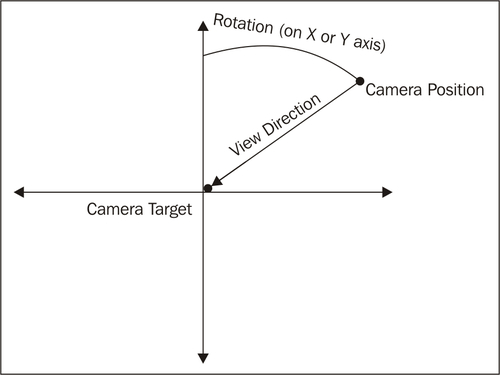
Most games limit the vertical and zoom range of this type of camera, so our camera will allow this as well. The code for the ArcBall Camera
class is as follows:
public class ArcBallCamera : Camera
{
  // Rotation around the two axes
  public float RotationX { get; set; }
  public float RotationY { get; set; }

  // Y axis rotation limits (radians)
  public float MinRotationY { get; set; }
  public float MaxRotationY { get; set; }

  // Distance between the target and camera
  public float Distance { get; set; }

  // Distance limits
  public float MinDistance { get; set; }
  public float MaxDistance { get; set; }

  // Calculated position and specified target
  public Vector3 Position { get; private set; }
  public Vector3 Target { get; set; }

  public ArcBallCamera(Vector3 Target, float RotationX,float RotationY, float MinRotationY, float MaxRotationY,float Distance, float MinDistance, float MaxDistance,GraphicsDevice graphicsDevice) : base(graphicsDevice)
    {
       this.Target = Target;

       this.MinRotationY = MinRotationY;
       this.MaxRotationY = MaxRotationY;

       // Lock the y axis rotation between the min and max values
       this.RotationY = MathHelper.Clamp(RotationY, MinRotationY, MaxRotationY);

       this.RotationX = RotationX;

       this.MinDistance = MinDistance;
       this.MaxDistance = MaxDistance;

       // Lock the distance between the min and max values
       this.Distance = MathHelper.Clamp(Distance, MinDistance, MaxDistance);
    }


  public void Move(float DistanceChange)
  {
     this.Distance += DistanceChange;

     this.Distance = MathHelper.Clamp(Distance, MinDistance, MaxDistance);
  }

  public void Rotate(float RotationXChange, float RotationYChange)
  {
     this.RotationX += RotationXChange;
     this.RotationY += -RotationYChange;

     this.RotationY = MathHelper.Clamp(RotationY, MinRotationY, MaxRotationY);
  }

  public void Translate(Vector3 PositionChange)
  {
     this.Position += PositionChange;
  }

  public override void Update()
  {
     // Calculate rotation matrix from rotation values
     Matrix rotation = Matrix.CreateFromYawPitchRoll(RotationX, -RotationY, 0);

      // Translate down the Z axis by the desired distance
      // between the camera and object, then rotate that
      // vector to find the camera offset from the target
      Vector3 translation = new Vector3(0, 0, Distance);
      translation = Vector3.Transform(translation, rotation);


      Position = Target + translation;

      // Calculate the up vector from the rotation matrix
      Vector3 up = Vector3.Transform(Vector3.Up, rotation);

      View = Matrix.CreateLookAt(Position, Target, up);
  }
}
To implement this camera in the Game1 class, we first instantiate our camera as an ArcBallCamera in the LoadContent()
method:
camera = new ArcBallCamera(Vector3.Zero, 0, 0, 0, MathHelper.PiOver2, 1200, 1000, 2000, GraphicsDevice);
Second, we need to update the updateCamera() function to reflect the way this new camera type moves:
void updateCamera(GameTime gameTime)
{
  // Get the new keyboard and mouse state
  MouseState mouseState = Mouse.GetState();
  KeyboardState keyState = Keyboard.GetState();

  // Determine how much the camera should turn
  float deltaX = (float)lastMouseState.X - (float)mouseState.X;
  float deltaY = (float)lastMouseState.Y - (float)mouseState.Y;

  // Rotate the camera
  ((ArcBallCamera)camera).Rotate(deltaX * .01f, deltaY * .01f);

  // Calculate scroll wheel movement
  float scrollDelta = (float)lastMouseState.ScrollWheelValue -(float)mouseState.ScrollWheelValue;

  // Move the camera
  ((ArcBallCamera)camera).Move(scrollDelta);

  // Update the camera
  camera.Update();

  // Update the mouse state
  lastMouseState = mouseState;
}
Run the game, and you will be able to rotate around the ship with the mouse, and move towards and away from it with the scroll wheel.
The last camera type we will look at is the chase camera. A chase camera is designed to "chase" an object. Generally, the camera follows the object at some distance and turns with it. This is the type of camera used, for example, in most third person situations—racing games, third person shooters, flight simulators, and so on. The chase distance and view direction are generally determined using an offset for the camera position and an offset for the target position from the object's position. The view matrix is then calculated as usual based on those values.
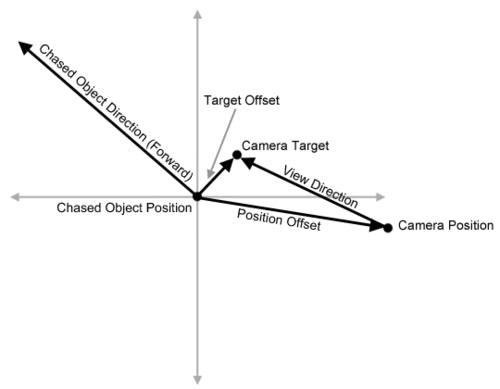
In this case, the chase camera also has a relative rotation value that allows the camera to rotate independently of the object, and a "springiness" value that allows the camera to "bend" from side-to-side instead of rigidly following the object. This can create more of a feeling of movement than simply following the object because the camera responds more like it would under real-life physics. The code for the
ChaseCamera class is as shown:
public class ChaseCamera : Camera
{
  public Vector3 Position { get; private set; }
  public Vector3 Target { get; private set; }

  public Vector3 FollowTargetPosition { get; private set; }
  public Vector3 FollowTargetRotation { get; private set; }

  public Vector3 PositionOffset { get; set; }
  public Vector3 TargetOffset { get; set; }

  public Vector3 RelativeCameraRotation { get; set; }

    float springiness = .15f;

  public float Springiness
  {
    get { return springiness; }
    set { springiness = MathHelper.Clamp(value, 0, 1); }
  }

  public ChaseCamera(Vector3 PositionOffset, Vector3 TargetOffset,Vector3 RelativeCameraRotation, GraphicsDevice graphicsDevice): base(graphicsDevice)
  {
     this.PositionOffset = PositionOffset;
     this.TargetOffset = TargetOffset;
     this.RelativeCameraRotation = RelativeCameraRotation;
  }

  public void Move(Vector3 NewFollowTargetPosition,Vector3 NewFollowTargetRotation)
  {
     this.FollowTargetPosition = NewFollowTargetPosition;
     this.FollowTargetRotation = NewFollowTargetRotation;
  }

  public void Rotate(Vector3 RotationChange)
  {
     this.RelativeCameraRotation += RotationChange;
  }

  public override void Update()
  {
     // Sum the rotations of the model and the camera to ensure it
     // is rotated to the correct position relative to the model's
     // rotation
     Vector3 combinedRotation = FollowTargetRotation + RelativeCameraRotation;

     // Calculate the rotation matrix for the camera
     Matrix rotation = Matrix.CreateFromYawPitchRoll(combinedRotation.Y, combinedRotation.X, combinedRotation.Z);

     // Calculate the position the camera would be without the spring
     // value, using the rotation matrix and target position
     Vector3 desiredPosition = FollowTargetPosition +Vector3.Transform(PositionOffset, rotation);

     // Interpolate between the current position and desired position
     Position = Vector3.Lerp(Position, desiredPosition, Springiness);

     // Calculate the new target using the rotation matrix
     Target = FollowTargetPosition +  Vector3.Transform(TargetOffset, rotation);

    // Obtain the up vector from the matrix
    Vector3 up = Vector3.Transform(Vector3.Up, rotation);

    // Recalculate the view matrix
    View = Matrix.CreateLookAt(Position, Target, up);
  }
}
Let's use the concepts and classes learned and created so far to create a simple game in which the player flies our spaceship around using the keyboard. You'll notice that the example uses the ChaseCamera to follow the spaceship and uses two models to represent the ground and spaceship.
We'll start by instantiating these values in the
LoadContent()method:models.Add(new CModel(Content.Load<Model>("ship"),new Vector3(0, 400, 0), Vector3.Zero, new Vector3(0.4f), GraphicsDevice)); models.Add(new CModel(Content.Load<Model>("ground"),Vector3.Zero, Vector3.Zero, Vector3.One, GraphicsDevice)); camera = new ChaseCamera(new Vector3(0, 400, 1500), new Vector3(0, 200, 0),new Vector3(0, 0, 0), GraphicsDevice);Next, we will create a new function that updates the position and rotation of our model based on keyboard input, which is called by the
Update()function:// Called when the game should update itself protected override void Update(GameTime gameTime) { updateModel(gameTime); updateCamera(gameTime); base.Update(gameTime); } void updateModel(GameTime gameTime) { KeyboardState keyState = Keyboard.GetState(); Vector3 rotChange = new Vector3(0, 0, 0); // Determine on which axes the ship should be rotated on, if any if (keyState.IsKeyDown(Keys.W)) rotChange += new Vector3(1, 0, 0); if (keyState.IsKeyDown(Keys.S)) rotChange += new Vector3(-1, 0, 0); if (keyState.IsKeyDown(Keys.A)) rotChange += new Vector3(0, 1, 0); if (keyState.IsKeyDown(Keys.D)) rotChange += new Vector3(0, -1, 0); models[0].Rotation += rotChange * .025f; // If space isn't down, the ship shouldn't move if (!keyState.IsKeyDown(Keys.Space)) return; // Determine what direction to move in Matrix rotation = Matrix.CreateFromYawPitchRoll(models[0].Rotation.Y, models[0].Rotation.X, models[0].Rotation.Z); // Move in the direction dictated by our rotation matrix models[0].Position += Vector3.Transform(Vector3.Forward, rotation) * (float)gameTime.ElapsedGameTime.TotalMilliseconds * 4; }We can now greatly simplify the
updateCamera()function:void updateCamera(GameTime gameTime) { // Move the camera to the new model's position and orientation ((ChaseCamera)camera).Move(models[0].Position, models[0].Rotation); // Update the camera camera.Update(); }And with that, we're finished! Run your game one last time and you should be able to fly the ship around with W, S, A, D, and the Space bar:
In an effort to allow developers to easily maintain compatibility with a wide range of devices, XNA provides two "graphics profiles." A graphics profile is a set of features that are guaranteed to work on a certain machine, as long as the machine meets all of the requirements of that graphics profile. The two profiles XNA provides are "Reach" and "HiDef." Games developed with the Reach profile will work on a very large range of devices, but are limited in which graphics features they can use. Games developed with the HiDef profile will be able to use a large range of graphics features but they will only work on a much more limited range of devices. The Xbox 360 supports the HiDef profile.
In order to implement many of the examples in this book, you will need to be developing under the Hidef profile. Some examples may work under the Reach profile but this book assumes you are working on a computer supporting HiDef. If you encounter errors while trying to build or run an example, you should first ensure that the game is set to run under the HiDef profile. To do this, right click on your game's project in the solution explorer in Visual Studio (labelled "MyGame" if you have been following along) and click "Properties." Under the "XNA Game Studio" tab, select "Use HiDef to access the complete API (including features unavailable for Windows Phone." Rebuild the game and run it and any errors relating to the graphics profile will be fixed. More information can be found at http://msdn.microsoft.com/en-us/library/ff604995.aspx.
Now that you have completed this chapter, you have an understanding of the fundamentals of 3D graphics. You know how to create a new game project with Visual Studio, how to add content to its content project, and how to remove content. You also have a basic understanding of the content pipeline and how to interact with it through code and the ContentManager. You have also created a number of useful classes that will be reused later, including the CModel and Camera classes, and all of the derived camera classes. Finally, you also have a way to determine which objects intersect others or which are onscreen.
In the coming chapters, we will learn how to add new special effects to our games. We will start with "Effects" (which were mentioned earlier) and HLSL to implement some lighting and texturing effects.