Analytical Accounting is an add-on module to Microsoft Dynamics GP, which allows the extension of analysis of information beyond the segmental account. Without Analytical Accounting, additional reporting can only be accomplished by adding an additional segment to the chart of accounts. Analytical Accounting allows for this extended reporting without the need to change the chart of accounts, and also allows for the storage of information beyond monetary such as time (hours worked), space (size of room hired), or activity (such as marketing channel).
In this chapter we will take an introductory look at how to activate, configure, and enter transactions in Analytical Accounting. It is assumed that the Analytical Accounting feature has already been added to the installation of Microsoft Dynamics GP, and that GP Utilities has been run to update the databases.
Before Analytical Accounting can be used, there are several steps that must be completed. The first of them is to create the default records needed for Analytical Accounting.
To create the default records needed for Analytical Accounting, follow these steps:
Log on to Microsoft Dynamics GP using the
saordynsauser accounts.Open the Analytical Accounting Setup Wizard window in Dynamics GP by selecting Administration from the navigation pane on the left, and then clicking on Setup in the area page under Setup | Company | Analytical Accounting.
Make sure that the Create Default Record checkbox is marked, and then click on Next.

A listbox will be displayed showing the tasks, which will be processed. Click on Finish to proceed.
Once complete, click on OK to close the Analytical Accounting Setup Wizard window.
Repeat steps 1 to 5 for each company database.
This setup step needs to be performed in every company where Analytical Accounting is to be used as it creates all the records required for Analytical Accounting to function.
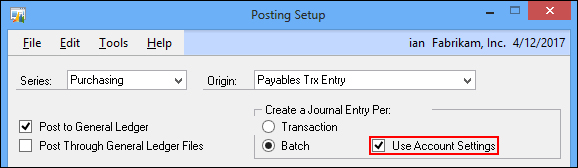
The final step needed before activating Analytical Accounting is to ensure that all posting options for Create a Journal Entry Per are set to either Transaction, as is most common, or to Batch with Use Account Settings marked.
To change the posting options, follow these steps:
Open the Posting Setup window in Dynamics GP by selecting Administration from the navigation pane on the left, and then clicking on Posting in the area page under Setup | Posting.
Check each Series/Origin combination, and ensure that Use Account Settings is marked, if the Create a Journal Entry Per: setting is set to Batch.
Click on OK or Save, once all Series/Origin combinations have been configured.
The Payroll module is slightly different to the other series in that there is an additional checkbox, Post In Detail, which must be marked for all origins except for Period End Reports. To enable this setting, follow these steps:
Open the Posting Setup window in Dynamics GP by selecting Administration from the navigation pane on the left, and then clicking on Posting in the area page under Setup | Posting.
Set Series: to Payroll, and Origin: to All.
Mark the Post In Detail checkbox (which is located above the Use Account Settings checkbox, when the Series: is set to Payroll).

Click on OK or Save, and close the Posting Setup window.
Now that the posting options have been configured as required by Analytical Accounting, the module can now be activated for use.
To activate Analytical Accounting, follow these steps:
Ensure there is a good backup of both the system (which is usually called Dynamics) and company database.
Log on to Microsoft Dynamics GP using the
saordynsauser accounts.Open the Analytical Accounting Setup Wizard window in Dynamics GP by selecting Administration from the navigation pane on the left, and then clicking on Setup in the area page under Setup | Company | Analytical Accounting.
Mark the Activate Analytical Accounting checkbox, and click on Next.

A listbox will be displayed showing the tasks that will be processed. Click on Finish to proceed.
Once complete, click on OK to close the Analytical Accounting Setup Wizard.
Now that Analytical Accounting has been activated, security needs to be configured, so that users without the POWERUSER role can use the functionality it offers. Analytical Accounting integrates into the standard Dynamics GP role-based security.
When installed, Analytical Accounting adds several default security roles and tasks. The default security tasks are:
|
ADMIN_AA_001* |
CARD_AA_001* |
RPT_AA_001* |
|
ADMIN_AA_002* |
INQ_AA_001* |
TRX_AA_001* |
|
AADEFAULTUSER* |
INQ_AA_002* |
The default security roles are:
|
AA CLERK* |
AA MANAGER* |
Custom roles and tasks can be created if the default ones do not meet the needs of your organization. Once the required roles have been created, they need to be assigned to the users.
To assign the AA MANAGER* role to a user:
Open the User Security Setup window in Dynamics GP by selecting Administration from the navigation pane on the left, and then clicking on User Security in the area page under Setup | System.
Enter the User: to have the role assigned, and tab from the field.
In the Roles: scrolling window, mark the checkbox next to AA MANAGER*.

Click on Save.
The AA CLERK* role (or any custom role) can be assigned to the users in exactly the same way.
Analytical Accounting integrates with the standard Dynamics GP security model by creating the required operations, tasks, and roles. This means any user who currently understands the process of maintaining security will be able to grant access, or create the appropriate security to the users.
The next stage in configuring Analytical Accounting is to set up the options, which control the behavior of Analytical Accounting.
To amend the Analytical Accounting options:
Open the Analytical Accounting Options window in Dynamics GP by selecting Administration from the navigation pane on the left, and then clicking on Options in the area page under Setup | Company | Analytical Accounting.

Mark the checkbox next to Post through to General Ledger for Trx Posting to allow transaction posting to post through the GL. A batch is automatically created and assigned to the transaction, during the transaction posting process.
Mark the Include dimensions in the year end close checkbox to transfer analytical data to history, during the year-end close process.
Click on the User-Defined button to change the field labels for the twenty user defined fields, which can be used for adding more information to the alphanumeric transaction dimensions.
Click on the Column Heading button to amend the column heading labels used on inquiries and reports.
Click on the Reporting Periods button to view the Fiscal and Calendar Views used in reports.
Click on the SmartList Integration button to select which SmartLists should be installed. To install a SmartList, mark the checkbox next to the SmartList folder in the scrolling window or, to install all, click on the Mark All button. Once all selections have been made, click on Process, then close the window.
Click on OK to close the Analytical Accounting Options window.
The Assignment Setup window allows for control over whether a module requires the full distribution amount to be assigned, or if a partial assignment can be posted. The exception to this is Bank Reconciliation, where you can post partial assignments, if the destination module of the posting allows partial assignments.
To amend the Assignment Setup window to allow partial assignment in the General Ledger module:
Open the Assignment Options window in Dynamics GP by selecting Administration from the navigation pane on the left, and then clicking on Assignment in the area page under Setup | Company | Analytical Accounting.
Unmark the checkbox in the Full column, next to the General Ledger module.

If you do not want to be warned about partial assignments when they have been allowed, mark the checkbox No Warning when partial Assignments are Allowed at the bottom of the window.
Click on OK to accept the setup.
By default, Analytical Accounting requires that the full distribution amount be assigned to an analysis code, but this is not always the way users want it to work. The Assignment Setup window grants users the flexibility to define if the distribution amount should be fully distributed, or if only a partial assignment is possible.
Analysis information is entered via transaction dimensions. In this recipe we will take a look at the types of transaction dimensions that can be created.
There are four types of transaction dimensions that can be created: alphanumeric, numeric, yes/no, and date. An unlimited number of each type of transaction dimension can be created, with alphanumeric ones having codes created and attached.
To create an alphanumeric transaction dimension, perform the following steps:
Open the Transaction Dimension Maintenance window in DynamicsGP by selecting Financial from the navigation pane on the left, and then clicking on Transaction Dimension in the area page under Cards | Financial | Analytical Accounting.

Enter
MARKETINGin the Trx Dimension field.Enter
Marketing Channelsin Description 1.Leave Create New Codes On The Fly checked to allow users to create new transaction dimension codes, when entering transactions.
Mark the Consolidate balances during Year End close checkbox to transfer analytical data to history during the year-end close.
Click on the Codes button in the bottom-right corner.
When prompted to save changes, click on Save.

Enter
ONLINEADSin the Trx Dimension Code field.Enter
Online Advertsin the Description 1 field.Click on the lookup button next to the Linked to Node field.
Ensure that
Marketing Channelsis selected, and click on Select.Click on Save.
Repeat steps 7 to 11 to create transaction dimension codes for
TWITTER,FACEBOOK, andGOOGLE+.Click on Save, and close the Transaction Dimension Code Maintenance window.
Click on Save, and close the Transaction Dimension Maintenance window.
An accounting class is a group of accounts used to determine for which accounts analysis information can be entered. The Analytical Transaction Entry window can only be opened, when entering transactions, if the account has been assigned to an account class.
To create an accounting class, perform the following steps:
Open the Accounting Class Maintenance window in Dynamics GP by selecting Administration from the navigation pane on the left, and then clicking on Accounting Class in the area page under Cards | Financial | Analytical Accounting.

Enter
MARKETINGin the Class ID field.Enter
Marketing Channelsin the Description 1 field.In the Enable Reporting On frame, mark the checkboxes next to Customers and Vendors, which will allow the customer number or vendor ID to be stored for reporting purposes, along with the transaction dimensions.
Change the Analysis Type of
MARKETINGto Required, and leave any other Trx Dimension column's Analysis Type as the default, Not allowed.Note
The other types of Analysis Type available are Fixed, where a default Trx Dimension Code value must be selected, and cannot be changed during transaction entry; Optional, where a Trx Dimension Code can be selected, if desired; and Not allowed, which prevents the accounting class having access to the transaction dimension.
To assign accounts to the
Accountingclass, click on the Accounts button in the bottom-right corner of the window, and when prompted click on Save to save theAccountingclass.
Enter
000-6610-00in the Search by Account Number field, and press Tab.Mark the checkbox in the Link column next to
000-6610-00to link it to theMARKETINGaccounting class.Close the Account Class Link window.
Click on Save, and close the Accounting Class Maintenance window.
Analytical Accounting allows the creation of multiple accounting classes, which can each be allocated an unlimited number of accounts. However, any account can only be allocated to a single accounting class.
The accounting class defines which analysis codes are required, optional, or not allowed for the allocated accounts.
Now that transaction dimensions and accounting classes have been created, the final step needed before Analytical Accounting can be used for entering transactions and to grant user access to the transaction dimensions. Access can only be configured for alphanumeric transaction dimensions, whereas other transaction dimensions will be available to all users.
To grant user access, perform the following steps:
Open the User Access to Trx Dimension Codes window in Dynamics GP by selecting Administration from the navigation pane on the left, and then clicking on User Access in the area page under Setup | Company | Analytical Accounting.
Enter
MARKETINGin the Trx Dimension field.Enter
ONLINEADSin the Trx Dimension Code field.
To give access to the dimensions during transaction entry, mark the checkbox in the Dimension column, next to the relevant users in the scrolling window.
To give access to the dimensions when making an adjustment to a posted transaction, mark the checkbox in the Adjust column next to the relevant users in the scrolling window.
Click on Save, and repeat steps 2 to 5 for all transaction dimension codes, which have been created.
Once granted access, users can enter or adjust transactions. Any new user created in Dynamics GP will need to have access granted before they can enter or adjust dimension information.
As discussed earlier, Analytical Accounting integrates with the standard security model of Dynamics GP. But, this is only to give access to the windows themselves. If a user is to be able to use the alphanumeric analysis codes, then the user needs to have access granted through User Access to Trx Dimension Codes.
When implementing the module, it would be worth speaking to your Dynamics GP partner for scripts to help automate the configuration of security for new codes.
With the setup of Analytical Accounting that we have covered so far in this recipe, we are now able to start entering transactions, and record the additional information via the transaction dimensions.
To enter a payable transaction with Analytical Accounting information, perform the following steps:
Open the Purchase Order Entry window in Dynamics GP by selecting Purchasing from the navigation pane on the left, and then clicking on Purchase Order Entry in the area page under Transactions.
Leave the Type: field as Standard, and tab through the PO Number field to have a purchase order number assigned.
Enter
IMAGEMAK0001in the Vendor ID field.
Enter
MARKETINGin the Item field.Enter
Eachin the U of M field.Enter a unit cost of
$10,000in the Unit Cost field.Enter
Online Marketingin the Description field.Enter
NORTHin Site ID.Click on the blue expansion arrow button next to the Item field header to open Purchase Item Detail Entry.
Click on the Analytical Accounting button next to the Purchases Account field to open the Analytical Purchase Order Entry window.

Change the Assign % field to
66.67%.Enter
ONLINEADSin the Alphanumeric column of the scrolling window.Enter
Online adverts via adsensein the Reference field (this field is restricted to 30 characters).Click on the Assign % column on the second row, and enter
33.33%.Enter
Sponsored tweetsin the Reference field.
Enter
TWITTERin the first row of the Alphanumeric column.Click on OK to save, and close the Analytical Payables Transaction Entry window.
Click on Save, and close the Purchasing Item Detail Entry window.
Click on Save, and then close the Purchase Order Entry window.
Analytical Accounting transaction dimension information can be broken down on each distribution line by changing the Originating Amount or Assign % values on the Analytical Payables Transaction Entry window, and then entering an Originating Amount or Assign % on the next line, in the scrolling window.
Microsoft Dynamics GP 2013 has seen several enhancements to the Analytical Accounting series such as integration to the Fixed Asset Management and the ability to duplicate analysis information when copying a transaction.
Analysis information can be copied for three types of transactions: Purchase Orders, Sales Orders, and posted General Ledger transactions.
In each of the copy transaction windows, a new checkbox has been added. For example, in the Copy Journal Entry window, a new Copy Analytical Accounting Information checkbox has been added.
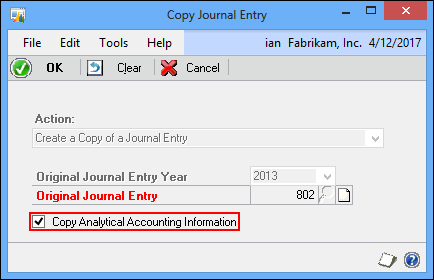
The same functionality has been added to the copy of Purchase and Sales Orders.
In Dynamics GP 2013, Fixed Asset Management has been enhanced to allow the entry of analysis information for distribution accounts, which are linked to an account class. With the batch enhancements also added to Fixed Assets General Ledger Posting, the analysis information can be saved prior to posting the batch.
Budgets can be created and tracked for reporting purposes to ensure expenditure is managed. There are several steps required to create budgets for analytical accounting dimensions.
The first step is to create a budget tree, which contains the selected dimensions. To create one, perform the following steps:
Open the Budget Tree Maintenance window in Dynamics GP by selecting Financial from the navigation pane on the left, and then clicking on Budget Tree in the area page under Cards.
Enter
2017 MARKETINGin the Budget Tree ID field.Enter
2017 Marketing Budgetin the Description field.
In the Available Dimensions list, select
2017 Marketing Budget, and click the Insert>> button to move it to the Selected Dimensions list.Click on Save, and then close the Budget Tree Maintenance window.
As many dimensions as required can be selected in the budget tree, so that a budget value can be assigned, and dimensions can be included in more than one budget tree.
Once the budget tree has been created, the budget tree codes need to be assigned. To do this, perform the following steps:
Open the Assign Budget Tree Codes window in Dynamics GP by selecting Financial from the navigation pane on the left, and then clicking on Assign Budget Tree Codes in the area page under Cards.
Enter
2017 MARKETINGin the Budget Tree ID field.
The From and To values will be set to
<FIRST>and<LAST>respectively, but can be changed by either entering new values or performing a lookup.In this example, we'll assign budgets to all codes within the Marketing Channels dimension, so leave them as they are, and click on the Assign button.
This will add the selected dimension codes to the Dimension Code Tree list in the lower-right corner of the window; codes can be removed or added using the controls to the left.
Click on the Save button, and then close the Assign Budget Tree Codes window.
With the budget tree set up and dimensions assigned, the budget amounts can now be entered. This is done in the Analytical Accounting Budget Maintenance window. To add budget amounts, perform the following steps:
Open the Analytical Accounting Budget Maintenance window in Dynamics GP by selecting Financial from the navigation pane on the left, and then clicking on Assign Budget Tree Codes in the area page under Cards.
Enter
2017MARKETINGin the Budget ID field.
Enter
2017 Marketing Channels Budgetin the Description field.Leaved Based On set to Fiscal Year, and set the Budget Year field to
2017.Set the Budget Tree field to
2017MARKETING.Click on the Methods button near the lower-right of the window to open the Budget Calculation Methods window.
Enter
$48,000.00in the Amount field.
Click on Calculate to close the Budget Calculation Methods window.
The
$48,000.00budget value will be evenly distributed in the Node Budget Amounts list.Change the Period4 4/1/2017 value to
$2,000.00, and the Period5 5/1/2017 value to$6,000.00.The distributed
$48,000.00is at the top level of the budget, and needs to be rolled down to the dimension codes. To do this, click on the Node button to open the Node Budget Roll Down window.Calculate Method can be set to either Equal Split, or left at the default of Percentage. Enter the following values:
20.00%in Facebook10.00%in Google+40.00%in Online Adverts30.00%in Twitter
Click on the Assign button to accept the changes, and close the Node Budget Roll Down window.
Click on the Save button, and then close the Analytical Accounting Budget Maintenance window.
The budget that we have created is at dimension code level. Once a budget has been created and saved, it can be amended, and have more details applied to the budget by changing the Budget Level from Tree to Account. When this is done, each node in the Dimension Code Tree will need to have an account assigned.
If only a single account is required for a particular node, then this can be done by entering it in the Account field. If a range of nodes need to have the budget amount distributed, then open the Account Budget Roll Down window by clicking on the Account button.
The Analytical Accounting Budget Maintenance window is used to create budgets within Microsoft Dynamics GP, but can also be used to export a budget to Microsoft Excel, and then import it again.
To export a budget to Microsoft Excel, follow these steps:
Open the Analytical Accounting Budget Maintenance window in Dynamics GP by selecting Financial from the navigation pane on the left, and then clicking on Assign Budget Tree Codes in the area page under Cards.
Perform a lookup, and select
2017MARKETINGin the Budget ID field.Click on the Export button on the toolbar.
Leave the Excel Workbook type set to New workbook. Before clicking on OK, make sure all windows are minimized as the Microsoft Excel Save As dialog will often open behind the main Dynamics GP window, and can be difficult to access.
Enter
2017MARKETINGin the File name, and then click on Open.
The General Ledger Year-End Closing window performs the bulk of actions required for the year-end processing of the Analytical Accounting module. When the year-end closing is performed, the following occurs:
All the previous years' analytical data for each account is transferred to the history (when history is being kept).
Analytical information for marked alphanumeric transaction dimensions for open year balance sheet accounts are brought forward as the beginning balances in the new fiscal year.
Analytical information for marked alphanumeric transaction dimensions for open year profit and loss accounts is consolidated and transferred to the Retained Earnings account.
To ensure the analytical data is correct, balance brought forward transactions are created even if no profit and loss distributions exist for the year being closed and the profit and loss accounts' balances are zeroed.
Balances are brought forward for unit accounts.
The Analytical Accounting year-end closing report is printed.
If you are activating Analytical Accounting in a Dynamics GP system which already had fiscal years closed, then you need to run the Transfer Transaction Data to History utility. This window is used to transfer analytical transaction information for closed years to the history and, in order to prevent duplicate brought forward balances, it is important that the transfer is completed before transactions are posted to a closed year or before closing an open year.
To transfer analysis information for closed years to history:
Open the Transfer Transaction Data to History window in Dynamics GP by selecting Financial from the navigation pane on the left, and then clicking on Move Data To History in the area page under Utilities | Analytical Accounting.
Select the action to perform:
Transfer transaction detail to history will transfer all analysis information for the earliest closed year to the history.
Consolidate transactions and transfer detail to history will consolidate transactions in the closed year based on the alphanumeric transaction dimensions marked for inclusion in the year-end close process. The analysis information will be moved to the history and closing balances brought forward to the next year.
Print transfer preview report only allows you to print a report showing what the transfer will do.
After selecting one of the three options, click on the OK button.
Analytical Accounting includes a number of inquiries, which can be used to view information.
The Transaction Dimension Relation is the simplest of the inquiry windows and does not have any user-definable criteria. The inquiry window shows the hierarchical structure, if any, created for the alphanumeric dimension codes.
The Analytical Accounting – Journal Entry Inquiry can be used to view the analysis information for posted transactions as well as the consolidated analysis information for the balances that are brought forward.
To view a posted transaction's analysis information, perform the following steps:
Open the Analytical Accounting – Journal Entry Inquiry window in Dynamics GP by selecting Financial from the navigation pane on the left, and then clicking on Journal Entry Inquiry in the area page under Inquiry | Analytical Accounting.
In the Budget ID field, enter or perform a lookup for a posted transaction with analysis information. In this example, I am using journal
3,454.Use the navigation buttons next to the Distribution field to scroll through the distributions to view the analysis information in the window at the bottom of the window.

The Analytical Accounting Distribution Query Wizard is used to create, execute, and export queries to a Microsoft Excel worksheet and allows queries to be saved for later reuse.
Posted analysis information for transaction dimension codes that have subsequently been set to inactive status can be viewed, as well as the consolidated balances that are brought forward when a fiscal year is closed; the beginning value of the period range must be 0 in the Distribution Query Wizard – Finish window in order to view consolidated balances.
To use the Distribution Query Wizard to run a query, follow these steps:
Open the Distribution Query Wizard window in Dynamics GP by selecting Financial from the navigation pane on the left, and then clicking on Distribution Query Wizard in the area page under Inquiry | Analytical Accounting.
On the Column Selection step, select the following items in the Available Columns list, and then click on the Insert>> button after selecting each one:
Journal Entry
GL Posting Date
Account Number
Account Description
Credit Amount
Debit Amount
Vendor ID
Item Number
Trx Dimension – Alphanumeric
Marketing Channels
Click on Next.
In the list, select Marketing Channels to populate the Selected Column field.
Set the Select Type to Is Between.
Set the range to
FACEBOOKandTWITTER.Mark the Balance Sheet checkbox.
Click on Next.

Click on Next.
On the Completing the Options step, set Period in the From field to
1and the To field to12.Enter
2017 Marketing Channelsin the Comment field.Click on Finish to generate the inquiry to Excel.

The preceding steps show how to create an ad hoc query, but the inquiry also allows queries to be saved for later by adding a couple of extra steps to them. To save a query, perform these steps:
Open the Distribution Query Wizard window in Dynamics GP by selecting Financial from the navigation pane on the left, and then clicking on Distribution Query Wizard in the area page under Inquiry | Analytical Accounting.
Select Query Maintenance and click on Next.
In the Query ID field, enter
2017MARKETING.Enter
2017 Marketing Channelsin the Description field.Click on Next.
Use the steps from the Ad Hoc Query steps mentioned previously to create the query and save it for use.
The query can be run using the third option on Distribution Query Wizard. To do so, follow these steps:
Open the Distribution Query Wizard window in Dynamics GP by selecting Financial from the navigation pane on the left, and then clicking on Distribution Query Wizard in the area page under Inquiry | Analytical Accounting.
Select 2017MARKETING in Query ID, and click on Next.
Enter a Comment and click on Finish to run the query as saved, or use the < Back button to amend the query.
There is no limit to the number of queries that can be saved in this inquiry.
The Analytical Accounting Multilevel Query Wizard is used to create, execute, and export queries to a Microsoft Excel worksheet. Queries can be created to analyze the data based on transaction dimensions, which can include dimensions set to inactive as well as consolidated balances that are brought forward when a fiscal year is closed.
As with the Distribution Query Wizard, queries can be saved for reuse as well as being constructed and used on an ad hoc basis.
Creating and saving a Multilevel Query is the same as creating and saving a Distribution Query. In this example, we'll cover creating an ad hoc query. To create one, perform the following steps:
Open the Multilevel Query Wizard window in Dynamics GP by selecting Financial from the navigation pane on the left, and then clicking on Multilevel Query Wizard in the area page under Inquiry | Analytical Accounting.
Select Execute Ad Hoc Query, and click on Next.
On the Level Selection step, select the following items in the Available Items list, and click on the Insert>> button after selecting each one:
Time
Account Number
Marketing Channels
Click on Next.
On the Column Spreads step, click on Next.
Enter
MT_ACCOUNT, or perform a lookup and selectMT_ACCOUNTas the Tree for the Account Number level.Enter
MT_MARKETING, or perform a lookup and selectMT_MARKETINGas the Tree for theMarketing Channelslevel.Click on Next.
Mark the Balance Sheet checkbox, and click on Next.
On the Column Selection step, select the following Available Columns and click on the Insert>> button.
Net change
Net change YTD
Click on Next.
Set the Period range in the From field to
4and the To field to4.Click on Finish to generate the query.
In the resulting Excel spreadsheet, click on the expansion button to show the multilevel data.

The Analytical Accounting Budget vs Actual Inquiry window can be used to view the actual and budgeted amounts for a selected node along with the variance calculated as both an amount and a percentage. To use the inquiry, perform the following steps:
Open the Analytical Accounting Budget vs Actual Inquiry window in Dynamics GP by selecting Financial from the navigation pane on the left, and then clicking on Budget vs Actual in the area page under Inquiry | Analytical Accounting.
Enter
2017MARKETINGin the Budget ID field.Enter
2017in the Year field.
In the Dimension Code Tree list, click on Online Adverts to populate the grid at the bottom of the window with the actual and budget values for the selected dimension code.
If deployed, there are a number of SmartLists available to inquire upon the Analytical Accounting data, which work in the same fashion as standard SmartLists.
The SmartLists can be broken down into two types: Setup and Transaction, with the former having a larger number of SmartLists.
|
Setup |
Transaction |
|---|---|
|
AA Accounting Classes |
AA Dimension Balances |
|
AA Distribution Queries |
AA Transactions |
|
AA Multilevel Queries | |
|
AA Trees | |
|
AA Trx Dimension Codes | |
|
AA Trx Dimensions |
In this chapter we have taken an introductory look at the Analytical Accounting module covering setup and transaction entry. Analytical Accounting is not a stand-alone module, but one which operates by adding additional functionality into other modules. The majority of Analytical Accounting functionality lives within the Financial series, but it adds functionality to modules such as Payables Management, Receivables Management, Inventory Management, and Fixed Assets among others.
The purpose of Analytical Accounting is to allow the recording of analysis information at a level below the General Ledger account. This allows deeper analysis of expenditure, or revenue, without overcomplicating the chart of accounts.
In the next chapter, we'll take a look at how Cash Flow Management can be used to oversee the management of inflows and outflows of cash.