


In this first chapter, after a short introduction to some common terms of the embedded programming used in this book, we'll give you a brief overview of BeagleBone Black's hardware features, how to use the BeagleBone Black's on-board operating system, and how to (re)install and set up a complete developing system based on the Debian distribution, starting from zero. At the end of this chapter, we will give you some hints on how to install a complete host system based on Ubuntu.
Before putting our hands on our new board, it is recommended that we acquaint ourselves with some terms that the user should know in order to avoid misunderstandings. People who have already worked with some GNU/Linux and/or embedded systems may skip this part; however, a brief overview of these preliminary stuff may be useful for everyone. The BeagleBone Black is a tiny single-board computer that can be embedded into a device, so the user should be familiar with some terms used in the wonderful world of the embedded programming.
The BeagleBone Black is a complete computer despite its dimensions. In fact, it's a little bigger than a credit card yet power packed.
The main hardware key features are as follows:
|
Part |
Specification |
|---|---|
|
Processor |
ARM processor: Sitara AM3358 @ 1 Ghz with 3D engine |
|
SDRAM memory |
512 MB DDR3 @800 Mhz |
|
On-board flash |
4 GB, 8-bit eMMC |
|
USB 2.0 ports |
1 device 1 host |
|
Serial port |
UART0 via 6 pin 3.3 V TTL connector |
|
Ethernet |
10/100 via RJ45 connector |
|
SD/MMC |
MicroSD 3.3 V slot |
|
Video out |
16b HDMI 1280 x 1024 |
|
Audio out |
Stereo via HDMI interface |
|
LED indicators |
|
|
Expansion connectors |
|
The following image shows a top view of the BeagleBone Black, where we can see some interesting things:
The connector J1 can be used to access the serial console (this concept will be explained in detail in the Getting access to the serial console section of Chapter 2, Managing the System Console).
The Ethernet connector.
The two expansion connectors P8 and P9, where we can connect the dedicated extension boards and/or custom peripherals (these connectors will be explained in detail in the next chapters).
The reset button can be used to reset the board. The power button can be used to turn on/off the board.
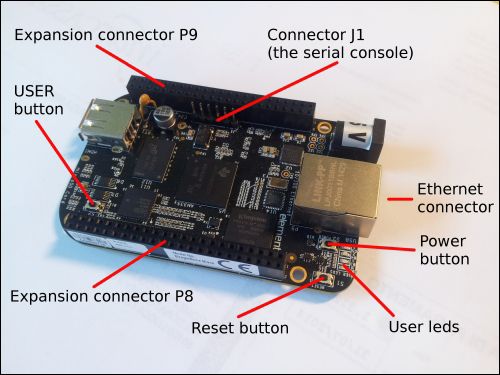
From the preceding image, we can see that the BeagleBone Black doesn't look like a PC, but it can act as a PC! The BeagleBone Black is a fully functional single-board computer and can be readily used as a PC if required by connecting a monitor to the HDMI port and attaching a USB keyboard and mouse through a USB hub. However, it is more suited to embedded applications, where it can act as more than a PC due its expansion connectors, and we can stack up to four expansion boards (named capes) that are useful for several purposes.
In this book, we'll see how we can manage (and reinstall) a complete Debian distribution that allows us to have a wide set of ready-to-run software packages, as a normal PC may have (in fact, the Debian ARM version is equivalent to the Debian x86 version). Then, we'll see how we can use the expansion connectors to connect to the board. Several peripherals are used to monitor/control the external environment.
Once we get our new BeagleBone Black in front of us, we just have a board and a USB cable, so the only thing to do is to connect one end of the USB cable to the BeagleBone Black's mini USB connector and the other end to our PC's USB host port:
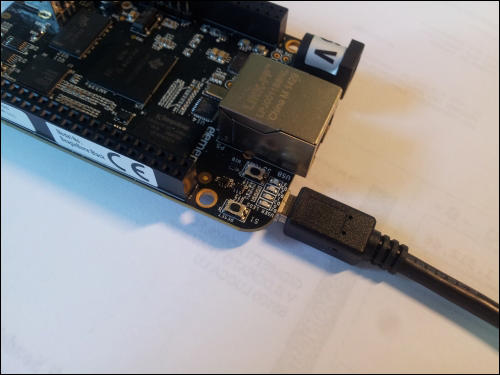
If everything works well, we should see the BeagleBone Black's user LEDs blinking (on the board, these LEDs are labeled as USER LEDS) and after a while, on the host PC, we should get some kernel messages as follows:
usb 2-1.1: new high-speed USB device number 12 using ehci-pci
usb 2-1.1: New USB device found, idVendor=1d6b, idProduct=0104
usb 2-1.1: New USB device strings: Mfr=2, Product=3, SerialNumber=4
usb 2-1.1: Product: BeagleBoneBlack
usb 2-1.1: Manufacturer: Circuitco
usb 2-1.1: SerialNumber: C0-3214BBBK0716
rndis_host 2-1.1:1.0 eth0: register 'rndis_host' at usb-0000:00:1d.0-1.1, RNDIS device, 78:a5:04:ca:cb:00
cdc_acm 2-1.1:1.2: This device cannot do calls on its own. It is not a modem.
cdc_acm 2-1.1:1.2: ttyACM0: USB ACM device
Tip
I'm using an Ubuntu 14.04 LTS-based system as a host PC.
To get the preceding kernel messages, we can use both the dmesg and tail -f /var/log/kern.log commands.
This behavior means that the BeagleBone Black is working correctly, so let's first log in to the system.
Let's take a look at the preceding kernel messages. We will notice the following two lines:
cdc_acm 2-1.1:1.2: This device cannot do calls on its own. It is not a modem.
cdc_acm 2-1.1:1.2: ttyACM0: USB ACM device
The serial device ttyACM0 can be used to get access to the BeagleBone Black's internal system. To do so, we can use a terminal emulator; usually, I use minicom, but you can use your preferred tool. In case of minicom, the following command line is used:
$ minicom -o -D /dev/ttyACM0
You must now verify that the serial port setup is 115200,8N1 without the hardware and software flow control (in minicom, these settings can be checked using the Ctrl +A + O key sequence, and then selecting the entry in the Serial port setup menu).
Now, if we press the Enter key, we get the following string:
Password:
Nothing to worry about, just hit the Enter key again and then enter the string root when the board asks for an user account as reported as follows:
BeagleBone login:
No password is needed here. The console then displays the last login time and the version. It will look something like this:
Last login: Wed Apr 23 20:20:54 UTC 2014 on ttyGS0
Linux BeagleBone 3.8.13-bone47 #1 SMP Fri Apr 11 01:36:09 UTC 2014 armv7l

The programs included with the Debian GNU/Linux system are free software;
the exact distribution terms for each program are described in the
 individual files in /usr/share/doc/*/copyright.

Debian GNU/Linux comes with ABSOLUTELY NO WARRANTY, to the extent
permitted by applicable law.
root@BeagleBone:~#
Great! We just did our first login!
Now that we are logged into the system, it's time to take a look at the preloaded tools. In the next section, we're going to install all the missing software that a good developing system needs.
Now we should verify that the Secure Shell (SSH) tool is functional. The Secure Shell, sometimes known as Secure Socket Shell, is a Unix-based command interface for securely getting access to a remote computer. It was designed to replace the insecure telnet. To test it on the target serial console, we can use the ifconfig command to check the network settings:
root@BeagleBone:~# ifconfig
Then, the following message is displayed:
eth0      Link encap:Ethernet  HWaddr 78:a5:04:ca:c9:fe
          UP BROADCAST MULTICAST  MTU:1500  Metric:1
          RX packets:0 errors:0 dropped:0 overruns:0 frame:0
          TX packets:0 errors:0 dropped:0 overruns:0 carrier:0
          collisions:0 txqueuelen:1000
          RX bytes:0 (0.0 B)  TX bytes:0 (0.0 B)
          Interrupt:40

lo        Link encap:Local Loopback
          inet addr:127.0.0.1  Mask:255.0.0.0
          inet6 addr: ::1/128 Scope:Host
          UP LOOPBACK RUNNING  MTU:65536  Metric:1
          RX packets:0 errors:0 dropped:0 overruns:0 frame:0
          TX packets:0 errors:0 dropped:0 overruns:0 carrier:0
          collisions:0 txqueuelen:0
          RX bytes:0 (0.0 B)  TX bytes:0 (0.0 B)

usb0      Link encap:Ethernet  HWaddr 96:66:68:88:3b:fa
          inet addr:192.168.7.2  Bcast:192.168.7.3  Mask:255.255.255.252
          inet6 addr: fe80::9466:68ff:fe88:3bfa/64 Scope:Link
          UP BROADCAST RUNNING MULTICAST  MTU:1500  Metric:1
          RX packets:3376 errors:0 dropped:0 overruns:0 frame:0
          TX packets:41 errors:0 dropped:0 overruns:0 carrier:0
          collisions:0 txqueuelen:1000
          RX bytes:926304 (904.5 KiB)  TX bytes:10306 (10.0 KiB)
We can use the usb0 device (which is a virtual Ethernet running on the USB cable). First, we should check whether the corresponding Ethernet device has been created on the host using the same command:
$ ifconfig
The output of the command is as follows:
eth1      Link encap:Ethernet  HWaddr bc:ae:c5:20:36:80
          UP BROADCAST MULTICAST  MTU:1500  Metric:1
          RX packets:0 errors:0 dropped:0 overruns:0 frame:0
          TX packets:0 errors:0 dropped:0 overruns:0 carrier:0
          collisions:0 txqueuelen:1000
          RX bytes:0 (0.0 B)  TX bytes:0 (0.0 B)

eth4      Link encap:Ethernet  HWaddr 78:a5:04:ca:cb:00
          inet addr:192.168.7.1  Bcast:192.168.7.3  Mask:255.255.255.252
          inet6 addr: fe80::7aa5:4ff:feca:cb00/64 Scope:Link
          UP BROADCAST RUNNING MULTICAST  MTU:1500  Metric:1
          RX packets:112 errors:0 dropped:0 overruns:0 frame:0
          TX packets:3483 errors:0 dropped:0 overruns:0 carrier:0
          collisions:0 txqueuelen:1000
          RX bytes:17031 (17.0 KB)  TX bytes:1143213 (1.1 MB)
Note
Note that I dropped all the network devices that are not named ethX (for example, the lo device, wlanX, and so on.).We can notice that the eth4 device, which owns the IP address 192.168.7.1, is the one we are looking for. Because of this fact, its IP address is in the same subnet of the BeagleBone Black's usb0 device mentioned earlier. So, let's get connected via SSH to our board with the following command:
$ ssh root@192.168.7.2
The authenticity of host '192.168.7.2 (192.168.7.2)' can't be established.
ECDSA key fingerprint is b1:a9:84:39:71:99:a3:af:9e:ba:26:d5:e6:77:03:08.
Are you sure you want to continue connecting (yes/no)? yes
Warning: Permanently added '192.168.7.2' (ECDSA) to the list of known hosts.
Debian GNU/Linux 7

BeagleBoard.org BeagleBone Debian Image 2014-04-23

Support/FAQ: http://elinux.org/Beagleboard:BeagleBoneBlack_Debian
Last login: Thu Apr 24 21:20:09 2014 from hulk.local
root@BeagleBone:~#
In the Internet era, a web interface is a must-have, and the easy way to have one is to install a LAMP (Linux-Apache-MySQL-PHP) suite.
By default, the preloaded Debian image has the Apache web server preinstalled, so if we point our web browser to the host at the address 192.168.7.2 and port 8080, we should get something like this:
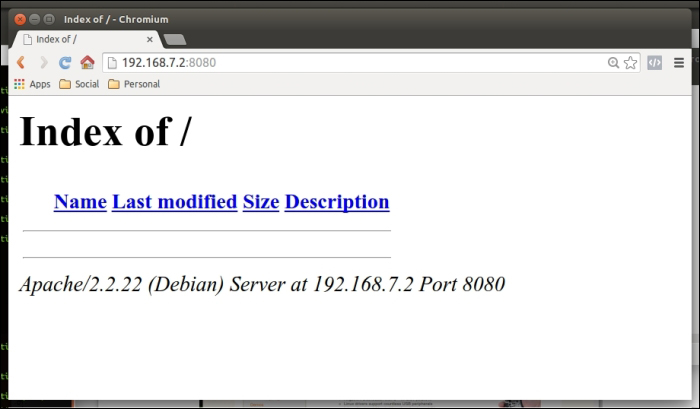
However, we must not forget to mention the port 8080 specification in the URL (the correct form is 192.168.7.2:8080), or we'll get a different output related to the Bone101 service, as shown in the following screenshot:
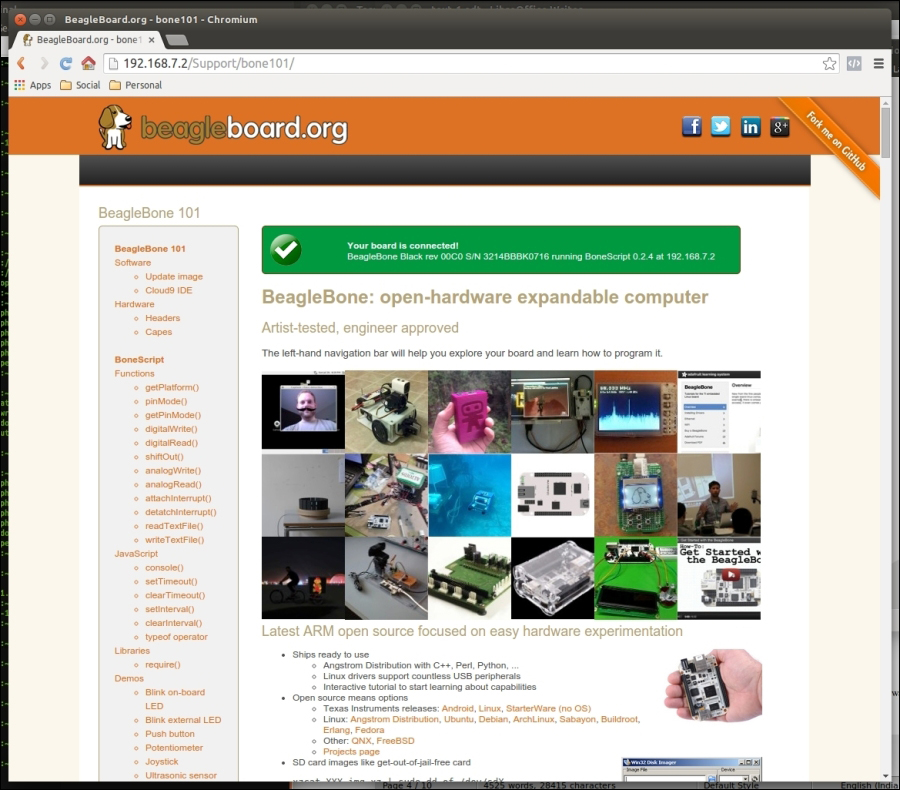
The Bone101 service is something similar to the Arduino IDE, which is a high-level programming environment, where beginners can try simple programs using an integrated IDE and a dedicated JavaScript library.
You can take a look at this system using the tutorial at http://beagleboard.org/support/bone101. However, we are going to disable this service in the next section because it's not useful to better understand how the computer peripherals can be connected to and managed by the BeagleBone Black, and also, in order to get a standard LAMP suite, we need port 80 to be free.
Ok, first of all, we should set up the networking settings, since we are going to download a lot of software packages. The Ethernet cable should be plugged into the BeagleBone Black's Ethernet connector and the other end should be connected to the LAN switch. If the connection works, we should see the following line in the BeagleBone Black's kernel messages:
libphy: 4a101000.mdio:00 - Link is Up - 100/Full
Tip
Let me remind you that you can use either the tail -f /var/log/kern.log or dmesg command to see the kernel messages.
We can avoid using an Ethernet connection with a network trick; in fact, the host PC can be used as a gateway, for the BeagleBone Black, that can access the Internet using the USB cable. In the host, we can use the following commands:
# iptables --table nat --append POSTROUTING --out-interface eth1 -j MASQUERADE
#  iptables --append FORWARD --in-interface eth4 -j ACCEPT
# echo 1 >> /proc/sys/net/ipv4/ip_forward
Then, on the BeagleBone Black, we can set the gateway through the USB cable using the following command:
root@beaglebone:~# route add default gw 192.168.7.1
The eth1 device is the preferred Internet connection on the host system, while the eth4 device is the BeagleBone Black's device as viewed on the host system, as already seen earlier.
If we have a DHCP server installed in our LAN, the eth0 interface should automatically display an IP address. Here is what I get on my LAN:
root@BeagleBone:~# ifconfig eth0
eth0      Link encap:Ethernet  HWaddr 78:a5:04:ca:c9:fe
          inet addr:192.168.32.30  Bcast:192.168.32.255 Mask:255.255.255.0
          inet6 addr: fe80::7aa5:4ff:feca:c9fe/64 Scope:Link
          UP BROADCAST RUNNING MULTICAST  MTU:1500  Metric:1
          RX packets:143 errors:0 dropped:0 overruns:0 frame:0
          TX packets:136 errors:0 dropped:0 overruns:0 carrier:0
          collisions:0 txqueuelen:1000
          RX bytes:23623 (23.0 KiB)  TX bytes:19576 (19.1 KiB)
          Interrupt:40
However, if the DHCP server is up and running, but for some mystic reasons, this magic doesn't happen, we can force it using the following command:
root@BeagleBone:~# dhclient eth0
On the other hand, if the DHCP server is not working at all, we can use a static configuration by altering the /etc/network/interfaces file by adding the following lines:
iface eth0 inet static
    address 192.168.32.30
    netmask 255.255.255.0
    network 192.168.32.0
    gateway 192.168.32.8
Next, we need to add the DNS settings to the /etc/resolv.conf file by adding the following lines:
nameserver 94.249.192.104
nameserver 8.8.8.8
Tip
Note that the IP/DHCP addresses mentioned in the commands are user specific. You should change them so that they match your settings.
When all the modifications are in place, we should restart the networking activities:
root@BeagleBone:~# /etc/init.d/networking restart
Now we are ready to verify that the network settings are set correctly by trying to update the software repositories with the following command:
root@BeagleBone:~# aptitude update
Get: 1 http://security.debian.org wheezy/updates Release.gpg [836 B]
Get: 2 http://ftp.us.debian.org wheezy Release.gpg [1,655 B]
Get: 3 http://debian.beagleboard.org wheezy-bbb Release.gpg [490 B]
Get: 4 http://security.debian.org wheezy/updates Release [102 kB]
...
Get: 38 http://ftp.us.debian.org wheezy-updates/main 2014-06-16-2054.31.pdiff [5
01 B]
Fetched 20.1 MB in 35s (561 kB/s)

Current status: 78 updates [+78], 2 new [+2].
There is 1 newly obsolete package: libmozjs10d
Here, the system tells you that just one package is obsolete, and there are some new packages to be installed, so you can either leave all of them untouched or decide to upgrade everything. In the latter case, we can use the following command:
root@BeagleBone:~# aptitude upgrade
The following packages will be upgraded:
  acpi-support-base apache2 apache2-mpm-worker apache2-utils apache2.2-bin
  apache2.2-common apt apt-utils base-files bash BeagleBone bind9-host curl
  dbus dbus-x11 dpkg dpkg-dev file gnupg gpgv libapt-inst1.5 libapt-pkg4.12
  libavcodec-dev libavcodec53 libavformat-dev libavformat53 libavutil-dev
  libavutil51 libbind9-80 libc-bin libc-dev-bin libc6 libc6:armel libc6-dev
  libcups2 libcurl3 libcurl3-gnutls libdbus-1-3 libdbus-1-dev libdns88
  libdpkg-perl libgnutls26 libgssapi-krb5-2 libisc84 libisccc80 libisccfg82
  libjpeg-progs libjpeg8 libjpeg8-dev libk5crypto3 libkrb5-3
  libkrb5support0 liblcms2-2 liblwres80 libmagic1 libnspr4 libnss3

  libsmbclient libsoup-gnome2.4-1 libsoup2.4-1 libssl-dev libssl-doc
  libssl1.0.0 libswscale-dev libswscale2 libwbclient0 libxfont1 libxml2
  libxml2-dev libxml2-utils linux-libc-dev locales multiarch-support
  openssh-client openssh-server openssl rsyslog tzdata
The following packages are RECOMMENDED but will NOT be installed:
  bash-completion gnupg-curl gnupg-curl:armel krb5-locales
78 packages upgraded, 0 newly installed, 0 to remove and 0 not upgraded.
Need to get 53.2 MB of archives. After unpacking 159 kB will be freed.
Do you want to continue? [Y/n/?]
A lot to do here. For the moment, I decide to leave the system untouched. So, I just answer no by typing n.
Now let's see how to set up a proper LAMP suite.
First of all, we should drop the Bone101 service in order to free port 80, which is the World Wide Web's default port:
root@BeagleBone:~# systemctl stop bonescript.socket
root@BeagleBone:~# systemctl disable bonescript.socket
rm '/etc/systemd/system/sockets.target.wants/bonescript.socket'
Ok. Now, to test whether port 80 is really free, we type the following command and echo it to be sure of its status:
root@BeagleBone:~# netstat -pln | grep ':80\>' || echo "OK."
OK.
Now, we can switch the Apache web server from port 8080 to port 80 by altering the first lines of the /etc/apache2/sites-enabled/000-default file as follows:
--- 000-default.orig  2014-04-23 20:21:56.619140638 +0000
+++ 000-default  2014-10-10 20:00:21.752090984 +0000
@@ -1,4 +1,4 @@
-<VirtualHost *:8080>
+<VirtualHost *:80>
   ServerAdmin webmaster@localhost

   DocumentRoot /var/www
Then, replace all the 8080 occurrences with the string 80 in the /etc/apache2/ports.conf file as follows:
--- ports.conf.orig  2014-04-23 20:23:46.623046902 +0000
+++ ports.conf  2014-04-23 20:24:01.580078153 +0000
@@ -5,8 +5,8 @@
 # Debian etch). See /usr/share/doc/apache2.2-common/NEWS.Debian.gz and
 # README.Debian.gz

-NameVirtualHost *:80
-Listen 80
+NameVirtualHost *:8080
+Listen 8080

 <IfModule mod_ssl.c>
     # If you add NameVirtualHost *:443 here, you will also have to change
Now that all the modifications are done, we will now restart the server. To do so, we will use the following command:
root@BeagleBone:~# /etc/init.d/apache2 restart
[....] Restarting apache2 (via systemctl): apache2.service. ok
Once the server has been restarted, we will check whether the server is in the listening state. To do this, we will type the following command:
root@BeagleBone:~# netstat -pln | grep ':80\>'
tcp6       0      0 :::80                   :::*             LISTEN
2367/apache2
Ok, we did it! You can now repoint your browser to the default port 80 to verify that everything is working correctly.
Now, we can verify that the Apache PHP support is working by adding a simple PHP file to the DocumentRoot directory /var/www, as specified in the /etc/apache2/sites-enabled/000-default configuration file:
root@BeagleBone:~# cd /var/www/
root@BeagleBone:/var/www# cat > test.php <<EOF
<?php
phpinfo();
?>
EOF
Tip
The <<EOF trick used in the preceding command is often used when we need to supply one or more commands to a program directly to its standard input line (stdin). Using such a syntax, we tell the Bash shell to send the lines to the command itself and the line that holds the EOF characters directly to stdin of the executed command.
Now, if we point the browser to the URL http://192.168.7.2/test.php, we'll most probably get a blank page. This means that Apache lacks the PHP support, so let's install it:
root@BeagleBone:~# aptitude install libapache2-mod-php5 apache2-mpm-worker- apache2-
The following NEW packages will be installed:
  apache2-mpm-prefork{a} libapache2-mod-php5 libonig2{a} libqdbm14{a}
  lsof{a} php5-cli{a} php5-common{a}
The following packages will be REMOVED:
  apache2 apache2-mpm-worker
The following packages will be upgraded:
  apache2.2-bin apache2.2-common
2 packages upgraded, 7 newly installed, 2 to remove and 74 not upgraded.
Need to get 6,748 kB of archives. After unpacking 14.4 MB will be used.
Do you want to continue? [Y/n/?]
Tip
Don't forget the sign—after apache2-mpm-worker and apache2 because this means that we want to uninstall these packages, as they are incompatible with the apache2-mpm-prefork package.
You may discover the difference between the apache2-mpm-worker and apache2-mpm-prefork packages by surfing the net.
Get: 1 http://ftp.us.debian.org/debian/ wheezy/main lsof armhf 4.86+dfsg-1 [315
kB]
Get: 2 http://security.debian.org/ wheezy/updates/main php5-common armhf 5.4.4-1
4+deb7u14 [589 kB]...
Setting up php5-common (5.4.4-14+deb7u14) ...
Setting up apache2-mpm-prefork (2.2.22-13+deb7u3) ...
[....] Starting apache2 (via systemctl): apache2.service. ok
Setting up libonig2 (5.9.1-1) ...
Setting up libqdbm14 (1.8.78-2) ...
Setting up libapache2-mod-php5 (5.4.4-14+deb7u14) ...

Creating config file /etc/php5/apache2/php.ini with new version
[....] Restarting apache2 (via systemctl): apache2.service. ok
Setting up php5-cli (5.4.4-14+deb7u14) ...
We can update the alternatives using /usr/bin/php5 to provide /usr/bin/php (php) in auto mode. Note that during this procedure, we may get a lot of errors, which are as follows:
insserv: Starting led_aging.sh depends on rc.local and therefore on system facil
ity `$all' which can not be true!
insserv: Max recursions depth 99 reached
insserv:  loop involving service udhcpd at depth 2
insserv: There is a loop between service rc.local and mountall-bootclean if star
ted...
dpkg: error processing apache2-mpm-worker (--configure):
 dependency problems - leaving unconfigured
Errors were encountered while processing:
 apache2.2-common
 apache2
 apache2-mpm-worker
Don't panic! Just replace the /etc/init.d/led_aging.sh file with the following code:
#!/bin/sh -e
### BEGIN INIT INFO
# Provides:          led_aging.sh
# Required-Start:    $local_fs
# Required-Stop:     $local_fs
# Default-Start:     2 3 4 5
# Default-Stop:      0 1 6
# Short-Description: Start LED aging
# Description:       Starts LED aging (whatever that is)
### END INIT INFO

x=$(/bin/ps -ef | /bin/grep "[l]ed_acc")if [ ! -n "$x" -a -x /usr/bin/led_acc ]; then/usr/bin/led_acc &fi
Tip
Downloading the example code
You can download the example code files from your account at http://www.packtpub.com for all the Packt Publishing books you have purchased. If you purchased this book elsewhere, you can visit http://www.packtpub.com/support and register to have the files e-mailed directly to you.
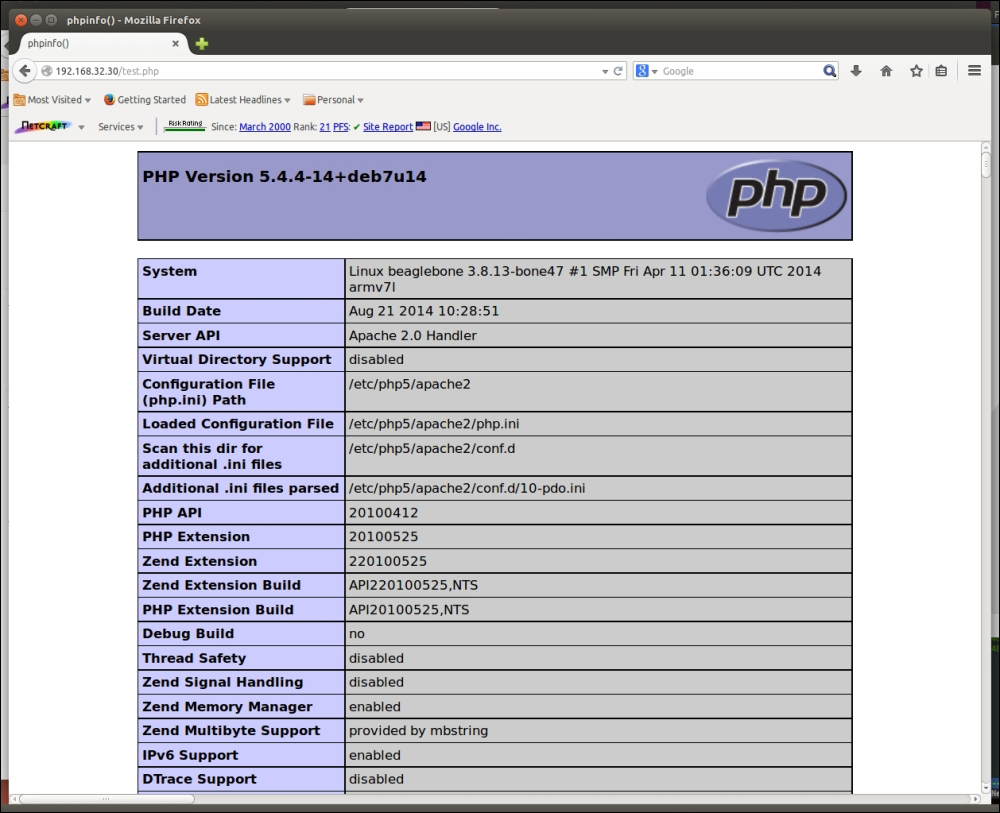
Ok. Now we can test the PHP support by reloading the URL http://192.168.7.2/test.php. The output should be something similar to the following screenshot:
Now the last step is to add the MySQL database server and the corresponding PHP support.
Installing the MySQL server is quite easy:
root@BeagleBone:~# aptitude install mysql-server mysql-client
Type the preceding command and proceed with the installation as mentioned earlier, and when the system asks for an administrative password for the database of the root user (don't confuse this MySQL user with the system's root user!), we should create one.
Tip
It may happen that some strange characters are displayed on the serial terminal; don't panic, it's just a display issue. We can ignore them and enter the desired root's password.
Also, note that you can install the mysql-client packet too to be able to manage the database settings from the command line.
When finished, the system should display this:
Setting up libhtml-template-perl (2.91-1) ...
Setting up mysql-client (5.5.38-0+wheezy1) ...
Setting up mysql-server (5.5.38-0+wheezy1) ...
This means that the MySQL server is up and running. We can easily test it by running the following command, again using the preceding <<EOF trick:
root@BeagleBone:~# mysql -u root -p <<EOF
show databases;
EOF
The system will ask for the database's root password to be inserted during the installation by showing the following line:
Enter password:
Then, if the password is correct, the output will be as follows:
Database
information_schema
mysql
performance_schema
If we get the preceding output, it means that we did it! This means that the installation was successful. However, the PHP still lacks the MySQL support; in fact, if we add the following code to the mysql_test.php file in the /var/www directory (as done earlier for the test.php file):
<?php
        # Check the PHP's MySQL support
        if (!function_exists("mysql_connect"))
                die("MySQL support missing!");

        # Get connect with the MySQL server.
        # Don't forget to replace the following string "ROOTPASS" with
        # the database's root password you choose during the installation!!!
        $connect = mysql_connect("localhost", "root", "ROOTPASS")
                or die("Unable to Connect");
        mysql_select_db("information_schema")
                or die("Could not open the db");

        # Do a simple query
        $showtablequery = "SHOW TABLES FROM information_schema";
        $query_result = mysql_query($showtablequery);

        # Let's display the result!
        while($row = mysql_fetch_array($query_result))
                echo $row[0] . " ";
?>
Then, pointing the web browser to the URL http://192.168.32.30:8080/mysql_test.php, we will see an error message as follows:
MySQL support missing!
So, to install PHP's MySQL support, use the following command:
root@BeagleBone:~# aptitude install php5-mysql
If we try reloading the preceding URL, we will not see the error messages anymore but the following text:
CHARACTER_SETS COLLATIONS COLLATION_CHARACTER_SET_APPLICABILITY COLUMNS COLUMN_PRIVILEGES ENGINES EVENTS FILES GLOBAL_STATUS GLOBAL_VARIABLES KEY_COLUMN_USAGE PARAMETERS PARTITIONS PLUGINS PROCESSLIST PROFILING REFERENTIAL_CONSTRAINTS ROUTINES SCHEMATA SCHEMA_PRIVILEGES SESSION_STATUS SESSION_VARIABLES STATISTICS TABLES TABLESPACES TABLE_CONSTRAINTS TABLE_PRIVILEGES TRIGGERS USER_PRIVILEGES VIEWS INNODB_BUFFER_PAGE INNODB_TRX INNODB_BUFFER_POOL_STATS INNODB_LOCK_WAITS INNODB_CMPMEM INNODB_CMP INNODB_LOCKS INNODB_CMPMEM_RESET INNODB_CMP_RESET INNODB_BUFFER_PAGE_LRU
Just a few years ago, the native compilation of programs on the target embedded system was previously unheard of, but the latest CPUs are now really powerful and both the RAM and storage (Flash, MMC, and so on.) memories are quite large to support native compilations. The BeagleBone hardware is capable of handling native compilations with ease although in terms of compilation time, it is more practical to cross-compile for larger projects or use the kernel (that's why we will show you how to install a cross-compiler on the host PC in the last section of this chapter).
The command to install the GGC suite is as follows:
root@BeagleBone:~# aptitude install gcc make
Tip
On my system, the preceding packages are already installed; in this case, the preceding command will give an answer to us as follows:
No packages will be installed, upgraded, or removed.
0 packages upgraded, 0 newly installed, 0 to remove and 74 not upgraded.
Need to get 0 B of archives. After unpacking 0 B will be used.
To check whether the compiler is working, we can consider compiling the classic Hello World C program. To do so, just insert the following code into a file called helloworld.c:
#include <stdio.h>

int main(int argc, char *argv[])
{
        printf("Hello World!\n");

        return 0;
}
Now we can compile it using the following command:
root@BeagleBone:~# make CFLAGS="-Wall -O2" helloworld
cc -Wall -O2    helloworld.c   -o helloworld
To execute the new program, type the following line:
root@BeagleBone:~# ./helloworld
Hello World! If it prints Hello World, then our code has been executed successfully!
The on-board system is a complete ready-to-use Debian distribution; however, it may happen that we may need another image (maybe during some developing stages) or just for backup purposes (just in case, the default image is corrupted for some reason). So, it's important to see how we can install an alternate image on our board.
There are many ways to install a Debian OS on our BeagleBone Black. I'm going to use the simplest and quickest one using a prebuild image to be put on a microSD. This solution has the advantage that by simply removing the microSD from the system, the board will boot with the original default image.
Tip
A similar procedure may be used to install a different OS too.
Note that the microSD should be a class 10 and have at least 4 GB storage space.
The first step is to download the image to a working directory on the host machine. We have several resources on the Internet, but I chose the one at http://ynezz.ibawizard.net/beagleboard/wheezy/.
The command to download the file is as follows:
$ wget http://ynezz.ibawizard.net/beagleboard/wheezy/debian-7.6-console-armhf-2014-08-13.tar.xz
By the time you read this, new versions could be available or the current one could be missing. Then, you should verify the available versions in case of errors while downloading the rootfs image used earlier. Next, unzip it, and then enter the newly created directory:
$ tar xf debian-7.6-console-armhf-2014-08-13.tar.xz
$ cd debian-7.6-console-armhf-2014-08-13
We are now ready to build our microSD.
The command to build the microSD is as follows:
# ./setup_sdcard.sh --mmc /dev/sdX --dtb BeagleBone
Here the /dev/sdX device must be chosen carefully. The best way to do so is using the tail command on the host in order to watch the kernel messages while we insert the microSD into our host PC:
$ tail -f /var/log/kern.log
In this situation, an usual kernel activity should be something like this:
usb 2-1.1: new high-speed USB device number 18 using ehci-pci
usb 2-1.1: New USB device found, idVendor=058f, idProduct=6387
usb 2-1.1: New USB device strings: Mfr=1, Product=2, SerialNumber=3
usb 2-1.1: Product: Miss Storage
usb 2-1.1: Manufacturer: Generic
usb 2-1.1: SerialNumber: 9B4B5BCC
usb-storage 2-1.1:1.0: USB Mass Storage device detected
scsi13 : usb-storage 2-1.1:1.0
scsi 13:0:0:0: Direct-Access     Generic  FIash Disk       8.07 PQ: 0 ANSI: 2
sd 13:0:0:0: Attached scsi generic sg3 type 0
sd 13:0:0:0: [sdd] 15663104 512-byte logical blocks: (8.01 GB/7.46 GiB)
sd 13:0:0:0: [sdd] Write Protect is off
sd 13:0:0:0: [sdd] Mode Sense: 03 00 00 00
sd 13:0:0:0: [sdd] No Caching mode page found
sd 13:0:0:0: [sdd] Assuming drive cache: write through
sd 13:0:0:0: [sdd] No Caching mode page found
sd 13:0:0:0: [sdd] Assuming drive cache: write through
 sdd: sdd1
sd 13:0:0:0: [sdd] No Caching mode page found
sd 13:0:0:0: [sdd] Assuming drive cache: write through
sd 13:0:0:0: [sdd] Attached SCSI removable disk
FAT-fs (sdd1): Volume was not properly unmounted. Some data may be corrupt. Please run fsck.
If we take a look at the preceding messages, it is quite clear that on my PC, the device used is /dev/sdd. In fact, these lines tell me that the newly attached SCSI device (the microSD) has been assigned to the sdd device.
Tip
Depending on our system configuration, we may discover that the right device to use is /dev/sdb, /dev/sdc, and so on or even a device named as /dev/mmcblk0. In this last case, our host PC is using a MMC device instead of a USB adapter to manage the SD or microSD slot of the PC. In this special situation, the kernel messages look like:
mmc0: cannot verify signal voltage switch
mmc0: new ultra high speed SDR50 SDHC card at address 0007
mmcblk0: mmc0:0007 SD4GB 3.70 GiB
mmcblk0: p1
Once the right device has been discovered, we can proceed with the microSD creation:
# ./setup_sdcard.sh --mmc /dev/sdd --dtb BeagleBone
The system will display a complete disk configuration asking for user confirmation; if we are sure about what we are doing, we've simply to answer yes and go on. At the end, we should see something like this:
Debug: image has: v3.16.0-armv7-x4
Debug: image has: v3.16.0-armv7-lpae-x2
Debug: image has: v3.8.13-bone63
Debug: using: v3.8.13-bone63
Finished populating rootfs Partition
-----------------------------
setup_sdcard.sh script complete
-----------------------------
The default user:password for this image:
debian:temppwd
-----------------------------
Well, now we can remove the microSD from the host PC and put it in our BeagleBone Black. If everything has been done correctly, then after we reboot, we can log in to our new Debian system in the same way as we did during our first login earlier:
$ minicom -o -D /dev/ttyACM0
Tip
Note that this time, we have to wait a bit longer that the normal boot due to some configuration issues of this Debian image, which can delay the booting time. This fact will be more clear in the following chapter, where we will be able to see the serial console messages.
Then, as reported, at the end of the microSD creation stage, we must supply the debian user with the temppwd password (don't worry if no login prompt is displayed), as shown in the following code:
debian
Password:
Last login: Wed Apr 23 20:21:01 UTC 2014 on ttyGS0
Linux BeagleBone 3.8.13-bone47 #1 SMP Fri Apr 11 01:36:09 UTC 2014 armv7l

The programs included with the Debian GNU/Linux system are free software;
the exact distribution terms for each program are described in the
individual files in /usr/share/doc/*/copyright.

Debian GNU/Linux comes with ABSOLUTELY NO WARRANTY, to the extent
permitted by applicable law.
debian@BeagleBone:~$
As stated at the beginning of this book, as a host system, I'm using a normal PC running Ubuntu 14.04 LTS distribution. Those who may wish to use another GNU/Linux-based OS can use most of the commands I'm going to use in the next chapter without any modifications (or with just a few differences, these can be replaced with a little effort). However, those who still insist on using a Windows- or Mac OS-based host system may have some troubles in following what I do, that's why I decided to write this little section/tutorial to help these people to install a GNU/Linux host system on their computers.
The trick to do our job is quite simple: we should use a virtual machine! Here, it is not so important to know which visualization system is used (my preference is for VirtualBox), the important thing is to install a GNU/Linux-based OS.
I will skip the instructions on how to install a new OS on a virtual machine since this is not the purpose of this book and because this operation is quite simple.
Ok, now that our new GNU/Linux OS is running on our new virtual machine, we need to make some adjustments in order to use it as a real host PC.
Tip
All the commands are for Ubuntu 14.04 LTS. You should use the proper commands if you decide to install a different GNU/Linux distribution.
First of all, let's check the networking settings; we should verify that our system can access the Internet so that we can install all the needed tools.
To check whether we can get connected to our BeagleBone via the emulated serial port, as we did during our first login, we need to install the minicom tool:
bbb@bbb-VirtualBox:~$ sudo apt-get install minicom
After the installation is completed, verify that the virtual machine is connected to the USB host port, where the BeagleBone Black is connected by checking the kernel messages as done earlier:
cdc_acm 1-1:1.2: ttyACM0: USB ACM device
You should verify that the USB device corresponding to the BeagleBone Black is connected to the virtual machine. This action depends on the virtual machine implementation used, and it implies some actions taken by the user. For example, VirtualBox allows you to choose the serial port from a menu, otherwise it stays connected to the host. Great! The serial port is accessible, so let's use the minicom command:
bbb@bbb-VirtualBox:~$ sudo minicom -o -D /dev/ttyACM0
Now let's check the Ethernet connection emulated via the USB cable. Using the ifconfig command, we can check whether the Ethernet devices are up and running on both the host and target systems. On the host, we have the following:
bbb@bbb-VirtualBox:~$ ifconfig eth1
eth1      Link encap:Ethernet  HWaddr 78:a5:04:ca:cb:00
          inet addr:192.168.7.1  Bcast:192.168.7.3  Mask:255.255.255.252
          inet6 addr: fe80::7aa5:4ff:feca:cb00/64 Scope:Link
          UP BROADCAST RUNNING MULTICAST  MTU:1500  Metric:1
          RX packets:2 errors:0 dropped:0 overruns:0 frame:0
          TX packets:53 errors:0 dropped:0 overruns:0 carrier:0
          collisions:0 txqueuelen:1000
          RX bytes:580 (580.0 B)  TX bytes:11465 (11.4 KB)
Depending on the virtual machine configuration, the Ethernet device ethX may vary, so we can use the ifconfig command without any arguments in order to get a list of all the networking devices present on the system. So, recalling what we did before, we should get connected to the target using the ssh command from the host system:
bbb@bbb-VirtualBox:~$ ssh root@192.168.7.2
The authenticity of host '192.168.7.2 (192.168.7.2)' can't be established.
ECDSA key fingerprint is b1:a9:84:39:71:99:a3:af:9e:ba:26:d5:e6:77:03:08.
Are you sure you want to continue connecting (yes/no)? yes
Warning: Permanently added '192.168.7.2' (ECDSA) to the list of known hosts.
Debian GNU/Linux 7

BeagleBoard.org BeagleBone Debian Image 2014-04-23

Support/FAQ: http://elinux.org/Beagleboard:BeagleBoneBlack_Debian
Last login: Wed Apr 23 20:20:26 2014
root@BeagleBone:~#
Ok, everything is working correctly!
In the end, the only tool that we need on the host is the C cross-compiler suite.
It can be installed using the following command on the newly created virtual machine:
$ sudo apt-get install gcc-arm-linux-gnueabihf make
Now we can try to compile the previous Hello World C example program on our new virtualized host PC:
$ make CC=arm-linux-gnueabihf-gcc CFLAGS="-Wall -O2" cross-helloworld
arm-linux-gnueabihf-gcc -Wall -O2    cross-helloworld.c   -o cross-helloworld
Tip
Note that now I've renamed the preceding Hello World program to cross-helloworld.c and the command line is quite different from before. The options of the make command are needed to select the cross-compiler and to use special compilation flags.
Now we can check whether the cross-compiler did its job correctly using the file command as follows:
bbb@bbb-VirtualBox:~$ file cross-helloworld
cross-helloworld: ELF 32-bit LSB  executable, ARM, EABI5 version 1 (SYSV), dynamically linked (uses shared libs), for GNU/Linux 2.6.32, BuildID[sha1]=5ea2036028d983438e38fc2df1a21d24d8fd7e59, not stripped
Yes, our cross-compiler is a good guy, but to be completely sure, we should test the code on our BeagleBone Black by copying the binary to it:
bbb@bbb-VirtualBox:~$ scp cross-helloworld root@192.168.7.2:
Debian GNU/Linux 7

BeagleBoard.org BeagleBone Debian Image 2014-04-23

Support/FAQ: http://elinux.org/Beagleboard:BeagleBoneBlack_Debian
cross-helloworld                              100% 8357     8.2KB/s   00:00
We will then execute it on the target:
bbb@bbb-VirtualBox:~$ ssh root@192.168.7.2 ./cross-helloworld
Debian GNU/Linux 7

BeagleBoard.org BeagleBone Debian Image 2014-04-23

Support/FAQ: http://elinux.org/Beagleboard:BeagleBoneBlack_Debian
Hello World!
Tip
In the last command, we used ssh to execute the cross-helloworld binary file on the remote machine to display the result on the local machine.
You can read more about this feature in the ssh user manual at http://www.openssh.com/manual.html.
In this chapter, we first logged in to our new BeagleBone Black, and then we set up all the developing tools we are going to use in the next chapters (the LAMP suite, native compiler, cross-compiler, and so on).
However, before we start using them, we need to do a fundamental step: we need to get access to the serial console in order to be able to get full control of our embedded board. This topic is presented in the next chapter.