Download code from GitHub
Chapter 1: Getting Started with Typescript 4
Our journey of learning design patterns is based on learning their purpose, their structure, and then implementing them using TypeScript 4. We do this mainly for the following reasons:
- To learn our patterns using a modern and concrete programming language such as TypeScript
- To leverage newer concepts of the language as opposed to dated or stereotyped implementations
- To study them, tweak them, or refactor them more carefully using modern best practices
Although TypeScript 4 offers a variety of language features, we are only going to use a small subset of them. For example, we will not discuss how to use namespaces, modules, or mixins; not because the language doesn't offer them, but because they are not very practical when learning about design patterns. The examples in this chapter are self-contained and intended for self-study and as reference implementations. Our goal is to provide material that you can use as a quick reference when you try to use design patterns, or understand the main reasons why or when to apply them in practice.
In this chapter, we are going to cover the following main topics:
- Introducing TypeScript 4
- Understanding TypeScript and JavaScript's relationship
- Installing and using the code examples
- Using VSCode with TypeScript
- Introducing to the Unified Modeling Language (UML)
By the end of this chapter, you will be able to write simple programs in TypeScript, leverage VSCode to compile run tasks, and be able to read basic UML class diagrams.
Note
The links to all the sources mentioned in this chapter, as well as any supplementary reading materials, are provided in the Further reading section, toward the end of this chapter.
Technical requirements
The code bundle for this chapter is available on GitHub at https://github.com/PacktPublishing/TypeScript-4-Design-Patterns-and-Best-Practices/tree/main/chapters/chapter-1_Getting_Started_With_Typescript_4.
In the Installing and using the code examples section, we will discuss how to install and use the code examples in this book. First, let's refresh our knowledge on TypeScript, especially its latest version.
Introducing TypeScript 4
Understanding the basic language constructs of TypeScript is very valuable when learning design patterns. You will need to recognize valid TypeScript code and some of its features because it will help you define better typings for objects, as well as help you avoid mistakes. We will strive to provide small but consistent examples and use cases of TypeScript idioms and constructs for completeness.
The basic structure of a TypeScript program consists of statements or expressions. The following is a list of basic types that are partly associated with JavaScript runtime types:
- Primitive types: These are
number,string,Boolean,void,null,undefined,unknown,never,unique,bigint, andanyvalues. To define or declare them, you need to write the name of the variable, followed by a semicolon (:) and its type. If you assign the wrong type, then the compiler will throw an error. Here is an example usage of those types (intro.ts):const one: string = "one"; const two: boolean = false; const three: number = 3; const four: null = null; const five: unknown = 5; const six: any = 6; const seven: unique symbol = Symbol("seven"); let eight: never; // note that const eight: never cannot happen as we cannot instantiate a never - Enums: They allow us to create named constants, such as the following:
enum Keys {
  Up,
  Down,
  Left,
  Right,
}
let up: Keys = Keys.Up;
You can enforce a compiler optimization with enums to make them constant, thus eliminating any unused information:
const enum Bool { True, False, } let truth: Bool = Bool.True; - Array and tuples: Arrays represent a collection of items of the same type, and they can have a variable size:
const arr: number[] = [1, 2, 3]; // array of numbers of any size
Tuples represent a fixed array, with each element having a defined type:
const tup: [number] = [1]; // tuple with one element of type number
- Classes: These are typical Object-Oriented Programming (OOP) abstractions that allow us to define objects of a specific shape with properties, methods, and visibility modifiers. For example, here is a typical use case of a class:
class User {
  private name: string;
  constructor(name: string) {
    this.name = name;
  }

  public getName(): string {
    return this.name;
  }
}

const user = new User("Theo");
console.log(user.getName()); // prints "Theo"
You can also define abstract classes (that is, regular classes) that cannot be instantiated. Instead, they need to be inherited as part of a parent-child relationship:
abstract class BaseApiClient { abstract fetch(req: any): Promise<any>; /* must be implemented in sub-classes*/ } class UsersClient extends BaseApiClient { fetch(req: any): Promise<any> { return Promise.resolve([]); } } const client = new UsersClient(); client.fetch({url: '/users'}); - Interfaces and types: Interfaces are abstractions that let you define the shape of an object and its properties, but without specifying an implementation. For example, we can define a
Comparableinterface like this:interface Comparable<T> { compareTo(o: T): number }Note that we are not defining an implementation for
compareTohere, just its type. Interfaces in TypeScript can also have properties:interface AppConfig { paths: { base: string; }; maxRetryCount?: number; }The question mark (
?) after the name represents an optional parameter, so it's allowed to create a type with or without it:const appConfig: AppConfig = { paths: { base: '/', } }Type is a similar concept to interfaces but is a bit more flexible. You can combine a
Typewith anotherTypeeither as aunionor as anintersectiontype:type A = 'A'; // type is 'A' type B = 'B'; // type is 'B' type C = A & B; /* type is never as there is nothing in common between A and C*/ type D = C | "E"; // type is "E" as C is a never type type E = { name: string; } type F = E & { age: number; } let e: F = { name: "Theo", age: 20 }Note
As a rule of thumb, you should be declaring interfaces first. However, when you want to combine or create new types on the fly, then you should use types.
There are many other notable features of TypeScript that you will learn about throughout this book. Now, let's move on and learn how to handle input and output.
Working with input and output
Understanding how to read from input and write to output is one of the most fundamental skills of any programming language. Handling input and output operations with TypeScript depends primarily on where you use it. For example, when using TypeScript in a browser environment, you accept input from user interactions, such as when a user clicks on a button and submits a form or when you send an AJAX request to a server.
When using TypeScript in a server, you can read input values from command-line arguments or from the standard input stream (stdin). Subsequently, we can write values to the output stream, called the standard output stream (stdout). All these concepts are common to all computer environments.
As an example, let's take a case where we are using TypeScript with Node.js. We can use the following simple program to read from stdin and write to stdout:
inputOutput.ts
const stream = process.stdin;
setImmediate(function () {
  stream.push(null);
});

stream.pipe(process.stdout);
Then, you can invoke this program from the command line:
 echo "Hello" | npm run ts chapters/chapter-1_Getting_Started_With_Typescript_4/inputOutput.ts
Hello World
Working with streams exposes a different programming model, called reactive programming, where you are concerned about asynchronous data streams and events. You will learn more about asynchronous communication patterns in Chapter 7, Reactive Programming with TypeScript.
Useful TypeScript 4 features
The latest version of TypeScript (v4.2) offers a great list of features that help developers write type-safe programs and abstractions. For example, with TypeScript 4, we have the following:
- Variadic tuple types: Tuples are interesting data structures as they represent fixed array types, where each element has a specific type. For example, we can model a point in 2D or 3D space as a tuple:
type Point2d = [number, number];
type Point3d = [number, number, number];
const point1: Point2d = [1, 2];
const point2: Point3d = [1, 2, 3];
Before TypeScript 4, you could not pass a variadic type parameter for a tuple as the shape of the tuple had to be defined. Now, let's check out the following code:
type NamedType<T extends unknown[]> = [string, ...T];
type NamedPoint2d = NamedType<Point2d>;
const point3: NamedPoint2d = ["Point: (1, 2)", 1, 2];
Here, the type of
NamedPoint2dis [string,number,number]. With this feature, we may have more compelling reasons to use tuples to model domain primitives. - Labeled tuples: Taking the previous example with the two tuples, we can also add names for each tuple element. This can improve documentation as you can clearly see the corresponding parameter for each item. For example, let's add labels to show the usage of x, y, and z coordinates:
type Point2dL = [x: number, y: number];
type Point3dL = [x: number, y: number, z: number];
Labeled tuples are useful for documentation purposes; so, if you use tuples, you should also provide labels for them.
- Template literal types: TypeScript 4 has added a new literal type for templates that allows us to combine types. This helps when defining new types out of existing ones and you want to avoid repetition. For example, we can model a Deck of Cards type using just two lines of code:
type Suit = `${"Spade" | "Heart" | "Diamond" | "Club"}`;
type Rank = `${"2" | "3" | "4" | "5" | "6" | "7" | "8" | "9" | "10" | "Jack" | "Queen" | "King" | "Ace"}`

type Deck = `${Rank} of ${Suit}`;
If you inspect the type of the Deck declaration, you will see that it enumerates the possible cards of a standard 53 deck of cards: 2 of Spade, 3 of Spade …, Ace of Club.
Now that we've introduced and understood TypeScript 4's features, let's learn how TypeScript and JavaScript are related to each other.
Understanding TypeScript and JavaScript's relationship
Now that you have a firm grasp of TypeScript's basic language concepts, you probably want to know how to migrate existing code in JavaScript to TypeScript, and what to look for while doing that. This is incredibly valuable if you already possess good experience with JavaScript, but you want to migrate some projects to TypeScript and you don't know how. Therefore, it's important to understand where existing JavaScript programs stand when translating them into TypeScript.
Let's move on to the next section to learn how JavaScript compares to TypeScript.
How does JavaScript compare to TypeScript?
If you are from a JavaScript background, you will find that learning TypeScript is not very far away from what you were doing. TypeScript adds types to JavaScript and, in reality, it wraps all JavaScript programs so that they are valid TypeScript programs by default. However, adding additional compiler checks may cause those programs not to compile as they did previously.
Therefore, you need to recognize the following concepts. Some JavaScript projects compile successfully. However, the same JavaScript projects may not type check. Those that type check represent a subset of all JavaScript programs. If you add more compiler checks, then this subset becomes smaller as the compiler will reject programs that do not pass this phase.
As a straightforward example, the following JavaScript program is also a valid TypeScript program by default, although no types are declared in the parameter name or the return type:
const isArray = (arr) => {
  return Array.isArray(a);
};
This program type checks correctly, so long as the noImplicitAny compiler flag is false.
Note
Although it is valid, it is not recommended in the long run as the compiler will infer the parameters as any type, which means that it will not type check them. When working on large-scale TypeScript projects, you should avoid those cases when you have implicit any types. If you don't, you lose many of the benefits of type safety.
Transitioning from JavaScript to TypeScript
A reasonable question you may have to answer when attempting to translate existing JavaScript code into TypeScript is this: How can you do this efficiently and how can you write correct types?
There are several techniques that you can use to perform that body of work, but in most cases, we can summarize it in a few words: divide and conquer:
- To begin with, you can start by dividing large pieces of JavaScript into smaller packages and files. This is to ensure you don't spend time only in one package.
- Then, start by renaming
.jsfiles as.tsfiles. Depending on thetsconfigflags, you will have some compilation errors, which is expected. Most of the compiler errors are for missing parameter types. For example, the following is a function that checks if the parameter is an object. You can easily use it in TypeScript, so long as thenoImplicitAnycompiler flag is unset:export const isObject = (o) => { return o === Object(o) && !Array.isArray(o) && typeof o !== "function"; }; - You may also want to enable the
allowJsflag, which allows you to import regular JavaScript files in TypeScript programs, with no complaints from the compiler. For example, if you maintain a file namedutilities.js, you can import it into TypeScript like so:import { isObject } from "./utilities";If you have imported from external libraries such as
lodashorRxjs, you may be prompted to download types for them. Usually, TypeScript will reference where those types are located. For example, forlodash, you should install it this way:npm install --save @types/lodash
In any other cases, you will have to follow the compiler leads and suggestions. Hopefully, if you have structured your programs so that they're in small and manageable pieces, then this process won't take much of your time.
Next, we will see whether design patterns can be used in JavaScript or whether it makes more sense to leave them as a typed language such as TypeScript.
Design patterns in JavaScript
When studying TypeScript design patterns and best practices, you may find yourself writing equivalent code in JavaScript for those examples. Although you can technically implement those patterns in JavaScript, the lack of types and abstractions makes learning those concepts less appealing.
For example, while using interfaces as parameters, we can change the implementation logic at runtime, without changing the function signature. This is how the strategy design pattern works, as will be explained in Chapter 5, Behavioral Design Patterns.
With JavaScript, we cannot use interfaces, so you may have to rely more on Duck Typing, property checks, or runtime assertions to verify that a particular method exists in an object.
Duck Typing is a concept where we are only interested in the shape of an object (property names or runtime type information) when we try to use it for a particular operation. This is because, in a dynamic environment such as JavaScript, there are only runtime checks to ensure the validity of operations. For example, let's say we have a function that accepts a logger object, which logs events into a stream, and an emailClient object by name and checks if certain methods are available before calling them:
function triggerNotification(emailClient, logger) {
    if (logger && typeof logger.log === 'function') {
        logger.log('Sending email');
    }
    if (emailClient && typeof emailClient.send ===
      'function') {
        emailClient.send("Message Sent")
    }
}
So long as the log and send properties exist in those objects and they are functions, then this operation will succeed. There are many ways that this can go wrong, though. Look at the following call to this function:
triggerNotification({ log: () => console.log("Logger call") }, { send: (msg) => console.log(msg) });
When you call the function this way, nothing happens. This is because the order of the parameters has changed (swapped) and log or send are not available as properties. When you provide the right shape of objects, then the call succeeds:
triggerNotification({ send: (msg) => console.log(msg) }, { log: () => console.log("Logger call") });
This is the correct output of this program:
> Logger call
> Message Sent
With the correct arguments passed into the triggerNotification function, you will see the aforementioned output of the console.log command.
Duck Typing has a similar counterpart to TypeScript, and it's called structural typing.
This is what is enforced during static analysis, and it means that when we have two types (A and B), then we can assign B to A if B is a subset of A. For example, look at the following logger object assignment:
interface Logger {
  log: (msg: string) => void;
}
let logger: Logger;
let cat = { log: (msg: string) => console.log(msg) };
logger = cat;
Here, A is logger of the Logger type and B is of the {log: (string) => void} type. Because type B is equivalent to A, this assignment is valid. Structural typing is a very important concept when learning TypeScript. Wewill see more examples throughout this book.
TypeScript and JavaScript have a close relationship, and Typescript will continue to be a superset of JavaScript for the time being. Now, let's learn how to use the code examples in this book.
Installing and using the code examples
When you download and install the source code that accompanies this book, you will find that the files are structured like a typical TypeScript project. We have included all the libraries and configurations you need to evaluate all the examples within the command line or via VSCode. It's useful to know what libraries are included in the examples and what problems they solve. Understanding the different tsconfig parameters that determine the behavior of the tsc compiler is helpful. You also need to be aware of how to run or debug the unit tests using Jest.
This section covers the following topics:
- Explaining the libraries used in this book
- Understanding the tsconfig configuration
- Running the unit tests
Let's get started.
Reviewing the libraries included in the code examples
We have included several references from external libraries in this book's source code. Our aim is to help you review several of the design patterns within a specific use case. Here is an overview of what they are and what problems they solve:
React: React is the most popular library for creating user interfaces right now, and it promotes some useful patterns such as composition, component factories, and higher-order components. We will explain the usage of TypeScript with React in Chapter 2, TypeScript Core Principles.Express: When building web services using TypeScript in Node.js, we want to use a minimal web framework. Express is the most stable choice when creating Node.js applications because it promotes modularity and performance. You will learn more about how to use TypeScript in the server in Chapter 2, TypeScript Core Principles.immutable.js: This is a library that provides immutable data structures and the relevant utility methods for working with them in an efficient way. Immutability is a concept that we use quite frequently in functional programming, where we do not allow objects to be modified or altered once they have been created. We will learn more about immutability in Chapter 6, Functional Programming with TypeScript.fp-ts: This is a library that exposes functional programming abstractions such as Monads, Options, and Lens. We will learn more about functional programming in Chapter 6, Functional Programming with TypeScript.rx.js: This is a library that offers reactive programming abstractions such as Observables in a nice API. Using Observables can help us develop scalable and resilient applications. You will learn more about Observables in Chapter 7, Reactive Programming with TypeScript.inversify.js: This is a lightweight inversion of control container, or IOC for short. We use IOC to handle object instantiation and lifetime guarantees, as well as to apply Single Responsibility, Open-Closed, Liskov-Substitution, Interface Segregation, and Dependency Inversion (SOLID) principles to our abstractions. We are going to explain more about these SOLID principles in Chapter 8, Developing Modern and Robust TypeScript Applications.
Using libraries is an excellent way to promote reusability and reliability. Quite often, when developing enterprise software, there is already a stack preconfigured for you, unless you are exceptionally fortunate to work in greenfield projects.
Next, we will learn how to configure the TypeScript compiler using tsconfig.json.
Understanding the tsconfig.json file
When you have a TypeScript source code inside a folder, the Typescript compiler needs to be able to find those files and compile them with some specific flags. Using a tsconfig.json or a jsconfig.json file determines the configuration-specific behavior of the compiler.
In most cases, you will only need one tsconfig.json file to manage all source code, but this is not a requirement. In this book, we will use a more flexible approach when compiling the source code examples.
We have a base tsconfig.json file that pertains to all the common compiler flags for all the chapters in this book. Then, each chapter will contain its own tsconfig.json, which inherits from the base config.
To understand what these flags are and what they do, let's describe them briefly now:
module: Modules define how imports and exports work. In this book, we are using CommonJS, which is the format used for Node.js projects. This means that the code generation will create the relevantrequirestatements. For example, you can inspect the compiled code of the code generation inside thedistfolder.target: This specifies the actual code generation target, such as ES6, ES2017, ESNEXT, and so on. This means that some features may not work in all environments, such as Node.js or older browsers. In this project, we will use ES5, which is the lowest common denominator; it has great support.noImplicitAny: This prevents the program from compiling when TypeScript infers the type asany. This happens relatively often when you define a function without specifying the types for the parameters. For example, the following program (degToRad.ts) does not compile when this flag is true:const degToRad = (degree): number => (degree * Math.PI) / 180; > npx tsc --build chapters/chapter-1_Getting_Started_With_Typescript_4 chapters/chapter-1_Getting_Started_With_Typescript_4/degToRad.ts:1:19 - error TS7006: Parameter 'degree' implicitly has an 'any' type. 1 const degToRad = (degree): number => (degree * Math.PI) / 180;
strictNullChecks: This rule makes undefined and null checks more prevalent. Any time the compiler infers a type as undefined, it will follow any code that does not ensure that null is left unchecked, and it will raise an error.experimentalDecoratorsandemitDecoratorMetadata: In some examples, especially when usingInversify.js, we use decorators, which are experimental features of JavaScript. Decorators are a very interesting concept, and they also have a relevant design pattern for using classes. Enabling these two flags is a requirement with TypeScript.sourceMap: This enables source maps that are used when debugging TypeScript code. This will allow, for example, VSCode or the browser to show the original uncompiled Typescript code when stopping at breakpoints.There are also many more compiler flags available that can tweak different aspects of the system. These options usually tweak more specific aspects of the compiler by customizing the restrictiveness of the type checks. For example, using
strictBindCallApplyorstrictFunctionTypesmay introduce more type checks for theBind,Call,Apply, orFunctiontypes. Before enabling any extra flags, it is recommended that you achieve consensus with your colleagues to avoid any confusion.
Running the unit tests
As we mentioned previously, you can run unit tests using the Jest runner. This is a popular testing framework for TypeScript and JavaScript projects as it is easy to get started and it has good integrations with major frameworks. Here, we have provided configuration options for running the unit tests right from VSCode.
To run the tests, you'll have to execute the following command in the console:
npm run-script test
For example, there is a file named mul.ts that includes a function for multiplying two numbers:
mul.ts
function mul(a: number, b: number) {
  return a * b;
}
export default mul;
Then, we also have the test file for this function, which has the same filename but with a test.ts extension:
mul.test.ts
import mul from "./mul";
test("multiplies 2 and 3 to give 6", () => {
  expect(mul(2, 3)).toBe(6);
});
When you execute these test cases, you will see the runner results:
npm test > TypeScript-4-Design-Patterns-and-Best-Practices@1.0.0 test TypeScript-4-Design-Patterns-and-Best-Practices > jest PASS chapters/chapter-1_Getting_Started_With_Typescript_4/mul.test.tsmultiplies 2 and 3 to give 12 (1 ms) Test Suites: 1 passed, 1 total Tests: 1 passed, 1 total
We will frequently use Jest to verify some assumptions of design patterns. For example, we will test whether the Singleton design pattern uses only one instance and does not create more, or whether the Factory pattern constructs objects with the right type and nothing else. Writing good unit test cases is often a requirement before releasing code to production, so it's crucial to always test your abstractions promptly.
Using VSCode with TypeScript
You now know what libraries are included in the code examples and how to run them. Just as it is important to know how to use the examples in this book, it is of equal importance to master the editor and the development environment. This is because using an Integrated Development Environment (IDE) can help you maximize your time when you're debugging or refactoring methods or functions.
First, you will learn how to use VSCode for this book's code. This will help you not only run and debug the examples, but experiment with the code as well. You can use the IDE's inspection utilities to view the inferred types of each defined variable. Finally, you want to understand how to refactor existing code so that you can make it easier to read and reuse.
Using VSCode for this book's code
VSCode is a lightweight integrated editor that was released in 2015 by Microsoft. It offers an impressive array of features that aid us when writing code. It currently supports several major programming languages, including TypeScript, Java, Go, and Python. We can use VSCode's native TypeScript integration to write and debug code, inspect types, and automate common development tasks. Let's get started:
- To install it, you may want to visit the official Download page at https://code.visualstudio.com/Download and choose the right executable for your operating system. In this book, we are using VSCode version 1.53.1.
- Once installed, you will want to open this book's projects folder using the menu dialog: File | Open | (Project). Since we are working on the first chapter, you can expand the
Chapter 1folder and inspect the programs located there. - We have preconfigured all the necessary tasks and launch configurations to run or debug the examples in this book. If you've installed all the project dependencies, as we did in the previous section, the only thing you need to do is select the Run icon from the sidebar and select the Run Code from Chapter 1 option, as depicted in the following screenshot:

Figure 1.1 – Run Code from Chapter 1 option
- You will be prompted to select a program name to run. For now, let's run
computeFrequency.ts. This contains a function that computes the frequencyMapof an input string:function computeFrequency(input: string) { const freqTable = new Map(); for (let ch of input) { if (!freqTable.has(ch)) { freqTable.set(ch, 1); } else { freqTable.set(ch, freqTable.get(ch) + 1); } } return freqTable; } console.log(computeFrequency("12345"));The result will be shown in the console:
Map(5) {1 => 1, 2 => 1, 3 => 1, 4 => 1, 5 => 1} - You can run several of the examples in this book or create additional programs on your own. You can also debug any section of the code. To do that, you need to add breakpoints next to each line, as depicted in the following screenshot:

Figure 1.2 – Debugging code
- Once you've placed breakpoints, you can run the task again and the code will stop at the first one. Debugging with breakpoints is valuable when you're trying to understand how the program behaves at runtime.
- You can also add more programs to select from the launch list. To do this, you must open the
.vscode/launch.jsonfile and modify theinputs-> programNameChapter1->options to include an additional filename. For example, if you have created a new file namedexample.ts, you will need to change theinputsfield so that it looks like this:"inputs": [ { "type": "pickString", "id": "programNameChapter1", "description": "What program you want to launch?", "options": [ "computeFrequency.ts", "removeDuplicateVars.ts", "example.ts", ], "default": "computeFrequency.ts" } ]
From now on, you will be able to select this program from the launch list.
Inspecting types
Now that you know how to run and debug programs using VSCode, you probably want to know how to inspect types and apply suggestions to improve consistency.
By default, when you write statements in VSCode, they retrieve suggestions and other operations from the TypeScript language server. This server is bundled together with the tsc compiler and offers an API for querying or performing those refactorings. You don't have to run or configure this server manually as VSCode will do that for you.
Let's learn how to inspect types using VSCode:
- Open the
removeDuplicateChars.tsfile in the editor. This contains a function that accepts an input string and removes any duplicate characters. Feel free to run it and inspect how it works:function removeDuplicateChars(input: string) { const result: string[] = []; // const result = []; let seen = new Set(); for (let c of input) { if (!seen.has(c)) { seen.add(c); result.push(c); } } } console.log(removeDuplicateChars("aarfqwevzxcddd")); - If you place the mouse cursor on top of the variables in the function body, you can inspect their types. Here is an example of using the
resultvariable:
Figure 1.3 – Inspecting the type of a variable
This is fairly obvious as we declared its type. However, we can inspect types that have been inferred by the compiler and figure out when or why we need to add explicit types.
What happens when you don't explicitly add types to variables that need them? In most cases, the compilation will fail.
- Comment this line and remove the comments from the following line:
const result = [];
- Then, run the program again. You will see the following error:
removeDuplicateVars.ts:8:19 - error TS2345: Argument of type 'string' is not assignable to parameter of type 'never'.
If you inspect the type again, you will see that TypeScript will infer it as
never[]:
Figure 1.4 – The never type
A
nevertype is almost always what you don't want. The compiler here could not determine the correct type at instantiation, even though we pushed string characters into theforloop's body. - If we were to initialize the result with a value, the compiler will infer it correctly; for example:

Figure 1.5 – Inferred type
Using the correct types and relying on type inference whenever possible is very important when working with TypeScript. VSCode offers good inspection utilities to do this, but a lot of times, we need to help the compiler do this.
You will learn how to work with types and understand type inference in Chapter 2, TypeScript Core Principles, in the Working with advanced types section.
Refactoring with VSCode
Using VSCode, we can refactor the code that we are working with. Code refactoring is the process of restructuring the code base to accommodate future changes. With refactoring, we have specific end goals, such as making the code easier to read, easier to extend, or easier to navigate while keeping the same functionality.
Note
When you perform refactoring, you want to have unit tests in place before changing any existing code. This is to ensure you did not introduce any breaking changes or fail to capture edge cases.
In some cases, refactoring code can reveal potential opportunities for using design patterns, so it's a useful technique to learn. The main gotcha is that when you refactor, you need to know when to stop. Once you've applied simple refactoring, you should stop and think whether further changes to the code base are justified based on the scope of the problem you are trying to solve.
To perform simple refactoring with VSCode, you just need to highlight a specific block of code and review the options:
- Inside the
Chapter 1source code folder, open therefactoring.tsfile. You will find a definition of thefindfunction that implements a linear search algorithm to find the elements inside a list:function find<T>(arr: T[], predicate: (item: T) => boolean) { for (let item of arr) { if (predicate(item)) { return item; } } return undefined; }Notice that we can refactor the predicate function parameter and use it as the same type with the
indexOffunction parameter. You just need to select the whole function body; that is,(item: T) => Boolean. - Right-click and select the Refactor option. Then, select Extract to type alias:

Figure 1.6 – Extract to type alias option
- Name it
Predicate. This will create a type alias for this function signature:type Predicate<T> = (item: T) => boolean;
- Now, you can see that the IDE has renamed the type of this variable as the refactored definition:
function indexOf<T>(arr: T[], predicate: Predicate<T>) {
  for (let i = 0; i < arr.length; i += 1) {
    if (predicate(arr[i])) {
      return i;
    }
  }
  return -1;
}
What is the inferred return type of this function?
The answer is
T|undefinedbecause we can either find the element, thus returning it, or not find it and return it undefined.
Reusing types and blocks of code like this helps you compartmentalize the code base and makes it easier to reuse.
VSCode offers additional refactoring options, such as the following:
- Extract Method: When you want to extract a block of code into a method or a global function.
- Extract Variable: When you want to extract an expression as a variable.
- Rename Symbols: When you want to rename a variable and all its usages across files.
Familiarizing yourself with these refactoring operations can help you save time and reduce typos when modifying code. In the next section, you will learn how to use Unified Modeling Language (UML) to visualize object-oriented systems.
Introducing Unified Modeling Language (UML)
You now know how to work with VSCode and have a firm understanding of its code base and some examples. We will complete this chapter by learning about UML and how we can utilize it to study design patterns. We will focus on a limited set of UML, specifically class diagrams, since this is the traditional way to depict design patterns; plus, they are straightforward to comprehend.
What is UML?
UML is a standardized way of modeling software architecture concepts, as well as interactions between systems or deployment configurations. Nowadays, UML covers more areas, and it's fairly comprehensive. It came as a result of a consolidation of similar tools and modeling techniques, such as use cases, the Object Modeling Technique (OMT), and the Booch Method.
You don't really need to know all the ins and outs of UML, but it is really helpful when you're learning about design patterns. When you first learn about design patterns, you want to have a holistic overview of the patterns, irrespective of the implementation part, which will differ from language to language. Using UML class diagrams is a perfect choice for modeling our patterns in a design language that everyone can understand with minimal training.
Let's delve into more practical examples using TypeScript.
Note
Although UML diagrams have a long history in software engineering, you should use them carefully. Generally, they should only be used to demonstrate a specific use case or sub-system, together with a short explanation of the architecture decisions. UML is not very suitable for capturing the dynamic requirements of very complex systems because, as a visual language, it is only suitable for representing high-level overviews.
Learning UML class diagrams
UML class diagrams consist of static representations of the classes or objects of a system. TypeScript supports classes and interfaces, as well as visibility modifiers (public, protected, or private) so that we can leverage those types to describe them with class diagrams. Here are some of the most fundamental concepts when studying class diagrams:
- A class represents a collection of objects with a specific structure and features. For example, the following
Productclass looks like this:class Product {}This corresponds to the following diagram:

Figure 1.7 – Class representation
- An interface is usually attached to a class and represents a contract that the class adheres to. This means that the class implements this interface:
interface Identifiable<T extends string | number>{
    id: T
}
class Product implements Identifiable<string> {
    id: string
    constructor(id: string) {
        this.id = id;
    }
}
This corresponds to the following diagram. Notice the placement of the interface clause on top of the class name within the left shift (
<<) and right shift (>>) symbols:
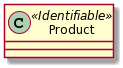
Figure 1.8 – Interface representation
- An abstract class represents an object that can't be directly instantiated:
abstract class BaseApiClient {}This corresponds to the following diagram. The name of the class is in italics:
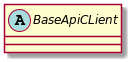
Figure 1.9 – Abstract class representation
- An association represents a basic relationship between classes, interfaces, or similar types. We use associations to show how they are linked with each other, and this can be direct or indirect. For example, we have the following models for
BlogandAuthor:class Blog implements Identifiable<string> { id: string; authorId: string; constructor(id: string, authorId: string) { this.id = id; this.authorId = authorId; } } class Author {}This corresponds to the following diagram.
Blogis connected toAuthorwith a line:
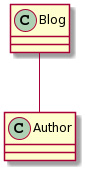
Figure 1.10 – Association representation
Notice that because the Author class here is not being passed as a parameter, it is referenced from the authorId parameter instead. This is an example of indirect association.
- An aggregation is a special case of association when we have two entities that can exist when one is missing or not available. For example, let's say we have a
SearchServicethat accepts aQueryBuilderparameter and performs API requests on a different system:class QueryBuilder {} class EmptyQueryBuilder extends QueryBuilder {} interface SearchParams { qb?: QueryBuilder; path: string; } class SearchService { queryBuilder?: QueryBuilder; path: string; constructor({ qb = EmptyQueryBuilder, path }: SearchParams) { this.queryBuilder = qb; this.path = path; } }This corresponds to the following diagram.
SearchServiceis connected toQueryBuilderwith a line and a white rhombus:
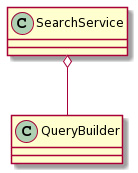
Figure 1.11 – Aggregation representation
In this case, when we don't have a QueryBuilder or the class itself has no queries to perform, then SearchService will still exist, although it will not actually perform any requests. QueryBuilder can also exist without SearchService.
Composition is a stricter version of aggregation, where we have a parent component or class that will control the lifetime of its children. If the parent is removed from the system, then all the children will be removed as well. Here is an example with Directory and File:
class Directory {
  files: File[];
  directories: Directory[];
  constructor(files: File[], directories: Directory[]) {
    this.files = files;
    this.directories = directories;
  }

  addFile(file: File): void {
      this.files.push(file);
  }
  addDir(directory: Directory): void {
    this.directories.push(directory);
  }
}
This corresponds to the following diagram. Directory is connected to File with a line and a black or filled rhombus:
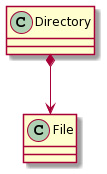
Figure 1.12 – Composition representation
- Inheritance represents a parent-child relationship when there is one or more sub-classes that inherit from base classes (also known as a superclass):
class BaseClient {}
class UsersApiClient extends BaseClient {}
This corresponds to the following diagram.
UsersApiClientis connected toBaseClientwith a line and a white pointed arrow:
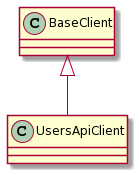
Figure 1.13 – Inheritance representation
- Visibility is related to attributes that the class contains and how they are accessed. For example, we have an
SSHUserclass that accepts a private key and a public key:class SSHUser { private privateKey: string; public publicKey: string; constructor(prvKey: string, pubKey: string) { this.privateKey = prvKey; this.publicKey = pubKey; } public getBase64(): string { return Buffer.from(this.publicKey).toString ("base64"); } }This corresponds to the following diagram.
SSHUsercontains two properties and one method. We use a minus (-) for private visibility and a plus (+) for public visibility:
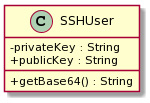
Figure 1.14 – Visibility
Here, we can see that the methods are separated by a horizontal bar for visibility.
We can also add notes or comments to class diagrams, although it's not very clear if they should be included in the code:
Figure 1.15 – Comments representation
The main difficulty when using class diagrams is not drawing them on a piece of paper, but rather how to properly model the domain classes and relationships in a sound manner. This process is often iterative and involves interacting with several domain experts or knowledgeable stakeholders. In Chapter 8, Developing Modern and Robust TypeScript Applications, we are going to learn how domain-driven design can help us with modeling business rules.
Summary
We introduced this chapter by providing a short introduction to TypeScript by focusing on the basic types and language abstractions. We compared its relationship to JavaScript and followed some steps to convert a program written in JavaScript into TypeScript.
We then reviewed the libraries that we will use throughout this book and how they will help us develop scalable applications. We explored the tsconfig file and its options.
Using the VSCode editor, we learned how to run and debug code and this book's examples. We then performed some refactorings, which helped us refine the code even better. Finally, we introduced UML and class diagrams, which are used as a traditional way of modeling design patterns or abstractions.
By applying what you have learned so far, you can start developing basic TypeScript projects that will help you become familiar with the language. Learning how to add VSCode tasks and launch configurations can help you master this programming editor and be more productive. Understanding UML diagrams helps you use a standardized way to document computer systems and models.
In the next chapter, we will delve deeper into the TypeScript type system and learn about more advanced types.
Q & A
- Why is JavaScript inherently less safe than TypeScript?
JavaScript lacks types and static checks, and it's more likely to introduce errors at runtime, not only because they cannot exist with TypeScript but because they are not prevented by any tool or mechanism. TypeScript provides some basic guarantees about the validity of the parameters or variables you use.
- Why do we use class diagrams to describe design patterns?
This is because class diagrams are useful for representing the static structure of a system and the associations between them.
- Explain why refactoring code using TypeScript is easier to perform.
As we mentioned previously, TypeScript comes with its own refactoring tool, namely the server executable, which integrates well with VSCode. Because the server scans the program and resolves all the types of the variables or objects, it can provide additional operations such as refactoring. This would be more difficult or limited when using JavaScript as there are no types to check against.
- How would you persuade a JavaScript developer to switch to TypeScript?
I would explain to them the difference between JavaScript and TypeScript and how easy it is to convert existing projects into TypeScript, piece by piece. I would also relay the benefits of type checking, refactoring, and having a better coding experience. I would conclude that TypeScript is widely used and documented, so there should be no fear in adopting it in practical projects.
- How does VSCode recognize the type of a variable when you hover over it?
TypeScript comes with its own refactoring tool, namely the server executable. This tool offers code inspection facilities that VSCode uses natively.
- What are the benefits of using external libraries such as
Immutable.js?We use external libraries to avoid implementing hard-to-understand concepts that require some expertise. For example, with
Immutable.js, writing a similar library that works with immutable data is a daunting feat. We must carefully avoid all sorts of issues, such as memory leaks, performance degradation, and bad API implementation. In many cases, it's also counterproductive as you won't have enough time to materialize business goals as you will lose time and money working on irrelevant features.
Further reading
- A good introduction to TypeScript is Learning TypeScript by Remo H. Jansen, available at https://www.packtpub.com/product/learning-typescript/9781783985548.
- Refactoring is explained in detail in Refactoring: Improving the Design of Existing Code, 2nd Edition by Martin Fowler, available at https://www.informit.com/store/refactoring-improving-the-design-of-existing-code-9780134757599.
- UML, as explained by its creators, is detailed in The Unified Modeling Language User Guide by Booch and James Rumbaugh, available at https://www.researchgate.net/publication/234785986_Unified_Modeling_Language_User_Guide_The_2nd_Edition_Addison-Wesley_Object_Technology_Series.