


In this chapter we will cover:
Installing Mudbox 2013 documentation
Setting up hotkeys
Increasing the resolution on your model
Bookmarking the camera view
Downloading and enabling stamps, stencils, and base meshes from the Internet
Adding and adjusting your image planes
Sculpting on different subdivision levels effectively
Recording a movie while you work in Mudbox
Setting up colors and other preferences
Setting up your Wacom tablet
Working in expert mode
This chapter will help you get your preferences set up so that you can work in a way that is most intuitive and efficient for you. Whether you are a veteran or a newbie, it is always a good idea to establish a good workflow. It will speed up your production time, allowing you to get ideas out of your head before you forget them. This will also greatly aid you in meeting deadlines and producing more iterations of your work.
In addition to the recipes in this book, you may find yourself wanting to look through the Mudbox 2013 documentation for additional help. By default, when you navigate to Help through Mudbox 2013's interface, you will be sent to an online help page. If you have a slow Internet connection or lack a connection altogether, you may want to install a local copy of the documentation. After downloading and installing the local copy, it is a good idea to have Mudbox 2013 point you to the right location when you navigate to Help from the menus. This will eliminate the need to navigate through your files in order to find the documentation. The following recipe will guide you through this process:
1. First thing you will want to do is download the documentation from Autodesk's website. You can find the documentation for this version as well as the previous versions from the following link: http://usa.autodesk.com/adsk/servlet/index?siteID=123112&id=17765502.
2. Once you're on this page you can scroll down and click on 2013 for the language and operating system that you are using. The following screenshot is what you should see:

3. Next you will navigate to the location that you downloaded the file to, and run it.
4. Now follow the prompts by clicking Next until the installation is complete. This file will install the documentation into your
Autodesk\Mudbox 2013folder by default. You can change this location during the installation process if you like but I recommend leaving this as the default location.5. After the local version of the Help files are installed, we need to point Mudbox 2013's Help menu to the local copy of the documentation. To do this, open the
Mudbox 2013folder, click on Windows in the top menu bar, and click on Preferences. The following screenshot shows how it should look:
6. Next, click on the small arrow next to Help so that more options open up. You will notice that next to Help Location it says Autodesk Web Site. We are going to change that to Installed Local Help by clicking on the small arrow next to (or directly on the text) Autodesk Web Site and choose Installed Local Help from the drop-down menu. Then click on OK.
The first thing you will want to do when you start using a new piece of software is, either set up your own hotkeys or familiarize yourself with the default hotkeys. This is very important for speeding up your workflow. If you do not use hotkeys, you will have to constantly go through menus and scroll through windows to find the tools that you need, which will undoubtedly slow you down.
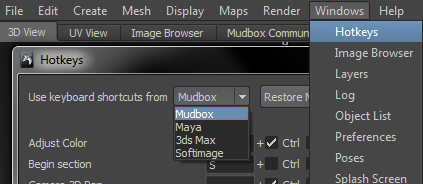
1. First you will need to go into the Windows menu item on the top menu bar.
2. Next, you will click on Hotkeys to bring up the hotkey window as shown in the next screenshot.
3. You will notice a drop-down menu that reads Use keyboard shortcuts from with a Restore Mudbox Defaults button next to it. Within this menu you can set your default hotkeys to resemble a 3D software that you are accustomed to using.
This will help you transition smoothly into using Mudbox. If you are new to all 3D software, or use a software package that is not on this list, then using Mudbox hotkeys should suffice.
The following screenshot shows the options available in Mudbox 2013:
After choosing a default set of keys, you can now go in and change any hotkeys that you would like to customize. Let's say, I would like Eyedropper to activate when I press the E key and the left mouse button together. What you will do is change the current letter that is in the box next to Eyedropper to E and you will make sure there is a check in the box next to LMB (Left Mouse Button). It should look like the following screenshot:

Once all your hotkeys are set up as desired, you will be able to use quick keystrokes to access a large number of tools without ever taking your eyes off your project. The more you get comfortable with your hotkeys, the faster you will get at switching between tools.
When you first start using a particular software, you probably won't know exactly which tools you will be using most often. With that in mind, you will want to revisit your hotkey customization after getting a feel for your workflow and which tools you use the most.
Another thing you want to think about, when setting up your hotkeys, is how easy it is to use the hotkey. For example, I tend to make hotkeys that relate to the tool in some way in order to make it easier to remember.
For example, the Create Curve tool has a good hotkey already set for it, Ctrl + C, for the reasons mentioned as follows:
One reason it is a good hotkey is that the first letter of the tool is also the letter of the key being used for the hotkey. I can relate C to curve.
Another reason this could be a good hotkey is because if creating curves is something that I find myself doing often, then all I have to do is use my pinky finger on the Ctrl key and my pointer finger on the C key. You may think "Yeah? So what?" but if I were to set the hotkey to Ctrl + Alt + U it's a bit more of a stretch on my fingers and I would not want to do that frequently.
The point is, key location and frequency of use are things you want to think about to speed up your workflow and stay comfortable while using your hotkeys.
Before you can get any fine details, or details that you would see while viewing from close up, into the surface of your model you will need to subdivide your mesh to increase its resolution. In the same way that a computer monitor displays more pixels when its resolution is increased, a model will have more points on its surface when the resolution is increased.
The hotkey for subdividing your surface is Shift + D or you can alternatively go into the menus as shown in the following screenshot:
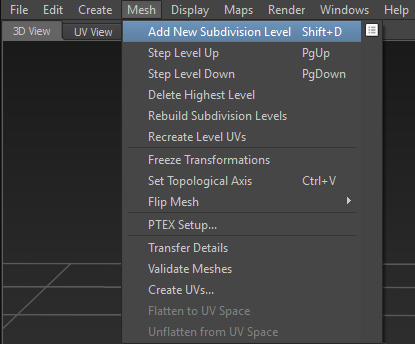
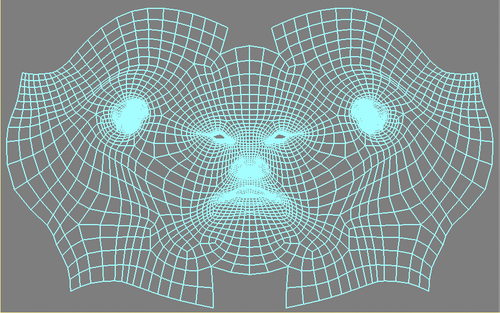
What this does is it adds more polygons which can be manipulated to add more detail. You will not want to subdivide your model too many times, otherwise, your computer will begin to slow down. The extent to which your computer will slow down is exponential. For example, if you have a six-sided cube and you subdivide it once, it will become 24-sided. If you subdivide it one more time, it will become 96-sided and so on. The following screenshot from Maya shows you what the wireframe looks like from one level to the next:
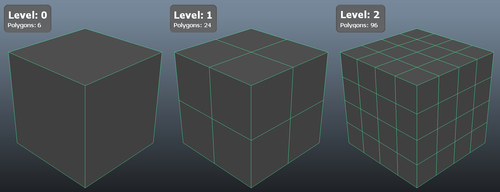
The reason this image was created in Maya is because Mudbox will only show the proper wireframe when your model reaches 1000 polygons or more.
The more powerful your computer, the more smoothly Mudbox 2013 will run. More specifically, it's the RAM and the video memory that are important. The following are some explanations on how RAM and video memory will affect your machines performance.
RAM is the most important of all. The more RAM you have, the more polygons Mudbox will be able to handle, without taking a performance hit.
The video memory increases the performance of your video card and allows high resolution, high speed, and color graphics. Basically, it allows the Graphical User Interface (GUI) to have better performance.
So, now that you know RAM is important, how do you decide how much will be needed to run Mudbox 2013 smoothly? Well, one thing to consider is your operating system and the version of Mudbox 2013 you are running. If you have a 32-bit operating system and you are running the 32-bit Mudbox 2013, then the maximum RAM you can get is 4 GB. But, in reality you are only getting about 3 GB of RAM as the operating system needs to use around 1 GB of that memory.
On the other hand, if you are using a 64-bit operating system and the 64-bit Mudbox 2013 version then you are capped at about 8 TB (yes, I said TB not GB). You will not need anywhere near that amount of RAM to run Mudbox 2013 smoothly. My recommendation is to have a minimum of 8 GB of RAM and 1 GB of video memory. With this amount of RAM and video memory you should be able to work with around 10 million triangles on the top level of your sculpt.
Notice the little white box next to Add New Subdivision Level in the following screenshot:
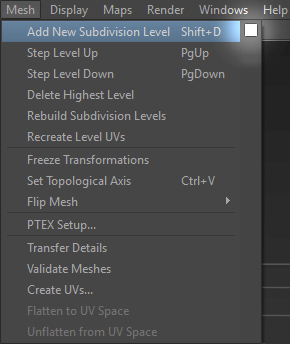
By clicking on this box, you will be given a few options for how Mudbox will handle the subdivision, as shown in the following screenshot:
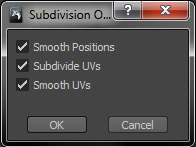
The options shown in the previous screenshot are explained as follows:
Smooth Positions: This option will smooth out the edges by averaging out the vertices that are added. The following screenshot shows the progression from Level 0 to Level 2 on a cube:

Subdivide UVs: If this option is unchecked when you create a new subdivision level, then you will lose your UVs on the object. To get your UVs back you will need to recreate the UVs for that level. This is discussed in a recipe found in Chapter 5, Get In and Get Out. If the Subdivide UVs option is turned on then it will just add subdivisions to your existing UVs.
Smooth UVs: If this option is turned on, the UVs will be smoothed within the UV Borders as shown in the next screenshot:

If you want your borders to smooth along with the interior parts of the shell, as shown in the next screenshot, then you will need to take a few extra steps to allow this:
This is the method Mudbox used in the 2009 and earlier versions. In Mudbox 2010, they switched the way they handle this operation so that the borders do not smooth. Here is an excerpt from the Service Pack notes from 2010:
"A new environment variable now exists to alter how the Smooth UVs property works when subdividing a model: MUDBOX2009_SUBDIVIDE_SMOOTH_UV. When this environment variable is set, the Smooth UVs property works as it did in Mudbox 2009. That is, the entire UV shell, including its UV borders, are smoothed when subdividing a model whenever the Smooth UVs property is turned on. If this environment variable is not set, the default Mudbox 2010 UV smoothing behavior occurs. That is, smoothing only occurs for the interior UVs in a UV shell, leaving the UV shell border edges unsmoothed. Which UV smoothing method you choose to use is entirely dependent on your individual rendering pipeline requirements and render application used."
This has not changed since Mudbox 2010. So, basically what you need to do on a PC is add an environment variable MUDBOX2009_SUBDIVIDE_SMOOTH_UV that has a value of 1. To do this you will need to right-click on My
Computer and click on Properties. Then, choose Advanced
system
settings and under the Advanced tab click on Environment
Variables.... Under System Variables click on New.... In the blank where it says Variable
Name enter MUDBOX2009_SUBDIVIDE_SMOOTH_UV and under Variable
Value input a 1. Hit OK and it's all ready to go.
Once you create subdivision levels using Shift + D, or through the menus, you can move up and down the levels you have created by using the Page Up key to move up in levels, or the Page Down key to move down in levels. But keep in mind, you will not be able to go any higher than the highest level you created using Add New Subdivision Level and you will never be able to go below Level 0.
Another thing to take into account is which model you are subdividing. If you have multiple objects in your scene, you need to make sure the correct mesh is active when subdividing. The following are a couple of ways to make sure you are subdividing the correct mesh:
One way is to select the object in the Object List before hitting Shift + D.
Another way is to hover your mouse cursor over the mesh that you want to subdivide and then hit Shift + D. This will subdivide the mesh that is directly underneath your cursor.
This recipe will teach you how to add bookmarks for your camera positions. This is great for setting up different angles that you would like to come back to.
Let's say you are working on sculpting a head and you have a photo reference of the head you are trying to portray but the pictures are from different angles. One technique you could use is to set up bookmarks of your camera in different positions around your model that match the angle of the real world cameras from the photos. This way you can switch back and forth between the different views and try to match the sculpt to the reference as best as you can.
Before you set the bookmark, you will want to adjust the camera position until you have the desired angle. You can do this by using whichever hotkeys you have set up for navigating through your workspace. The Mudbox default hotkeys for this are shown as follows:
1. You can find the Camera Bookmarks tool panel on the lower right-hand side corner of your screen, as long as you haven't moved it. It is docked inside the same panel as Stamps, Stencils, Falloff, Material Presets, and Lighting Presets.
2. Once your angle is set, you will go into this panel and click on the little arrow at the upper left-hand side corner of the panel. This will open up a drop-down menu with the menu item Add Camera Bookmark. The following screenshot will help you find what you are looking for.
3. Once you have done this you will be asked to name the bookmark. One cool feature about the Mudbox Camera Bookmarks is that the thumbnail it produces is an exact match to your viewport to help you with remembering which angle the camera was at.
4. Now, all you have to do is click on the bookmark thumbnail and the camera will snap into place.
5. You can also hover your mouse over the thumbnail for a larger thumbnail image with the name to appear.

What this does is, it takes the position and rotation of the virtual camera and stores that information into a button. It also takes a screenshot of the viewport and resizes it into a thumbnail to help you remember the angle of the bookmark.
If you would like to rename or delete a bookmark, all you have to do is go into the same menu where Add Camera Bookmark is located and choose your desired menu item. Keep in mind you must select the bookmark that you would like to affect before going into the menu.
This recipe will show you how to find customized stamps and stencils that you can download and use quickly, all from within the Mudbox user interface.
1. Once you have a stamp, stencil, or base mesh in mind, you will click on the Mudbox Community tab. This is located above the main viewport next to the 3D View, UV View, and Image Browser tabs, as shown in the following screenshot. This will take you to Autodesk's Area website where you can view other artists' work, tutorials, or download and enable stamps, stencils, and base meshes:

2. To get to the tools we are looking for, you will need to click on the LIBRARY menu item on the left-hand side of the screen, as shown in the following screenshot:

3. Once you click on LIBRARY, it will open up to show you the three subcategories Stamps, Stencils, and Base Meshes. If you click on one of these, your viewport will show thumbnail images with the name, category, artist name, size, date added, and a ranking to help you find what you are looking for.
4. On the top, right-hand side area of your viewport, you will find ways to sort the list by most recently added, most downloaded, or highest ranked.
5. There is also a search textbox that will allow you to type in what you are looking for.
6. You may also choose which category to search under, as well as how recently it has been added.
7. If you click on the button shown in the following screenshot, it will download and enable the chosen stamp, stencil, or base mesh. It will also be added to your list of stencils, stamps, or base meshes.

The Mudbox Community window is set up so that you can easily go into a database of user-created tools to use for your own projects. You can also easily upload your own stencils, stamps, and base meshes for other artists to use.
In order to upload a stencil, stamp, or base mesh that you have created, you will look to the bottom of the viewport where you will see the following:

You may also want to click on the image of one of the stamps, stencils, or base meshes that you find, for more information. Once you go into the more detailed view, you will be able to read the artist's description of the tool, rate the tool, report abuse, share the tool on different online networks, or quickly choose related tools.
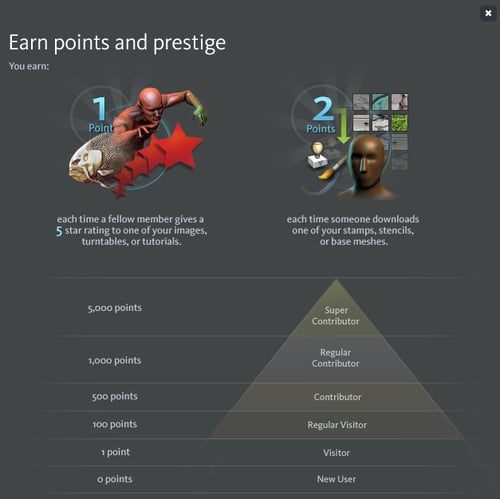
Autodesk has also set up a system to give artists who contribute a lot of good tools to the community, more prestige. When you click on an artist's tool to get the detailed view, it will show their prestige level and how many points they have earned. The following screenshot shows how to earn those points and what title you will be given. This will let other artists know how helpful you are in the community, and you could impress possible employers:
The Setting up stamps, stencils, and image planes using image browser recipein Chapter 2, Heads Up
The Tricks for painting with stamps recipe in Chapter 4, Fine Tooth Comb
The Tricks for painting with stencils recipe in Chapter 4 , Fine Tooth Comb
The Adding a stamp or a stencil to your toolbox recipe in Chapter 4 , Fine Tooth Comb
This recipe will teach you how to apply an image plane to your camera/viewport so that you can look at reference photos in your workspace.
First you will need an image that has been saved as .jpg, .bmp, .png, .tga, .tif, .gif, or .exr.
1. To apply the image to your image plane, first go to the Object List tab on the right-hand side of the Mudbox workspace. It is located between the Layers and Viewport Filters tab.
2. Next, go to the list under Name and find which camera you would like to attach it to.
3. The default camera you are looking through is the perspective camera. If you would like to switch cameras you can right-click on the camera you would like to use and choose Look Through.
4. Once you have chosen which camera you would like to add the image plane to, click on the + next to the name of the camera. This will drop down two menu items, Stencil and ImagePlane.
5. Now, you are going to select ImagePlane and the properties below this window will show an option to Import or Export an image. The following screenshot is what the window looks like with the Properties and Object List tab open.

6. The next thing you're going to do is click on Import and choose your image file. Once it is imported you will see it appear in your viewport.
When you apply an image to the image plane, it is basically setting up a billboard image that always faces the camera, no matter how much you rotate, zoom, or pan your camera.
The image plane will only be visible through the camera that you are looking. This can be helpful since you could apply reference images of different angles to each camera. For example, if you are working on a head, you can apply an image of the face to the front camera, and you can apply an image of the profile of the face to the side camera. This way you will be able to switch between cameras and only have the images you need from that view. Otherwise your workspace could get very cluttered with many images of all angles in one view.
If you need to adjust the image plane, you can use the following hotkeys:
e + left mouse button will rotate the image
e + middle mouse button will pan the image
e + left mouse button + middle mouse button will scale the image
e + right mouse button will adjust the depth of the plane
Under the advanced drop-down menu for the image plane, you will find settings for Visibility and Depth. You can either input a number into the textbox or you can use the slider to adjust the value.
Visibility: This determines how transparent the image plane will be. The closer it is to 1, the more visible it becomes, whereas adjusting the value closer to 0 will cause it to become more transparent.
Depth: This determines how far away from the camera the image plane will sit. This will not change the size in the viewport but it will make the image appear behind the objects in your scene, or in front of them, depending on what values you use. By default, the depth slider goes from 0 to 1000, 1000 being the farthest away and 0 being the closest. If you would like the plane to be even farther away, you can type a value into the textbox and the slider will readjust itself, making the number you input as the new maximum value. For example, if I enter
3000into the textbox, then the slider will now slide from 0 to 3000 instead of the original 0 to 1000.
The last section in the image plane properties is called Transformation. This section shows and allows you to change the values associated with the image plane's Translation (location), Rotation, and Scale. The quickest way to alter these values is by using the hotkeys mentioned earlier, but if you would like to go in and assign values manually, this is the place to do it. Note that next to Translation there are three textboxes. These are for the X, Y, and Z coordinates of 3D space.
The Bookmarking the camera view recipe
The Setting up stamps, stencils, and image planes using image browser recipe in Chapter 2, Heads Up
This recipe will discuss how sculpting on one subdivision level will affect the other subdivision levels and how to account for this in your workflow.
The basic idea is that you want to create large details on the lower levels and get finer with your details as you move up in level. This is a good idea in any medium as it allows you to get the shape, composition, and design figured out, before you start applying all the finer details only to realize that your foundation is not so great.
What is nice about Mudbox is that even if those large foundational shapes are not right at first, you can always go back down in the levels and reshape the sculpt while keeping the details you have already added.
This recipe will show you how to record the viewport while you work. This can be useful for creating your own tutorials or showing friends or employers your creation process.
First, you will need enough space on your computer to hold the movie file that you create. These files can get very large depending on what resolution you are recording at.
Then, you will also want to have your model at a point where you would like to start recording. Keep in mind this will not record audio.
1. To start recording, you can go to Render | Record Movie and you will see the following window after you click on it:

2. On this screen you will adjust the settings to what you need. The first thing you will need to adjust is Size. You can use the Presets drop-down menu or you can enter a custom resolution into the textboxes.
3. Next, you will adjust the Timing, giving you the ability to make the file size smaller by recording fewer frames or to speed up or slow down a sculpt. If you record with a high frames/second timing and play back at a low frames/second timing, your video will be slow and slightly choppy in its movement. If you set the record with frames per second as low and the playback with frames per second as high, you will get a fast time lapse of your work.
4. By checking the Automatically pause recording when idle checkbox you will save lots of time by not having to cut out all the slow parts of your video where nothing is happening. If your mouse stops moving then your video stops recording.
5. The Preview window shows you what the beginning of the video will look like and also what the thumbnail for the file will be. If you mark the Mudbox Window option you will be able to see the toolbars. By marking the 3D View Only choice, you will only see the inside of the viewport.
6. Once you begin recording, there will be a countdown timer before the recording starts and you will have a Pause and Stop button in the lower right-hand side of the Mudbox window.
7. When you finish recording, you will see the window as shown in the next screenshot, which allows you to delete the recording or save it as one of a few different file types:

8. After hitting Save As, you choose where you would like to save the movie and it will create the file for you.
You can also create a turntable by going to Render | Create Turntable Movie, which will give you this window:
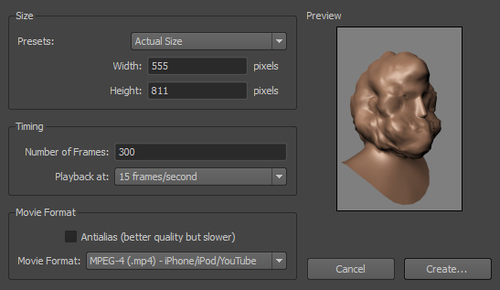
1. In the same way that you set the size of Record Movie, you will also need to set the size of the turntable. Actual Size will fit the sculpt perfectly within the window.
2. Under Timing, you can adjust the frames per second and the Number of Frames you want the turntable to be. The more frames you have, the longer it will be, and the more frames per second you have, the faster it will be.
3. The Movie Format section is like the Save As section of the Record Movie. Here you choose the type of movie file and you have a checkbox for Antialias. Antialiasing will improve the quality but it will increase your render times. This refers to the crispness of your edges.
4. Once you're ready, you can click on Create... and choose a place to save your file. It will start writing the file and you can see the process of the load in the bottom-left corner.
The Creating a three-point lighting preset recipe in Chapter 8, Ready for My CloseUp
This recipe will show you how to customize the colors of the Mudbox workspace. Customizing the colors will help you feel more comfortable with the user interface and allow more options for users who are color blind. In addition to this, if you are accustomed to use another software's color scheme, you can mimic those colors to allow quicker and easier adaptation to Mudbox 2013.
In order to adjust the colors of your workspace, you will need to go through the following steps:
1. Go into Windows | Preferences and click on the drop-down arrow next to Color. This will reveal the colors that you can customize as shown in the following screenshot:

2. Now, click on one of the colors next to the element you would like to change and you will be shown the window as seen in the first screenshot of step 3.
3. There are different ways to choose your color, and once you choose the color that you want, you can store it in the swatches on the top of the window where the tiny x's are. The different ways to choose a color are explained as follows:
i. One way is to choose the dropper tool to pick a color that is on the screen. Next to the dropper tool, you have few very saturated colors along with a white to black gradient. The Color History thumbnail shows the previous color you had selected next to the new color you have chosen. This allows you to compare the value, saturation, and hue of your newly selected color to your previous one.
ii. You could also use Ring which resembles a color wheel with a square in the middle. The square in the middle increases in saturation as you go from left to right and it increases in value as you go from top to bottom as shown in the following screenshot:

iii. Next, you have Spectrum which shows the different values of a color going from light to dark across, while changing hues vertically. To adjust the saturation of your color, you could use the slider below the hue and value selection window as shown in the following screenshot:

iv. Another way to select your color is from an Image. Once you load an image, you can aim your crosshairs at the color you would like to sample. The following screenshot shows the Image tab:

v. The Blend tab allows you to mix four colors and choose a color from that mixture as shown in the following screenshot:

4. The next drop-down menu is labeled Numeric Input. This menu item consists of RGB and HSV sliders, as follows:
i. The RGB sliders will let you increase the red, green, and blue channels on different sliders. You can even change the range from 0 to 1.0 or 0 to 255 depending on what units you are accustomed to working with. It is shown in the following screenshot:

ii. The HSV sliders will allow you to adjust the hue, saturation, and value of a color. The hue bar will slide you through the various colors on a 0-360 scale. The saturation and value sliders are on a 0-1 range. Having a 0 in the saturation makes it gray scale while 1 is a fully saturated color. 0 in the value slider will give you black while a 1 gives you white, as shown in the following screenshot:

5. The final way to choose your color is by using Color Palettes.
i. You can create, load, or save your own color palettes. It is usually a good idea to create a color palette that suits the need of the piece you are working on. The default palette looks like the following screenshot with a wide range of colors:

If you adjust some of your preferences and you find that Mudbox isn't acting quite right, then you may want to go back to the default settings. As with other software of this nature, your preference settings can get corrupted at times. To fix this, you'll just need to do the following:
Go into the Documents folder where you will find the Mudbox folder.
Open up the
Mudboxfolder and you should see a folder labeled as the version of Mudbox that you are using. For example, if you are using Mudbox 2013 64-bit version, then the path to the Settings folder should be something like this:C:\Users\yourusername\Documents\Mudbox\2013-x64.Open this folder and you should see a Settings folder.
Delete this folder to reset Mudbox's preferences back to its default.
Deleting this folder can fix a lot of different issues. If you notice strange things happening, you may want to try deleting this folder.
If you go into the Settings folder, you will notice some files inside. These files split up your settings into more specific categories. For example, sometimes you will have issues but you don't want to lose all your image-browser bookmarks or your hotkeys. What you can do in this case is save these individual files to a separate location as a backup for these settings. Once these files are backed up, go ahead and delete the Settings folder from your documents. The next time you run that version of Mudbox, the Settings folder will be replaced with the default one. Now you can try copying the backed up files back into the Settings folder and overwrite the default ones. This should bring your bookmarks, hotkeys, and other settings back.
As long as it is not that specific file that was corrupted in the first place, you should be back on track with no issues and the important preferences intact.
This recipe will describe how you can set up a Wacom tablet for use with Mudbox. A Wacom tablet is a tablet that you can draw on with a digital pen, to allow for more organic lines and shapes in your digital paintings or sculpts.
First, you will need to plug in your Wacom tablet. Next, you will need to make sure you have the latest drivers for your tablet installed. You can find the latest drivers for any Wacom product at Wacom's website, www.wacom.com/CustomerCare/Drivers. Your tablet may have also come with a disc that has the drivers on it. You may need to restart your computer once the drivers are installed.
Now that you have the drivers for your tablet, you can go to Wacom Tablet Properties shortcut by hitting the Windows key and typing in wacom. This should reveal the Wacom Tablet Properties shortcut in your start menu list. Next, you should click on this shortcut to reveal the window that looks like in the following screenshot:
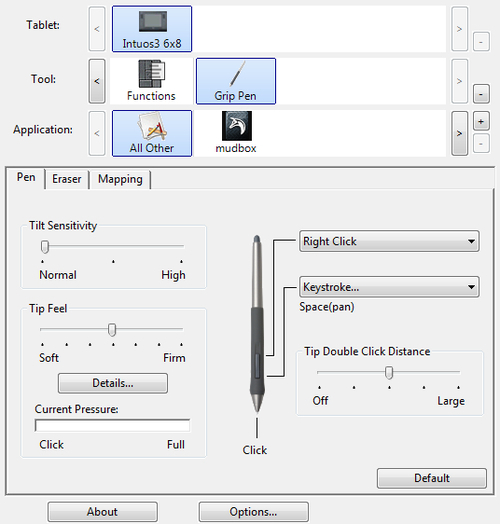
The Tablet section will list the tablets you have installed and connected to your machine. Tool is where you will choose which part of the tablet you would like to set up, the pen or the tablet itself. If you click the + across from Application, you will be able to add a customized setup for any software installed on your system. Otherwise, it will use the settings you have configured under All Other.
It is recommended that you set your pen buttons to Middle Click and Right Click for camera navigation. With these settings you will be able to do the following:
Tumble (rotate around a center point of interest) the camera by holding Alt and dragging the pen tip along the surface of your tablet
Track (pan up, down, left, and right) the camera by holding Alt and holding the button on your pen that was set to Middle Click while moving the pen tip just above the surface of your tablet
Dolly (zoom toward and away from a center point of interest) the camera by holding Alt and holding the button on your pen that was set to Right Click while moving the pen tip just above the surface of your tablet
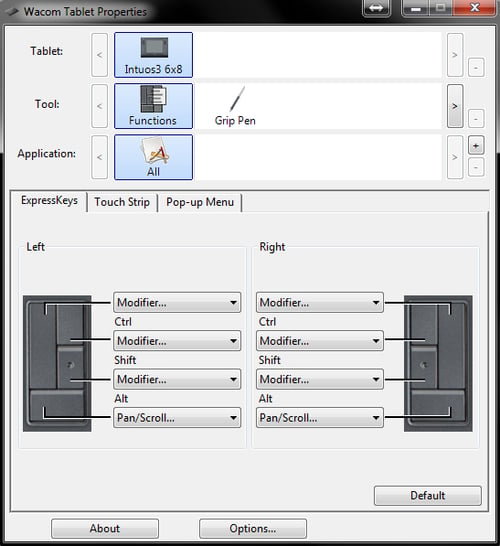
Alternatively, you could set up your navigation keys to use the buttons on your tablet itself. Keep in mind that you can set your tablet buttons and your pen buttons to anything you want, including a keystroke, which will allow you to enter a series of key presses. This is helpful for mapping hotkeys to your tablet buttons or your pen buttons.
You can also set the slide bar to allow you to zoom or resize your brush size or intensity. In the following screenshot, you will see an example of the tablet settings window:
This recipe will tell you how to work in expert mode and why it is useful. Expert mode will take away all your toolbars giving you maximum workspace.
Before you go into expert mode, you should set up all your hotkeys the way you would like them and memorize all of the hotkeys that you will need. You can look into the recipe on Setting up hotkeys for more information on this.
The quickest and easiest way to get in and out of expert mode is to use the hotkey T. This will toggle between having toolbars or no toolbars around your workspace. If you would like to go into expert mode, through the menus you can go to Display | Expert Mode as shown in the following screenshot:
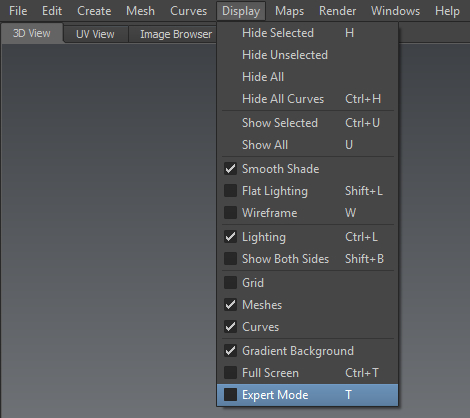
When you enable Expert Mode, it hides all the toolbars except the main menu on top so that you have a larger space to work in. The reason it is called Expert Mode is because you will need to have memorized the hotkeys that you will use to work on your project. Also, it's a good idea to familiarize yourself with the right-click menu before using this mode.
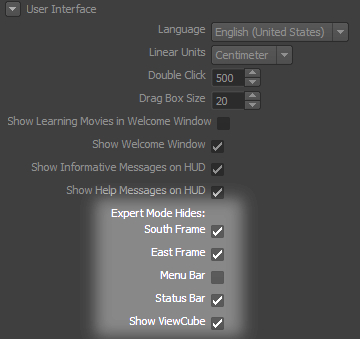
You can also customize which toolbars disappear when you enable Expert Mode by going to Windows | Preferences and clicking on the drop-down list for User Interface. At the bottom of the options listed here, you will see Expert Mode Hides: with some checkboxes for different toolbars. The following screenshot is what the menu should look like:
The primary reason you would want to work in Expert mode is to maximize your viewing space on your monitor. Another thing you can do to give yourself more monitor real estate is to work in Full Screen mode. This mode will enlarge the Mudbox 2013 window to fit the entire screen as opposed to just your desktop area, which will leave the start menu bar in Windows.
To use Full Screen mode, you can go to the same menu as Expert Mode, under Display, or you can use the hotkey, Ctrl + T.
I recommend using these two tools together to help you focus (no distracting UI elements) so that you can see more of your models at a higher resolution on the screen.
