


Making games was always a time consuming process that involved many people who had to keep focusing on building a game engine for at least a year before the game itself, and these custom engines would usually not be used with any other game afterwards. However, with the huge evolution of technology, we started to see lots of new handy engines that allow you to build several game types and save you the time of writing an engine from scratch, giving you a chance to focus on the game itself.
A long time ago, each platform was totally independent, and you were required to use a tool tied to the platform to create your own apps and games. Nowadays, however, with the evolution toward multi-platform development, making games for a platform using another one has become a lot easier—more than easy, in fact!
When it comes to making iOS games, there are a number of factors we have to keep in mind. Unreal Engine 4.0 supports the development of iOS games on Windows. However, later versions (4.3 onwards) support the ability to make, build, and test iOS games from within a Windows-based machine and then import them to your iOS device via some special tools that have been developed by Epic. This gives us a wide range of available scenarios when it comes to making/building iOS games using UE4.
Unreal Engine has been on the market for almost 20 years, and the leading AAA companies have used it to make tons and tons of games for a wide range of platforms. However, recently Epic has moved it to another step, where it is open for everyone in the world with a low price and more platform support. This gives lots of people the chance to start using this technology to achieve what was initially exclusive for AAA companies only.
In this chapter, we'll cover the following topics:
Getting and installing the engine
Building the source code on Mac
The difference between the several engine copies
Tools required for iOS game development
Creating game profiles on the Apple Developers Portal
Despite the relative openness of UE4, I would recommend you use a Mac OS X computer for developing iOS games using Unreal (or any other engine for that matter). It's important as it gives you direct access to XCode, which you will need to use to do the following:
Debugging your game using its console
Analyzing the game's performance using its tools (instruments)
Adding a third party's libraries to the XCode project
Adding platform-specific code to the game's XCode project
If you don't have an iMac, Mac Pro, or MacBook Air, there are still other options that you can choose:
Purchase a Mac mini, which is very cheap and can get the job done. With Epic's new system, you can work and make all your games in a Windows-based computer and then move them to your Mac to build and test with more efficient building tools.
Install a virtual machine on your Windows-based PC using applications like Virtual Box (this saved me one day when I was not able to get a Mac). In this case, you will have a dual OS on one device.
Use Virtual Box to turn your PC into a fully functional Mac, but it should be done on your own guarantee!
Your last choice is to run a normal Windows OS PC; you will be able to follow along 100 percent with this book, except only one part where we will build the engine. This should also be a straightforward process on the Windows platform. However, you can save your time and just download the prebuilt version directly from Epic's website.
The first step is to get the engine running. Using Unreal Engine to build iOS games is a little different than using any other tool or engine out there, as Epic took a brave and awesome step by releasing its entire engine source code to its subscribers. We will see two different ways to get the engine running.
Downloading UE4 directly will ensure that you have an already compiled version of the engine. All that you have to do is just start using it. You can get it by following these steps:
Access the engine home page.
Press the Get Unreal button and start filling in all your information to make an account with Epic games. Also, you will need to read the engine license and accept it if it works fine with you.

After confirming your e-mail and getting your account running, your dashboard will look different. You will see a confirmation of the successful subscription billing.

Then, you will see the other options to download the engine. In the case of direct download, you have to pick the launcher OS version you want: Windows or Mac. In my case, I've picked the Mac version (keep in mind that it will download a launcher, which is approximately 50 MB only).

When you run the launcher, you will find many useful links to the forums, answer hubs, and marketplace where you can find free projects among other things.
You can go to the library and select an engine version (the latest should be the best; I'm running 4.3 while writing this book, as it is the latest one and was just released a few days ago) and start installing it. After you finish, you will see a new section called Engine Slots, which holds all the engine versions you are running via the launcher.

The GitHub version is not just a precompiled copy of the engine; it contains the full C++ source code of the engine, which means if you are a ninja coder and you want to add new features or fix the engine bugs and improve it, this is the best way to get your copy. Also, if you are a beginner in the engine world or a student who wants to learn more about the engine constructions, your best bet is to get the GitHub version:
After the first three steps in the previous method (opening the engine page and registering an account with Epic), instead of selecting to download a launcher, you will need to access the GitHub version to get the full source code of the engine.

Follow the link in the GitHub instructions to access the repository.

To be able to access Epic's repository of the engine in GitHub (which is a private repository), you will need to list your GitHub account name (make a new one if you don't have one already) in your account settings. This should be enough to connect your GitHub account with Epic's GitHub group. If you access your GitHub account, you should now find Epic listed in your organizations list.

From the available branches, you can select the version of the engine you want to download, or you can directly access all the release versions from the release tag at the top of the page:

Now, you need to download the files associated with the engine version you chose. Ensure that you download only 4 out of 5: Optional, Required_1of2, Required_2of2, and Source code(zip).

Now, as we have all the required files, we need to extract all of them while ensuring that the files are together in the same folder, without replacement of any of the folders. As all of the ZIP files contain the same folder names (as they are all related to one dependency), you might need to press Alt on your Mac while merging the files/folders and select Keep Newer to add them instead of replacing them.

After finishing the file merge process, you will end up with the final engine source code files, which is approximately 6.5 GB. All that you need now is to run the script that is responsible for generating the project files. If you are using a Mac, which is our case, then you need to run
GenerateProjectFiles.command; otherwise you can run it's Windows equivalent,GenerateProjectFiles.bat.This project file autogenerating process will hold for a few minutes and it will end up adding some files to your engine's folders and directories. However, the only one you can see and the only one you need right now to build the engine will be in the root directory: it will be an XCode project file named
UE4.xcodeprojor a Visual Studio solution calledUE4.slnon Windows.Run this project in XCode 5.1 or later. Give it a while to index your project, which might take approximately 30 minutes or less, depending on your Mac speed. Don't be in a rush, as it might break everything if you start building to soon. You should wait till the activity viewer bar at the top of XCode finishes indexing and tells you that it is ready.
Now, it is time for the final step: building and running the engine. We just need to define what exactly we are going to build. In this case, we want to build an Unreal Engine Editor for Mac. So, we need to open the Set the active scheme menu from the top-left corner and select the UE4Editor – Mac scheme. Now, you can click on Build and run, and this will give you a debug build of the editor that could be a little slow and buggy. If you want a final build that is more optimized, efficient, and free from the debugging code, you could easily build using Product, Build For, and finally Profiling.

After building, the Unreal Editor will run automatically. Whenever you want to run the Editor, you don't have to build it again; you just need to browse to the build location and open it. The location for Mac and Windows is as follows:
For Mac: UnrealEngine-4.3.0-release /Engine/Binaries/Mac/ UE4Editor-4.3.0.app
For Windows: UnrealEngine-4.3.0-release /Engine/Binaries/Win64/ UE4Editor.exe
Keep in mind that the final *.app name might be different; it depends on the build type you made. Here, I made a debug engine build and my final engine application file was named Debug.app by default, which I then changed to UE4Editor-4.3.0. Feel free to change it; as long as you have different engine builds running at the same time, you will need to define them to avoid any confusion.
Making an iOS game with Unreal Engine doesn't mean that we will only be using Unreal Engine throughout the process. During the course of this book, you will need other tools and applications running too. Here are the other tools you will need and why.
As you saw in the previous steps, we used XCode to build our engine because it is the main IDE for Mac OS X. It is an essential tool and we will need it again anytime we want to rebuild the engine or write a C++ game using the generated project from Unreal Engine. As Epic has outlined, for Mac users, the minimum version to be used with Unreal Engine 4.x should be 5.1.
As this book will take care of the process of making games using UE4, it is ultimately down to you whether you choose to use the assets provided with the book or your own that will fit your requirements. If you are going to build your own assets, I would recommend that you use Blender3D for the 3D assets or Inkscape for the 2D assets. I used both of these applications while I was building the examples presented in this book. Both are free/open source applications with high-end quality and tools.
When we finish our game, we will need to submit it to Apple for review. The best and the only way to upload *.ipa files to Apple is using the Application Loader app. It is free and easily available. Later in Chapter 9, Publishing, you will learn how to use it during the submission process.
If you are running on a Mac, then iTunes will be installed by default. However, if you are running on Windows, you will need to install it, as it is the best way to push an *.ipa installation file to your device to test it. If you cannot get hold of this, you can get iTools, which is very easy and straightforward to install and it runs on Mac and Windows. I used to use both applications all the time to push *.ipa builds to an authorized device outside XCode.E- iOS 6.0.
To be able to run Unreal Engine 4 games, you must have at least an iPhone 4 or iPad 2 running iOS 6.0 or later.
As I already mentioned, making an iOS game is a little different than making any other mobile game. For iOS games in particular, there are many steps involved in the preproduction period; these steps should be done first on the App Store developer's portal to be able to run a test on a device.
To be able to run these steps, you must have an Apple iOS developer account; if you don't have one yet, then apply for one. It is a straightforward process, and like purchasing any other account, you will need to provide an Apple account number and a credit card or any other valid online payment method.
Registering for an iOS developer account should be processed quickly, so if you apply as an independent person, you might get the approval within two days. However, if you apply as a company, then it might take up to two weeks or a bit more.
Now, you have an Apple iOS account (your developer account permits you to develop or access the iOS dev center only; you will not be able to access Mac or Safari dev centers). We now have to perform several steps, which should be done in proper order, as some steps will be based on the previous steps. The good thing about the latest updates from Apple is that they made a new and better control panel, which organizes with the correct order. Previously, the control panel was a bit messy, which made it difficult to find what you want.
Generating a certificate is a process that needs to be started in the development device (your Mac) and then completed in the Apple developer's portal.
First, you will need to open KeyChain Access, and through the drop-down menu of KeyChain Access, select Certificate Assistant. Finally, click on Request a Certificate from a Certified Authority.

From the Certificate Assistant window, fill the User Email Address field with your e-mail, insert a common name, and mark the Save to disk option to save the file to your disk. Click on Continue and save it to your desktop (or somewhere you can remember later).
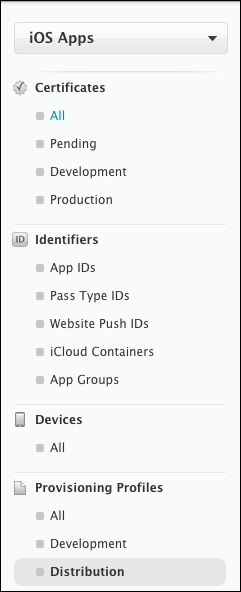
This process will generate a file with a *.certSigningRequest extension. Go directly to the Apple developer's portal, access the iOS developers, and click on the Certificates section.
Click on Add, and you will be moved to a screen where you need to select a certificate type. Keep in mind that we will use the generated *.certSigningRequest extension twice. We will generate a development certificate to be used for the testing phase, and then we will make one for production, which will be used for the final build and store submission version of your games.
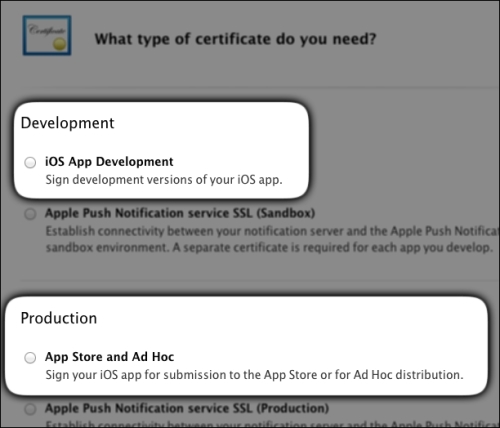
Here, select iOS App Development and click on Continue. In the following screen, you will find some information about how to make the *.certSigningRequest file, which we already made. Then, you can click on Continue and select the file from your desktop (or wherever you saved it).
Click on Generate, and this will provide you with a valid development certificate; download it.
Redo the same process, but this time, select App Store and Ad Hoc and use the same process to generate the production certificate and download it.
Now, as you have two certificates downloaded (files with the *.cer extension), double-click on each of them. This will run KeyChain Access for you and ask you whether you really want to install it. Do the process twice, as we will require one development certificate while building and testing and another one for the distribution build.
After installing both, you will find that they have a green icon next to each of them, and this tells you that both are valid.
Now, go back to the main panel in your iOS developer account screen, and from the section named Identifiers, choose the subsection App IDs and start adding a new App ID.
The process is very simple and it involves adding some inputs:
App ID Description: You should describe your game/app within a small phrase. Normally, using your game name is enough to fill this input field.
App ID Suffix: This is the most important input (Bundle ID), and this is the one that will be used in your provisioning profile. Usually, you write the word
comfollowed by.and then your company name followed by another.after which you finally write the game name, for example,com.companyName.GameName.App Services: This allows you to select what exactly the game will be supporting. Keep in mind that you can come here again and edit the ID and regenerate it, so don't worry if you forget something.
Finally, click on Continue to finish the process of adding the App ID (Bundle ID).
As a part of the secure development environment that Apple provides to developers, you can define which devices are authorized to try the game/app during the development process. So, in case someone gets a development version of the game, he/she will not be able to run it on his/her device. Only the devices that are included in the provisioning profile (we will explain how to do this shortly) will be able to run the game build.
Adding a new device is a very simple process; you just hit the Add new device button in the Devices section on your left panel, and then provide the following details:
One last thing regarding the devices. Apple's developer portal allows you to add up to 100 devices in your devices list. These devices will not be per project but per account, meaning that you can have 100 devices as a company only; so, use them wisely if you are working in a huge team! Anyway, an iOS game in any size will not require such a massive team!
This is our last and main destination in the process of preparing the game profile in Apple's developer portal, as all the previous steps were made to serve this process. All we need from the developer's portal are the provisioning profile files. With these files, we will be able to make a valid build (either development or release), but to have these valid files, we had to set up the certificate, App ID, and devices; you will see how useful and time saving it is to finish these three things beforehand, just as we did.
Now, in the last section of the developer panel in Apple's developer portal, which is named Provisioning Profiles, click to add a new provisioning profile. Then, you will be prompted to four different screens:

Select Type: In the first screen, you can choose whether the profile you are going to generate is going to be the one for development that will be used to make the development/test build or the one for distribution that will be used to make the final store build. So, keep in mind what you will choose now; you will have to carry out the same steps again to generate the other one. At the end of the day, you will need to make both build types in the process of making any iOS game. So, ensure that you select iOS App Development in one instance and App Store in the other instance.
Select App ID: On the second screen, you will need to select your App ID. So, if it is your first time creating a game/app, then you will find only one App ID that we already generated earlier in the second section of the iOS developer portal panel. However, if you have made several App IDs before, then you need to pick the correct one.
Select certificate: In this screen, you will need to select the correct certificate. As you can see, this screen looks like a smart one. If you are already generating a Development Provisioning Profile, the screen will show you only the development certificates, from which you have to select the correct one (in case you have more than one), and if you are generating a Distribution Provisioning Profile, it will list only the distribution certificates. Pick the correct one and click on Continue.
Select devices: This is not a mandatory screen. What I mean is that it is not necessary to see it every time you generate a profile. For example, if you are generating a development profile, you must see this screen, as it will ask you to select the authorized devices to run the game/app. However, if you are generating a Distribution Provisioning Profile, it does make sense to never ask you to select devices, as the game will be published and should be running on any valid device that downloaded/purchased it in the correct way via the App Store.
Name the profile: Feel free to use any name that you can identify later. Usually, you enter the game name with a word, for example
DevelopmentorDeveloper, that will make your organizer in XCode look a lot more clean and organized. Also, as this will be our last screen in the process, you will see that it shows the choices you have made in the previous steps and tells you the type, App ID, certificates, and the number of devices that will be listed in the profile. Ensure that you have entered a good name and all the choices are correct. Now, hit the Generate button.Download: The process of generating the profile will take a few seconds and then will automatically take you to a download screen; you can/must download this profile. Then, redo the same process for a profile of the other type (development or distribution). After you finish the process for the other file, keep those files in a safe place, as we will use them later. Keep in mind that with each new game we create, we will need to generate a new App ID and only two provisioning profiles (development and distribution). The certificate and devices will remain the same, except if you want to add new devices or change the certificate or update it in case it expires.
Now you've made one of the most important steps in your iOS game development pipeline. No matter what you will make inside the editor, without a valid provisioning profile, you will not be able to test in your device or publish the game to the App Store.
Now, you have completed the process of getting UE4 source code or a precompiled version and getting your own developer account. You have also learned how to build your own Unreal Engine version using the GitHub source code within XCode, and set the whole thing up correctly to avoid any errors/issues in the future.
Building a game profile is essential to start making and testing any iOS game using UE4 or any other technology. Now, you will not only be able to make a game profile, but also build a developer certificate from scratch and associate some devices as test devices.
Now, with all of this in your pocket, it is time to run Unreal Engine and start building the stepping stones for all the games we are going to make in this book. Making an iOS game requires some procedures inside Unreal Engine regardless of the game type, genre, or inputs. In Chapter 2, Methods and Tools to Create Your Games, we will prepare a sample project, which will be the core of many of our upcoming games. Also, we will discuss the techniques and methods that can be used to build our games. So, if you are ready, turn the page and jump directly to Chapter 2, Methods and Tools to Create Your Games. However, if you have not built a game profile yet, then ensure that you can build one first!