In this chapter, we will cover:
Opening a level using the CryENGINE 3 Sandbox
Navigating a level with the Sandbox Camera
Setting up a personalized toolset layout
How to customize toolbars and menus
Using the Rollup Bar
Selecting and browsing level objects
Restoring the CryENGINE 3 default settings
The main focus of this particular chapter will be in getting the CryENGINE 3 Software Development Kit installed and having you up and editing a level in the Sandbox editor right away! One of the key things to keep in mind when learning a game compositing tool such as Sandbox is to remember to experiment and have fun! It is important not to forget that most of us (game developers) are trying to make things fun and not dreary and dull.
With such a powerful toolset waiting for you to dive in, let's get right to it!
As most people involved in the game's development process should be familiar with opening levels, this section will take you through the relatively straightforward task of opening a level within the CryENGINE 3 Sandbox editing tool.
Having already located the Editor.exe in either your bin32 or bin64 folders, it will now be started in this section.
Let's get to opening a level:
Launch the
Editor.exelocated in either theBin32orBin64folder. You will be presented with an interface, as shown in the following screenshot:
As there are already example levels installed with the SDK, we can open them.
To open an existing level, we need to access the File menu.

The File menu includes commands related to the handling of level files such as opening, saving, showing log files, and a list of recently-loaded levels.
As we want to open a pre-existing level, choose the Open option.
You will then be presented with a browser window defaulting to the
CryENGINE3/game/levelsfolder.Browse to
Forestand open the folder.Within the folder there is a
Forest.cryfile that contains raw level data for editing.Open the
Forest.cryfile.

The editor will now start to load this level for you to start exploring!
The editor reads the .cry files and can also access the subfolder layers within the level folder.
As the level loads, it reads the information present in the .cry file.
You may want to know what the .cry file is composed of or even how to apply console command changes to individual levels.
The ability to intuitively navigate levels is a basic skill that all developers should be familiar with. Thankfully, this interface is quite intuitive to anyone who is already familiar with the WASD control scheme popular in most First Person Shooters Games developed on the PC.
You should have already opened a level from the CryENGINE 3 Software Development Kit content and seen a perspective viewport displaying the level.
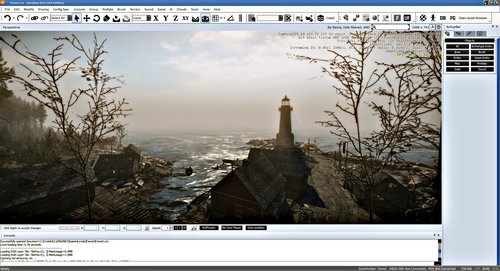
The window where you can see the level is called the Perspective Viewport window. It is used as the main window to view and navigate your level. This is where a large majority of your level will be created and common tasks such as object placement, terrain editing, and in-editor play testing will be performed.
The first step to interacting with the loaded level is to practice moving in the Perspective Viewport window.
Note
Sandbox is designed to be ergonomic for both left and right-handed users. In this example, we use the WASD control scheme, but the arrow keys are also supported for movement of the camera.

Press W to move forwards.
Then press S to move backwards.
A is pressed to move or strafe left.
Finally, D is pressed to move or strafe right.
Now you have learned to move the camera on its main axes, it's time to adjust the rotation of the camera.
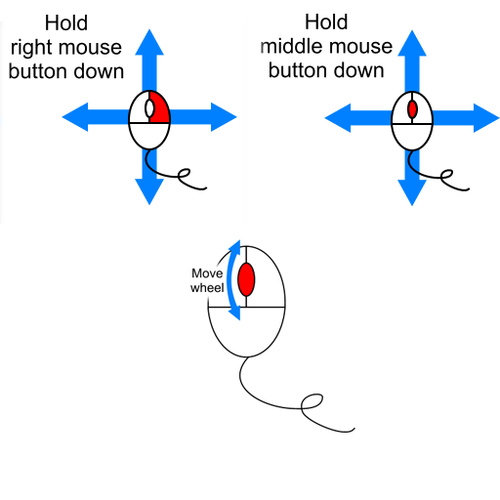
When the viewport is the active window, hold down the right mouse button on your mouse and move the mouse pointer to turn the view.
You can also hold down the middle mouse button and move the mouse pointer to pan the view.
Roll the middle mouse button wheel to move the view forward or backward.
Finally, you can hold down Shift to double the speed of the viewport movements.
The Viewport allows for a huge diversity of views and layouts for you to view your level; the perspective view is just one of many. The perspective view is commonly used as it displays the output of the render engine. It also presents you a view of your level using the standard camera perspective, showing all level geometry, lighting, and effects.
To experiment further with the viewport, note that it can also render subsystems and their toolsets such as flow graph, or character editor.
You will likely want to adjust the movement speed and how to customize the viewport toyour individual use. You can also split the viewport in multiple different views, which is discussed further.
The Speed input is used to increase or decrease the movement speed of all the movements you make in the main Perspective Viewport.

The three buttons to the right of the Speed: inputs are quick links to the .1, 1, and 10 speeds.
Top View, Front, and Left views will show their respective aspects of your level, consisting of bounding boxes and line-based helpers. It should be noted that geometry is not drawn.
Map view shows an overhead map of your level with helper, terrain, and texture information pertaining to your level.
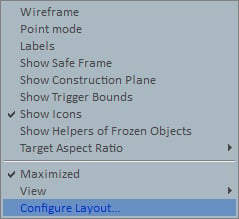
Individual users can customize the layout and set viewing options specific to their needs using the viewport menu accessed by right-clicking on the viewports header.
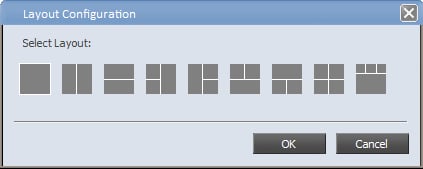
The Layout Configuration window can be opened from the viewport header under Configure Layout. Once selected, you will be able to select one of the preset configurations to arrange the windows of the Sandbox editor into multiple viewport configurations. It should be recognized that in multiple viewport configurations some rendering effects may be disabled or performance may be reduced.
It would suffice to say that every user of Sandbox will have different preferences to how different views and toolsets should be distributed on screen. The CryENGINE 3 Sandbox allows for this kind of user-based customization and this recipe will take you through the use of some of the built-in tools for customizing your interface.
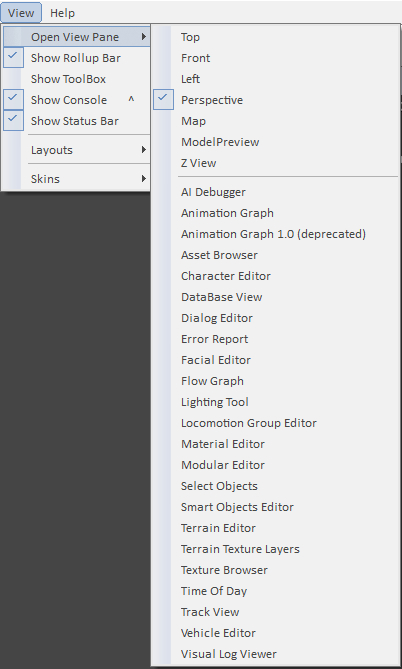
Before starting, it's important to introduce the view menu. The view menus allow you to turn various windows, toolbars, and subsystems on or off as well as open the various Sandbox extended editors and tool dialogs.
While experimenting with views, be aware that if you close a window and want to open it again, this can be done easily using the View | Open View Pane menu.
Another important toolset that you will likely want on your layout is the Rollup Bar.
The Rollup Bar is similar to the 3ds Command Panels for those already familiar with 3ds. It is a quick menu bar for the majority of the functions available to the editor exposed to the developer in an easily accessible format.
The final important tool you will likely want is the Console.
The Console is a direct command-line editor to the CryENGINE 3. This essentially allows access to various advanced functions within the Sandbox editor, including various debug and test profiles.
To start this tutorial, you should have Sandbox Editor.exe started.
The first step of customization will be to learn how to scale and move the various windows in Sandbox around:
Let's first open a new window.
Click VIEW | Open Viewpan>e | Asset Browser.
This will open up a window containing the asset browser in the centre of your screen.
Ignore the contents for now as the asset browser will be explained later on in this recipe; let's resize the window.
Move the mouse pointer to the edge of the window, so that it turns into a double-ended black arrow. Click and drag the mouse pointer to scale the window.
Now that we have resized the window to our liking, let's use the docking toolbars to anchor the asset browser into the layout.
You can see the docking helpers whenever you drag a window over another window, or the Sandbox editor itself.
Click and drag the window from the title bar and move it over various docking helpers shown around the main view window.
Notice that once you release the mouse button, the window will dock itself into that location.

Now that the window is docked, we should learn how to undock it:
Similar to when we docked the window, drag the title bar again and move the selected window away.
Notice that the window maintains its original size and shape. You may thus want to resize the window once you have undocked it.
Another important interface to master is the ability to dock a window within other windows.
Go back to the View menu and open another window.
For this example, open the Flow Graph window.
Now, drag the Asset Browser window to the Flow Graph window.
You will observe the docking buttons being displayed again.
Use the lower, central button to dock the selected window in the lower half of the Flow Graph window.
You can also dock windows at the top and sides of other windows using the other docking buttons:
To do this drag the title bar of the Asset Browser out of the Flow Graph window and away to another docking helper within the flow graph window to move it.
The final tool that is available to you in customization is Docking a Window as a Tab in Another Window.
For people using only one monitor, this is almost essential!
You may have noticed previously that when you move a window to another window, a new central, circular button is displayed.

This anchor will allow you to place the currently selected window as a tab within another window.
Drag the Asset Browser to the Flow Graph window, and on to the central dock as the tab button.
You will notice that there are now two tabs at the bottom of the window, Flow Graph and the Asset Browser.
You can now select each window by clicking on its corresponding tab.

Keep in mind that you can undock a window by dragging its tab to another part of the screen.
Once you are happy with your layout you can save this layout for easy loading later.
To do this, we will access the Layout Configuration window on the Display menu under Configure Layout.
Select Save Layout from the Configure Layout dialog.

You will then be presented with an opportunity to name this layout. Type the name of the configuration in this window and click OK.
The docking helpers work very similar to windows office applications, so any users of those applications may be familiar with this system.
The save layout process creates a folder under the CryENGINE3/editor directory called layouts.
In this folder, it then saves a .layout file that is essentially an .xml file. This means that it could be edited by hand if required but can also be version controlled, which means multiple presets can be shared across large teams.
The Status Bar contains translation/rotation/scaling information for selected objects, editor interaction shortcuts, and camera controls.
The Console in the Sandbox editor is used to input variables. It can be visually toggled on or off by going to the View Menu and selecting View Console or by pressing the caret key (^) while the Perspective Viewport is selected.
In the editor, a full list of console variables can be accessed by double-clicking the input field on the Console to open the Console Variables window.

Search for variables with partial or complete commands. Information on individual variables can be shown by hovering the mouse over a Console Variable for a couple of seconds in the Console Variable window; text will then be displayed as a tool-tip.
This section will now introduce you to the various toolbars and menus available in the Sandbox. With these toolbars, users can very quickly access many of the features of the Sandbox editor by using simple icons and groups of icons at the top of the interface. These toolbars can be configured to fit the preferences and needs of individual users.

Before adjusting the toolbars, it is important that we explore a brief summary of the default toolbars that are available in Sandbox.

The Standard ToolBar contains open, save, hold, and fetch options.

The EditMode ToolBar contains various tools for level editing. These tools include undo and redo, link and unlink, select all, object movement/scaling, axes and terrain options, as well as object selection, saving, and loading.
The Object ToolBar contains tools for object alignment. The icons are go to selected object, align selection, align object to grid, set object(s) height, align object to the surface normal, and fix and unfix selected objects.

With the Mission ToolBar, you can select the current mission, duplicate a mission, delete a mission, and reload and edit mission scripts.

The Terrain ToolBar contains shortcuts to tools within the Terrain Editor, the Terrain Texture Layer editor, and Terrain Lighting dialog.

The Dialogs ToolBar contains icons used to access extender editor such as the Materials Editor, the Character Editor, the DataBase View, and the Flow Graph Editor.

The Console ToolBar has options specific to console game development. The buttons include sync data to console, automatically sync data to console, sync camera, options, load current level on console, and launch current level on console.
Now that we know about the default toolbars, let's go ahead and set up our layout:
To do this, we will need to access the ToolBar settings menu.
To access it, right-click anywhere on the Icon Bar.

This will display the ToolBar settings menu.
Selecting a toolbar from the list will display it or hide it on the main header.
To customize these toolbars and to create new ones simply click on the Customize option at the bottom of the ToolBar settings menu.
The Customize dialog box allows users to customize preset toolbars, as well as create custom user toolbars.

The New button allows you to create a new custom toolbar. On pressing the button, a prompt will appear requesting a name for the new toolbar.
The Rename button allows you to rename any of the custom toolbars you have created.
The Delete button allows you to delete any of the custom toolbars you have created.
The Reset button returns any changes made to the toolbars back to default.
Click on New and name it
my_toolbar.You will then see the toolbar added as an empty container on the interface.

We can now add commands to this toolbar for easy and customized access!
The Commands tab allows you to drag-and-drop any of the icons in the Commands box into any toolbar, even custom ones.
Go to View in the categories options.
Click and drag the Show Rollup Bar command into your new toolbar.

Click Close to accept the changes to your custom toolbar.
To test its function, click the newly created button and notice that it now toggles the rollup bar on and off.
Custom toolbars and overall toolbar configuration is saved in the registry information written by Sandbox to the PC. The toolbars are quite organic in the fact that you can undock and move them anywhere in the Sandbox interface, which, of course, makes it far easier to interface with some of them.
You may want to explore some of the other tabs available within the Customize interface.
In the Options tab, there are some options that allow you to edit the way the interface reacts.
The first option is Always show full menus, which as the name suggests always shows the full menu of the currently selected menu.
The next is the Show full menus after a short delay, which will, after a short delay, display the full menu even if a skin collapses the menu to only show frequently used items.
The Reset menu and toolbars usage data deletes the record of the commands that you've used in the editor, restoring the defaults.
Under the Other Header, we have the Large icons checkbox. This displays large icons when the editor skin has the choice of using large or small icons.
We also have the Show screen tips on toolbars checkbox, which displays screen tips when the mouse is held over toolbar buttons.
There is a subcheckbox to the screen tips, which is to show shortcut keys in screen tips. This shows keyboard shortcuts along with the screen tips.
Finally, we have Menu animations. This changes how menus are displayed. The options include: (System default), Random, Unfold, Slide, Fade, and None.
The Keyboard tab allows the user to assign different shortcuts to certain functions within the editor.
You can browse through different categories using the Category drop-down list. Depending on the category selected, different commands will be listed in the commands frame. If the function is already assigned to a key, it will be shown in the Key Assignments frame.
To assign a shortcut key, you must have a command selected and then click within the Press new shortcut key textbox and that key will then be ready to be assigned to the selected command. To accept the shortcut assignment click the Assign button. You can also remove this later by using the Remove button.
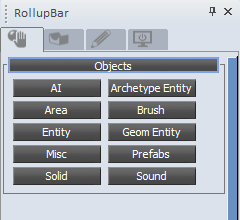
The Rollup Bar is one of the most commonly used tools within Sandbox. By default, it is located to the right of the viewport typically along the right edge of the interface. This is where entity parameters, settings, and controls are listed and accessed.
The Rollup Bar is split into four very different panels, which are accessed from their corresponding tabs.
The first tab contains the object and entity creation tools for the editor, as well as being the tab that will display all entity-specific information and dialogs.
The second tab has the overall environmental, vegetation, and terrain editing tools. The tools in this tab are used to modify the specific level you currently have loaded in Sandbox.
The third tab contains the display options.
The last one is the layer organizational tool.
In this task, we will only use the Objects and Entities tab, which is the first and default tab within the Rollup Bar. To access the majority of scene elements throughout this book, we will use this tab.
It holds interfaces to the various Database libraries and the brush database on your hard drive.
You must have a pre-existing level opened in Sandbox to complete this recipe.
Let's start using the Rollup Bar.
In the Rollup Bar, click on the Brush button.
This will display a browser linked to the
CryENGINE3/Game/Objectsdirectory of your build.Brushes are compiled geometry containing no extra data other than collision. Typically, most levels are created with brushes as they are simple geometry.
At the bottom of the browser window you will see a dialog box that says filter:
This is a very useful feature when browsing for specific objects.
Type in
villagein the filter dialog.Once you hit enter the browser will then simplify the contents of the browser to the folder that contained any objects with the name village in them.

Browse to the default SDK folder
Objects/library/architecture/village/and notice there is an object calledvillage_house1_c.cgf.You can now drag this object out of the brush browser and into your level!
Within the Objects tab, there are a variety of libraries and object types that support drag-and-drop functionality.
They are separated logically into a few different areas.
There are a variety of different sections contained in the Rollup Bar. These sections are further explained later and will be used throughout the course of this book.
This section within the Rollup Bar contains AI control objects, which are used to control AI entities and their behaviours in the level. They can define a specific behaviour for an AI with reference to its location or other variables in the level. AI control objects can define navigation paths or an area for the AI on the terrain, including boundaries and forbidden areas. The objects can be used by AI actors to perform specific actions or events, such as animations and changes of behaviour.
The Area section contains the area objects, which are used to create three-dimensional zones in the level that can be used to trigger events.
The Misc Objects section includes various tools and functions used during a level's creation such as roads, rivers, and comments.
The Solids tool is used to create simple structures and objects, or placeholders for future art assets. This is one of the best forms of white boxing the engine has available!
The Archetype section allows users to access currently loaded archetype libraries within a given level. An Archetype entity is based on a regular entity and specifies individual parameter values for that regular entity. The main advantage of archetypes is that if the value of an archetype parameter is changed, all instances of that archetype in the level will be updated automatically. Archetype entities are organized into .xml libraries, which can be created in the editor under the Database view.
The Geom entity section is a browser similar to the brush browser but instead allows for the placement of a very simple entity that takes its physicalization parameters from its assigned geometry. When objects are placed as Geom entities and it have user-defined properties (discussed later), they become interactive entities with physical values, so they can behave like real-life objects. It is similar to a basic entity, but simpler, more efficient, and has fewer configurable parameters.
The Prefabs section contains the currently loaded Prefab libraries for a given level.
Prefabs are groups of objects that can be placed in the level as instances similar to archetype entities. Altering one prefab universally applies the changes to each instance of the prefab object. Any iteration to the prefab is required to be saved to the Prefabs library to ensure they are correctly propagated across an entire series of levels.
To navigate levels is important, but to be able to select and browse your level objects is essential.
To do this, we will be using the Select Objects window, which enables you to quickly search for objects, hide, unhide, freeze, and unfreeze objects in a list type view.
To follow the example in this recipe, you should have the Forest.cry level loaded in the Sandbox editor.
Let's open the Select Objects window:
You can access the Select Objects window by using the EditMode toolbar or in the main menu, under View | Select Object(s).
You can also open the Select Objects window using the shortcut Control + T.
Press the heading of the column to sort the level objects based on that particular heading's type. In this case, let's sort by name.

You will notice all the objects in the level are listed here.
Using the Fast Select dialog type in
shrine.Use the Select button to transfer selections from the object's list to the editor's object selection.

You can now combine this with the use of the
gotoobject button in the object toolbar.Reset the selection using the Reset button, which resets the selection in the table and the editor's object selection.
The layout of the Select Objects window is quite intuitive. It displays a list of the objects in the currently opened level, which can be sorted by the name of the objects, the type, and the layer the object is on or even by the material applied to the object.
You can also use the Select All button, which selects all the objects in the table and transfers them to the editor's object selection.
There are a good deal of tools available immediately in the Select Objects window; you can browse frozen and hidden objects, the type of object, and even show dependencies.
You can browse through hidden or frozen objects without changing their corresponding state using the Display list to filter them from the object table.
To restore all the toolbar's windows and saved settings, you can restore Sandbox's default settings in the next recipe
To get right to creating your first level, go to the Creating a new level recipe in Chapter 2, Sandbox Basics
It is important to know how to reset the settings in Sandbox to their default states.
It can occur that system paths to root builds or folders become corrupted after switching between multiple instances of the CryENGINE 3.
This example will demonstrate how you can restore the default settings by deleting the relevant keys in the Windows Registry editor. This step-by-step process takes you through which keys in the registry should be removed to restore the defaults.
If you are trying to simply restore the Sandbox layout, please try restoring the default layout settings from the View Menu | Layouts | Restore Default Layout.
Note
Editing your registry is a very sensitive operation! As such, you should back up your registry before starting this tutorial.
After this task you will have restored all Sandbox and resource compiler settings to their default settings.
Depending on your Operating System version, the process of opening your PC's registry for edit may be different:
To open the Windows Registry editor using Windows XP:
Click Start
Click Run
Type into the text box, regedit
Press Enter
This will now have opened your Windows Registry editor.
In the Registry editor, navigate to
HKEY_CURRENT_USER\Software\Crytek\Sandbox 3.
Press Delete.
Now, we can restore the default folder structure automatically by navigating back to the the
Editor.exeand launching it.
Sandbox stores various compulsory values and folders.
Note
It is not recommended to adjust these values manually without having in-depth knowledge of the consequences of the changes.
The registry contains some editor layout data but not all, and because of this, completely restoring the default settings could require removal of other directories, such as the user folder.
Sometimes it's not required to completely reset the registry to restore some of the settings for Sandbox. You can delete the user folder, which is explained further.
The user folder might be needed to store user-specific data. Windows can have restrictions on where the user can store files. For example, the program folder might not be writable at all. For that reason, screenshots save game data and other files are typically stored in the user folder.
You can simply delete this folder and restart Sandbox for the default settings to be restored.