Download code from GitHub
In this chapter, we will introduce some advanced user and group management scenarios along with some examples on how to handle advanced level options such as password aging, managing sudoers, and so on, on a day to day basis. Here, we are assuming that we have already successfully installed CentOS 7 along with a root and user credentials as we do in the traditional format. Also, the command examples, in this chapter, assume you are logged in or switched to the root user.
The following topics will be covered:
User and group management from the GUI and the command line
Quotas
Password aging
Sudoers
We can add a user to the system using useradd from the command line with a simple command, as follows:
useradd testuser
This creates a user entry in the /etc/passwd file and automatically creates the home directory for the user in /home. The /etc/passwd entry looks like this:
testuser:x:1001:1001::/home/testuser:/bin/bash
But, as we all know, the user is in a locked state and cannot log in to the system unless we add a password for the user using the command:
passwd testuser
This will, in turn, modify the /etc/shadow file, at the same time unlock the user, and the user will be able to log in to the system.
By default, the preceding set of commands will create both a user and a group for the testuser user on the system. What if we want a certain set of users to be a part of a common group? We will use the -g option along with the useradd command to define the group for the user, but we have to make sure that the group already exists. So, to create users such as testuser1, testuser2, and testuser3 and make them part of a common group called testgroup, we will first create the group and then we create the users using the -g or -G switches. So, we will do this:
# To create the group :
groupadd testgroup
# To create the user with the above group and provide password and unlock
user at the same time :

useradd testuser1 -G testgroup
passwd testuser1

useradd testuser2 -g 1002
passwd testuser2
Here, we have used both -g and -G. The difference between them is: with -G, we create the user with its default group and assign the user to the common testgroup as well, but with -g, we create the user as part of the testgroup only. In both cases, we can use either the gid or the group name obtained from the /etc/group file.
There are a couple more options that we can use for an advanced level user creation; for example, for system users with uid less than 500, we have to use the -r option, which will create a user on the system, but the uid will be less than 500. We also can use -u to define a specific uid, which must be unique and greater than 499. Common options that we can use with the useradd command are:
-c: This option is used for comments, generally to define the user's real name, such as-c "John Doe".-d: This option is used to definehome-dir; by default, thehomedirectory is created in/homesuch as-d /var/<user name>.-g: This option is used for the group name or the group number for the user's default group. The group must already have been created earlier.-G: This option is used for additional group names or group numbers, separated by commas, of which the user is a member. Again, these groups must also have been created earlier.-r: This option is used to create a system account with a UID less than 500 and without ahomedirectory.-u: This option is the user ID for the user. It must be unique and greater than 499.
There are few quick options that we use with the passwd command as well. These are:
In order to control the disk space used in the Linux filesystem, we must use quota, which enables us to control the disk space and thus helps us resolve low disk space issues to a great extent. For this, we have to enable user and group quotas on the Linux system.
In CentOS 7, the user and group quotas are not enabled by default so we have to enable them first.
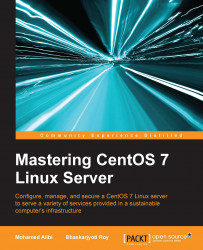
To check whether quota is enabled or not, we issue the following command:
mount | grep ' / '
The image shows that the root filesystem is enabled without quota as mentioned by the noquota in the output.
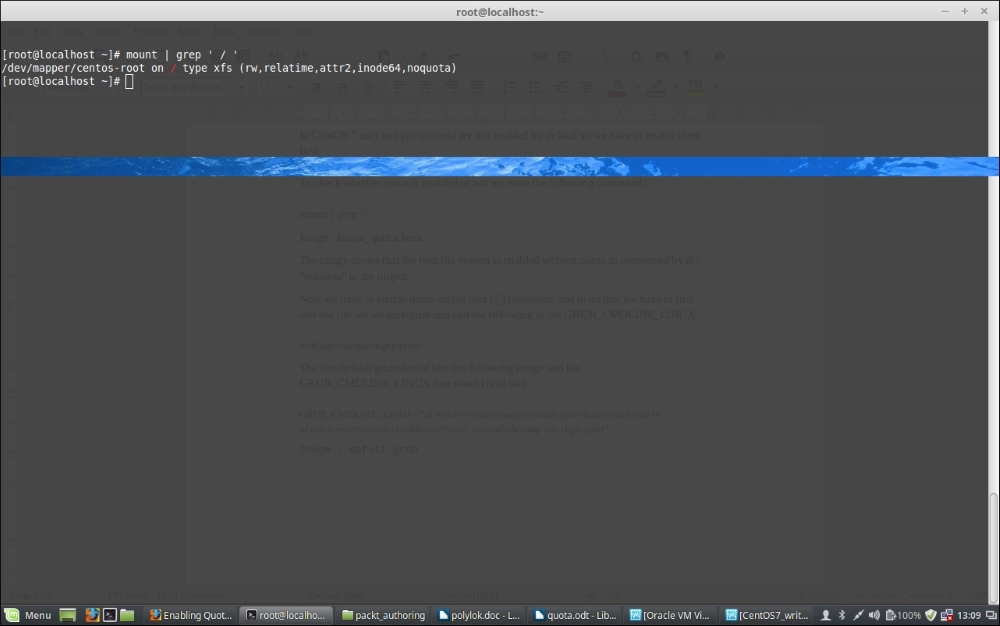
Now, we have to enable quota on the root (/) filesystem, and to do that, we have to first edit the file /etc/default/grub and add the following to GRUB_CMDLINE_LINUX:
rootflags=usrquota,grpquota
In file GRUB_CMDLINE_LINUX line should read as follows:
GRUB_CMDLINE_LINUX="rd.lvm.lv=centos/swap vconsole.font=latarcyrheb-sun16 rd.lvm.lv=centos/root crashkernel=auto vconsole.keymap=us rhgb quiet rootflags=usrquota,grpquota"
The output of cat /etc/default/grub command should look like the following screenshot:
Since we have to reflect the changes we just made, we should backup the grub configuration using the following command:
cp /boot/grub2/grub.cfg /boot/grub2/grub.cfg.original
Now, we have to rebuild the grub with the changes we just made using the command:
grub2-mkconfig -o /boot/grub2/grub.cfg
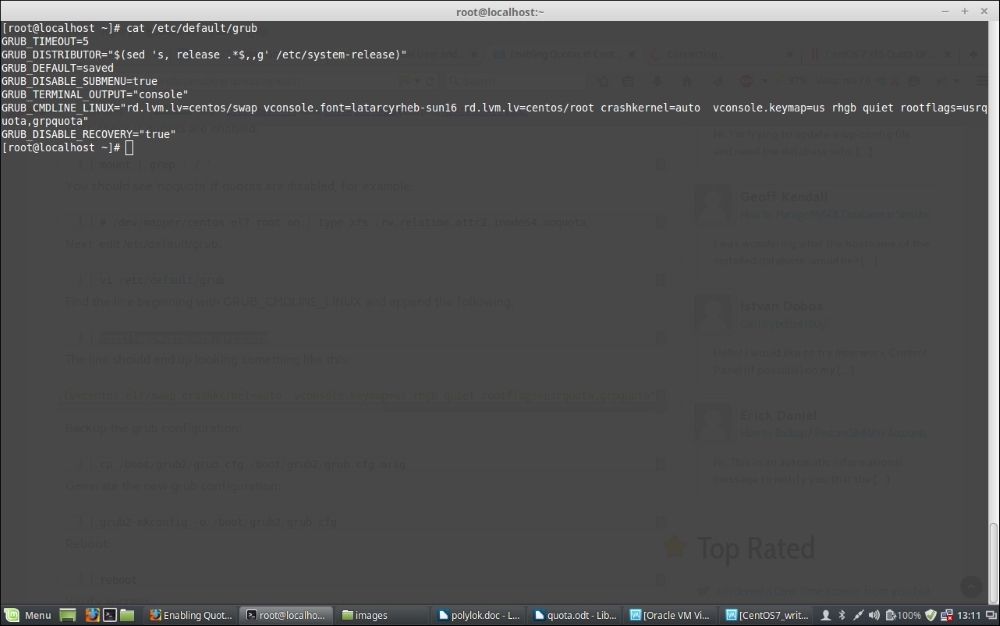
Next, reboot the system. Once it's up, log in and verify that the quota is enabled using the command we used before:
mount | grep ' / '
It should now show us that the quota is enabled and will show us an output as follows:
/dev/mapper/centos-root on / type xfs (rw,relatime,attr2,inode64,usrquota,grpquota)
Add the following lead-in before image and apply CIT style to mount | grep ' / '
Now, since quota is enabled, we will further install quota using the following to operate quota for different users and groups, and so on:
yum -y install quota
Once quota is installed, we check the current quota for users using the following command:
repquota -as
The preceding command will report user quotas in a human-readable format.
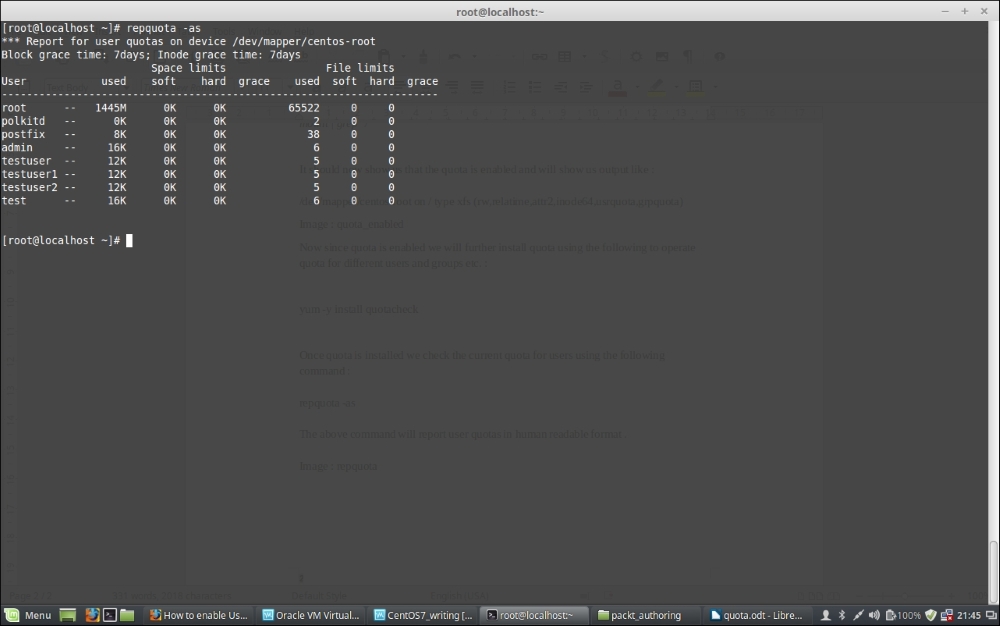
From the preceding screenshot, there are two ways we can limit quota for users and groups; one is setting soft and hard limits for the size of disk space used, and another is limiting the user or group by limiting the number of files they can create. In both cases, soft and hard limits are used. A soft limit is something that warns the user when the soft limit is reached, and the hard limit is the limit that they cannot bypass.
We will use the following command to modify a user quota:
edquota -u username
The preceding command output shall look like the following screenshot:

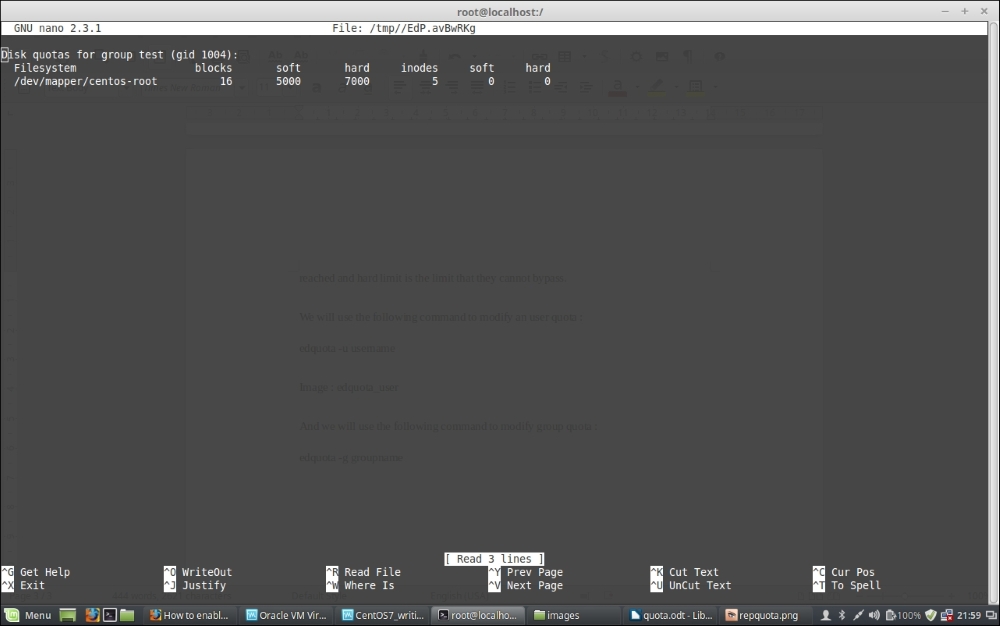
Now, we will use the following command to modify the group quota:
edquota -g groupname
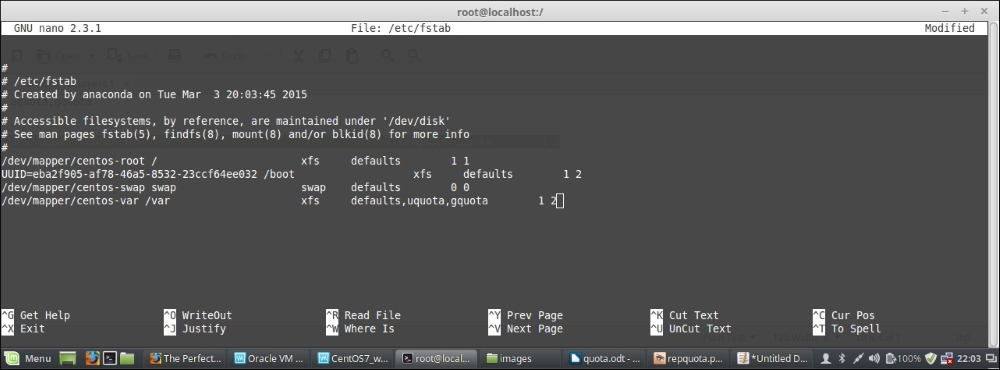
If you have other partitions mounted separately, you have to modify the /etc/fstab file command to enable quota on the filesystem by adding usrquota and grpquota after the defaults for that specific partition as in the following screenshot, where we have enabled the quota for the /var partition:
Once you are finished enabling quota, remount the filesystem and run the following commands:
To remount /var :
mount -o remount /var
To enable quota :
quotacheck -avugm
quotaon -avug
Quota is something all system admins use to handle disk space consumed on a server by users or groups and limit over usage of the space. It thus helps them manage the disk space usage on the system. In this regard, it should be noted that you plan before your installation and create partitions accordingly as well so that the disk space is used properly. Multiple separate partitions such as /var and /home etc are always suggested, as generally these are the partitions which consume most space on a Linux system. So, if we keep them on a separate partition, it will not eat up the root (/) filesystem space and will be more failsafe than using an entire filesystem mounted as only root.
It is a good policy to have password aging so that the users are forced to change their passwords at a certain interval. This, in turn, helps to keep the security of the system as well.
We can use chage to configure the password to expire the first time the user logs in to the system.
This method of using chage will ensure that the user is forced to change the password right away.
Tip
If we use only chage <username>, it will display the current password aging value for the specified user and will allow them to be changed interactively.
The following steps need to be performed to accomplish password aging:
Lock the user. If the user doesn't exist, we will use the
useraddcommand to create the user. However, we will not assign any password to the user so that it remains locked. But, if the user already exists on the system, we will use theusermodcommand to lock the user:Usermod -L <username>Force immediate password change using the following command:
chage -d 0 <username>Unlock the account. This can be achieved in two ways. One is to assign an initial password and the other is to assign a null password. We will take the first approach as the second one, though possible, is not good practice in terms of security. Therefore, here is what we do to assign an initial password:
Use the Python command to start the command-line Python interpreter:
import crypt; print
crypt.crypt("Q!W@E#R$","Bing0000/")
Here, we have used the
Q!W@E#R$password with a salt combination of the alphanumeric character:Bing0000followed by a/character. The output is the encrypted password, similar toBiagqBsi6gl1o.Press Ctrl + D to exit the Python interpreter.
At the shell, enter the following command with the encrypted output of the Python interpreter:
usermod -p "<encrypted-password>" <username>So, here, in our case, if the username is
testuser, and the encrypted output is" BiagqBsi6gl1o"we will do:usermod -p "BiagqBsi6gl1o" testuser
Now, upon initial login using the Q!W@E#R$ password, the user will be prompted for a new password.
This is a set of rules defined in some files, which have to be followed when a system user is setting up. It's an important factor in security because one of the many security breach histories was started with hacking user passwords. This is the reason why most organizations set a password policy for their users. All users and passwords must comply with this.
A password policy usually is defined by the following:
Password aging
Password length
Password complexity
Limit login failures
Limit prior password reuse
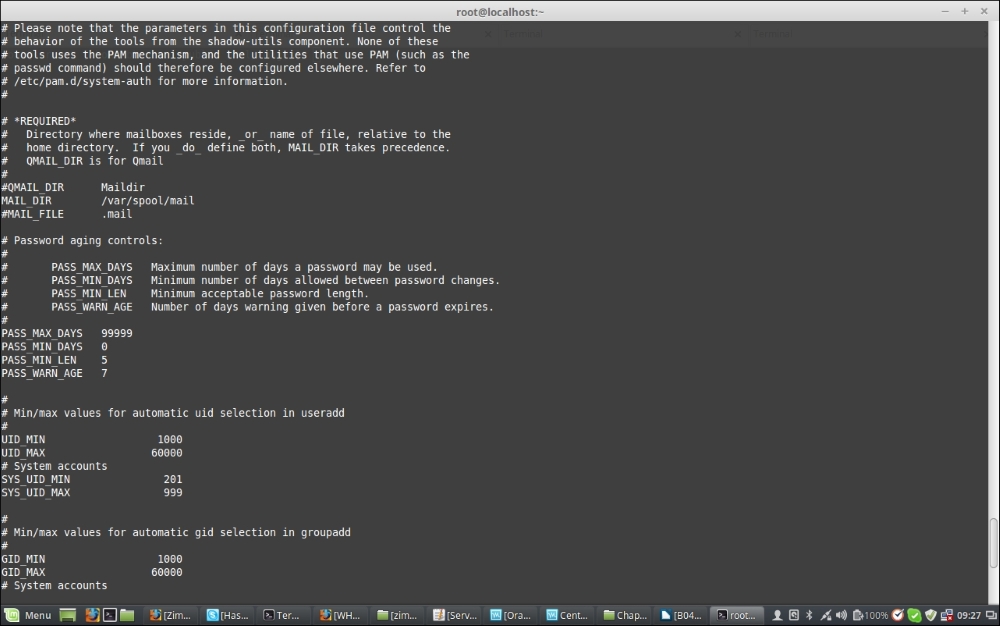
Password aging and password length are defined in /etc/login.defs. Aging basically means the maximum number of days a password might be used, minimum number of days allowed between password changes, and number of warnings before the password expires. Length refers to the number of characters required for creating the password. To configure password aging and length, we should edit the /etc/login.defs file and set different PASS values according to the policy set by the organization.
Note
Note: The password aging controls defined here do not affect existing users; it only affects the newly created users. So, we must set these policies when setting up the system or the server at the beginning. The values we modify are:
Let's take a look at a sample configuration of the login.defs file:
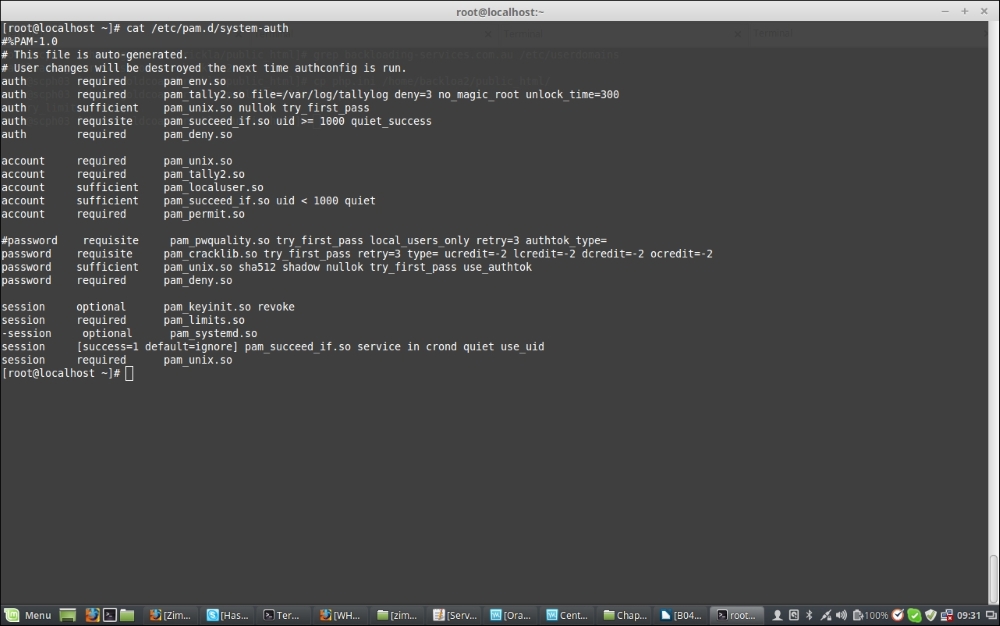
By editing the /etc/pam.d/system-auth file, we can configure the password complexity and the number of reused passwords to be denied. Password complexity refers to the complexity of the characters used in the password, and the reused password deny refers to denying the desired number of passwords the user used in the past. By setting the complexity, we force the usage of the desired number of capital characters, lowercase characters, numbers, and symbols in a password. The password will be denied by the system until and unless the complexity set by the rules is met. We do this using the following terms:
Force capital characters in passwords:
ucredit=-X, whereXis the number of capital characters required in the password.Force lower case characters in passwords:
lcredit=-X, whereXis the number of lowercase characters required in the password.Force numbers in passwords:
dcredit=-X, whereXis the number of numbers required in the password.Force the use of symbols in passwords:
ocredit=-X, whereXis the number of symbols required in the password. For example:password requisite pam_cracklib.so try_first_pass retry=3 type= ucredit=-2 lcredit=-2 dcredit=-2 ocredit=-2Deny reused passwords:
remember=X, whereXis the number of past passwords to be denied. For example:password sufficient pam_unix.so sha512 shadow nullok try_first_pass use_authtok remember=5
Let's now take a look at a sample configuration of /etc/pam.d/system-auth:

We set the number of login failures allowed by a user in the /etc/pam.d/password-auth, /etc/pam.d/system-auth, and /etc/pam.d/login files. When a user's failed login attempts are higher than the number defined here, the account is locked and only a system administrator can unlock the account. To configure this, make the following additions to the files. The following deny=X parameter configures this, where X is the number of failed login attempts allowed.
Add these two lines to the /etc/pam.d/password-auth and /etc/pam.d/system-auth files and only the first line to the /etc/pam.d/login file:
auth        required    pam_tally2.so file=/var/log/tallylog deny=3 no_magic_root unlock_time=300
account     required    pam_tally2.so
The following screenshot is a sample /etc/pam.d/system-auth file:
The following is a sample /etc/pam.d/login file:

To see failures, use the following command:
pam_tally2 –user=<User Name>
To reset the failure attempts and to enable the user to log in again, use the following command:
pam_tally2 –user=<User Name> --reset
Separation of user privileges is one of the main features in Linux operating systems. Normal users operate in limited privilege sessions to limit the scope of their influence on the entire system. One special user exists on Linux that we know already is root, which has super-user privileges. This account doesn't have any restrictions that are present to normal users. Users can execute commands with super-user or root privileges in a number of different ways.
There are mainly three different ways to obtain root privileges on a system:
Log in to the system as
root.Log in to the system as any user and then use the
su -command. This will ask you for therootpassword and once authenticated, will give you the root shell session. We can disconnect this root shell using Ctrl + D or using the commandexit. Once exited, we will come back to our normal user shell.Run commands with root privileges using
sudowithout spawning arootshell or logging in as root. Thissudocommand works as follows:sudo <command to execute>
Unlike su, sudo will request the password of the user calling the command, not the root password.
The sudo doesn't work by default and requires to be set up before it functions correctly.
In the following section, we will see how to configure sudo and modify the /etc/sudoers file so that it works the way we want it to.
The sudo is modified or implemented using the /etc/sudoers file, and visudo is the command that enables us to edit the file.
Note
Note: This file should not be edited using a normal text editor to avoid potential race conditions in updating the file with other processes. Instead, the visudo command should be used.
The visudo command opens a text editor normally, but then validates the syntax of the file upon saving. This prevents configuration errors from blocking sudo operations.
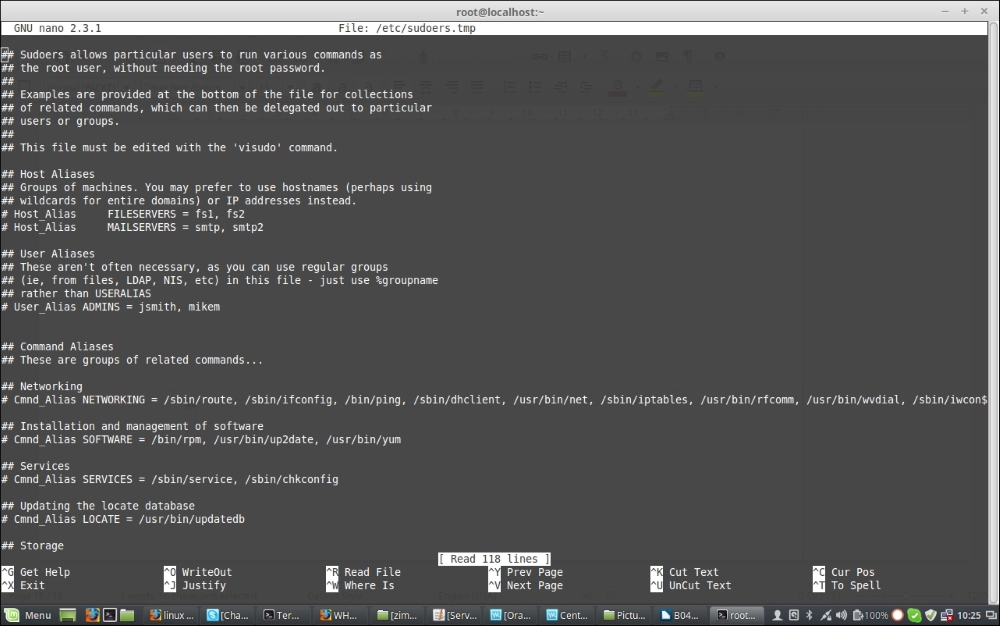
By default, visudo opens the /etc/sudoers file in vi editor, but we can configure it to use the nano text editor instead. For that, we have to make sure nano is already installed or we can install nano
using:
yum install nano -y
Now, we can change it to use nano by editing the ~/.bashrc file:
export EDITOR=/usr/bin/nano
Then, source the file using:
. ~/.bashrc
Now, we can use visudo with nano to edit the /etc/sudoers file. So, let's open the /etc/sudoers file using visudo and learn a few things.
We can use different kinds of aliases for different sets of commands, software, services, users, groups, and so on. For example:
Cmnd_Alias NETWORKING = /sbin/route, /sbin/ifconfig, /bin/ping, /sbin/dhclient, /usr/bin/net, /sbin/iptables, /usr/bin/rfcomm, /usr/bin/wvdial, /sbin/iwconfig, /sbin/mii-tool
Cmnd_Alias SOFTWARE = /bin/rpm, /usr/bin/up2date, /usr/bin/yum
Cmnd_Alias SERVICES = /sbin/service, /sbin/chkconfig
We can use these aliases to assign a set of command execution rights to a user or a group. For example, if we want to assign the NETWORKING set of commands to the group netadmin we will define:
%netadmin ALL = NETWORKING
Otherwise, if we want to allow the wheel group users to run all the commands, we will do the following:
%wheel ALL=(ALL) ALL
If we want a specific user, john, to get access to all commands, we will do the following:
john ALL=(ALL) ALL
We can create different groups of users, with overlapping membership:
User_Alias      GROUPONE = abby, brent, carl
User_Alias      GROUPTWO = brent, doris, eric,
User_Alias      GROUPTHREE = doris, felicia, grant
Group names must start with a capital letter. We can then allow members of GROUPTWO to update the yum database and all the commands assigned to the preceding software by creating a rule like this:
GROUPTWO ALL = SOFTWARE
If we do not specify a user/group to run, sudo defaults to the root user.
We can allow members of GROUPTHREE to shut down and reboot the machine by creating a command alias and using that in a rule for GROUPTHREE:
Cmnd_Alias      POWER = /sbin/shutdown, /sbin/halt, /sbin/reboot, /sbin/restart
GROUPTHREE  ALL = POWER
We create a command alias called POWER that contains commands to power off and reboot the machine. We then allow the members of GROUPTHREE to execute these commands.
We can also create Runas aliases, which can replace the portion of the rule that specifies to the user to execute the command as:
Runas_Alias     WEB = www-data, apache
GROUPONE    ALL = (WEB) ALL
This will allow anyone who is a member of GROUPONE to execute commands as the www-data user or the apache user.
Just keep in mind that later, rules will override previous rules when there is a conflict between the two.
There are a number of ways that you can achieve more control over how sudo handles a command. Here are some examples:
The updatedb command associated with the mlocate package is relatively harmless. If we want to allow users to execute it with root privileges without having to type a password, we can make a rule like this:
GROUPONE ALL = NOPASSWD: /usr/bin/updatedb
NOPASSWD is a tag that means no password will be requested. It has a companion command called PASSWD, which is the default behavior. A tag is relevant for the rest of the rule unless overruled by its twin tag later down the line.
For instance, we can have a line like this:
GROUPTWO ALL = NOPASSWD: /usr/bin/updatedb, PASSWD: /bin/kill
In this case, a user can run the updatedb command without a password as the root user, but entering the root password will be required for running the kill command. Another helpful tag is NOEXEC, which can be used to prevent some dangerous behavior in certain programs.
For example, some programs, such as less, can spawn other commands by typing this from within their interface:
!command_to_run
This basically executes any command the user gives it with the same permissions that less is running under, which can be quite dangerous.
To restrict this, we could use a line like this:
username ALL = NOEXEC: /usr/bin/less
You should now have clear understanding of what sudo is and how we modify and provide access rights using visudo. There are many more things left here. You can check the default /etc/sudoers file, which has a good number of examples, using the visudo command, or you can read the sudoers manual as well.
One point to remember is that root privileges are not given to regular users often. It is important for us to understand what these commands do when you execute with root privileges. Do not take the responsibility lightly. Learn the best way to use these tools for your use case, and lock down any functionality that is not needed.
In this chapter, you learned about some advanced user management and how to manage users through the command line, along with password aging, quota, exposure to /etc/sudoers, and how to modify them using visudo. User and password management is a regular task that a system administrator performs on servers, and it has a very important role in the overall security of the system.
In the next chapter, we will look into advanced security features called Security-Enhanced Linux (SELinux), which comes integrated with CentOS or RedHat Linux operating systems.