ESM: ECMAScript modules
ECMAScript modules (also known as ES modules or ESM) were introduced as part of the ECMAScript 2015 specification with the goal to give JavaScript an official module system suitable for different execution environments. The ESM specification tries to retain some good ideas from previous existing module systems like CommonJS and AMD. The syntax is very simple and compact. There is support for cyclic dependencies and the possibility to load modules asynchronously.
The most important differentiator between ESM and CommonJS is that ES modules are static, which means that imports are described at the top level of every module and outside any control flow statement. Also, the name of the imported modules cannot be dynamically generated at runtime using expressions, only constant strings are allowed.
For instance, the following code wouldn't be valid when using ES modules:
if (condition) {
  import module1 from 'module1'
} else {
  import module2 from 'module2'
}
While in CommonJS, it is perfectly fine to write something like this:
let module = null
if (condition) {
  module = require('module1')
} else {
  module = require('module2')
}
At a first glance, this characteristic of ESM might seem an unnecessary limitation, but in reality, having static imports opens up a number of interesting scenarios that are not practical with the dynamic nature of CommonJS. For instance, static imports allow the static analysis of the dependency tree, which allows optimizations such as dead code elimination (tree shaking) and more.
Using ESM in Node.js
Node.js will consider every .js file to be written using the CommonJS syntax by default; therefore, if we use the ESM syntax inside a .js file, the interpreter will simply throw an error.
There are several ways to tell the Node.js interpreter to consider a given module as an ES module rather than a CommonJS module:
- Give the module file the extension
.mjs - Add to the nearest parent
package.jsona field called "type"with a value of"module"
Throughout the rest of this book and in the code examples provided, we will keep using the .js extension to keep the code more easily accessible to most text editors, so if you are copying and pasting examples straight from the book, make sure that you also create a package.json file with the "type":"module" entry.
Let's now have a look at the ESM syntax.
Named exports and imports
ESM allows us to export functionality from a module through the export keyword.
Note that ESM uses the singular word export as opposed to the plural (exports and module.exports) used by CommonJS.
In an ES module, everything is private by default and only exported entities are publicly accessible from other modules.
The export keyword can be used in front of the entities that we want to make available to the module users. Let's see an example:
// logger.js
// exports a function as `log`
export function log (message) {
  console.log(message)
}
// exports a constant as `DEFAULT_LEVEL`
export const DEFAULT_LEVEL = 'info'
// exports an object as `LEVELS`
export const LEVELS = {
  error: 0,
  debug: 1,
  warn: 2,
  data: 3,
  info: 4,
  verbose: 5
}
// exports a class as `Logger`
export class Logger {
  constructor (name) {
    this.name = name
  }
  log (message) {
    console.log(`[${this.name}] ${message}`)
  }
}
If we want to import entities from a module we can use the import keyword. The syntax is quite flexible, and it allows us to import one or more entities and even to rename imports. Let's see some examples:
import * as loggerModule from './logger.js'
console.log(loggerModule)
In this example, we are using the * syntax (also called namespace import) to import all the members of the module and assign them to the local loggerModule variable. This example will output something like this:
[Module] {
  DEFAULT_LEVEL: 'info',
  LEVELS: { error: 0, debug: 1, warn: 2, data: 3, info: 4,
    verbose: 5 },
  Logger: [Function: Logger],
  log: [Function: log]
}
As we can see, all the entities exported in our module are now accessible in the loggerModule namespace. For instance, we could refer to the log() function through loggerModule.log.
It's very important to note that, as opposed to CommonJS, with ESM we have to specify the file extension of the imported modules. With CommonJS we can use either ./logger or ./logger.js, with ESM we are forced to use ./logger.js.
If we are using a large module, most often we don't want to import all of its functionality, but only one or few entities from it:
import { log } from './logger.js'
log('Hello World')
If we want to import more than one entity, this is how we would do that:
import { log, Logger } from './logger.js'
log('Hello World')
const logger = new Logger('DEFAULT')
logger.log('Hello world')
When we use this type of import statement, the entities are imported into the current scope, so there is a risk of a name clash. The following code, for example, would not work:
import { log } from './logger.js'
const log = console.log
If we try to execute the preceding snippet, the interpreter fails with the following error:
SyntaxError: Identifier 'log' has already been declared
In situations like this one, we can resolve the clash by renaming the imported entity with the as keyword:
import { log as log2 } from './logger.js'
const log = console.log
log('message from log')
log2('message from log2')
This approach can be particularly useful when the clash is generated by importing two entities with the same name from different modules, and therefore changing the original names is outside the consumer's control.
Default exports and imports
One widely used feature of CommonJS is the ability to export a single unnamed entity through the assignment of module.exports. We saw that this is very convenient as it encourages module developers to follow the single-responsibility principle and expose only one clear interface. With ESM, we can do something similar through what's called a default export. A default export makes use of the export default keywords and it looks like this:
// logger.js
export default class Logger {
  constructor (name) {
    this.name = name
  }
  log (message) {
    console.log(`[${this.name}] ${message}`)
  }
}
In this case, the name Logger is ignored, and the entity exported is registered under the name default. This exported name is handled in a special way, and it can be imported as follows:
// main.js
import MyLogger from './logger.js'
const logger = new MyLogger('info')
logger.log('Hello World')
The difference with named ESM imports is that here, since the default export is considered unnamed, we can import it and at the same time assign it a local name of our choice. In this example, we can replace MyLogger with anything else that makes sense in our context. This is very similar to what we do with CommonJS modules. Note also that we don't have to wrap the import name around brackets or use the as keyword when renaming.
Internally, a default export is equivalent to a named export with default as the name. We can easily verify this statement by running the following snippet of code:
// showDefault.js
import * as loggerModule from './logger.js'
console.log(loggerModule)
When executed, the previous code will print something like this:
[Module] { default: [Function: Logger] }
One thing that we cannot do, though, is import the default entity explicitly. In fact, something like the following will fail:
import { default } from './logger.js'
The execution will fail with a SyntaxError: Unexpected reserved word error. This happens because the default keyword cannot be used as a variable name. It is valid as an object attribute, so in the previous example, it is okay to use loggerModule.default, but we can't have a variable named default directly in the scope.
Mixed exports
It is possible to mix named exports and a default export within an ES module. Let's have a look at an example:
// logger.js
export default function log (message) {
  console.log(message)
}
export function info (message) {
  log(`info: ${message}`)
}
The preceding code is exporting the log() function as a default export and a named export for a function called info(). Note that info() can reference log() internally. It would not be possible to replace the call to log() with default() to do that, as it would be a syntax error (Unexpected token default).
If we want to import both the default export and one or more named exports, we can do it using the following format:
import mylog, { info } from './logger.js'
In the preceding example, we are importing the default export from logger.js as mylog and also the named export info.
Let's now discuss some key details and differences between the default export and named exports:
- Named exports are explicit. Having predetermined names allows IDEs to support the developer with automatic imports, autocomplete, and refactoring tools. For instance, if we type
writeFileSync, the editor might automatically addimport { writeFileSync } from 'fs'at the beginning of the current file. Default exports, on the contrary, make all these things more complicated as a given functionality could have different names in different files, so it's harder to make inferences on which module might provide a given functionality based only on a given name. - The default export is a convenient mechanism to communicate what is the single most important functionality for a module. Also, from the perspective of the user, it can be easier to import the obvious piece of functionality without having to know the exact name of the binding.
- In some circumstances, default exports might make it harder to apply dead code elimination (tree shaking). For example, a module could provide only a default export, which is an object where all the functionality is exposed as properties of such an object. When we import this default object, most module bundlers will consider the entire object being used and they won't be able to eliminate any unused code from the exported functionality.
For these reasons, it is generally considered good practice to stick with named exports, especially when you want to expose more than one functionality, and only use default exports if it's one clear functionality you want to export.
This is not a hard rule and there are notable exceptions to this suggestion. For instance, all Node.js core modules have both a default export and a number of named exports. Also, React (nodejsdp.link/react) uses mixed exports.
Consider carefully what the best approach for your specific module is and what you want the developer experience to be for the users of your module.
Module identifiers
Module identifiers (also called module specifiers) are the different types of values that we can use in our import statements to specify the location of the module we want to load.
So far, we have seen only relative paths, but there are several other possibilities and some nuances to keep in mind. Let's list all the possibilities:
- Relative specifiers like
./logger.jsor../logger.js. They are used to refer to a path relative to the location of the importing file. - Absolute specifiers like
file:///opt/nodejs/config.js. They refer directly and explicitly to a full path. Note that this is the only way with ESM to refer to an absolute path for a module, using a/or a//prefix won't work. This is a significant difference with CommonJS. - Bare specifiers are identifiers like
fastifyorhttp, and they represent modules available in thenode_modulesfolder and generally installed through a package manager (such as npm) or available as core Node.js modules. - Deep import specifiers like
fastify/lib/logger.js, which refer to a path within a package innode_modules(fastify, in this case).
In browser environments, it is possible to import modules directly by specifying the module URL, for instance, https://unpkg.com/lodash. This feature is not supported by Node.js.
Async imports
As we have seen in the previous section, the import statement is static and therefore subject to two important limitations:
- A module identifier cannot be constructed at runtime
- Module imports are declared at the top level of every file and they cannot be nested within control flow statements
There are some use cases when these limitations can become a little bit too restrictive. Imagine, for instance, if we have to import a specific translation module for the current user language, or a variation of a module that depends on the user's operating system.
Also, what if we want to load a given module, which might be particularly heavy, only if the user is accessing the piece of functionality that requires that module?
To allow us to overcome these limitations ES modules provides async imports (also called dynamic imports).
Async imports can be performed at runtime using the special import() operator.
The import() operator is syntactically equivalent to a function that takes a module identifier as an argument and it returns a promise that resolves to a module object.
We will learn more about promises in Chapter 5, Asynchronous Control Flow Patterns with Promises and Async/Await, so don't worry too much about understanding all the nuances of the specific promise syntax for now.
The module identifier can be any module identifier supported by static imports as discussed in the previous section. Now, let's see how to use dynamic imports with a simple example.
We want to build a command line application that can print "Hello World" in different languages. In the future, we will probably want to support many more phrases and languages, so it makes sense to have one file with the translations of all the user-facing strings for each supported language.
Let's create some example modules for some of the languages we want to support:
// strings-el.js
export const HELLO = 'Γεια σου κόσμε'
// strings-en.js
export const HELLO = 'Hello World'
// strings-es.js
export const HELLO = 'Hola mundo'
// strings-it.js
export const HELLO = 'Ciao mondo'
// strings-pl.js
export const HELLO = 'Witaj świecie'
Now let's create the main script that takes a language code from the command line and prints "Hello World" in the selected language:
// main.js
const SUPPORTED_LANGUAGES = ['el', 'en', 'es', 'it', 'pl']   // (1)
const selectedLanguage = process.argv[2]                     // (2)
if (!SUPPORTED_LANGUAGES.includes(selectedLanguage)) {       // (3)
  console.error('The specified language is not supported')
  process.exit(1)
}
const translationModule = `./strings-${selectedLanguage}.js` // (4)
import(translationModule)                                    // (5)
  .then((strings) => {                                       // (6)
    console.log(strings.HELLO)
  })
The first part of the script is quite simple. What we do there is:
- Define a list of supported languages.
- Read the selected language from the first argument passed in the command line.
- Finally, we handle the case where the selected language is not supported.
The second part of the code is where we actually use dynamic imports:
- First of all, we dynamically build the name of the module we want to import based on the selected language. Note that the module name needs to be a relative path to the module file, that's why we are prepending
./to the filename. - We use the
import()operator to trigger the dynamic import of the module. - The dynamic import happens asynchronously, so we can use the
.then()hook on the returned promise to get notified when the module is ready to be used. The function passed tothen()will be executed when the module is fully loaded andstringswill be the module namespace imported dynamically. After that, we can accessstrings.HELLOand print its value to the console.
Now we can execute this script like this:
node main.js it
And we should see Ciao mondo being printed to our console.
Module loading in depth
To understand how ESM actually works and how it can deal effectively with circular dependencies, we have to deep dive a little bit more into how JavaScript code is parsed and evaluated when using ES modules.
In this section, we will learn how ECMAScript modules are loaded, we will present the idea of read-only live bindings, and, finally, we will discuss an example with circular dependencies.
Loading phases
The goal of the interpreter is to build a graph of all the necessary modules (a dependency graph).
In generic terms, a dependency graph can be defined as a directed graph (nodejsdp.link/directed-graph) representing the dependencies of a group of objects. In the context of this section, when we refer to a dependency graph, we want to indicate the dependency relationship between ECMAScript modules. As we will see, using a dependency graph allows us to determine the order in which all the necessary modules should be loaded in a given project.
Essentially, the dependency graph is needed by the interpreter to figure out how modules depend on each other and in what order the code needs to be executed. When the node interpreter is launched, it gets passed some code to execute, generally in the form of a JavaScript file. This file is the starting point for the dependency resolution, and it is called the entry point. From the entry point, the interpreter will find and follow all the import statements recursively in a depth-first fashion, until all the necessary code is explored and then evaluated.
More specifically, this process happens in three separate phases:
- Phase 1 - Construction (or parsing): Find all the imports and recursively load the content of every module from the respective file.
- Phase 2 - Instantiation: For every exported entity, keep a named reference in memory, but don't assign any value just yet. Also, references are created for all the
importandexportstatements tracking the dependency relationship between them (linking). No JavaScript code has been executed at this stage. - Phase 3 - Evaluation: Node.js finally executes the code so that all the previously instantiated entities can get an actual value. Now running the code from the entry point is possible because all the blanks have been filled.
In simple terms, we could say that Phase 1 is about finding all the dots, Phase 2 connects those creating paths, and, finally, Phase 3 walks through the paths in the right order.
At first glance, this approach doesn't seem very different from what CommonJS does, but there's a fundamental difference. Due to its dynamic nature, CommonJS will execute all the files while the dependency graph is explored. We have seen that every time a new require statement is found, all the previous code has already been executed. This is why you can use require even within if statements or loops, and construct module identifiers from variables.
In ESM, these three phases are totally separate from each other, no code can be executed until the dependency graph has been fully built, and therefore module imports and exports have to be static.
Read-only live bindings
Another fundamental characteristic of ES modules, which helps with cyclic dependencies, is the idea that imported modules are effectively read-only live bindings to their exported values.
Let's clarify what this means with a simple example:
// counter.js
export let count = 0
export function increment () {
  count++
}
This module exports two values: a simple integer counter called count and an increment function that increases the counter by one.
Let's now write some code that uses this module:
// main.js
import { count, increment } from './counter.js'
console.log(count) // prints 0
increment()
console.log(count) // prints 1
count++ // TypeError: Assignment to constant variable!
What we can see in this code is that we can read the value of count at any time and change it using the increment() function, but as soon as we try to mutate the count variable directly, we get an error as if we were trying to mutate a const binding.
This proves that when an entity is imported in the scope, the binding to its original value cannot be changed (read-only binding) unless the bound value changes within the scope of the original module itself (live binding), which is outside the direct control of the consumer code.
This approach is fundamentally different from CommonJS. In fact, in CommonJS, the entire exports object is copied (shallow copy) when required from a module. This means that, if the value of primitive variables like numbers or string is changed at a later time, the requiring module won't be able to see those changes.
Circular dependency resolution
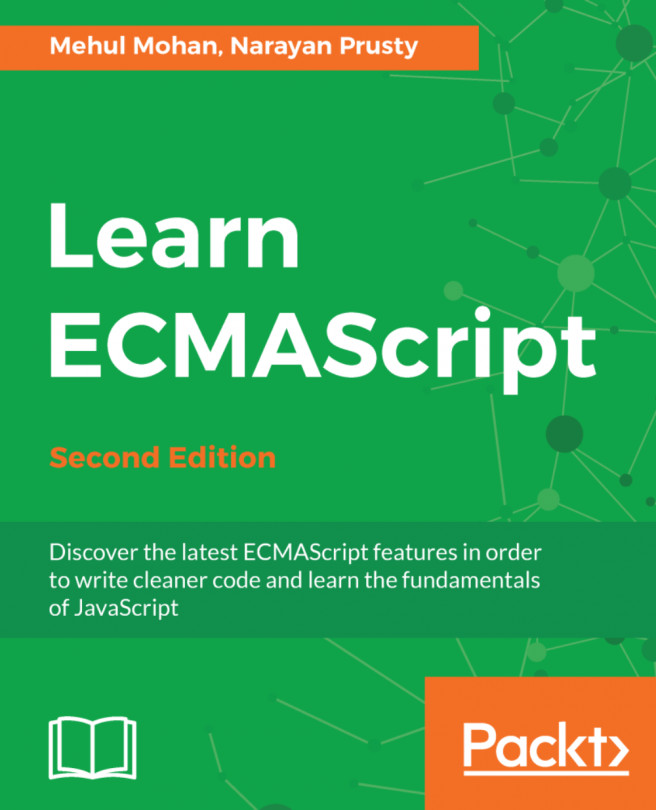
Now to close the circle, let's reimplement the circular dependency example we saw in the CommonJS modules section using the ESM syntax:
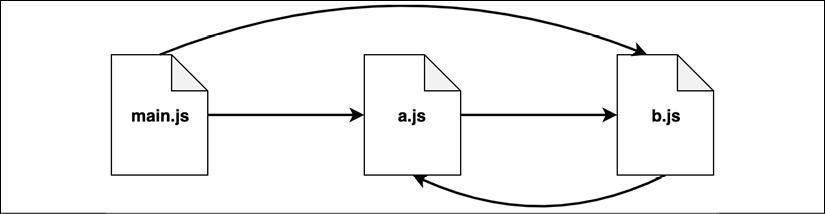
Figure 2.3: An example scenario with circular dependencies
Let's have a look at the modules a.js and b.js first:
// a.js
import * as bModule from './b.js'
export let loaded = false
export const b = bModule
loaded = true
// b.js
import * as aModule from './a.js'
export let loaded = false
export const a = aModule
loaded = true
And now let's see how to import those two modules in our main.js file (the entry point):
// main.js
import * as a from './a.js'
import * as b from './b.js'
console.log('a ->', a)
console.log('b ->', b)
Note that this time we are not using JSON.stringify because that will fail with a TypeError: Converting circular structure to JSON, since there's an actual circular reference between a.js and b.js.
When we run main.js, we will see the following output:
a -> <ref *1> [Module] {
  b: [Module] { a: [Circular *1], loaded: true },
  loaded: true
}
b -> <ref *1> [Module] {
  a: [Module] { b: [Circular *1], loaded: true },
  loaded: true
}
The interesting bit here is that the modules a.js and b.js have a complete picture of each other, unlike what would happen with CommonJS, where they would only hold partial information of each other. We can see that because all the loaded values are set to true. Also, b within a is an actual reference to the same b instance available in the current scope, and the same goes for a within b. That's the reason why we cannot use JSON.stringify() to serialize these modules. Finally, if we swap the order of the imports for the modules a.js and b.js, the final outcome does not change, which is another important difference in comparison with how CommonJS works
It's worth spending some more time observing what happens in the three phases of the module resolution (parsing, instantiation, and evaluation) for this specific example.
Phase 1: Parsing
During the parsing phase, the code is explored starting from the entry point (main.js). The interpreter looks only for import statements to find all the necessary modules and to load the source code from the module files. The dependency graph is explored in a depth-first fashion, and every module is visited only once. This way the interpreter builds a view of the dependencies that looks like a tree structure, as shown in Figure 2.4:
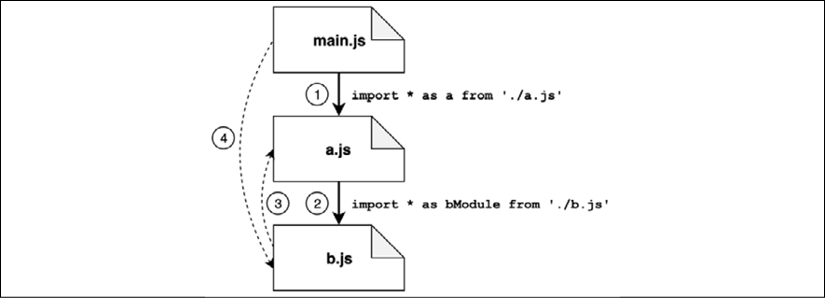
Figure 2.4: Parsing of cyclic dependencies with ESM
Given the example in Figure 2.4, let's discuss the various steps of the parsing phase:
- From
main.js, the first import found leads us straight intoa.js. - In
a.jswe find an import pointing tob.js. - In
b.js, we also have an import back toa.js(our cycle), but sincea.jshas already been visited, this path is not explored again. - At this point, the exploration starts to wind back:
b.jsdoesn't have other imports, so we go back toa.js;a.jsdoesn't have otherimportstatements so we go back tomain.js. Here we find another import pointing tob.js, but again this module has been explored already, so this path is ignored.
At this point, our depth-first visit of the dependency graph has been completed and we have a linear view of the modules, as shown in Figure 2.5:
Figure 2.5: A linear view of the module graph where cycles have been removed
This particular view is quite simple. In more realistic scenarios with a lot more modules, the view will look more like a tree structure.
Phase 2: Instantiation
In the instantiation phase, the interpreter walks the tree view obtained from the previous phase from the bottom to the top. For every module, the interpreter will look for all the exported properties first and build out a map of the exported names in memory:
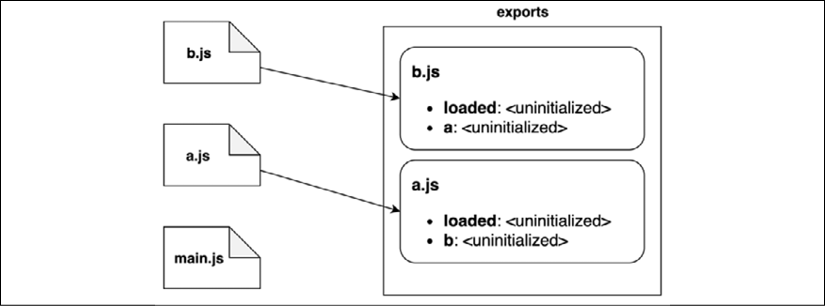
Figure 2.6: A visual representation of the instantiation phase
Figure 2.6 describes the order in which every module is instantiated:
- The interpreter starts from
b.jsand discovers that the module exportsloadedanda. - Then, the interpreter moves to
a.js, which exportsloadedandb. - Finally, it moves to
main.js, which does not export any functionality. - Note that, in this phase, the exports map keeps track of the exported names only; their associated values are considered uninitialized for now.
After this sequence of steps, the interpreter will do another pass to link the exported names to the modules importing them, as shown in Figure 2.7:
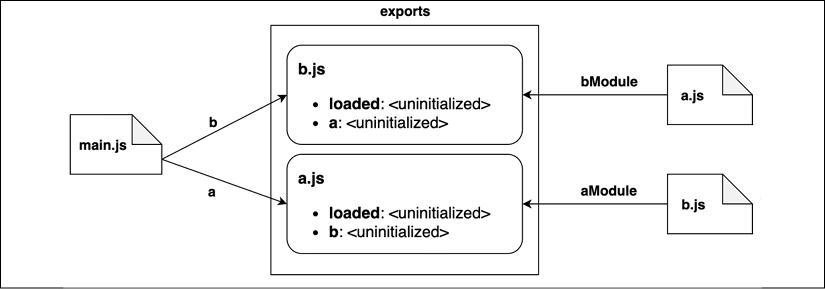
Figure 2.7: Linking exports with imports across modules
We can describe what we see in Figure 2.7 through the following steps:
- Module
b.jswill link the exports froma.js, referring to them asaModule. - In turn,
a.jswill link to all the exports fromb.js, referring to them asbModule. - Finally,
main.jswill import all the exports inb.js, referring to them asb; similarly, it will import everything froma.js, referring to them asa. - Again, it's important to note that all the values are still uninitialized. In this phase, we are only linking references to values that will be available at the end of the next phase.
Phase 3: Evaluation
The last step is the evaluation phase. In this phase, all the code in every file is finally executed. The execution order is again bottom-up respecting the post-order depth-first visit of our original dependency graph. With this approach, main.js is the last file to be executed. This way, we can be sure that all the exported values have been initialized before we start executing our main business logic:
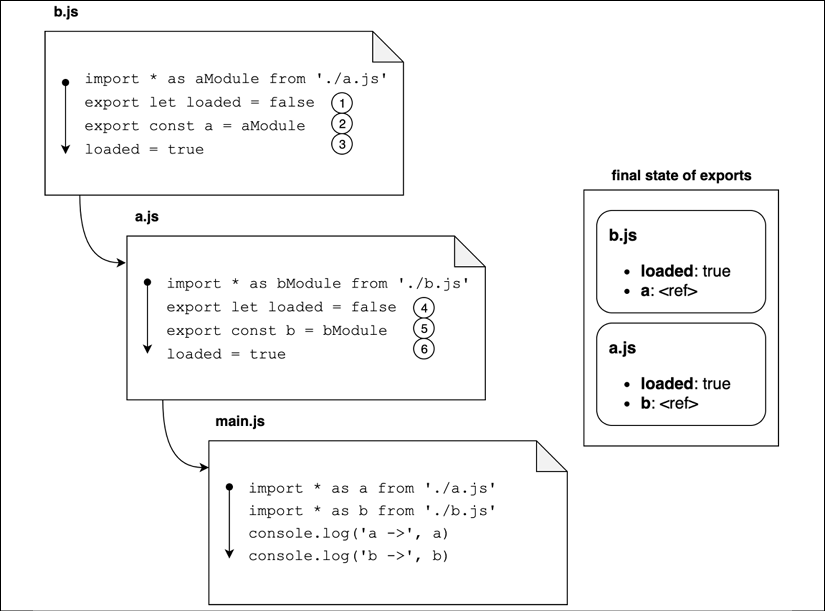
Figure 2.8: A visual representation of the evaluation phase
Following along from the diagram in Figure 2.8, this is what happens:
- The execution starts from
b.jsand the first line to be evaluated initializes theloadedexport tofalsefor the module. - Similarly, here the exported property
agets evaluated. This time, it will be evaluated to a reference to the module object representing modulea.js. - The value of the
loadedproperty gets changed totrue. At this point, we have fully evaluated the state of the exports for moduleb.js. - Now the execution moves to
a.js. Again, we start by settingloadedtofalse. - At this point, the
bexport is evaluated to a reference to moduleb.js. - Finally, the
loadedproperty is changed totrue. Now we have finally evaluated all the exports fora.jsas well.
After all these steps, the code in main.js can be executed, and at this point, all the exported properties are fully evaluated. Since imported modules are tracked as references, we can be sure every module has an up-to-date picture of the other modules, even in the presence of circular dependencies.
Modifying other modules
We saw that entities imported through ES modules are read-only live bindings, and therefore we cannot reassign them from an external module.
There's a caveat, though. It is true that we can't change the bindings of the default export or named exports of an existing module from another module, but, if one of these bindings is an object, we can still mutate the object itself by reassigning some of the object properties.
This caveat can give us enough freedom to alter the behavior of other modules. To demonstrate this idea, let's write a module that can alter the behavior of the core fs module so that it prevents the module from accessing the filesystem and returns mocked data instead. This kind of module is something that could be useful while writing tests for a component that relies on the filesystem:
// mock-read-file.js
import fs from 'fs'                                        // (1)
const originalReadFile = fs.readFile                       // (2)
let mockedResponse = null
function mockedReadFile (path, cb) {                       // (3)
  setImmediate(() => {
    cb(null, mockedResponse)
  })
}
export function mockEnable (respondWith) {                 // (4)
  mockedResponse = respondWith
  fs.readFile = mockedReadFile
}
export function mockDisable () {                           // (5)
  fs.readFile = originalReadFile
}
Let's review the preceding code:
- The first thing we do is import the default export of the
fsmodule. We will get back to this in a second, for now, just keep in mind that the default export of thefsmodule is an object that contains a collection of functions that allows us to interact with the filesystem. - We want to replace the
readFile()function with a mock implementation. Before doing that, we save a reference to the original implementation. We also declare amockedResponsevalue that we will be using later. - The function
mockedReadFile()is the actual mocked implementation that we want to use to replace the original implementation. This function invokes the callback with the current value ofmockedResponse. Note that this is a simplified implementation; the real function accepts an optionaloptionsargument before the callback argument and is able to handle different types of encoding. - The exported
mockEnable()function can be used to activate the mocked functionality. The original implementation will be swapped with the mocked one. The mocked implementation will return the same value passed here through therespondWithargument. - Finally, the exported
mockDisable()function can be used to restore the original implementation of thefs.readFile()function.
Now let's see a simple example that uses this module:
// main.js
import fs from 'fs'                                          // (1)
import { mockEnable, mockDisable } from './mock-read-file.js'
mockEnable(Buffer.from('Hello World'))                       // (2)
fs.readFile('fake-path', (err, data) => {                    // (3)
  if (err) {
    console.error(err)
    process.exit(1)
  }
  console.log(data.toString()) // 'Hello World'
})
mockDisable()
Let's discuss step by step what happens in this example:
- The first thing that we do is import the default export of the
fsmodule. Again, note that we are importing specifically the default export exactly as we did in ourmock-read-file.jsmodule, but more on this later. - Here we enable the mock functionality. We want, for every file read, to simulate that the file contains the string "Hello World."
- Finally, we read a file using a fake path. This code will print "Hello World" as it will be using the mocked version of the
readFile()function. Note that, after calling this function, we restore the original implementation by callingmockDisable().
This approach works, but it is very fragile. In fact, there are a number of ways in which this may not work.
On the mock-read-file.js side, we could have tried the two following imports for the fs module:
import * as fs from 'fs' // then use fs.readFile
or
import { readFile } from 'fs'
Both of them are valid imports because the fs module exports all the filesystem functions as named exports (other than a default export which is an object with the same collection of functions as attributes).
There are certain issues with the preceding two import statements:
- We would get a read-only live binding into the
readFile()function, and therefore, we would be unable to mutate it from an external module. If we try these approaches, we will get an error when trying to reassignreadFile(). - Another issue is on the consumer side within our
main.js, where we could use these two alternative import styles as well. In this case, we won't end up using the mocked functionality, and therefore the code will trigger an error while trying to read a nonexistent file.
The reason why using one of the two import statements mentioned above would not work is because our mocking utility is altering only the copy of the readFile() function that is registered inside the object exported as the default export, but not the one available as a named export at the top level of the module.
This particular example shows us how monkey patching could be much more complicated and unreliable in the context of ESM. For this reason, testing frameworks such as Jest (nodejsdp.link/jest) provide special functionalities to be able to mock ES modules more reliably (nodejsdp.link/jest-mock).
Another approach that can be used to mock modules is to rely on the hooks available in a special Node.js core module called module (nodejsdp.link/module-doc). One simple library that takes advantage of this module is mocku (nodejsdp.link/mocku). Check out its source code if you are curious.
We could also use the syncBuiltinESMExports() function from the module package. When this function is invoked, the value of the properties in the default exports object gets mapped again into the equivalent named exports, effectively allowing us to propagate any external change applied to the module functionality even to named exports:
import fs, { readFileSync } from 'fs'
import { syncBuiltinESMExports } from 'module'
fs.readFileSync = () => Buffer.from('Hello, ESM')
syncBuiltinESMExports()
console.log(fs.readFileSync === readFileSync) // true
We could use this to make our small filesystem mocking utility a little bit more flexible by invoking the syncBuiltinESMExports() function after we enable the mock or after we restore the original functionality.
Note that syncBuiltinESMExports() works only for built-in Node.js modules like the fs module in our example.
This concludes our exploration of ESM. At this point, we should be able to appreciate how ESM works, how it loads modules, and how it deals with cyclic dependencies. To close this chapter, we are now ready to discuss some key differences and some interesting interoperability techniques between CommonJS and ECMAScript modules.