

If you're a Swift developer like me, you probably have existing code in Swift 2.2 that you aren't ready to let go of just yet. Thankfully, Xcode 8 and the built in Swift Migrator will help you convert your Swift 2.2 projects to Swift 3. We will use a sample project to walk through using the Migrator. We will also go over some useful strategies you can employ when the Migrator fails to convert all of your code properly.
When you open a Swift 2.2 project in Xcode 8 for the first time, you are given the option to migrate your project to either Swift 2.3 or Swift 3 in order to take advantage of the new SDKs. However, if for some you decide that now is not the right time to convert, you can always do so later. The Swift Migrator tool is accessible in Xcode 8 under the Edit | Convert | To Current Swift Syntax… menu.
You will need to convert your code if you want to use the new SDK's available for iOS 10, macOS 10.12, watchOS 3, or tvOS 10. You have two options for migrating your project listed below:
If you want to build against the latest Swift and use all of the new features of Xcode 8, then choose the migrate to Swift 3 option. The Migrator will modify your source files to adhere to the new Swift 3 syntax.
Let's face it, Xcode is asking you to bravely use its black box tool to make irreversible changes to your project. While I'm a huge Apple fan, I doubt I would ever just press the shiny new migrate button without thinking about what could go wrong in the process. I'm not in the business of scrapping projects and starting from scratch. Honestly, who really is? To avoid a potentially terrible time with the Migrator, you really should consider doing everything listed below as pre-work before migrating your project:
Ensure that your existing codebase is making use of a version control system such as Git (https://git-scm.com) or Subversion (https://subversion.apache.org). If you run the Migrator and the output doesn't convert things as expected (or other unexpected things happen), you will have peace of mind that you can always get back to your original version.
Make sure your project compiles on the latest version of Xcode (7.3 or 7.3.1). You want to make sure everything, including...
Once you've done your pre-work, it's time to migrate your code. For our purposes, we are going to use a simple Tic Tac Toe project that you can download from the Packt website:
Launch Xcode 8 and open the Tic Tac Toe project: On first launch, Xcode will ask you if you want to migrate your Swift 2.2 project to use the latest SDKs. Choose Convert to start the migration.
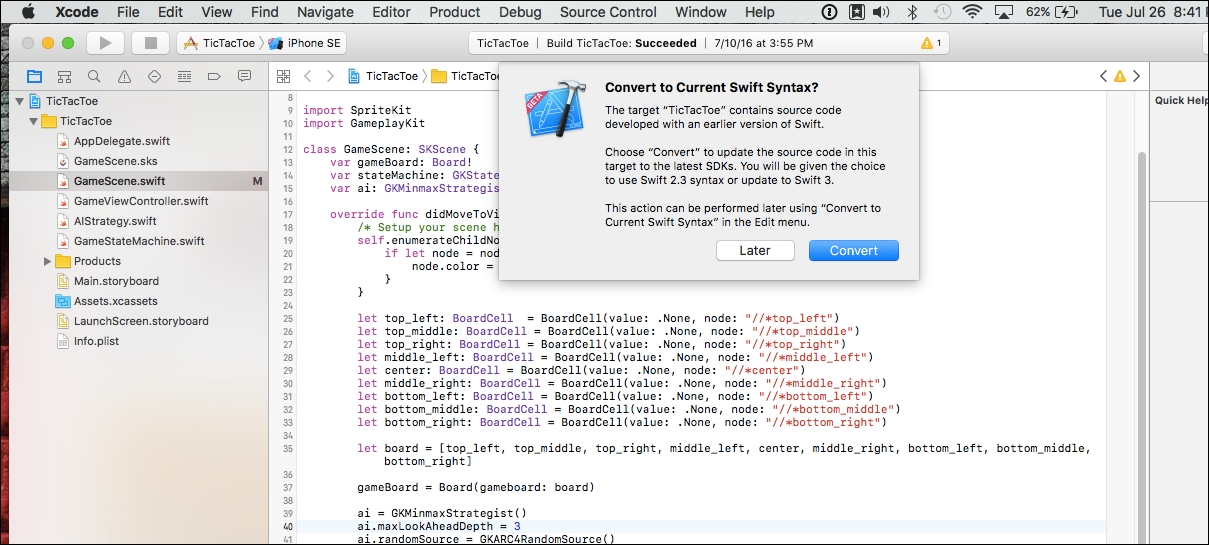
Choose either Swift 2.3 or Swift 3: After choosing to convert, you will be prompted with another screen that basically lets you know that Xcode is going to modify your files. You are also told that, once the migration is over, you will be given the option to accept the changes or dismiss them without permanently changing your project's files. The modal dialog also gives you a disclaimer that the Swift Migrator isn't perfect and you might have to make additional changes once the migration has completed. Press Next and then choose Swift 3.

Choose the targets to convert: If you have...
The Swift Migrator is a great tool that saves you time when you need to migrate Swift 2.2 projects to Swift 3 (or Swift 2.3). We learned that we have to migrate our existing Swift 2.2 projects to Swift 3 to take advantage of everything Xcode 8 has to offer. We also learned that we can use the new SDKs without migrating to Swift 3 by choosing to migrate to Swift 2.3 (Swift 2.2 plus new SDKs). At any point in the future, we can use the Edit |Convert | To Current Swift Syntax... menu to launch the migration tool. Finally, we learned that the Migrator isn't perfect and that it might not convert everything. We might have to make some manual changes to get things to work after the migration has finished. In the next chapter, we will begin covering Swift 3's core language changes.
The rest of the chapter is locked
You have been reading a chapter from
Swift 3 New FeaturesPublished in: Oct 2016Publisher: PacktISBN-13: 9781786469632
Register for a free Packt account to unlock a world of extra content!
A free Packt account unlocks extra newsletters, articles, discounted offers, and much more. Start advancing your knowledge today.
undefined
Unlock this book and the full library FREE for 7 days
Get unlimited access to 7000+ expert-authored eBooks and videos courses covering every tech area you can think of
Renews at $15.99/month. Cancel anytime