Search icon
Subscription
0
Cart icon
Close icon
You have no products in your basket yet
Save more on your purchases!
Savings automatically calculated. No voucher code required
Arrow left icon
All Products
Best Sellers
New Releases
Books
Videos
Audiobooks
Learning Hub
Newsletters
Free Learning
Arrow right icon
SQL Server 2017 Integration Services Cookbook

You're reading from  SQL Server 2017 Integration Services Cookbook

Product type Book
Published in Jun 2017
Publisher Packt
ISBN-13 9781786461827
Pages 558 pages
Edition 1st Edition
Languages
Authors (6):
Christian Cote Christian Cote
Profile icon Christian Cote
Dejan Sarka Dejan Sarka
Profile icon Dejan Sarka
David Peter Hansen David Peter Hansen
Matija Lah Matija Lah
Profile icon Matija Lah
Samuel Lester Samuel Lester
Christo Olivier Christo Olivier
View More author details

Table of Contents (18) Chapters

Title Page
Credits
About the Authors
About the Reviewers
www.PacktPub.com
Customer Feedback
Preface
1. SSIS Setup 2. What Is New in SSIS 2016 3. Key Components of a Modern ETL Solution 4. Data Warehouse Loading Techniques 5. Dealing with Data Quality 6. SSIS Performance and Scalability 7. Unleash the Power of SSIS Script Task and Component 8. SSIS and Advanced Analytics 9. On-Premises and Azure Big Data Integration 10. Extending SSIS Custom Tasks and Transformations 11. Scale Out with SSIS 2017

Deploying the source database with its data


The first thing we have to do now is to deploy the SQL Server database, which are AdventureWorksLT and AdventureWorksLTDW.

Getting ready

This section requires you to have copied the sample solution on your PC and opened the SSISCookBook.sln solution file.

How to do it...

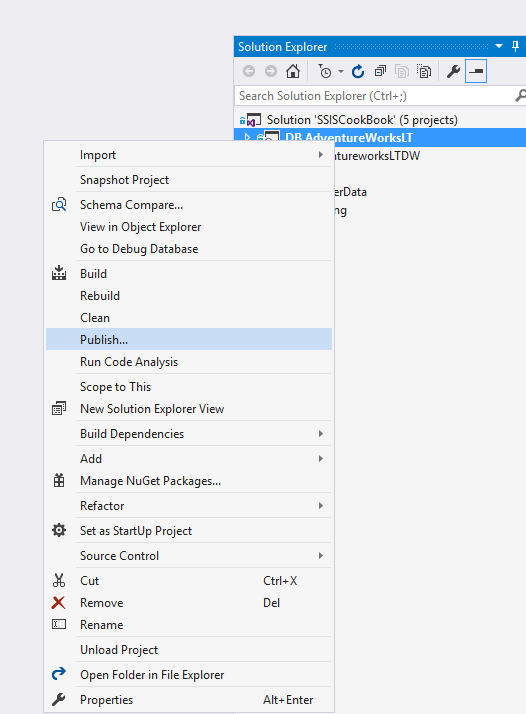
  1. In SQL Server Data Tools (Visual Studio), right-click on the DB.AdventureWorksLT project and select Publish..., as shown in the following screenshot:

  1. The following screen appears; click on the Edit... button to create a connection string to our local SQL Server instance:

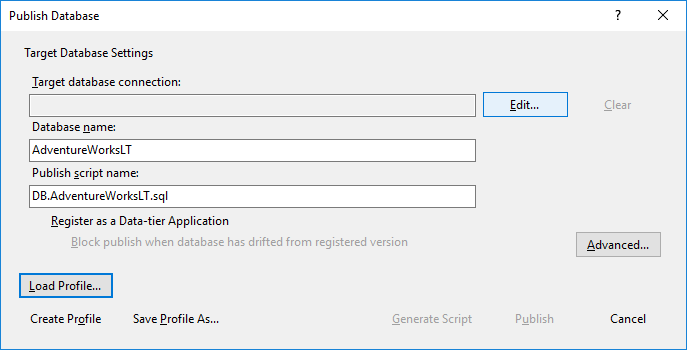
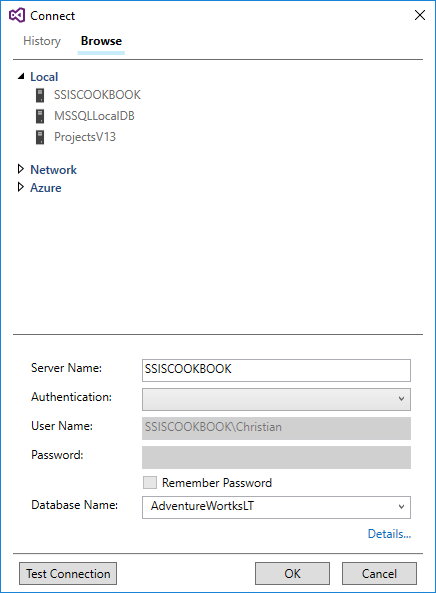
  1. As shown in the following screenshot, clicking on the Browse tab brings up a screen where we can choose the SQL Server instance location. In our case, we'll choose Local. Expand the Local label and choose your SQL Server instance, in our case SSISCOOKBOOK. The Server Name textbox will display the server you chose. Click OK to return to the previous screen.

  1. Back in the Publish Database screen, click on the Advanced...
lock icon The rest of the chapter is locked
Register for a free Packt account to unlock a world of extra content!
A free Packt account unlocks extra newsletters, articles, discounted offers, and much more. Start advancing your knowledge today.
Unlock this book and the full library FREE for 7 days
Get unlimited access to 7000+ expert-authored eBooks and videos courses covering every tech area you can think of
Renews at $15.99/month. Cancel anytime}