Microsoft provides several options to install SQL Server and its technologies as simply as possible. Almost everything is done through the SQL Server installation center, which is opened via the autorun property of the installation media. The next chapter describes typical scenarios of installation and first post-installation checks and configurations.
Installation process
Installation options
The SQL Server installation center provides several ways on how to install SQL Server. The most common method of installation is to use the wizard for standalone installation as well as for cluster installation of SQL Server.
For situations when more SQL Servers are propagated into the environment (for example, new departments or sales points are created often and every department or sales point has its own SQL Server), SQL Server provides a possibility to be installed through the command line, which is the only approach possible for installations on core editions of Windows or sysprep installation.
Installation wizard
The installation wizard is started from the SQL Server installation center from the second tab called Installation. There are several wizards (shortened):
- New SQL Server standalone installation
- Install SQL Server Reporting Services (new on SQL Server 2017; the version 2016 installation of SSRS was added to SQL Server's installation wizard directly)
- Install SQL Server Management Tools (means SQL Server Management Studio (SSMS); beginning in version 2016, management and data tools are not installed within SQL Server installation process, they are installed and versioned separately)
The first option called New SQL Server stand-alone installation is the right way to install SQL Server on a clean machine just with the operating system. When a user clicks on this option, the wizard starts.
The first two steps of installation ask for the license key and EULA acceptation. In the third step, the Global Rules installer checks the state of the computer again. Two product update steps try to connect Microsoft update for news. Until now, everything is very clear and almost automated, the administrator just uses the Next button.
The fifth step called Install setup files sets up the installation runtime. After this, the setup wizard checks that the computer is not a domain controller and then the actual installation begins:
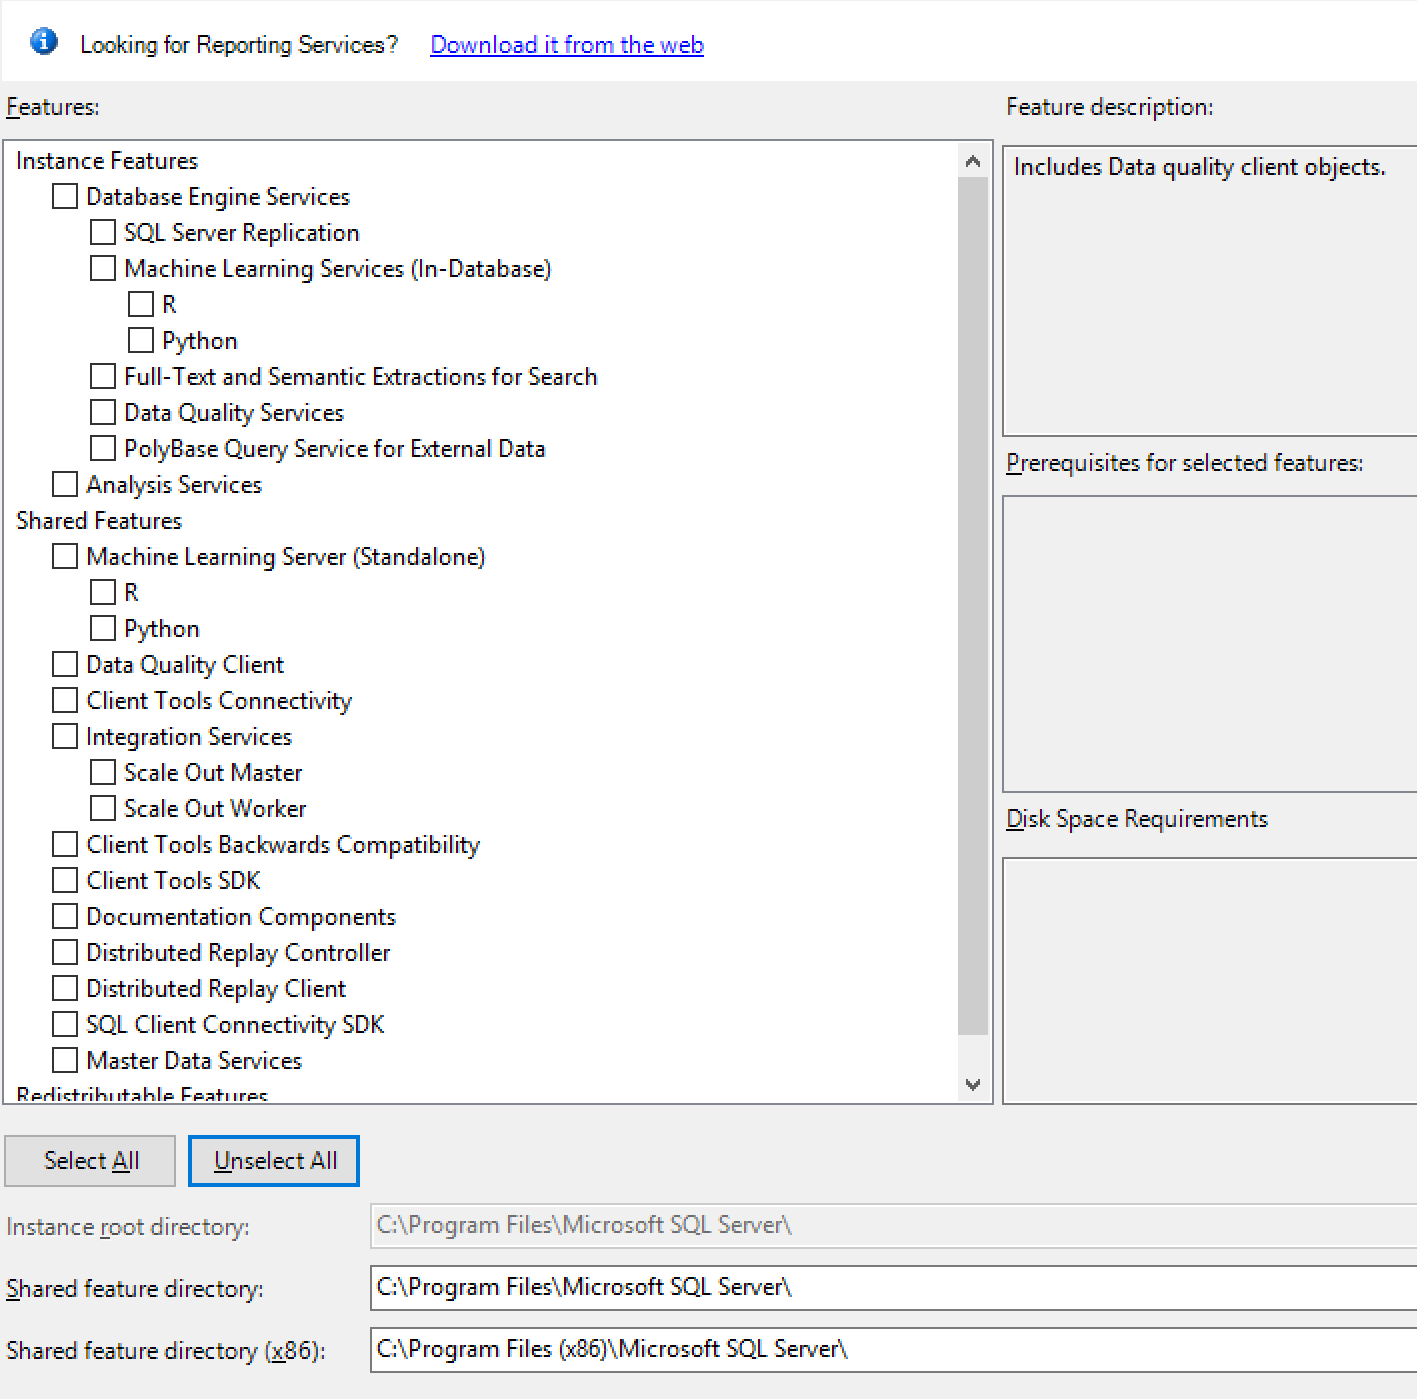
Setup wizard step with Feature Selection
As shown in the preceding screenshot, the setup wizard offers a wide set of features to be installed at once. For administrators who already installed previous versions of SQL Server, the setup step writes an information message about SQL Server Reporting Services. This service is newly installed separately from SQL Server installation.
When Installing SQL Server DE, administrator selects these options:
- Database Engine Services: This is the core component, DE itself
- Optionally SQL Server Replication: For the possibility of setting up replication scenarios
- Optionally Full-Text and Semantic Extractions for Search: Full text is a strong feature provided by SQL Server DE and it could be very useful for users.
Other options such as machine learning services (provides support to run external scripts on SQL Server) can be installed later or in a standalone separated setup. Features such as PolyBase are beyond the scope of this book.
In the bottom part of this setup step, the user decides where to place program files, not data files. So in the System Configuration Checker successful result default screenshot, location is set.
After the Feature Selection step, the instance configuration step appears that enables you to set an instance name. SQL Server can run in multi-instance mode. This means that more than one instance of SQL Server could be installed on the same machine. It's a good for example for side-by-side upgrades when on the same operating system. Another scenario for several instance could be when some information system needs its own SQL Server configuration. That's why SQL Server provides an ability to install default instances and named instances. The default instance has no special additional name provided by the administrator during installation; whereas every named instance must have its own additional name that is unique on a certain computer. When connecting a default instance, clients just use the computer name or IP address (such as MYSQLSERVER01); when connecting to a named instance, users must provide the instance name (for example, MYSQLSERVER01\MYADDITIONALNAME).
The next step is server configuration. Server configuration is divided into two tabs. Never miss going through both! The first tab is to set user accounts for SQL Server and all other installed features. The second tab is called collations.
Collations contains only a configuration value, which cannot be changed after installation easily! When mismatched, it leads to a reinstalling of system databases.
The setting called collation describes which code page, sort rules, and case sensitivity will be used as the server's default way of handling string characters. This server default is inherited by databases as a database default collation, and every character column in the database has its own collation inherited from database default collation. On database as well as on column level, the collation setting could be overridden, but it's not good practice. It is crucial for the proper working of SQL Server to set the server default collation correctly. It's not simple to say which collation is the correct one. The only idea is that, if not sure, it's a better approach to use ANSI compatible collation with case insensitivity in a combination of unicode SQL Server data types such as nchar or nvarchar.
The next steps could vary--their set and order depends on features selected in the Feature Selection step. For our database administration purposes, the step called database engine configuration is the most important one. In this step, all crucial configurations are done by an administrator. As shown in the following screenshot, the step is divided into tabs. Never miss going through all these tabs!
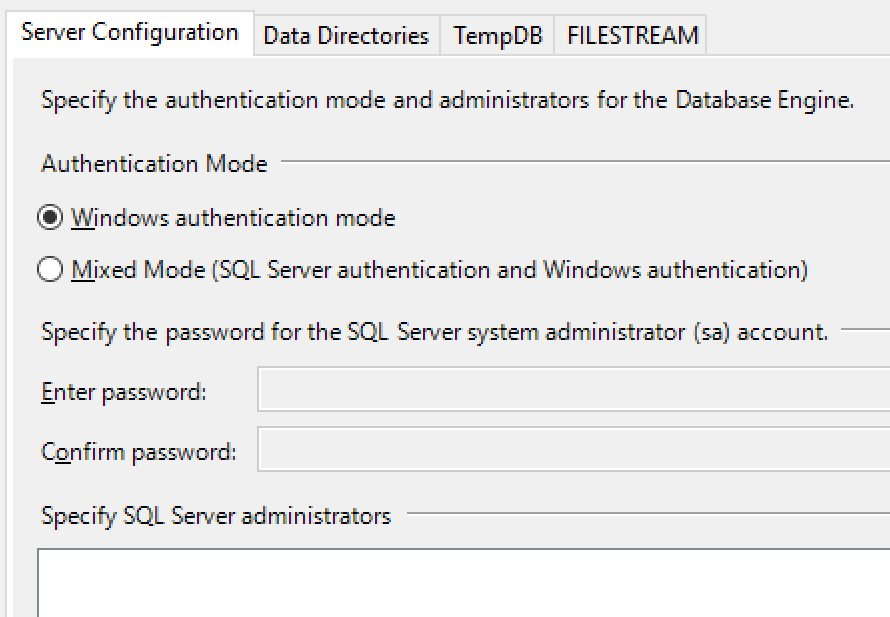
Crucial part of Database engine configuration step
In the first tab called Server Configuration are basic settings for SQL Server security from a client's perspective. The first setting is Authentication Mode. It has two options:
- Windows authentication mode: In this mode, logins to SQL Server can be established in a trusted way only. It means that only logins created from Windows (domain or local accounts of groups) can connect to the SQL Server.
- Mixed mode: For cases when every user comes with its domain identity, SQL Server can manage Standard logins or SQL logins--logins with passwords managed directly by SQL Server. This was considered as a minor security risk, but since SQL Server 2005 (this was the first version of SQL Server able to consume Group Policy Object (GPO)), this is not a problem any more.
When the administrator selects mixed mode, he must provide a strong password for standard system SQL Server login called sa. This is the standard administrator login on SQL Server.
Authentication mode is the configuration value that can be changed later during SQL Server instance's lifetime, but then it needs restarting so it's a better approach to set it directly during installation.
In the last part of this tab is a list of sysadmin server role members of the SQL Server instance being installed. Add yourselves to the list and add another users to the list of principals who will have administrator access to the SQL Server.
The Data directories tab is very important as well. It's a set of paths to the filesystem where system databases, user databases, and backups will be placed when the user will not provide their actual paths:
- Data root directory: This is the base path to all data files (with .mdf or .ndf extensions). All system databases will be placed to this path (with the exception of the tempdb database). It's not recommended to use the default path to the program files, as was explained in the Planning disk capacity section; the best practice is to have a disk prepared just for data files.
- User database directory: This is the default base directory for user database data files. For certain data files this path can be overridden.
- User database log directory: In this, all log files (with the .ldf extension) of every database will be placed. Never mix data and log files in the same place.
User as well as system databases could be moved to a different location.
The third tab called TempDB precalculates the best configuration settings for the tempdb database. The tempdb database has a very special position in SQL server as well as for developers using it in some optimization tasks. The optimized execution of the tempdb database roughly depends on the following:
- Number of data files
- Their location
- Their symmetric growth
The number of data files is calculated from the number of CPUs. The best practice is to have 1/4 to 1/2 data files to the number of CPUs (even logical CPUs). The best location of data files is on a fast separate disk. In the case of tempdb failure due to a disk failure, tempdb is regenerated every time SQL Server starts.
The symmetric growth of all data files is carried out by the SQL Server engine automatically. Unlike the prior versions that had trace flags set in startup parameters, this is not needed from SQL Server 2016.
The last tab in the database engine configuration is called FILESTREAM. The FILESTREAM itself is a type of storage for binary data like documents or pictures saved in the database. If you have no idea about saving FILESTREAM data at the moment of installation, the FILESTREAM should remain disabled. It can be enabled and configured properly later without the need for restarting SQL Server.
After database engine configuration, additional wizard steps could occur depending on other features selected in Feature Selection.
Maybe some readers are concerned about where SQL Server Agent configuration is. SQL Server Agent doesn't have any special settings in the installation process and its installation is automatically done along with every instance of database engine installation.
The installation wizard is almost complete now. After a short recap of what was selected by the administrator, the setup operation starts and shows its progress.
Command line
Installing SQL Server directly from the command line is possible but when searching the Install SQL Server from the Command Prompt topic on MSDN, the user will obtain a huge set of options that need to be added to the command prompt (or to the bat file) directly. It leads to a big risk of misspellings and other mistakes.
A better approach is to use configuration files for command prompt installations. It contains the same options as the command prompt itself, but we can find very good working examples from any setup already run from the wizard. When the wizard setup finishes, it leaves the setup log and configuration on disk. If SQL Server is installed in the default location, the path is C:\Program Files\Microsoft SQL Server\140\Setup Bootstrap\Log. In this location is a file called Summary.txt, which contains the actual path to the ConfigurationFile.inifile. The configuration file can be copied and adjusted as needed and then run using the following command from the command prompt:
setup.exe /ConfigurationFile=<path to my config file>.ini
The SQL Server installation wizard allows you to prepare a configuration file without installing. When the administrator goes through the wizard, everything is saved in the newly created configuration file. In the summary step of the wizard, the path to the configuration file is shown. So the administrator can cancel the wizard without the actual installation of SQL Server.
New installation possibilities
With the release of SQL Server 2017, administrators are very excited about the following new installation scenarios:
- SQL Server on Linux
- SQL Server in a container
The SQL Server on Linux installation scenario was a big highlight when SQL Server 2017 was announced for the first time. The installation process is managed via the command prompt, from downloading the SQL Server installer to starting the newly installed instance. Access to the instance is done by the sqlcmd command line almost in the same way as on Windows. Right now, SQL Server DE, as well as SSRS and SSIS services, support running on Linux.
Container is quite a new term supported by Microsoft. We can think about containers as lightweight virtual machines with less isolation of processes (for example, service running in a container can be stopped from the host operating system). Another approach of container is to create a sandbox for an isolated amount of system resources. Container installation of SQL Server is done via command prompt.
When SQL Server is installed on Linux or in some container, it's accessed by clients in exactly the same way as any other instance of SQL Server. More detailed information about these new installation scenarios is beyond the scope of this book.
Checking the completed installation
We have taken all the necessary steps to install standalone instance of SQL Server DE. Next step is to check if the installation was successful, if the instance is up and running. After the installation completes, administrators have to check whether everything is working as expected.
If any error occurs during installation, additional diagnostics is needed. Every single task of the setup process is described in the setup log (in the case of default installation path, the log is placed on the C:\Program Files\Microsoft SQL Server\140\Setup Bootstrap\Log path).
However, it is still good practice to check whether everything works as expected. Those simple post-installation checks could be done using Sql Server Configuration Manager:
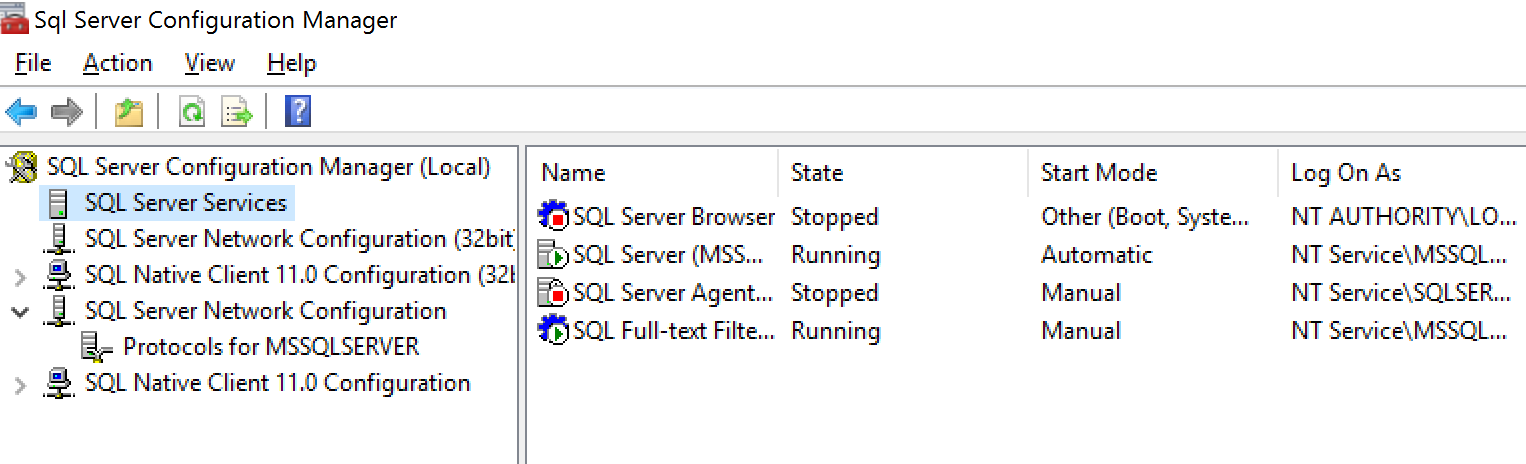
Sql Server Configuration Manager
The Sql Server Configuration Manager is the only visual client tool actually installed in the SQL Server setup. Configuration manager is a snap-in to Microsoft Management Console and consists of two main sections:
- SQL Server Services: When selected in the left pane, the right detail pane shows every SQL Server service or feature installed with its state, start-up mode, and logon account. These settings can be changed by right-clicking on a certain row and selecting Properties from the pop-up menu. The properties modal dialog appears and we can go through it to correct any setting as needed.
- SQL Server Network Configuration (32-bit): In this section, administrators view a list of instances (the MSSQLSERVER instance name seen in Sql Server Configuration Manager picture above is the internal name for the default instance of SQL Server) and, when clicked on any instance in the left, a list of network protocols appears in the right pane.
There are also other nodes in the tree shown in the left pane of Sql Server Configuration Manager such as SQL Native Client configuration, which provides the ability to set client aliases for SQL Server instances (for example, when SQL Server is accessible only via its IP address, which is almost non-readable to users), but the preceding two sections are the most important ones.
SQL Server services configuration node
The administrator can call for a pop-up menu from every record shown in the right pane. Special attention should be focused on SQL Server itself and on SQL Server Agent.
SQL Server may be shown in several records because every instance has its own configurations so the first good thing is to select the right record. Following image shows the properties dialog box.
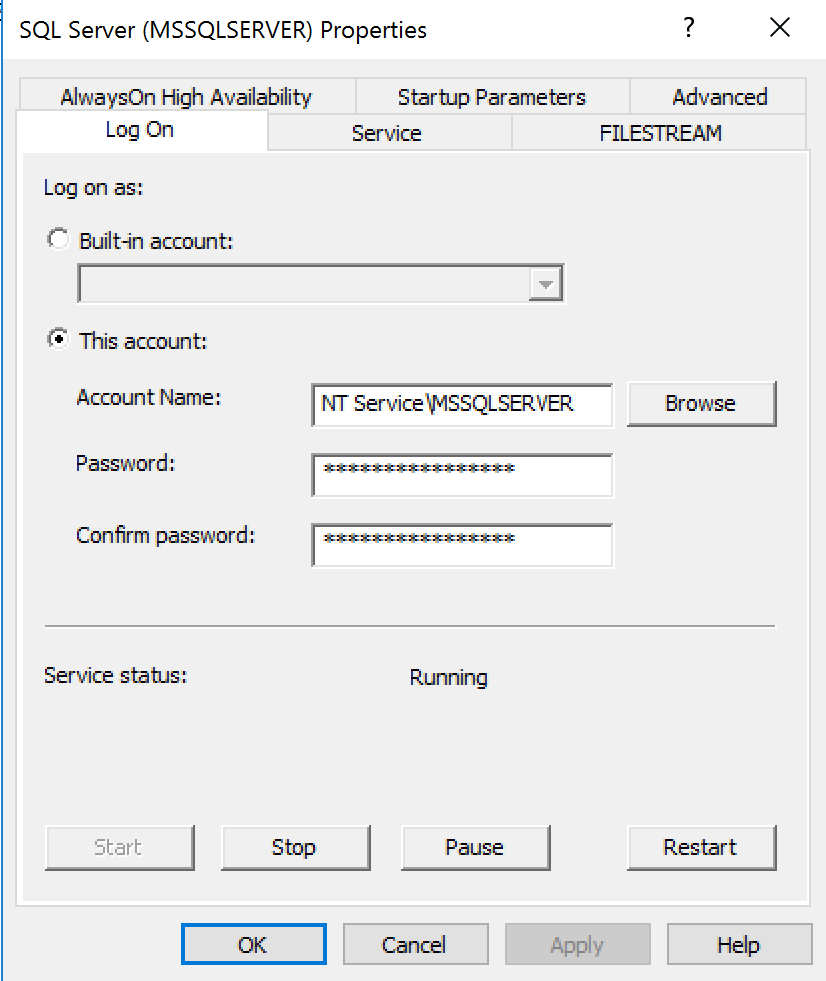
As shown on preceding image, Properties dialog box for every instance allows you to set the following:
- Log On tab: The context of the Windows account that will be used by the instance to log in to the operating system. This configuration needs restarting if changed.
- Service tab: The only setting enabled on this tab is Startup mode, which should be set to automatic.
- FILESTREAM tab: This tab contains FILESTREAM settings. As described earlier, FILESTREAM is a special kind of storage for binary data such as pictures or documents stored in relational data directly to a database. From administrator's point of view, FILESTREAM must be enabled for at least T-SQL Access. When enabled, databases can contain FILESTREAM file groups, which are actual representations of the binary storage. There's enhancement called file tables for which the second two textboxes (allow for I/O... and enable remote clients...) must be switched on.
- Startup Parameters tab: This tab contains three startup parameters as default:
- d: The location of the primary data file of the database master (must be reconfigured when the master database is moved)
- l: The location of the log file of the database master (must be reconfigured when the master database is moved)
- e: The default path for error logs written by SQL Server
- Additional parameters like trace flags and others can be added if needed.
- AlwaysOn High Availability tab: AlwaysOn is an advanced concept of data availability and reliability built on top of Microsoft Cluster Service (MSCS). When certain instances would attend to the AlwaysOn group, it must be enabled on this tab. MSCS must already be present before this configuration is done.
- Advanced tab: This tab actually has no advanced settings, just error reporting and usage feedback to Microsoft.
Special attention should be given to SQL Server Agent. SQL Server Agent is installed with every single instance of SQL Server. In other words, every instance of SQL Server has its own SQL Server Agent. Immediately after installation, SQL Server Agent is set to manual startup mode, which is not good enough for production environments.
That's why one of the first post-installation configurations should be to change SQL Server Agent's startup mode to automatic because SQL Server Agent is an invaluable service for a lot of regular administrator tasks as well as automated tasks done by SQL Server itself (for example, data collection, strong diagnostics tool, and collecting performance statistics using SQL Server Agent jobs).
SQL Server network configuration node
SQL Server communicates with clients on its own network application protocol called Tabular Data Stream (TDS). Under this network application layer, TCP/IP and Named Pipes (now deprecated) network protocols are supported. The third option called Shared Memory is always enabled and allows communication between server and client when the client is running locally on the same machine as SQL Server.
SQL Server supports both 32-bit and 64-bit protocols so configuration for both modes is the same. Under the SQL Server Network Configuration node (even if it's the 32-bit node), network protocols for every instance of SQL Server already installed on the machine are placed. The administrator selects certain instances (for example, Protocols for MSSQLSERVER, which is the default instance) and, in the right pane of the Sql Server Configuration Manager, selects the property window for certain network protocols by right-clicking on properties.
The most complex configuration has to be made on the TCP/IP protocol. When SQL Server 2017 is installed, the protocol is enabled, so the administrator just checks whether the proper TCP ports are used. The default TCP port used for SQL Server communication is port number 1433. For additional named instances, ports starting with numbers 1450, 1451, or similar are often used. The ability and port number has to be set for every variant of IP address of every network interface.
After this configuration is done, instance of SQL Server needs to be restarted.
Testing connection to a fresh SQL Server
As mentioned earlier, SQL Server does not contain a client management toolset in its installation. It's a good idea to install SQL Server Management Studio directly on the server where SQL Server service is already running because a lot of administrator's tasks will be done directly on the server, but for a quick check whether SQL Server is accessible to clients, the command prompt can be used. Its name is sqlcmd and it's the only client tool installed with SQL Server directly. This tool is very useful in some scenarios:
- When SQL Server Management Studio is not present or cannot be used (for example, when restoring the master database)
- When the express edition of SQL Server was installed and SQL Server Agent cannot be used (when planning regular tasks, it can be done by PowerShell or by sqlcmd in conjunction with Windows Task Scheduler)
The most simple way to use sqlcmd is as follows:
sqlcmd
When running sqlcmd as shown in the preceding code example, it tries to connect the local default instance of SQL Server using the current user's Windows account. When successfully connected, rows in the command prompt window start to be numbered.
A better approach is to call sqlcmd with parameters precisely set:
sqlcmd -E -S localhost
In domain user context or with SQL login context:
sqlcmd -U <user name> -P <password> -S localhost
The E parameter (beware that all parameters of all command line tools provided by SQL Server are case-sensitive) says to the connection that Windows login context of the user currently logged in the desktop will be used; U and P parameters are used when user wants to connect via mixed authentication mode of SQL Server. Then user and password created on the SQL Server are used, not the Windows identity.
The S parameters is used for the name of the server. If connected locally on a default instance of SQL Server, shortcuts such as . or (localhost) could be used.
All the preceding examples start the sqlcmd tool in interactive mode. When successfully connected, rows start numbering and the user can start to write queries. Every query must be followed by the GO keyword. This keyword (sometimes called batch terminator) causes the text written to the console to be sent to SQL Server and then processed with some result.
Results returned back to the console are not so readable in many cases, so the sqlcmd could be started with the command parameter, o, followed by the path to the output file. The output file is just a text file catching all results from all queries sent by the user in the session.
When the user wants to run sqlcmd in unattended mode, the i parameter followed by the path to the input file may also be very useful. A complete example may look the following. The first piece of code shows the correctly created input file (for example, demo.sql):
--   content of demo.sql file
use master
go
select @@version as VersionOfMySQL
go
The first line (use master) establishes the correct database context in the connection and it is highly recommended to never commit this row because very often, the database context is not the default database context set for login.
The third line is just an example of doing something meaningful.
When the administrator wants to run a script file like this, he can add the following command to the command prompt:
sqlcmd -E -S (localhost) -i "c:\demo.sql" -o "c:\demo_output.txt"
The command will run and it will save all results (even if error will occur) to the file called demo_output.txt.
There are more useful command parameters for sqlcmd but this set, especially the first three examples, are sufficient to test an instance's accessibility locally.
For remote testing of accessibility, very common way is to use SQL Server Management Studio. Common issues (followed by error No. 40 - Network Related Error) are as follows:
- SQL Server instance is not running: In Sql Server Configuration Manager, this error is seen if service is running or not. When it's not running, we can try to start it up manually and diagnose additional errors.
- TCP/IP protocol is disabled: This issue may be corrected by Sql Server Configuration Manager (requires restart after reconfiguring).
- Other than default TCP port number is used: It can be corrected on user's side by adding the port number after server name (for example, MYSQLSERVER:12345).
- Firewall rules are not set: It must be resolved on firewall's side by enabling certain ports for communication.