Search icon
Arrow left icon
All Products
Best Sellers
New Releases
Books
Videos
Audiobooks
Learning Hub
Newsletters
Free Learning
Arrow right icon
Splunk 7 Essentials - Third Edition

You're reading from  Splunk 7 Essentials - Third Edition

Product type Book
Published in Mar 2018
Publisher Packt
ISBN-13 9781788839112
Pages 220 pages
Edition 3rd Edition
Languages
Authors (4):
J-P Contreras J-P Contreras
Profile icon J-P Contreras
Steven Koelpin Steven Koelpin
Erickson Delgado Erickson Delgado
Profile icon Erickson Delgado
Betsy Page Sigman Betsy Page Sigman
Profile icon Betsy Page Sigman
View More author details

Table of Contents (10) Chapters

Preface Splunk – Getting Started Bringing in Data Search Processing Language Reporting, Alerts, and Search Optimization Dynamic Dashboarding Data Models and Pivot HTTP Event Collector Best Practices and Advanced Queries Taking Splunk to the Organization

Dynamic Dashboarding

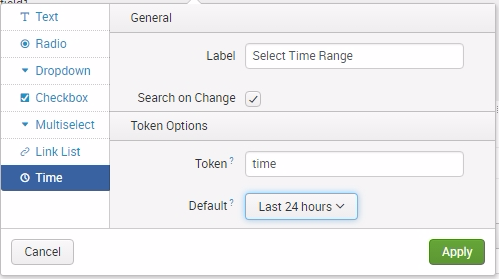
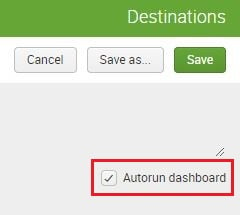
Splunk makes it easy to visualize many different KPIs or reports in a single view using its dashboard functionality. For users to adopt the dashboard, it must be fast, easy to use, and carefully laid out to answer a variety of common queries. Splunk comes with a wide variety of chart types to visually represent your data, as you've seen in prior exercises in this book. Charts and reports can be organized into a dashboard layout with minimal effort. With practice, you can spin off a dashboard in a fraction of the time it would take if you were writing custom software to accomplish the same task.

In this chapter, we will cover the following topics:

  • Identifying different types of dashboards
  • Gathering business requirements for your dashboard
  • Modifying dashboard panels
  • Building multi-panel, dynamic dashboards showing relevant key performance indicators
...

Creating effective dashboards

Splunk is easy to use for developing a powerful analytical dashboard with multiple panels. A dashboard with too many panels, however, will require scrolling down the page and can cause the viewer to miss crucial information. An effective dashboard should generally meet the following conditions:

  • Single screen view: The dashboard fits in a single window or page, with no scrolling
  • Multiple data points: Charts and visualizations should display a number of data points
  • Crucial information highlighted: The dashboard points out the most important information, using appropriate titles, labels, legends, markers, and conditional formatting as required
  • Created with the user in mind: Data is presented in a way that is meaningful to the user
  • Loads quickly: The dashboard returns results in 10 seconds or less
  • Avoid redundancy: The display does not repeat information...

Types of dashboards

There are three kinds of dashboards typically created with Splunk:

  • Dynamic form-based dashboards
  • Real-time dashboards
  • Dashboards as scheduled reports

Dynamic form-based dashboards allow Splunk users to modify the dashboard data without leaving the page. This is accomplished by adding data-driven input fields (such as time, radio button, textbox, checkbox, dropdown, and so on) to the dashboard. Updating these inputs changes the data based on the selections. Dynamic form-based dashboards have existed in traditional business intelligence tools for decades now, so users who frequently use them will be familiar with changing prompt values on the fly to update the dashboard data.

Real-time dashboards are often kept on a big panel screen for constant viewing, simply because they are so useful. You see these dashboards in data centers, network operations centers...

Form inputs

With the dashboard layout complete, it is time to make it dynamic and interactive. Before jumping into the exercises, however, we'll review the key concepts related to form inputs first.

Just as in any web page, a form input is an element that allows you to select or type in information that will be submitted to the application for processing. There are different form inputs available for Splunk dashboards:

  • Text (key in free-form text)
  • Radio (uses a radio button convention)
  • Dropdown (uses a menu or list to select a single option)
  • Checkbox
  • Multiselect (similar to Dropdown, allowing you to select multiple choices)
  • Link list (this is a horizontal list that contains clickable links)
  • Time

In this list is also the Submit option. This is an action button. If you decide not to autorun the dashboard on change of input selection, the Submit button will execute the dashboard...

Creating a time range input

Let's change our input field into a time range field:

  1. On the list to the left for the first input, select Time.
  2. In the General section, type Select Time Range in the Label space.
  3. Click on the Search on Change checkbox.
  4. Enter time for the Token value.
  5. Set the Default time range to Last 24 hours.
  1. Click Apply when done.
  2. Use the following screenshot as a guide:
  1. Before you save the dashboard changes, click the Autorun dashboard checkbox, as seen in the following screenshot. Then click on Save:

You can now try to change the time range using the time input, but nothing will happen. This is because we have not yet configured the panels to react when the time input has been changed. In these next steps, we are adjusting the searches to consider the token filled by the input selection. Let us do that now:

  1. Go back to Edit to allow for dashboard changes...

Creating a radio input

Now, we are going to create radio inputs with dynamic searches used to drive the input value choices. This will allow users to select server and status types, and will affect the information rendered by the panels:

  1. Click on Edit.
  2. Select Add Input | Radio.
  3. Click on the Edit icon in the newly created input.
  4. In the Label field, type in Select Server:.
  5. Enable Search on Change by checking the checkbox.
  6. In the Token field, type server:
  1. Scroll down to Static Options and click on it. In Static Options, add Name as ALL and Value as *.
  2. Click on Dynamic Options, then fill in Search String, entering the following search command:
SPL> index=main | top server_ip
  1. Update the time range to Last 60 minutes.
  2. In Field For Label, type in server_ip.
  3. In Field For Value, type in server_ip:
  1. Now, scroll back up to Token Options.
  2. For Default, select ALL.
  3. For Initial Value...

Creating a drop-down input

Drop-down inputs function exactly the same as radio inputs. The former is used when the selection is huge and you do not want the list of choices to unnecessarily clutter the entire page. The http_uri field has numerous results, so this makes a dropdown the ideal candidate for input here.

Follow the same procedure as for radio input creation, but make sure you have selected Dropdown instead. Use the following information and screenshots as guides to complete the task:

  1. Click on Edit
  2. Select Add Input | Dropdown
  3. Click the Edit icon for the newly created input
  4. In the Label field, type in Select HTTP URI: to name your new dropdown
  5. As you did when you created a radio button, enable Search on Change by checking the checkbox
  6. In the Token field, type http_uri
  7. For Static Options, type ( Name: ALL, Value: * )
  8. Under Token Options section, in Default, select ALL...

Static real-time dashboard

In this section, we will create a real-time dashboard that will display crucial information based on the data we have. To encourage you, we present a screenshot here and show how it will look when we are done:

Test real-time dashboard with advanced indicators, combo charts, and choropleth charts

Single-value panels with color ranges

In the previous sections, you first created panels by running searches and then saving them as dashboard panels. You then started to modify the visualization in each panel. This is one way to build a dashboard. However, you may first want to see the visualization before adding it to a dashboard. We will use that method in this real-time dashboard exercise:

  1. Let&apos...

Creating a choropleth map

A choropleth map, whose name comes from two Greek words meaning area/region and multitude, is a two-dimensional map where areas are designated by color shades or patterns to indicate the measured strength of a statistical indicator, such as sales per area or crime rates.

We will not cover in detail the mathematical details of how a choropleth is created, but we are fortunate that we can use Splunk to provide this effective visualization tool for us. We will create two choropleth maps to denote bookings by region and traffic by region.

Since we don't have a panel to clone from, we will create this from scratch:

  1. Enter edit mode with the Edit button.
  2. Click on Add Panel.
  3. Select New | Choropleth Map.
  4. Change Time Range to a 1 hour window under the real-time presents.
  5. In Content Title, type in Traffic Choropleth.
  6. Type in this Search String, which includes...

Summary

In this chapter, you delved deeper into dashboard creation. You learned about the different types of dashboards and how to create them. You created a fully functional form-based dashboard that allowed you to change the inputs and affect the dashboard data, by using tokens and assigning them to search panels. Through this process, you also created and modified advanced visualization options. Finally, you learned how to create a real-time dashboard with advanced visualization panels such as Single Value with Trends and choropleth maps.

lock icon The rest of the chapter is locked
You have been reading a chapter from
Splunk 7 Essentials - Third Edition
Published in: Mar 2018 Publisher: Packt ISBN-13: 9781788839112
Register for a free Packt account to unlock a world of extra content!
A free Packt account unlocks extra newsletters, articles, discounted offers, and much more. Start advancing your knowledge today.
Unlock this book and the full library FREE for 7 days
Get unlimited access to 7000+ expert-authored eBooks and videos courses covering every tech area you can think of
Renews at $15.99/month. Cancel anytime}