


At the heart of the Pi is the Broadcom System on a Chip (SOC)—think of it as all the common hardware components of a PC baked into a small piece of silicon. Different versions of the Pi have different types of Broadcom chip, as outlined in the model comparison table above, but they are each based on an ARM processor, with the Pi Model 3 having the most powerful ARM processor.
For graphics, the Pi sports a Broadcom VideoCore IV GPU, which is quite powerful for such a tiny device and is capable of full HD video playback through the HDMI connector built in to every Pi.
The following figure shows the Raspberry Pi Version 3 board layout and connectors:

At the edge of the board, we find the General Purpose Input/Output (GPIO) pins, which as the name implies, can be used for any kind of general tinkering and to interface with other pieces of hardware.
The 3.5 mm four-pole jack socket is for the audio output, and on later models also contains the composite video output that was originally connected to an RCA socket. We can use that to connect the Pi to one of those old television sets using an RCA connector cable. You can also get audio out of the Pi through the HDMI connector.
Status LEDs are used to tell us what the Pi is up to at the moment. They have the following meanings:
- The green light labelled ACT will blink whenever the Pi is accessing data from the SD card
- The red light labelled PWR should stay solid as long as the Pi has sufficient power
The USB 2.0 ports allow us to connect keyboards, mice, and most importantly for us, Wi-Fi dongles, microphones, video cameras, and GPS receivers. We can also expand the number of USB ports available with the help of a self-powered USB hub.
The Ethernet port allows us to connect the Pi to a network at a maximum speed of 100 Mbit/s. This will most commonly be a home router or a switch, but it can also be connected directly to a PC or a laptop. A Category 5 twisted-pair cable is used for wired network connections.
The Camera Serial Interface (CSI) is where the official Raspberry Pi camera module connects to, using a flexible flat cable.
The Display Serial Interface (DSI) is for connecting TFT or LCD display panels using a flexible flat cable and connects to the Mobile Industry Processor Interface (MIPI) inside the Broadcom chip, which feeds graphics data directly to the display panel.
The High-Definition Multimedia Interface (HDMI) connector is used to connect the Pi to a modern TV or monitor. The cable can carry high-resolution video up to 1920 x 1200 pixels, and digital sound. It also supports a feature called Consumer Electronics Control (CEC), which allows us to use the Pi as a remote control for many common television sets.
The power input on the Raspberry Pi is a 5V (DC) Micro-USB Type B jack. A power supply with a standard USB to micro-USB cable, such as a common cell phone charger, is then connected to feed the Pi.
Take a look at the output printed on your power adapter. The voltage should be between 5V to 5.25V and the amperage provided should be at least 1A.
Tip
The most frequently reported issues from Raspberry Pi users are without a doubt those caused by insufficient power supplies and power-hungry USB devices. Should you experience random reboots, or that your Ethernet port or attached USB device suddenly stops working, it's likely that your Pi is not getting enough stable power. Another indication of the Pi not getting enough power is if you see a rainbow icon in the top right-hand of the monitor.
The official 2A power supply sold by the Foundation is highly recommended—especially for the Raspberry Pi Version 3 (1A = 1000mA).
You can help your Pi by moving your devices to a self-powered USB hub (a hub that has its own power supply).
Also note that the Pi is very sensitive to devices being inserted or removed while it's running, and powering your Pi from another computer's USB port usually doesn't work well.
The microSD card is where all our data lives, and the Pi will not start without one inserted into the slot. All models since the Model B+ use the tiny microSD cards, whereas earlier models used standard sized SD cards. The Pi 3 no longer has a push-to-release mechanism because so many people were accidentally ejecting their SD cards! You simply slide the card out now to remove it.
SD cards come with a wide variety of data storage capabilities. A card with a minimum of 4 GB of storage space is recommended for the projects in this book. The SD cards also carry a class number that indicates the read/write speed of the card—the higher the better.
The Raspberry Pi only boots from an SD card, and cannot boot from an external drive or USB stick (well that's not strictly true, but is outside the scope of this book).
It's recommended that you use a Class 10 SD card for performance, but a Class 6 card will be fine for the projects in this book. You'll need to have a minimum card size of 4 GB.
Now we have our Raspberry Pi board and SD card to hand, we need to prepare the SD card so we can start creating some mischief. We're going to use the standard Raspbian operating system, as there really is no reason to use any other distribution, and it's the de facto operating system for the Raspberry Pi.
You'll need to grab the latest Raspbian OS image from the Raspberry Pi site at https://www.raspberrypi.org/downloads/.
Download the Raspbian OS ZIP file containing the image to your PC.
Once downloaded, unzip the file and you'll have the file 2016-05-27-raspian-jessie.img.
The next thing to do is burn this image to your SD card.
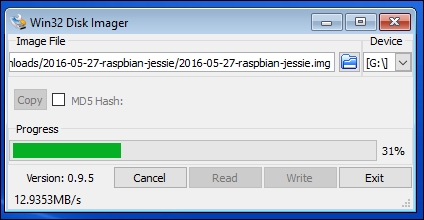
On a Windows PC, the best way to burn the image to your SD card is to use the Win32 Disk Imager utility. This can be downloaded from https://sourceforge.net/projects/win32diskimager/.
It doesn't have an installer, and launches directly from the EXE file.
Now it's time to create your SD card image:
- Insert your SD card into the PC and launch Win32 Disk Imager.
- Select SD card device drive letter (make sure it's right!).
- Choose the Raspbian image file you've just downloaded.
- Click the Write button to create the SD card image:
On a Linux PC you'll need to use the fdisk and dd utilities to burn the image to your SD card.
Carry out the following steps to create your SD card image:
- Extract the
2016-05-27-raspbian-jessie.imgto yourHomefolder. - Type the following command to check which drives you have before you insert your SD card, so that you can compare the difference in a moment to ensure you are selecting the right drive:
$ sudo fdisk -l - Now insert your SD card into the PC.
- If you're not already in a shell terminal window, open one (Ctrl + Alt + T).
- Type the following commands in the shell terminal:
$ sudo fdisk -l
In the list, check that your SD card appears as a drive device (for example, /dev/sdb). It's crucial you ensure you use the right device in the next step. We'll assume that your device is /dev/sdb.
To burn the image to the SD card, type the following command:
$ sudo dd if=2016-05-27-raspbian-jessie.img of=/dev/sdb
Hit Enter and go and make a cup of tea or coffee as this will take a while. You'll know when it's finished when the command ($) prompt re-appears.
When the command prompt does re-appear, type the following command:
$ sudo sync
Once that command has finished, you can remove the SD card from the PC.
You're now ready to boot up your Raspberry Pi. Pop in your newly burned SD card and plug the power in the Pi.
Assuming you have a monitor attached to your Pi, you should see your system booting up nicely. Although you could wait for it to boot up and connect via a terminal session (we'll look at that later), I recommend that you connect a monitor to it, at least in the first instance, just to make sure everything is working correctly.
In the new Jessie version of Raspbian you'll boot straight into a desktop GUI, which is a major change from previous versions. Previously, you'd be taken to the raspi-config utility the first time the system is run, where you'd set up your Pi, and importantly, expand the filesystem to use the entire space available on your SD card:

When you first create your Raspbian SD card you'll only be left with about 200 MB of space in the filesystem, regardless of the size of your SD card. This is not much use, so we want to expand the filesystem so it uses all of the available space on the card.
Fortunately, this is very easy now on the Raspberry Pi, as this function is available in the Raspberry Pi Configuration tool on the desktop.
To access the new configuration tool, go to Menu and select Preferences | Raspberry Pi Configuration:

Anyway, now we click the Expand Filesystem button, and in a couple of seconds you'll see a confirmation message. The filesystem will be expanded when the system next reboots.
If you have an older version of Raspbian, or you're not using the desktop GUI, then you'll need to use the raspi-config utility (which is still better than the old days when we had to do this manually in the shell). The first time you boot up you'll be taken straight to the raspi-config utility:

The first option is the Expand Filesystem option—select this and you'll see various commands scrolling up the screen. Once it's finished, you'll see the following message:
Root partition has been resized.
The filesystem will be enlarged upon the next reboot.
Click OK. Select Finish on the configuration screen and reboot your Pi when prompted.
After your Pi reboots with its fuller filesystem, you'll be taken straight to the shell prompt, where you can log in with the default user and password:
Login: pi
Password: raspberry


