Setting up our development machine
Developing an app for multiple platforms imposes higher demands on our development machine. One reason for this is that we often want to run one or multiple simulators or emulators on our development machine. Different platforms also have different requirements for what is needed to begin development. Regardless of whether we use macOS or Windows, Visual Studio will be our integrated development environment (IDE). There are several versions of Visual Studio, including the free community edition. Go to https://visualstudio.microsoft.com/ to compare the available versions, and select the version that is right for you; .NET MAUI is included in all versions of Visual Studio for Windows and macOS. The following list is a summary of what we need to begin development for each platform:
- iOS: To develop an app for iOS, we need a Macintosh (Mac) device. This could either be the machine that we are developing on or a machine on our network, if we are using one. The reason we need to connect to a Mac is we need Xcode to build the app package. Xcode also provides various simulators to run and debug your app. It is possible to do some iOS development on Windows without a connected Mac; you can read more about this in the Xamarin Hot Restart section of this chapter.
- Android: Android apps can be developed on either macOS or Windows. Everything we need, including SDKs and simulators, is installed with Visual Studio.
- WinUI: WinUI apps can only be developed in Visual Studio on a Windows machine.
We’ll start with setting up a Mac first, and then later cover Windows. If you do not own a Mac, you can skip this section and head straight to the Setting up a Windows machine section.
Setting up a Mac
There are two main tools that are required to develop apps for iOS and Android with .NET mobile on a Mac. These are Visual Studio for Mac (if we are only developing Android apps, this is the only tool we need) and Xcode. In the following sections, we will look at how to set up a Mac for app development.
Installing Xcode
Before we install Visual Studio, we need to download and install Xcode. Xcode is the official development IDE from Apple and contains all the tools available for iOS development, including SDKs for iOS, macOS, Mac Catalyst, and tvOS.
We can download Xcode from the Apple developer portal (https://developer.apple.com) or the Apple App Store. I recommend that you download it from the App Store because this guarantees you have the latest stable version. The only reason to download Xcode from the developer portal is if you want to use a prerelease version of Xcode to develop it for a prerelease of iOS.
When using prerelease versions of macOS and its accompanying version of Xcode, it is possible that .NET for iOS/tvOS/Mac Catalyst/macOS has not been updated to work with the latest Xcode changes. It is recommended to check the compatibility before installing the latest Xcode to ensure a working environment.
After the first installation, and after each update of Xcode, it is important that you open it. Xcode often needs to install additional components after an installation or an update. We also need to open Xcode to accept the license agreement with Apple.
Installing Visual Studio
To install Visual Studio, we first need to download it from https://visualstudio.microsoft.com.
Visual Studio for Mac deprecation
On August 31, 2023, Microsoft announced the deprecation of Visual Studio for Mac in accordance with their Modern Lifecycle Policy, which will mean the end of support on August 31, 2024. Visual Studio for Mac will remain supported until that date. If you have a Visual Studio subscription, you can always download the latest version of Visual Studio for Mac from my.visualstudio.com. Microsoft has released the C# Dev Kit and .NET MAUI Dev Kit extensions for Visual Studio Code. The extensions work on Windows, macOS, and Linux. You can use Visual Studio Code and these extensions to complete the projects in this book, although the instructions pertaining to the UI for Visual Studio for Mac will not match Visual Studio Code. To learn more, visit https://learn.microsoft.com/en-us/visualstudio/mac/what-happened-to-vs-for-mac?view=vsmac-2022.
When we start the Visual Studio installer via the file we downloaded, it will start to check what we already have installed on our machine. When the check is finished, we can select which platforms and tools we would like to install.
Once we have selected the platforms that we want to install, Visual Studio downloads and installs everything that we need to get started with app development using .NET mobile, as shown:
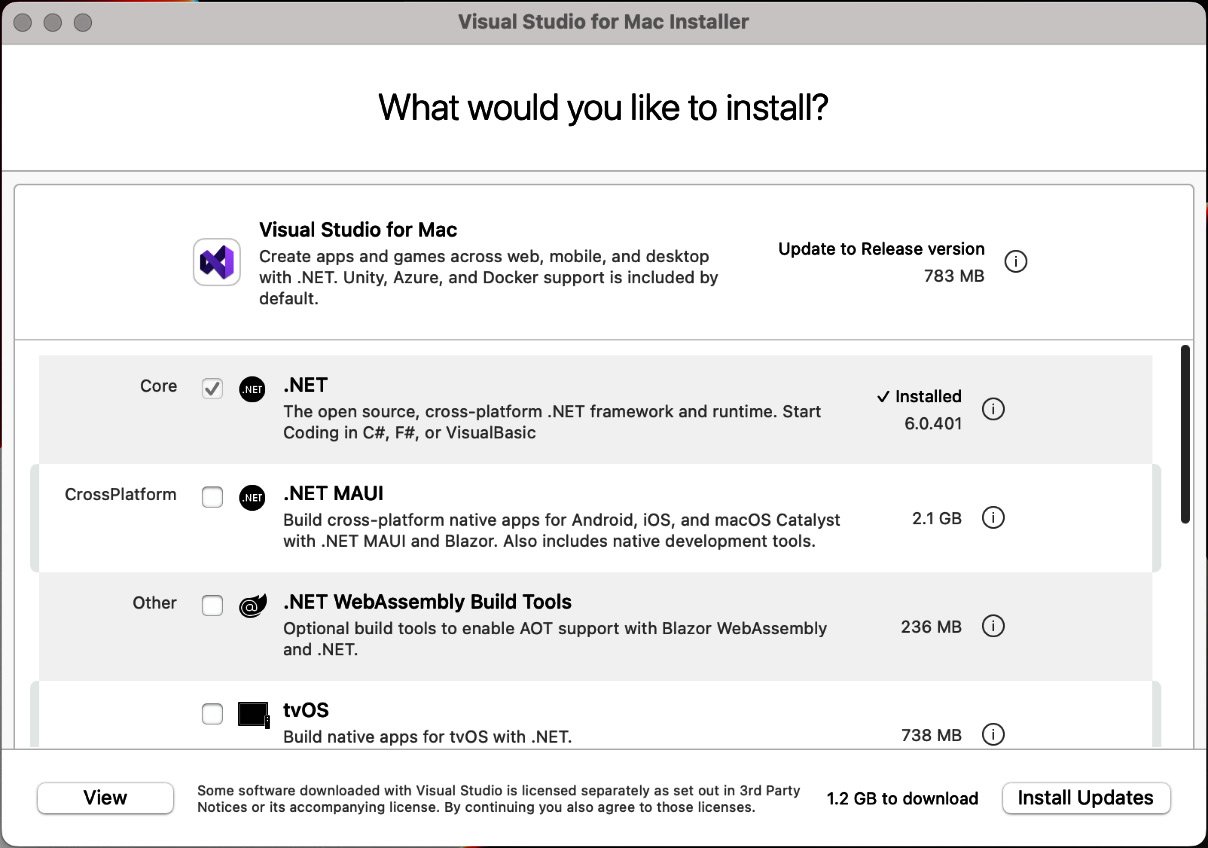
Figure 1.9 – Visual Studio for Mac installer
Configuring the Android Emulator
Visual Studio uses the Android emulators provided by Google. They are installed and configured through SDK Manager.
Special note for Intel-based Mac device
If we want our emulator to be fast, then we need to ensure that it is hardware-accelerated. To hardware-accelerate the Android emulator, we need to install the Intel Hardware Accelerated Execution Manager (HAXM), which can be downloaded from https://software.intel.com/en-us/articles/intel-hardware-accelerated-execution-manager-intel-haxm.
The next step is to create the Android emulator. First, we need to ensure that the Android emulator and the Android OS images are installed. To do this, take the following steps:
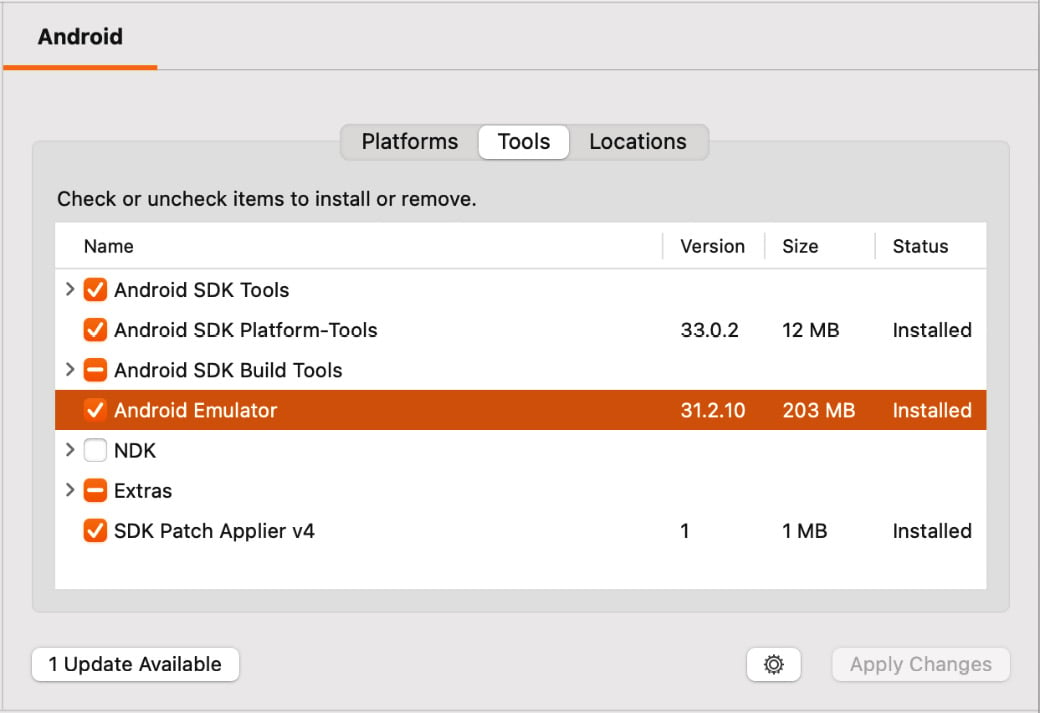
Figure 1.10 – Installing Android Emulator in Visual Studio for Mac
- We also need to install one or multiple images to use with the emulator. We can install multiple images if, for example, we want to run our app on different versions of Android. We can select emulators with Google Play (as in the following screenshot) so that we can use Google Play services in our app, even when we are running it in an emulator. This is required if, for example, we want to use Google Maps in our app:
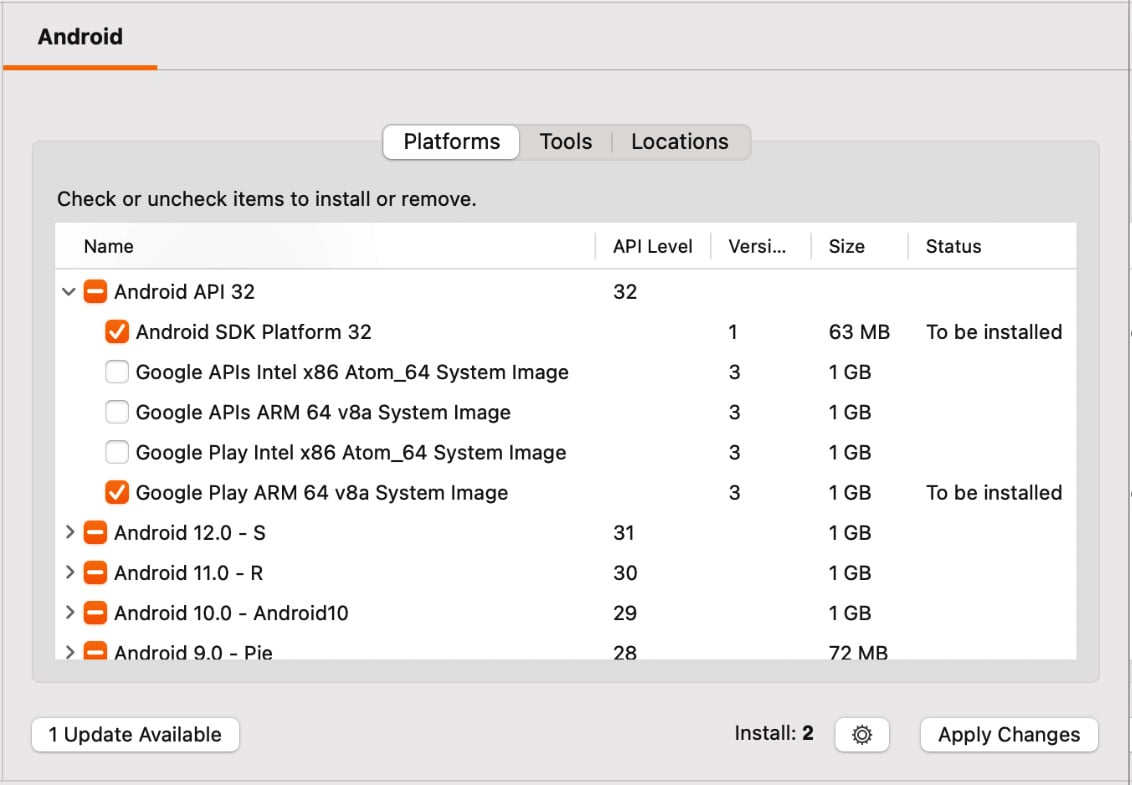
Figure 1.11 – Installing emulator images in Visual Studio for Mac
Intel versus Apple M1
If you have an Apple Mac that uses the M1 chipset, then you should use emulator images that have ARM 64 in the name; otherwise, if you are using older Mac devices with the Intel chipset, then use images with Intel x86 in the name.
- Then, to create and configure an emulator, go to Device Manager in the Tools menu in Visual Studio. From Android Device Manager, we can start an emulator if we already have one created, or we can create new emulators, as shown:

Figure 1.12 – Android Device Manager in Visual Studio for Mac
- If we click on the New Device button, we can create a new emulator with the specifications that we need. The easiest way to create a new emulator here is to select a base device that matches our needs. These base devices are preconfigured, which is often enough. However, it is also possible to edit the properties of the device so that we have an emulator that matches our specific needs.
The processor dropdown will be preselected with the correct architecture of your device. If you change this, for example, from ARM to x86 or x86 to ARM, then the emulator will be slower; always try to use the architecture that matches your device.
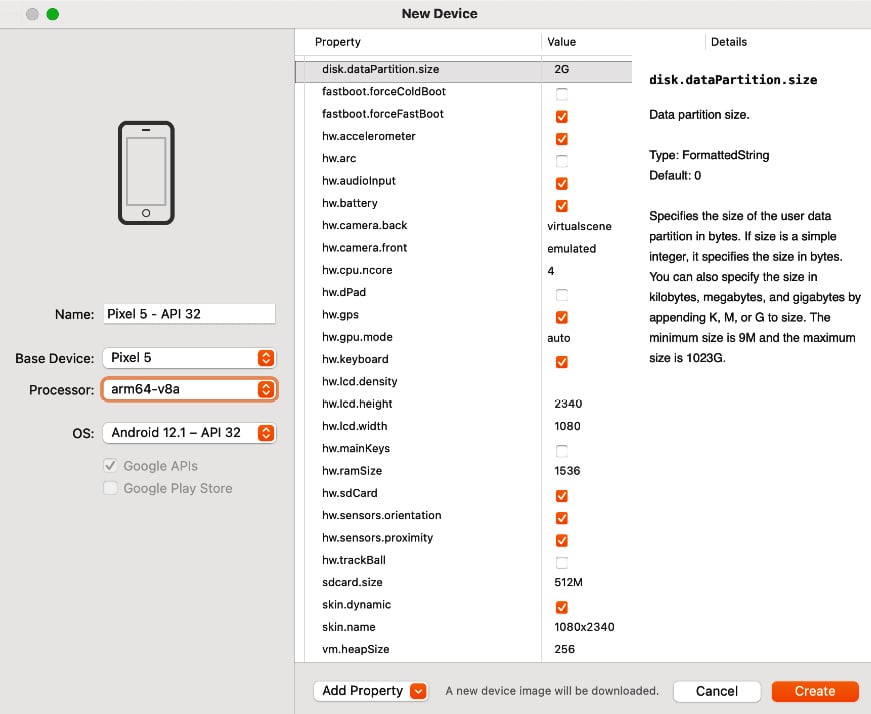
Figure 1.13 – Creating a new Android device
If you only have a Mac, then you are done and can skip to the .NET mobile productivity tooling section. If you have a Windows device, then the next section, Setting up a Windows machine, is for you.
Setting up a Windows machine
We can use either a virtual or physical Windows machine for development with .NET mobile. We can, for example, run a virtual Windows machine on our Mac. The only tool we need for app development on our Windows machine is Visual Studio.
Installing .NET mobile for Visual Studio 2022 or later
If we already have Visual Studio 2022 or later installed, we first need to open Visual Studio Installer; otherwise, we need to go to https://visualstudio.microsoft.com to download the installation files. Under the banner in the Meet the Visual Studio Family section, you can find the links to download Visual Studio 2022 for Windows or Visual Studio 2022 for Mac.
Before the installation starts, we need to select which workloads we want to install.
For .NET MAUI development, we need to install .NET Multi-platform App UI development. Select the ASP.NET and web development workload to be able to develop MAUI/Blazor hybrid apps.
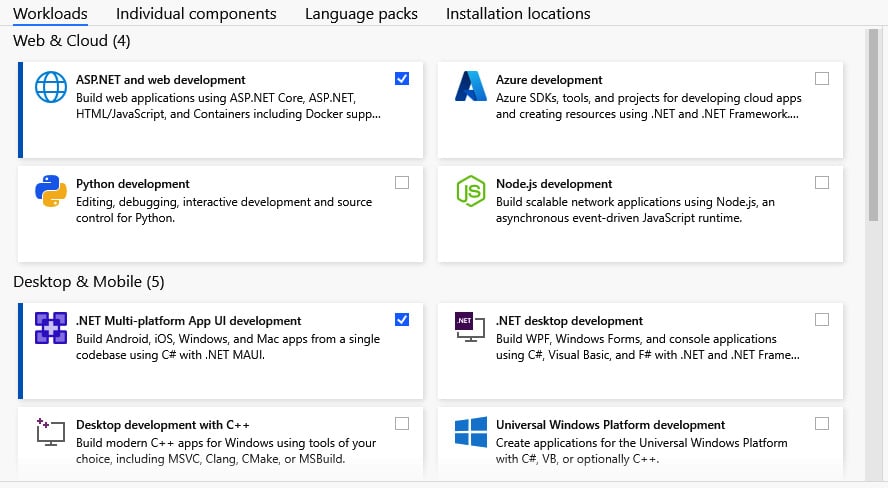
Figure 1.14 – Visual Studio 2022 installer
Hyper-V is the default hardware acceleration method when using .NET MAUI. If you want to use Intel HAXM, you will need to check the checkbox for Intel HAXM in the Individual components tab, as in the following screenshot:
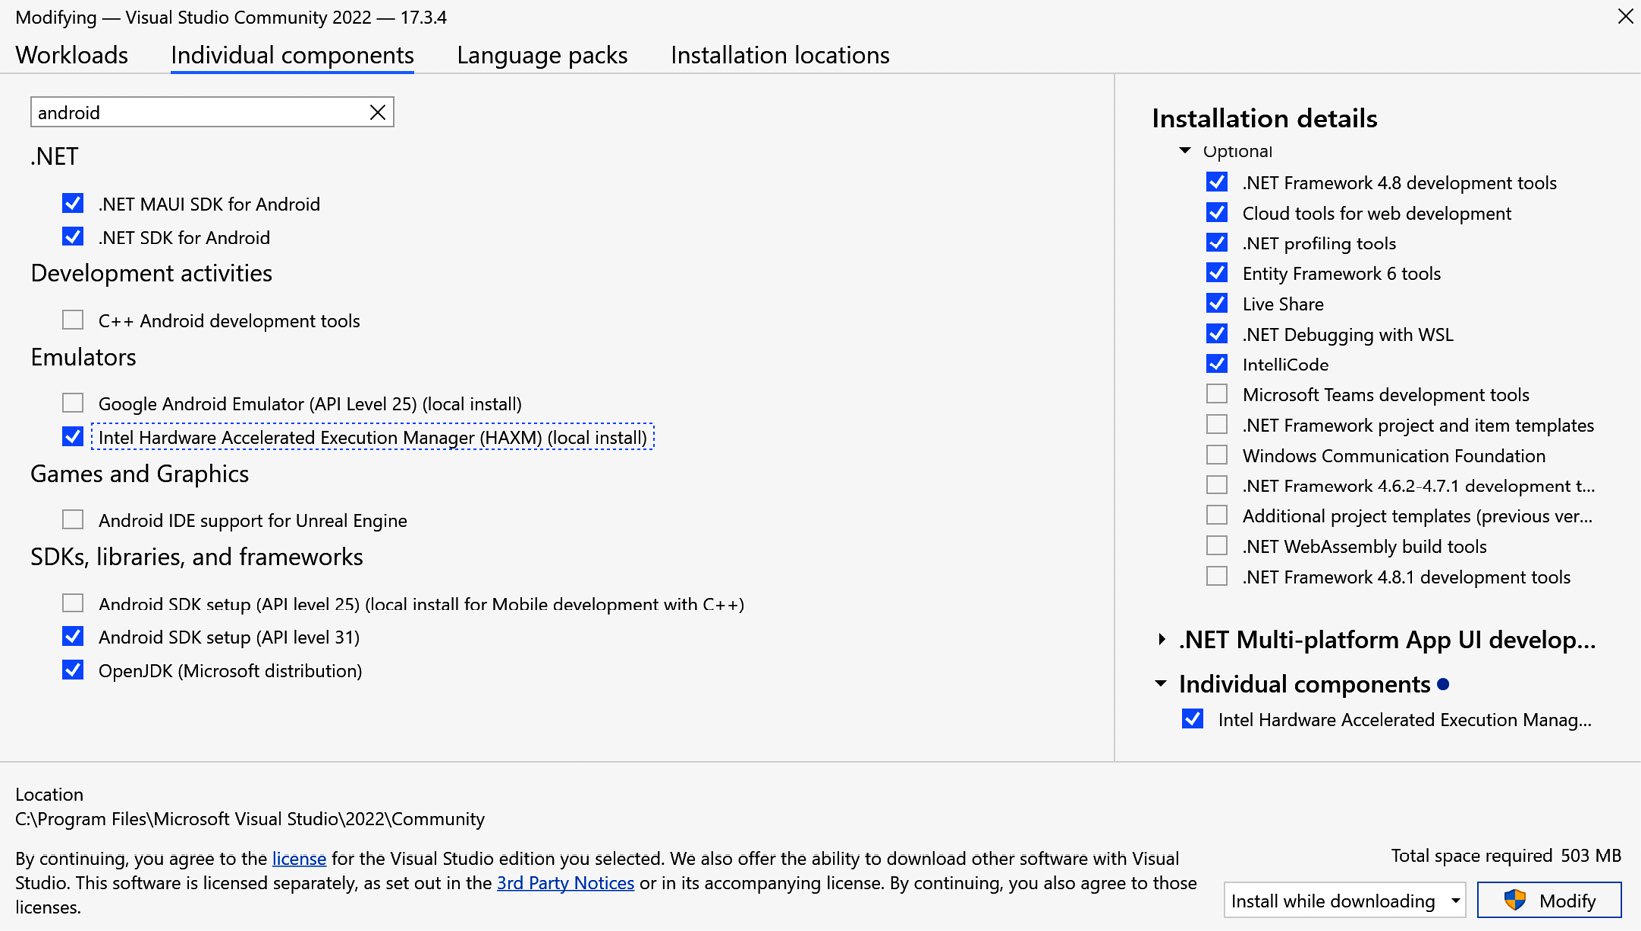
Figure 1.15 – Adding Intel HAXM
When we first start Visual Studio, we will be asked whether we want to sign in. It is not necessary for us to sign in unless we want to use Visual Studio Professional or Enterprise, in which case we will need to sign in so that our license can be verified.
Now that Visual Studio is installed, we can finish the configuration needed to run and debug apps for iOS and Android.
Pairing Visual Studio with a Mac
If we want to run, debug, and compile our iOS app from a Windows development machine, then we need to connect it to a Mac. We can set up our Mac manually, as described earlier in this chapter, or we can use Automatic Mac Provisioning from within Visual Studio. This installs Mono and .NET for iOS on the Mac that we are connecting to. It will not install the Visual Studio IDE, but this isn’t necessary if we just want to use it as a build machine. We do, however, need to install Xcode manually.
To connect to the Mac from Visual Studio, use the Pair to Mac button in the toolbar (as in the following screenshot), or, in the top menu, go to Tools | iOS | Pair to Mac:

Figure 1.16 – Pair to Mac button
If this is the first time you have attempted to pair to a Mac, Visual Studio will open a wizard that will guide you through the steps you need to take on your Mac to enable Visual Studio to connect.
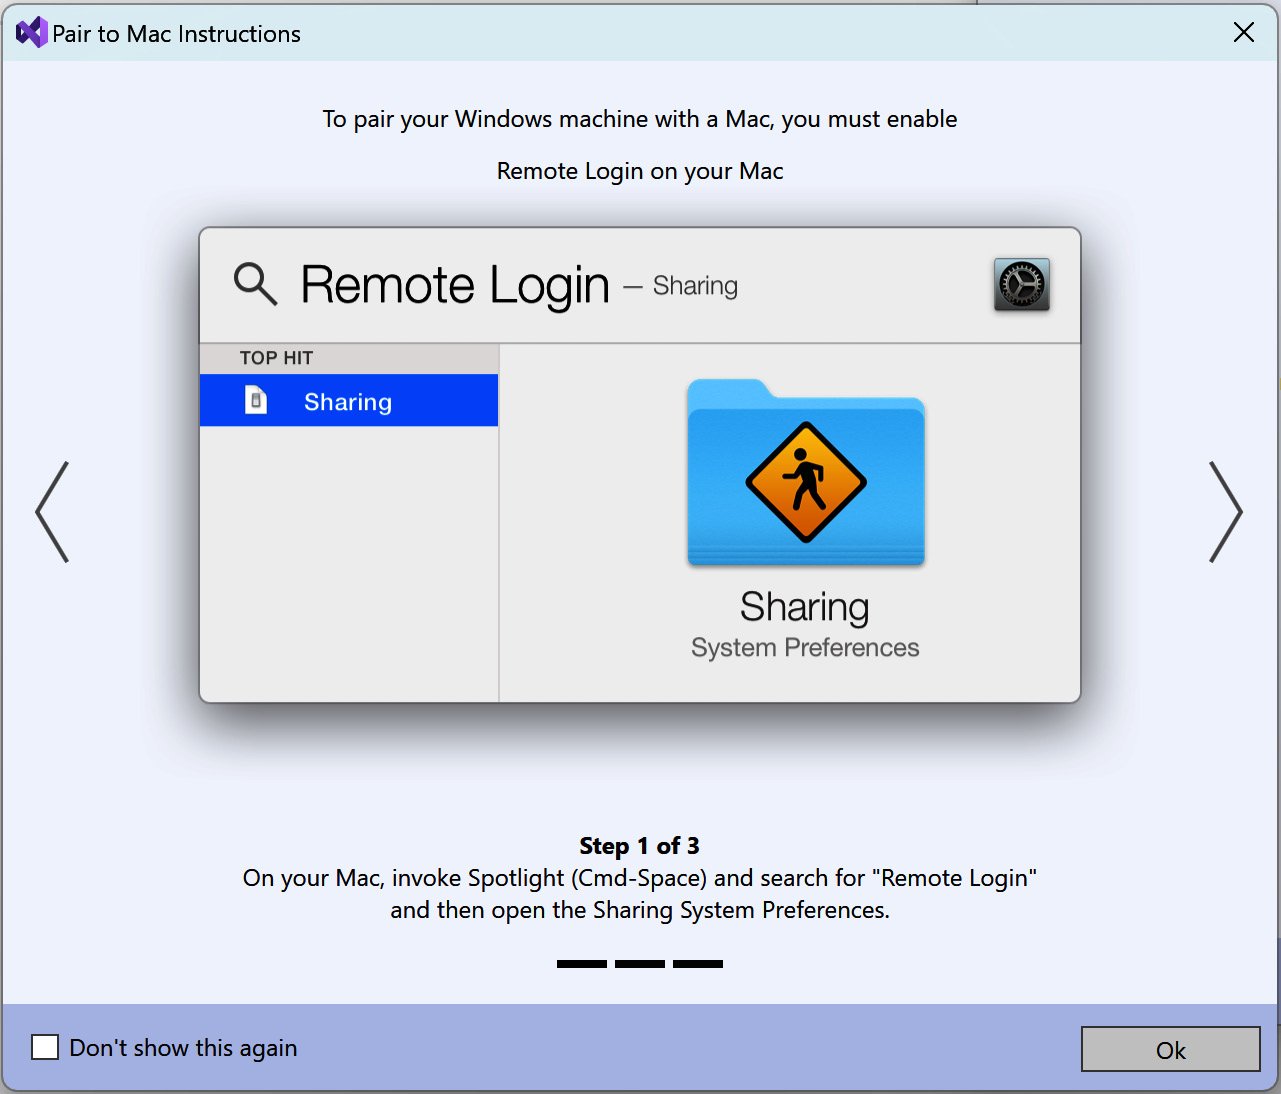
Figure 1.17 – Pair to Mac wizard
To be able to connect to a Mac—either manually or using Automatic Mac Provisioning—we need to be able to access the Mac via our network, and we need to enable Remote Login on the Mac.
To do this, go to Settings | Sharing and select the checkbox for Remote Login. To the left of the window, we can select which users are allowed to connect with Remote Login, as shown:
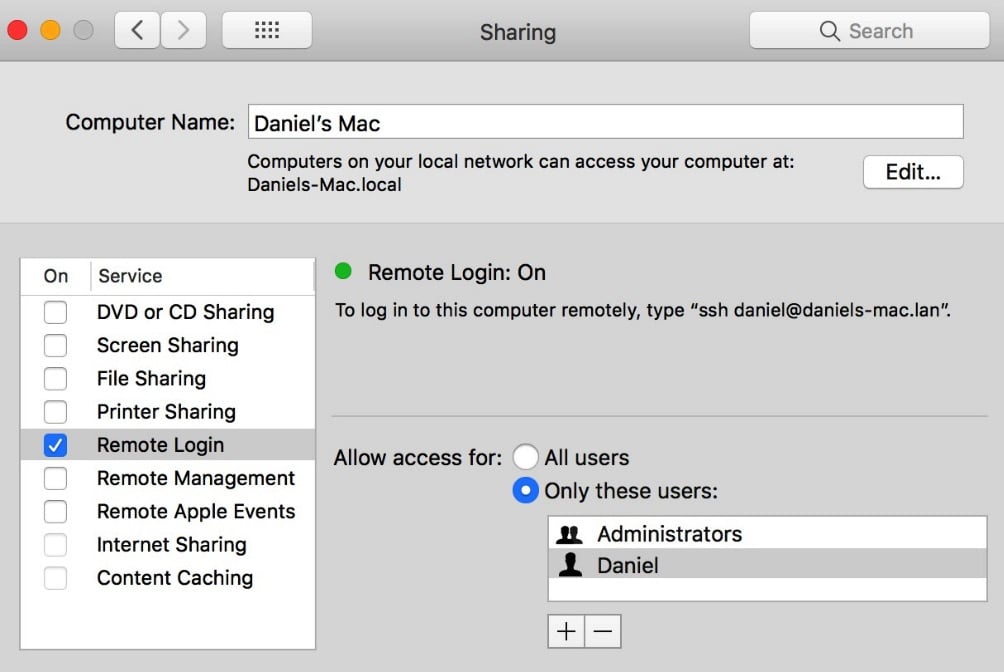
Figure 1.18 – Enabling Remote Login on macOS
A dialog box will appear showing all the Macs that can be found on the network. If your Mac doesn’t appear in the list of available Macs, you can use the Add Mac... button in the bottom-left corner of the window to enter an IP address, as shown:
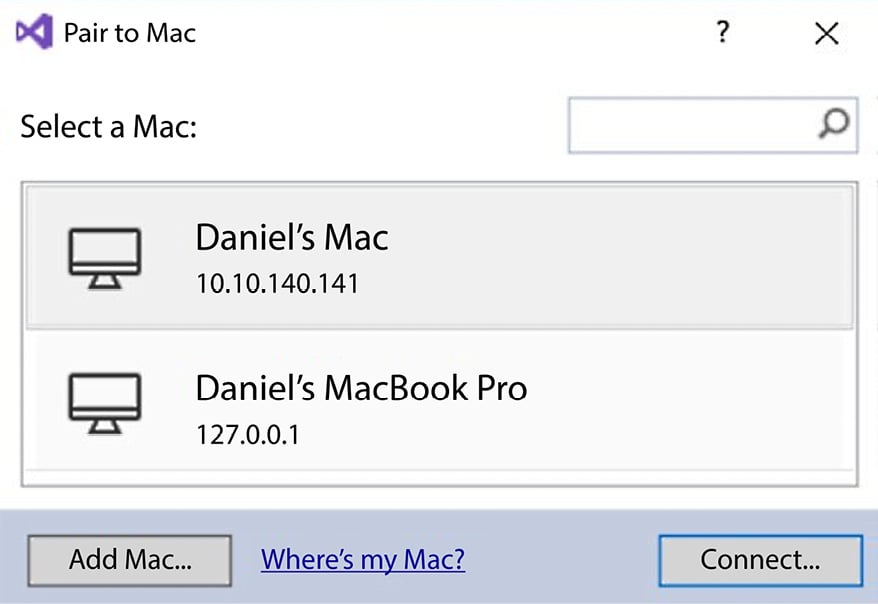
Figure 1.19 – Pair to Mac
If everything that we need is installed on the Mac, then Visual Studio will connect, and we can start building and debugging our iOS app. If Mono is missing on the Mac, a warning will appear. This warning will also give us the option to install it, as shown:

Figure 1.20 – Missing Mono installation dialog
Now that we have our Mac paired, we can get the Android emulator configured.
Configuring an Android emulator and hardware acceleration
If we want a fast Android emulator that works smoothly, we need to enable hardware acceleration. This can be done using either Intel HAXM or Hyper-V. The disadvantage of Intel HAXM is that it can’t be used on machines with an Advanced Micro Devices (AMD) processor; we must use a machine with an Intel processor. We can’t use Intel HAXM in parallel with Hyper-V.
Because of this, Hyper-V is the preferred way to hardware-accelerate an Android emulator on a Windows machine. To use Hyper-V with our Android emulator, we need to have Windows 11 or Windows 10 with the April 2018 update (or later), and Visual Studio 2017 version 15.8 (or later) installed.
Find your version of Visual Studio
To determine the version of Visual Studio you are using, when Visual Studio is open, use the Help | About Visual Studio menu, and you should be presented with a dialog similar to the following:
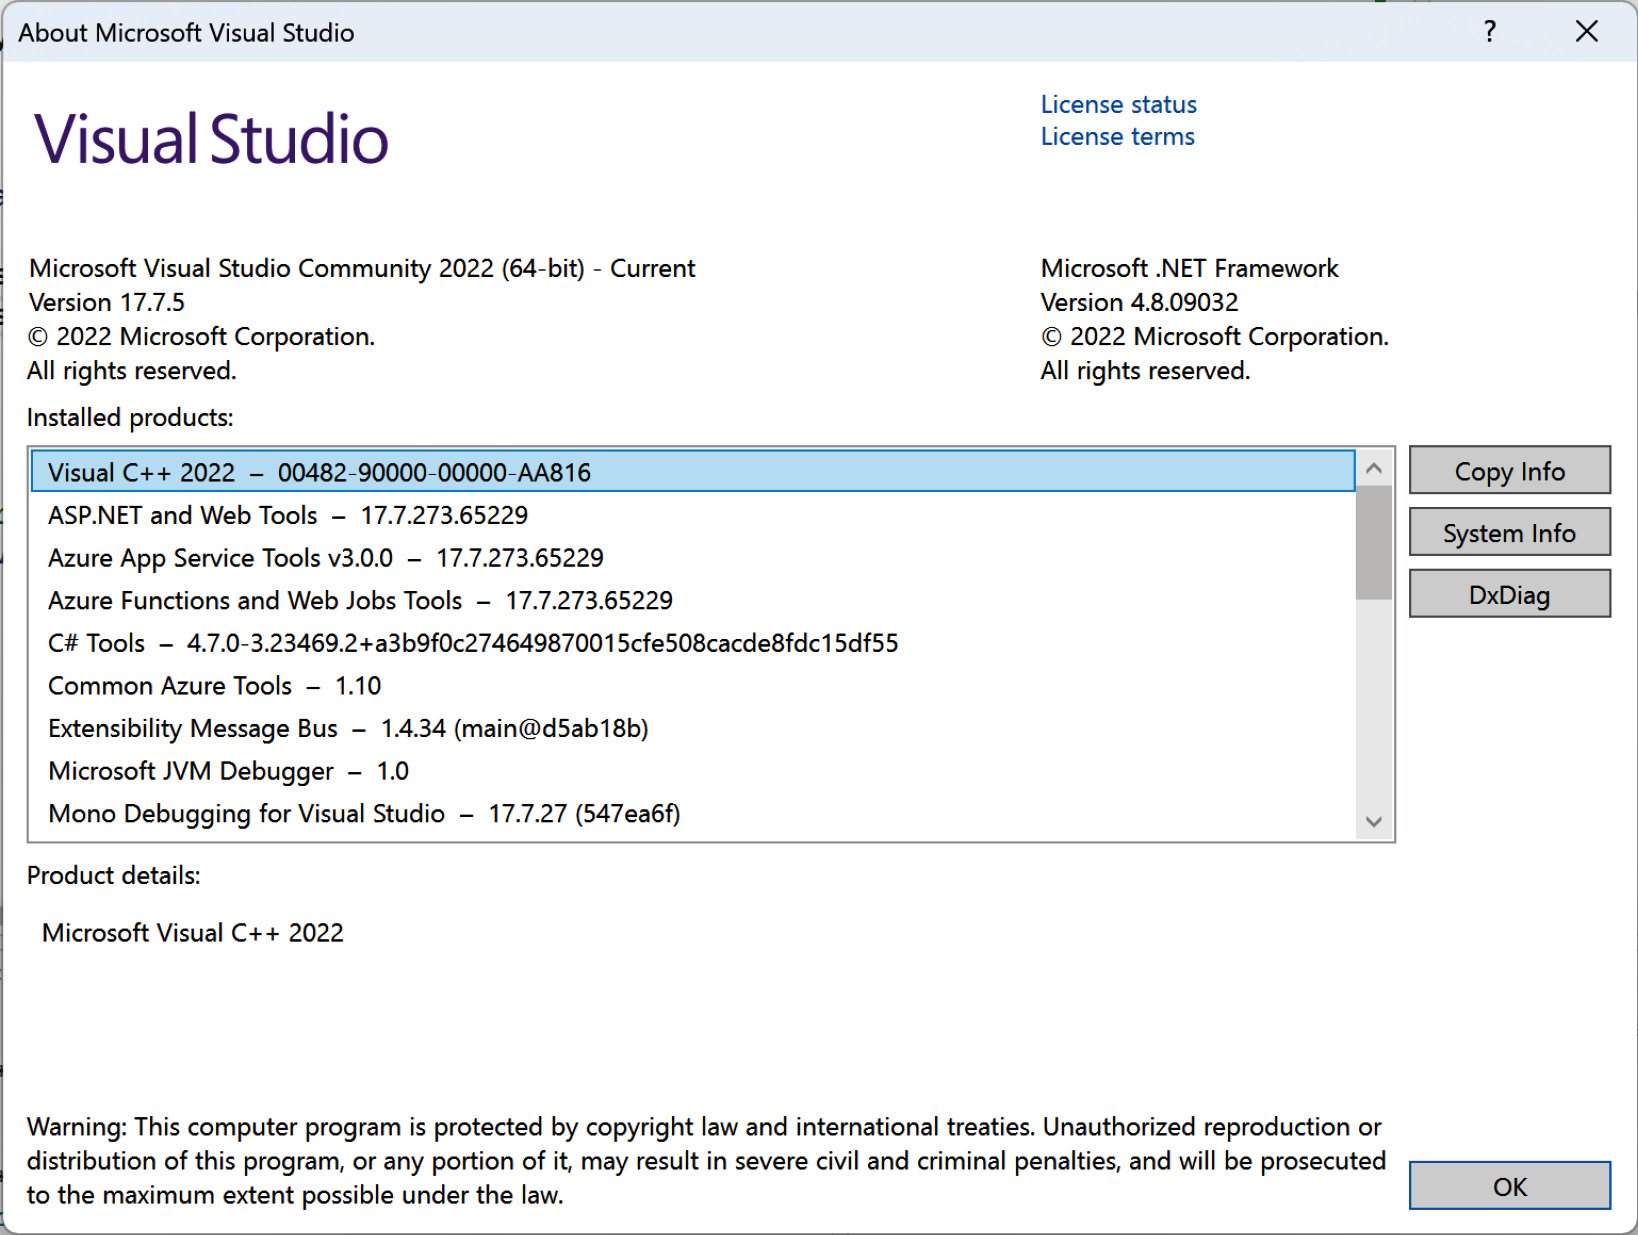
Figure 1.21 – Help | About
To enable Hyper-V, we need to take the following steps:
- Open the search menu and type in
Turn Windows features on or off. Click the option that appears to open it, as shown:
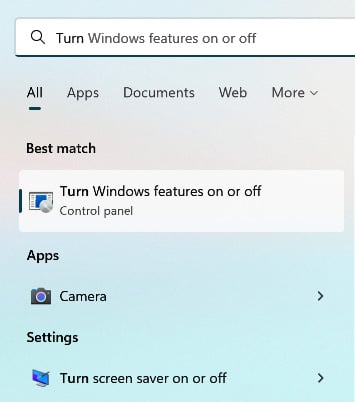
Figure 1.22 – Turn Windows features on or off
- To enable Hyper-V, select the Hyper-V checkbox. Also, expand the Hyper-V option and check the Hyper-V Platform checkbox. We also need to select the Windows Hypervisor Platform checkbox, as shown:
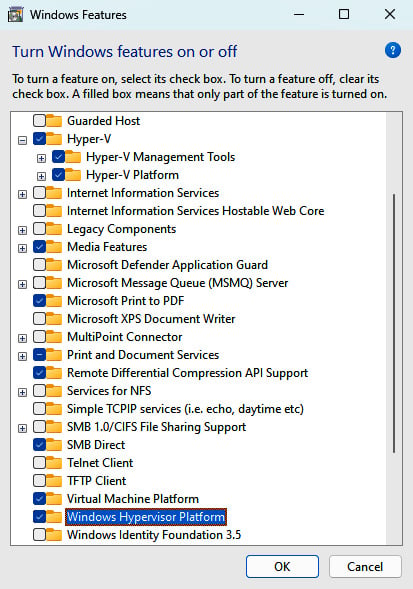
Figure 1.23 – Enabling Hyper-V in Windows Features
- Restart the machine when Windows prompts you to do so.
- Because we didn’t install an Android emulator during the installation of Visual Studio, we need to install it now. Go to the Tools menu in Visual Studio, then click on Android and then Android SDK Manager.
- Under Tools in Android SDK Manager, we can install the emulator by selecting Android Emulator, as in the following screenshot. Also, we should ensure that the latest version of Android SDK Build Tools is installed:
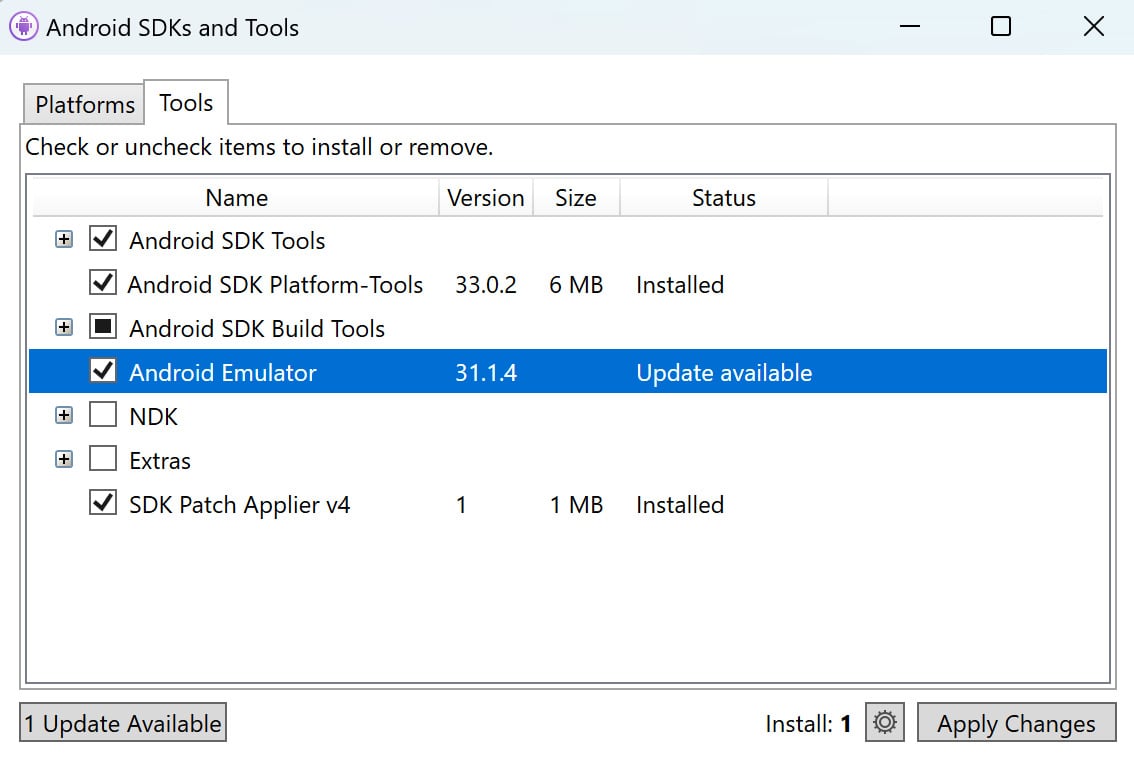
Figure 1.24 – Installing Android Emulator in Android SDK Manager
- The Android SDK allows multiple emulator images to be installed simultaneously. We can install multiple images if, for example, we want to run our app on different versions of Android. Select emulators with Google Play (as in the following screenshot) so that we can use Google Play services in our app, even when we are running it in an emulator.
This is required if, for example, we want to use Google Maps in our app:
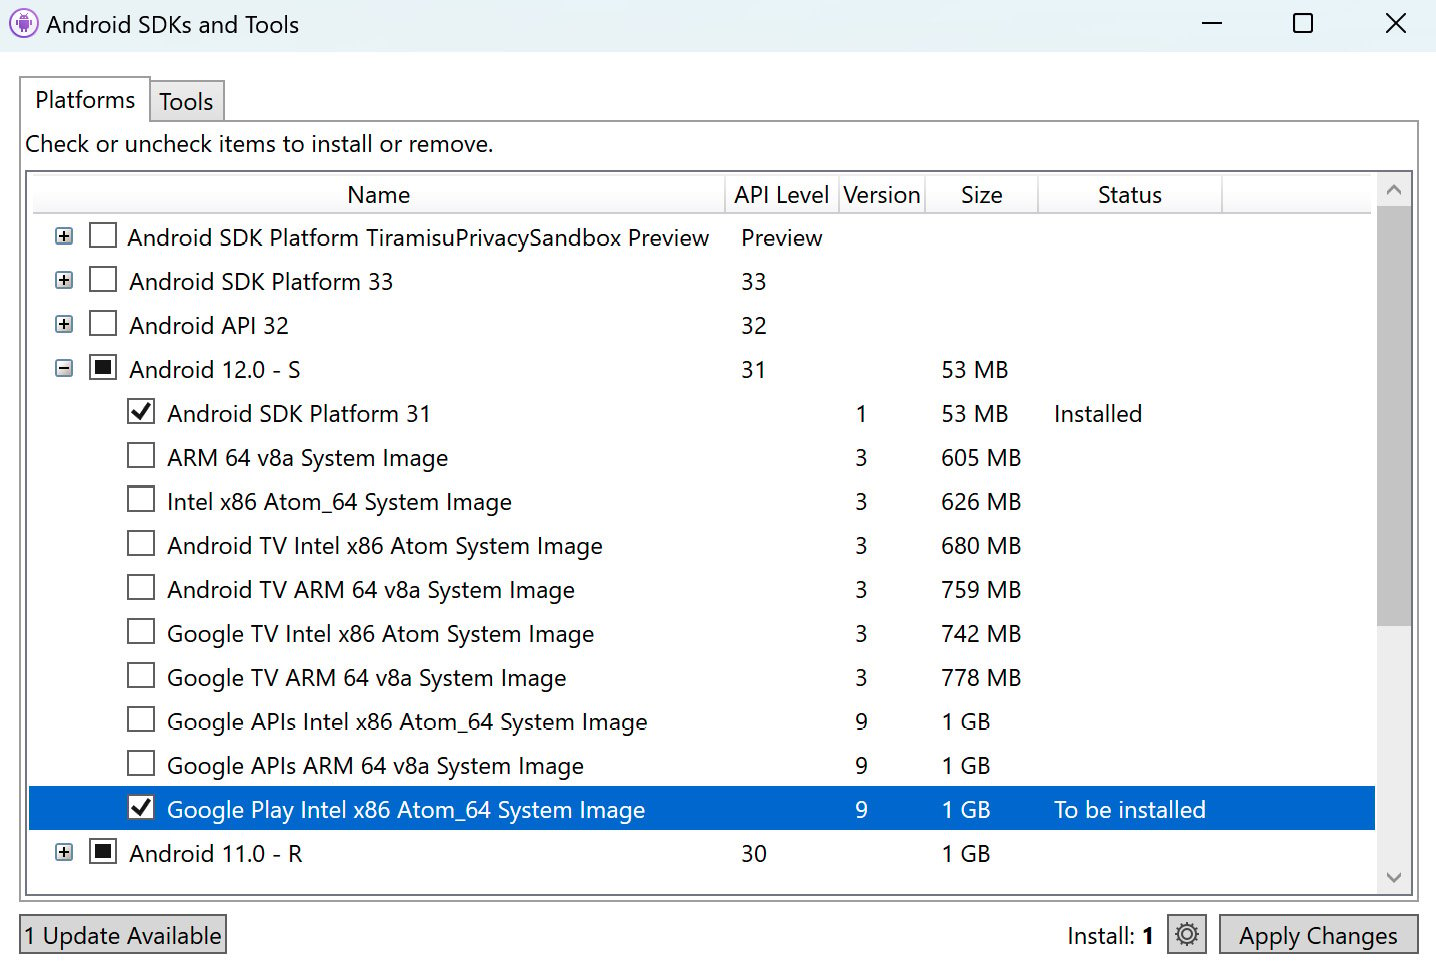
Figure 1.25 – Installing Android Emulator images in Android SDK Manager
- Be sure to click the Apply Changes button to install any components you selected before closing the window.
- The next step is to create a virtual device to use the emulator image. To create and configure an emulator, go to Android Device Manager, which we can open from the Tools tab in Visual Studio. From the device manager, we can either start an emulator—if we already have one created—or we can create new emulators, as shown:

Figure 1.26 – Android Device Manager
If we click on the New button, we can create a new emulator with the specifications that we need. The easiest way to create a new emulator here is to select a base device that matches our needs. These base devices are preconfigured, which is often enough. However, it is possible to edit the properties of the device so that we have an emulator that matches our specific needs.
We must select the correct processor for the emulator to match the processor in our Windows development machine. If it doesn’t match, then the emulator will be slower than it needs to be. Select the x86_64 processor (as in the following screenshot) if you are using Intel or AMD x86-based hardware, or arm64-v* if you have an ARM device running Windows.
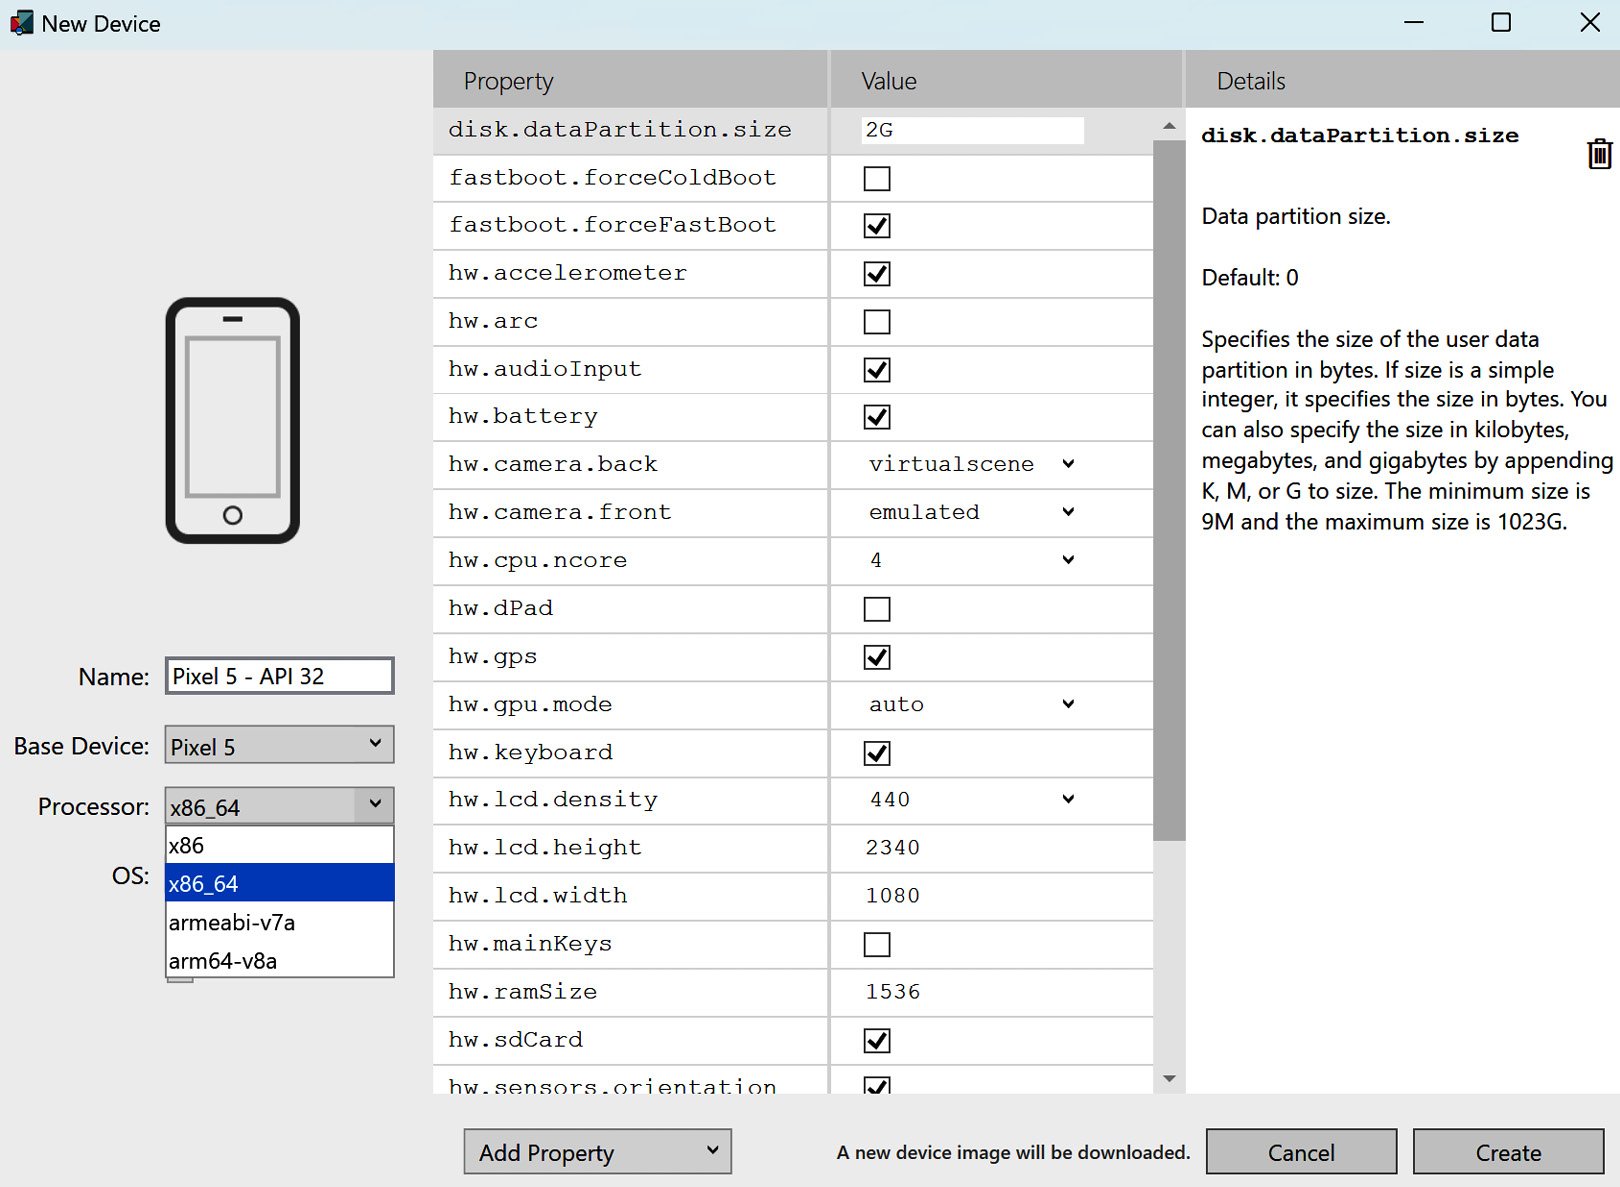
Figure 1.27 – Creating a new device in Android Device Manager
Configuring Developer Mode
If we want to develop desktop apps for Windows, we need to activate Developer Mode on our development machine. To do this, go to Settings | Privacy & security | For developers. Then, select Developer Mode, as in the following screenshot. This makes it possible for us to sideload and debug apps via Visual Studio:
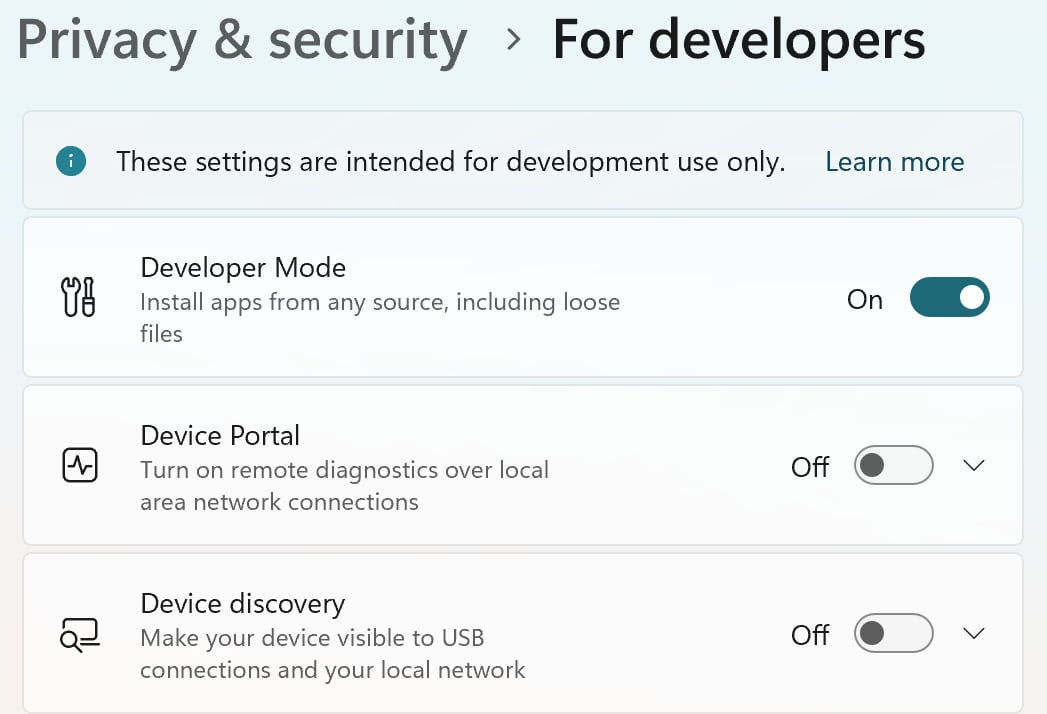
Figure 1.28 – Enabling Developer Mode
At this point, our Windows machine is ready for development. Before we dive into creating our first project, there are a few more optional features that we should review. These will help your development process as you build your apps.

