Reader small image

You're reading from  MongoDB Fundamentals

Product typeBook
Published inDec 2020
PublisherPackt
ISBN-139781839210648
Edition1st Edition
Tools
Concepts
Right arrow
Authors (4):
Amit Phaltankar
Amit Phaltankar
author image
Amit Phaltankar

Amit Phaltankar is a software developer and a blogger experienced in building lightweight and efficient software components. He specializes in wiring web-based applications and handling large-scale data sets using traditional SQL, NoSQL, and big data technologies. He is experienced in many technology stacks and loves learning and adapting to newer technology trends. Amit is passionate about improving his skill set and loves guiding and grooming his peers and contributing to blogs. He is also an author of MongoDB Fundamentals.
Read more about Amit Phaltankar

Juned Ahsan
Juned Ahsan
author image
Juned Ahsan

Juned Ahsan is a software professional with more than 14 years of experience. He has built software products and services for companies and clients such as Cisco, Nuamedia, IBM, Nokia, Telstra, Optus, Pizzahut, AT&T, Hughes, Altran, and others. Juned has a vast experience in building software products and architecting platforms of different sizes from scratch. He loves to help and mentor others and is a top 1% contributor on StackOverflow. He is passionate about cognitive CX, cloud computing, artificial intelligence, and NoSQL databases.
Read more about Juned Ahsan

Michael Harrison
Michael Harrison
author image
Michael Harrison

Michael Harrison started his career at the Australian telecommunications leader Telstra. He worked across their networks, big data, and automation teams. He is now a lead software developer and the founding member of Southbank Software, a Melbourne based startup that builds tools for the next generation of database technologies.
Read more about Michael Harrison

Liviu Nedov
Liviu Nedov
author image
Liviu Nedov

Liviu Nedov is a senior consultant with more than 20 years of experience in database technologies. He has provided professional and consulting services to customers in Australia and Europe. Throughout his career, he has designed and implemented large enterprise projects for customers like Wotif Group, Xstrata Copper/Glencore, and the University of Newcastle and Energy, Queensland. He is currently working at Data Intensity, which is the largest multi-cloud service provider for applications, databases, and business intelligence. In recent years, he is actively involved in MongoDB NoSQL database projects, database migrations, and cloud DBaaS (Database as a Service) projects.
Read more about Liviu Nedov

View More author details
Right arrow

1. Introduction to MongoDB

Overview

This chapter will introduce you to MongoDB fundamentals, first defining data and its types, then exploring how a database solves data storage challenges. You will learn about the different types of databases and how to select the right one for your task. Once you have a clear idea about these concepts, we will discuss MongoDB, its features, architecture, licensing, and deployment models. By the end of the chapter, you will have gained hands-on experience using MongoDB through Atlas—the cloud-based service used to manage MongoDB—and worked with its basic elements, such as databases, collections, and documents.

Introduction

A database is a platform to store data in a way that is secure, reliable, and easily available. There are two types of databases used in general: relational databases and non-relational databases. Non-relational databases are often called as NoSQL databases. A NoSQL database is used to store large quantities of complex and diverse data, such as product catalogs, logs, user interactions, analytics, and more. MongoDB is one of the most established NoSQL databases, with features such as data aggregation, ACID (Atomicity, Consistency, Isolation, Durability) transactions, horizontal scaling, and Charts, all of which we will explore in detail in the upcoming sections.

Data is crucial for businesses—specifically, storing, analyzing, and visualizing the data while making data-driven decisions. It is for this reason that MongoDB is trusted and used by companies such as Google, Facebook, Adobe, Cisco, eBay, SAP, EA, and many more.

MongoDB comes in different variants and can be utilized for both experimental and real-world applications. It is easier to set up and simpler to manage than most other databases due to its intuitive syntax for queries and commands. MongoDB is available for anyone to install on their own machine(s) or to be used on the cloud as a managed service. MongoDB's cloud-managed service (called Atlas) is available to everyone for free, whether you are an established enterprise or a student. Before we start our discussion of MongoDB, let us first learn about database management systems.

Database Management Systems

A Database Management System (DBMS) provides the ability to store and retrieve data. It uses query languages to create, update, delete, and retrieve data. Let us look at the different types of DBMS.

Relational Database Management Systems

Relational Database Management Systems (RDBMS) are used to store structured data. The data is stored in the form of tables that consist of rows and columns. The tables can have relationships with other tables to depict the actual data relationships. For example, in a university relational database, the Student table can be related to the Course and Marks Obtained tables through a common columns such as courseId.

NoSQL Database Management Systems

NoSQL databases were invented to solve the problem of storing unstructured and semi-structured data. Relational databases enforce the structure of data to be defined before the data can be stored. This database structure definition is often referred to as schema, which pertains to the data entities, that is, its attributes and types. RDBMS client applications are tightly coupled with the schema. It is hard to modify the schema without affecting the clients. Contrastingly, NoSQL databases allow you to store the data without a schema and also support dynamic schema, which decouples the clients from a rigid schema, and is often necessary for modern and experimental applications.

The data stored in the NoSQL database varies depending on the provider, but generally, data is stored as documents instead of tables. An example of this would be databases for inventory management, where different products can have different attributes and, therefore, require a flexible structure. Similarly, an analytics database that stores data from different sources in different structures would also need a flexible structure.

Comparison

Let us compare NoSQL databases and RDBMS based on the following factors. You will get an in-depth understanding of these as you read through this book. For now, a basic overview is provided in the following table:

Figure 1.1: Differences between relational databases and NoSQL

Figure 1.1: Differences between relational databases and NoSQL

That concludes our discussion on databases and the differences between the various database types. In the next section, we will begin our exploration of MongoDB.

Introduction to MongoDB

MongoDB is a popular NoSQL database that can store both structured and unstructured data. Founded in 2007 by Kevin P. Ryan, Dwight Merriman, and Eliot Horowitz in New York, the organization was initially called 10gen and was later renamed MongoDB—a word inspired by the term humongous.

It provides both essential and extravagant features that are needed to store real-world big data. Its document-based design makes it easy to understand and use. It is built to be utilized for both experimental and real-world applications and is easier to set up and simpler to manage than most of the other NoSQL databases. Its intuitive syntax for queries and commands makes it easy to learn.

The following list explores these features in detail:

  • Flexible and Dynamic Schema: MongoDB allows a flexible schema for your database. A flexible schema allows variance in fields in different documents. In simple terms, each record in the database may or may not have the same number of attributes. It addresses the need for storing evolving data without making any changes to the schema itself.
  • Rich Query Language: MongoDB supports intuitive and rich query language, which means simple yet powerful queries. It comes with a rich aggregation framework that allows you to group and filter data as required. It also has built-in support for general-purpose text search and specific purposes like geospatial searches.
  • Multi-Document ACID Transactions: Atomicity, Consistency, Integrity, and Durability (ACID) are features that allow your data to be stored and updated to maintain its accuracy. Transactions are used to combine operations that are required to be executed together. MongoDB supports ACID in a single document and multi-document transactions.
  • Atomicity means all or nothing, which means either all operations are a part of a transaction as it happens or none of them are. This means that if one of the operations fails, then all the executed operations are rolled back to leave the data affected by transaction operation in the state it was in before the transaction started.
  • Consistency in a transaction means keeping the data consistent as per the rules defined for the database. If a transaction breaks any database consistency rules, then it must be rolled back.
  • Isolation enforces running transactions in isolation, which means that the transactions do not partially commit the data and any values outside the transactions change only after all the operations are executed and are fully committed.
  • Durability ensures that the changes are committed by the transaction. So, if a transaction has executed then the database will ensure the changes are committed even if there is a system crash.
  • High Performance: MongoDB provides high performance using embedded data models to reduce disk I/O usage. Also, extensive support for indexing on different kinds of data makes queries faster. Indexing is a mechanism to maintain relevant data pointers in an index just like an index in a book.
  • High Availability: MongoDB supports distributed clusters with a minimum of three nodes. A cluster refers to a database deployment that uses multiple nodes/machines for data storage and retrieval. Failovers are automatic, and data is replicated on secondary nodes asynchronously.
  • Scalability: MongoDB provides a way to scale your databases horizontally across hundreds of nodes. So, for all your big data needs, MongoDB is the perfect solution. With this, we have looked at some of the essential features of MongoDB.

    Note

    MongoDB 1.0 was first officially launched in February 2009 as an open source database. Since then, there have been several stable releases of the software. More information about different versions and the evolution of MongoDB can be found at the official MongoDB website (https://www.mongodb.com/evolved).

MongoDB Editions

MongoDB is available in two different editions to address the needs of developers and enterprises, as follows:

Community Edition: The Community Edition is released for the developer community, for those who want to learn and get hands-on experience with MongoDB. The Community Edition is free and is available for installation on Windows, Mac, and different Linux flavors, such as Red Hat, Ubuntu, and so on. You can run your production workload on community servers; however, for advanced enterprise features and support, you must consider the paid Enterprise Edition.

Enterprise Edition: The Enterprise Edition uses the same underlying software as the Community Edition but comes with some additional features, which include the following:

  • Security: Lightweight Directory Access Protocol (LDAP) and Kerberos authentication. LDAP is a protocol that allows authentication from external user directories. This means that you do not need to create users in the database to authenticate them but can use external directories such as a corporate user directory. This saves a lot of time by not replicating users in different systems such as a database.
  • In-memory storage engine: This provides high throughput and low latency.
  • Encrypted storage engine: This lets you encrypt data at rest.
  • SNMP monitoring: Centralized data collection and aggregation.
  • System event auditing: This lets you record events in JSON format.

Migrating Community Edition to Enterprise Edition

MongoDB allows you to upgrade your Community Edition to the Enterprise Edition. This can be useful for scenarios in which you started with the Community Edition and eventually built a database that is now good for commercial use. For such cases, instead of installing the Enterprise Edition and building the database again, you can simply upgrade the Community Edition to the Enterprise Edition, saving time and effort. For more information about upgrading, you can visit this link: https://docs.mongodb.com/manual/administration/upgrade-community-to-enterprise/.

The MongoDB Deployment Model

MongoDB can run on a variety of platforms, including Windows, macOS, and different flavors of Linux. You can install MongoDB on a single machine or a cluster of machines. Multiple machine installation provides high availability and scalability. The following list details each of these installation types:

Standalone

Standalone installation is a single-machine installation and is meant mainly for development or experimental purposes. You can refer to the Preface for the steps to install MongoDB on your system.

Replica Set

A replica set in MongoDB is a group of processes or servers that work together to provide data redundancy and high availability. Running MongoDB as a standalone process is not highly reliable because you may lose access to your data due to connectivity issues and disk failures. Using a replica set solves these problems as the data copies are stored on multiple servers. It requires at least three servers in a cluster. These servers are configured as the primary, secondaries, or arbiters. You will learn more about the replica set and its benefits in Chapter 9, Replication.

Sharded

Sharded deployments allow you to store the data in a distributed way. They are required for applications that manage massive data and expect high throughput. A shard contains a subset of the data, and each shard must use a replica set to provide redundancy of the data that it holds. Multiple shards working together provide a distributed and replicated dataset.

Managing MongoDB

MongoDB provides the user with two options. Based on your requirements, you can either install it on your system and manage the database yourself or utilize the Database as a Service (DBaaS) option offered by MongoDB (Atlas). Let us learn more about these two options.

Self-Managed

MongoDB is available to be downloaded and installed on your machines. The machine can be a workstation, a server, a virtual machine in a data center, or on the cloud. You can install MongoDB as standalone, a replica set, or sharded clusters. All these deployments are possible with both the Community and Enterprise Editions. Each deployment has its advantages and associated complexity. A self-managed database can be useful for scenarios where you either want more granular control of your database or you just want to learn database management and operations.

Managed Service: Database as a Service

A managed service is the concept of outsourcing some processes, functions, or deployments to a vendor. DBaaS is a term generally used for databases outsourced to an external vendor. A managed service enforces a shared responsibility model. The provider of the service manages the infrastructure, that is, the installation, deployment, failover, scalability, disk space, monitoring, and so on. You can manage the data and the settings for security, performance, and tuning. It allows you to save time managing databases and focus on other things, such as application development.

In this section, we learned about the history of MongoDB and its evolution. We also learned about different editions of MongoDB and the differences between them. We concluded the section by learning how MongoDB can be deployed and managed.

MongoDB Atlas

MongoDB Atlas is the DBaaS offering from MongoDB Inc. It allows you to provision a database on the cloud as a service, which can be used for your applications from anywhere. Atlas uses cloud infrastructures from different cloud vendors. You can choose the cloud vendor on which you want to deploy your database. Like any other managed service, you get the benefits of highly available secured environments with low or no maintenance needed.

MongoDB Atlas Benefits

Let us look at some of the benefits of MongoDB Atlas.

  • Simple Setup: The database setup on Atlas is easy and can be done in just a few steps. Atlas runs a variety of automated tasks behind the scenes to set up your multi-node cluster.
  • Guaranteed Availability: Atlas deploys at least three data nodes or servers per replica set. Each node is deployed in a separate availability zone (Amazon Web Services (AWS)), fault domains (Microsoft Azure), or zones (Google Cloud Platform (GCP)). This allows a highly available setup and continuous uptime in case of outages or routine updates.
  • Global Presence: MongoDB Atlas is available across different regions in the AWS, GCP, and Microsoft Azure clouds. The support for different regions allows you to pick a region closer to you for low latency read and write.
  • Optimal Performance: The founders of MongoDB manage Atlas, and they utilize their expertise and experience to keep the databases in Atlas running optimally. Also, single-click upgrades are available for upgrading to the latest versions of MongoDB.
  • Highly Secured: Security best practices are implemented by default, such as a separate VPC (virtual private cloud), network encryption, access controls, and firewalls to restrict access.
  • Automated Backups: You can configure automated backups with customizable schedules and data retention policies. Secure backups and restores are available for switching between different versions of your database.

Cloud Providers

MongoDB Atlas currently supports three cloud providers, namely AWS, GCP, and Microsoft Azure.

Availability Zones

Availability Zones (AZs) are a group of physical data centers within close proximity, equipped with computational, storage, or networking resources.

Regions

A region is a geographical area, for example, Sydney, Mumbai, London, and so on. A region generally consists of two or more AZs. The AZs are generally in different cities/towns away from each other, to provide fault tolerance in case of any natural disasters. Fault tolerance is the ability of a system to keep running when something goes wrong in one portion of the system. In terms of AZs, if one AZ goes down due to some reason, another AZ should still be able to serve the operations.

MongoDB Supported Regions and Availability Zones

MongoDB Atlas allows you to deploy your database in a multi-cloud global infrastructure from AWS, GCP, and Azure. It allows MongoDB to support a vast number of regions and AZs. Also, the number of supported regions and AZs keeps growing as cloud providers keep adding to them. Follow these links from the official MongoDB website about cloud providers' region support:

Atlas Tiers

To build a database cluster in MongoDB Atlas, you need to select a tier. A tier is a level of database power that you get from your cluster. When you provision your database in Atlas, you are given two parameters: RAM and storage. Depending on your selection of these parameters, an appropriate amount of database power is provisioned. The cost of your cluster is linked to the selection of RAM and storage; a higher selection means a higher cost and a lower selection means a lower cost.

M0 is the free tier available in MongoDB Atlas, which gives you shared RAM with storage of 512 MB. It is the tier that we will be using for our learning purposes. The free tier is not available in all regions, so if you do not find it in your region, select the closest free tier region. The proximity of your database determines the latency for your operations.

Selecting a tier requires an understanding of your database usage and how much you would like to spend. Under provisioned databases can exhaust your application's capacity at peak usage and can lead to application errors. Overprovisioned databases can help your application perform well but are more expensive. One of the advantages of using a cloud database is that you can always modify your cluster size as per your needs. But you still need to find what is the optimal capacity for your day-to-day database use. Determining the maximum number of concurrent connections is a critical decision factor that can help you choose the appropriate MongoDB Atlas tier for your use case. Let us look at the different tiers available:

Figure 1.2: MongoDB Atlas tier configuration

Figure 1.2: MongoDB Atlas tier configuration

MongoDB Atlas Pricing

Capacity planning is essential but estimating the cost of your database cluster is important too. We learned that an M0 cluster is free, with minimal resources, making it ideal for prototyping and learning purposes. For the paid cluster tiers, Atlas charges you on an hourly basis. The total cost is comprised of multiple factors, such as the type and number of servers. Let us look at an example to understand the cost estimation of an M30 type replica set (three servers) on Atlas.

Cluster Cost Estimation

Let us try to understand how to estimate the cost of your MongoDB Atlas cluster. Identify the cluster requirements as follows:

  • Machine type: M30
  • Number of servers: 3 (replica set)
  • Running time: 24 hours a day
  • Estimation time period: 1 month

Once we have identified our requirements, the estimated cost can be calculated as follows:

  • Cost of running a single M30 server per hour: $0.54
  • Number of hours a server will run: 24 (hours) x 30 (days) = 720
  • Cost of a single server for a month: 720 x 0.54 = $388.8
  • Cost of running the three-server cluster: 388.8 x 3 = $1166.4

So, the total cost should come down to $1166.4.

Note

Apart from the running cost of your cluster, you should consider the cost of additional services such as backups, data transfer, and support contracts.

Let us implement our learning in an example scenario through the following exercise.

Exercise 1.01: Setting Up a MongoDB Atlas Account

MongoDB Atlas offers you free registration to set up a free cluster. In this exercise, you will create an account by executing the following steps:

  1. Go to https://www.mongodb.com and click Start free. The following window appears:
    Figure 1.3: MongoDB Atlas home page

    Figure 1.3: MongoDB Atlas home page

  2. You can sign up using your Google account or by providing your details manually as can be seen from the following screen. Provide your usage, Your Work Email, First Name, Last Name, and Password details in the respective fields, select the checkbox to agree to the terms of service and click Get started free.
    Figure 1.4: The Get started page

Figure 1.4: The Get started page

The following window appears in which you can enter your organization and project details:

Figure 1.5: Page to enter the organization and project details

Figure 1.5: Page to enter the organization and project details

Next, you should see the following page, which means your account has been successfully created:

Figure 1.6: Confirmation page

Figure 1.6: Confirmation page

In this exercise, you successfully created your MongoDB account.

MongoDB Atlas Organizations, Projects, Users, and Clusters

MongoDB Atlas enforces a basic structure for your environment. This includes the concepts of organizations, projects, users, and clusters. MongoDB provides a default organization and a project to help you get started easily. This section will teach you what these entities mean and how to set them up.

Organizations

A MongoDB Atlas organization is the top-level entity in your account, containing other elements such as projects, clusters, and users. You need to set up an organization first before any other resources.

Exercise 1.02: Setting Up a MongoDB Atlas Organization

You have successfully created an account on MongoDB Atlas, and in this exercise, you will set up an organization based on your preferences:

  1. Log on to your MongoDB account created in Exercise 1.01, Setting Up a MongoDB Atlas Account. To create an organization, select the Organizations option from your account menu as shown in the following figure:
    Figure 1.7: User options – Organizations

    Figure 1.7: User options – Organizations

  2. You will see the default organization in the list of organizations. To create a new organization, click the Create New Organization button in the top-right corner:

    Figure 1.8: Organizations list

    Figure 1.8: Organizations list

  3. Type the organization name in the Name Your Organization field. Leave the default selection for Cloud Service as MongoDB Atlas. Click Next to proceed to the next step:
    Figure 1.9: Organization Name

    Figure 1.9: Organization Name

    You will be presented with the following screen:

    Figure 1.10: Create Organization page

    Figure 1.10: Create Organization page

  4. You will see your login as the Organization Owner. Leave everything as their defaults and click Create Organization.

    Once you have successfully created the organization, the following Projects screen will appear:

    Figure 1.11: Projects page

Figure 1.11: Projects page

So, in this exercise, you have successfully created the organization for your MongoDB application.

Projects

A project provides a grouping of clusters and users for a specific purpose; for example, you would like to segregate your lab, demo, and production environments. Similarly, you may like a different network, region, and user setup for different environments. Projects allow you to do this grouping as per your own organizational needs. In the next exercise, you will create a project.

Exercise 1.03: Creating a MongoDB Atlas Project

In this exercise, you will set up a project on MongoDB Atlas using the following steps:

  1. Once you have created an organization in Exercise 1.02, Setting Up MongoDB Atlas Organization, the Projects screen will appear on your next login. Click New Project:
    Figure 1.12: Projects page

    Figure 1.12: Projects page

  2. Provide a name for your project on the Name Your Project tab. Name the project myMongoProject. Click Next:

    Figure 1.13: Create a Project page

    Figure 1.13: Create a Project page

  3. Click Create Project. The Add Members and Set Permissions page is not mandatory, so leave it as the default. Your name should appear as the Project Owner:

    Figure 1.14: Add Members and Set Permissions for the project

Figure 1.14: Add Members and Set Permissions for the project

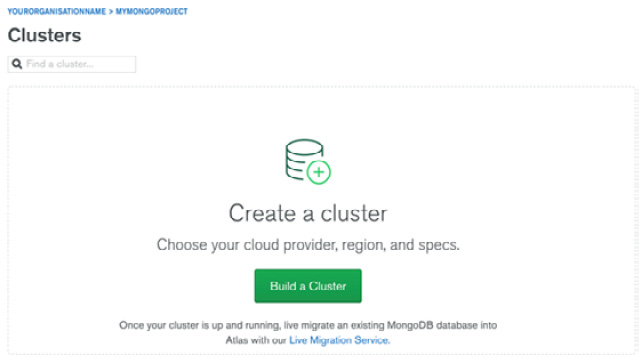
Your project is now set up. A cluster setup splash screen appears as shown in the following figure:

Figure 1.15: Clusters page

Figure 1.15: Clusters page

Now that you have created a project, you can create your first MongoDB cloud deployment.

MongoDB Clusters

A MongoDB cluster is the term used for a database replica set or shared deployments in MongoDB Atlas. A cluster is a distributed set of servers used for data storage and retrieval. A MongoDB cluster, at the minimum level, is a three-node replica set. In a sharded environment, a single cluster may contain hundreds of nodes/servers containing different replica sets with each replica set comprised of at least three nodes/servers.

Exercise 1.04: Setting Up Your First Free MongoDB Cluster on Atlas

In this section, you will set up your first MongoDB replica set on Atlas free tier (M0). Here are the steps to do this:

  1. Go to https://www.mongodb.com/cloud/atlas and log on to your account using the credentials that you used in Exercise 1.01, Setting Up a MongoDB Atlas Account. The following screen appears:
    Figure 1.16: Clusters page

    Figure 1.16: Clusters page

  2. Click Build a Cluster to configure your cluster:
    Figure 1.17: Build a Cluster page

    Figure 1.17: Build a Cluster page

    The following cluster options will appear:

    Figure 1.18: Available cluster options

    Figure 1.18: Available cluster options

  3. Select the Shared Clusters option marked as FREE as shown in the previous figure.
  4. A cluster configuration screen will be presented to select different options for your cluster. Select the cloud provider of your choice. For this exercise, you will be using AWS, as shown here:
    Figure 1.19: Selecting the cloud provider and region

    Figure 1.19: Selecting the cloud provider and region

  5. Select the Recommended region that is closest to your location and is free. In this case, you are selecting Sydney, as can be seen from the following figure:
    Figure 1.20: Selecting the recommended region

    Figure 1.20: Selecting the recommended region

    On the region selection page, you will see your cluster setting as per your selection. The Cluster Tier will be M0 Sandbox(Shared RAM, 512 MB storage), Additional Settings will be MongoDB 4.2 No Backup, and Cluster Name will be Cluster0:

    Figure 1.21: Additional Settings for the cluster

    Figure 1.21: Additional Settings for the cluster

  6. Ensure that the selections are made correctly in the preceding step so that the cost appears as FREE. Any selections different from what is recommended in the previous steps may add costs for your cluster. Click on Create Cluster:
    Figure 1.22: FREE tier notification

Figure 1.22: FREE tier notification

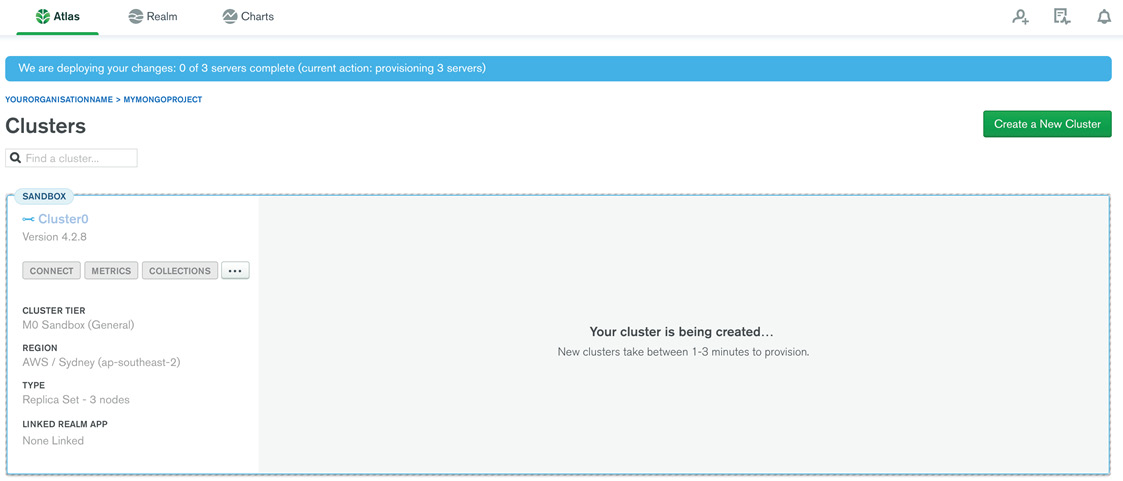
A success message of Your cluster is being created… appears on the screen. It generally takes a few minutes to set up the cluster:

Figure 1.23: MongoDB Cluster getting created

Figure 1.23: MongoDB Cluster getting created

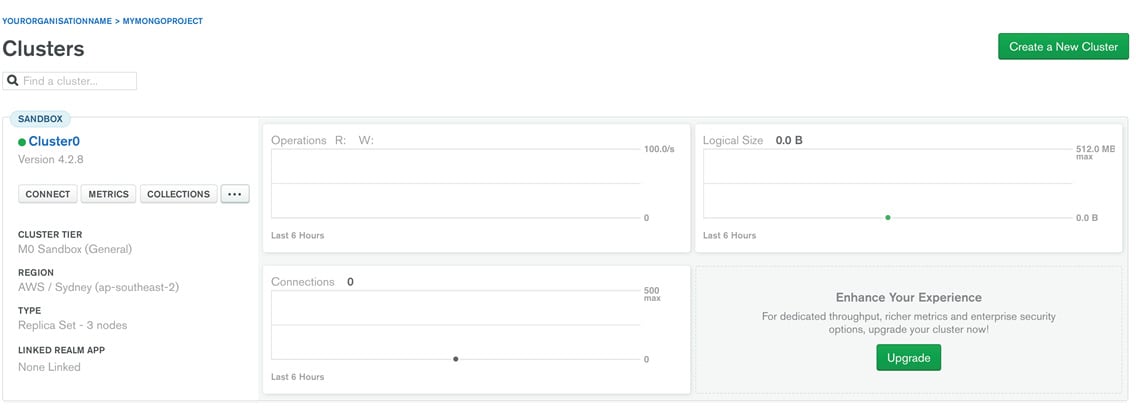
After a few minutes, you should see your new cluster, as shown here:

Figure 1.24: MongoDB cluster created

Figure 1.24: MongoDB cluster created

You have successfully created a new cluster.

Connecting to Your MongoDB Atlas Cluster

Here are the steps to connect to your MongoDB Atlas cluster running on the cloud:

  1. Go to https://account.mongodb.com/account/login. The following window appears:
    Figure 1.25: MongoDB Atlas login page

    Figure 1.25: MongoDB Atlas login page

  2. Provide your email address and click Next:
    Figure 1.26: MongoDB Atlas Login page (password)

    Figure 1.26: MongoDB Atlas Login page (password)

  3. Now type your Password and click Login. The Clusters window appears as shown here:
    Figure 1.27: MongoDB Atlas Clusters screen

    Figure 1.27: MongoDB Atlas Clusters screen

  4. Click the CONNECT button under Cluster0. It will open a modal screen as follows:
    Figure 1.28: MongoDB Atlas modal screen

    Figure 1.28: MongoDB Atlas modal screen

    The first step before you connect to the cluster is to whitelist your IP address. MongoDB Atlas has a built-in security feature that is enabled by default, which blocks connectivity to the database from everywhere. So, the whitelisting of the client IP is necessary to connect to the database.

  5. Click Add Your Current IP Address to whitelist your IP as shown here:
    Figure 1.29: Adding your current IP address

    Figure 1.29: Adding your current IP address

  6. The screen will show your current IP address; just click on the Add IP Address button. If you wish to add more IPs to the whitelist, you can add them manually by clicking the Add a Different IP Address option (see preceding figure):
    Figure 1.30: Adding your current IP address

    Figure 1.30: Adding your current IP address

    The following message appears once the IP is whitelisted:

    Figure 1.31: IP whitelisted message

    Figure 1.31: IP whitelisted message

  7. To create a new MongoDB user, provide a Username and Password for a new user and click on the Create Database User button to create a user as shown here:
    Figure 1.32: Creating a MongoDB user

    Figure 1.32: Creating a MongoDB user

    Once the details are successfully updated, the following screen appears:

    Figure 1.33: MongoDB user created screen

    Figure 1.33: MongoDB user created screen

  8. To choose a connection method, click on the Choose a connection method button. Select the Connect with the mongo shell option as shown here:
    Figure 1.34: Choosing the connection type

    Figure 1.34: Choosing the connection type

  9. Download and install the mongo shell by selecting the options for your workstation/client machine as shown in the following screenshot:
    Figure 1.35: Installing the mongo shell

    Figure 1.35: Installing the mongo shell

    The mongo shell is a command-line client to connect to your Mongo server(s). You will be using this client throughout the book, so it is imperative that you install it.

  10. Once you have the mongo shell installed, run the connection string you grabbed in the preceding step to connect to your database. When prompted, enter the password that you used for your MongoDB user in the previous step:
    Figure 1.36: Installing the mongo shell

Figure 1.36: Installing the mongo shell

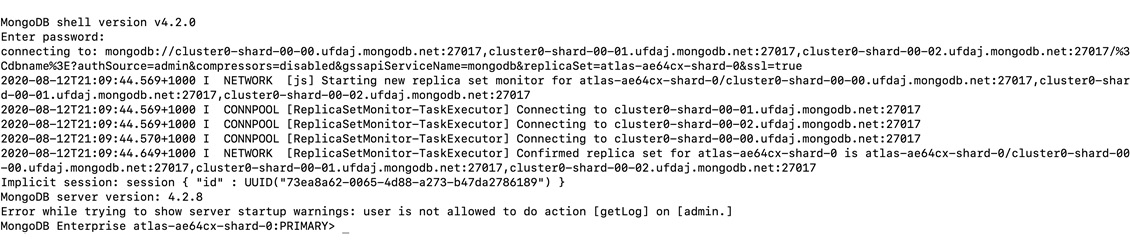
If everything goes well, you should see the mongo shell connected to your Atlas cluster. Here is a sample output of a connecting string execution:

Figure 1.37: Output of connecting string execution

Figure 1.37: Output of connecting string execution

Ignore the warnings seen in Figure 1.37. At the end, you should see your cluster name and a command prompt. You can run the show databases command to list the existing database. You should see the two databases that are used by MongoDB for administrative purposes. Here is some sample output of the show databases command:

MongoDB Enterprise Cluster0-shard-0:PRIMARY> show databases
admin  0.000GB
local  4.215GB

You have successfully connected to your MongoDB Atlas instance.

MongoDB Elements

Let us dive into some very basic elements of MongoDB, such as databases, collections, and documents. Databases are basically aggregations of collections, which in turn, are made up of documents. A document is the basic building block in MongoDB and contains information about the various fields in a key-value format.

Documents

MongoDB stores data records in documents. A document is a collection of field names and values, structured in a JavaScript Object Notation (JSON)-like format. JSON is an easy-to-understand key-value pair format to describe data. The documents in MongoDB are stored as an extension of the JSON type, which is called BSON (Binary JSON). It is a binary-encoded serialization of JSON-like documents. BSON is designed to be more efficient in space than standard JSON. BSON also contains extensions that allow the representation of data types that cannot be represented in JSON. We will look at these in detail in Chapter 2, Documents and Data Types.

Document Structures

MongoDB documents contain field and value pairs and follow a basic structure, as follows:

{
     "firstFieldName": firstFieldValue,
     "secondFieldName": secondFieldValue,
     …
     "nthFieldName": nthFieldValue
}

The following is an example of a document that contains details about a person:

{
    "_id":ObjectId("5da26111139a21bbe11f9e89"),
    "name":"Anita P",
    "placeOfBirth":"Koszalin",
    "profession":"Nursing"
}

The following is another example with some fields and date types from BSON:

{
    "_id" : ObjectId("5da26553fb4ef99de45a6139"),
    "name" : "Roxana",
    "dateOfBirth" : new Date("Dec 25, 2007"),
    "placeOfBirth" : "Brisbane",
    "profession" : "Student"
}

The following example of a document contains an array and a sub-document. An array is a set of values and can be used when you need to store multiple values for a key such as hobbies. Sub-documents allow you to wrap related attributes in a document against a key, such as an address:

{
    "_id" : ObjectId("5da2685bfb4ef99de45a613a"),
    "name" : "Helen",
    "dateOfBirth" : new Date("Dec 25, 2007"),
    "placeOfBirth" : "Brisbane",
    "profession" : "Student",
    "hobbies" : [
     "painting",
     "football",
     "singing",
     "story-writing"],
    "address" : {
     "city" : "Sydney",
    "country" : "Australia",
    "postcode" : 2161
  }
}

The _id field shown in the preceding snippet is auto generated by MongoDB and is used as a unique identifier for the document. We will learn more about this in the upcoming chapters.

Collections

In MongoDB, documents are stored in collections. Collections are analogous to tables in relational databases. You need to use the collection name in your queries for operations such as insert, retrieve, delete, and so on.

Understanding MongoDB Databases

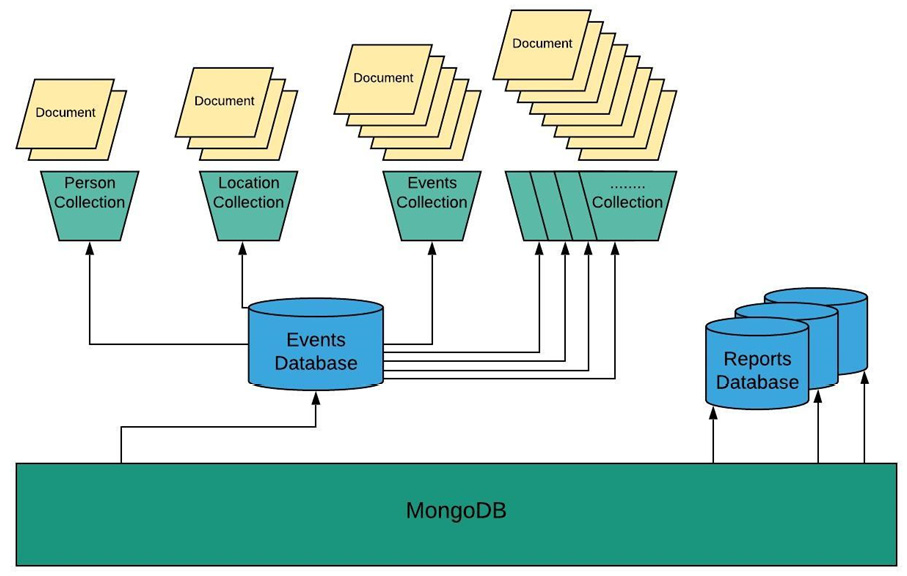
A database is a container for collections grouped together. Each database has several files on the filesystem that contain database metadata and the actual data stored in collections. MongoDB allows you to have multiple databases, and each of these databases can have various collections. In turn, each of these collections can have numerous documents. This is illustrated in the following figure, which shows an events database that contains collections for different event-related fields, such as Person, Location, and Events; these, in turn, contain various documents with all the granular data:

Figure 1.38: Pictorial representation of a MongoDB database

Figure 1.38: Pictorial representation of a MongoDB database

Creating a Database

Creating a database in MongoDB is very simple. Execute the use command in the mongo shell as follows, by replacing yourDatabaseName with your own choice of database name:

use yourDatabaseName

If the database does not exist, Mongo will create the database and will switch the current database to the new database. If the database exists, Mongo will refer to the existing database. Here is the output of the last command:

switched to db yourDatabaseName

Note

Naming conventions and using logical names always help even if you are working on a learning project. The project name is meant to be replaced by something more meaningful for you and understandable for later use. This rule applies to the name of any asset that we create, so try to use logical names.

Creating a Collection

You can use the createCollection command to create a collection. This command allows you to utilize different options for your collection, such as a capped collection, validation, collation, and so on. Another way to create a collection is by just inserting a document in a non-existent collection. In such a case, MongoDB checks whether the collection exists, and if not, it will create the collection before inserting the documents passed. We will try to utilize both methods to create a collection.

To create the collection explicitly, use the createCollection operation in the syntax as follows:

db.createCollection( '<collectionName>',
{
     capped: <boolean>,
     autoIndexId: <boolean>,
     size: <number>,
     max: <number>,
     storageEngine: <document>,
     validator: <document>,
     validationLevel: <string>,
     validationAction: <string>,
     indexOptionDefaults: <document>,
     viewOn: <string>,
     pipeline: <pipeline>,
     collation: <document>,
     writeConcern: <document>
})

In the following snippet, we are creating a capped collection with a maximum of 5 documents, with each document having a size limit of 256 bytes. The capped collection works like a circular queue, which means older documents will go out to make space for the latest inserts when the maximum size is reached:

db.createCollection('myCappedCollection',
{
     capped: true,
     size: 256,
     max: 5
})

Here is the output of the createCollection command:

{
        «ok» : 1,
        «$clusterTime» : {
                «clusterTime» : Timestamp(1592064731, 1),
                «signature» : {
                        «hash» : BinData(0,»XJ2DOzjAagUkftFkLQIT                           9W2rKjc="),
                        «keyId» : NumberLong(«6834058563036381187»)
                }
        },
        «operationTime» : Timestamp(1592064731, 1)
}

Do not worry about the preceding options much as none of them are mandatory. If you do not need to set any of these, then your createCollection command can be simplified as follows:

db.createCollection('myFirstCollection')

The output of this command should look as follows:

{
        «ok» : 1,
        «$clusterTime» : {
                «clusterTime» : Timestamp(1597230876, 1),
                «signature» : {
                        «hash» : BinData(0,»YO8Flg5AglrxCV3XqEuZG                           aaLzZc="),
                        «keyId» : NumberLong(«6853300587753111555»)
                }
        },
        «operationTime» : Timestamp(1597230876, 1)
}

Creating a Collection Using Document Insertion

You do not need to create a collection before inserting documents. MongoDB creates a collection if it does not exist on the first document insertion. You would use this method as follows:

use yourDatabaseName;
db.myCollectionName.insert(
{
    "name" : "Yahya A",  "company" :  "Sony"}
);

The output of your command should look like this:

WriteResult({ "nInserted" : 1 })

The preceding output returns the number of documents inserted into the collection. As you have inserted a document in a non-existent collection, MongoDB must have created the collection for us before inserting this document. To confirm that, display your collections list using the following command:

show collections;

The output of your command should display the list of collections in your database, something like this:

myCollectionName

Creating Documents

As you must have noticed in the previous section, we used the insert command to put a document in a collection. Let us look at a couple of variants of insert commands.

Inserting a Single Document

The insertOne command is used to insert one document at a time, as in the following syntax:

db.blogs.insertOne(
  { username: "Zakariya", noOfBlogs: 100, tags: ["science",    "fiction"]
})

The insertOne operation returns the _id value of the newly inserted document. Here is the output of the insertOne command:

{
  "acknowledged" : true,
  "insertedId" : ObjectId("5ea3a1561df5c3fd4f752636")
}

Note

insertedId is the unique ID for the document that is inserted, and it will not be the same for you as mentioned in the output.

Inserting Multiple Documents

The insertMany command inserts multiple documents at once. You can pass an array of documents to the command as mentioned in the following snippet:

db.blogs.insertMany(
[
      { username: "Thaha", noOfBlogs: 200, tags: ["science",       "robotics"]},
      { username: "Thayebbah", noOfBlogs: 500, tags: ["cooking",     "general knowledge"]},
      { username: "Thaherah", noOfBlogs: 50, tags: ["beauty",        "arts"]}
]
)

The output returns the _id values of all the newly inserted documents:

{
  «acknowledged» : true,
  «insertedIds» : [
    ObjectId(«5f33cf74592962df72246ae8»),
    ObjectId(«5f33cf74592962df72246ae9»),
    ObjectId(«5f33cf74592962df72246aea»)
  ]
}

Fetching Documents from MongoDB

MongoDB provides the find command to fetch documents from a collection. This command is useful to check whether your inserts are actually saved in the collections. Here is the syntax for the find command:

db.collection.find(query, projection)

The command takes two optional parameters: query and projection. The query parameter allows you to pass a document to apply filters during the find operation. The projection parameter allows you to pick desired attributes from the returned documents instead of all the attributes. When no parameter is passed in the find command, then all the documents are returned.

Formatting the find Output Using the pretty() Method

When the find command returns multiple records, it is sometimes hard to read them as they are not formatted properly. MongoDB provides the pretty() method at the end of the find command to get the returned records in a formatted manner. To see it in action, insert a couple of records in a collection called records:

db.records.insertMany(
[
  { Name: "Aaliya A", City: "Sydney"},
  { Name: "Naseem A", City: "New Delhi"}
]
)

It should generate an output as follows:

{
  "acknowledged" : true,
  "insertedIds" : [
    ObjectId("5f33cfac592962df72246aeb"),
    ObjectId("5f33cfac592962df72246aec")
  ]
}

First, fetch these records using the find command without the pretty method:

db.records.find()

It should return an output as shown here:

{ "_id" : ObjectId("5f33cfac592962df72246aeb"), "Name" : "Aaliya A",   "City" : "Sydney" }
{ "_id" : ObjectId("5f33cfac592962df72246aec"), "Name" : "Naseem A",   "City" : "New Delhi" }

Now, run the same find command using the pretty method:

db.records.find().pretty()

It should return the same records, but in a beautifully formatted way as shown here:

{
  "_id" : ObjectId("5f33cfac592962df72246aeb"),
  "Name" : "Aaliya A",
  "City" : "Sydney"
}
{
  "_id" : ObjectId("5f33cfac592962df72246aec"),
  "Name" : "Naseem A",
  "City" : "New Delhi"
}

Clearly, the pretty() method can be quite useful when you are looking at multiple or nested documents, as the output is more easily readable.

Activity 1.01: Setting Up a Movies Database

You are one of the founders of a company that builds software about movies from all over the world. Your team does not have much database administration skills and there is no budget to hire a database administrator. Your task is to provide a deployment strategy and basic database schema/structure and set up the movies database.

The following steps will help you complete the activity:

  1. Connect to your database.
  2. Create a movies database named moviesDB.
  3. Create a movies collection and insert the following sample data: https://packt.live/3lJXKuE.
    [
        {
            "title": "Rocky",
            "releaseDate": new Date("Dec 3, 1976"),
            "genre": "Action",
            "about": "A small-time boxer gets a supremely rare chance           to fight a heavy-  weight champion in a bout in           which he strives to go the distance for his self-respect.",
            "countries": ["USA"],
            "cast" : ["Sylvester Stallone","Talia Shire",          "Burt Young"],
            "writers" : ["Sylvester Stallone"],
            "directors" : ["John G. Avildsen"]
        },
        {
            "title": "Rambo 4",
            "releaseDate ": new Date("Jan 25, 2008"),
            "genre": "Action",
            "about": "In Thailand, John Rambo joins a group of           mercenaries to venture into war-torn Burma, and rescue           a group of Christian aid workers who were kidnapped           by the ruthless local infantry unit.",
            "countries": ["USA"],
            "cast" : [" Sylvester Stallone", "Julie Benz",           "Matthew Marsden"],
            "writers" : ["Art Monterastelli",          "Sylvester Stallone"],
            "directors" : ["Sylvester Stallone"]
        }
    ]
  4. Check whether the documents are inserted by fetching the documents.
  5. Create an awards collection with a few records using the following data:
    {
        "title": "Oscars",
        "year": "1976",
        "category": "Best Film",
        "nominees": ["Rocky","All The President's Men","Bound For       Glory","Network","Taxi Driver"],
        "winners" :
        [
            {
                "movie" : "Rocky"
            }
        ]
    }
    {
        "title": "Oscars",
        "year": "1976",
        "category": "Actor In A Leading Role",
        "nominees": ["PETER FINCH","ROBERT DE NIRO",      "GIANCARLO GIANNINI","WILLIAM  HOLDEN","SYLVESTER STALLONE"],
        "winners" :
        [
            {
                "actor" : "PETER FINCH",
                "movie" : "Network"
            }
        ]
    }
  6. Check whether your inserts have saved the documents in the collection as desired by fetching the documents.

    Note

    The solution for this activity can be found via this link.

Summary

We began this chapter by covering the fundamentals of data, databases, RDBMS, and NoSQL databases. You learned the differences between RDBMS and NoSQL databases, and how to decide which database is a good fit for a given scenario. You learned that MongoDB can be used as self-managed or as DbaaS, set up your account in MongoDB Atlas, and reviewed MongoDB deployment on different cloud platforms and how to estimate its cost. We concluded the chapter with the MongoDB structure and its basic components, such as databases, collections, and documents. In the next chapter, you will utilize these concepts to explore MongoDB components and its data model.

lock icon
The rest of the chapter is locked
You have been reading a chapter from
MongoDB Fundamentals
Published in: Dec 2020Publisher: PacktISBN-13: 9781839210648
Register for a free Packt account to unlock a world of extra content!
A free Packt account unlocks extra newsletters, articles, discounted offers, and much more. Start advancing your knowledge today.
undefined
Unlock this book and the full library FREE for 7 days
Get unlimited access to 7000+ expert-authored eBooks and videos courses covering every tech area you can think of
Renews at $15.99/month. Cancel anytime

Authors (4)

author image
Amit Phaltankar

Amit Phaltankar is a software developer and a blogger experienced in building lightweight and efficient software components. He specializes in wiring web-based applications and handling large-scale data sets using traditional SQL, NoSQL, and big data technologies. He is experienced in many technology stacks and loves learning and adapting to newer technology trends. Amit is passionate about improving his skill set and loves guiding and grooming his peers and contributing to blogs. He is also an author of MongoDB Fundamentals.
Read more about Amit Phaltankar

author image
Juned Ahsan

Juned Ahsan is a software professional with more than 14 years of experience. He has built software products and services for companies and clients such as Cisco, Nuamedia, IBM, Nokia, Telstra, Optus, Pizzahut, AT&T, Hughes, Altran, and others. Juned has a vast experience in building software products and architecting platforms of different sizes from scratch. He loves to help and mentor others and is a top 1% contributor on StackOverflow. He is passionate about cognitive CX, cloud computing, artificial intelligence, and NoSQL databases.
Read more about Juned Ahsan

author image
Michael Harrison

Michael Harrison started his career at the Australian telecommunications leader Telstra. He worked across their networks, big data, and automation teams. He is now a lead software developer and the founding member of Southbank Software, a Melbourne based startup that builds tools for the next generation of database technologies.
Read more about Michael Harrison

author image
Liviu Nedov

Liviu Nedov is a senior consultant with more than 20 years of experience in database technologies. He has provided professional and consulting services to customers in Australia and Europe. Throughout his career, he has designed and implemented large enterprise projects for customers like Wotif Group, Xstrata Copper/Glencore, and the University of Newcastle and Energy, Queensland. He is currently working at Data Intensity, which is the largest multi-cloud service provider for applications, databases, and business intelligence. In recent years, he is actively involved in MongoDB NoSQL database projects, database migrations, and cloud DBaaS (Database as a Service) projects.
Read more about Liviu Nedov