


Adding a custom error message to the Event Receiver
When we created our Event Receiver in the previous recipe, we saw that if we cancelled the insertion of an item into a list (due to a data validation error), an ugly error message appeared indicating that an Event Receiver had cancelled the request. It is difficult for users to comprehend this error message, it does not indicate that the error is due to data validation and that there is nothing wrong with SharePoint. In this recipe, we will customize this error message that indicates what the error is.
Getting ready
The solution from the previous recipe is used for further modifications. You should complete the previous recipe successfully to follow this one.
How to do it...
If you have closed your Visual Studio IDE, launch it now as an administrator and open the solution file that we created in the previous recipe.
Open EventReceiver1.cs and add the following two lines of code just before the properties.cancel = true line in the
workphoneregular expression match "if statement":string sErrMsg = "Business Phone is not in correct format"; properties.ErrorMessage = sErrMsg;
Do the same for the
Emailregular expression matchifstatement. YourItemAddingmethod should look like the following code bundle:public override void ItemAdding(SPItemEventProperties properties) { base.ItemAdding(properties); string sWorkPhone = properties.AfterProperties["WorkPhone"].ToString(); string sEmail = properties.AfterProperties["Email"].ToString(); if (!string.IsNullOrEmpty(sWorkPhone)) { if (!System.Text.RegularExpressions.Regex.IsMatch(sWorkPhone, @"^[01]?[- .]?(\([2-9]\d{2}\)|[2-9]\d{2})[- .]?\d{3}[- .]?\d{4}$")) { string sErrMsg = "Business Phone is not in correct format"; properties.ErrorMessage = sErrMsg; properties.Cancel = true; } } if (!string.IsNullOrEmpty(sEmail)) { if (!System.Text.RegularExpressions.Regex.IsMatch(sEmail, @"^(?("")("".+?""@)|(([0-9a-zA-Z]((\.(?!\.))|[-!#\$%&'\*\+/=\?\^`\{\}\|~\w])*)(?<=[0-9a-zA-Z])@))(?(\[)(\[(\d{1,3}\.){3}\d{1,3}\])|(([0-9a-zA-Z][-\w]*[0-9a-zA-Z]\.)+[a-zA-Z]{2,6}))$")) { string sErrMsg = "Email is not in correct format"; properties.ErrorMessage = sErrMsg; properties.Cancel = true; } } }When you build and run this solution, as done previously, you should be directed to the site that you provided in the solution creation wizard.
Enter a new contact with an improper phone format for the Business Phone field. You should see the same error screen as shown previously including a custom error message that you coded as shown here:

How it works...
The properties object that you use in the ItemAdding method has a property called Error Message. It is null by default. When SharePoint encounters a null value, it just uses the default error message. Adding a custom error message to this field will cause SharePoint to display your error message.
There's more...
If you want to just cancel the insertion of an item into the list to list without displaying the error page as done previously, just set the properties object's status property as shown in the following code. This will cancel the insert, but will not display the error page.
properties.Status = SPEventReceiverStatus.CancelNoError;
More information on SPEventReceiverStatus can be found on MSDN (http://msdn.microsoft.com/en-us/library/microsoft.sharepoint.speventreceiverstatus.aspx)
More information – How to get field names
In the
Event Receiver we have used field name WorkPhone for the Business Phone and Email for the Email Address fields. How did I figure these names? In Visual Studio 2010 there is a new tool called Add SharePoint Connection. You can access it from menu Tools | Add
SharePoint
Connection
It will ask the URL to connect. Provide URL information for your site and it will list all the information pertaining to your site in a tree structure. This information is read-only and you cannot make any changes through the IDE. You can navigate to the Contacts List and to the fields as shown here:
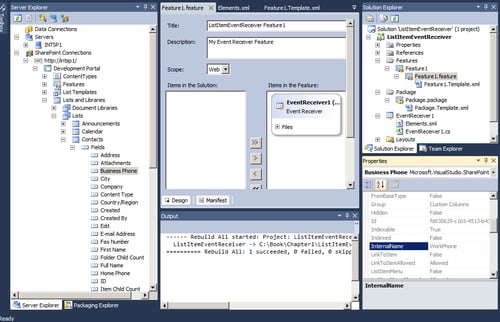
You
can select the Business Phone field and in the Properties window look for InternalName. This is the field name that we used in the code to get the values. Just go through the different properties of the field in the properties window, and you will find some interesting properties like Field ID which is a GUID, whether the field is hidden or not, and so on.
See also
Adding an Application Page to an Event Receiver recipe


