Business Rules are a Power User's dream come true. They minimize the amount of custom JavaScript required on forms and they can replace some simple calculation plugins when the rule is scoped at the entity level.
In this example, we will create a simple Business Rule to show and hide the Student Id attribute based on the contact types defined in the first recipe of this chapter.
Similar to the previous recipes, a System Customizer or higher security role is required to perform the configuration as well as a solution to contain the changes.
- Navigate to
Settings|Solutions|Packt. - Navigate to
Entities|Contact|Formsand open the previously createdContactform. - Double-click on
Contact Typeand uncheck theVisible by defaultcheckbox. - Click on
OK, then click onSave and Close. - Navigate to
Entities|Contact|Business Rulesand click onNew. - Under
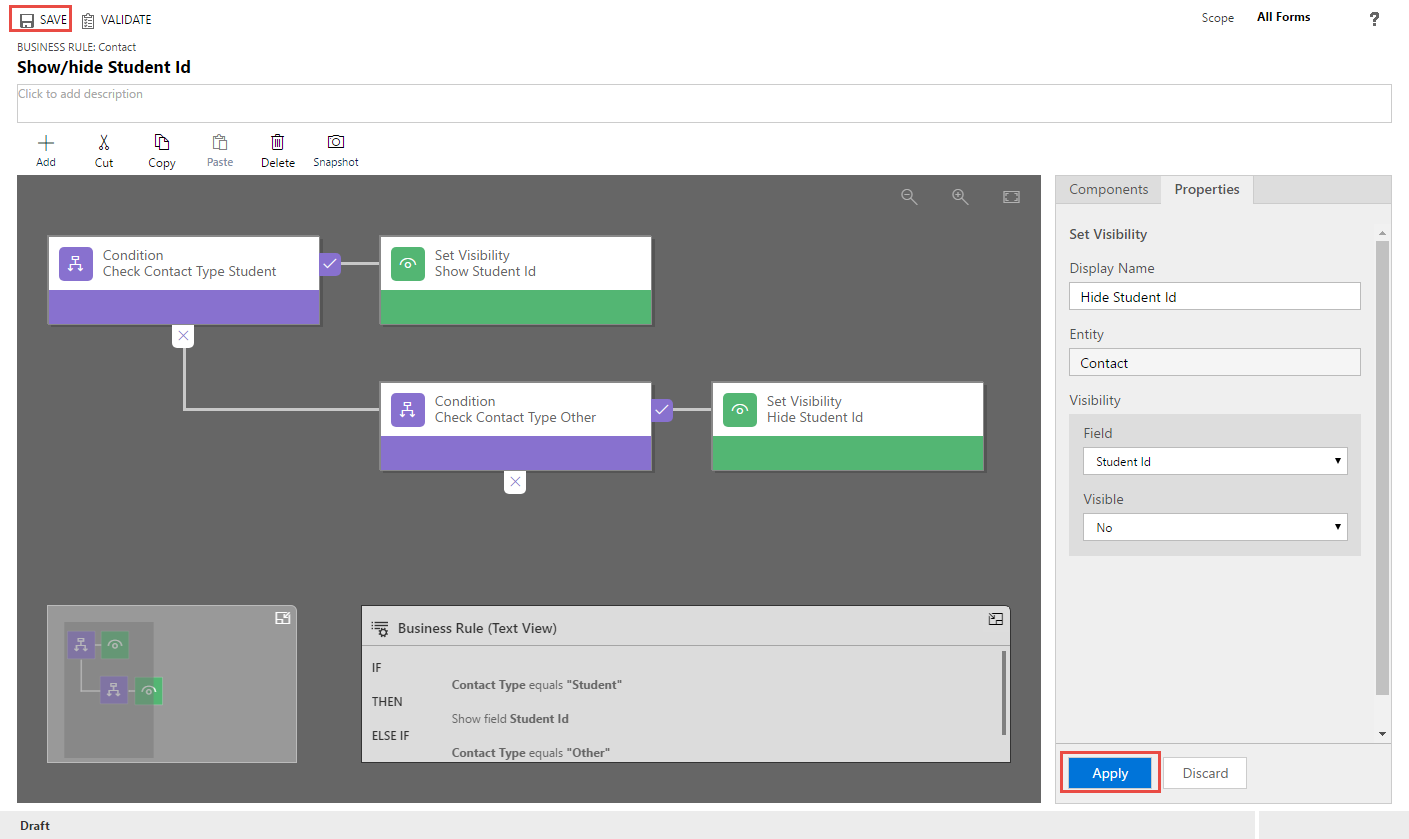
BUSINESS RULE: Contact, enter the title,Show/Hide Student Id. - Click on the first available
CONDITIONand enter the following details in the right pane:Display Name:Check Contact Type StudentSource:EntityField:Contact TypeOperator:EqualsType:ValueValue:Student
- Click on the
Applybutton. - Back in the main editor, click on
Add|Add Set Visiblyand select the + sign adjacent to the tick sign:

Enter the following details, followed by a click on Apply:
Display Name:Show Student IdField:Student IdStatus:Show field
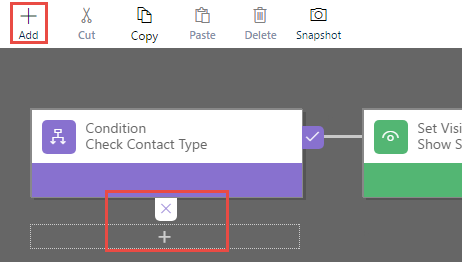
- Back in the main editor again, click on
Add|Add Conditionand select the+sign adjacent to theXsign:
Enter the following details:
Display Name:Check Contact Type OtherSource:EntityField:Contact TypeOperator:EqualsType:ValueValue:Other
- Click on
Apply.
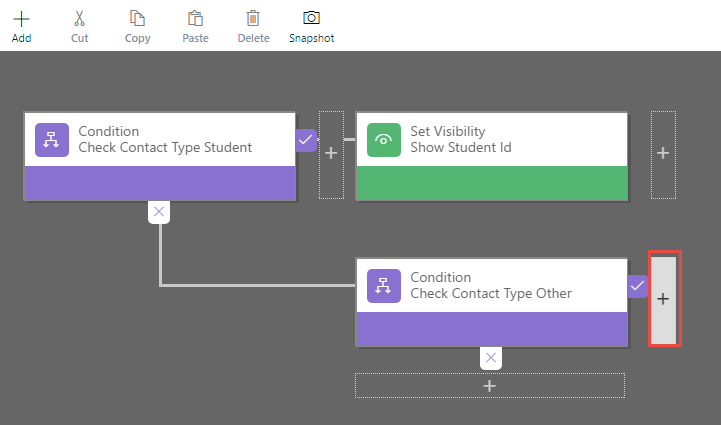
- Click on
Add action|Add Set Visibilityand select the+sign adjacent to the tick sign for the new condition:
Enter the following in the right-hand pane:
Display Name:Hide Student IdField:Student IdStatus:Hide field
- Click on
Applyin the right navigation pane, followed bySavein the main editor in the top left:
- Once saved, click on
Activateon the main editor followed byActivatein theProcess Activate Confirmationprompt:

- You can optionally click on the
VALIDATEbutton to ensure that your business rules do not have any issues.
We started by marking the field as hidden by default in step 3. As a best practice, it always makes for a better user experience when hidden fields are revealed, as opposed to hiding visible fields on loading a record. In step 7 and step 8, we created the condition and rule to show the field; in step 9 and step 10, we created the converse condition and rule to hide the field. Always think about the reverse scenario when implementing business rules, otherwise, you will be faced with an irreversible action.
Given that the scope of the business rule was set to the default All Forms (top-right corner when editing the business rule), all forms will now respect that rule. If the scope was set to Entity, the rule would also trigger on the server side, which could be useful if implementing calculation rules that need to be respected when manipulating the data outside of a form (for example editable grids, bulk import, or through the Web API or SDK):
Behind the scenes, JavaScript functionality is created to address the rules' requirements. This is also respected in all form factors following the configure once, deploy everywhere design pattern.
Business Rules also have limitations, as follows:
- There is a limit of 10
If Elseconditions per business rule - Business Rules cannot control sections and tabs
- If not set to a scope of Entity, a Business Rule will only run on load and on changes to the field, not on save.
- Conditions cannot be a mixture of AND and OR; it's a set of one or the other
For additional limitations, visit https://technet.microsoft.com/en-us/library/dn531086.
Business Rules provide a wide range of actions that can be performed. Among them are the following:
- Show error message
- Set field value (using another field's value, a static value, a formula, or simply clear it; it's good for simple plugin replacements)
- Set visibility
- Set default value
- Lock or unlock a field
The TechNet article (https://www.microsoft.com/en-us/Dynamics/crm-customer-center/create-business-rules-and-recommendations-to-apply-logic-in-a-form.aspx) covers more details about Business Rule.