Search icon
Arrow left icon
All Products
Best Sellers
New Releases
Books
Videos
Audiobooks
Learning Hub
Newsletters
Free Learning
Arrow right icon
Mastering Proxmox. - Second Edition

You're reading from  Mastering Proxmox. - Second Edition

Product type Book
Published in May 2016
Publisher Packt
ISBN-13 9781785888243
Pages 418 pages
Edition 2nd Edition
Languages
Author (1):
Wasim Ahmed Wasim Ahmed
Profile icon Wasim Ahmed

Table of Contents (21) Chapters

Mastering Proxmox - Second Edition
Credits
About the Author
About the Reviewer
www.PacktPub.com
Preface
1. Understanding Proxmox VE and Advanced Installation 2. Exploring the Proxmox GUI 3. Proxmox under the Hood 4. Storage Systems 5. KVM Virtual Machines 6. LXC Virtual Machines 7. Network of Virtual Networks 8. The Proxmox Firewall 9. Proxmox High Availability 10. Backup/Restore VMs 11. Updating and Upgrading Proxmox 12. Monitoring a Proxmox Cluster 13. Proxmox Production-Level Setup 14. Proxmox Troubleshooting Index

Chapter 5. KVM Virtual Machines

So far, we have familiarized ourselves with the Proxmox graphical user interface, configuration files, and directory structure. We have also learned about the different types of storage supported by Proxmox and how to integrate them in the cluster. In this chapter, we are going to take it one step further by looking at Kernel-based Virtual Machine (KVM) and all that it has to offer. We are going to cover the following topics:

  • Exploring KVM

  • Creating a KVM

  • Configuring a KVM

  • Migrating a KVM

  • Nested virtual environment

  • Proxmox backup/restore system

  • Virtual machine snapshots

Exploring a KVM


As the name implies, a KVM adds the hypervisor ability to a Linux kernel. KVM allows you to create fully isolated virtual machines while not being dependent on the host kernel. The isolation is created by emulating several pieces of hardware, such as CPU, RAM, Sound/Video/Network card, PCI bridges, and Keyboard/Mouse input devices. Since KVM is not dependent on the host kernel, it is able to virtualize a wide range of operating systems, such as Linux, BSD, Windows, OS X, and so on. One of the main differences between KVM and container-based virtual machines is that the allocated resources for KVM is isolated from each other and the host.

Thus, the density of the number of KVM VMs in a node is much lower than containers. KVM are the only choice for non-Linux operating systems and for purpose-built operating systems based on Linux, such as ClearOS, FreeNAS, Zentyal, and so on. For more information on KVM, refer to https://en.wikipedia.org/wiki/Kernel-based_Virtual_Machine.

Creating a KVM


In Proxmox, we can create a KVM VM in the following two ways:

  • From scratch

  • From a template

Creating a VM from scratch

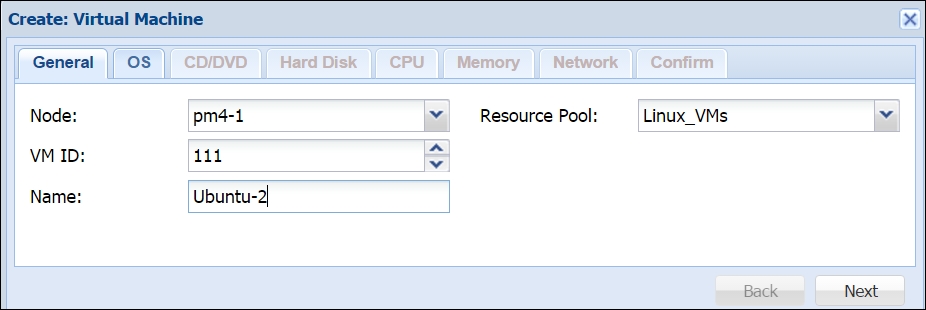
This process walks you through the entire virtual machine creation process using a tab-based dialog box. During the process, we have to assign resources and enter the necessary information pertaining to the VM. The following screenshot shows the dialog box after you click on Create VM in the Proxmox GUI:

General tab

The General tab of the dialog box is used to mainly assign identification information, such as:

  • Node: This is a drop-down list to select in which Proxmox node the VM should be created.

  • VM ID: This is the textbox used to enter the numeric ID of the VM. We can also increase or decrease the value of the VM ID using the arrows. If we assign an ID that already exists in the cluster, the box will have a red border around it, as shown in the following screenshot:

  • Name : This is the text box used to enter the name of the VM. We can enter any alphanumeric string...

Advanced configuration options for VM


We will now look at some of the advanced configuration options we can use to extend the capability of KVM virtual machines.

Configuring a sound device

In this section we are going to see how to add sound support to a VM. Proxmox by default does not add audio hardware to a VM. In order for the VM operating system to start a sound service, some arguments must be added to the VM configuration file through CLI. As of Proxmox VE 4.1 it is not possible to add a sound interface through the GUI. The following steps will add a sound device to a VM:

  1. Log in to the Proxmox node through SSH or directly in the console.

  2. Navigate to the VM configuration directory /etc/pve/nodes/<node_name>/qemu-server/<vm_id>.conf.

  3. Open the VM configuration file with your favorite text editor and add on of the the following arguments:

    For Windows 10 and later VMs:

    args: -device intel-had,id=sound5,bus=pci.0,addr=0x18 –device hda-micro,id=sound5-codec0,bus=sound5.0,cad=0 –device...

Migrating a KVM


Proxmox Migration allows a KVM virtual machine to be moved to a Proxmox node in both offline and online or live modes. The most common scenario of VM migration is when a Proxmox node needs a reboot due to a major kernel update or other patches. Other scenarios may include hardware failures, node replacement, software issues, and so on. Without the live migration option, each reboot would be very difficult for an administrator as all the running VMs would have to be stopped first before reboot occurs. This will cause major downtime in a mission-critical virtual environment.

With the live migration option, a running VM can be moved to another node without downtime. During a live migration, the VM does not experience any major slowdown. After the node reboots, simply migrate the VMs back to the original node. Any offline VMs can also be moved with ease.

Proxmox takes a very minimalistic approach to the migration process. Right click on the VM to be migrated to open the context...

Nested virtual cluster


It is possible to create a virtual cluster using the Proxmox hypervisor on top of an existing Proxmox cluster. Due to the performance drop with a nested hypervisor, the use cases of nested clusters are very limited. It can be used in the following scenarios, but is not limited to these scenarios:

  • Practice cluster in a classroom.

  • Test cluster to test latest software releases before applying to a real environment.

  • Proof of concept cluster to test new configuration ideas.

In this section we are going to see how to enable the nesting feature in Proxmox. Plan ahead if a nested virtual cluster is going to be used on a physical Proxmox cluster. There must be adequate resources, such as CPU and memory available, to support the actual and virtual nested cluster.

In order to have close to native performance of a hypervisor, the virtual machines must have access to some hardware features that leverage virtualization. These features are known as Hardware Assisted Virtualization Extension...

Summary


In this chapter we looked at KVM Virtual Machines, how to create them, clone them, and migrate them when need. We also looked at some advanced configuration such as adding a sound device and enabling pci/gpu passthrough for KVM VMs. By leveraging cloning techniques we can scale a virtual cluster effortlessly when deploying identical virtual machines. Optional and non-production setup of a Nested Virtual Environment was also explained.

KVM virtual machine are a best practice for all non-Linux operating systems and also when total resource isolation between VMs is mandatory.

In the next chapter we are going to look at LXC containers in greater detail. We will learn why a Proxmox administrator would choose them over KVM Virtual Machines.

lock icon The rest of the chapter is locked
You have been reading a chapter from
Mastering Proxmox. - Second Edition
Published in: May 2016 Publisher: Packt ISBN-13: 9781785888243
Register for a free Packt account to unlock a world of extra content!
A free Packt account unlocks extra newsletters, articles, discounted offers, and much more. Start advancing your knowledge today.
Unlock this book and the full library FREE for 7 days
Get unlimited access to 7000+ expert-authored eBooks and videos courses covering every tech area you can think of
Renews at $15.99/month. Cancel anytime}