Search icon
Arrow left icon
All Products
Best Sellers
New Releases
Books
Videos
Audiobooks
Learning Hub
Newsletters
Free Learning
Arrow right icon
Learning WebRTC

You're reading from  Learning WebRTC

Product type Book
Published in Jun 2015
Publisher
ISBN-13 9781783983667
Pages 186 pages
Edition 1st Edition
Languages
Author (1):
Daniel M. Ristic Daniel M. Ristic
Profile icon Daniel M. Ristic

Table of Contents (16) Chapters

Learning WebRTC
Credits
About the Author
About the Reviewers
www.PacktPub.com
Preface
1. Getting Started with WebRTC 2. Getting the User's Media 3. Creating a Basic WebRTC Application 4. Creating a Signaling Server 5. Connecting Clients Together 6. Sending Data with WebRTC 7. File Sharing 8. Advanced Security and Large-scale Optimization Answers to Self-test Questions Index

Chapter 5. Connecting Clients Together

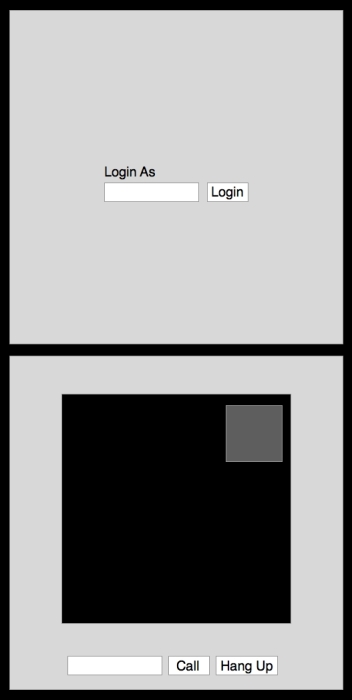
Now that we have implemented our own signaling server, it is time to build an application to utilize its power. In this chapter, we are going to build a client application that allows two users on separate machines to connect and communicate in real time using WebRTC. By the end of this chapter, we will have a well-designed working example of what most WebRTC applications function like.

In this chapter, we will cover the following topics:

  • Getting a connection to our server from a client

  • Identifying users on each end of the connection

  • Initiating a call between two remote users

  • Hanging up a finished call

If you have not already completed Chapter 4, Creating a Signaling Server, now is a great time to go back and do so. This chapter is built upon the server which we built in that chapter, so you will have to know how to set up and run the server locally on your computer.

The client application


The goal of the client application is to enable two users to connect and communicate with each other from different locations. This is often seen as the hello world of WebRTC applications, and many examples of this type of application can be seen around the Web and at WebRTC-based conferences and events. Chances are you have used something much similar before to what we will build in this chapter.

Our application will have two pages in it: one for selecting a username and the other for calling another user. Keep in mind that the page itself will be extremely simplistic in nature. We will mostly be focusing on how to build the actual WebRTC functionality. We will now look at the initial wireframe mock-ups to be used as a guideline before building the application.

You can say that it is not a complex application by any means. The two pages will be the div tags that we will switch out using JavaScript. Also, most input is done through simple event handlers. If you have...

Setting up the page


To start, we need to create a basic HTML page. The following is the boilerplate code used to give us something to work from. Copy this code into your own index.html document:

<!DOCTYPE html>
<html lang="en">
  <head>
    <meta charset="utf-8" />

    <title>Learning WebRTC - Chapter 5: Connecting Clients Together</title>

    <style>
      body {
        background-color: #3D6DF2;
        margin-top: 15px;
        font-family: sans-serif;
        color: white;
      }

      video {
        background: black;
        border: 1px solid gray;
      }

      .page {
        position: relative;
        display: block;
        margin: 0 auto;
        width: 500px;
        height: 500px;
      }

      #yours {
        width: 150px;
        height: 150px;
        position: absolute;
        top: 15px;
        right: 15px;
      }

      #theirs {
        width: 500px;
        height: 500px;
      }
    </style>
  </head>...

Getting a connection


The first thing we will do is establish a connection with our signaling server. The signaling server that we built in Chapter 4, Creating a Signaling Server, is entirely based on the WebSocket protocol. The great thing about the technology that we built on top of is that it requires no extra libraries to connect to the server. It simply uses the built-in power of WebSocket in most up-to-date browsers today. We can just create a WebSocket object directly, and connect to our server in no time at all.

Tip

The other wonderful thing about using WebSockets is that the standard is much further along in the process. On most browsers today, there are no checks or prefixes needed and it should be readily available. As always, however, check the latest documentation for your browser.

We can start by creating the client.js file that our HTML page includes. You can add the following connection code:

var name,
    connectedUser;

var connection = new WebSocket('ws://localhost:8888');...

Logging in to the application


The first interaction with the server is to log in with a unique username. This is to identify ourselves as well as give other users a unique identifier to call us by. To do this, we simply send a name to the server, which will then tell us if the username has been taken or not. In our application, we will let the user select any name they would like.

To implement this, we need to add a bit of functionality to our application's script file. You can add the following to your JavaScript:

var loginPage = document.querySelector('#login-page'),
    usernameInput = document.querySelector('#username'),
    loginButton = document.querySelector('#login'),
    callPage = document.querySelector('#call-page'),
    theirUsernameInput = document.querySelector('#their username'),
    callButton = document.querySelector('#call'),
    hangUpButton = document.querySelector('#hang-up');

callPage.style.display = "none";

// Login when the user clicks the button
loginButton.addEventListener...

Initiating a call


Now that we have set everything up properly, we are ready to initiate a call with a remote user. Sending the offer to another user starts all this. Once a user gets the offer, he/she will create a response and start trading ICE candidates, until he/she successfully connects. This process is exactly the same as mentioned in Chapter 3, Creating a Basic WebRTC Application, except for the fact that it is now being done remotely over our signaling server. To accomplish this, we add the following code to our script:

callButton.addEventListener("click", function () {
  var theirUsername = theirUsernameInput.value;

  if (theirUsername.length > 0) {
    startPeerConnection(theirUsername);
  }
});

function startPeerConnection(user) {
  connectedUser = user;

  // Begin the offer
  yourConnection.createOffer(function (offer) {
    send({
      type: "offer",
      offer: offer
    });
    yourConnection.setLocalDescription(offer);
  }, function (error) {
    alert("An error has...

Hanging up a call


The last feature we will implement is the ability to hang up an in-progress call. This will notify the other user of our intention to close the call and stop transmitting information. It will take just a few additional lines to our JavaScript:

hangUpButton.addEventListener("click", function () {
  send({
    type: "leave"
  });

  onLeave();
});

function onLeave() {
  connectedUser = null;
  theirVideo.src = null;
  yourConnection.close();
  yourConnection.onicecandidate = null;
  yourConnection.onaddstream = null;
  setupPeerConnection(stream);
};

When the user clicks on the Hang Up button, it will send a message to the other user and destroy the connection locally. There are a few things required to successfully destroy the connection and also allow another call to be made in the future:

  1. First off, we need to notify our server that we are no longer communicating.

  2. Secondly, we need to tell RTCPeerConnection to close, and this will stop transmitting our stream data to the...

A complete WebRTC client


The following is the entire JavaScript code used in our client application. This includes all the code to hook up the UI, connect to the signaling server, and initiate a WebRTC connection with another user:

var connection = new WebSocket('ws://localhost:8888'),
    name = "";

var loginPage = document.querySelector('#login-page'),
    usernameInput = document.querySelector('#username'),
    loginButton = document.querySelector('#login'),
    callPage = document.querySelector('#call-page'),
    theirUsernameInput = document.querySelector('#their- username'),
    callButton = document.querySelector('#call'),
    hangUpButton = document.querySelector('#hang-up');

callPage.style.display = "none";

// Login when the user clicks the button
loginButton.addEventListener("click", function (event) {
  name = usernameInput.value;

  if (name.length > 0) {
    send({
      type: "login",
      name: name
    });
  }
});

connection.onopen = function () {
  console.log("Connected...

Improving the application


What we have built over the course of this chapter is an adequate place to jump off into bigger and better things. It provides a baseline of features that almost every peer-to-peer communication application needs. From here, it is a matter of adding on common web application features to enhance the experience.

The login experience is one place to start improving the experience. There are a number of well-built services to enable user identification through common platforms like Facebook and Google. Integration with either of these APIs is easy and straightforward, and provides a great way to ensure that each user is unique. They also provide friend list capabilities so that the user has a list of people to call even if it is his/her first time using the application.

On top of this, the application will need to be foolproof to ensure the best possible experience. User input should be checked at each part of the way by both the client and server. Also, there are several...

Self-test questions


Q1. Creating a WebSocket connection in most browsers requires the installation of several frameworks to get working properly. True or false?

Q2. Which technology or technologies does the user's browser need to support to successfully run the example created in this chapter?

  1. WebRTC

  2. WebSockets

  3. Media Capture and Streams

  4. All of the above

Q3. The application allows for more than two users to connect with each other in a video call. True or false?

Q4. The best way to make our application more stable, resulting in fewer errors when trying to establish a call, is to add:

  1. More CSS styles

  2. Facebook login integration

  3. More error checking and validation along every step of the way

  4. Really cool looking animations

Summary


After completing this chapter, you should take a step back and congratulate yourself for making it this far. Over the course of this chapter, we have brought the entire first half of the book into perspective with a full-fledged WebRTC application. With how complex peer-to-peer connections can be, it is amazing that we have been able to make one successfully in just five short chapters. You can now put down that chat client and use your own hand-built solution for communicating with people all over the world!

Now you should have a grasp on the overall architecture of any WebRTC application. We have covered the implementation of not only the client, but also the supporting signaling server. We have even integrated other HTML5 technologies, such as WebSockets, to help us in making a remote peer-to-peer connection.

If there was any point where you can take a break and put down this book, now would be the time. This application is a jumping off point to start prototyping your own WebRTC...

lock icon The rest of the chapter is locked
You have been reading a chapter from
Learning WebRTC
Published in: Jun 2015 Publisher: ISBN-13: 9781783983667
Register for a free Packt account to unlock a world of extra content!
A free Packt account unlocks extra newsletters, articles, discounted offers, and much more. Start advancing your knowledge today.
Unlock this book and the full library FREE for 7 days
Get unlimited access to 7000+ expert-authored eBooks and videos courses covering every tech area you can think of
Renews at $15.99/month. Cancel anytime}