


Adding materials, lights, and shadows
Adding new materials and lights in Three.js is very simple and is done in pretty much the same way as we explained in the previous section. We start by adding a light source to the scene (for the complete source look at 03-materials-light.html), as follows:
  var spotLight = new THREE.SpotLight( 0xffffff );
  spotLight.position.set( -40, 60, -10 );
  scene.add( spotLight );
THREE.SpotLight illuminates our scene from its position (spotLight.position.set( -40, 60, -10 )). If we render the scene this time, however, you won't see any difference from the previous one. The reason is that different materials respond differently to light. The basic material we used in the previous example (THREE.MeshBasicMaterial) doesn't do anything with the light sources in the scene. They just render the object in the specified color. So, we have to change the materials for plane, sphere, and cube to the following:
var planeGeometry = new THREE.PlaneGeometry(60,20);
var planeMaterial = new THREE.MeshLambertMaterial({color: 0xffffff});
var plane = new THREE.Mesh(planeGeometry, planeMaterial);
...
var cubeGeometry = new THREE.BoxGeometry(4,4,4);
var cubeMaterial = new THREE.MeshLambertMaterial({color: 0xff0000});
var cube = new THREE.Mesh(cubeGeometry, cubeMaterial);
...
var sphereGeometry = new THREE.SphereGeometry(4,20,20);
var sphereMaterial = new THREE.MeshLambertMaterial({color: 0x7777ff});
var sphere = new THREE.Mesh(sphereGeometry, sphereMaterial);
In this piece of code, we changed the materials for our objects to MeshLambertMaterial. This material and MeshPhongMaterial are the materials Three.js provides that take light sources into account when rendered.
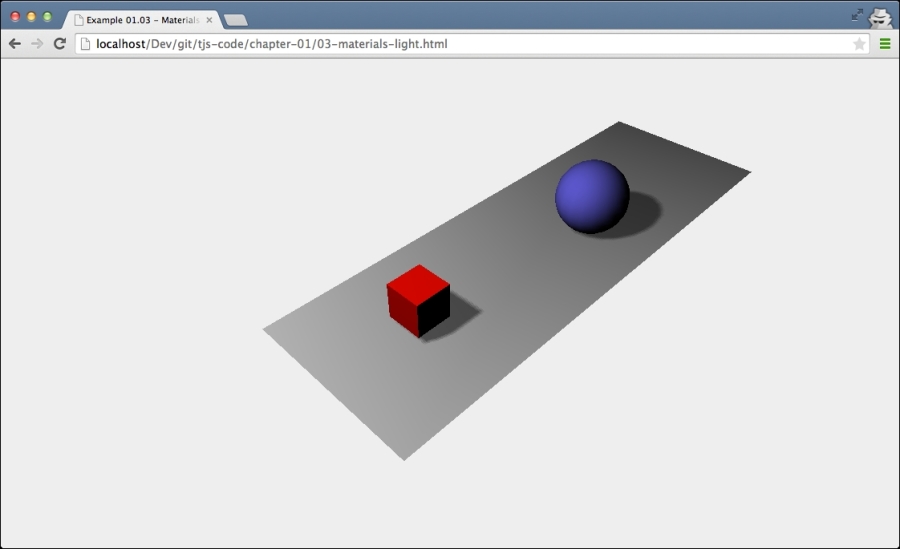
The result, shown in the following screenshot, however, still isn't what we're looking for:

We're getting there, and cube and sphere are looking a lot better. What is still missing, though, are the shadows.
Rendering shadows takes a lot of computing power, and for that reason, shadows are disabled by default in Three.js. Enabling them, though, is very easy. For shadows, we have to change the source in a couple of places, as follows:
renderer.setClearColor(new THREE.Color(0xEEEEEE, 1.0));
renderer.setSize(window.innerWidth, window.innerHeight);
renderer.shadowMapEnabled = true;
The first change we need to make is tell renderer that we want shadows. You do this by setting the shadowMapEnabled property to true. If you look at the result from this change, you won't notice anything different yet. That is because we need to explicitly define which objects cast shadows and which objects receive shadows. In our example, we want the sphere and the cube to cast shadows on the ground plane. You do this by setting the corresponding properties on those objects:
plane.receiveShadow = true;
...
cube.castShadow = true;
...
sphere.castShadow = true;
Now, there is just one more thing to do to get the shadows. We need to define which light sources in our scene will cause shadows. Not all the lights can cast shadows, and you'll learn more about that in the next chapter, but THREE.SpotLight, which we used in this example, can. We only need to set the correct property, as shown in the following line of code, and the shadows will finally be rendered:
spotLight.castShadow = true;
And with this, we get a scene complete with shadows from our light source, as follows:
The last feature that we'll add to this first scene is some simple animation. In Chapter 9, Animations and Moving the Camera, you'll learn more advanced animation options.


