


We have already discussed the configuration, compiling, and installation of BusyBox; it's time to talk about its usage on embedded platforms, and then for system optimization.
Android is the most popular embedded Linux system, and our book uses it as the experiment platform. To simplify building the experiment environment, the open source and free Android emulator is used instead of the real Android devices throughout the whole book. As a prerequisite, a virtual Android device will be created in this recipe.
Compare to real Android devices, such as the Raspberry Pi board or an Android smartphone or tablet, the virtual Android device created by Android emulator is cheaper. Android emulator is free to download and it is already rooted (with root permission for using without any limitation). Of course, because it is software emulated, it may be slower (if your development system has a low-end hardware configuration).
If you want to perform the following experiments on a real Android device, please make sure the device is rooted; otherwise, some exercises may fail due to permission limitations. The rooting method is out of the scope of this book; please contact your product maker for the same.
To create a virtual Android device, the Android emulator and the related Android SDK Manager should be installed first. ADT (Android Development Tools) provides these tools; we can get it from http://developer.android.com/sdk/index.html.
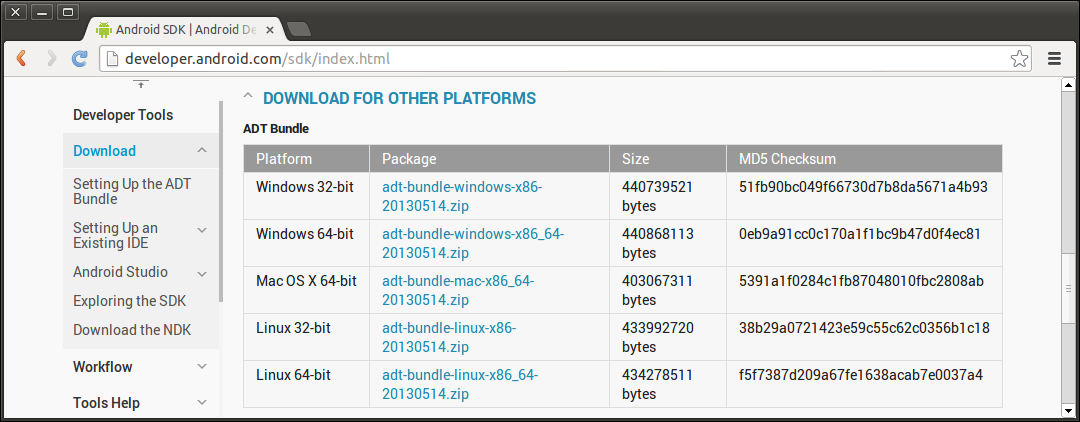
Download and use adt-bundle-linux-x86_64-20130514.zip for our x86-64 desktop development system. For other architectures, please download the proper version.
$ wget http://dl.google.com/android/adt/adt-bundle-linux-x86_64-20130522.zip
$ sudo unzip adt-bundle-linux-x86_64-20130514.zip -d /usr/local/
$ sudo mv /usr/local/adt-bundle-linux-x86_64-20130514 /usr/local/adt-bundle-linux
The tools required are installed at /usr/local/adt-bundle-linux/sdk/. Set the PATH variable in the shell startup script as before to set them permanently, so that they are easy to use:
$ echo "export SDK_ROOT=/usr/local/adt-bundle-linux/sdk/" >> ~/.bashrc
$ echo "export PATH=\$SDK_ROOT/tools/:\$PATH" >> ~/.bashrc
$ echo "export PATH=\$SDK_ROOT/platform-tools/:\$PATH" >> ~/.bashrc
$ source ~/.bashrc
With these settings, the tools like android, emulator, and adb are installed.
We use a virtual Nexus 7 device as our emulated experiment platform; its CPU is ARM with armeabi-v7a ABI (Application Binary Interface), and runs Android 4.2 with API (Application Program Interface) level 17.
Create a virtual Android device with Android AVD Manager. Android allows us to quickly create an AVD (Android Virtual Device). Let's create one named
busybox-avd; first, launch the AVD manager interface with the following command:$ android avdClick on the New button; start the configure interface and name it
busybox-avd; choose Nexus 7 as the device name, and configure it as follows:
Click OK to finish creation.
Launch the virtual Android device with emulator.
Start the AVD manager using
android avd; choose the just created AVD and click on Start; choose Scale display to real size, and click on Launch to start it. After a while, the typical Android UI will be displayed.It can also be started with the following command line:
$ emulator @busybox-avd -scale auto
-scale auto lets the emulator scale the windows to the real size of the virtual device.
Google Android emulator, being based on QEMU, is an open source and free Bare Metal emulator. That is, it simulates the actual machine instruction set of the target system. This makes for a very accurate simulation, but it may be slow.
In reality, emulator is a wrapper and enhancement of QEMU. It adds the Goldfish platform emulation and adds some Android-specific features. It can be used to do most of the Android system development.
Just as the real Android smartphone or tablet, the virtual Android device just created supplies with some development features, such as Android Debug Bridge (ADB) and the virtual serial-port-based shell environment.
Android Debug Bridge (adb): This is a powerful tool that can transmit files between the development system and the target Android system (including our virtual Android device); it can also start a shell and run commands on the device and so forth.
Use the
adb devicescommand to check if the virtual Android device is connected, as follows:$ adb devices List of devices attached emulator-5554 device
The system setting of the USB debugging option should be enabled for this feature.
We can also use it to transfer files; for example, download a prebuilt BusyBox for ARM and push it to the
/datadirectory of the target Android device (/datastores the data of Android applications). In our example, we will download the one suffixed witharmv7lfor our virtual Android deviceABI: armeabi-v7a.$ wget http://busybox.net/downloads/binaries/latest/busybox-armv7l $ adb push busybox-armv7l /data/busybox
Log in to Android from our development system, and experiment with our BusyBox on the Android device.
$ adb shell
root@android:/ # chmod 755 /data/busybox
root@android:/ # /data/busybox echo "Hello, Android."
Hello, Android.
The previous command lines log in to the Android shell with
adb. Use thechmodcommand to make sure/data/busyboxis executable. Finally, run theechoapplet of BusyBox on Android.adbalso supports multiple devices; if many AVDs are connected together, the AVD can be specified via the serial number with the-scommand, for example:$ adb -s emulator-5554 shellSerial port debugging: To interact with the target system at the early development stage or to verify the low-level Linux drivers, we need another debugging tool, Serial port. This should be your first choice for debugging a just-launched embedded device or the last resort for tracking system statuses when the system is highly unstable.
The Android emulator supports the virtual serial port; to start AVD with the virtual serial port and Linux kernel log output, append the
-shell -show-kernelcommand:$ emulator @busybox-avd -scale auto -shell -show-kernel shell@android:/ echo $SHELL /system/bin/sh shell@android:/
Note that the virtual serial port and Linux kernel log output belong to the Android system running on the Android emulator, not our development system.
The previous
-shellcommand starts a console with a serial port, and-show-kernelenables Linux kernel log output. As we can see, a console is linked with the virtual serial port, and the default shell is/system/bin/sh.If you only want to perform Linux kernel hacking, the
-no-windowcommand can be added to disable the graphic UI as follows:$ emulator @busybox-avd -no-window -show-kernel -shell


