


Quick start – creating a Camel application
Here, we are going to develop a Camel application that integrates e-mails, filesystem operations, and web services as means of communication.
As we have our project set up, we will go ahead and add a few dependencies. First, we will add slf4j-simple to the project dependencies so we can see what's going on in the console.
<dependency>
    <groupId>org.slf4j</groupId>
    <artifactId>slf4j-simple</artifactId>
    <version>1.7.2</version>
</dependency>
Then, we will add the following code to the file src/main/java/com/company/cuscom/App.java:
package com.company.cuscom;

import org.apache.camel.CamelContext;
import org.apache.camel.builder.RouteBuilder;
import org.apache.camel.impl.DefaultCamelContext;

public class App {
    public static void main(String[] args) throws Exception {
        CamelContext ctx = new DefaultCamelContext();
        ctx.addRoutes(new RouteBuilder() {
            @Override
            public void configure() throws Exception {
                from("direct:start")
                        .to("log:end?level=INFO");
            }
        });
        ctx.start();
        ctx.createProducerTemplate().sendBody("direct:start", "Hello, world! ");
        ctx.stop();
    }
}
Now, we should be able to run our Java application with the main class com.company.cuscom.App in the IDE or using the following command line:
% mvn -q compile exec:java -Dexec.mainClass="com.company.cuscom.App"
What happens is that Maven will download all the necessary dependencies, then build the application, and then it will run the App class as shown in the following screenshot:
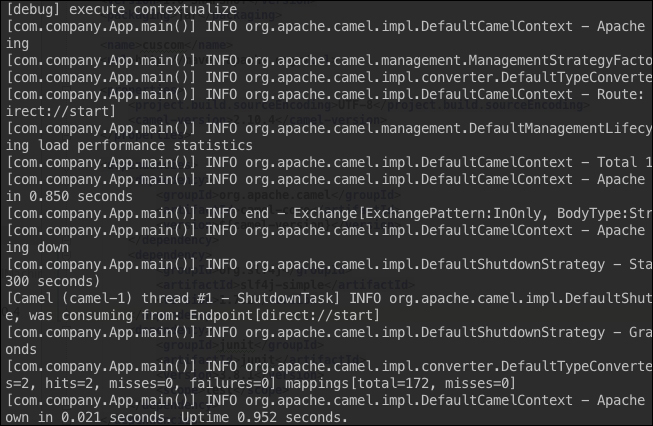
The lines present in the preceding screenshot show what is going on inside our Camel application. Among other things, you might see the following line:
INFO end - Exchange[ExchangePattern:InOnly, BodyType:String, Body:Hello, world!l]
That is our message going through the Apache Camel routing engine.
So, let's go over the application and see what is going on. It is a typical Java application and we start it using the main method. In the first line, we create a Camel context:
CamelContext ctx = new DefaultCamelContext();
CamelContext is the central object of the whole Camel application. It holds information about routes, environment configuration, processors, endpoints, and so on. We will describe CamelContext in detail later, but, as of now, you can see from the console output that CamelContext is running in its own threads and has a JMX instrumentation enabled. Most importantly, CamelContext contains information about routes, which we are adding in the next lines.
We added routes using the ctx.addRoutes method. We added a route using RouteBuilder. The abstract class RouteBuilder allows us to use Java DSL (which we will cover later when specifying domain specific languages) to construct routes. That is what we do in the overridden configure method. We used methods from(…) and to(…) of the RouteBuilder class and, as their names suggest, these methods would create a route that starts at direct:start and ends at log:end?level=INFO. The names would tell Apache Camel to create two endpoints and direct: and log: tell Apache Camel what the types of these endpoints should be or what kind of components leverage those endpoints. One would be a DirectComponent object that synchronously passes the message to the connected consumers in the same CamelContext. The other is a component that is connected to the logging system; it will send the message to the logging mechanism whether it is log4j, java.util.logging, or something else.
Then, we started a routing and mediating engine ctx.start() from the main thread. Apache Camel will start its own thread pool.
One of the ways to send a message to Apache Camel is through ProducerTemplate. This is an interface to invoke a producing endpoint to emit a message. We call createProducerTemplate on the Camel context we use to create a ProducerTemplate that provides multiple different ways to create and send messages.
Then, we create a simple message with just a body Hello, Camel! and send it from direct:start endpoint:
ctx.createProducerTemplate().sendBody("direct:start", "Hello, world! ");At the end of the program, we stop CamelContext with ctx.stop().
All this is pretty simple and self-contained. However, the application will finish its execution right after following all the instructions in the main() method. If we want to have our Apache Camel application running like a server—receiving, routing, and sending messages—we should use support classes that come with Apache Camel.
We will jump to it right after we introduce some concepts and terms that we will use throughout the book.


