Now, let's send the same data to the internet. The first thing to do is to create an account on http://thingspeak.com and set up a channel. Each channel has eight fields that you can use to store the data transmitted by ESP8266.
As a free account, you need not send data more often than three times per minute. The advantage is that your data is stored on their server and you can see them on a nice graphic or embed them as an IFRAME in another web server.
In Channel Settings, create one field and name it Light, then go to the API key tab and get Write API KEY. Here, you can also define a read APY KEY if you have an application that wants to read data written by other modules. It is a rudimentary way of sharing data between modules.
Since the Witty module has the LDR, let's use it to log the data every minute on api.thingspeak.com:
#include <ESP8266WiFi.h>

const char* WIFI_SSID     = "YOUR_WIFI_SSID";
const char* WIFI_PASSWORD = "YOUR WIFI_PASSWORD";
const char* host = "api.thingspeak.com";
const char* writeAPIKey = "YOUR_WRITE_API_KEY";

#define LDR     A0
In the setup() function, which is executed once, the LDR pin is set as an INPUT pin and will connect the ESP8266 to the Wi-Fi network with the WiFi.begin(WIFI_SSID, WIFI_PASSWORD) function:
void setup()
{
Serial.begin(115200);
delay(10);
pinMode(LDR, INPUT);
WiFi.begin(WIFI_SSID, WIFI_PASSWORD);
delay(20);
Serial.print("Connecting to ");
Serial.println(WIFI_SSID);
while (WiFi.status() != WL_CONNECTED) {
delay(500);
Serial.print(".");
  }
Serial.println("");
Serial.println("WiFi connected!");
Serial.println();
}
In the loop() function every minute the light intensity will be read from the LDR sensor and post it on the Light field on a channel from https://thingspeak.com/:
void loop()
{
if ((millis() % (60 * 1000)) == 0) {
// make TCP connections
WiFiClient client;
const int httpPort = 80;
if (!client.connect(host, httpPort)) {
return;
}
String url = "/update?key=";
url+=writeAPIKey;
url+="&field1=";
url+=String(analogRead(LDR));
url+="\r\n";
Serial.println(url);
// Request to the server
client.print(String("GET ") + url + " HTTP/1.1\r\n" +
"Host: " + host + "\r\n" +
"Connection: close\r\n\r\n");
}
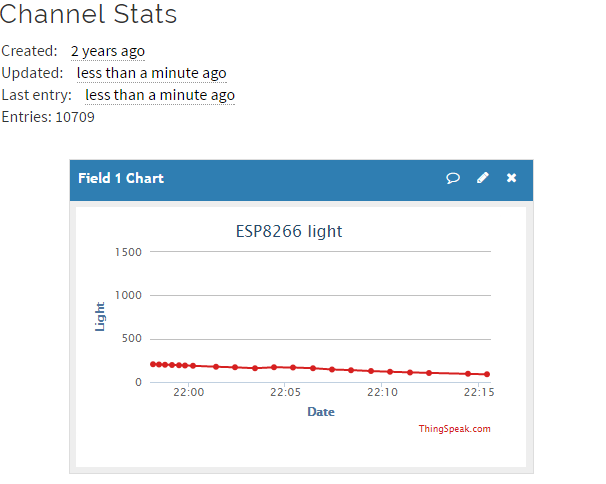
} Let's see how the data looks after a few minutes:
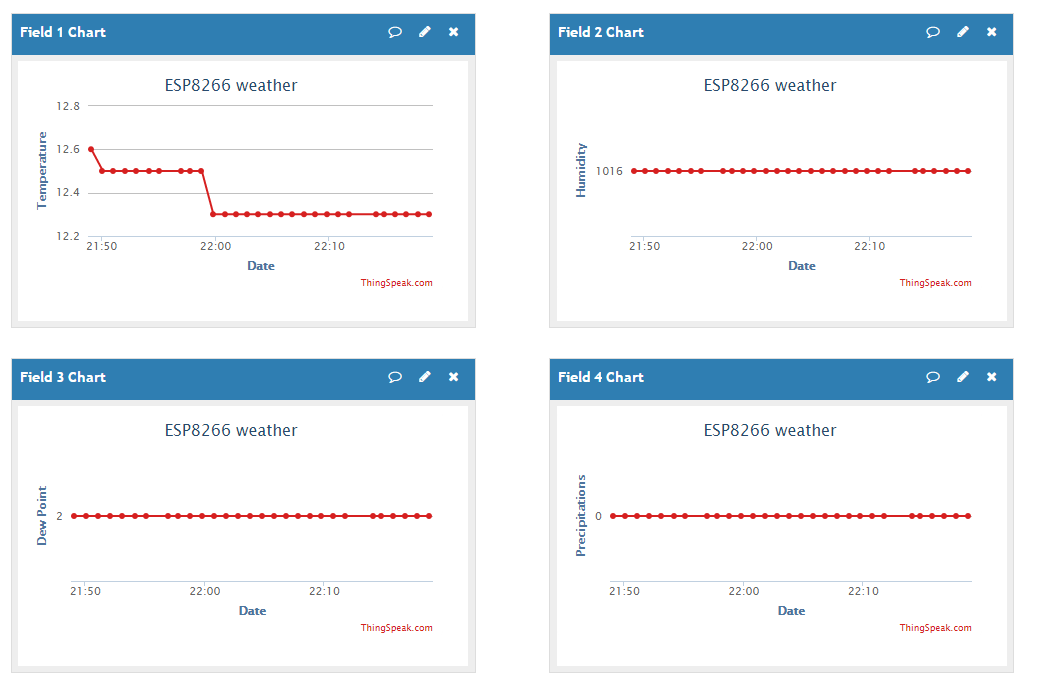
Now, let's combine the sketches that read the weather from wunderground.com and this one that sends data to thingspeak.com. It will take the temperature, humidity, dew point, and precipitation and it will store them on thinkspeak.com so that later we can import them. Basically, this will be a weather logger:
#include <ESP8266WiFi.h>
#include <JsonListener.h>
#include "WundergroundClient.h"
The following are the Wunderground settings:
const String  WUNDERGRROUND_API_KEY = "58dfbeb30d02af26";
const Boolean IS_METRIC = true;
WundergroundClient weather_data(IS_METRIC);
const char* WIFI_SSID     = "YOUR_WIFI_SSID";
const char* WIFI_PASSWORD = "YOUR_WIFI_PASSWORD";
const String WUNDERGROUND_LANGUAGE = "EN";
const String WUNDERGROUND_COUNTRY = "NL";
const String WUNDERGROUND_CITY = "Eindhoven";
const char* host = "api.thingspeak.com";
const char* writeAPIKey = "YOUR_WRITE_API_KEY";
WiFiClient wifiClient
The following is the setup() function to connect to the Wi-Fi network:
void setup() {

Serial.begin(115200);
delay(10);

WiFi.begin(WIFI_SSID, WIFI_PASSWORD);
delay(20);
Serial.print("Connecting to ");
Serial.println(WIFI_SSID);
while (WiFi.status() != WL_CONNECTED) {
delay(500);
Serial.print(".");
  }
Serial.println("");
Serial.println("WiFi connected!");
Serial.println();
}
In the loop() function, every minute weather data will be retrieved from wunderground.com and it will post it to thingspeak.com. Along with the temperature, pressure, precipitation and dew point more information will be printed in the serial output like moon phase, sunrise or sunset, information that can be used if you plan to add a display module to visualize all weather conditions:
void loop() {
if ((millis() % (60 * 1000)) == 0) {
Serial.println();
Serial.println("\n\nNext Loop-Step: " + String(millis()) + ":");

weather_data.updateConditions(WUNDERGRROUND_API_KEY, WUNDERGROUND_LANGUAGE, WUNDERGROUND_COUNTRY, WUNDERGROUND_CITY);

Serial.println("wundergroundHours: " + weather_data.getHours());
Serial.println("wundergroundMinutes: " + weather_data.getMinutes());
Serial.println("wundergroundSeconds: " + weather_data.getSeconds());
Serial.println("wundergroundDate: " + weather_data.getDate());

Serial.println("wundergroundMoonPctIlum: " + weather_data.getMoonPctIlum());
Serial.println("wundergroundMoonAge: " + weather_data.getMoonAge());
Serial.println("wundergroundMoonPhase: " + weather_data.getMoonPhase());
Serial.println("wundergroundSunriseTime: " + weather_data.getSunriseTime());
Serial.println("wundergroundSunsetTime: " + weather_data.getSunsetTime());
Serial.println("wundergroundMoonriseTime: " + weather_data.getMoonriseTime());
Serial.println("wundergroundMoonsetTime: " + weather_data.getMoonsetTime());
Serial.println("wundergroundWindSpeed: " + weather_data.getWindSpeed());
Serial.println("wundergroundWindDir: " + weather_data.getWindDir());

Serial.println("wundergroundCurrentTemp: " + weather_data.getCurrentTemp());
Serial.println("wundergroundTodayIcon: " + weather_data.getTodayIcon());
Serial.println("wundergroundTodayIconText: " + weather_data.getTodayIconText());
Serial.println("wundergroundMeteoconIcon: " + weather_data.getMeteoconIcon(weather_data.getTodayIconText()));
Serial.println("wundergroundWeatherText: " + weather_data.getWeatherText());
Serial.println("wundergroundHumidity: " + weather_data.getHumidity());
Serial.println("wundergroundPressure: " + weather_data.getPressure());
Serial.println("wundergroundDewPoint: " + weather_data.getDewPoint());
Serial.println("wundergroundPrecipitationToday: " + weather_data.getPrecipitationToday());

WiFiClient client;
const int httpPort = 80;
if (!client.connect(host, httpPort)) {
return;
    }

    String url = "/update?key=";
url+=writeAPIKey;
url+="&field1=";
url+=String(weather_data.getCurrentTemp());
url+="&field2=";
url+=String(weather_data.getPressure());
url+="&field3=";
url+=String(weather_data.getDewPoint());
url+="&field4=";
url+=String(weather_data.getPrecipitationToday());
url+="\r\n";
Serial.println(url);
    // Request to the server
client.print(String("GET ") + url + " HTTP/1.1\r\n" +
               "Host: " + host + "\r\n" +
               "Connection: close\r\n\r\n");

Serial.println("---------------------------------------------------/\n");
  }
}
After a few minutes, you can see the values received by the ESP8266 from wunderground.com and posted on thingspeak.com displayed on four graphs: