Introducing Blue Pill microcontroller board programming
As you learned from Chapter 1, Introduction to Microcontrollers and Microcontroller Boards, you can program the Blue Pill board using the Arduino IDE, along with a special library installed in the IDE. Remember that this IDE uses C++ language, which is an extension of C. Programs are also called sketches in Arduino IDE programming. All the sketches must have two functions, called setup() and loop().
The setup() function is used to define variables, define input or output ports (board pins), define and open a serial port, and so on, and this function will run only once. It must be declared before the loop() function.
The loop() function is the main block of your code and will run the main statements of your program. This loop() function will run repeatedly and endlessly. Sketches do not require the main() function.
This is the main structure for your sketches (programs):
void setup()
{
    statement(s);
}
void loop()
{
    statement(s);
}
Here is how to define pins (a microcontroller board's ports) either as inputs or outputs:
void setup ( )
{
 // it sets the pin as output.
    pinMode (pin_number1, OUTPUT);
 // it sets the pin as input
    pinMode (pin_number2, INPUT);
}
An input port will serve to read data from a sensor or switch, and an output port will be used to send data to another device or component, turn on an LED, and suchlike.
Tip
Programming in the Arduino IDE is case-sensitive. Be careful when you write function names, define variables, and so on.
As you can see from the preceding code, each block of statements is enclosed in curly brackets, and each statement ends with a semicolon, similar to ANSI C. These are useful functions that can be used for programming the Blue Pill:
digitalWrite(pin_number, value);: This function writes a HIGH (3.3 V) or LOW (0 V) value on the specified pin (port); for example,digitalWrite(13,HIGH);will send a HIGH value to pin (port) number 13.Note
You must previously declare
pin_numberasOUTPUTin thesetup()function.digitalRead(pin_number);: This function returns either a logic HIGH (3.3 V) or logic LOW (0 V) value that is read from a specified pin (port), for example,val = digitalRead(pin_number);.Note
You must previously declare
pin_numberasINPUTin thesetup()function.analogWrite(pin_number, value);: This function writes (sends) an analog value (0..65535) to a specified PIN (output port) of the Blue Pill.analogRead(pin_number);: This function returns an analog value read from the specified PIN. The Blue Pill has 10 channels (ports or pins that can be used as analog inputs) with a 12-bit analog-to-digital conversion (ADC) resolution. Their input range is 0 V – 3.3 V. So, theanalogRead()function will map input voltages between 0 and 3.3 volts into integer numbers between 0 and 4095, for example:int val = analogRead(A7);delay(number_of_milliseconds);: This function pauses the program for the specified amount of time defined in milliseconds (remember that there are one thousand milliseconds in a second).Tip
You can also use the C language structure explained in this section for programming the Arduino microcontroller boards, with the only difference being that the range of values for
analogWrite()will be 0...255 instead of 0...65535, andanalogRead()will have a range of 0 to 1023 instead of 0 to 4095.
Figure 2.2 shows the I/O ports and other pins from the Blue Pill:
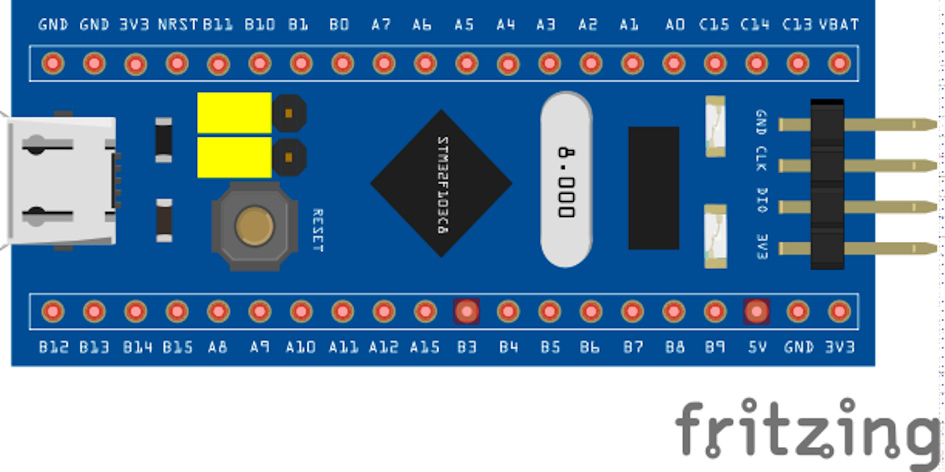
Figure 2.2 – The Blue Pill's pins configuration
The ports' pins can be seen in Figure 2.2. Some of them are used in this book's chapters. The Blue Pill has the following analog ports: A0, A1, A2, A3, A4, A5, A6, A7, B0, and B1. The following are digital I/O ports: C13, C14, C15, B10, B11, B12, B13, B14, B15, A8, A9, A10, A11, A12, A15, B3, B4, B5, B6, B7, B8, and B9.
Just remember that in the code, the ports are referenced as PA0, PA1, and so on, adding a letter P.
We will use some of the preceding functions in an example in the next section.