


Hands-on – creating and accessing your AWS account
The projects in this book require you to access an AWS account with administrator privileges. If you already have administrator privileges for an AWS account and know how to access the AWS Management Console, you can skip this section and move on to Chapter 2, Data Management Architectures for Analytics.
If you are making use of a corporate AWS account, you will want to check with your AWS cloud operations team to ensure that your account has administrative privileges. Even if your daily-use account does not allow full administrative privileges, your cloud operations team may be able to create a sandbox account for you.
What is a sandbox account?
A sandbox account is an account isolated from your corporate production systems with relevant guardrails and governance in place and is used by many organizations to provide a safe space for teams or individual developers to experiment with cloud services.
If you cannot get administrative access to a corporate account, you will need to create a personal AWS account or work with your cloud operations team to request specific permissions needed to complete each section. The exercises in this book assume you have administrative access and the full details of required granular permissions will not be covered, but you can review the AWS documentation for information on granular permission requirements for each service.
An important note about costs associated with hands-on tasks in this book
If you are creating a new personal account or using an existing personal account, you will incur and be responsible for AWS costs as you follow along in this book. While some services may fall under AWS Free Tier usage, some of the services covered in this book will not. We strongly encourage you to set up budget alerts within your account and to regularly check your billing console.
See the AWS documentation on setting up billing alarms to monitor your costs at https://docs.aws.amazon.com/AmazonCloudWatch/latest/monitoring/monitor_estimated_charges_with_cloudwatch.html.
Creating a new AWS account
To create a new AWS account, you will need the following things:
- An email address (or alias) that has not been used before to register an AWS account
- A phone number that can be used for important account verification purposes
- Your credit or debit card, which will be charged for AWS usage outside of the Free Tier
A tip regarding the phone number you use when registering
It is important that you keep your contact details up to date for your AWS account as, if you lose access to your account, you will need access to the email address and phone number registered for the account to restore access. If you expect that your contact number may change in the future, consider registering a virtual number that you will always be able to access and that you can forward to your primary number. One such service that enables this is Google Voice (http://voice.google.com).
The following steps will guide you through creating a new AWS account:
- Navigate to the AWS landing page at http://aws.amazon.com.
- Click on the Create an AWS Account link in the top right-hand corner.
- Provide an email address, provide a name for your account, and then click on Verify email address. You will be emailed a verification code to verify your email, which you need to enter on the form to continue.
A tip about reusing an existing email address
Some email systems support adding a “+” sign followed by a few characters to the end of the username portion of your email address in order to create a unique email address that still goes to your same mailbox. For example,
atest.emailaddress@gmail.comandatest.emailaddress+dataengineering@gmail.comwill both go to the primary email address inbox. If you have used your primary email address previously to register an AWS account, you can use this tip to provide a unique email address during registration but still have emails delivered to your primary account.
- Once you verify using the code emailed to you, specify a new secure password for your account (one that you have not used elsewhere). Then click on Continue.
- Select Business or Personal for the account type (note that the functionality and tools available are the same no matter which one you pick).
- Provide the requested personal information and then, after reviewing the terms of the AWS Customer Agreement, click the checkbox if you agree to the terms, and then click Continue.
- Provide a credit or debit card for payment information and select Verify and Continue.
- Provide a phone number for a verification text or call, enter the characters shown for the security check, and complete the verification.
- Select a support plan (basic support is free, but only provides self-service access to support resources) and complete the signup.
- You will receive a notification that your account is being activated. This usually completes in a few minutes, but it can take up to 24 hours. Check your email to confirm account activation.
What to do if you don’t receive a confirmation email within 24 hours
If you do not receive an email confirmation within 24 hours confirming that your account has been activated, follow the troubleshooting steps provided by AWS Premium Support at https://aws.amazon.com/premiumsupport/knowledge-center/create-and-activate-aws-account/.
Accessing your AWS account
Once you have received the confirmation email confirming that your account has been activated, follow these steps to access your account and create a new admin user:
- Access the AWS console login page at http://console.aws.amazon.com.
- Make sure Root user is selected, and then enter the email address that you used when creating the account.
- Enter the password that you set when creating the account.
Best practices for securing your account
When you log in using the email address you specified when registering the account, you are logging in as the account’s root user. It is a recommended best practice that you do not use this login for your day-to-day activities but rather, only use this when performing activities that require the root account, such as creating your first Identity and Access Management (IAM) user, deleting the account, or changing your account settings. For more information, see https://docs.aws.amazon.com/IAM/latest/UserGuide/id_root-user.html.
It is also strongly recommended that you enable Multi-Factor Authentication (MFA) on this and other administrative accounts. To enable this, see https://docs.aws.amazon.com/IAM/latest/UserGuide/id_credentials_mfa_enable_virtual.html.
In the following steps, we are going to create a new IAM administrative user account:
- In the AWS Management Console, confirm which Region you are currently in. You can select any region, such as the region closest to you geographically.
Selecting a region
The region you select in the AWS console is the geographical area of the world where the AWS resources you create will be deployed. It generally makes sense to deploy to the region closest to where you are located; however, this is not always the case. For example, not all AWS services are available in all regions (for a list of services available per region, see https://aws.amazon.com/about-aws/global-infrastructure/regional-product-services/).
Another factor to consider is that the pricing for AWS services differs from region to region, so also take this into account when selecting a region to use for the exercises in this book. Finally, make sure that you are always in the same region when working through the exercises in each chapter.
For more information on selecting a region, refer to the AWS blog post What to Consider when Selecting a Region for your Workloads at https://aws.amazon.com/blogs/architecture/what-to-consider-when-selecting-a-region-for-your-workloads/.
In the following screenshot, the user is in the Ohio region (also known as us-east-2).

Figure 1.1: AWS Management Console
- In the Search bar at the top of the screen, type in
IAMand press Enter. This brings up the console for Identity and Access Management (IAM). - On the left-hand side menu, click Users and then Add users.
- Provide a username, and then select the checkbox for Enable console access - optional.
- Select Custom password, provide a password for console access, select whether to force a password change on the next login, then click Next.
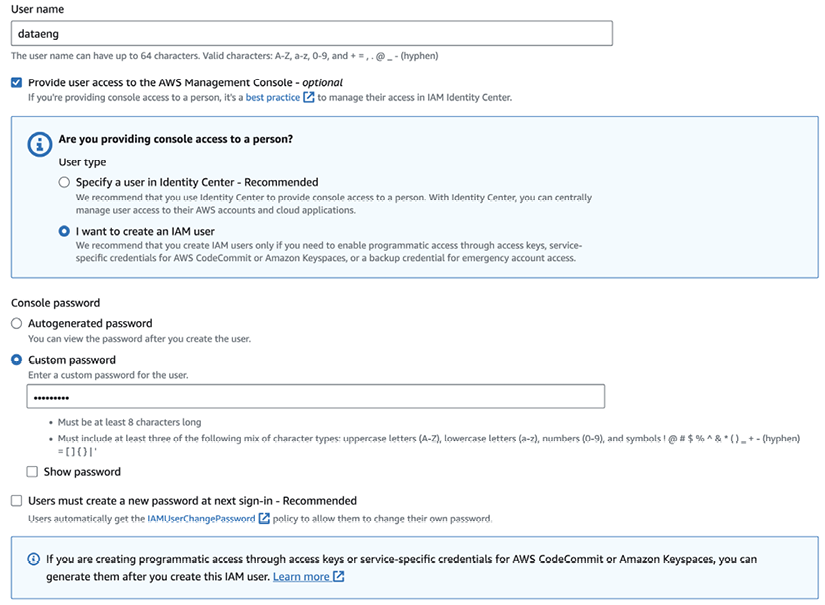
Figure 1.2: Creating a new user in the AWS Management Console
- For production accounts, it is best practice to grant permissions with a policy of least privilege, giving each user only the permissions they specifically require to perform their role. However, AWS managed policies can be used to cover common use cases in test accounts, and so to simplify the setup of our test account, we will use the AdministratorAccess managed policy. This policy gives full access to all AWS resources in the account.
On the Set permissions screen, select Attach policies directly from the list of policies, select AdministratorAccess, then click Next: Tags.
- Optionally, specify tags (key-value pairs), then click Next.
- Review the settings, and then click Create user.
- Take note of the Console sign-in URL link that you will use to sign into your account.
For the remainder of the tutorials in this book, you should log in using the URL link provided and the username and password you set for your IAM user. You should also strongly consider enabling MFA for this account, a recommended best practice for all accounts with administrator permissions.


