


Creating our first ASP.NET Web API
In this section, we will start building our Web API, covering the necessary environment required for creating a Web API. We will also discuss our problem scenario, and then create a Web API from scratch. We will then delve into the details of Microsoft Azure websites and deploy our first Web API in Microsoft Azure.
Prerequisites
The following must be configured to run the example scenarios we discuss in this and following chapters:
Developer machine: We need a development environment that can support Microsoft Visual Studio and ASP.NET Web tools. Although we can create ASP.NET Web API solutions from a local PC, for the purpose of this book, we will host a new virtual machine in Microsoft Azure and use it as our development environment. Setting up and managing an environment on Microsoft Azure is so straightforward and elegant, that it is now used as a preferred way to develop applications.
A Microsoft Azure subscription: We need a Microsoft Azure subscription to host our Web API. A free trial is available at http://azure.microsoft.com/pricing/free-trial/?WT.mc_id=A261C142F. For MSDN subscribers, Azure subscription can be activated using their Microsoft Azure credits.
Visual Studio 2013: Once we have the virtual machine up and running, we will need Visual Studio 2013. Any version of Visual Studio Professional 2013 or later should be sufficient for our samples. There is also a free full feature version of Visual Studio referred to as Community Edition, which enables ASP.NET web development. MSDN subscribers can also get access to a set of preconfigured Visual Studio virtual machine images available as part of the Microsoft Azure subscription. The source and samples for this book are built using Visual Studio 2013 Community Edition Update 4.
Visual Studio Online: It is always good practice to use a code management and collaboration system when starting a project. Visual Studio Online (VSO) is a Microsoft Azure-based service that provides the capabilities of Team Foundation Server in the cloud. We will use VSO for source control throughout all samples, we will also be using Git as our source control system; Visual Studio Online provides integral support for this. VSO also provides integration with Microsoft Azure for Continuous Integration (CI) and Continuous Delivery (CD) capabilities.
A free Visual Studio Online account can be created at the following link: https://www.visualstudio.com/en-us/products/what-is-visual-studio-online-vs.aspx. To know more about using Git with Visual Studio Online, visit the following link: https://msdn.microsoft.com/en-us/library/hh850437.aspx.
An alternative is to use GitHub as a source control strategy as well. For the purpose of this book, we will use VSO and Git.
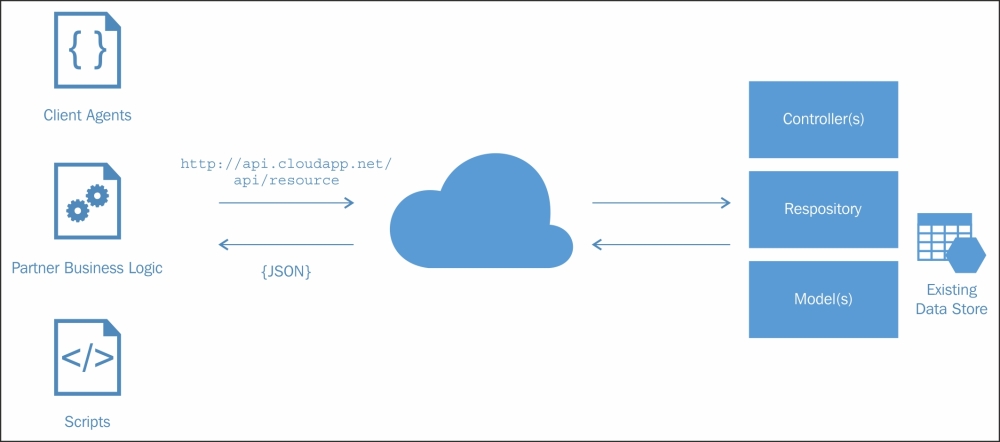
Now that we have the development tools installed and ready, let's quickly take an example to put these to test. We will build an ASP.NET Web API for a fictitious transport service provider that provides consumers with package tracking abilities. The following figure shows how clients interact with the solution:
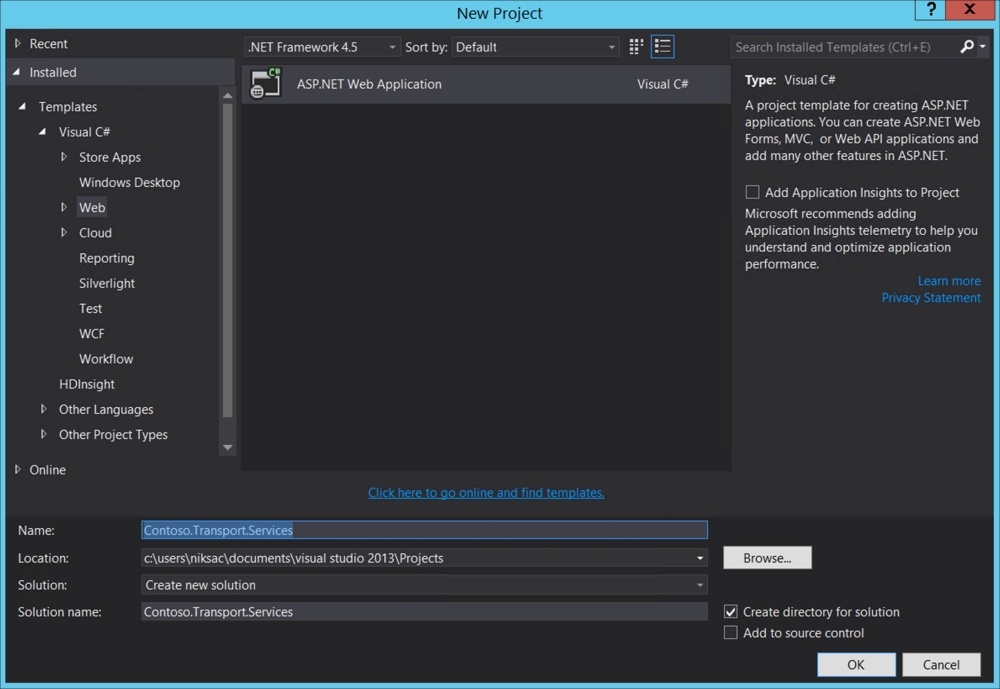
Creating the ASP.NET Web API project
We will start by creating a new ASP.NET Web Application project in Visual Studio.
Uncheck the application insights to project box for now.
In the new ASP.NET project page, we select the empty template and check Web API in the Add folders and core references for section. Let Authentication be set to No Authentication for now. The empty template skips many other sample controllers and folders such as the MVC helper and documentation folders.
Also, we unselect Host in the Cloud under Microsoft Azure for now. We will add this in the next section when we talk about the Microsoft Azure website.

At this stage, the solution should look like this:
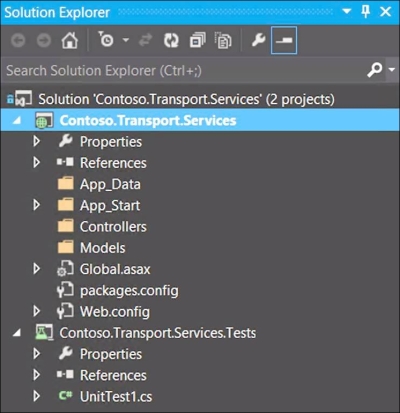
A few things have been added to jump start our Web API project:
A static WebApiConfig type has been added to the App_Start folder. The WebApiConfig.cs file is responsible for registering configuration settings for the Web API during startup. Some of the common uses of WebApiConfig.cs are to define default routes, customize the behavior of global and per route matching routes, and define media type formatters.
An important thing to note is the Register method that contains the following code:
config.Routes.MapHttpRoute(
    name: "DefaultApi",
    routeTemplate: "api/{controller}/{id}",
    defaults: new { id = RouteParameter.Optional }
This method defines the default route template for any request; what this means is that any request that has a route api/{controller}/{id} will be considered a valid route. In this route we have the following parameters:
{controller}: This refers to the name of the controller class without the suffix, for example, a class with namePackageControllerwill be represented asPackagein the incoming request{id}: This is used for parameter binding, these together define the controller and action route for the request
With Web API 2, we now have the option to specify attribute-based routes on each API call to provide granular route definitions for our Web API. We will cover this in more detail in Chapter 2, Extending the ASP.NET Web API.
The Global.asax file has the following defined in Application_Start, this registers a delegate for the WebApiConfig.Register method in GlobalConfiguration. Note that GlobalConfiguration belongs to System.Web.Http.WebHost, which indicates that we are currently hosting our Web API in IIS, as shown:
GlobalConfiguration.Configure(WebApiConfig.Register);
Defininig an ASP.NET data model
A model in ASP.NET Web API is similar to a data model defined in the ASP.NET MVC framework. It is a type that represents the entity in the application and manages its state. ASP.NET Web API has inherent capabilities to serialize a model automatically to JSON, XML, or any other format, and then write the serialized data into the body of the HTTP response message. The client can then deserialize the object to obtain the response.
Note
For more information on ASP.NET MVC patterns, visit https://msdn.microsoft.com/en-us/library/dd381412%28v=vs.108%29.aspx.
For the scope of this chapter, we will keep the data access very simple. We will have an in-memory store and will define an ASP.NET model to represent it. In later chapters, we will fetch data using tools like Entity Framework and also discuss how expose OData endpoints for building query capabilities from our Web APIs.
We follow these steps to create an ASP.NET model for our solution:
Right-click on the
Modelsfolder. Click on Add and then on New Item.From the Add New Item dialog, add a new C# class. Name it
Package.cs.Add properties to the data model. The package data model should look like this:
namespace Contoso.Transport.Services.Models
{
    public class Package
    {
        public int Id { get; set; }

        public Guid AccountNumber { get; set; }

        public string Destination { get; set; }

        public string Origin { get; set; }

        public double Weight { get; set; }

        public double Units { get; set; }

        public int StatusCode { get; set; }
    }
}
Defining an ASP.NET Web API controller
We will now implement a Web API controller that will allow clients to retrieve packages based on a unique package ID. We will use the empty controller template in Visual Studio and then add the following code to our controller type:
Right-click on the
Controllersfolder in theContoso.Transport.Servicesproject. Click on Add and select Controller.Choose an empty Web API 2 controller. Name the controller
PackageController.
Add a reference to the
Contoso.Transport.Service.Modelsnamespace:using Contoso.Transport.Services.Models;
Replace the code in
PackageControllerwith the following code snippet:namespace Contoso.Transport.Services.Controllers { public class PackageController : ApiController { private static IEnumerable<Package> packages; public Package Get(int id) { return packages.SingleOrDefault(p => p.Id == id); } protected override void Initialize(HttpControllerContext controllerContext) { base.Initialize(controllerContext); // Create package for testing purposes. In the real world use a repository pattern or entity framework to fetch this data. GenerateStubs(); } private static void GenerateStubs() { packages = new List<Package> { new Package { Id = 1, AccountNumber = Guid.NewGuid(), Origin = "CA", Destination = "TX", StatusCode = 1, Units = 1, Weight = 2.5, Created = DateTime.UtcNow, }, new Package { Id = 2, AccountNumber = Guid.NewGuid(), Origin = "AZ", Destination = "AL", StatusCode = 1, Units = 2, Weight = 1, Created = DateTime.UtcNow.AddDays(-2), }, new Package { Id = 3, AccountNumber = Guid.NewGuid(), Origin = "FL", Destination = "GA", StatusCode = 3, Units = 1, Weight = 2.5, Created = DateTime.UtcNow, } }; } } }
The preceding code is relatively straightforward; it creates an in-memory store for packages and a GET operation to search for a package based on its ID. A few important things to consider are discussed next.
We override the Initialize method for the controller. The method is called when the controller is initialized by the Web API pipeline. It can be used for setting up member variables and populating metadata for a controller.
Note
Note that because this is a sample scenario, we are using an in-memory collection for the data entities. In real-world scenarios, we should use tools such as Entity Framework along with the Repository pattern to make the code more maintainable. The later part of this book discusses the Entity Framework.
The return type here is our Package entity, when a response is generated, ASP.NET Web API will serialize the entity using the MediaFormatter configured for the project. To facilitate control over the HTTP Response, ASP.NET Web API also provides additional types such as IHttpActionResult and HttpResponseMessage. We discuss these in Chapter 2, Extending the ASP.NET Web API.
The signature of the GET operation matches HttpRoute that we defined in the WebAPIConfig.cs file (api/{controller}/{id}). The signature allows us to determine which HTTP verb needs to be executed for the incoming request. We may define multiple operations for a controller, but each needs to match to a particular route. This approach is also referred to as routing by convention. If no route is found, an exception is thrown. ASP.NET Web API 2 also provides specific routes per controller or even per action through attribute routing. We will discuss these approaches in detail in Chapter 2, Extending the ASP.NET Web API.
Next, build the project and that is it! We just created our first Web API. We now have a controller that can search for packages based on IDs and return the package model as a response. In the next section, we put our Web API to test in order to verify our operations.


